TFA 60.2542 User manual

Bedienungsanleitung
Instruction manual
Mode d’emploi
Instrucciones de uso
Gebruiksaanwijzing
Istruzioni per l'uso
Kat. Nr. 60.2542
RoHS
TFA_No. 60.2542_Anleitung 29.08.2017 13:37 Uhr Seite 1

32
Fig. 1 Fig. 2
A2
A4
A3
A 1 A 6 A 8
A 9
A 7
A 10
A 5
B 5B 4B 3 B 6
A 7
C 1
TFA_No. 60.2542_Anleitung 29.08.2017 13:37 Uhr Seite 2

5
Funkwecker
Vielen Dank, dass Sie sich für dieses Gerät aus dem Hause TFA
entschieden haben.
1. Bevor Sie mit dem Gerät arbeiten
•Lesen Sie sich bitte die Bedienungsanleitung genau
durch.
So werden Sie mit Ihrem neuen Gerät vertraut, lernen alle
Funktionen und Bestandteile kennen, erfahren wichtige
Details für die Inbetriebnahme und den Umgang mit dem
Gerät und erhalten Tipps für den Störungsfall.
•Durch die Beachtung der Bedienungsanleitung vermeiden
Sie auch Beschädigungen des Gerätes und die Gefähr-
dung Ihrer gesetzlichen Mängelrechte durch Fehlge-
brauch.
•Ebenso haften wir nicht für inkorrekte Messwerte und Fol-
gen, die sich aus solchen ergeben können.
•Für Schäden, die aus Nichtbeachtung dieser Bedienungs-
anleitung verursacht werden, übernehmen wir keine Haf-
tung.
•Beachten Sie besonders die Sicherheitshinweise!
•Bewahren Sie diese Bedienungsanleitung gut auf!
4
Fig. 3
B1 B 2
TFA_No. 60.2542_Anleitung 29.08.2017 13:37 Uhr Seite 3

76
Funkwecker
2. Lieferumfang
• Funkwecker
• Bedienungsanleitung
3. Einsatzbereich und alle Vorteile Ihres neuen Gerätes
• Funkuhr mit höchster Genauigkeit
• Wochentag und Datum
• Weckalarm mit Snooze-Funktion
• Innentemperatur
• Hintergrundbeleuchtung
4. Zu Ihrer Sicherheit
• Das Produkt ist ausschließlich für den oben beschriebenen
Einsatzbereich geeignet. Verwenden Sie das Produkt nicht
anders, als in dieser Anleitung dargestellt wird.
• Das eigenmächtige Reparieren, Umbauen oder Verändern
des Gerätes ist nicht gestattet.
Funkwecker
Vorsicht!
Verletzungsgefahr:
• Bewahren Sie die Batterien und das Gerät außerhalb der
Reichweite von Kindern auf.
• Batterien können bei Verschlucken lebensgefährlich sein.
Wurde eine Batterie verschluckt, kann dies innerhalb von
2 Stunden zu schweren inneren Verätzungen und zum Tode
führen. Wenn Sie vermuten, eine Batterie könnte ver-
schluckt oder anderweitig in den Körper gelangt sein, neh-
men Sie sofort medizinische Hilfe in Anspruch.
• Batterien nicht ins Feuer werfen, kurzschließen, auseinan-
der nehmen oder aufladen. Explosionsgefahr!
• Batterien enthalten gesundheitsschädliche Säuren. Um ein
Auslaufen der Batterien zu vermeiden, sollten schwache
Batterien möglichst schnell ausgetauscht werden. Verwen-
den Sie nie gleichzeitig alte und neue Batterien oder Batte-
rien unterschiedlichen Typs.
• Beim Hantieren mit ausgelaufenen Batterien chemikalienbe-
ständige Schutzhandschuhe und Schutzbrille tragen!
TFA_No. 60.2542_Anleitung 29.08.2017 13:37 Uhr Seite 4

98
Funkwecker
Wichtige Hinweise zur Produktsicherheit!
• Setzen Sie das Gerät keinen extremen Temperaturen, Vibra-
tionen und Erschütterungen aus.
• Vor Feuchtigkeit schützen.
5. Bestandteile
A: Display (Fig. 1):
A 1: Innentemperatur
A 2: Uhrzeit
A 3: AM/PM
A 4: Datum
A 5: Wochentag
A 6: Alarmsymbol
A 7: DCF-Empfangszeichen
A 8: Sommerzeit-Symbol
A 9: Sekunden
A 10: Snooze-Symbol
Funkwecker
B: Tasten (Fig. 2+3):
B 1: SNOOZE/LIGHT Taste
B 2: ALARM ON/OFF Taste
B 3: MODE Taste
B 4: ▲Taste
B 5: ▼Taste
B 6: WAVE Taste
C: Gehäuse (Fig. 3):
C 1: Batteriefach
6. Inbetriebnahme
• Öffnen Sie das Batteriefach und legen Sie zwei neue Batte-
rien 1,5 V AAA ein. Achten Sie auf die richtige Polarität beim
Einlegen der Batterien.
• Schließen Sie das Batteriefach wieder.
• Ein kurzer Signalton ertönt und es werden alle LCD Seg-
mente kurz angezeigt.
TFA_No. 60.2542_Anleitung 29.08.2017 13:37 Uhr Seite 5

1110
Funkwecker
7. Empfang der Funkzeit
• Die Uhr versucht nun, das Funksignal zu empfangen und
das DCF-Empfangszeichen blinkt. Wenn das Funksignal
nach 3-8 Minuten empfangen wurde, werden die funkge-
steuerte Zeit, das Datum, der Wochentag und das DCF-
Empfangszeichen ständig im Display angezeigt.
• Der DCF-Funkempfang findet täglich um 1:00 morgens statt.
Ist der Empfang nicht erfolgreich, so finden um 2.00, 3.00,
4.00 und um 5:00 Uhr früh weitere Empfangsversuche statt.
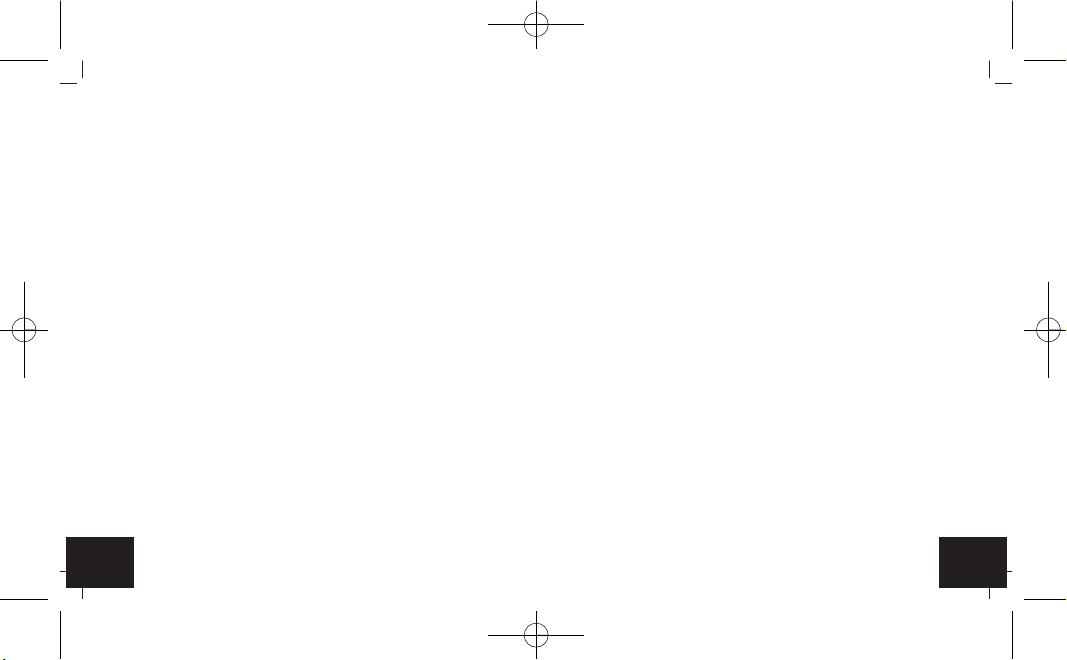
• Sie können die Initialisierung auch manuell starten.
• Drücken Sie die WAVE Taste.
• Die Uhr versucht nun, das Funksignal zu empfangen und
das DCF-Empfangszeichen blinkt.
• Zum Beenden des DCF-Empfangsversuchs drücken Sie die
WAVE Taste noch einmal. Das DCF-Empfangszeichen ver-
schwindet.
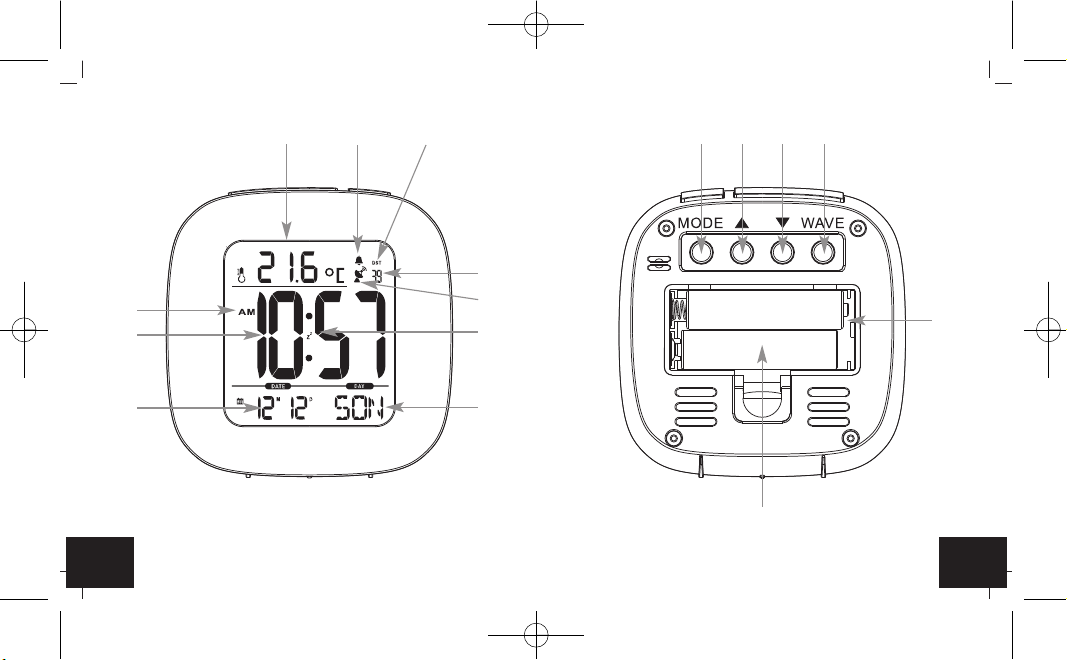
• Es gibt drei verschiedene Empfangssymbole:
blinkt - Empfang aktiv
bleibt stehen - Empfang erfolgreich
kein Symbol - Kein Empfang
Funkwecker
• Falls die Funkuhr kein DCF-Signal empfangen kann (z.B.
wegen Störungen, Übertragungsdistanz, etc.), kann die Zeit
auch manuell eingestellt werden.
• Die Uhr arbeitet dann wie eine normale Quarz-Uhr (siehe
Manuelle Einstellungen).
Empfang der Funkzeit
Die Zeitübertragung erfolgt von einer Cäsium Atom-Funkuhr,
die von der Physikalisch Technischen Bundesanstalt in Braun-
schweig betrieben wird. Die Abweichung beträgt weniger als 1
Sekunde in einer Million Jahren. Die Zeit ist kodiert und wird
von Mainflingen in der Nähe von Frankfurt am Main durch ein
DCF-77 (77.5 kHz) Frequenzsignal übertragen mit einer Reich-
weite von ca. 1.500 km. Ihre Funkuhr empfängt das Signal,
wandelt es um und zeigt immer die exakte Zeit an. Auch die
Umstellung von Sommer- und Winterzeit erfolgt automatisch.
Während der Sommerzeit erscheint DST im Display. Der Emp-
fang hängt hauptsächlich von der geographischen Lage ab. Im
Normalfall sollten innerhalb des Radius von 1.500 km ausge-
hend von Frankfurt bei der Übertragung keine Probleme auf-
tauchen.
TFA_No. 60.2542_Anleitung 29.08.2017 13:37 Uhr Seite 6

1312
Funkwecker
Bitte beachten Sie folgende Hinweise:
• Es wird empfohlen, einen Abstand von mindestens 1,5 – 2
Metern zu eventuell störenden Geräten wie Computerbild-
schirmen und Fernsehgeräten einzuhalten.
• In Stahlbetonbauten (Kellern, Aufbauten) ist das empfange-
ne Signal natürlicherweise schwächer. In Extremfällen wird
empfohlen, das Gerät in Fensternähe zu platzieren und/oder
durch Drehen das Funksignal besser zu empfangen.
• Nachts sind die atmosphärischen Störungen meist geringer
und ein Empfang ist in den meisten Fällen möglich. Ein ein-
ziger Empfang pro Tag genügt, um die Genauigkeit zu
gewährleisten und Abweichungen unter 1 Sekunde zu hal-
ten.
8. Bedienung
8.1 Manuelle Einstellungen
• Halten Sie die ▲oder ▼Taste im Einstellmodus gedrückt,
gelangen Sie in den Schnelllauf.
• Das Gerät verlässt automatisch den Einstellmodus, wenn
länger als 30 Sekunden keine Taste gedrückt wird.
Funkwecker
8.1.1 Einstellung von Uhrzeit und Datum
• Halten Sie die MODE Taste auf der Rückseite im Normalmo-
dus für drei Sekunden gedrückt.
• 24 Hr (Voreinstellung) fängt an zu blinken und Sie können
mit der ▲oder ▼Taste das 12- oder 24-Stunden-Zeit-
system einstellen. Im 12-h-System erscheint AM oder PM
(nach 12 Uhr) auf dem Display.
• Drücken Sie die MODE Taste noch einmal und Sie können
nun nacheinander die Zeitzone (00 - Voreinstellung), die
Stunden, die Minuten, das Jahr, den Monat, den Tag und die
Sprache für den Wochentag (GER - Voreinstellung) ansteu-
ern und mit der ▲oder ▼Taste einstellen.
• Bestätigen Sie die Eingabe mit der MODE Taste.
• Bei erfolgreichem Empfang des DCF-Funksignals wird die
manuell eingestellte Zeit überschrieben.
8.1.1.1 Einstellung der Zeitzone
• Im Einstellungsmodus können Sie die Zeitzonenkorrektur
(-12/+12) vornehmen.
TFA_No. 60.2542_Anleitung 29.08.2017 13:37 Uhr Seite 7

1514
Funkwecker
• Die Zeitzonenkorrektur wird benötigt, wenn das DCF Funk-
signal empfangen werden kann, die Zeitzone sich aber von
der DCF Zeit unterscheidet (z.B. +1=eine Stunde später).
8.1.1.2 Spracheinstellung für den Wochentag
• Im Einstellungsmodus können Sie die Sprachauswahl für
den Wochentag vornehmen: Deutsch (GER), Englisch
(ENG), Italienisch (ITA), Französisch (FRE), Niederländisch
(DUT), Spanisch (SPA) und Dänisch (DAN).
8.1.2 Einstellung der Alarmzeit
• Halten Sie die ALARM ON/OFF Taste für drei Sekunden
gedrückt, um in den Einstellmodus zu gelangen.
• 0:00 Uhr (Voreinstellung) bzw. die zuletzt eingestellte
Weckzeit erscheint im Display.
• Die Stundenanzeige blinkt.
• Stellen Sie mit der ▲oder ▼Taste die gewünschte Zeit ein.
• Bestätigen Sie mit der ALARM ON/OFF Taste.
Funkwecker
• Geben Sie auf gleiche Weise die Minuten ein.
• Bestätigen Sie mit der ALARM ON/OFF Taste.
8.1.2.1 Aktivieren und Deaktivieren des Weckalarms
• Um die Alarm-Funktion zu aktivieren und zu deaktivieren,
drücken Sie die ALARM ON/OFF Taste im Normalmodus.
• Das Alarmsymbol erscheint oder verschwindet im Display.
• Bei aktiviertem Alarm beginnt der Wecker zu klingeln, wenn
die eingestellte Weckzeit erreicht ist.
• Drücken Sie auf eine beliebige Taste (außer der SNOOZE/
LIGHT Taste) und der Alarm wird beendet.
• Wird der Alarm nicht unterbrochen, schaltet sich der
ansteigende Alarmton nach 2 Minuten aus und aktiviert sich
erneut zur gleichen Weckzeit wieder.
• Das Alarmsymbol bleibt im Display stehen.
• Wenn der Wecker klingelt, drücken Sie die SNOOZE/LIGHT
Taste, um die Snooze-Funktion zu aktivieren.
• Ist die Snooze-Funktion aktiviert, blinkt das Snooze-Symbol
auf dem Display.
• Der Alarm wird für die Dauer von 5 Minuten unterbrochen.
TFA_No. 60.2542_Anleitung 29.08.2017 13:37 Uhr Seite 8

1716
Funkwecker
8.1.3 Einstellung der Temperatureinheit
• Drücken Sie im Normalmodus die ▼Taste, um von Celsius
(°C) auf Fahrenheit (°F) als Temperatureinheit zu wechseln.
9. Beleuchtung
• Drücken Sie die SNOOZE/LIGHT Taste.
• Die Hintergrundbeleuchtung wird für 5 Sekunden aktiviert.
10. Pflege und Wartung
• Reinigen Sie das Gerät mit einem weichen, leicht feuchten
Tuch. Keine Scheuer- oder Lösungsmittel verwenden!
• Entfernen Sie die Batterien, wenn Sie das Gerät längere Zeit
nicht verwenden.
• Bewahren Sie Ihr Gerät an einem trockenen Platz auf.
10.1 Batteriewechsel
• Wenn die Funktionen schwächer werden, wechseln Sie bitte
die Batterien.
• Öffnen Sie das Batteriefach und legen Sie zwei neue Batte-
rien 1,5 V AAA polrichtig ein.
• Schließen Sie das Batteriefach wieder.
Funkwecker
11. Fehlerbeseitigung
Problem Lösung
Keine Anzeige ➜ Batterien polrichtig einlegen
➜ Batterien wechseln
Kein DCF Empfang ➜ WAVE Taste im Normal-
modus drücken
➜ Empfangsversuch in der
Nacht abwarten
➜ Standortwechsel
(Störfaktoren!)
➜ Neuinbetriebnahme gemäß
Betriebsanleitung starten
➜ Uhrzeit manuell einstellen
Unkorrekte Anzeige ➜ Batterien wechseln
Wenn Ihr Gerät trotz dieser Maßnahmen immer noch nicht
funktioniert, wenden Sie sich an den Händler, bei dem Sie das
Produkt gekauft haben.
TFA_No. 60.2542_Anleitung 29.08.2017 13:37 Uhr Seite 9

1918
Funkwecker
12. Entsorgung
Dieses Produkt wurde unter Verwendung hochwertiger Materia-
lien und Bestandteile hergestellt, die recycelt und wiederverwen-
det werden können.
Batterien und Akkus dürfen keinesfalls in den
Hausmüll!
Als Verbraucher sind Sie gesetzlich verpflichtet,
gebrauchte Batterien und Akkus zur umweltge-
rechten Entsorgung beim Handel oder entspre-
chenden Sammelstellen gemäß nationaler oder
lokaler Bestimmungen abzugeben.
Die Bezeichnungen für enthaltene Schwermetalle
sind: Cd=Cadmium, Hg=Quecksilber, Pb=Blei
Dieses Gerät ist entsprechend der EU-Richtlinie
über die Entsorgung von Elektro- und Elektronik-
Altgeräten (WEEE) gekennzeichnet.
Funkwecker
Dieses Produkt darf nicht mit dem Hausmüll ent-
sorgt werden. Der Nutzer ist verpflichtet, das Alt-
gerät zur umweltgerechten Entsorgung bei einer
ausgewiesenen Annahmestelle für die Entsor-
gung von Elektro- und Elektronikgeräten abzuge-
ben.
13. Technische Daten
Messbereich Temperatur 0…..+50°C (32…+122 °F)
Spannungsversorgung: 2 x 1,5 V AAA Batterien
(nicht inklusive)
Gehäusemaße: 78 x 30 x 78 mm
Gewicht: 71 g (nur das Gerät)
TFA_No. 60.2542_Anleitung 29.08.2017 13:37 Uhr Seite 10

2120
Funkwecker
Diese Anleitung oder Auszüge daraus dürfen nur mit Zustimmung von
TFA Dostmann veröffentlicht werden. Die technischen Daten entspre-
chen dem Stand bei Drucklegung und können ohne vorherige Benach-
richtigung geändert werden.
Die neuesten technischen Daten und Informationen zu Ihrem Produkt
finden Sie unter Eingabe der Artikel-Nummer auf unserer Homepage.
EU-KONFORMITÄTSERKLÄRUNG
Hiermit erklärt TFA Dostmann, dass der Funkanlagentyp 60.2542 der
Richtlinie 2014/53/EU entspricht. Der vollständige Text der EU-Konfor-
mitätserklärung ist unter der folgenden Internetadresse verfügbar:
www.tfa-dostmann.de
E-Mail: [email protected]
TFA Dostmann GmbH & Co.KG
Zum Ottersberg 12, D-97877 Wertheim, Deutschland 09/17
Radio-controlled alarm clock
Thank you for choosing this instrument from TFA.
1. Before you use this product
•Please make sure you read the instruction manual care-
fully.
This information will help you to familiarize yourself with
your new device, to learn all of its functions and parts, to
find out important details about its first use and how to
operate it and to get advice in the event of a malfunction.
•Following and respecting the instructions in your manual
will prevent damage to your instrument and loss of your
statutory rights arising from defects due to incorrect use.
•We shall not be liable for any damage occurring as a
result of non following of these instructions.
•Please take particular note of the safety advice!
•Please keep this instruction manual safe for future refer-
ence.
2. Delivery contents
• Radio-controlled alarm clock
• Instruction manual
TFA_No. 60.2542_Anleitung 29.08.2017 13:37 Uhr Seite 11

2322
Radio-controlled alarm clock
3. Range of application and all the benefits of your new
instrument at a glance
• Highest precision radio-controlled clock
• Date and weekday
• Alarm with snooze function
• Indoor temperature
• Backlight
4. For your safety
• This product is exclusively intended for the range of appli-
cation described above. It should only be used as described
within these instructions.
• Unauthorized repairs, alterations or changes to the product
are prohibited.
Caution!
Risk of injury:
• Keep this instrument and the batteries out of reach of child-
ren.
Radio-controlled alarm clock
• Batteries may be hazardous if swallowed. If a battery is
swallowed, this can lead to serious internal burns and death
within two hours. If you suspect a battery could have been
swallowed or otherwise caught in the body, seek medical
help immediately.
• Batteries must not be thrown into a fire, short-circuited,
taken apart or recharged. Risk of explosion!
• Batteries contain harmful acids. Low batteries should be
changed as soon as possible to prevent damage caused by
leaking. Never use a combination of old and new batteries
together, nor batteries of different types.
• Wear chemical-resistant protective gloves and safety glass-
es when handling leaking batteries.
Important information on product safety!
• Do not expose the device to extreme temperatures, vibra-
tions or shocks.
• Protect it from moisture.
TFA_No. 60.2542_Anleitung 29.08.2017 13:37 Uhr Seite 12

2524
Radio-controlled alarm clock
5. Elements
A: Display (Fig. 1):
A 1: Indoor temperature
A 2: Time
A 3: AM/PM
A 4: Date
A 5: Day of the week
A 6: Alarm symbol
A 7: DCF reception symbol
A 8: Daylight Saving Time symbol
A 9: Seconds
A 10: Snooze symbol
B: Buttons (Fig. 2+3):
B 1: SNOOZE/LIGHT button
B 2: ALARM ON/OFF button
B 3: MODE button
B 4: ▲button
B 5: ▼button
B 6: WAVE button
Radio-controlled alarm clock
C: Housing (Fig. 3):
C 1: Battery compartment
6. Getting started
• Open the battery compartment and insert two new AAA 1,5
V batteries. Make sure the polarity is correct.
• Close the battery compartment again.
• The device will alert you with a beep and all segments will
be displayed for a short moment.
7. Radio-controlled time reception
• The clock will now scan the DCF frequency signal and the
DCF symbol will be flashing on the display. When the time
code is successfully received after 3-8 minutes, the radio-
controlled time, the date, the day of the week and the DCF
symbol will be shown steadily on the display.
• The DCF reception always takes place at 1:00 in the morn-
ing. If the reception is not successfully received, further
attempts will be taken at 2:00, 3:00, 4:00 and 5:00 o'clock.
• You can also start the initialization manually.
TFA_No. 60.2542_Anleitung 29.08.2017 13:37 Uhr Seite 13

2726
Radio-controlled alarm clock
• Press the WAVE button.
• The clock will now scan the DCF frequency signal and the
DCF symbol will be flashing on the display.
• To end the DCF reception attempt, press the WAVE button
again. The DCF reception symbol disappears.
• There are three different reception states:
flashing - reception is active
solid - reception is very good
no symbol - no DCF reception
• If the clock cannot detect the DCF-signal (e.g. due to inter-
ference, transmitting distance, etc.), the time can be set
manually.
• The clock will then work as a normal quartz clock. (see:
Manual settings).
Note on radio-controlled time
The time base for the radio-controlled time is a caesium atom-
ic clock operated by the Physikalisch Technische Bunde-
sanstalt based in Braunschweig (Brunswick), Germany. It has
a time deviation of less than one second in one million years.
Radio-controlled alarm clock
The time is coded and transmitted from Mainflingen near
Frankfurt via the frequency signal DCF-77 (77.5 kHz) and has a
transmitting range of approximately 1,500 km. The adjustment
to Daylight Saving Time (summer/winter time) is automatic. In
Daylight Saving Time DST is shown on the display. The recep-
tion quality depends mainly on geographic location. Normally
there should be no reception problems within a 1,500 km
radius around Frankfurt.
Therefore, please note the following steps:
• The recommended distance to any interfering sources like
computer screens or TV sets is at least 1.5 - 2 meters.
• Within concrete walls (reinforced with steel) such as base-
ments, the received signal is naturally weakened. In extreme
cases, please place the unit close to a window to improve
reception.
• During night-time, the atmospheric interference is usually
less severe and reception is possible in most cases. A sin-
gle daily reception is adequate to keep the accuracy devia-
tion under 1 second.
TFA_No. 60.2542_Anleitung 29.08.2017 13:37 Uhr Seite 14

2928
Radio-controlled alarm clock
8. Operation
8.1 Manual settings
• Press and hold the ▲or ▼button in setting mode for fast
mode.
• The device will automatically quit the setting mode if no
button is pressed for 30 seconds.
8.1.1 Setting of the time and date
• Press and hold the MODE button at the back in normal
mode for three seconds.
• The 24 Hr digit (default) will be flashing. Press the ▲or ▼
button to choose 12 Hr or 24 Hr system. In the 12-hour
system AM or PM (after 12 o'clock) appears on the display.
• Press the MODE button to make the settings in the follow-
ing sequence: The time zone (00 - default), the hours, the
minutes, the year, the month, the day and the language of
the day of the week (GER - default). Press the ▲or ▼ but-
ton to adjust it.
• Confirm with the MODE button.
• The manually set time is overwritten once the DCF time sig-
nal is successfully received.
Radio-controlled alarm clock
8.1.1.1 Time zone setting
• You can make the time zone correction (-12/+12) in setting
mode.
• The time zone correction is needed for countries where the
DCF signal can be received but the time zone is different
from the DCF time (e.g. +1=one hour plus).
8.1.1.2 Day-of-the week language
• In the setting mode you can choose between the day-of-the
week language: German (GER), English (ENG), Italian (ITA),
French (FRE), Dutch (DUT), Spanish (SPA) and Danish
(DAN).
8.1.2 Alarm time setting
• Press and hold the ALARM ON/OFF button for three seconds
to enter the setting mode.
• 0:00 (default) or the last adjusted alarm time appear on the
display.
• The hour digits flash.
• Press the ▲or ▼ button to set the desired time.
TFA_No. 60.2542_Anleitung 29.08.2017 13:37 Uhr Seite 15

3130
Radio-controlled alarm clock
• Confirm the setting with the ALARM ON/OFF button.
• Set the minutes in the same way.
• Confirm the setting with the ALARM ON/OFF button.
8.1.2.1 Activate and deactivate the alarm
• To activate or deactivate the alarm function press the
ALARM ON/OFF button in normal mode.
• The alarm symbol appears/disappears on the display.
• When the adjusted alarm time is reached, the alarm rings.
• Press any button (except SNOOZE/LIGHT) and the alarm will
stop.
• If the alarm is not stopped manually, the ascending alarm
tone automatically turns off after two minutes and will be
reactivated at the same set time on the following day.
• The alarm symbol remains on the display.
• When the alarm rings, press the SNOOZE/LIGHT button and
the snooze function is activated.
• Once the snooze function is activated, the snooze symbol
will be flashing on the display.
• The alarm will be interrupted for 5 minutes.
Radio-controlled alarm clock
8.1.3 Temperature unit setting
• Press the▼ button in normal mode to change between °C
(Celsius) or °F (Fahrenheit) as temperature units.
9. Backlight
• Press the SNOOZE/LIGHT button.
• The backlight turns on for 5 seconds.
10. Care and maintenance
• Clean the device with a soft damp cloth. Do not use solvents
or scouring agents.
• Remove the batteries if the device will not be used for an
extended period of time.
• Keep the device in a dry place.
10.1 Battery replacement
• Change the batteries when the device functions become
weak.
• Open the battery compartment and insert two new AAA 1.5
V batteries, polarity as illustrated.
• Close the battery compartment again.
TFA_No. 60.2542_Anleitung 29.08.2017 13:37 Uhr Seite 16

3332
Radio-controlled alarm clock
11. Troubleshooting
Problem Solution
No display ➜ Ensure the batteries' polarity
are correct
➜ Change the batteries
No DCF reception ➜ Press the WAVE button in
normal mode
➜ Wait for an attempt recep-
tion during the night
➜ Change the location
(interference!)
➜ Restart the device according
to the manual
➜ Set the clock manually
Incorrect indication ➜ Change the batteries
If your device fails to work despite these measures, contact
the retailer where you purchased the product.
Radio-controlled alarm clock
12. Waste disposal
This product has been manufactured using high-grade materials
and components which can be recycled and reused.
Never dispose of empty batteries and recharge-
able batteries in ordinary household waste.
As a consumer, you are required by law to take
them to your retail store or to an appropriate col-
lection site depending on national or local regu-
lations in order to protect the environment.
The symbols for the contained heavy metals are:
Cd = cadmium, Hg = mercury, Pb = lead
This product is labelled in accordance with the
EU Waste Electrical and Electronic Equipment
Directive (WEEE).
Please do not dispose of this product in ordinary
household waste. As a consumer, you are
required to take end-of-life devices to a designat-
ed collection point for the disposal of electrical
and electronic equipment, in order to ensure
environmentally-compatible disposal.
TFA_No. 60.2542_Anleitung 29.08.2017 13:37 Uhr Seite 17

3534
Radio-controlled alarm clock
13. Specifications
Measuring range
Temperature: 0…..+50°C (32…+122 °F)
Power consumption: 2 x AAA 1,5 V batteries
(not included)
Housing dimension: 78 x 30 x 78 mm
Weight: 71 g (device only)
Radio-controlled alarm clock
No part of this manual may be reproduced without written consent of
TFA Dostmann. The technical data are correct at the time of going to
print and may change without prior notice.
The latest technical data and information about your product can be
found by entering the product number on our homepage.
EU Declaration of conformity
Hereby, TFA Dostmann declares that the radio equipment type 60.2542
is in compliance with Directive 2014/53/EU. The full text of the EU dec-
laration of conformity is available at the following Internet address:
www.tfa-dostmann.de
E-Mail: [email protected]
TFA Dostmann GmbH & Co.KG
Zum Ottersberg 12, D-97877 Wertheim, Germany 09/17
TFA_No. 60.2542_Anleitung 29.08.2017 13:37 Uhr Seite 18

3736
Réveil radio-piloté
Nous vous remercions d'avoir choisi l'appareil de la société TFA.
1. Avant d'utiliser votre appareil
•Veuillez lire attentivement le mode d'emploi.
Vous vous familiariserez ainsi avec votre nouvel appareil,
vous découvrirez toutes les fonctions et tous les éléments
qui le composent, vous noterez les détails importants rela-
tifs à sa mise en service et vous lirez quelques conseils en
cas de dysfonctionnement.
•
En respectant ce mode d'emploi, vous éviterez d'endomma-
ger votre appareil et de perdre vos droits légaux en cas de
défaut si celui-ci résulte d’une utilisation non-conforme.
•Nous n'assumons aucune responsabilité pour des dom-
mages qui auraient été causés par le non-respect du pré-
sent mode d'emploi.
•Suivez bien toutes les consignes de sécurité !
•Conservez soigneusement le mode d'emploi !
2. Contenu de la livraison
• Réveil radio-piloté
• Mode d'emploi
Réveil radio-piloté
3. Aperçu du domaine d'utilisation et de tous les avantages
de votre nouvel appareil
• Horloge radio-pilotée de grande précision
• Jour de la semaine et date
• Réveil avec fonction de répétition snooze
• Température ambiante
• Éclairage de fond
4. Pour votre sécurité
• Le produit est destiné uniquement à l'utilisation décrite ci-
dessus. N'utilisez jamais l’appareil à d'autres fins que celles
décrites dans le présent mode d'emploi.
• Vous ne devez en aucun cas réparer, démonter ou modifier
l'appareil par vous-même.
Attention !
Danger de blessure :
• Gardez votre appareil et les piles hors de la portée des
enfants.
TFA_No. 60.2542_Anleitung 29.08.2017 13:37 Uhr Seite 19

3938
Réveil radio-piloté
• Les piles peuvent être mortelles dans le cas d’une ingestion.
Si une pile a été avalée, elle peut entraîner des brûlures
internes graves ainsi que la mort dans l’espace de 2 heures.
Si vous craignez qu’une pile ait pu être avalée ou ingérée
d’une autre manière, quelle qu’elle soit, contactez immédia-
tement un médecin d’urgence.
• Ne jetez jamais de piles dans le feu, ne les courtcircuitez
pas, ne les démontez pas et ne les rechargez pas. Risque
d'explosion !
• Les piles contiennent des acides nocifs pour la santé. Une
pile faible doit être remplacée le plus rapidement possible
afin d'éviter toute fuite. N'utilisez jamais simultanément de
piles anciennes avec des piles neuves ou des piles de types
différents.
• Pour manipuler des piles qui ont coulé, utilisez des gants de
protection chimique spécialement adaptés et portez des
lunettes de protection !
Réveil radio-piloté
Conseils importants de sécurité du produit !
• Évitez d’exposer l’appareil à des températures extrêmes, à
des vibrations ou à des chocs.
• Protégez-le contre l'humidité.
5. Composants
A : Affichage (Fig. 1) :
A 1 : Température intérieure
A 2 : Horloge
A 3 : AM/PM
A 4 : Date
A 5 : Jour de la semaine
A 6 : Symbole d'alarme
A 7 : Symbole de réception DCF
A 8 : Symbole de l'heure d'été
A 9 : Secondes
A 10 : Symbole snooze
TFA_No. 60.2542_Anleitung 29.08.2017 13:37 Uhr Seite 20
Table of contents
Languages:
Other TFA Alarm Clock manuals