THE BOLD LOOK OF KOHLER K-704410 User manual

Installation Guide
Frameless Bypass Bath/Shower Doors
Mproduct numbers are for Mexico (i.e. K-12345M)
Los números de productos seguidos de Mcorresponden a México
(Ej. K-12345M)
Français, page “Français-1”
Español, página “Español-1”
K-704410, K-704412, K-704414
1015439-2-D

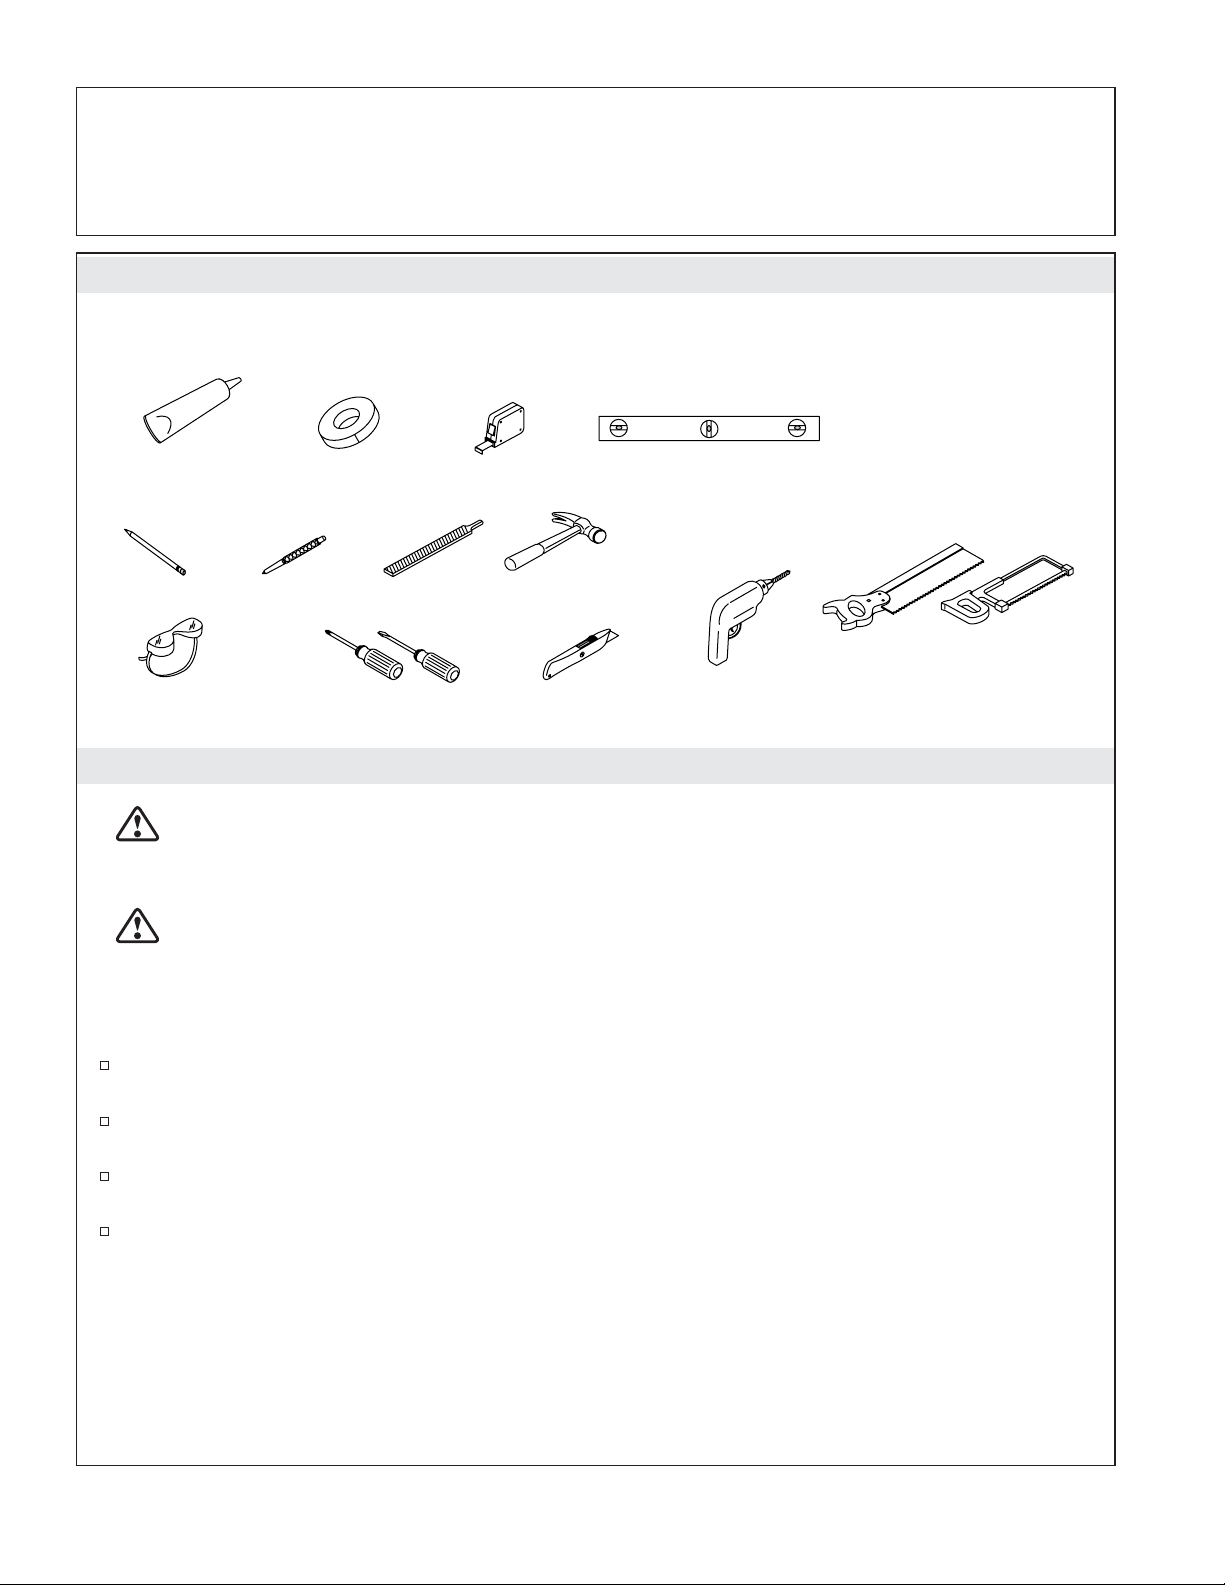
Tools and Materials
Before You Begin
CAUTION: Risk of injury or product damage. Unframed tempered glass should not contact hard
surfaces or it may shatter. Do not touch the edge of the tempered glass panel with tools or any hard
objects. Do not set unframed tempered glass directly on the floor or any other hard surface.
CAUTION: Risk of injury or product damage. Do not cut tempered glass. It will shatter.
IMPORTANT! This door is designed to accommodate walls that are less than 3/8″(1 cm) out of plumb.
Verify the area the door will be attached to is within 3/8″(1 cm) or better of plumb. The door may not
function properly if the wall is more than 3/8″(1 cm) out of plumb.
The shower bath or receptor should be installed/prepared, including finished wall materials, before
continuing.
Before starting the installation, lay out and identify all of the parts. Inspect them for damage.
Once inspected, return the glass panels to their packaging and place them in a safe area until they
are needed.
Kohler Co. reserves the right to make revisions in the design of products without notice, as specified
in the Price Book.
Level
Safety Glasses
Pencil Center Punch
Assorted Screwdrivers Knife
Hammer
File
Miter Saw or Hack Saw
with 32 teeth per inch blade
Drill & Assorted
Drill Bits
Silicone Sealant
(required) Masking
Tape Tape
Measure
Plus:
• Drop cloth
1015439-2-D 2 Kohler Co.

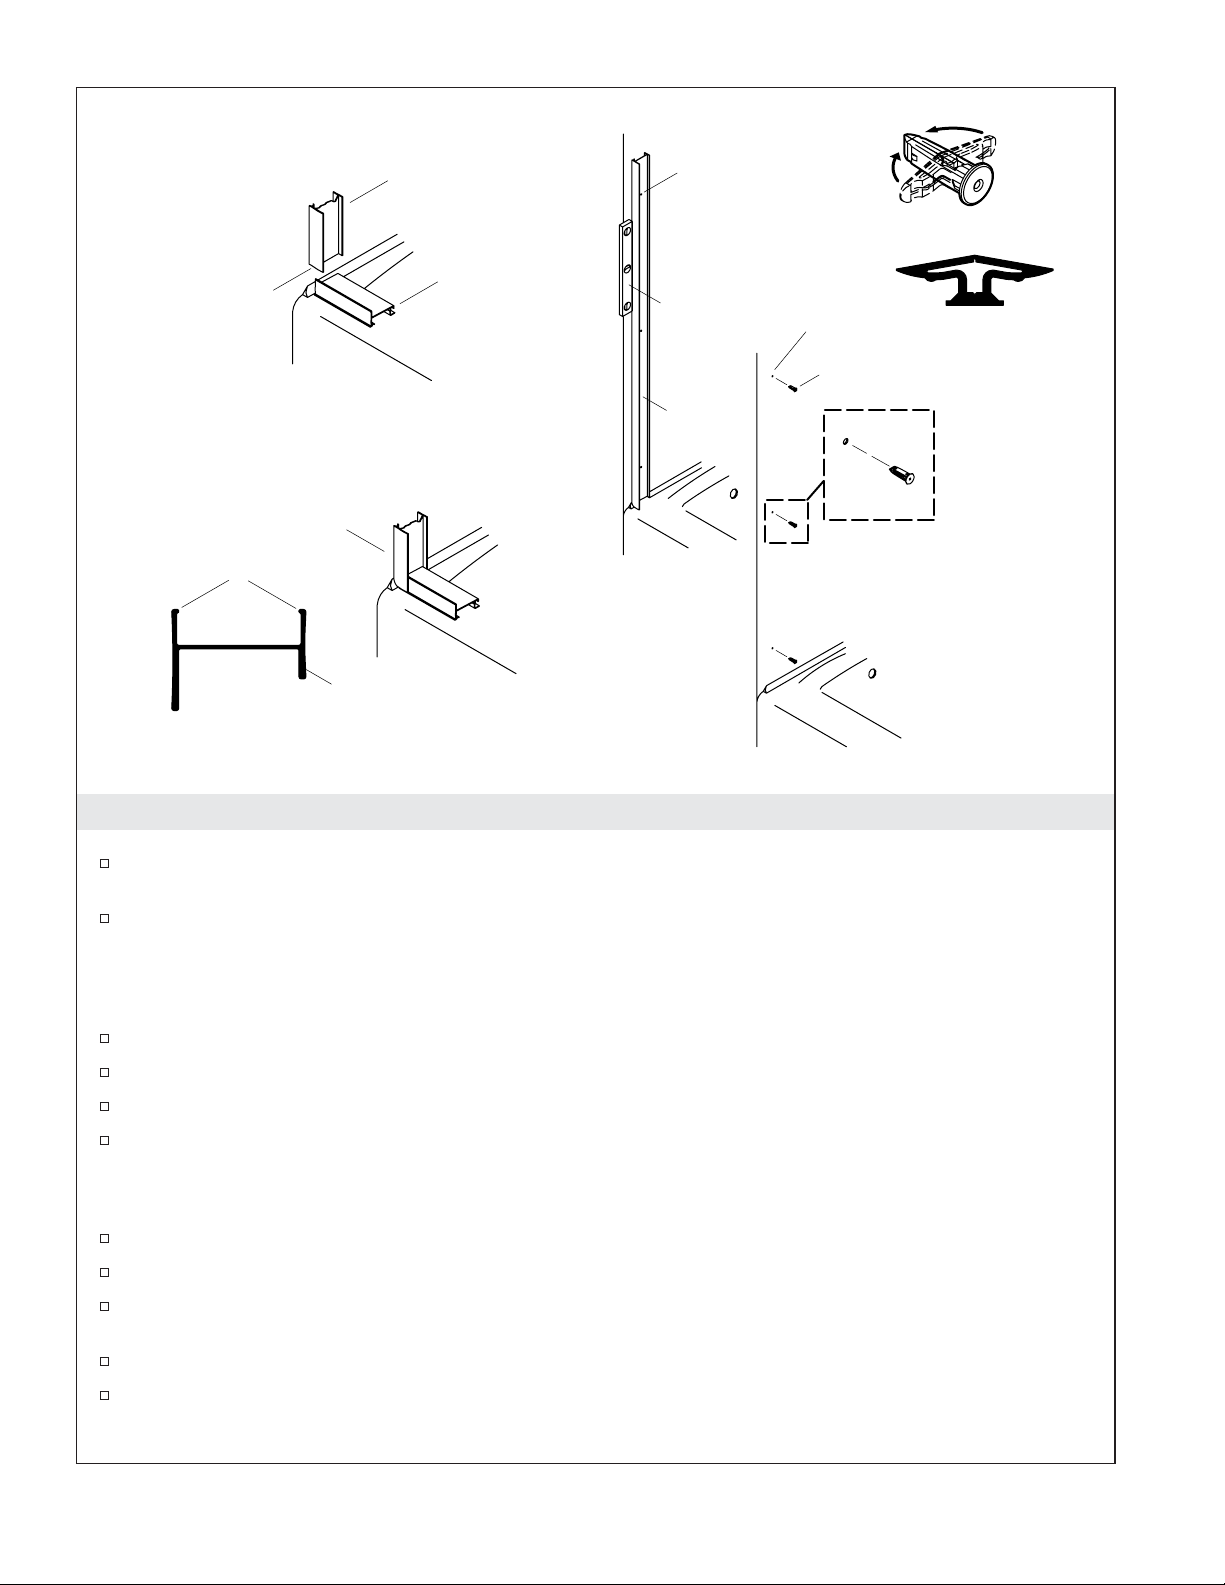
Parts Identification
Top Track
Roller
Bottom Track
Blind Nut
Bushing
Bolt
Handle
Handle
#8-32 x 3/8"
Machine Screw
#8-18 x 1-1/2"
Panhead Screw
Hanging
Bracket
Screw
Cover
Screw
Cover
Wall
Jamb
Screw
Cover
Inside
Panel
Outside
Panel
#8-18 x 3/8"
Panhead Screw
Inside Panel
Guide
Anchors
Bumper
Kohler Co. 3 1015439-2-D
Very Important Instructions
IMPORTANT!
Most Common Installation Mistake
Do not cut the top and bottom track the same
length for this installation.
Please read these installation instructions
carefully before cutting the top and bottom
track.
If uncertain about cutting tracks, please contact
a customer service representative using
the phone number on the last page
of this document.
1015439-2-D 4 Kohler Co.

1. Measure and Cut the Bottom Track
WARNING: Risk of personal injury. Always wear safety glasses when cutting materials.
NOTICE: Risk of product damage. Do not cut the top track at this time. The top track dimension is not
the same as the bottom track.
IMPORTANT! If your shower has a curve in the corners where they meet the sidewalls, be sure to
measure from wall to wall above the curves. Failure to measure above the curve or angle could result in
the bottom track being cut too short.
Measure from wall to wall at the flattest part of the shower ledge (dimension ″D″).
Mark dimension ″D″on the bottom track.
IMPORTANT! For best results, use a 32-teeth hacksaw blade and a miter box to cut the bottom track.
On the end opposite the mark, align the end of the insert flush with the end of the bottom track.
Subtract 1-1/8″(2.9 cm) from dimension ″D″and cut the bottom track to this dimension.
File the rough edges smooth where the bottom track was cut, taking care not to mar the finished
surface.
NOTE: If there are curves where the sidewalls meet the threshold, use a file to contour the bottom track
edges to match the curves as necessary.
Leg faces
outside of
shower.
Bottom
Track
D
D
Kohler Co. 5 1015439-2-D

2. Locate the Bottom Track
NOTE: The bottom track must sit flat. If the bath/shower ledge has a curve in the corners or is
constructed of fiberglass, it may be necessary to shape the ends of the track with a file.
Place the bottom track on the flattest part of the bath/shower ledge with the leg toward the outside
of the shower.
Position the bottom track so there is an equal gap between each wall and the ends of the bottom
track.
Temporarily secure the bottom track to the ledge with masking tape.
Mark the ledge along the front edge of the bottom track with a soft pencil.
1015439-2-D 6 Kohler Co.
3. Mark the Wall Jamb Locations
Position a wall jamb against the wall directly over the bottom track. The wall jamb should sit flat
against the wall.
Slide the wall jamb down over the bottom track until the wall jamb and bottom track are fully
engaged.
NOTE: The wall jamb must sit flat on the bottom ledge. If your ledge has a curve in the corners at the side
wall, it may be necessary to shape the bottom end of the wall jamb with a file.
Use a level to plumb the wall jamb vertically.
Using the pre-drilled screw holes as a guide, mark the hole locations on the wall.
Repeat the procedures with the second wall jamb.
Remove the bottom track and wall jambs.
NOTE: When installing on ceramic tile, use a center punch to nick the surface of the glaze. Tap the center
punch lightly with a hammer to avoid cracking the tile.
Lightly center punch the hole locations.
Drill a 5/16″hole at each mark. Use a tile or masonry bit for ceramic tile.
Press and hold the legs of each anchor (provided) together and insert the anchor legs into the
pre-drilled mounting holes.
Repeat for all the anchors.
Thoroughly clean the shower floor ledge and wall.
Wall Jamb
Bottom Track
Wider edge towards
outside of shower.
Wall jamb must sit flat
against wall and fully
engage bottom track.
Short Legs
Wall Jamb
Level
Mark holes.
Drill holes.
Insert anchors.
Wall
Jamb
Press and hold legs together.
Kohler Co. 7 1015439-2-D

4. Install the Bottom Track
Apply a 1/4″(6 mm) bead of silicone sealant into the groove on the underside of the track.
Install the bottom track with the sealant side down and the front leg facing the outside of the
shower.
5. Install the Wall Jambs
Insert a #8-18 x 1-1/2″panhead screw through each of the four bumpers.
Place a wall jamb over the bottom track. Align the holes in the wall jamb with the holes in the wall.
Align the holes in the wall jamb with the holes in the wall and secure the wall jamb to the wall
with #8-18 x 1-1/2″panhead screws. Bumpers should be located in the top and bottom holes. Do
not overtighten. The bumper may lose its shape.
Repeat the procedures with the other wall jamb.
Apply sealant
Front Leg
Bottom Track
Bumper
#8-18 x 1-1/2"
Panhead Screw
1015439-2-D 8 Kohler Co.
6. Measure, Cut, and Install the Top Track
Carefully measure the wall to wall opening (dimension ″A″) above the installed wall jambs.
NOTE: For best results, use a 32-teeth per inch hacksaw blade and a miter box.
Subtract 1/32″(1 mm) from dimension ″A″and cut the top track to this dimension.
Taking care not to scratch the finished surfaces, carefully file the rough edges at the cut end of the
top track.
Install the top track over the ends of both wall jambs.
A
Top Track Length = A– 1/32" (1 mm)
Top Track
Top Track
Wall Jamb
Kohler Co. 9 1015439-2-D
7. Install the Hanging Brackets — Inside Panel
CAUTION: Risk of injury or product damage. Unframed tempered glass should not contact hard
surfaces or it may shatter. Do not touch the edge of the tempered glass panel with tools or any hard
objects. Do not set unframed tempered glass directly on the floor.
Lay the inside door panel on a flat surface taking care to protect the glass. that the two holes located
in the bottom frame are in the up position.
Thread two provided # 8-18 x 3/8″panhead screws into the bottom frame approximately 1/4″(6
mm). Do not completely tighten at this time.
Insert a bushing into one of the holes at the top of the inside glass panel.
Install a hanging bracket over the glass panel, aligning the hole in the bracket with the bushing.
Repeat the steps to install the other bracket on the inside panel.
IMPORTANT! The steel side of the roller must be installed against the hanging brackets.
The inside panel is installed on the showerhead side of the bath or shower.
Install the rollers on the same side as the bottom frame holes.
Assemble the rollers and #8-32 x 3/8″machine screws to the hanging brackets through the center
hole of the bracket.
Secure the rollers.
Bushing
Bolt
Hanging Bracket
Roller
Blind Nut
8-32 x 3/8" Machine Screw
Install inside
panel roller.
Rollers on same side
as bottom frame hole.
#8-18 x 3/8"
Panhead Screw
1015439-2-D 10 Kohler Co.

8. Install the Hanging Brackets — Outside Panel
CAUTION: Risk of injury or product damage. Unframed tempered glass should not contact hard
surfaces or it may shatter. Do not touch the edge of the tempered glass panel with tools or any hard
objects. Do not set unframed tempered glass directly on the floor.
Insert a bushing into one of the holes at the top of the outside glass panel.
Install a hanging bracket over the glass panel, aligning the hole in the bracket with the bushing.
Insert a blind nut into the hanging bracket hole and bushing. Secure with a bolt.
Repeat the steps to install the other bracket on the outside panel.
IMPORTANT! The steel side of the roller must be installed against the hanging brackets.
Install the rollers on the same side as the bottom frame leg.
Assemble the rollers and #8-32 x 3/8″machine screws to the hanging brackets through the center
hole of the bracket.
Secure the rollers.
Bushing
Bolt
Hanging Bracket
8-32 x 3/8" Machine Screw
Roller
Blind Nut
Rollers on same side as bottom frame leg.
Install outside panel roller.
Kohler Co. 11 1015439-2-D

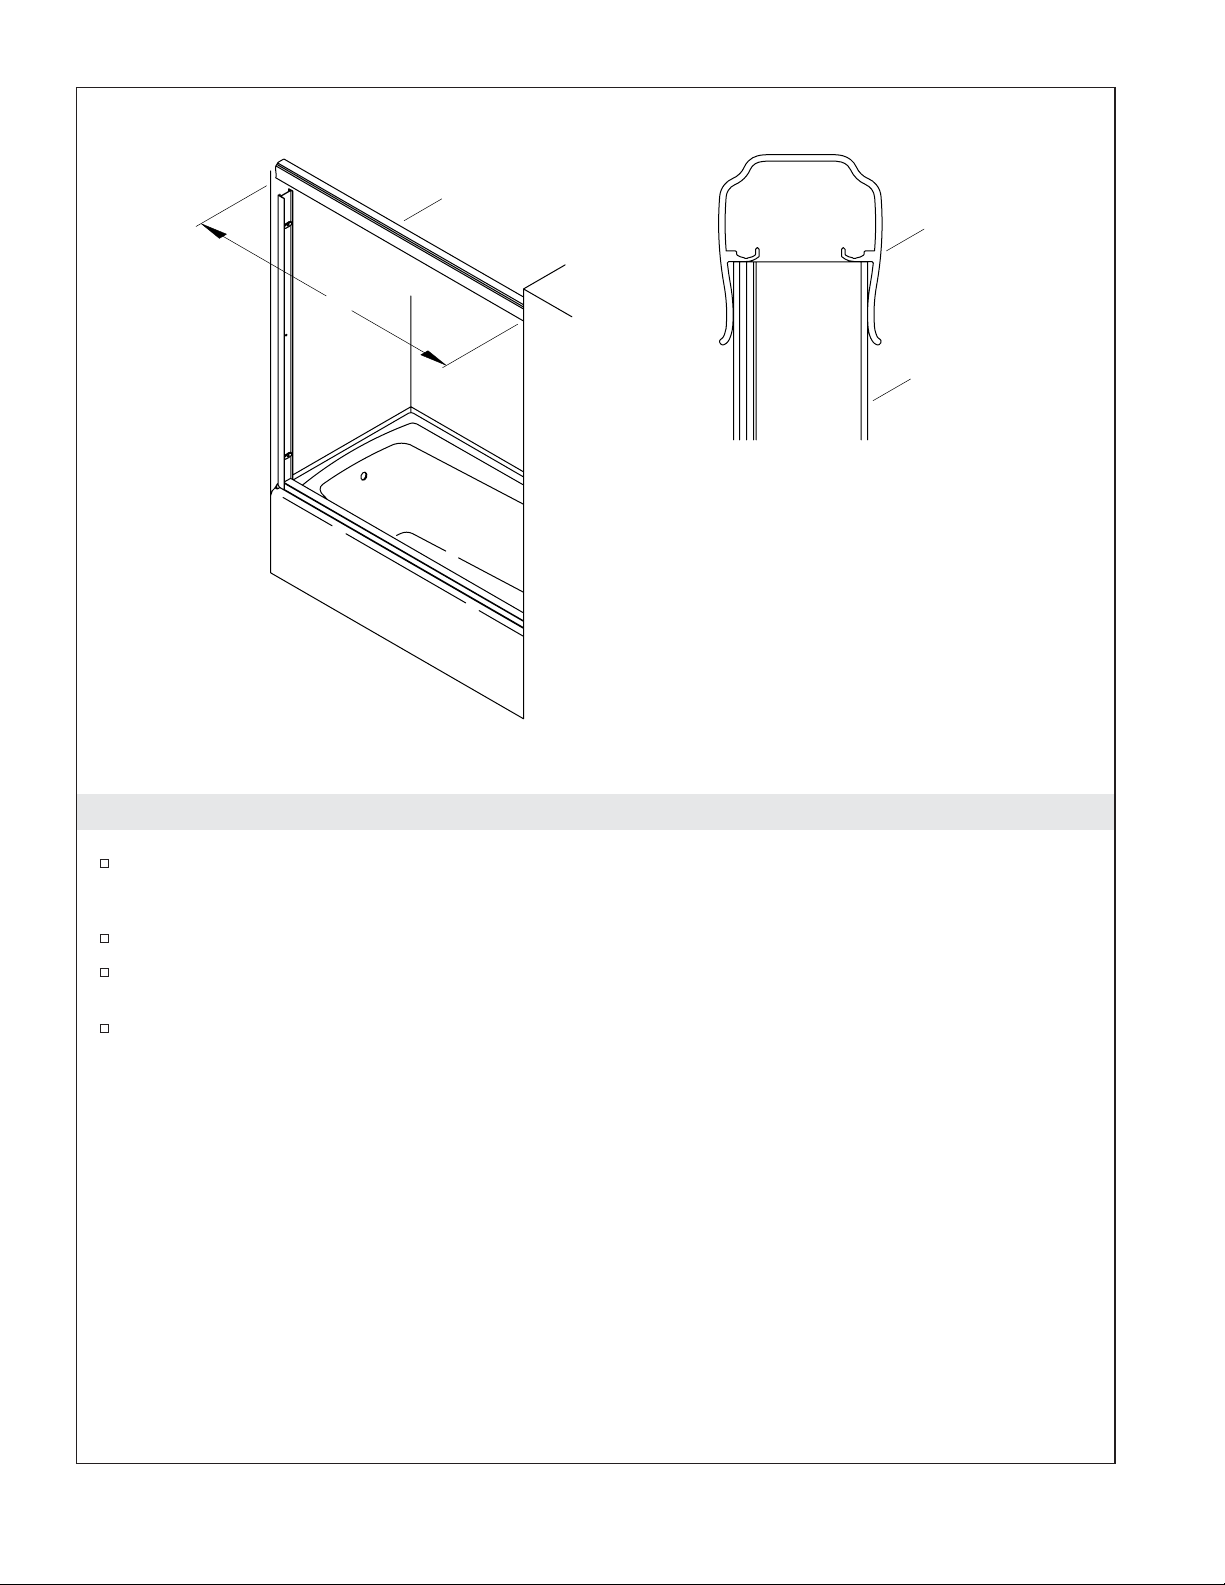
9. Install the Door Handles
WARNING: Handles use a strong adhesive to ensure lasting performance. Once handles are placed,
any adjustments to their position must be made immediately (within 20 seconds). You will not be
able to remove handles by hand after 20 seconds.
The inside panel is installed on the showerhead side of the bath or shower.
Find the position of the door handle by locating the center point of each door panel on the side of
the door that the handle will be installed. For bath door K-704410, measure 27-1/2″(69.9 cm) from
the top of each panel. For shower doors K-704412 and K-704414, measure 33-1/2″(85.1 cm) from the
top of each panel. Mark the edge of the door panel with a pencil.
Fold the template and slide it onto the door. The pencil mark should be visible through the small
cutout in the middle of the template. For precise placement, align the center of the mark with the
arrows next to the window on the template.
Peel off the tape liners on the back of the template and press it against the glass until it is firmly
secured.
Use the supplied alcohol cloth to clean the visible glass in the cutout. Peel off the tape liner on the
handle.
Make sure the Kohler logo is up. Position the handle inside the cutout in the handle template.
Press the edges and center of the handle for better contact. If adjustment is needed, reposition the
handle immediately.
Install the second handle on the other side of the inside panel.
Repeat above procedures for outside door panel. Install the handles on the side of the panel closes
to the back wall of the shower enclosure.
Wait one hour and remove the templates by gripping and pulling the white area near the handle.
27-1/2" (69.9 cm)
33-1/2" (85.1 cm)
K-704410 (Bath):
K-704412, K-704414
(Shower):
Mark center of
door from top
to bottom with
a pencil.
Handle Template
Grab here to
remove.
Glass Door
Align mark in
window with
arrows.
Fold fits over edge
of glass, template
wraps around.
1015439-2-D 12 Kohler Co.

10. Install the Door Panels
NOTE: Perform these installation steps from outside the bath/shower.
IMPORTANT! Risk of product damage and personal injury. It is critical the bumpers prevent direct
contact between the door panel and the metal frame. If the door panel makes direct contact it will result in
breakage of the glass and bodily harm.
NOTICE: Risk of product damage. For the protection of your bath unit, use a drop cloth or similar
material as a protective cover during these steps.
Install the Inside Panel
Run a rag along the each of the inside rails of the top track to remove debris.
Lift the inside door panel with the rollers facing away from you.
Position the rollers on the inside rail of the top track.
Move the inside panel to the same side the showerhead is located.
Install the Outside Panel
Lift the outside door panel with the rollers facing you and position the rollers on the outside rail.
Position the rollers on the outside rail of the top track.
Move the outside panel to the side opposite the showerhead.
Confirm Proper Operation
Roll each door panel back and forth along the track to make sure they operate smoothly.
Inside
Panel
Outside Panel
Kohler Co. 13 1015439-2-D

Install the Door Panels (cont.)
If both door panels operate smoothly, perform the ″Confirm Panel Alignment″instructions later in
this section.
If one of the door panels does not operate smoothly, remove it and make sure there is no debris or
rough areas on the rails inside the top track.
If no debris or rough areas are found, adjustment is required.
If adjustment is required, determine if the door panel should be raised or lowered.
Remove the door panel from the top track.
Adjust the rollers by loosening the roller screw and moving the roller in the to a different hole.
To adjust the door panel higher, move the rollers lower.
To adjust the door panel lower, move the rollers higher.
Reinstall the door panel.
Repeat if necessary.
Confirm Panel Alignment
NOTE: The edge of each door panel must touch the bumpers before coming in contact with the wall
jambs. If the door panels do not touch the bumpers first, the wall is not plumb and the door panel needs
to be adjusted.
Check to be certain that the door panel is plumb with the wall and the door panels come in contact
with the bumpers, not the wall jamb.
If adjustment is required, determine whether the top or bottom of the door panel is closer to the
wall.
Remove the door panel from the top track and adjust the roller on the side of the door panel closest
to the wall.
Adjust the rollers by loosening the roller screw and moving the roller to a different hole.
If the bottom of the door panel on the side being adjusted is farther away from the wall than the
top of the panel, raise the roller.
If the top of the panel is farther away from the wall than the bottom of the panel, lower the roller.
Reinstall the door panel.
Repeat if necessary.
1015439-2-D 14 Kohler Co.

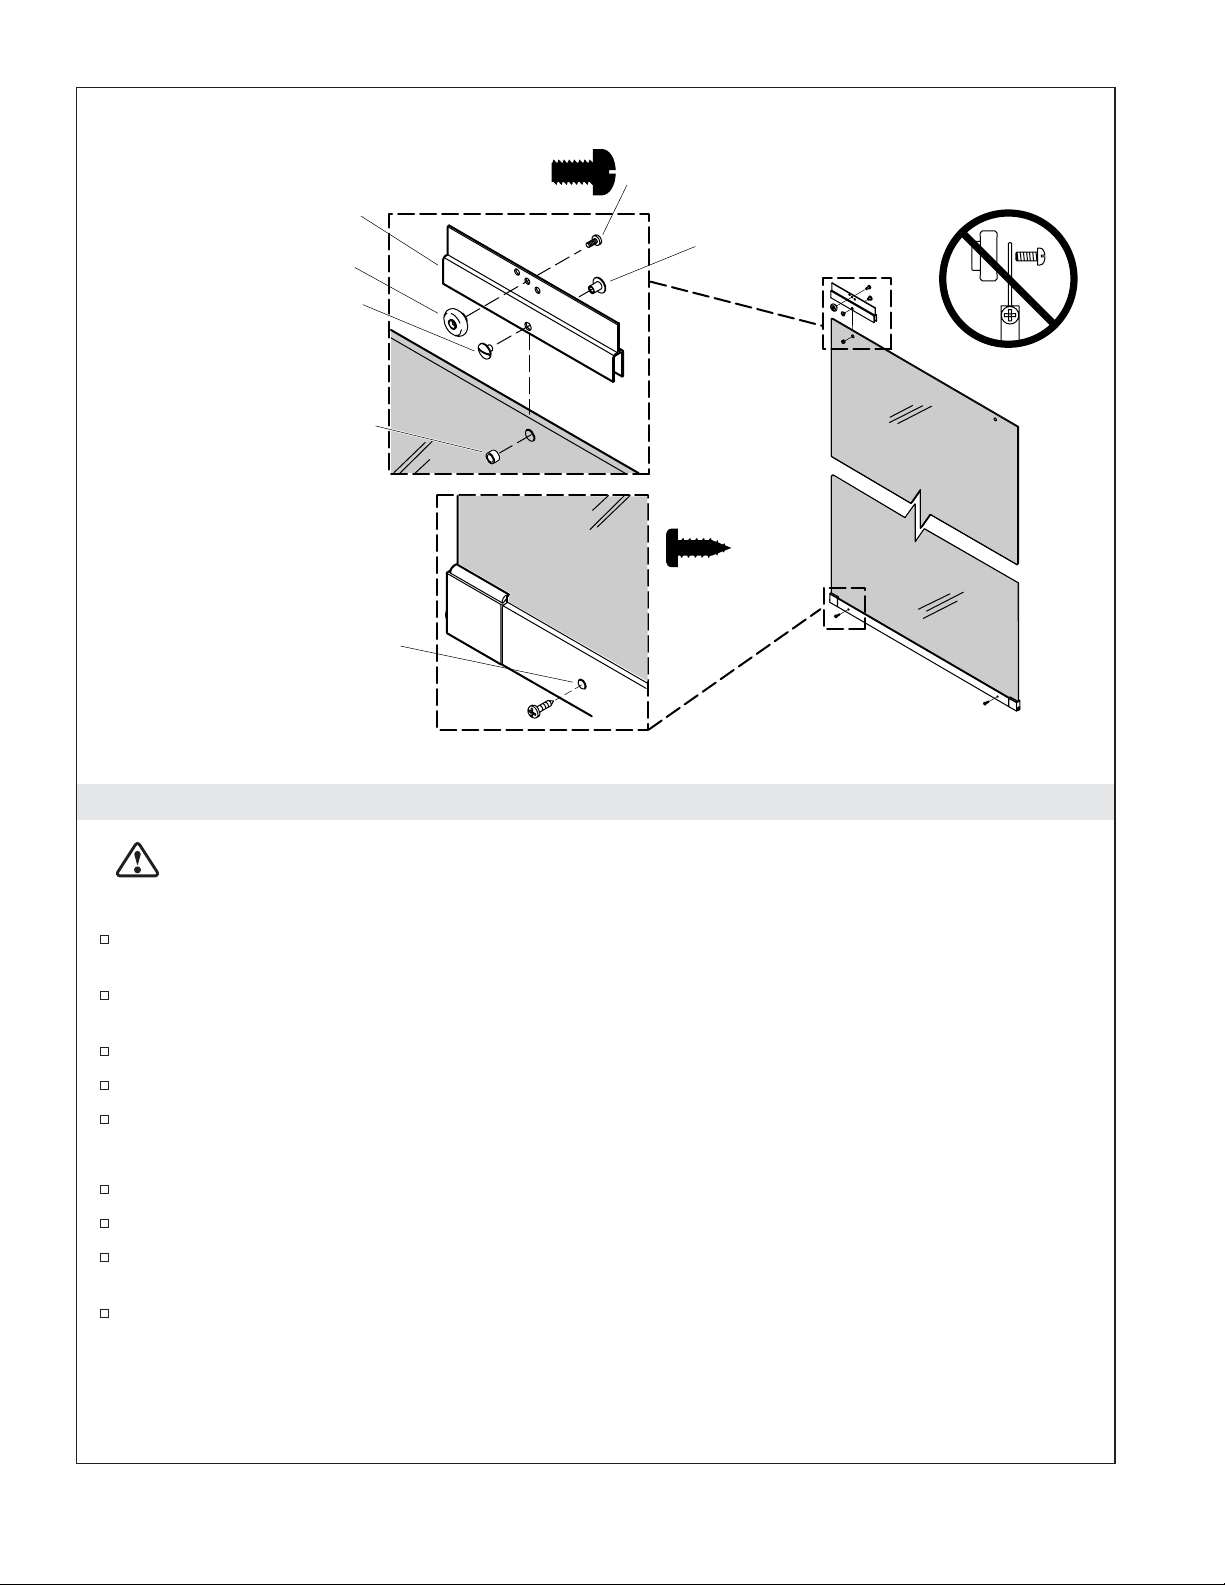
11. Install the Inside Panel Guide
NOTE: Perform this step from inside the shower.
Engage the inside panel guide into the opening of the bottom track.
Align the slots on the panel guide with the two pre-threaded screws in the inside panel bottom
frame.
Lower the panel guide slightly for clearance and tighten the screws. Do not overtighten. If the
screws are overtightened the door may not operate properly.
Move the panel back and forth along the full width of the opening and make sure it operates
smoothly.
If the panel binds, loosen the screws and lower the inside panel guide.
NOTE: If the door still does not operate smoothly, the rollers may need to be adjusted. See the steps in the
″Install the Door Panels″section.
Inside Panel Guide
Inside Panel
Inside Panel Guide
Kohler Co. 15 1015439-2-D

12. Apply Silicone Sealant
NOTE: Thoroughly clean all dust, dirt, or grease from the bottom track and shower ledge surfaces where
sealant will be applied. Make sure the surfaces are dry.
Apply sealant where the wall jambs and wall meet.
Apply sealant where the wall jambs and bottom track meet.
Fill the channel where the wall jamb and bottom track meet at the front with sealant. Refer to the
illustration for correct placement of sealant.
Allow sealant to fully cure following the sealant manufacturer’s instructions before using the
shower/bath.
13. Install the Screw Covers
Install the provided screw covers (6) over the wall jamb screws.
Install the provided screw covers (4) over the bottom frame screws.
Install the provided screw covers (2) over the inside panel guide screws.
Channel
Wall Jamb
Apply
silicone
sealant.
Bottom
Track
Screw Cover
1015439-2-D 16 Kohler Co.
Guide d’installation
Portes coulissantes de baignoire/douche sans cadre
Outils et matériels
Avant de commencer
ATTENTION: Risque de blessure ou d’endommagement du produit. Le verre trempé non encadré
ne doit pas être en contact avec les surfaces dures pour ne pas briser. Ne pas toucher les bords du
panneau de verre avec des outils ou des matériaux durs. Ne pas placer le panneau non encadré
directement sur le sol ou autre surface solide.
ATTENTION: Risque de blessure ou d’endommagement du produit. Ne pas découper le verre
trempé. Il se brisera.
IMPORTANT! Cette porte est conçue pour s’adapter à des murs qui sont à moins de 3/8″(1 cm) hors
d’aplomb. Vérifier que la zone où la porte sera fixée est comprise dans 3/8″(1 cm) ou moins de l’aplomb.
La porte risque de ne pas fonctionner correctement si le mur est à plus de 3/8″(1 cm) hors d’aplomb.
La baignoire de douche ou le receveur devraient être installés/préparés, y compris les matériaux du
mur fini avant de continuer.
Avant de commencer l’installation, préparer et identifier toutes les pièces. Les inspecter pour
s’assurer de l’absence de tout dommage.
Une fois inspectés, remettre les panneaux de verre dans l’emballage de protection en attendant d’en
avoir besoin.
Kohler Co. se réserve le droit d’apporter toutes modifications sur le design des produits et ceci sans
préavis, tel que spécifié dans le catalogue des prix.
Niveau à bulle
Lunettes de protection
Crayon à papier Poinçon
Tournevis assortis Couteau
Marteau
Lime
Scie à onglets ou à métaux
avec des lames de 32
dents par pouce
Perceuse et
mèches variées
Mastic à la
silicone (requis) Ruban-
cache Mètre
ruban
Plus:
• Bâche de protection
Kohler Co. Français-1 1015439-2-D

Identification des pièces
Rail supérieur
Rouleau
Rail inférieur
Butée
Écrou borgne
Manchon
Boulon
Poignée
Poignée
Ancrage
Vis mécanique
#8-32 x 3/8"
Vis à tête ronde
#8-18 x 1-1/2"
Patte de
suspension
Cache-vis
Cache-vis
Montant
du mur
Cache-vis
Panneau
intérieur
Panneau
extérieur
Vis à tête ronde
#8-18 x 3/8"
Guide du
panneau
intérieur
1015439-2-D Français-2 Kohler Co.

Instructions très importantes.
IMPORTANT!
L'erreur la plus commune d'installation
Ne pas couper le rail supérieur et inférieur à la
même longueur pour cette installation.
Veuillez s'il vous plaît lire avec attention ces
instructions d'installation avant de couper le rail
supérieur et inférieur.
Si la manière de découper les rails n'est pas
très claire, contacter un représentant du
service à la clientèle en appelant le numéro
fourni sur la page arrière de ce document.
Kohler Co. Français-3 1015439-2-D

1. Mesurer et couper le rail inférieur
AVERTISSEMENT: Risque de blessures corporelles. Porter des lunettes de protection lors de la
découpe des matériaux.
AVIS: Risque d’endommagement du produit. Ne pas couper le rail supérieur à ce moment. La dimension
du rail supérieur n’est pas la même que le rail inférieur.
IMPORTANT! Si la douche à des coins arrondis au niveau des murs latéraux, mesurer d’un mur à l’autre
au-dessus des coins, sinon, le rail inférieur risquerait d’être trop court.
Mesurer d’un mur à l’autre à la partie la plus plate du rebord de la douche (dimension ″D″).
Marquer la dimension ″D″sur le rail inférieur.
IMPORTANT! Pour de meilleurs résultats, utiliser une scie à métaux à 32 dents et une boîte à onglets
pour couper le rail inférieur.
A l’extrémité opposée à la marque, aligner l’extrémité de l’insertion à égalité avec l’extrémité du rail
inférieur.
Soustraire 1-1/8″(2,9 cm) à la dimension ″D″et couper le rail inférieur à cette dimension.
Limer les rebords rugueux à l’endroit de découpe du rail inférieur en évitant d’endommager la
surface finie.
REMARQUE: S’il y a des courbes à la rencontre des parois latérales et du seuil, utiliser une lime pour
former les rebords de rail inférieur en conséquence.
Pied orienté vers
l'extérieur de la
douche.
Rail
inférieur
D
D
1015439-2-D Français-4 Kohler Co.
This manual suits for next models
2
Table of contents
Languages:
Other THE BOLD LOOK OF KOHLER Bathroom Fixture manuals

Popular Bathroom Fixture manuals by other brands


newform
newform LINFA 67049 Instructions and guarantee

DUSBAD
DUSBAD Vital 1 Series Assembly instructions

Bossini
Bossini Syncro Neb I00633 Instructions for installation

Toto
Toto YB990 Installation and owner's manual

Signature Hardware
Signature Hardware COOPER 940965 manual

Helvex
Helvex PIAZZA PIA-200 installation guide