The One Studio TH-332 User manual
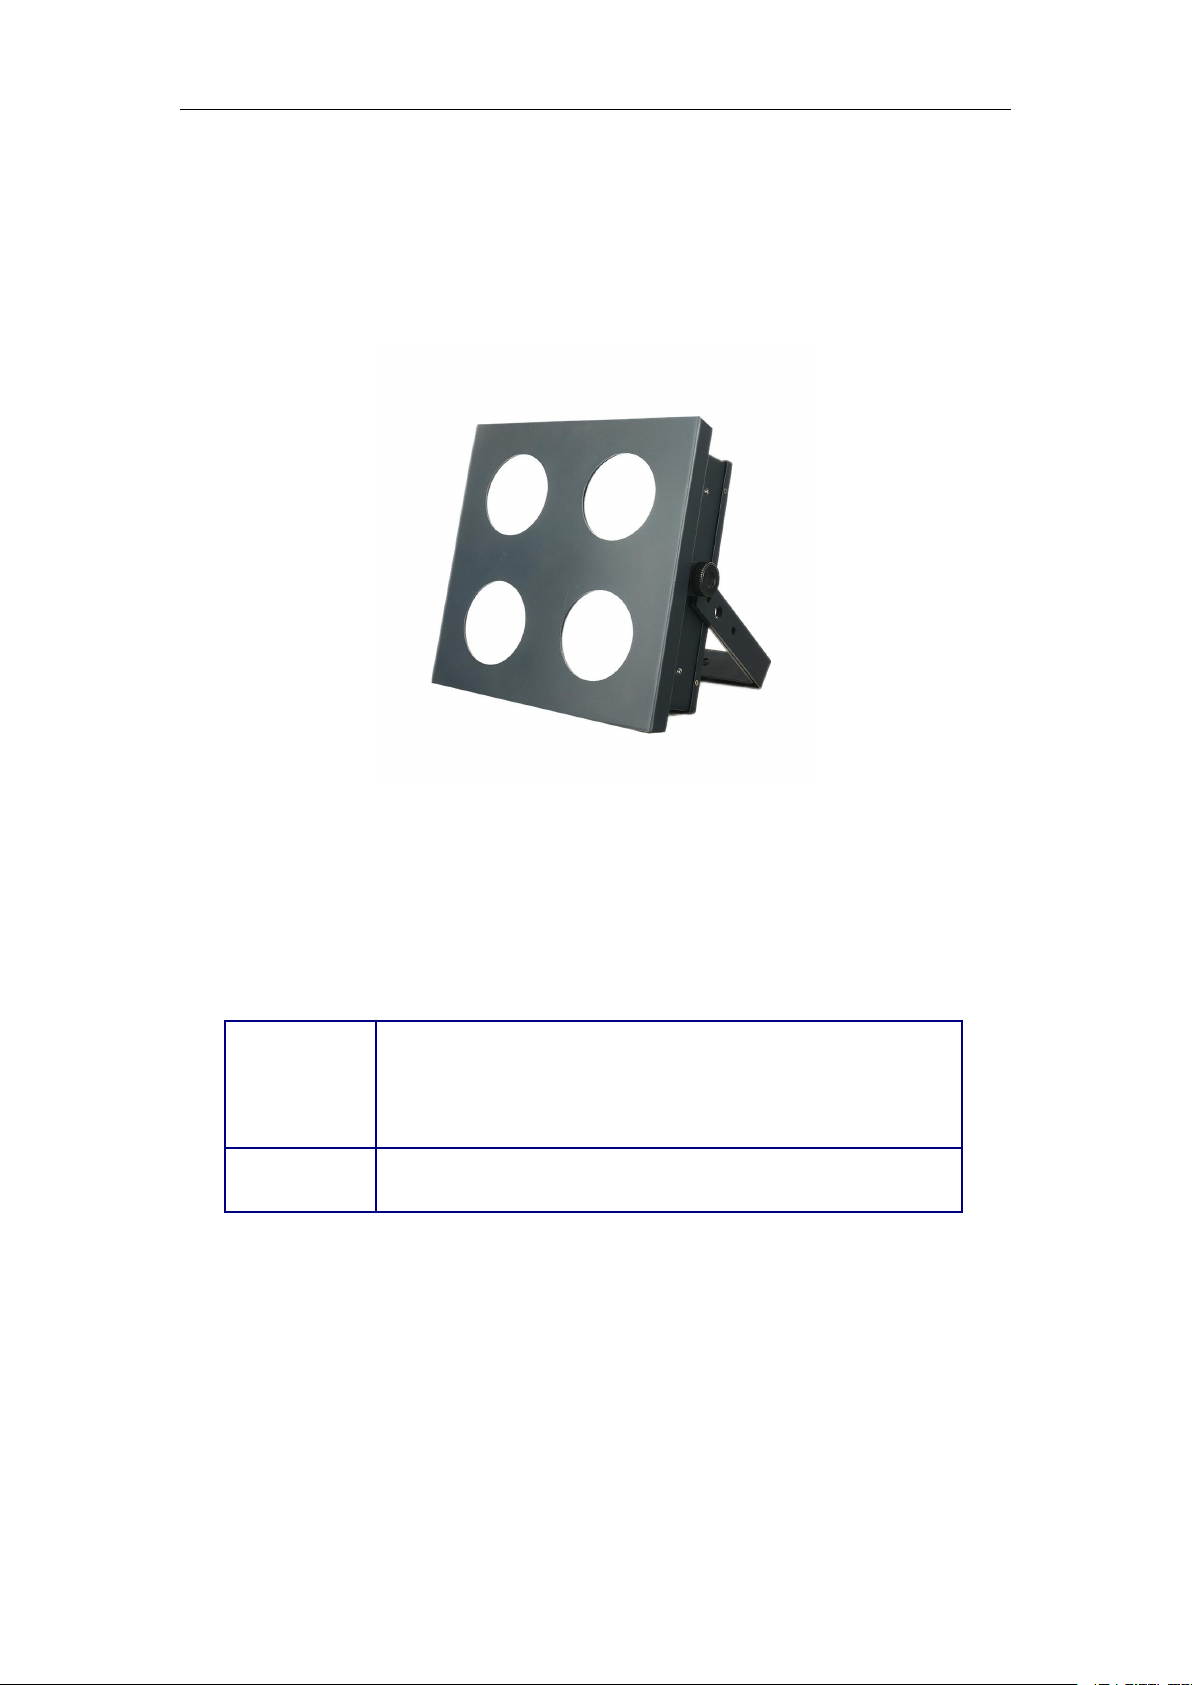
TH-332 4*100W COB LED Blinder
USER MANUAL
CE RoHS
Notice: because the policy of improve the products quality of our company. Maybe some data in the
instructions will change in future. By that time, we won’t inform you about the changed matters. The-One
company reserve the right of changing correlative specification when improve the products. Publisher of
the instruction will not responsible for veracity of information and some correlative results caused by this
information.
MODE
NO.
TH-332
NAME
2x2 COB Led Blinder

1
Technical Parameter:
•LED: 4 pcs* 100W COB LED
•Light Color: Single color warm white or cool white
•LED Life Time: over 50,000 hours
•Voltage :AC100V-240V 50-60Hz
•Power consumption :260/520W
•Beam Angle: 30 degree
•Dimmer: 0~100% linearly adjustable
•Strobe effect: Variable speed (1-30Hz)
•Refresh rate : 11700Hz! 100% Flicker Free for film and TV camera
•Color effect feature: With individual control effect
•Power input : Powercorn connector
•House Material: Metal
•House Color: Black
•Control mode: DMX512,Master/Slave, Auto Run, Stand alone, Sound active
•DMX Channel: 4/8CH
•Working temperature: -30°C~40°C
•Cooling: Two low noise fans
•IP Grade: IP20
•Net Weight: 5kgs
•Gross Weight: 7kgs
1. Description
1.1. Character
4 control mode
External control mode
DMX512 controller controller mode (2 kind of DMX Channel)
Master/slave
Auto mode
Built-in Program
Different kind of Gradual change& Random change
Different kind of strobe:speed (slow to fast)、fix color( Strobe
+color、Strobe +Gradual change)……
Setting Program
It can setting the program without the controller , it can setting

2
Gradual change、jump change、strobe ...(different effect)
And the program data can be down load from master light to
slave light
Static model
It can fix the color without the controller ,also can be choose the
color with strobe
Sound model
Included 2 kinds of commonly used sound model
“Software cutting ”
In the STAR mode , working built-in program /setting program ,the light
would be turn off when the dimmer channel as "0"(procedure would
keep working)
The difference with “BLACKOUT” key(controller keys) &"Software
cutting" :only work this light , and do not clear up the controller data .
White color
Setting different color temperature of white color
Screen Protection
Without operate key in 30 seconds , it enter black screen. Press any
keys then it can quit screen protection.
Temperature Protection
It can set to protect the temperature .
Speed of the Fan
The fan will be worked when the working temperature reach 40 degree,
and the speed will get the faster as the temperature get high.
Can be showed reverse display

3
1.2.Multi-light working in the same time
When using controller to control several lights , and using strobe , auto
mode, the controller just send the channel data . Those effect( strobe ,auto
running ,fix color)would be showed by itself. And should be attention for the
follow situation:
1. There will be many situation make the light become not synchronization
in the beginning. (For example: the different time of opening the light will make
them connect the controller in different time) . And you can change the
controller table puller data( from 20 to 0, and back to 20), then it can be
synchronization.
2. Due to different lights crystal frequency are not exactly equal, so it will
become not synchronization after long time.
3. If need to be synchronization for long time, there is 2 approaches:
A. Using the controller to make program make the strobe, auto run
effect to be synchronization.
B. Using the Maser/Slave model

4
2.Operation
2.1 Key operation
Menu:
The first list is the main menu (press MENU to
exchange), the second list is submenu (press
ENTER to get in or exchange)
If the menu include the decimal point, that’s the
data, and it can be set by the Key of Up/Down.
Key operation:
Key of “MENU” (Press it and can save the data)
If it’s the main menu, it will exchange to next
main menu.
If it’s the submenu , it will back to main menu.
Key of “ENTER” (Press it and can save the data)
If it’s the main menu and it have submenu, it will
enter the submenu.
If it’s the submenu, it will exchange to the next
submenu
Key of “UP/DOWN”
It’s no function if the menu not include the
decimal point.
If the menu include the decimal point, it can set
the data after the decimal point. And it need to
press “ENTER” to save the data.
5
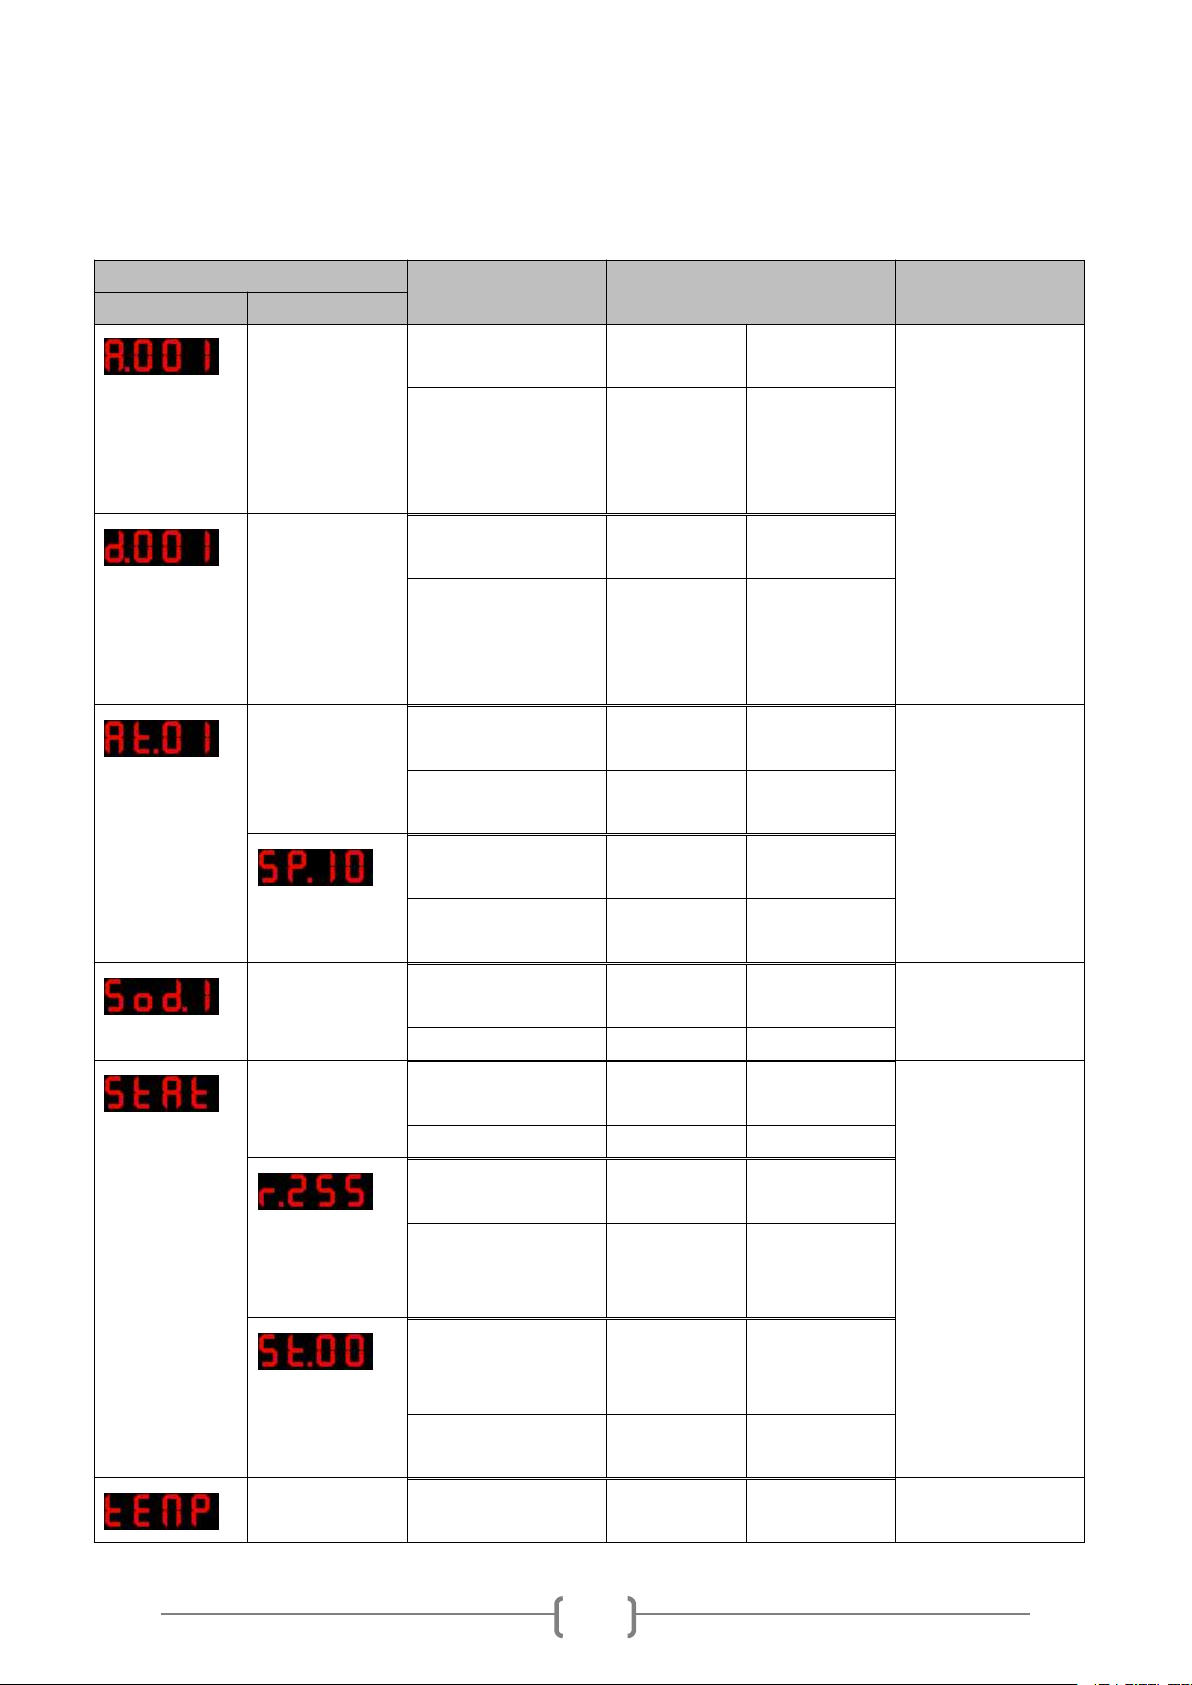
2.2 Menu Data
Menu
State
Operation
Remark
Main Menu
Vice Menu
No vice menu
A: advance
UP/DOWN
adjust ID
adress
disconnect the
controller and
connect the
master light, then it
will follow the
master light.
It will flicker if no
signal.
External control
mode
(standard channel
model)
ENTER
save the ID
address
No vice menu
d: dmx
UP/DOWN
adjust ID
adress
External control
mode
(Basic channel
model)
ENTER
Save the ID
address
One vice menu
At: auto
UP/DOWN
Choose
program
Auto run
ENTER
Enter vice
menu
SP: speed
UP/DOWN
Adjust the
speed
select the speed of
auto run
ENTER
Save data
None
Sod: sound
UP/DOWN
change to
Sound control
Sound mode
ENTER
Save data
With multi-vice
menus
StAt: static
ENTER
Enter vice
menu
Static model
……
r、G、b、W……
UP/DOWN
Change the
value of led
Led set
ENTER
Save data
and change to
vice menu
St: strobe
UP/DOWN
Change the
value of
strobe
Strobe and the
speed
ENTER
Save data
and change
2 vice menu
tEMp: temperature
ENTER
enter the vice
menu

6
temperature control
current temperature
ENTER
change to
vice menu
t: top
UP/DOWN
change the
data of
temperature
protect
set the protect
temperature
ENTER
save and
change
With menus
Wt: white
UP/DOWN
Color temperature
setting
ENTER
Enter the vice
menu
……
r、G、b、W……
UP/DOWN
Change the
value of led
Change the value of
color temperature
ENTER
Sace data
and change to
vice menu
No vice menu
diSP: display
ENTER
reverse the
display
set to show reverse
display
No vice menu
rESt: reset
ENTER
enter the
interface of
key
the password is
“UP DONW UP
DOWN”
return Initial State
7
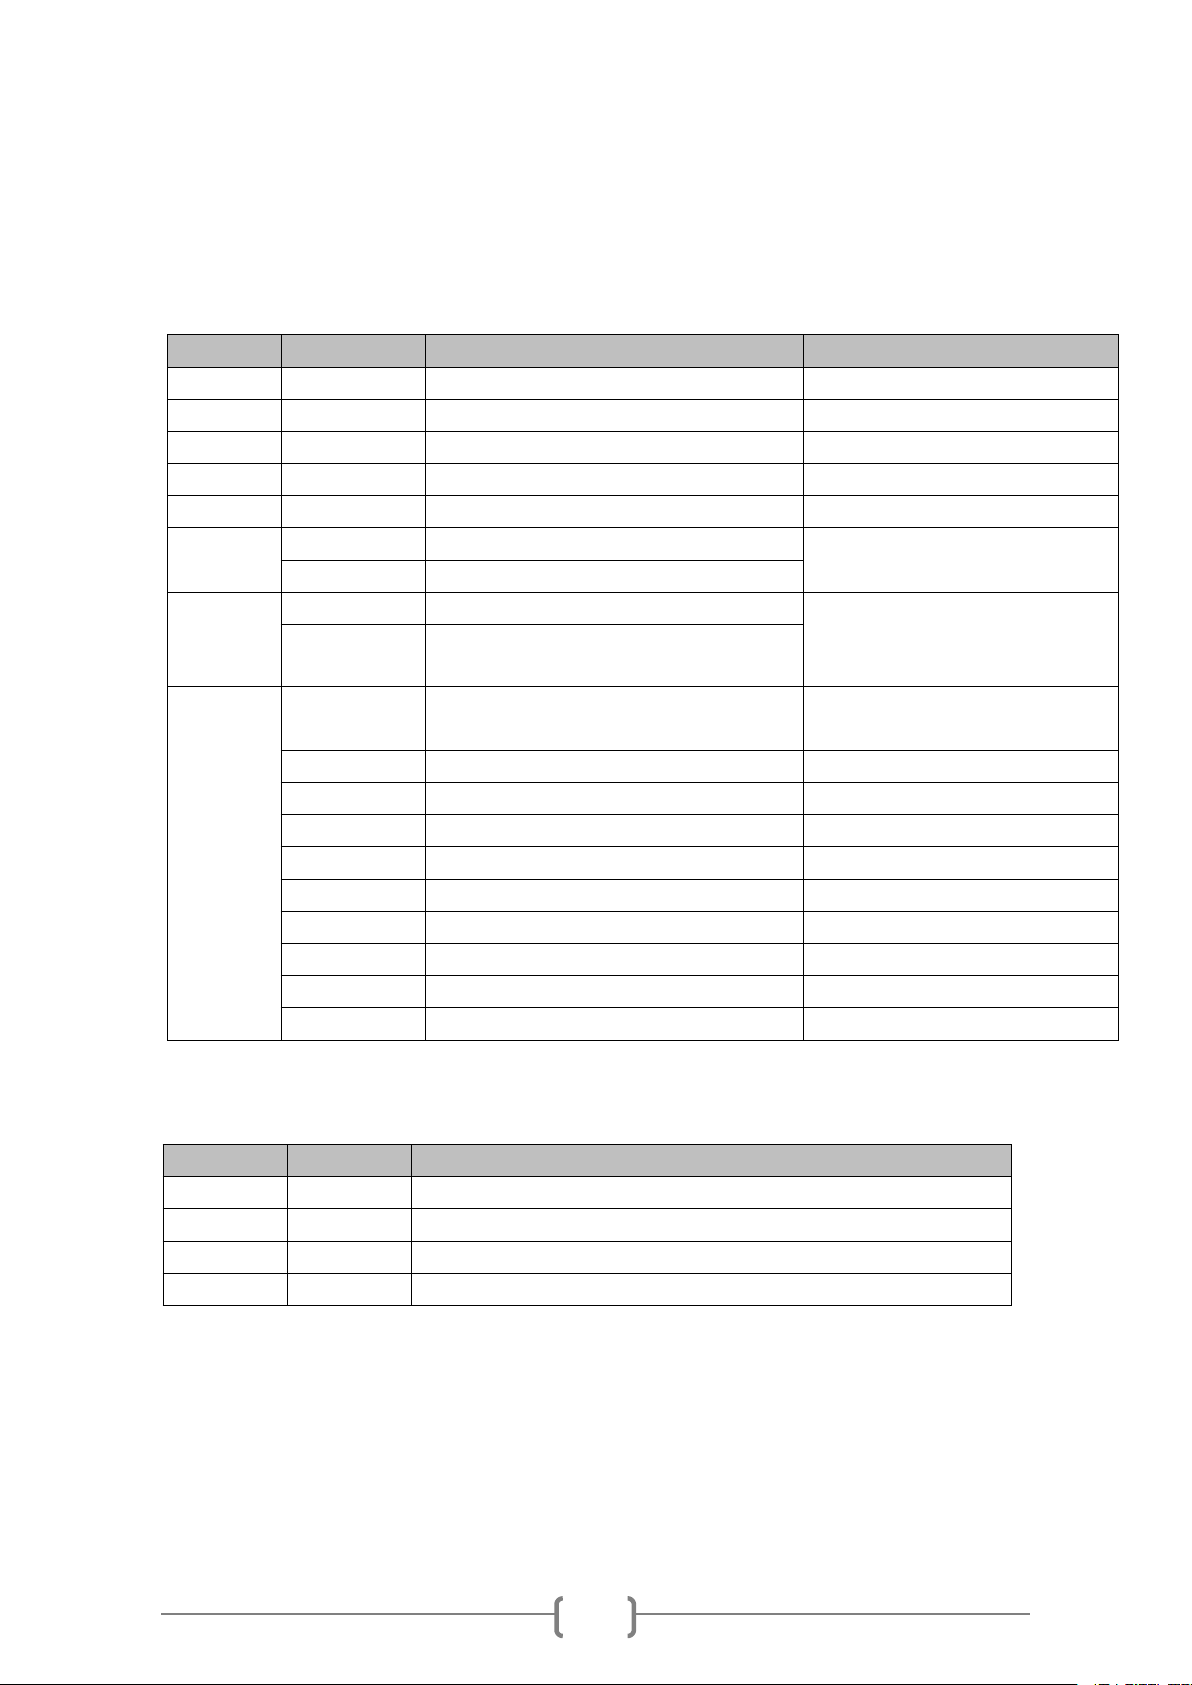
2.3 Channel data
2.3.1 Channel
Channel
Data
Function
1
0~255
Dimmer
2
0~255
Led 1
3
0~255
Led 2
4
0~255
Led 3
5
0~255
Led 4
6
0~30
No effect
Can be set via menu of
“WT.xx”
31~255
Dimmer
7
0~10
No strobe
This channel can control the
speed when run the inner
program
11~255
The speed of strobe (255 is fasterest)
8
0~20
Speed of dimmer 4 (slowest and
softest)
21~40
Speed of dimmer 3
41~60
Speed of dimmer 2
61~80
Speed of dimmer 1
81~99
Speed pf dimmer off (no delay)
100~109
Inner program 1
......
......(each 10 data is a program)
190~199
Inner program 10
200~240
Change light led by sound model
241~255
Strobe by sound model
Channel
Data
Function
1
0~255
Led 1
2
0~255
Led 2
3
0~255
Led 3
4
0~255
Led 4

8
3.Photographic Chart
3.1 Spectrogram
3.2 CRI

9
3.3 Lumen

10
SAFETY INSTRUCTIONS
When use this product please pay close attention to the following items.
1)The product must be installed by a qualified professional
2)The product left the place of manufacture in perfect condition. In order to maintain this condition and
for safe operation, the user must always follow the instructions and safety warning described in this user
manual.
3)Manufacture will not with responsibility for those operation not according to this instruction.
Operation attentions
1) Do not connect power cable of other electric products with this unit.
2) Do not connect DMX512 signal cable of other electric products with this unit.
3) Check the fixture and power cord time to time, make sure the power cord is not crimped or damaged
by sharp edges.
4) Do not shake the fixture. Avoid brute force when installing or operating, do not permit operation by
person not qualified for operating the device.
5) Always make sure that the products are connected the proper voltage, and that the line voltage of the
products connecting to is not higher than that stated on the decal or rear panel of the fixture.
6) During long period of non-use, disconnect the unit's main power
7) Do not attempt to operate this unit if the power has been frayed or broken. If the exterior cord of the
fixture is damaged, it must be replaced by manufactory, agent or qualified technician.
8) There are no serviceable parts inside the unit. Do not open the housing or attempt any repairs
yourself.
9) Maximum ambient temperature (Ta) is 35℃. Do not operate unit at temperature higher than this
10) The surface temperature of the light can reach to 65℃, cool down at least 15 minutes before the light
operated.
11) Avoid looking into the source directly(especially those who suffer from epileptic fits)
12) Do not install the fixture on combustible surface. Always mount this unit in safe and stable mater.

11
DISCLAIMER
1. The device is with one year warranty . The warranty period appear non-artificial quality problem, this
company is responsible for free maintenance
2. User violate operation caused the machine failure, this is user responsibility.
3. If due to the wrong operation or intense impact caused product destroy even safety accidents, the
manufacturer does not undertake any responsibility
4. Prohibit replaced product components by any person, therefore caused any consequences will be
whose responsible
Please contact us freely when you need our related products or information...
Table of contents
Other The One Studio Dj Equipment manuals


Popular Dj Equipment manuals by other brands


Reloop
Reloop Terminal Mix 8 quick start guide

AK Pro Technology
AK Pro Technology Robot Light V1 user manual

VDC Display Systems
VDC Display Systems Marquee 8520 Ultra quick start

Music & Lights
Music & Lights TRIBE LUMI4COB user manual

nedis
nedis KN-DJMIXER10 manual

Blizzard Lighting
Blizzard Lighting Stiletto Glo 19 user manual