NEO PROTON IP User manual

USER MANUAL / MANUAL DE USUARIO
PLEASE READ THE INSTRUCTIONS CAREFULLY BEFORE USE
POR FAVOR LEA LAS INSTRUCCIÓNES ANTES DE USAR
PROTON IP

PROTON IP
ENGLISH VERSION
p. 2
1. Product (general)
1.1 Technical specifications
LED MODULE

1.2 Safety warning
Important
• This product be installed by a qualified professional.
• All maintenance must be carried out by a qualified elec-
trician.
• A minimum distance of 0,5m must be maintained be-
tween the equipment and a combustible surface.
• The product must always be operated in a well ventilat-
ed area.
• DO NOT stare directly into the LED light source.
• Always disconnect the power before carrying out any
maintenance.
• The earth must always be connected to the ground.
• Ensure that all parts the equipment are kept clean and
free of dust.
2. Installation
2.1 Mounting
Hanging - The fixture can be mounted in a hanging position
using the supporting bracket. The bracket should be secured
to the mounting truss or structure using a standard mounting
clamp. Please note that when hanging the unit a safety cable
should also be used.
Upright - The fixture can be mounted in an upright sitting
position using the supporting brackets.
2.2 power connections
@220V: 50 units may be connected in series
@120V: 25 units may be connected in series
2.3 setting up with a DMX521 controller
• Connect the DMX512 controller to the units in series.
• Each unit has 13 DMX channels so the DMX Addresses
should increase by increments of 1, (Nx1) + 1, (Nx2) + 1,
(Nx3) + 1, ....
• The ID address has not been set so therefore when using
the controller CH 10 must be inactive (CH10=0).
• It is also possible to deactivate ID address selecting [ID
OFF] from the [Settings] menu, on the fixture.
• Each DMX Address may be used as many times as required.
• Any DMX address in the range from 001 to 512 may be used.
Example
The fixture above shows a simple DMX512 layout with the
starting address of the first unit set at 1, with the second set at
(Nx1)+1and so on...
(Note that when used in this way, the Ch10 ID function must be
inactive (CH10=0))
PROTON IP
ENGLISH VERSION
p. 3

3 Display panel operation
3.1 Display operation
[MENU] return to the previous menu.
[ENTER] enter the currently selected menu.
[UP] scroll down through the current menu list or decrease
the value of the current function.
[DOWN] scroll up through the current menu list or increase
the value od the current function.
3.2 Menu map
PROTON IP
ENGLISH VERSION
p. 4

3.2 Menu map
imagen
3.3 Edit static colour
• Combine [Red], [Green] and [Blue] to create an infinite
range of colors (0-255)
• Set the value of the [Strobe] (0-20Hz)
3.4 Activating auto programs
• Select the target [AUTO] program and press [ENTER].
• Programs [AT.01] to [AT.10] are fully pre-programmed
and will not be altered by changes in [EDIT] mode.
• Programs [PR.01] to [PR.10] are fully pre-programmed
and can be edited in [EDIT] mode.
3.5 Run mode
• Enter the [RUN] mode to set working mode.
• [DMX] mode is for using the DMX512 controller to control
fixtures.
• [SLAV] mode is for Master - Slave operation.
3.6 DMX512 settings
• -Enter the [dMX] mode to set the DMX ADDRESS.
PROTON IP
ENGLISH VERSION
p. 5

3.7 Personality
• Enter the [PERSONALITY] mode to select DMX mode:
[TOUR] [TR16],
• [ARC.1], [AR1.d], [AR1.S], [HSV]
3.8 Editing custom programs
• Enter the [EDIT] mode to edit the custom programs
[PR.01] to [PR.10]
• Each custom program has 30 steps that can be edited.
• Each step allows the creation of a scene using RED [Red],
GREEN [Green], BLUE [Blue], STRB [Strb], TIME [Time] &
FADE [Fade].
3.9 Special settings
• Elect [UPLD] to upload the custom programs from the
current MASTER unit to the SLAVE units.
• In order to reset custom modes to default values se-
lect [REST].
• [COLO] is for activate/unactivate the color calibration
functions.When[RGBW]isselected,on RGB=255,255,255,
the color is displayed as calibrated in CAL2 - RGBW. When
[COLR] is set [OFF], on RGB= 255,255,255, the RGB values
are not adjusted and the output is most powerful. When
[UC] is selected, the RGB output are adjusted to a stan-
dard preset universal color which balances fixtures from
dierent generations.
• Select [DIM1], [DIM2], [DIM3] or [DIM4] for dierent dim-
ming speeds, ([DIM4] is the slowest dimming speed)
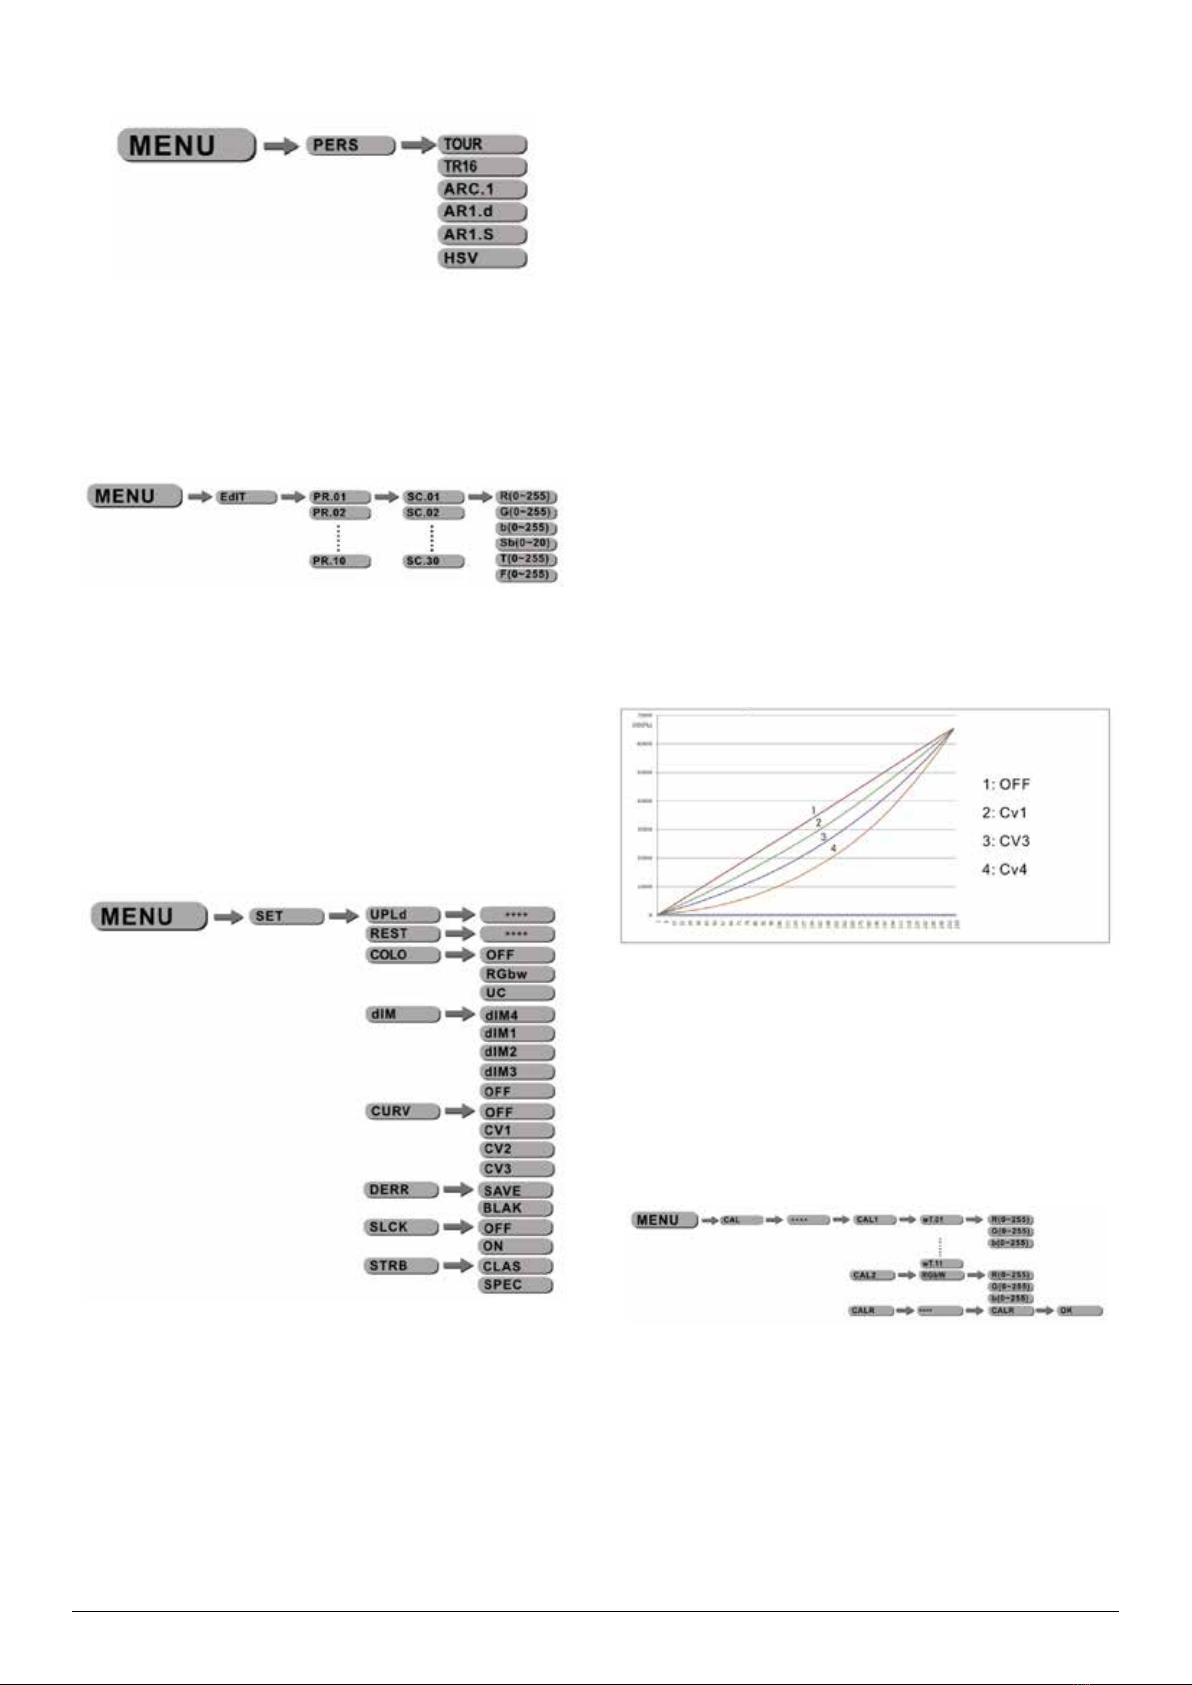
[CURV] allows the user to adjust the user to adjust the
shape of the dimming curve, See the CURV chart to un-
derstand more about actual dimming curves.
• [DERR] Choose [Save] in order to save the last DMX data
incase of DMX signal error. Choose [Black] in order
• to blackout in case of DMX signal error.
• [SLCK] is used to lock the settings menu. When [SLCK]
is set to [ON] then user must insert passcode (UP-
+DOWN+UP+DOWN) in order to access the settings menu.
• [STRB] This fixture allows for dierent strobe personal-
ity settings, [CLAS] strobe or [SPEC] strobe. The [STRB]
settings are only valid in the DMX personalities [TOUR],
[AR2.S] and [TR16]
CURV DIMMING
3.10 Balance parameters and correction
menu display
Press [MENU] button to enter the password confirmation, to
enter the correct password <UP + DOWN + UP + DOWN>
Key, press the [MENU] in, the correct password will enter
show submenu.
• Enter the [CAL1] to select white color of dierent color
temperature.
• There are 11 pre-programmed White colors can be edit-
ed by using [Red], [Green] & [Blue].
• Enter the [CAL2] to adjust the RGB parameter to make
dierent whites.
• When the new setting is activated, the DMX controller
PROTON IP
ENGLISH VERSION
p. 6

choose RGB=255,255,255 the white color will be made
by the actual RGB values on the [CAL2].
3.11 Activate the password
• Enter the [Key] mode to select whether the access pass-
word is on or o.
• When the fixture is set as PASS [ON], aer 30 seconds or
turn on the fixture next time, the fixture will need access
passwords to enter the display menu control.
Note: The factory access passwords is [UP] + [DOWN] + [UP] +
[DOWN], then press [ENTER] to confirm access.
PROTON IP
ENGLISH VERSION
p. 7

4. Using a DMX512 Controller
4.1 channel assignment
• Note: This product have eleven DMX512 channel configu-
ration: TOUR/TR16/ARC1/AR1,d/AR1,S/HSV
PROTON IP
ENGLISH VERSION
p. 8

PROTON IP
ENGLISH VERSION
p. 9

PROTON IP
ENGLISH VERSION
p. 10

TR16
PROTON IP
ENGLISH VERSION
p. 11

TR16
PROTON IP
ENGLISH VERSION
p. 12

TR16
PROTON IP
ENGLISH VERSION
p. 13

ARC.1
AR1.D
AR1.S
HVS
PROTON IP
ENGLISH VERSION
p. 14

5. Appendix
5.1 Parts diagram
PROTON IP
ENGLISH VERSION
p. 15

Índice
1.General..................................................................17
1.1. Especificaciones técnicas...................................................17
1.2.Advertenciasdeseguridad..................................................17
2.Instalación.............................................................18
2.1.Montaje................................................................................18
2.2.Conexioneseléctricas..........................................................18
2.3. Configuración de controlador dmx512..............................18
3. Operación de la pantalla..........................................19
3.1.Operacióndelapantalla......................................................19
3.2.Mapademenús....................................................................19
3.3. Edición de colores estáticos................................................20
3.4.Activacióndeprogramasautomáticos................................20
3.5. Modo de ejecución...............................................................20
3.6. Configuración de dmx512...................................................20
3.7.Personalidad........................................................................20
3.8. Edición de programas personalizados...............................21
3.9.Configuracionesespeciales.................................................21
3.10.Menúdeparámetrosdebalanceycorrección...................21
3.11. Activación de la contraseña..............................................22
4. Uso del controlador dmx512....................................23
4.1. Asignación de canales .......................................................23
5. Apéndice...............................................................30
5.1. Componentes.....................................................................30
PROTON IP
VERSIÓN ESPAÑOL
p. 16

1. General
1.1. Especificaciones técnicas
Módulo led
Tipo Modelo Voltaje Temperatura de
operación Peso Tamaño Potencia IP
(en mm) (en W)
IRGB: 3Wx7 CA100-240V
-20~45 3,5
220x175x258
27
IP2X
II RGB: 3Wx7 50/60HZ 220x175x228 IP66
1.2. Advertencias de seguridad
Importante
• Procure que la instalación del producto esté a cargo de
un técnico calificado.
• Las tareas de mantenimiento solo podrán ser efectuadas
por un especialista.
• Deberá dejar una distancia mínima de 0,5 metros entre
el equipo y superficies inflamables.
• Procure ubicar el producto en lugares con una venti-
lación adecuada.
• Nunca mire fijo a la fuente de luz LED.
• Desenchufe el equipo antes de realizar tareas de man-
tenimiento.
• Procure conectar el dispositivo a tierra.
• Asegúrese de que todas las piezas del equipo se manten-
gan limpias y sin polvo.
PROTON IP
VERSIÓN ESPAÑOL
p. 17

2. Instalación
2.1. Montaje
Posición colgante
Si desea instalar el equipo en posición colgante, utilice el
soporte correspondiente. Este soporte debe asegurarse en
un truss o estructura de montaje mediante una abrazadera
de montaje estándar. Tenga en cuenta que también deberá
utilizar un cable de seguridad.
Posición vertical
Si desea instalar el equipo en posición vertical u horizontal,
utilice los soportes correspondientes.
NOTA
Podrá instalar el MÓDULO LED en cualquier ángulo y
posición. Asimismo, podrá ajustar el ángulo del MÓDULO
LED utilizando los dos mandos de ajuste ubicados al cost-
ado de la unidad.
2.2. Conexiones eléctricas
Conexión 220 V: podrá conectar hasta 50 unidades en serie.
Conexión 120 V: podrá conectar hasta 25 unidades en serie.
2.3.Configuracióndecontrolador dmx512
• Conecte el controlador DMX512 a las unidades en serie.
• Cada unidad cuenta con 13 canales DMX; los valores de
las direcciones DMX se incrementarán de 1 en 1: (Nx1)+1,
(Nx2)+1, (Nx3)+1, y así sucesivamente.
• La dirección ID no se encuentra configurada, por lo que
el canal CH 10 debe estar inactivo al utilizar el controla-
dor (CH10=0).
• También es posible desactivar la dirección ID mediante
la opción [ID OFF] del menú [Settings] en la unidad.
• Podrá usar cada dirección DMX la cantidad de veces que
sea necesario, siempre que se encuentre dentro del in-
tervalo 001-512.
Por ejemplo:
Referencias de la imagen
DMX Addr. 1 Dirección DMX 1
DMX Addr.(Nx1)+1 Dir. DMX (Nx1)+1
DMX Addr.(Nx2)+1 Dir. DMX (Nx2)+1
DMX512 CONTROLLER CONTROLADOR DMX512
La figura anterior muestra un esquema simple de direcciona-
miento DMX512, donde el valor de la dirección inicial de la prime-
ra unidad es 1, de la segunda es (Nx1)+1, y así sucesivamente. Se
debe tener en cuenta que este tipo de configuración requiere que
la función ID del canal Ch10 esté inactiva (CH10=0).
PROTON IP
VERSIÓN ESPAÑOL
p. 18

3. Operación de la pantalla
3.1. Operación de la pantalla
[MENU] Permite volver al menú anterior.
[ENTER] Permite ingresar al menú seleccionado en pantalla.
[UP] Permite desplazar la selección hacia arriba en el menú
actual o aumentar el valor de la función actual.
[DOWN] Permite desplazar la selección hacia abajo en el
menú actual o disminuir el valor de la función actual.
3.2. Menu Map
PROTON IP
VERSIÓN ESPAÑOL
p. 19

3.3. Edición de colores estáticos
• Ajuste las opciones [Red], [Green] y [BIue] para lograr dif-
erentes colores (valores: 0-255).
• Configure el valor de [Strobe] (valores: 0-20 Hz).
3.4.Activación de programas automáticos
• Seleccione la opción [AUTO] y presione la tecla [ENTER].
• Los programas [AT.01] a [AT.10] están preconfigurados
íntegramente y no se alterarán por los cambios que se
realicen en el modo [EDIT].
• Los programas [PR.01] a [PR.10] están preconfigurados
íntegramente y podrán modificarse en el modo [EDIT].
3.5. Modo de ejecución
• Ingrese a la opción [RUN] para configurar el modo de eje-
cución.
• El modo [DMX] permite utilizar el controlador DMX512
para controlar las unidades.
• La función [SLAV] permite operar la unidad en modo
master/slave.
3.6. Configuración de dmx512
• Ingrese al modo [dMX] para configurar el valor de la DI-
RECCIÓN DMX.
3.7. Personalidad
• Ingrese a la opción [PERSONALITY] para seleccionar el
modo DMX: [TOUR], [TR16], [ARC.1], [AR1.d], [AR1.S], [HSV]
PROTON IP
VERSIÓN ESPAÑOL
p. 20
Table of contents
Languages:
Other NEO Dj Equipment manuals

NEO
NEO ELIPSOLED 5600 MAX Torch 4000 User manual

NEO
NEO BOMBER User manual

NEO
NEO ION 132 F User manual

NEO
NEO FOLLOWER 35ST User manual

NEO
NEO ZOOM PANEL User manual

NEO
NEO ION 280F User manual

NEO
NEO PROTON 12 USB User manual

NEO
NEO Proton 12 HEX USB User manual

NEO
NEO ION 715Z User manual

NEO
NEO Blinder 64 User manual

NEO
NEO ELIPSOLED LITE 50 User manual

NEO
NEO Ion 280 3-en-1 User manual

NEO
NEO Moving Torch User manual

NEO
NEO Flex Par User manual

NEO
NEO STEAM F700 User manual

NEO
NEO Sion User manual

NEO
NEO FLEX STRIP User manual

NEO
NEO STORMER QUAD User manual

NEO
NEO FRESNELED COLOR User manual

NEO
NEO PROTON IP QW ZOOM User manual