Thermor BIOS Diagnostics halo 235DI User manual

1 SECOND
EAR
THERMOMETER
Instruction Manual

2
235DI
1 Second Ear Thermometer
Instruction Manual
Table of Contents
1 Important Safety Instructions
2 Product Diagram
3 How this Thermometer Measures Temperature
4 Directions for Use
5 Setting Date and Time
6 Setting the Beeper
7 Fever Alarm
8 Changing Between Celsius and Fahrenheit
9 Memory Storage
10 Measuring Surface Temperatures
11 Care and Cleaning
12 Battery Replacement
13 Error Messages
14 Technical Specications
15 5 Year Warranty

3
1 Second Infrared Ear Thermometer
Thank you for purchasing the BIOS Diagnostics 1 Second Ear Thermometer.
The BIOS Diagnostics 1 Second Ear Thermometer is a high quality product
incorporating the latest technology and tested in accordance with international
standards.
With its unique technology, this thermometer can provide safe, accurate and
reliable readings with each measurement on people over 2 years of age.
Features
Multiple Uses (Wide Range Measurement)
This thermometer oers a wide measurement range feature from 0°C to
100.0°C (32.0°F to 212.0°F), meaning the unit can be used as an ear
thermometer to measure body temperature or it can be used to measure
surface temperature of the following:
• Milk surface temperature in a baby’s bottle
• Surface temperature of a baby’s bath
• Ambient temperature
Measurement in 1 Second
The innovative infrared technology allows measurement of ear temperature in
only 1 second.
Multiple Reading Recall
Users will be able to recall the last 30 readings when entering the recall mode,
enabling ecient tracking of temperature variations.
Fever Alarm
10 short beeps and a red LCD backlight alerts the patient that he/she may
have a temperature above 37.4°C / 99.3°F.
Illuminated Probe
This thermometer includes a probe LED light which enables the user to nd
the correct ear position in the dark. The probe will illuminate for approximately
10 seconds when the thermometer is turned ON.
“Clean Me” Technology
After each temperature measurement “clean me” will ash on the LCD to
remind users to clean the probe. See Care and Cleaning section.

4
Accurate and Reliable
The unique probe assembly construction incorporates an advanced infrared
sensor, ensuring that each measurement is accurate and reliable.
Please read these instructions carefully before using this
thermometer and keep both in a safe place.
1. IMPORTANT SAFETY INSTRUCTIONS
This instrument may only be used for the purposes described in this booklet.
The manufacturer cannot be held liable for damage caused by incorrect
application.
Never immerse this instrument in water or other liquids. For cleaning
please follow the instructions in the «Care and Cleaning» section.
• Do not use the instrument if there are any signs of damage. Do not
attempt to repair the instrument.
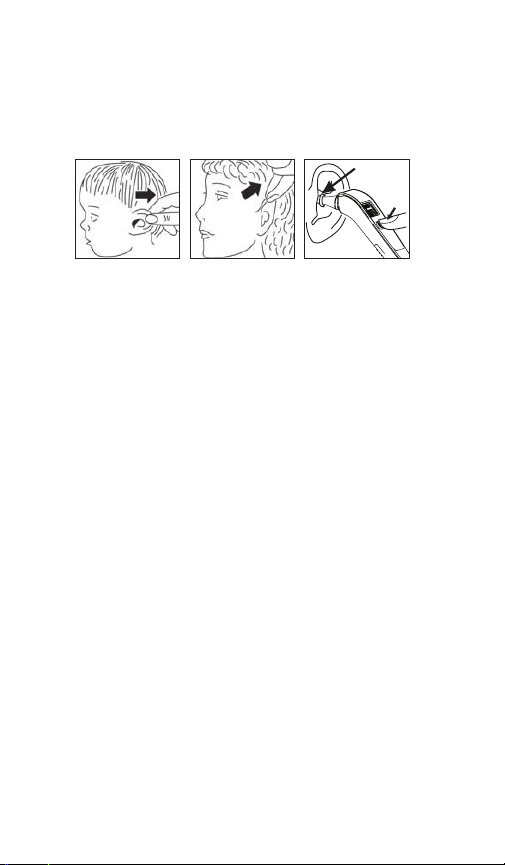
• Earwax in the ear canal may cause a lower temperature reading,
therefore it is important to ensure the patient’s ear canal is clean.
• If the measurement result is not consistent with the patient’s nding or
suspiciously low, repeat the measurement every 15 minutes or double
check the result by another core body temperature measurement.
• This thermometer consists of high quality precision parts. Do not drop
this instrument. Protect it from severe impact and shock.
• Keep the thermometer away from direct exposure to the sun and keep it
in a dust-free dry area.
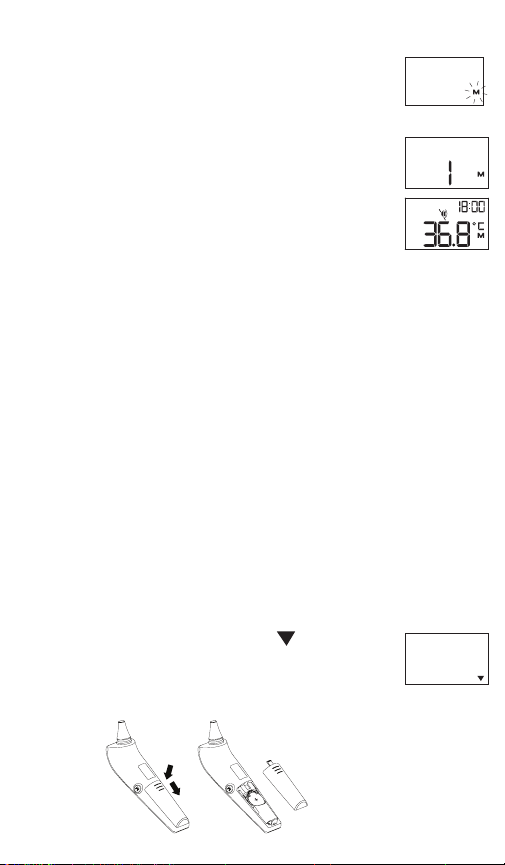
• If the instrument is not going to be used for a prolonged period the
battery should be removed.
WARNING:
• Use of this thermometer is not intended as a substitute for consultation
with your physician.
• Ensure that children do not use the instrument unsupervised; some parts
are small enough to be swallowed.
• It is not recommended to use infrared thermometers on children under 2
years of age.
• Infrared thermometers should not be used to manage important health
concerns, and therefore parents should not rely solely on temperature
readings to evaluate the status of your child’s health. If you have any
concerns, consult with your doctor.

5
2. PRODUCT DIAGRAM
1
2
3
4
5
6
1. Measuring sensor 4. ON/OFF button
2. Display 5. Battery compartment cover
3. START button 6. M-button (memory)
3. HOW THIS THERMOMETER MEASURES
TEMPERATURE
This thermometer measures infrared energy radiated from the eardrum
and the surrounding tissue. This energy is collected through the lens and
converted to a temperature value. The measured reading obtained directly
from the eardrum (Tympanic Membrane) ensures the most accurate ear
temperature.
Measurements taken from the surrounding tissue of the ear canal generate
lower readings and may result in misdiagnosis of fever.
4. DIRECTIONS FOR USE
IMPORTANT: If using the thermometer for the rst
time, remove the plastic strip located in the battery
compartment.
1. Switch ON the thermometer by pressing the ON/OFF button, all segments
will be shown for 1 second. (Figure 1)
TIME PM
MONTH DAY
Figure 1

6
2. After one beep is heard and the °C / °F icon is ashing, the thermometer
is ready for measurement. Straighten the ear canal by gently pulling the
middle of the ear back and up.
3. Place the probe rmly into the ear canal, press the START button and
keep the probe in the ear until the thermometer beeps to signal the
completion of the measurement. The probe LED light will turn OFF once
the START button is pressed to take the measurement.
about 1 sec.
NOTE:
• Always insert the thermometer in the same ear with the same direction
and depth.
• Always clean the probe accordingly before and after each use. (See
Care and Cleaning Section).
• It is recommended that you measure the temperature 3 times in the
same ear. If the 3 measurements are dierent, select the highest one.
(Allow 30 seconds between each measurement).
• Before measurements, remain in a stable environment and avoid
exercise and bathing for 30 minutes.
• Readings from dierent measuring sites should not be compared as the
normal body temperature varies by measuring site and time of day, being
highest in the evening and lowest about one hour before waking up.
Normal body temperature ranges:
- Axillary: 34.7 – 37.3°C / 94.5 – 99.1°F
- Oral: 35.5 – 37.5°C / 95.9 – 99.5°F
- Rectal: 36.6 – 38.0°C / 97.9 – 100.4°F
- Ear: 35.4 – 37.4°C / 95.7 – 99.3°F
5. SETTING DATE AND TIME
1. Once a new battery is installed or by pressing and holding the M-button
for 3 seconds the year will ash on the display. You can change the year by
pressing the START button. To conrm the year press the M-button. The
month will ash.
2. Press the START button to set the month digits. Press the M-button
to conrm.

7
3. Follow the steps above to set the day, 12/24 hour mode, hours and minutes.
MONTH DAY
TIME TIME
4. Once you have set the minutes and pressed the M-button the date and
time are set and the time is displayed.
- If no button is pressed for 20 seconds, the thermometer automatically
switches to the measuring screen.
- To cancel time setup, press the ON/OFF button during time setup. The
LCD will show Date / Time icons with “--:--”. Press the ON/OFF button
to start the measurement. If no further action is taken within 60 seconds,
the thermometer will automatically turn OFF.
6. SETTING THE BEEPER
1. When the thermometer is OFF, press and hold the
ON/OFF button for 5 seconds to set the beeper. (Figure 2)
2. Press the ON/OFF button again to either turn the beeper
ON or OFF. The beeper is activated when the beeper
icon is not crossed out.
NOTE: If no button is pressed for 5 seconds, the
thermometer automatically switches to measuring mode.
7. FEVER ALARM
If the thermometer detects a body temperature greater than 37.4°C/99.3°F, it
will make 10 short beeping sounds and the LCD will light up RED, indicating
a potential fever.
8. CHANGING BETWEEN CELSIUS AND
FAHRENHEIT
This thermometer can display temperature measurements in either Celsius or
Fahrenheit. To switch the display between °C and °F, simply turn OFF the unit,
press and hold the START button for 5 seconds; after 5
seconds, the current measurement scale (°C or °F icon) will
ash on the display (Figure 3). Change the measurement
scale between °C and °F by pressing the START button.
When the measurement scale has been chosen, wait for 5
seconds and the unit will automatically enter the ready for
measuring mode.
Figure 3
Figure 2

8
9. MEMORY STORAGE
This thermometer recalls the last 30 readings.
• Recall mode: Press the M-button to enter Recall mode
when the power is OFF. The memory icon << M >> will
ash. (Figure 4)
• Reading 1 - the last reading: Press and release the
M-button to recall the last reading. Number 1 and a
ashing M are displayed. (Figure 5)
• Reading 30 - readings in succession: Press and
release the M-button consecutively to recall the last
30 readings in succession. Pressing and releasing the
M-button after the last 30 readings have been recalled
will resume the above sequence from reading 1.
10. MEASURING SURFACE
TEMPERATURES
1. Press the ON/OFF button, after one beep sounds the thermometer is
ready for use.
2. Aim the thermometer probe at the desired surface and press the START button.
11. CARE AND CLEANING
Use an alcohol swab or cotton tissue moistened with alcohol (70% Isopropyl)
to clean and disinfect the thermometer casing and the measuring probe.
Ensure that no liquid enters the interior of the thermometer. Never use
abrasive cleaning agents, thinners or benzene for cleaning and never immerse
the instrument in water or other cleaning liquids. Take care not to scratch the
surface of the probe lens and the display.
12. BATTERY REPLACEMENT
This thermometer is supplied with one lithium battery type, CR2032.
The battery needs replacing when only the icon is shown
on the display. (Figure 6)
Remove the battery cover by sliding it in the direction shown.
Remove the battery and replace with a new one.
Figure 4
Figure 6
TIME
Figure 5

9
13. ERROR MESSAGES
Display Error
Measured temperature too high:
Displays “H” when measured temperature
is higher than 100°C / 212°F
Measured temperature too low:
Displays “L” when measured temperature
is lower than 0°C / 32°F
Ambient temperature too high:
Displays “H” in conjunction with the “ ”
when ambient temperature is higher than
40°C / 104°F
Ambient temperature too low:
Displays “L” in conjunction with the
“” when ambient temperature is lower
than 10°C / 50°F
Error function display:
The system has a malfunction
Blank display:
Check if the battery has been loaded
correctly. Also check polarity of the battery.
Flat battery indication:
If only the “ ” icon is shown on the
display, the battery should be replaced
immediately.
14. TECHNICAL SPECIFICATIONS
Type 1 Second Ear Thermometer 235DI
Measurement Range 0°C to 100.0°C/32°F to 212.0°F
Resolution 0.1°C/°F
Measurement
Accuracy
Laboratory:
± 0.2°C, 32°C to 42.2°C/
± 0.4°F, 89.6°F to 108.0°F
Display Liquid Crystal Display, 4 digits plus special
icons

10
Acoustic
• The unit is turned ON and ready for
the measurement: 1 short beep
• Complete the measurement:
1 long beep (1 second) if the reading is less
than 37.5°C/99.5°F, 10 short beeps sound,
if the reading is equal to or greater than
37.5°C/99.5°F
• System error or malfunction: 3 short
beep sounds
Memory
• Auto-Display the last measured
temperature
• 30 readings recall in the Memory Mode
Backlight
• The display light will be GREEN for 1
second, when the unit is turned ON.
• The display light will be GREEN for
5 seconds, when a measurement
is completed with a reading less than
37.5°C/99.5°F
• The display light will be RED for
5 seconds, when a measurement is
completed with a reading equal to or
higher than 37.5°C/99.5°F
Operating
Temperature
10°C to 40°C/50°F to 104°F
15% - 95% relative maximum humidity
Storage Temperature 10°C to 40°C/50°F to 104°F
15% - 95% relative maximum humidity
Automatic Switch-O Approximately 1 minute after last
measurement has been taken.
Battery CR2032 Battery 3V - at least 1,000
measurements
Dimensions 139 (L) x 39 (W) x 42 (H) mm
Weight 54.5 g (with battery), 51 g (without battery)
Reference to
Standards
EN 12470-5; ASTM E1965; IEC 60601-1;
IEC 60601-1-2 (EMC)
This device complies with the requirements
of the Medical Device Directive 93/42/EEC.

11
15. 5 YEAR WARRANTY
This product is warranted to be free from defects in material or workmanship
for 5 years. It will be repaired or replaced without charge upon receipt of the
unit prepaid with $5.00 to cover handling, packaging and return postage
to the address below. Please include your full name, address and daytime
phone number or email address.
16975 Leslie Street
Newmarket, ON
L3Y 9A1
www.biosmedical.com
Read the instruction manual carefully before using this device,
especially the safety instructions, and keep the instruction manual for
future use.
Type BF applied part
Batteries and electronic devices must be disposed of in accordance
with the locally applicable regulations, not with domestic waste.
Using the unit in the immediate vicinity of mobile phones, microwave
appliances or other devices with strong electromagnetic elds may result in
impaired functioning.
Protected against solid foreign objects of 12.5 mm diameter and
greater. Protected against vertically falling water drops when the device
is tilted up to 15°.
Expected service life: 5 years
Do not use this device close to strong electromagnetic elds, such as mobile
telephones or radio installations. Keep a distance from such devices when
using this unit.
IEC 60601-1-11 TH5107_JAN032017

THERMOMÈTRE
AURICULAIRE
1 SECONDE
Mode d’emploi

13
235DI
Thermomètre auriculaire 1 seconde
Mode d’emploi
Table des matières
1 Consignes de sécurité importantes
2 Schéma du produit
3Comment ce thermomètre mesure-t-il la
température?
4 Mode d’emploi
5 Réglages de la date et de l’heure
6 Réglage du signal sonore
7Alarme de èvre
8 Commutation entre Celsius et Fahrenheit
9 Stockage des mesures mémorisées
10 Mesure des températures de surface
11 Entretien et nettoyage
12 Remplacement de la pile
13 Messages d’erreur
14 Spécications techniques
15 Garantie de 5 ans

14
Thermomètre auriculaire à infrarouges 1 seconde
Nous vous remercions pour l’achat du thermomètre auriculaire 1 seconde de
BIOS Diagnostics.
Le thermomètre auriculaire 1 seconde de BIOS Diagnostics est un produit
de haute qualité à la ne pointe de la technologie et mis à l’essai selon les
stipulations des normes internationales.
Ce thermomètre doté d’une technologie remarquable peut procurer des
lectures sûres, précises et ables à chaque mesure sur les personnes âgées de
2 ans et plus.
Caractéristiques
Usages multiples (Vaste plage de mesures)
Ce thermomètre comporte une vaste plage de mesures de 0 °C à 100,0 °C
(32,0 °F à 212,0 °F), donc l’instrument peut être utilisé comme un thermomètre
auriculaire pour mesurer la température corporelle ou il peut être utilisé pour
mesurer la température de surface des éléments suivants :
• Température de surface du lait dans un biberon
• Température de surface de l’eau du bain du bébé
• Température ambiante
Mesure en 1 seconde
La technologie infrarouge novatrice permet une mesure auriculaire en
seulement 1 seconde.
Rappel de mesures multiples
Les utilisateurs ont la possibilité de rappeler les 30 dernières mesures en
mode rappel, leur permettant de faire un suivi ecace des variations de
température.
Alarme de èvre
10 signaux sonores brefs et un écran ACL rétroéclairé rouge avertit que la
température du patient est supérieure à 37,4 °C / 99,3 °F.
Sonde lumineuse
Ce thermomètre comporte une sonde à DEL lumineuse qui permet à
l’utilisateur de trouver, à la noirceur, la position exacte dans l’oreille, La
sonde s’allume pendant environ 10 secondes quand le thermomètre est mis
en marche.

15
Technologie “Clean Me”
Après chaque mesure de température, les mots “clean me” clignoteront sur
l’écran ACL pour rappeler à l’utilisateur de nettoyer la sonde. Référez-vous à
la section Entretien et nettoyage.
Précis et able
L’élaboration de l’assemblage de la sonde intègre un capteur infrarouge
perfectionné pour assurer que chaque mesure est précise et able.
Veuillez lire attentivement les consignes de sécurité avant d’utiliser
ce thermomètre et conservez-les ainsi que le thermomètre dans un
endroit sûr.
1. CONSIGNES DE SÉCURITÉ IMPORTANTES
Cet instrument doit être utilisé uniquement pour les usages décrits dans
ce mode d’emploi. Le fabricant ne peut être tenu responsable pour les
dommages causés par une utilisation incorrecte.
N’immergez jamais cet instrument dans l’eau ou dans d’autres
liquides. Pour le nettoyer, suivez les directives dans la section
«Entretien et nettoyage».
• N’utilisez pas cet instrument en présence de dommages visibles. Ne
tentez pas de réparer l’instrument.
• Le cérumen dans l’oreille peut donner une température plus basse, donc
il est important que le conduit auditif du patient soit propre.
• Si la mesure prise sur le patient est inconstante ou de façon suspecte
trop basse, répétez la mesure à toutes les 15 minutes ou revériez le
résultat par une autre mesure de température centrale corporelle.
• Ce thermomètre est composé de pièces de précision de haute qualité.
Ne laissez pas tomber cet instrument. Protégez-le des impacts
importants et des chocs.
• Tenez le thermomètre loin de l’exposition à la lumière solaire directe et
rangez-le dans un endroit sec sans poussière.
• Si le thermomètre n’est pas utilisé pendant un certain temps, la pile
devrait être enlevée.
MISE EN GARDE :
• L’utilisation de ce thermomètre n’est pas conçue pour remplacer une
consultation chez votre médecin.
• Les enfants ne doivent pas utiliser cet instrument sans supervision
parentale; certaines pièces sont assez petites pour être avalées.

16
• Il n’est pas recommandé d’utiliser un thermomètre à infrarouges sur des
enfants âgés de moins de 2 ans.
• Les thermomètres à infrarouges ne doivent pas être utilisés pour
résoudre les inquiétudes reliées à la santé; donc, par conséquent,
les parents ne doivent pas compter uniquement sur les mesures de
température pour gérer l’état de santé de leurs enfants. Si vous avez
des inquiétudes, consultez votre médecin.
2. SCHÉMA DU PRODUIT
1
2
3
4
5
6
1. Sonde de mesure 4. Bouton Marche/Arrêt [ON/OFF]
2. Écran 5. Couvercle du compartiment de la pile
3. Bouton Démarrer [START] 6. Bouton-M (mémoire)
3. COMMENT CE THERMOMÈTRE MESURE-T-IL
LA TEMPÉRATURE?
Ce thermomètre mesure l’énergie infrarouge émise par le tympan et le tissu
environnant. Cette énergie est perçue par la lentille et est convertie en une
valeur de température. La lecture de la mesure obtenue directement du
tympan (membrane tympanique) assure une mesure de température des plus
précises.

17
TIME PM
MONTH DAY
Figure 1
Les mesures prises à partir du tissu environnant du conduit auditif génèrent
des mesures inférieures et pourrait donner un diagnostic erroné de èvre.
4. MODE D’EMPLOI
IMPORTANT: Lors de la première utilisation du thermomètre, retirez la
languette de plastique située dans le compartiment de la pile.
1. En appuyant sur le bouton Marche/Arrêt [ON/OFF], tous
les segments s’acheront pendant 1 seconde (Figure 1).
2. Le thermomètre est prêt à l’emploi après le signal sonore
et l’achage de l’icône clignotante °C/°F. Redressez le canal auditif en
tirant délicatement le milieu de l’oreille vers l’arrière puis vers le haut.
3. Placez la sonde fermement dans le conduit auditif puis appuyez sur le
bouton Démarrer [START] et maintenez la sonde dans l’oreille jusqu’à ce
que le thermomètre émette un signal sonore annonçant la n de la mesure.
La sonde lumineuse à DEL se DÉSACTIVERA une fois que vous aurez
appuyé sur le bouton Démarrer [START] pour prendre la mesure.
environ 1 minute
PRENDRE NOTE :
• Insérez toujours le thermomètre dans la même oreille, la même direction
et la même profondeur.
• Nettoyez toujours la sonde en conséquence avant et après chaque
mesure (référez-vous à la section Entretien et nettoyage).
• Il est recommandé de prendre 3 mesures dans la même oreille. Si les 3
mesures sont diérentes, choisissez la mesure la plus élevée. (Attendez
30 secondes entre chaque mesure).
• Détendez-vous dans un environnement calme et évitez les exercices et
un bain 30 minutes avant la mesure de température.
• Les mesures provenant de régions de mesure diérentes ne doivent
pas être comparées car la température corporelle normale varie selon la
région de mesure et l’heure de la journée. La température peut être plus
élevée le soir et plus basse environ une heure avant le réveil.
Plages d’une température corporelle normale :
− Axillaire : 34,7 à 37,3 °C / 94,5 à 99,1 °F

18
− Buccale : 35,5 à 37,5 °C / 95,9 à 99,5 °F
− Rectale : 36,6 à 38,0 °C / 97,9 à 100,4 °F
− Auriculaire : 35,4 à 37,4 °C / 95,7 à 99,3 °F
5. RÉGLAGES DE LA DATE ET DE L’HEURE
1. Quand une nouvelle pile est mise en place ou en appuyant et en tenant
enfoncé le bouton-M pendant 3 secondes, l’année s’achera sur l’écran.
Vous pouvez changer l’année en appuyant sur le bouton Démarrer
[START]. Pour conrmer l’année, appuyez sur le bouton-M. Les chires
du mois clignoteront.
2. Appuyez sur le bouton Démarrer [START] pour régler les chires du mois.
Appuyez sur le bouton-M pour conrmer.
3. Suivez les étapes suivantes pour régler le jour, le mode du format 12/24
heures, les heures et les minutes.
MONTH DAY
TIME TIME
4. Dès l’instant où vous avez réglé les minutes et appuyé sur le bouton-M, la
date et l’heure sont réglées et l’heure s’ache.
− Si aucun bouton n’est appuyé pendant 20 secondes, le thermomètre
commute automatiquement à l’écran de mesure.
− Pour annuler la conguration de l’heure, appuyez sur le bouton Marche/
Arrêt [ON/OFF] pendant la conguration de l’heure. L’écran ACL
achera les icônes de la Date / Heure puis “--:--”. Appuyez sur le bouton
Marche/Arrêt [ON/OFF] pour commencer la mesure. Si aucune autre
action n’est prise pendant 60 secondes, le thermomètre se FERMERA
automatiquement.
6.RÉGLAGE DU SIGNAL SONORE
1. Le thermomètre FERMÉ, appuyez et tenez enfoncé le
bouton Marche/Arrêt [ON/OFF] pendant 5 secondes
pour régler le signal sonore (Figure 2).
2. Appuyez encore une fois sur le bouton Marche/Arrêt
[ON/OFF] soit pour activer ou désactiver le signal
sonore. Le signal sonore est activé quand l’icône du
signal sonore n’est pas biée.
NOTE : Si aucun bouton n’est appuyé pendant 5 secondes, le thermomètre
commute automatiquement au mode de mesure.
Figure 2

19
Figure 3
7. ALARME DE FIÈVRE
Si le thermomètre détecte une température corporelle supérieure à 37,4 °C
/99,3 °F, il émettra 10 signaux sonores brefs et l’écran ACL sera rétroéclairé
ROUGE, signiant une possibilité de èvre.
8. COMMUTATION ENTRE CELSIUS ET
FAHRENHEIT
Ce thermomètre peut acher des mesures de
température soit en Celsius ou en Fahrenheit. Pour
commuter l’achage entre °C et °F, fermez simplement
l’instrument, appuyez et tenez enfoncé le bouton
Démarrer [START] pendant 5 secondes. Après 5
secondes, l’échelle de mesure en cours (icône °C ou
°F) clignotera sur l’écran (Figure 3). Changez l’échelle
de mesure entre °C et °F en appuyant sur le bouton
Démarrer [START]. Dès que l’échelle de mesure a été
choisie, attendez 5 secondes et l’instrument accédera
automatiquement à l’échelle du mode de mesure.
9. STOCKAGE DES MESURES MÉMORISÉES
Ce thermomètre rappelle les 30 dernières mesures.
• Mode Rappel : Appuyez sur le bouton-Mpour accéder
au mode Rappel lorsque l’instrument est FERMÉ.
L’icône mémoire << M > clignotera.
(Figure 4)
• Mesure 1 – la dernière mesure : Appuyez et relâchez
le bouton-M pour rappeler la dernière mesure. Le
chire 1 et un M clignotant sont achés.
( Figure 5)
• 30 mesures – lectures successives : Appuyez et
relâchez le bouton-Mconsécutivement pour rappeler
les 30 dernières mesures. En appuyant et en relâchant
le bouton-M après le déroulement des 30 dernières mesures, la séquence
ci-dessus reprendra à partir de la Mesure 1.
10. MESURES DES TEMPÉRATURES DE SURFACE
1. Appuyez sur le bouton Marche/Arrêt [ON/OFF]; après le signal sonore, le
thermomètre est prêt pour la mesure.
2. Pointez la sonde du thermomètre vers la surface désirée et appuyez sur le
bouton Démarrer [START].
Figure 4
TIME
Figure 5

20
11. ENTRETIEN ET NETTOYAGE
Après chaque usage, utilisez un tampon d’alcool ou un cure-oreille humidié
d’alcool (alcool isopropylique 70 %) pour nettoyer et désinfecter la sonde et
le boîtier du thermomètre. Veillez à ce qu’aucun liquide ne pénètre à l’intérieur
du thermomètre. N’utilisez jamais aucun agent nettoyant abrasif, solvants ou
benzène pour nettoyer et n’immergez jamais l’instrument dans l’eau ou dans
d’autres liquides de nettoyage. Prenez soin ne pas égratigner la lentille de la
sonde et la surface de l’écran.
12. REMPLACEMENT DE LA PILE
Ce thermomètre est fourni avec une pile au lithium CR2032.
La pile doit être remplacée seulement lorsque l’icône
s’ache sur l’écran. (Figure 6)
Retirez le couvercle du compartiment de la pile en le
glissant dans la direction indiquée. Retirez la pile et
remplacez-la par une pile neuve.
13. MESSAGES D’ERREUR
Achage Erreur
Température mesurée trop élevée :
Ache “H” quand la température mesurée
est supérieure à 100 °C / 212 °F
Température mesurée trop passe :
Ache “L” quand la température mesurée
est inférieure à 0 °C / 32 °C
Température ambiante trop élevée :
Ache “H” en concomitance avec le
symbole “ ” lorsque la température
ambiante est supérieure à 40 °C / 104 °F
Figure 6
Table of contents
Languages:
Other Thermor Thermometer manuals

Thermor
Thermor BIOS 120SC User manual

Thermor
Thermor PS200 User manual

Thermor
Thermor Be Better RX531 User manual

Thermor
Thermor Be Better RX533 User manual

Thermor
Thermor 312TX User manual

Thermor
Thermor Be better FlexTip RX535 User manual

Thermor
Thermor BIOS Diagnostics 237DI User manual

Thermor
Thermor BIOS Diagnostics 1671 User manual

Thermor
Thermor BIOS Diagnostics 238DI User manual

Thermor
Thermor BIOS Diagnostics 227Di User manual