ThermOweld CRE-1 User manual

The Contractors Choice
thermOweld®
+1 (918) 627-5210 • 1-800-558-1373 • WWW.THERMOWELD.COM
ELECTRICAL GROUNDING • CATHODIC PROTECTION • ELECTRIC UTILITY • RAIL
thermOweld®Tel. +1.800.558.1373
4102 South 74th East Ave Tel. +1.918.627.5210
Tulsa, OK 74145 USA www.thermoweld.com
INSTRUCTIONS FOR THERMOWELD GROUNDING CONNECTIONS - CABLE TO REBAR
CRE-1†
Place end of cable to center of tap
hole. Follow instructions on reverse
side for proper use of copper shim
stock or packing pad.
CRE-2
Butt end of cable against rebar. Follow instructions on
reverse side for proper use of copper shim stock.
CRE-3†
Place cable and rebar into mold. Do not cut run cable.
Followinstructionsonreversesideforproperuseofcopper
shim stock or packing pad.
CRE-4†
Place cable and rebar into mold. Follow instructions on
reversesideforproper useof coppershim stockor packing
pad.
CRE-5†
Place cable and rebar into mold. Do not cut run cable.
Followinstructionson reversesideforproper useofcopper
shim stock or packing pad.
CRE-6†
Buttcableagainstrebar. Followinstructionsonreverseside
for proper use of copper shim stock or packing pad.
ECN 2422 REV "J" 1/5/11 34-5381-10
† Depending on weld type and rebar size, mold may go
around or be placed onto rebar.

1-800-558-1373 • SALES • SERVICE • TECHNICAL SUPPORT • VISIT www.thermOweld.com
t
h
e
r
m
O
w
e
l
d
®
Z
Z
E
E
Patented
E
Z
L
i
t
e
®
M
o
l
d
GENERAL SAFETY INSTRUCTIONS
1. Always wear proper clothing, safety glasses and gloves when
exothermic welding.
2. Only weld items mold is designed for.
3. Do not use worn or broken molds which could cause leakage
of molten weld metal.
4. Make sure that the material being welded fits in the mold
properly and that the mold will close tightly around them.
5. Do not alter molds or accessories without factory
authorization.
6. Avoid breathing concentrations of smoke, as it may be
hazardous to your health.
7. Avoid contact with hot materials.
8. Remove or protect fire hazards in the welding area.
9. Avoid moisture and contaminants in the mold and materials
being welded. Contact of molten weld metal with moisture or
contaminants may cause weld metal to spew out of mold.
10. When welding to pipe or vessels, you should consider
the following:
a.the effect welding may have on structural members
and thin wall pipe or vessels.
b.pipe or vessels that are pressurized or contain (or
have contained) flammable, explosive or hazardous
materials should be evaluated in the case of a melt-
through or hot molten weld metal coming in contact
with any flammable, explosive or hazardous materials.
11. Failure to abide by the above and follow welding procedures
may result in improper welds, damage to the material being
welded or create hazardous situations for the individual.
PREPARATION OF CABLE
1. Cable must be bright, clean and dry.
2. Cable that is saturated with oil or grease must be cleaned.
Cable may be cleaned by burning it off with a torch (gasoline
blow torch, butane torch, acetylene torch) After burning off oil
or grease, a wire brush should be used to remove residue.
Wet cable must be dried out. Use a hand torch.
3. Corroded cable must be cleaned. Use the 38-0135-00
cablecleaningbrushoracardclothbrush. Itisimportantthat
the ends of the individual strands are clean. This can best be
accomplished by making a fresh cut on the end of the cable.
4. Cable should be straightened before clamping mold in place.
Bent or out of round cable will hold mold open and cause leaks.
5. For hard drawn cable or cable under tension, use 38-0330-00
cable clamp.
6. Remove insulation from insulated cable before cutting with
hacksaw. Otherwiseendsofstrandswillbecomecoatedwith
insulating material which may cause defective welds.
7. FLEXIBLE CABLE
A sleeve must be used when welding flexible cable.
38-0329-00 wrap sleeves are recommended for 300 MCM
and smaller cable.
PREPARATION OF REINFORCING BAR
NOTE: The use of ThermOweld exothermic connections on
rebar can have an effect on the rebar’s structural
strength. Consideration as to weld location should
be made before actual welding. Area under minimum
stress is preferred.
1. Surface to be welded must be bright, clean and dry.
2. Remove rust and mill scale with coarse file or grinder.
3. Remove oil, grease or pitch coatings with solvent or torch.
USING COPPER SHIM STOCK AND PACKING PAD
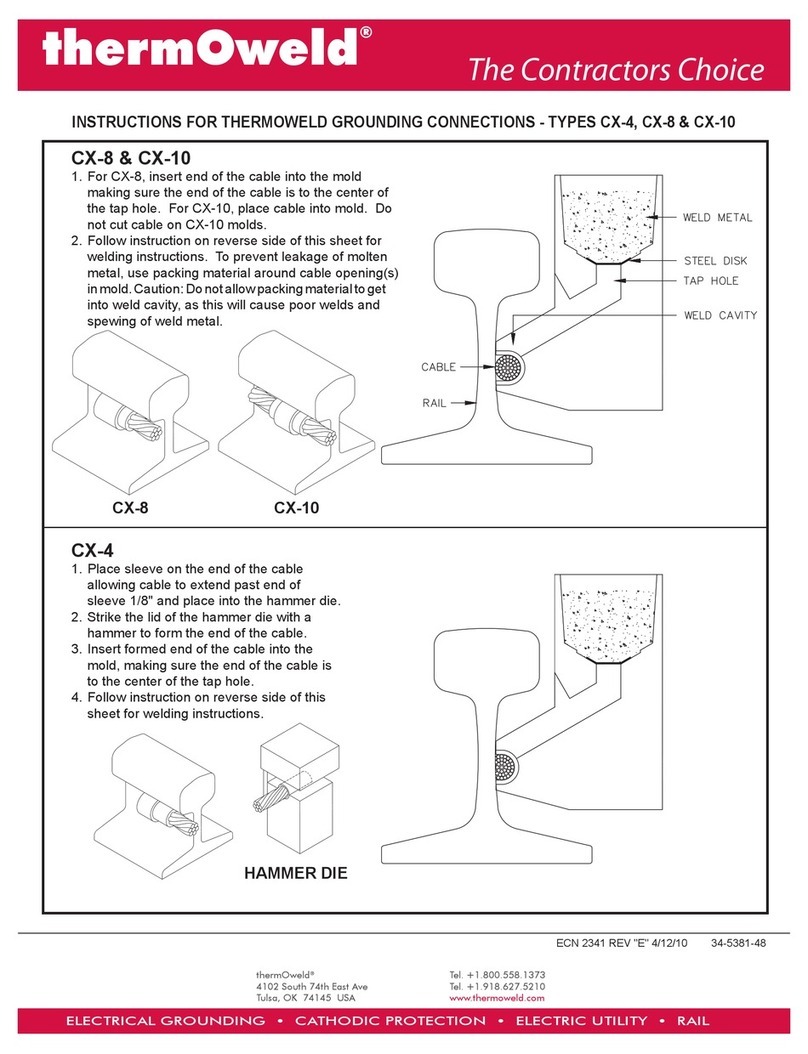
1. For molds requiring copper shim stock, wrap one copper
shim tightly around rebar on each side of area to be welded.
2. For molds requiring packing pad, form pad to rebar with hole
running lengthwise over cleaned area of rebar. Press mold
over pad with ends of pad even with edges of the mold.
Secure backing plate when required.
WELDING PROCEDURE
1. Checkmoldtagformaterialtobeweldedandpropercartridge
size to use.
2. Make sure all surfaces and conductors are clean, dry and are
the proper sizes for the molds application per mold tag.
3. Molds can be dried by heating to approximately 250ºF. Molds
may be dried with a hand operated butane torch or by firing a
charge in the mold before making the desired weld.
4. Position mold onto conductor(s). See front of this sheet for
positioning of conductors into mold. Lock mold with handle
clamps or frame, whichever is the case.
5. Insert steel disk being sure it is directly centered over the
tap hole. Failure to insert disk into mold or failure to seat the
disk properly can create an improper weld and may cause
mold to spew weld metal.
6. Pour proper weld cartridge(s) into crucible being careful not to
loosen all the starting powder while pouring weld metal into
mold. Use of wrong weld cartridge can cause improper welds
or damage to molds.
7. Close the lid of the mold and place a small amount of starting
powder in the ignition pocket.
OR
Insert the EZ Lite®ignitor in the connector of thermOweld EZ
Lite Remote™ Unit. Close the lid and place the ignitor in the
top opening of the EZ Lite®Lid allowing the connector to rest
on the lid.
8. Before igniting, verify conductor positioning and that mold is
closed completely.
9. Ignite the starting powder with the flint ignitor. Pull flint ignitor
away from starting powder right after trigger is pulled to keep
from fouling flint ignitor. (Do not place any exposed body part
directly over lid or in front of lid opening.)
OR
Turn the power button to the “ON” position on the EZ Lite
Remote™ Unit followed by the “operate” button until the
exothermic reaction is initiated.
10. Wait for 15 seconds before opening mold to allow weld metal
to cool.
11. To clean the mold, use a natural bristle brush, soft cloth or
newspaper before making next weld. On horizontally split
molds, use a small diameter rod or screw driver to remove
slag from tap hole. Caution should be used when cleaning
molds to avoid burns from contact with hot mold.
DO NOT USE WIRE BRUSH TO CLEAN MOLD!
NOTE: 1.A fouled flint ignitor may be cleaned by soaking in
house hold ammonia.
2.Proper cartridge size is marked on mold tag and
shown on the bottom of the cartridge tube.
3.Cartridge size is the approximate weight of the powder
in grams. When the cartridge size specified is not
available, two or more smaller cartridges or part of a
larger cartridge may be used. Care should be taken
not to mix starting material in-between cartridges.
4.HandleClampadjustmentsmaybemadebyremoving
cotter pin and clevis pin and turning eye bolt one turn
clockwise to tighten or one turn counter clockwise to
loosen.
This manual suits for next models
5
Other ThermOweld Welding Accessories manuals
Popular Welding Accessories manuals by other brands
GULLCO
GULLCO 50 Operating instructions & safety information
Rothenberger
Rothenberger P63-S6 instruction manual
PROFAX
PROFAX WP-500 operating instructions
Leister
Leister WELDING PEN S operating instructions
Kemppi
Kemppi MTP 350 operating manual

Inverter Fusion
Inverter Fusion Fusion MultiClean operating instructions
EWM
EWM UM 24 G EZA quick start guide
COWLEY INDUSTRIES
COWLEY INDUSTRIES LM05 Installation and operating instructions

Leister
Leister FUSION 1 operating instructions
FRONIUS
FRONIUS MTG 250i operating instructions
Welbilt
Welbilt SOLAR POWEREDAUTO-DARKENING WELDING HELMET owner's manual
FRONIUS
FRONIUS WF 25i Case D200 operating instructions

