TheSpace Neovide NSV500 User manual

Neovide 丨An All-in-One Sous Vide Cooker
User Manual
Model: NSV500

2
Select your language
User Manual ....................................................................................3
Manual de uso .............................................................................. 29
Mode d’emploi.............................................................................. 57
Bedienungsanleitung ....................................................................85
Manuale dell’utente .....................................................................113

3
User Manual

4
Contents
Important Safeguards ............................................................................ 5
Specs ........................................................................................................6
Know Your Neovide................................................................................7
Control Panel .......................................................................................... 8
Cooking Guidelines ..............................................................................10
Use Your Neovide .................................................................................11
Food probe .................................................................................... 11
Drip tray......................................................................................... 12
Before using .................................................................................. 12
NeoVide mode.............................................................................. 12
Manual mode................................................................................ 14
Marinate mode ..............................................................................15
Marinate NeoVide mode ............................................................. 16
Mild Sear mode ............................................................................ 17
Connect to the App.............................................................................. 18
How to connect to Wi-Fi..............................................................18
How to use the app ......................................................................20
Care and Cleaning ............................................................................... 23
Troubleshooting .................................................................................... 24
COMPLIANCE ...................................................................................... 27
WARRANTY INFORMATION............................................................ 28

5
Important Safeguards
When using this product, please always follow the instructions:
Read the user manual before using the product.
Connect only to the specified power indicated on the product tag.
Use the product on a dry, steady, and firm work surface.
Plug the product into an indoor grounded outlet with a circuit breaker.
Keep the cord and plug dry to protect against electric shock.
Disconnect the power before moving or cleaning the product, or when it is not in use.
To disconnect, remove the cord by grasping and pulling out the plug. Never unplug by
pulling on the cord.
Do not operate the product if the cord or plug is damaged.
Do not use multi-plug adapters and extension cords.
Do not touch hot parts such as the lid, the chamber, and the probe when the product is
operating or before it cools down.
Do not touch the tip of the food probe to avoid injury.
Do not submerge the probe in water when cleaning the machine to avoid damaging it.
Do not place any other objects, especially metal ones, in the chamber where the inner
tray is placed.
Keep the product out of reach of children and away from persons with reduced
physical, sensory, or mental capabilities.
If the product malfunctions or has been damaged, do not use it again. Consult
professional personnel for inspection or maintenance.
This product may be used with aluminum foil. Please use aluminum foil that is certified
by FDA and LFGB. Aluminum foil is temperature resistant up to 752℉(400℃) to 1112
℉(600℃) and is commonly used in aviation food containers and other industries.
The highest temperature used in this product for sous vide cooking is only 203 ℉
(95 ℃), so it is safe to use aluminum foil to wrap food during heating. Additionally,
aluminum foil is recyclable and environmentally friendly.
This product is only intended for its set purposes.

6
Specs
Model
NSV500
Power supply
US 110-120 V,
60 Hz
EU 220-240 V,
50 Hz
JP 100V, 50/60Hz
Power
1500W
1450W
1250W
Vacuum pump pressure
-23"Hg±5% / -779mbar±5%
Flow rate
11L/min±10%
Tray capacity
8.6L
Product dimensions
23.1" x 13.5" x 11.6" (587mm x 343mm x 294mm)
Chamber dimensions
15" x 10.2" x 3.5" (380mm x 260mm x 90mm)
Temperature range
(NeoVide/Manual mode)
68-203°F (20-95°C)
Timer
(Manual mode)
0:05-99:59
Temperature range
(Mild Sear mode)
302°F-410°F (150°C-210°C)
Timer
(Mild Sear mode)
0:01-00:30
Timer
(Marinate mode)
0:05-00:50 (1-10 cycles, every 5min is a cycle)
Weight
30.6lb (13.9kg)
Working conditions
Temperature: 41-95°F (5-35°C), Humidity: ≤85%
Connectivity
Wi-Fi 802.11 b/g/n 2.4 GHz
Bluetooth 5.0
Apps
iOS / Android

7
Know Your Neovide
①Gasket ②Food probe ③Lid ④Inner tray ⑤Lid button
⑥Control panel ⑦Lid handle ⑧Tray handle ⑨Power port ⑩Drip tray
⑩
①
②
④
⑤
③
⑦
⑧
⑥
⑨

8
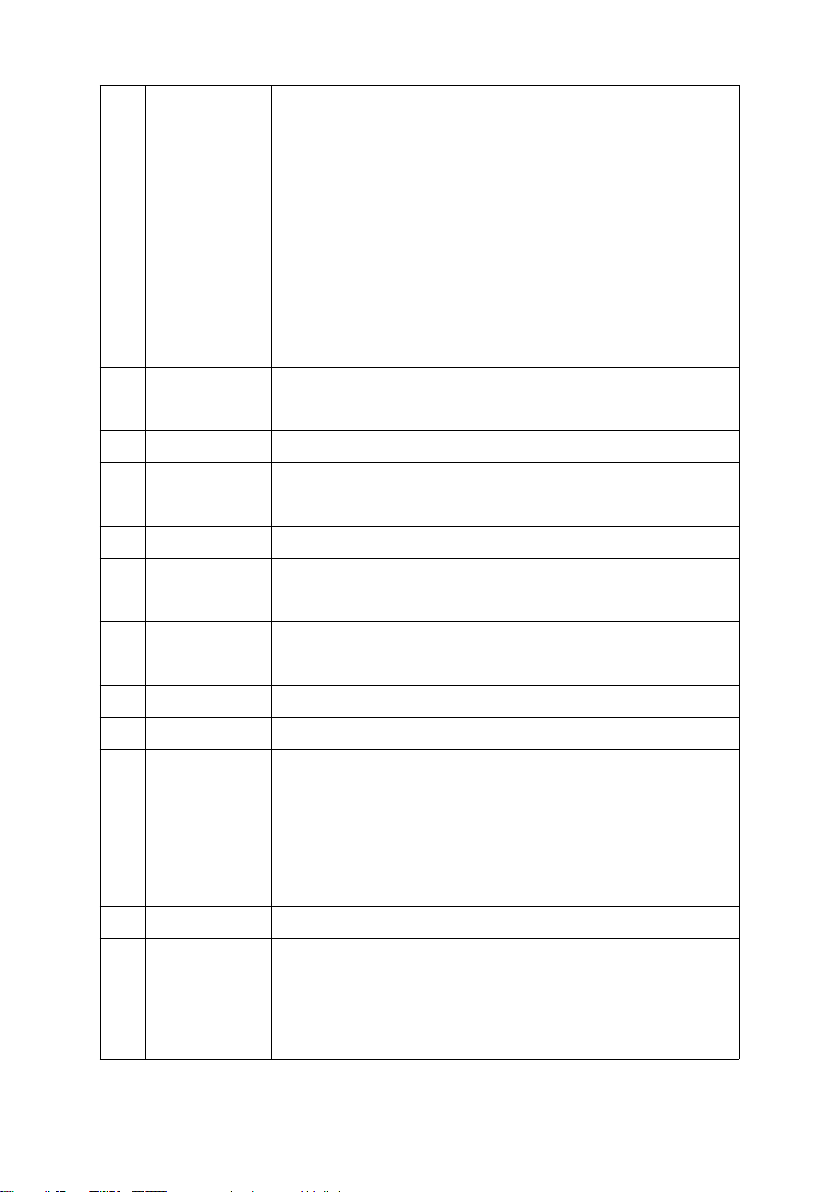
Control Panel
No.
Button/Indicator
Description
1
Power
-Plug into the electrical outlet, and the device is on the power
saving mode, with only the power button slightly bright.
-Press the "Power" button to enter standby status, in which the
"NeoVide" button lights up, and other buttons are slightly lit.
-In standby status or during operation, press the "Power"
button to return to power saving mode.
2
NeoVide
-Press the button to select NeoVide mode. The icon will light
up.
-Insert the probe into the food core while in this mode. The
display will show the food's internal temperature.
3
Manual
-Press the button to select Manual mode. The icon will light up.
-In this mode, you can manually set the time and temperature,
and do not need to use the probe.
4
Marinate
Press the button to select Marinate mode. The icon will light up.
5
Mild Sear
Press the button to select Mild Sear mode. The icon will light up.
11
1
3
4
2
5
6
8
7
9
10
12
13
14
15
16
9
6
Set
Settings: After selecting the target mode, you can press this button
and enter temperature and time settings. When the number on the
display flashes, turn the knob to adjust temperature and time.
View settings: During operation, press and hold the "Set" button for
about 3 seconds, and you can check the time and temperature
settings.
If there is no operation in the setting mode, the number on the
display will flash 10 times before the device automatically exits the
settings.
7
Knob
Adjust the target time and temperature by turning the knob when
the corresponding number on the display flashes.
8
Start/Stop
Press the button to start the machine in the selected mode.
9
Temperature
display
Displays the current temperature or the set temperature.
10
Time display
Displays the operating time or the set time.
11
°C/°F
In standby mode, press and hold the "Manual" and "Marinate"
buttons for a few seconds to switch the temperature units: °C or °F.
12
Wi-Fi indicator
The Wi-Fi indicator is on when the device is connected to the
mobile app.
13
Heating
When this icon is on, it means the device is heating up.
14
Vacuum pump
When this icon is on, it means the device is vacuuming.
15
Lock/Unlock
When the "unlock" icon is on, the lid can be opened.
When the "lock" icon is on, it means that the machine is working,
and the lid is not allowed to open. If you want to open the lid, you
need to stop the machine, and open it when the "unlock" icon lights
up.
16
Lid button
Press the lid button to open the lid.
17
Restore factory
settings
In the standby mode, long press the "Mild Sear" button and
"Manual" button simultaneously for 3 seconds. When you hear a
"beep" sound, the machine switches to NeoVide mode (the
displayed temperature is 60°C and the timer is 24:00), then you can
release the buttons. The machine is then under factory settings.

10
Cooking Guidelines
1. For regularly-shaped foods that are sliced or chunked, such as steak, pork chops,
chicken breast, salmon, and more, we recommend using the NeoVide mode with the
food probe. To use this mode, place the food on the bottom of the chamber and insert
the food probe firmly into the center of the food. If the meat is thicker than 4cm, we
recommend wrapping it in aluminum foil before placing it in the chamber to keep it
moist and evenly heated.
2. For foods that may not be easy to insert the probe, we recommend using the Manual
mode. In this mode, you can set the time and temperature like traditional sous vide.
Using water and bags is optional, giving you more flexibility in your cooking.
3. When cooking vegetables, it is essential to set the appropriate time and temperature.
Like traditional sous vide, some vegetables can release gas and spoil if cooked under
vacuum for too long.
11
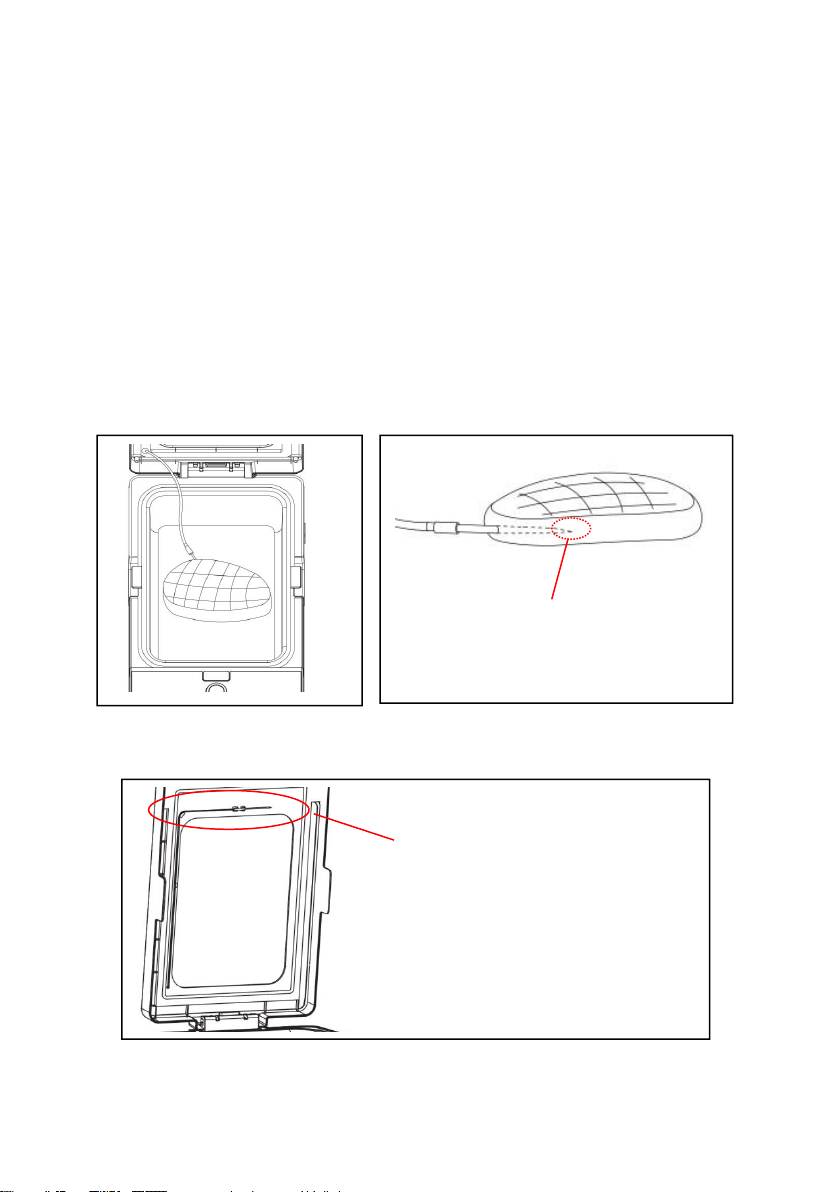
Use Your Neovide
Food probe
▪ In NeoVide mode, the food probe must be inserted into the food center.
Note: The tip of the food probe (10mm) is the temperature sensor. When using the
probe, make sure this portion is inserted into the food core. It is recommended to
insert the probe from the side of the food and into its core to ensure a firm insertion.
When it is not convenient to do so, you can also insert it from the food surface, but
also make sure the probe is inserted to the core and fixed tightly. Otherwise, the
detected temperature may be inaccurate.
▪ Attach the food probe to the clip under the lid if it is not in use.
Attach the food probe to the clip
under the lid if it is not in use.
Make sure the probe is inserted into the
food core and fixed tightly.

12
Drip tray
The drip tray is set at the back of the machine for storing the liquid generated in the cooking
process.
Before using
▪Plug into the electrical outlet, and the device is in power-saving mode, with only the power
button slightly lit.
▪Press the "Power" button to enter standby status, in which the "NeoVide" button lights up
and other buttons are slightly lit.
▪Press and hold the "Manual" and "Marinate" buttons simultaneously for about 3 seconds to
switch the temperature unit of °C or °F. (It will be saved as the default unit.)
NeoVide mode
In NeoVide mode, the probe monitors and controls the temperature of the food core
accurately, achieving truly precise sous vide cooking. To use this mode, simply set the target
temperature, without needing to consider the time setting. You can experiment with different
temperature settings to create your own unique dishes that suit your taste preferences.
(NeoVide mode is on when the "NeoVide" icon is lit.)
1. Press the "NeoVide" button to enter NeoVide mode. In this mode, the probe is used and
the food temperature is displayed.
2. Press the "Set" button, and turn the knob to adjust the temperature.
3. Press the lid button to open the lid.
Snap it

13
4. Place the food in the tray, take the probe off the lid and insert it into the food. Make sure
the probe is inserted into the food core and fixed tightly.
5. Close the lid and press the "Start/Stop" button, and the machine will start vacuuming and
heating.
6. When reaching the set temperature, the machine will beep and automatically enter
"keep-warm" mode. In this mode, the upper display shows "Hold", the lower display shows
the holding time. You can press “Start/Stop” to end the work.
Note: During the first five minutes of this mode, the machine will beep three times
at one-minute interval.
7. When the set program is completed, the "Unlock" indicator is on and the lid can be opened
at any time.
Note: The lid can only be opened when the "Unlock" icon is on. During operation,
the "Lock" icon is on, and it is not allowed to open the lid. If you want to open the lid,
press the "Start/Stop" button to stop the work.
When the food is thicker than 4 cm, we suggest
wrapping the food with aluminum foil.

14
Manual mode
For foods that are not suitable to be inserted with the probe, such as soups, eggs, irregularly
shaped vegetables, you can use Manual mode. In this mode, you can set the time and
temperature like traditional sous vide, but using water and bags is optional, providing more
flexibility in your cooking.
(Manual mode is on when the "Manual" icon is lit.)
1. Press the "Manual" button.
2. Press the "Set" button to switch to settings and adjust temperature and time with the knob
when the corresponding number flashes.
3. Press the lid button to open the lid.
4. Choose the suitable cooking method for the food.
Note: When using the above methods, please fix the food probe in its clip, and do not
immerse it in water to avoid damage.
5. Close the lid and press the "Start/Stop" button to start the task.
6. When reaching the set temperature, the machine emits a "beep" sound and enters the
countdown.
Note: If you want to enter the countdown before reaching the set temperature, press
the "Start/Stop" button again, and the machine will enter the countdown.
7. When the countdown ends, the machine will beep and automatically enter "keep-warm"
mode. In this mode, the upper display shows "Hold", the lower display shows the holding
Method ①: Put the food
directly in the tray.
Method ②: Add
water/sauce/soup and
food to the tray.
Method ③: Vacuum pack
the food and add water to
the tray.

15
time. Press the "Start/Stop" button to end the work.
Note: During the first five minutes of the keep-warm mode, the machine will beep three
times at one-minute interval.
8. When the task is completed, the "Unlock" indicator is on and the lid can be opened at any
time.
Note: The lid can only be opened when the "Unlock" indicator is on. During
operation, the "Lock" indicator is on, and it is not allowed to open the lid. If you want
to open the lid, press the "Start/Stop" button to stop the work.
Marinate mode
(Marinate mode is on when the "Marinate" icon is lit.)
1. Press the "Marinate" button, and the machine will enter Marinate mode.
2. Press the "Set" button, and set the time with the knob.
3. Press the lid button to open the lid, and place the food in the tray. The food can be stacked
up.
4. Close the lid and press the "Start/Stop" button, and the machine will start marinating.
5. When the marinating time counts down to 0, the machine will beep three times.
6. When the task is done, the "Unlock" icon lights up, and you can open the lid to take out the
food.
Note: The lid can only be opened when the "Unlock" icon is on. During operation,
the "Lock" icon is on, and it is not allowed to open the lid. If you want to open the lid,
press the "Start/Stop" button to stop the work.
The food can be stacked up.

16
Marinate NeoVide mode
(Marinate NeoVide mode is on when the "Marinate" and "NeoVide"
icons are lit.)
1. Press "Marinate" and "NeoVide" buttons, and the machine will enter Marinate NeoVide
mode. In this mode, the machine first starts marinating, then sous vide with the probe
being used.
2. Press the "Set" button to switch to settings, and when the corresponding number flashes,
adjust the time for marinating and the temperature for sous vide with the knob.
3. Press the lid button to open the lid, and place the food in the tray.
4. Take the probe off the lid and insert it into the food. Make sure the probe is inserted into
the food core and fixed tightly.
5. Close the lid, press the "Start/Stop" button, and the machine will first start the marinate
mode and then the NeoVide mode.
6. When reaching the set temperature, the machine will beep and automatically enter
"keep-warm" mode if the "Start/Stop" button is not pressed. In this mode, the upper display
shows "Hold", the lower display shows the holding time. During the first five minutes of this
mode, the machine will beep three times at one-minute intervals.
7. When the task is completed, the "Unlock" icon is on and the lid can be opened at any time.
Note: The lid can only be opened when the "Unlock" icon is on. During operation,
the "Lock" icon is on, and it is not allowed to open the lid. If you want to open the lid,
press the "Start/Stop" button to stop the work.
When the food is thicker than 4 cm, we
suggest wrapping the food with aluminum foil.

17
Mild Sear mode
(Mild Sear mode is on when the "Mild Sear" icon is lit.)
1. Press the lid button to open the lid.
2. Press the "Mild Sear" button to enter the mode.
3. Press the "Set" button and adjust the time and temperature by turning the knob when the
corresponding number flashes.
4. Press the "Start/Stop" button to start heating.
Note: If "Clos" is displayed after pressing "Start/Stop", it means that the lid is
closed and you should open the lid to start.
5. Make sure the tray is dry before adding cooking oil.
6. When reaching the set temperature, the machine will make a "beep" and start counting
down. At this time, you can put the food in the tray and start searing. In the process, you
can flip the food at the appropriate time.
Note: If you want to start searing before the set temperature is reached, press the
"Start/Stop" button and the machine will start counting down, and then you can put
the food in.
7. When the countdown is over, the machine beep three times, and the task is done.
Note: If the countdown is not over, press the "Start/Stop" button, and the machine
will stop working.

18
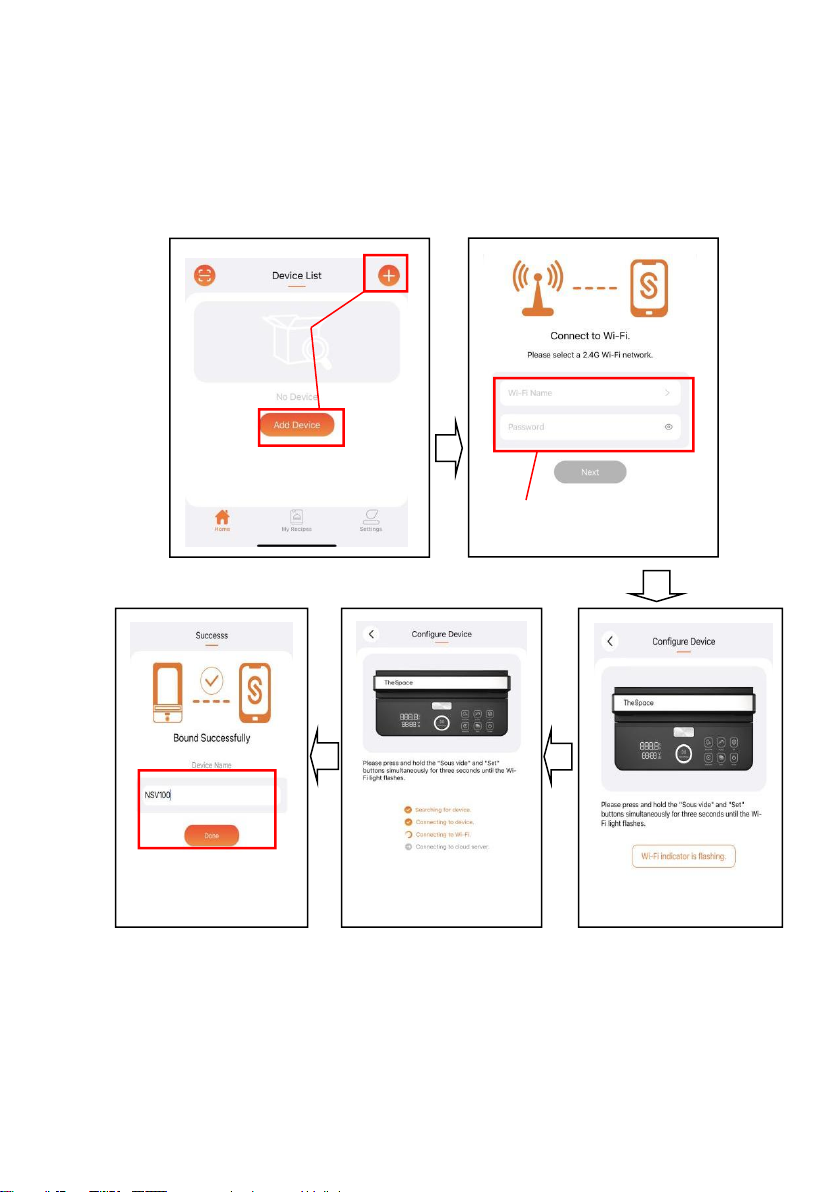
Connect to the App
How to connect to Wi-Fi
1. Download "The Space" app:
iOS:Go to the App Store and search "The Space Sous Vide". Download and install the
app with the above icon.
Android:Go to Google Play and search "The Space". Download and install the app
with the above icon.
2. Open the app, create your account and log in.
If you have an account already,
log in directly.
If you are a new user, please create
an account.
You can also login with your Apple or
Google account.
Check the box
19
3. Add your device
Tap the "+" or "Add Device" button → Select your Wi-Fi and enter the password → Press
and hold the "Manual" and "Set" buttons simultaneously until the Wi-Fi indicator flashes →
Wait for connection → Name your device
Note: The product image on the app UI may be different as there are different
models of products. But it will not affect your operation and control.
Select your Wi-Fi and enter
password
Name your device
Wait for connection
Click the “+” or “Add
Device” button
20
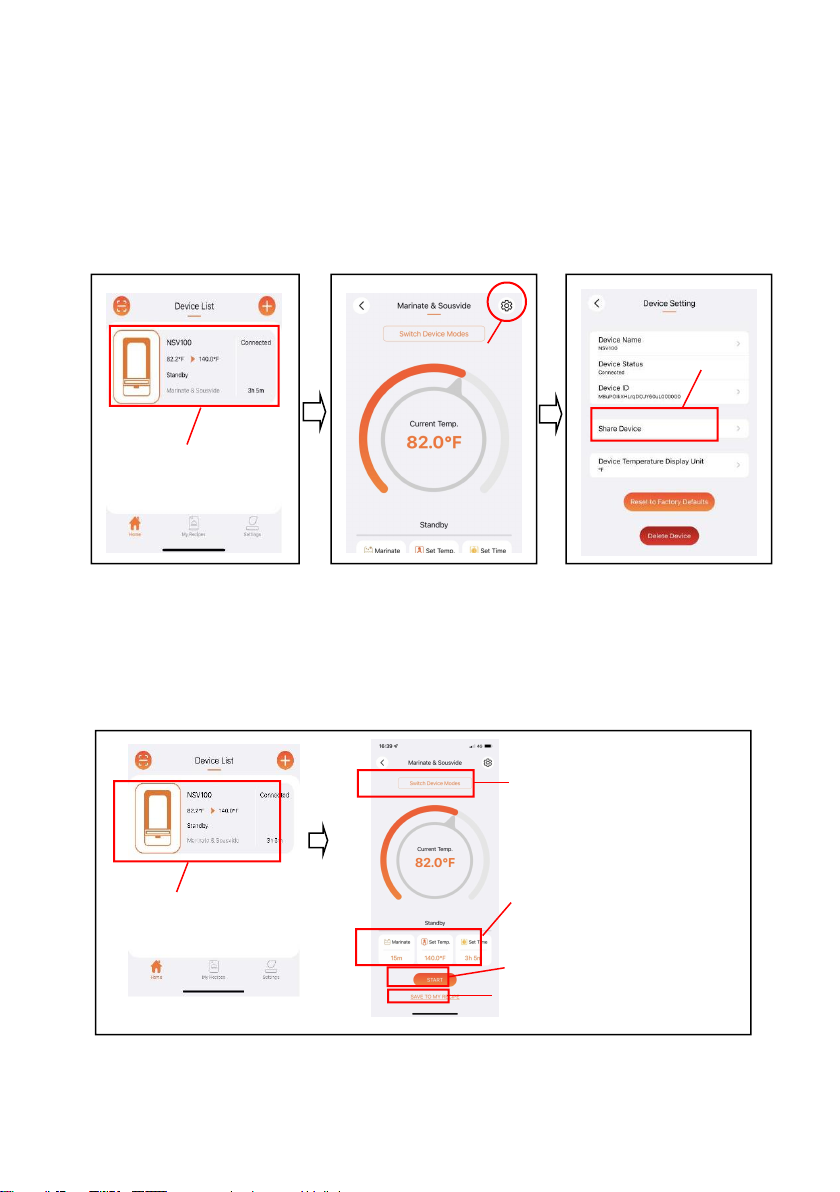
**Share your device:
You can share your device with others on The Space app. Go to the Setting page of the
device, click "Share Device" and a QR code will be created. Scan the QR code with The
Space app of another user: Go to the Home page of the app, click the icon at the top left
corner and scan it.
How to use the app
1. Home:
Choose the device mode and set the time and temperature to get started. Your settings
can be saved as a recipe for future use.
Click the device
Select device mode
Set time & temperature
Get started
Save your settings to recipes
Click the device
Click the icon
Click “Share Device”
and get the QR code
This manual suits for next models
1
Table of contents
Languages:


