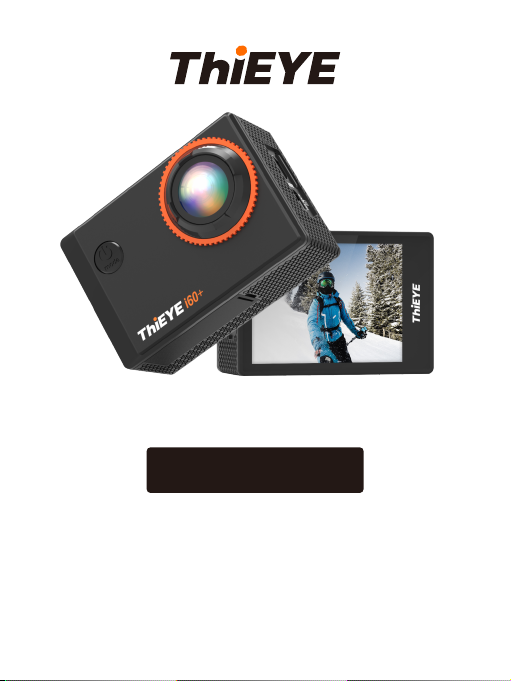
THIEYE i60+ User manual
www.thieye.com
Action Cam i60+
USER MANUAL
ThiEYE Social Media
Facebook YouTubeOfficial Website
USER MANUAL
Hướng dẫn sử dụng
Deutsche Anleitung
Guida di Operazione Rapida
取り扱い説明書
Инструкция пользователя
Hướng dẫn sử dụng
Guía de Inicio Rápido
01
27
53
79
105
131
157
183
.......................
....................
....................
.............
.......................
...............
....................
..................
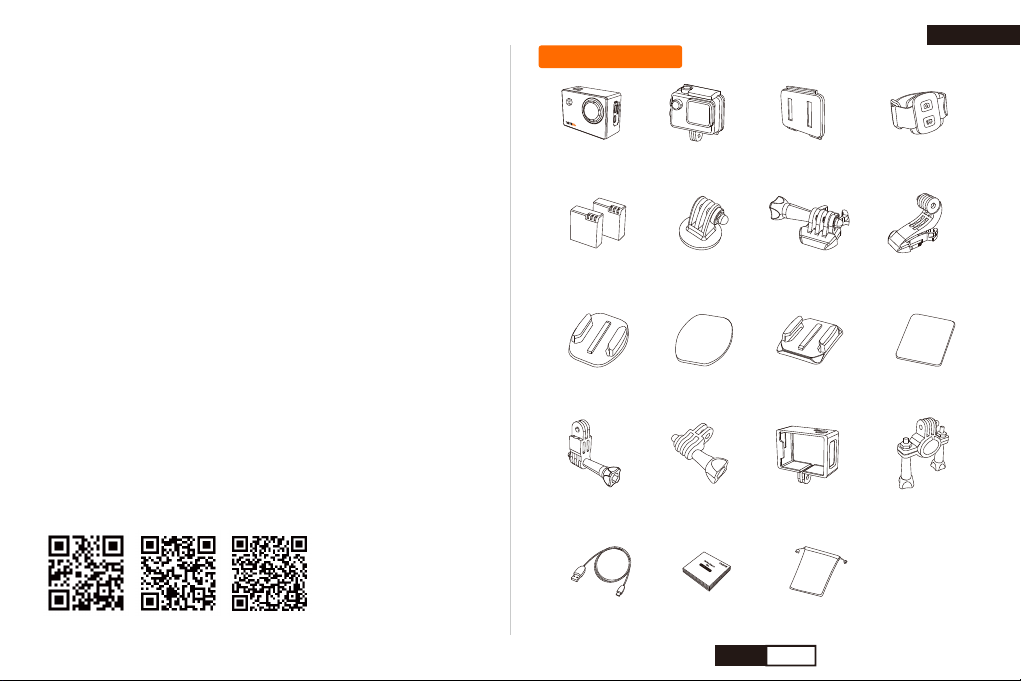
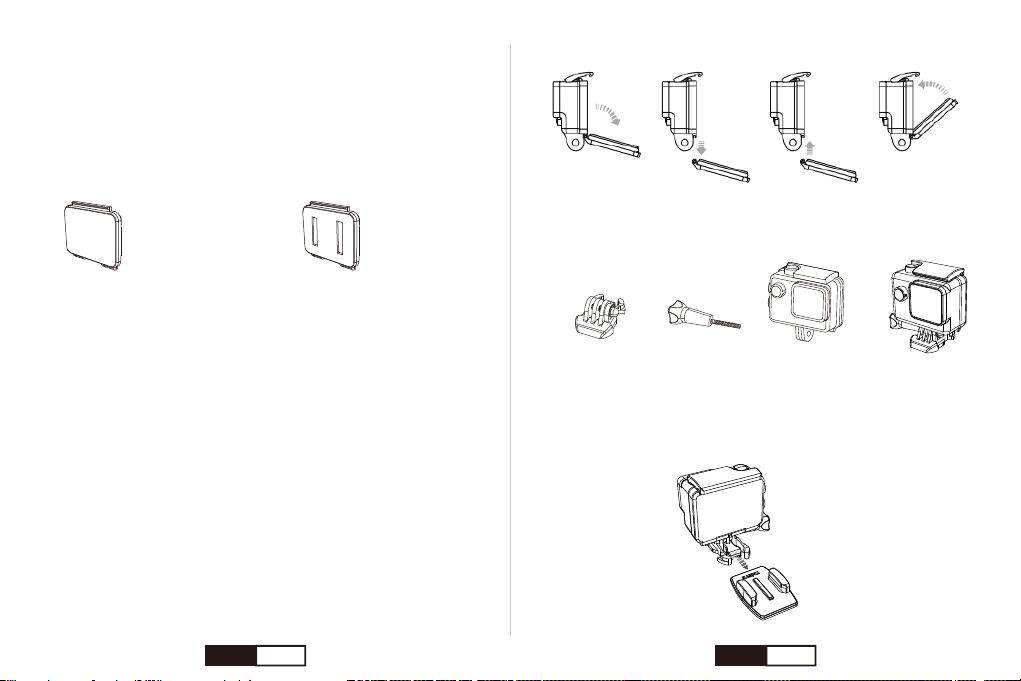
Packing Details
Flat Adhesive
Sticker
i60+ Action Cam Waterproof
Housing
Additional Skeleton
Backdoor
Wrist
Remote Control
Rechargeable
Battery ×2
1/4” Tripod
Mount Adaptor
Quick Release
Buckle
Vertical Release
Buckle
Flat Adhesive
Mount
Curved Adhesive
Mount
Curved Adhesive
Sticker
Switch Support Straight Mount Frame Mount Bike Handlebar
Mount
Micro USB Cable User Manual Cloth Bag
English
EN 01

Layout Getting Started
Lens
Power / Mode Button
Shutter / Select Button
WiFi Indicator Light
MIC
Micro SD Slot
USB Slot
1
2
3
4
5
6
7
8
9
HDMI Slot
2.0” LCD
Charging Indicator
Status Indicator
Up / WiFi Button
Down Button
Battery Cover
10
11
12
13
14
Welcome to your new i60+. To capture video and photos, you need a
microSD card (sold separately).
NOTICE:
* To keep your microSD card in good condition, reformat it on a regular
basis. Reformatting erases all of your content, so be sure to offload your
photos and videos first.
* To prevent loss of important data, frequently copy recorded videos
from Micro SD card to another storage device such as personal
computer.
* Use care when handling memory cards. Avoid liquids, dust and debris.
As a precaution, power off the camera before inserting or removing the
card. Check manufacturer guidelines regarding use in acceptable
temperature ranges.
Micro SD Cards
Use brand name memory cards that meet these requirements:
• microSD, microSDHC, or microSDXC
• Class 10 or UHS-I rating
• Capacity up to 128GB
EN 02 EN 03
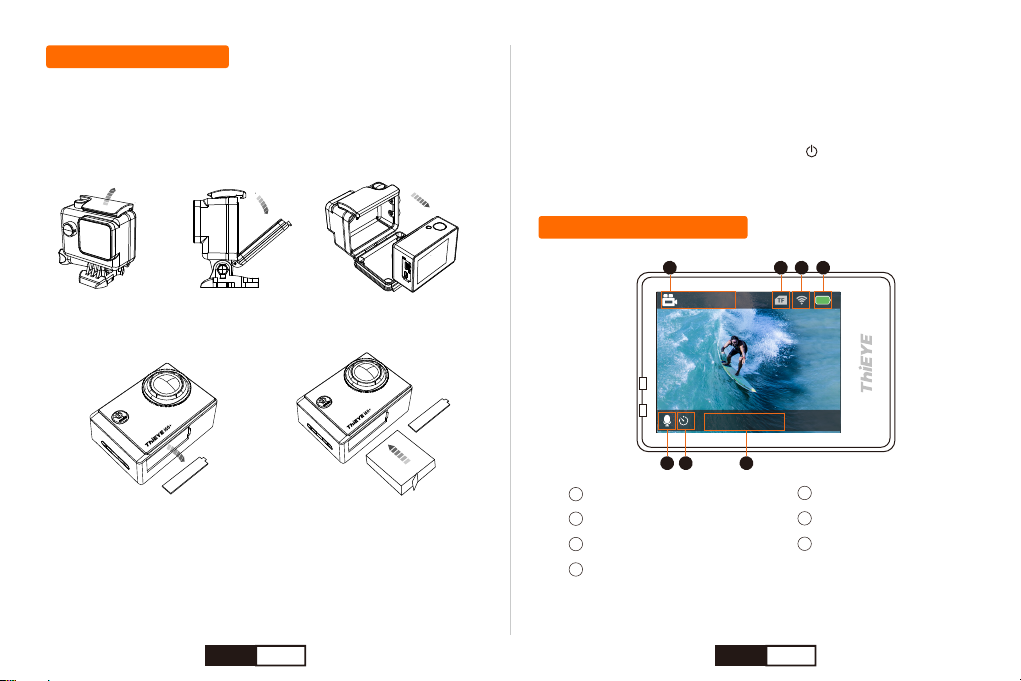
Power On / Off
Press and Hold the Power / Mode Button “ ” for 3s to power on /
power off the camera.
Charge the Battery
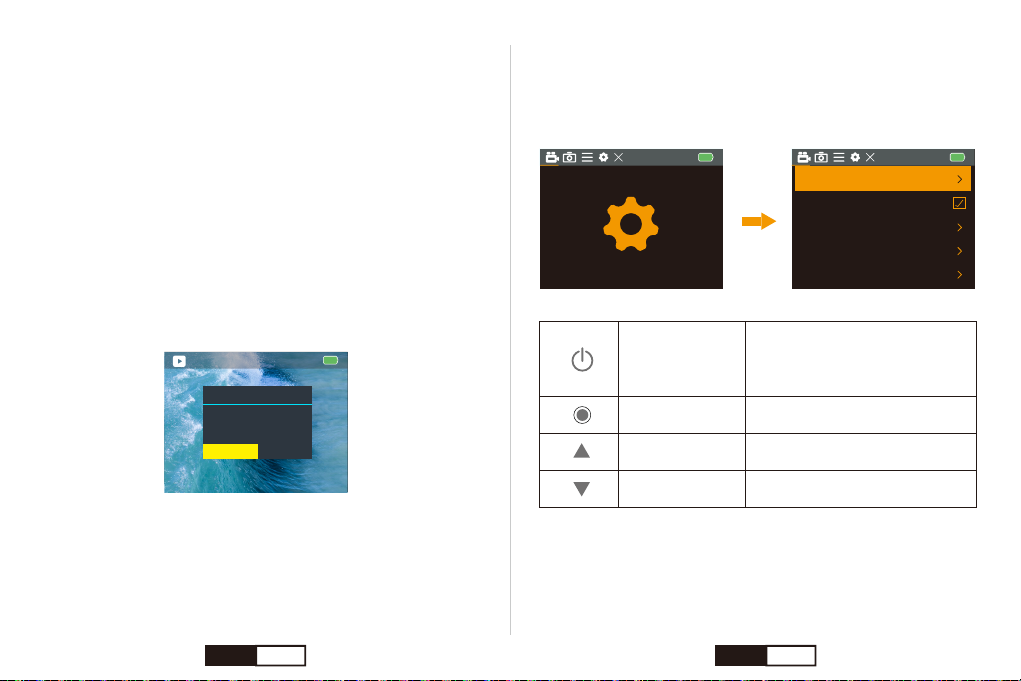
Camera Status Screen
Video Resolution
TF Card Icon
WiFi Status
Battery Status
Date / Time
Timelapse Video Icon
Microphone Icon
1
2
3
4
5
6
7
1080P60FPS
2019/09/20 15:31:37
1 2 3 4
7 56
For the best experience with your new camera, we recommend fully
charging the battery before first use.
1. Remove the camera from its housing.
2. Open the bottom door, insert the battery and then close the bottom door.
3. Connect the camera to a computer or other USB charging adapter
using the included USB-C cable.
4. Power off the camera. The charging indicator remains red and
flashed while the battery is charging, and the charging indicator will stop
flashing and remain on when the battery is fully charged.
When charging with a computer, be sure that the computer is
connected to a power source. If the camera status light does not turn
on, use a different USB port.
EN 04 EN 05

Photo Resolution
TF Card Icon
WiFi Status
Battery Status
Date / Time
Photo Burst Icon
1
2
3
4
5
6
12M
2019/09/2010P/S15:31:37
1 2 3 4
56
1080P60FPS
2019/09/20 15:31:37
Looping Record Icon
720P120FPS
2019/09/20 15:31:37
Slow Motion Resolution Playback Mode Icon File Number
Self-Timer Icon
12M
2019/09/20 15:31:37
Timelapse Photo Icon
12M
2019/09/20 15:31:37
00000/00000
EN 06 EN 07
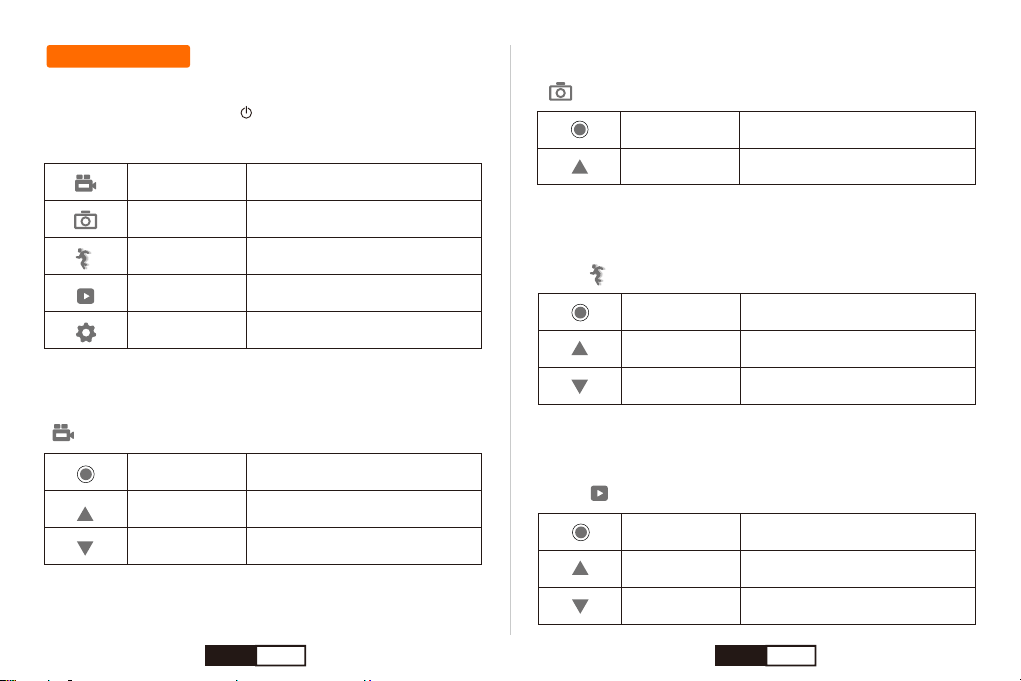
The i60+ features several camera modes. To cycle through the modes,
press the Power / Mode button “ ” repeatedly.
Video Mode
Press the Power / Mode Button repeatedly until you get to Video Mode
“ ”.
Camera Modes
These modes appear:
Video Record video
Capture a single photo
Capture a slow motion footage
Play back videos and photos
Adjust general camera settings
Photo
Slow Motion
Playback
Setup
Shutter /
Select Button Start / Stop Recording
Turn On / Off WiFi & Display the
WiFi SSID and Password
Open / Close the Voice Recording
Up / WiFi Button
Down Button
Slow Motion Mode
Press the Power / Mode Button repeatedly until you get to Slow Motion
Mode “ ”.
Playback Mode
Press the Power / Mode Button repeatedly until you get to Playback
Mode “ ”.
Shutter /
Select Button Start / Stop Recording
Turn On / Off WiFi & Display the
WiFi SSID and Password
Open / Close the Voice Recording
Up / WiFi Button
Down Button
Shutter /
Select Button Play / Stop the Video
Select the Previous File
Select the Next File
Up / WiFi Button
Down Button
Photo Mode
Press the Power / Mode Button repeatedly until you get to Photo Mode
“ ”.
Shutter /
Select Button Take a photo
Turn On / Off WiFi & Display the
WiFi SSID and Password
Up / WiFi Button
EN 08 EN 09
☆Viewing Videos and Photos on Your i60+
1. Turn on camera.
2. Press Power / Mode Button repeatedly until you get to Playback
Mode “ ”.
3. Press Up / Down Button to check the videos or photos files.
4. Press Shutter / Select Button to Play / Stop the Video.
00001/00000
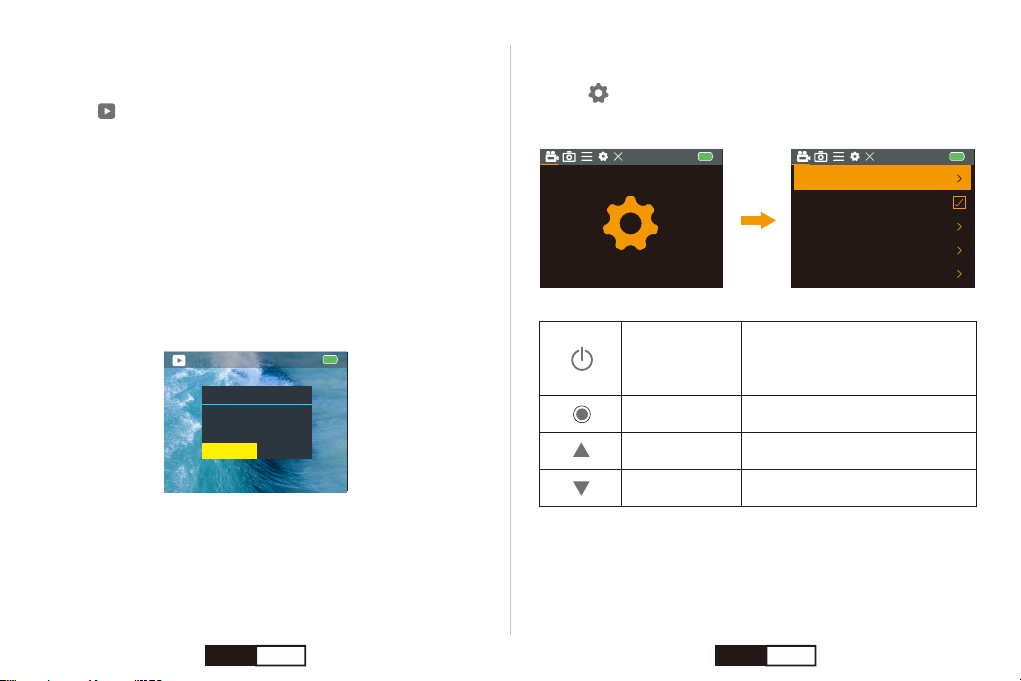
Setup Mode
* Press the Power / Mode Button repeatedly until you get to Setup
Mode “ ”.
* Press the Shutter / Select Button to enter the setting menus.
☆Delete Photos or Videos on Your i60+
1. Enter into playback mode.
2. Press Up / Down Button to check the videos or photos files.
3. Press & Hold Shutter / Select Button for 3s to enter the delete dialog.
The Screen shows “Delete this file?”
4. Press Up or Down Button to select “Confirmation”.
5. Short press Shutter / Select Button to confirm.
Notice:
* You can play back your content on the camera’s touch display, your
computer, TV, or smartphone / tablet.
* You can also play back content by inserting the micro SD card directly
into a device, such as a computer or compatible TV. With this method,
playback resolution depends on the resolution of the device and its
ability to play back that resolution.
Delete
Delete this file?
CencelConfirmation
Video Recording
Timelapse Video Close
Close
720P 120FPS
Looping Record
Slow Motion
Video Resolution 1080P 60FPS
Power /
Mode Button
Switch to a Different Menu:
Video Settings, Photo Settings and
System Settings.
Confirm Your Select
Turn to Previous Item
Turn to Next Item
Shutter /
Select Button
Up / WiFi Button
Down Button
EN 10 EN 11

1. Download ThiEYE App.
Please scan the QR code below to download ThiEYE App, or download
it from our official website www.thieye.com
The Zoom function lets you adjust how close or far away the subject
appears in your video or photo. The default is no zoom. Zoom function
is available in Video mode, Photo mode and Slow Motion Mode. i60+
can support 4X zoom.
1. Turn on the camera.
2. Press & Hold Up or Down button to adjust the zoom level.
2. Press Up / WiFi Button, the LCD will show a “ ” icon then WiFi is
on.
3. Connect your smart phone to WiFi Network (Name: ThiEYE_CAM,
Password:1234567890), then open the App and click the “Connect”
button.
4. View and control your camera on smart phone via App.
Tips:
* When you press Up / WiFi Button, the screen of the Cam display the
WiFi SSID and password.
* When the camera is in WiFi mode, the WiFi indicator light will flash
continuously.
Connect Your Smartphone to Camera Remote Control
Adjusting the Zoom Level
Photo Button (Press to take a photo)
LED Indicator
Video Button (Press to start/stop recording video)
Note: The Remote Controller is able to take pictures or videos without
pairing with action camera when the camera is turned on, easy &
convenient!
EN 12 EN 13
Self-Timer: 3 / 5 / 10 / 20s
Default setting is close.
Support self-timer at 3 / 5 / 10 / 20s setting. The camera will automati-
cally take a photo when the countdown ends.
◇When in Self-timer mode, press the Shutter / Select Button. The
camera initiates countdown with sound prompt, and capture a photo
when the countdown ends.
Photo Burst: 3 / 5 / 10 frames per second
Default setting is close.
Burst captures up to 10 photos per second, so it is perfect for capturing
the definitive moment in fast-action sports.
◇When in Photo Burst mode, press the Shutter / Select Button, the
camera beeps multiple times.
Time-Lapse Photo: 3 / 10 / 15 / 20 / 30s
Default setting is close.
Support shoot photos at the interval of 3 / 10 / 15 / 20 / 30s.
Looping Video: 2 / 3 / 5min
Default setting is close.
Record and save videos every 2 / 3 / 5min, the latest video will
overwrite the oldest video when Micro SD card is full.
Time-Lapse Video: 0.5 / 1 / 2 / 5/ 10 / 30 / 60s
Default setting is close.
To take continuous photos at the interval of 0.5 / 1 / 2 / 5/ 10 / 30 / 60s
of a changing scene, then form into a time lapse video when play at
normal video speed.
Slow Motion: 1080P 60FPS / 720P 120FPS
Default setting is 720P 120FPS.
Make a slow motion footage at 1080P 60FPS / 720P 120FPS when
selecting Slow Motion Mode.
Video Setting
Customizing Your i60+
Video Resolution
4K
2.7K
1080P
720P
FPS
30FPS
30FPS
30FPS / 60FPS
30FPS / 60FPS
Screen Resolution
3840×2160 16:9
2704×1520 16:9
1920×1080 16:9
1280×720 16:9
Photo Setting
Photo Resolution
20M
16M
12M
8M
Screen Resolution
5120x3840
4608x3456
4000x3000
3264x2448
Proportion
4:3
4:3
4:3
4:3
EN 14 EN 15

1. Car Mode: Open / Close
Default setting is close.
With the camera off and automotive charge connecting, when the car is
started, the camera will turn on and record automatically. When the car
is off, the video will be saved and the camera will turn off automatically.
2. 180° Turnover: Open / Close
Default setting is close.
When you use the i60+ as a driving recorder in your car, suggest you
turn this function on.
3. Exposure: -3 / -2 / -1 / 0 / 1 / 2 / 3
Default setting is 0.
By default, your camera uses the entire image to determine the
appropriate exposure level. However, Exposure lets you select an area
that you want the camera to prioritize when determining exposure. This
setting is particularly useful in shots where an important region might
otherwise be over- or underexposed. When you change this setting, the
display immediately shows you the effect on your image. If you change
modes, the camera returns to using the entire scene to determine the
correct level of exposure.
◇When in Time-Lapse Photo mode, press the Shutter / Select Button,
the camera initiates countdown and the camera beeps multiple times
each time a photo is captured.
◇To stop capturing, press the Shutter / Select Button.
Camera Setting
4. White Balance: Auto / Sunny / Cloudy / Incandescent Light /
Fluorescent Light
Default setting is Auto.
White Balance lets you adjust the color temperature of videos and
photos to optimize for cool or warm lighting conditions. When you
change this setting, the display immediately shows you the effect on
your image.
5. Wi-Fi: Open / Close
Default setting is close.
6. Power Frequency: Auto / 50Hz / 60Hz
Default setting is Auto.
7. LED Indicator Light: Open / Close
Default setting is open.
This setting determines whether to activate the camera status lights
(blue).
Note: If you close the LED Indicator Light, the blue indicator and the
WiFi indicator won’t on when recording.
8. Display Off: 10s / 20s / 30s / Close
Default setting is 30s.
Turns off the display after a period of inactivity to save battery life. To
turn on the display again, press any button on the camera.
EN 16 EN 17
Offloading Your Content
9. Auto Shutdown: 1min / 3min / 5min / Close
Default setting is close.
Your camera can be configured to automatically power off after a
specific period (1 minute - 5 minutes) in which no videos or photos are
captured and no buttons are pressed. You can also configure the
camera to never automatically power off (default).
10. Date Stamp: Open / Close
When you turn on date stamp, the time watermark is displayed on the
photos or videos.
11. Language: English, 简体中文, 繁體中文, 日本語, Pусский,
Deutsch, Français, Italiano, Español, Polski, nederlandse, Português,
ไทย, Indonesia.
Default setting is English.
12. Date & Time:
① Press Up button / Down button to select the day and time.
② Press Shutter / Select Button to confirm setting.
13. Format: Confirmation / Cancel
Default setting is Cancel.
To keep your micro SD card in good condition, reformat it on a regular
basis. Reformatting erases all of your content, so be sure to back-up
your photos and videos first.
14. Reset to Factory Setting: Confirmation / Cancel
Default setting is Cancel.
This option resets all settings to default values.
Offloading Your Content to a Computer
To play back your video and photos on a computer, you must first
transfer these files to a computer. Transferring also frees up space on
your micro SD card for new content.
To offload files to a computer using a card reader (sold separately) and
your computer’s file explorer, connect the card reader to the computer,
then insert the micro SD card. You can then transfer files to your
computer or delete selected files on your card. Note that you must use
a card reader to offload photos or audio files.
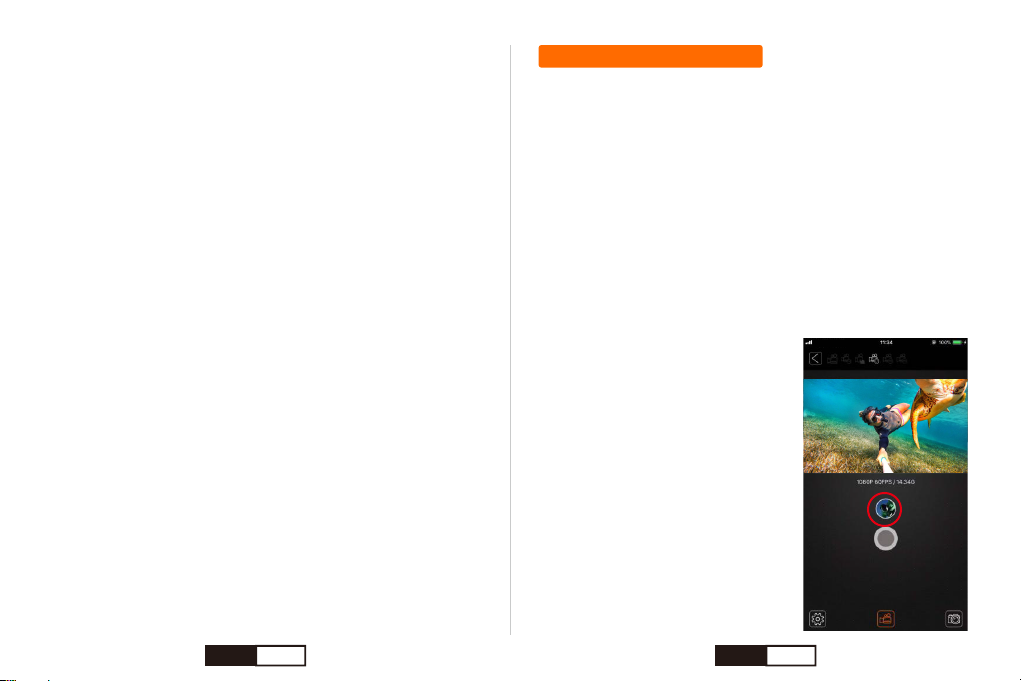
Offloading Your Content to Smartphone or Tablet
1. Connect your smartphone to the WiFi
of the action camera i60+.
2. Open the “ ThiEYE ” app. Click the
“ Connect ” button on the interface to
connect your camera with the app.
3. Press the button as shown below to
enter the app album.
EN 18 EN 19
Maintenance
Battery Information
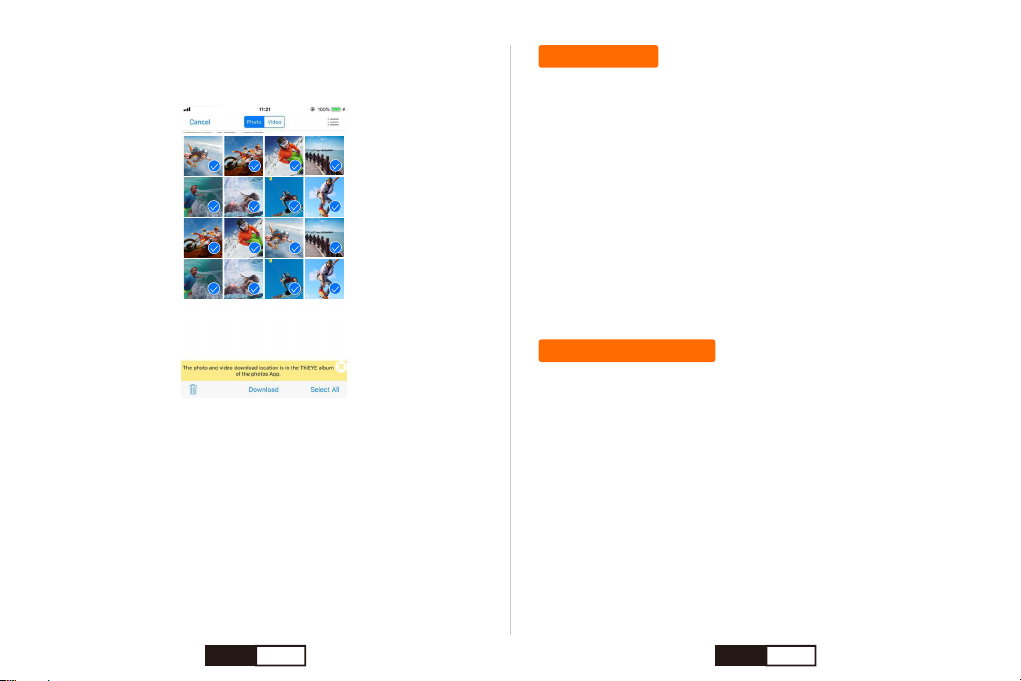
4. When you enter into one of the app album (Video or Photo), tap
“Select” at the right bottom corner of the interface.
Follow these guidelines to get the best performance from your camera:
1. For best audio performance, shake the camera or blow on the mic to
remove debris from the microphone holes.
2. To clean the lens, wipe it with a soft, lint-free cloth. Do not insert
foreign objects around the lens.
3. Don’t touch the lens with fingers
4. Keep the camera away from drops and bumps, which may cause
damage to the parts inside.
5. Keep the camera away from high temperature and strong sunshine
to avoid being damaged.
5. Tap the files you want to save.
6. Tap “Download” at the bottom interface.
7. The files has been offloaded to your local album of the App and your
Smartphone album.
Maximizing Battery Life
If the battery reaches 0% while recording, the camera saves the file and
powers off.
To maximize battery life, follow these guidelines when possible:
• Turn off Wireless Connections
• Capture video at lower frame rates and resolutions
• Use Screen Saver setting.
Battery Storage and Handling
The camera contains sensitive components, including the battery. Avoid
exposing your camera to very cold or very hot temperatures. Low or
high temperature conditions may temporarily shorten the battery life or
EN 20 EN 21

Mounting
cause the camera to temporarily stop working properly. Avoid dramatic
changes in temperature or humidity when using the camera, as
condensation may form on or within the camera.
• Do not dry the camera or battery with an external heat source such as
a microwave oven or hair dryer. Damage to the camera or battery
caused by contact with liquid inside the camera is not covered under
the warranty
• Do not store your battery with metal objects, such as coins, keys or
necklaces. If the battery terminals come in contact with metal objects,
this may cause a fire.
• Do not make any unauthorized alterations to the camera. Doing so
may compromise safety, regulatory compliance, performance, and may
void the warranty.
WARNING: Do not drop, disassemble, open, crush, bend, deform,
puncture, shred, microwave, incinerate or paint the camera or battery.
Do not insert foreign objects into the battery opening on the camera. Do
not use the camera or the battery if it has been damaged - for example,
if cracked, punctured or harmed by water. Disassembling or puncturing
the battery can cause an explosion or fire.
To Remove the Camera From the Housing:
1. Lift the front of the latch up to disengage it from the camera housing.
2. Pivot the latch backward and pull it up to release the backdoor.
3. Pull open the housing backdoor and remove the camera.
To Secure the Camera in the Housing:
1. Open the housing and place the camera into position.
2. Make sure the seal around the backdoor is free of debris.
3. Close the housing backdoor and squeeze it closed to ensure a good
seal.
4. Pivot the hinged arm backwards and hook the lip of the latch into the
grooved top of the housing backdoor.
5. Push the latch down to snap it into place.
EN 22 EN 23
WARNING: Always secure the camera in its housing when using the
camera in or around water. Do not get the camera or the battery wet.
Camera Backdoor
Your i60+ camera comes with two types of backdoor.
Attaching Your Camera To Mounts
To Change the Backdoor:
1. Open the backdoor of the housing so that it hangs downwards.
(Open the cover from the front.)
2. Firmly pull the backdoor downwards until it snaps free from the main
housing.
3. Line up the replacement backdoor into the hinge opening.
4. Push upwards on the backdoor until it clicks into place.
Standard Backdoor
Provides waterproof
protection to 197’ (60m).
Additional Skeleton Backdoor
Not waterproof, enables enhanced audio
capture during activities.
Quick Release
Buckle
Thumb Screw Housing Complete Unit
Attaching Quick Release Buckle to Mounts
Slide the buckle into the mount until it clicks into place.
+ + =
EN 24 EN 25
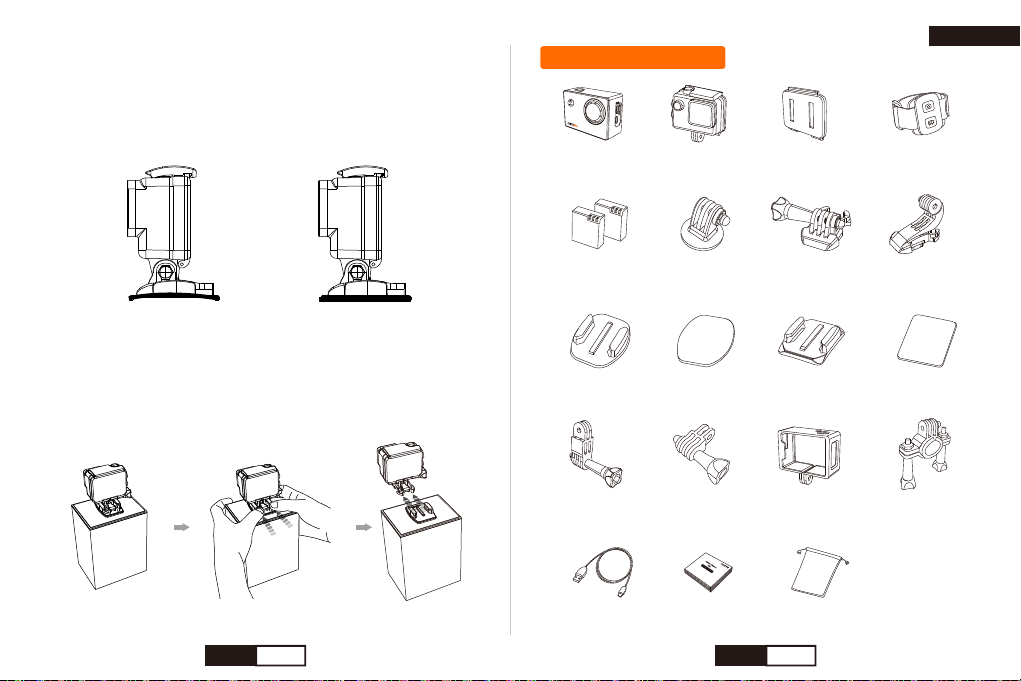
Removing the Quick Release Buckle From Mounts
Press inward on the quick release buckle and push forward until it
separated from mounts.
Using Curved + Flat Adhesive Mounts
The Curved + Flat Adhesive Mounts make it easy to attach the camera
to curved and flat surfaces of helmets, vehicles, and gear. With the
quick release buckle, the frame can be clicked on and off the secured
adhesive mounts.
Danh sách đóng gói
Nhãn dán phẳng
Máy ghi hình
hành động
Vỏ bảo vệ
chống nước
Nắp đậy kèm theo
của Vỏ bảo vệ
Điều khiển từ xa
đeo cổ cổ tay
Pin sạc × 2 Bộ chuyển đổi
chân máy 1/4
Khóa gài nhanh Khóa gài dọc
Miếng giữ Máy ghi
Hình loại phẳng
Miếng gữ máy ghi
hình loại cong
Nhãn dán cong
Hỗ trợ chuyển đổi Miếng giữ máy ghi
hình loại thẳng
Khung hình Khung giữ máy gắn
tay lái xe đạp
Usb cáp Hướng dẫn
sữ dụng
Túi đựng sản phẩm
Tiếng Việt
Curved Adhesive Mount Flat Adhesive Mount
EN 26 VN 27

Bên ngoài sản phẩmBẮT ĐẦU
Ống kính
Nút nguồn / Chế độ
Nút bấm màn trập / Nút chọn
Đèn báo wifi
Micro
Khe cắm thẻ nhớ Mirco SD
Khe cắm USB
1
2
3
4
5
6
7
8
9
Khe cắm HDMI
Màn hình LCD 2.0 "
Đèn báo sạc
Hiển thị trạng thái
NútUp / nút WiFi
Nút tắt
Vỏ bọc pin
10
11
12
13
14
Bạn sẽ cần dùng thẻ microSD (bán riêng) để lưu video và ảnh của
mình.
Cảnh báo:
* Giữ thẻ SD luôn ở điều kiện tốt bằng cách thường xuyên định dạng
lại. Thao tác này sẽ xóa tất cả phương tiện trong thẻ, vì vậy, hãy nhớ
lưu lại trước.
* Để tránh mất dữ liệu quan trọng, hãy thường xuyên sao chép video
đã ghi từ thẻ Micro SD sang thiết bị lưu trữ khác như máy tính cá nhân.
* Phải giữ tay sạch và khô ráo trước khi cắm thẻ SD. Xem hướng dẫn
của nhà sản xuất để biết ngưỡng nhiệt độ chấp nhận đối với thẻ và các
thông tin quan trọng khác.
THẺ MICROSD
Sử dụng thương hiệu nào cũng được miễn đáp ứng các yêu cầu sau:
• microSD, microSDHC, hoặc microSDXC
• Class 10 hoặc thẻ tốc độ cao UHS-I
• Dung lượng lên đến 128 GB
VN 28 VN 29
Bật / tắt máy ảnh
Giữ nút Nguồn / Chế độ " " trong 2-3 giây để bật / tắt máy ảnh.
SẠC PIN
Màn hình trạng thái camera
Độ phân giải Video
Biểu tượng thẻ TF
Tình trạng WiFi
Tình trạng pin
Thời gian và ngày tháng
Chế độ tua nhanh thời gian
Biểu tượng micro
1
2
3
4
5
6
7
1080P60FPS
2019/09/20 15:31:37
1 2 3 4
7 56
Nhớ sạc đầy pin trước khi khởi hành.
1. Tháo máy ảnh ra khỏi vỏ của nó.
2. Mở cửa dưới, lắp pin rồi đậy nắp.
3. Kết nối máy ảnh với phích cắm điện hoặc PC qua cáp USB.
4. Tắt nguồn máy ảnh. đèn báo sạc vẫn đỏ và nhấp nháy trong khi pin
đang sạc và đèn báo sạc sẽ ngừng nhấp nháy và vẫn bật khi pin được
sạc đầy.
Khi sạc bằng máy tính, hãy chắc chắn rằng máy tính được kết nối với
nguồn điện. Nếu đèn trạng thái camera không bật, hãy sử dụng cổng
USB khác.
VN 30 VN 31

Độ phân giải ảnh
Biểu tượng thẻ TF
Tình trạng WiFi
Tình trạng pin
Ngày giờ
Biểu tượng Burst
1
2
3
4
5
6
12M
2019/09/2010P/S15:31:37
1 2 3 4
56
1080P60FPS
2019/09/20 15:31:37
Biểu tượng vòng lặp
720P120FPS
2019/09/20 15:31:37
Độ phân giải chuyển động chậm Biểu tượng
chế độ phát lại Số của tập tin
Biểu tượng tự hẹn giờ
12M
2019/09/20 15:31:37
Biểu tượng hình ảnh Timelapse
12M
2019/09/20 15:31:37
00000/00000
VN 32 VN 33

I60 + có một số chế độ máy ảnh. Để quay vòng qua các chế độ, nhấn
Nút nguồn / Chế độ liên tục.
Chế độ Video
Nhấn Nút nguồn / Chế độ nhiều lần cho đến khi bạn chuyển sang Chế
độ video trực tiếp.
Chế độ máy ảnh
Các chế độ này xuất hiện:
Video Quay Video
Chụp một ảnh duy nhất
Ghi lại cảnh quay chuyển động
chậm
Phát lại video và hình ảnh
Điều chỉnh cài đặt camera chung
Ảnh
Chuyển động
chậm
Phát lại
Thiết lập
Nút bấm màn trập /
Nút chọn
Ấn nút Shutter (Màn trập) để bắt
đầu quay Ấn lại nút Shutter
(Màn trập) để dừng quay.
Bật / Tắt WiFi và hiển thị SSID
và mật khẩu WiFi
Mở / Đóng ghi âm giọng nói
NútUp / nút WiFi
Nút tắt
Chế độ chuyển động chậm
Nhấn Nút nguồn / Chế độ nhiều lần cho đến khi bạn chuyển sang Chế
độ chuyển động chậm.
Chế độ phát lại
Nhấn Nút nguồn / Chế độ nhiều lần cho đến khi bạn chuyển sang Chế
độ phát lại
Nút bấm màn trập /
Nút chọn Phát / Dừng video
Chọn tập tin trước
Chọn tệp tiếp theo
NútUp / nút WiFi
Nút tắt
Chế độ ảnh
Nhấn Nút nguồn / Chế độ nhiều lần cho đến khi bạn chuyển sang Chế
độ ảnh trực tiếp.
Nút bấm màn trập /
Nút chọn Chụp một tấm
Bật / Tắt WiFi và hiển thị SSID và
mật khẩu WiFi
NútUp / nút WiFi
Nút bấm màn trập /
Nút chọn
Ấn nút Shutter (Màn trập) để bắt
đầu quayẤn lại nút Shutter
(Màn trập) để dừng quay.
Bật / Tắt WiFi và hiển thị SSID
và mật khẩu WiFi
Mở / Đóng ghi âm giọng nói
NútUp / nút WiFi
Nút tắt
VN 34 VN 35
☆ Xem video và hình ảnh trên i60 + của bạn
1.Bật máy ảnh.
2.Nhấn Nút nguồn / Chế độ nhiều lần cho đến khi bạn chuyển sang
Chế độ phát lại.
3.Nhấn NútUp / Xuống để kiểm tra các tập tin video hoặc hình ảnh.
4.Nhấn Nút bấm màn trập / Nút chọn nút để phát / Dừng video.
00001/00000
Chế độ cài đặt
* Nhấn Nút nguồn / Chế độ nhiều lần cho đến khi bạn đến Chế độ cài đặt.
* Nhấn Nút bấm màn trập / Nút chọn để vào menu cài đặt.
☆ Xóa ảnh hoặc video trên i60 + của bạn
1.Vào chế độ phát lại.
2.Nhấn NútUp / Xuống để kiểm tra các tập tin video hoặc hình ảnh.
3.Nhấn và giữ Shutter / Chọn nút trong 3 giây để vào hộp thoại xóa.
Màn hình hiển thị xóa Xóa tập tin này?
4.Nhấn nút Lên hoặc Xuống để chọn Xác nhận xác nhận.
5.Bấm Nút bấm màn trập / Nút chọn nút để xác nhận.
Lưuý:
* Bạn có thể phát lại nội dung của mình trên màn hình cảm ứng máy
ảnh, máy tính, TV hoặc điện thoại thông minh / máy tính bảng.
* Bạn cũng có thể phát lại nội dung bằng cách cắm trực tiếp thẻ micro
SD vào thiết bị, chẳng hạn như máy tính hoặc TV tương thích. Với
phương pháp này, độ phân giải phát lại phụ thuộc vào độ phân giải của
thiết bị và khả năng phát lại độ phân giải đó.
Delete
Delete this file?
CencelConfirmation
Video Recording
Timelapse Video Close
Close
720P 120FPS
Looping Record
Slow Motion
Video Resolution 1080P 60FPS
Nút nguồn /
Chế độ
Chuyển sang Menu khác: Cài đặt
video, Cài đặt ảnh và Cài đặt
hệ thống.
Xác nhận lựa chọn của bạn
Chuyển sang mục trước
Chuyển sang mục tiếp theo
Nút bấm màn trập /
Nút chọn
NútUp / nút WiFi
Nút tắt
VN 36 VN 37
Table of contents
Languages:
Other THIEYE Action Camera manuals


