THIEYE i30+ User manual
01
USER MANUAL
01
PI30P-V1.0

01
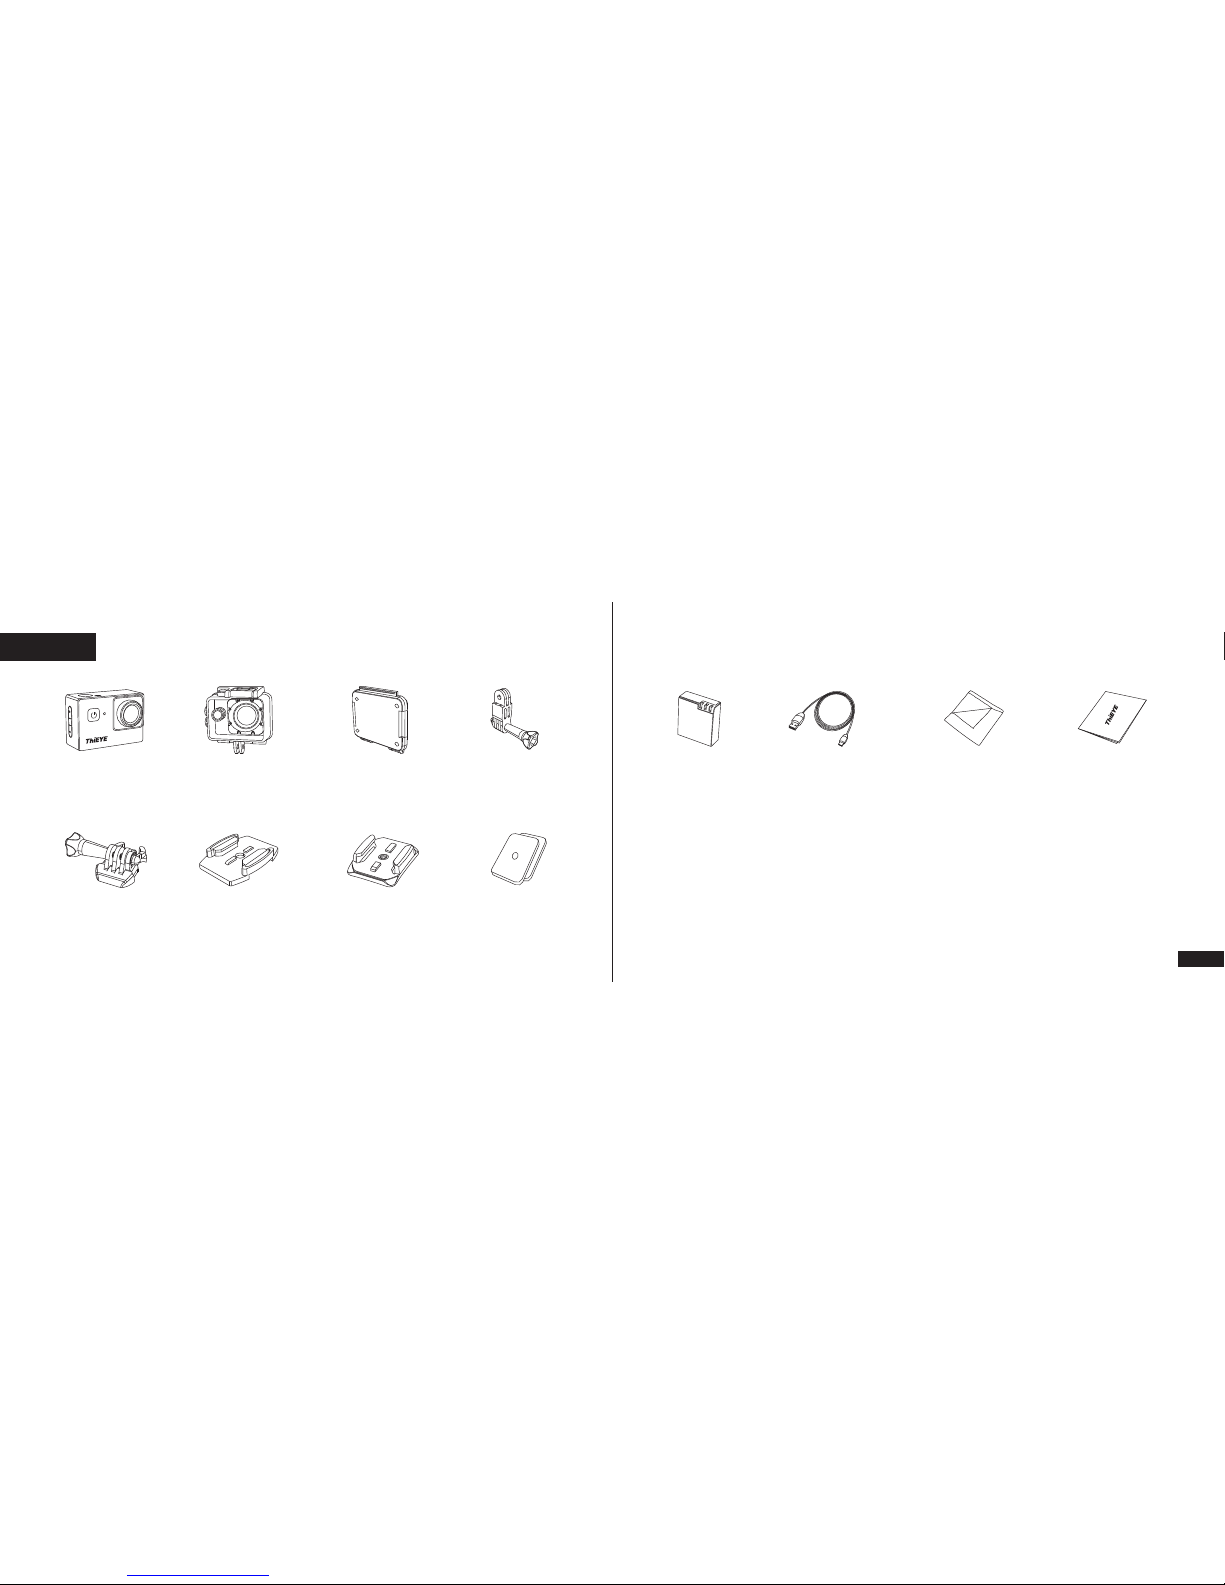
Packing List - 1 Enligsh
Action Camera Waterproof
Housing
Additional Skeleton
Backdoor
Switch Support
Quick Release
Buckle
Flat Adhesive
Mount
Adhesive
Sticker × 2
Curved Adhesive
Mount
USER MANUAL
Guide de démarrage rapide
取り扱い説明書
快速操作指南(繁中)
Deutsche Anleitung
Guía de Inicio Rápido
01
19
Инструкция пользователя
19
39
10
28
48
ThiEYE Social Media
Facebook YouTube Instagram Twitter

03
Packing List - 2
Lithium Battery Micro USB Cable Wiper User Manual
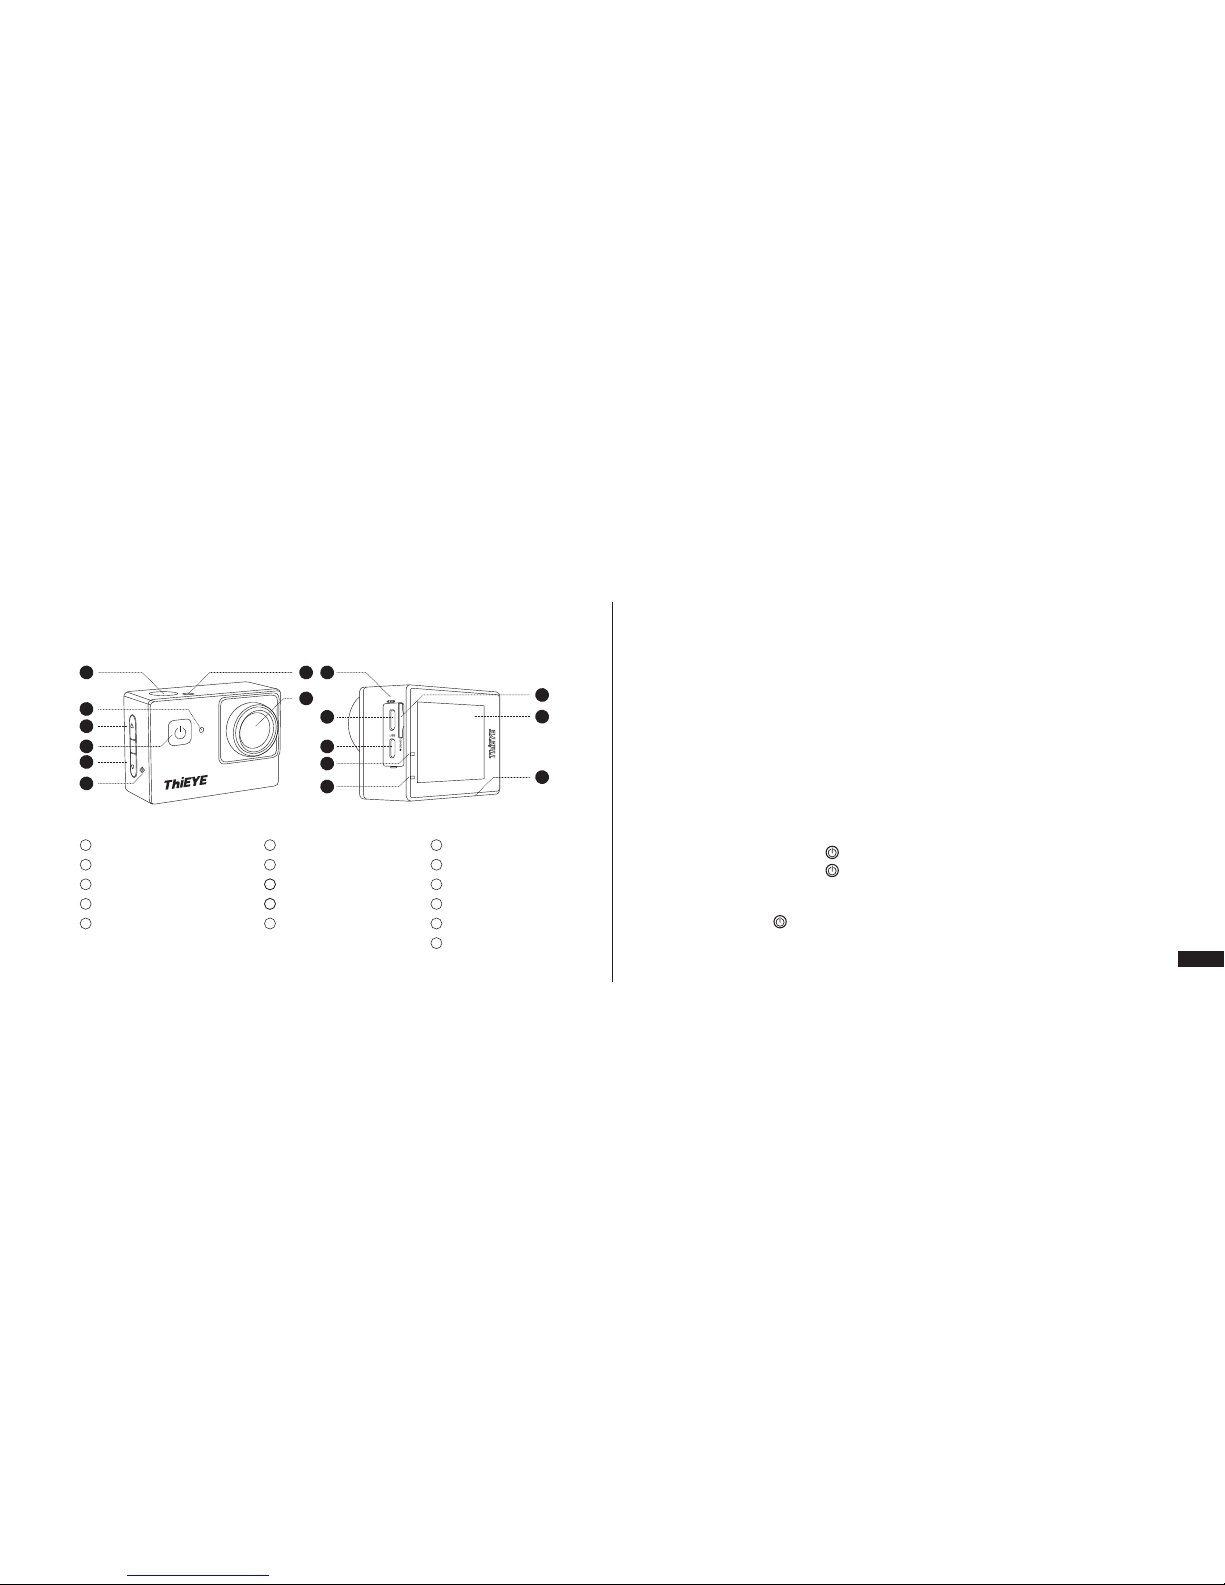
Layout
Shutter/OK Button
Charging Indicator 1
Up Button
Power/Mode Button
Down/WiFi Button
Speaker
Working Indicator 1
170° Wide Angle Lens
Microphone
Micro USB Slot
HDMI Slot
Charging Indicator 2
Working Indicator 2
Micro SD Slot
2.0” LCD
Battery Cover
1
2
3
4
5
6
7
8
9
11
12
13
14
15
16
10
1
2
3
4
6
7
8
9
10
11
12
13
15
14
16
5

05
Mode Switching
Repeatedly press Power/Mode Button “ ” to switch mode. The optional mode is as follows:
Video Mode, Photo Mode, Photo Burst, Self-Timer, Settings.
Video Mode
①Normal Video: Short press Shutter / OK Button “ ” to start recording, press again to stop
recording.
②Video Resolutions: 4K 10fps / 2.7K 20fps / 1080P 30fps / 720P 60fps
③ Loop Recording: In the case of recording and saving at interval of 3 minutes, when the
Micro SD card is full, the latest video will automatically cover the earliest in a circular way.
Photo Mode
①Photo Resolutions: 12M(4000x3000) / 8M(3264x2448) / 5M(2560x1920) / 2M(1920x1080)
②Self-Timer: Support self-timer at 2s setting.
③Photo Burst: Take photos to 3 photos per time.
④Time-lapse Photo: Take photos at the interval of 2 / 3 / 5 / 10 / 20 / 30 / 60s.
Getting Started
Insert a Micro SD Card
· Support up to 32G Class 10 UHS-I Suggested, sold separately.
· To keep your Micro SD card in good condition, please reformat it regularly. As reformatting
erases all of your content, be sure to offload your photos and videos first.
Charging the Battery
Connect the camera to a computer or PC or other USB charging adapter using the included
Mini USB cable. The blue charging indicator turns on when charging and turns off when
charging is complete.
Power ON/OFF
To Power ON: Short press the Power/Mode Button “ ” .
To Power OFF: Hold the Power/Mode Button “ ” (3s).
1.
2.
3.
4.
5.
6.

07
Settings
When the camera in setting mode, press the OK Button “ ” to select first level menu option,
press the OK Button into the second level menu, in the second level menu, press the up and
down button to select second menu options and press OK Button to confirm, and exit the
second level menu options (and the Power Button will return the first level menu).
Cautions
· Firmware and App Upgraded
Please keeping upgrading the firmware and App in time to maintain the best user experience.
· And when upgraded, please make sure the action camera is connected to a power source or
the battery capacity is over 50%.
7.
8.
App Connection
Please scan the QR Code or visit our official website www.thieye.com to download
ThiEYE App
Short press Down/WiFi Button “ ” , the LCD will show a “ Waiting for WiFi Connection ”
mark, then WiFi is on.
Connect your smartphone to the WiFi of the action camera (WiFi account: ThiEYE_CAM,
Password:1234567890), then open the App and click the “Connect” button.
View, edit and remote control your action camera with via App.
1.
2.
3.
4.
DOWNLOAD ON THE
App Store

09
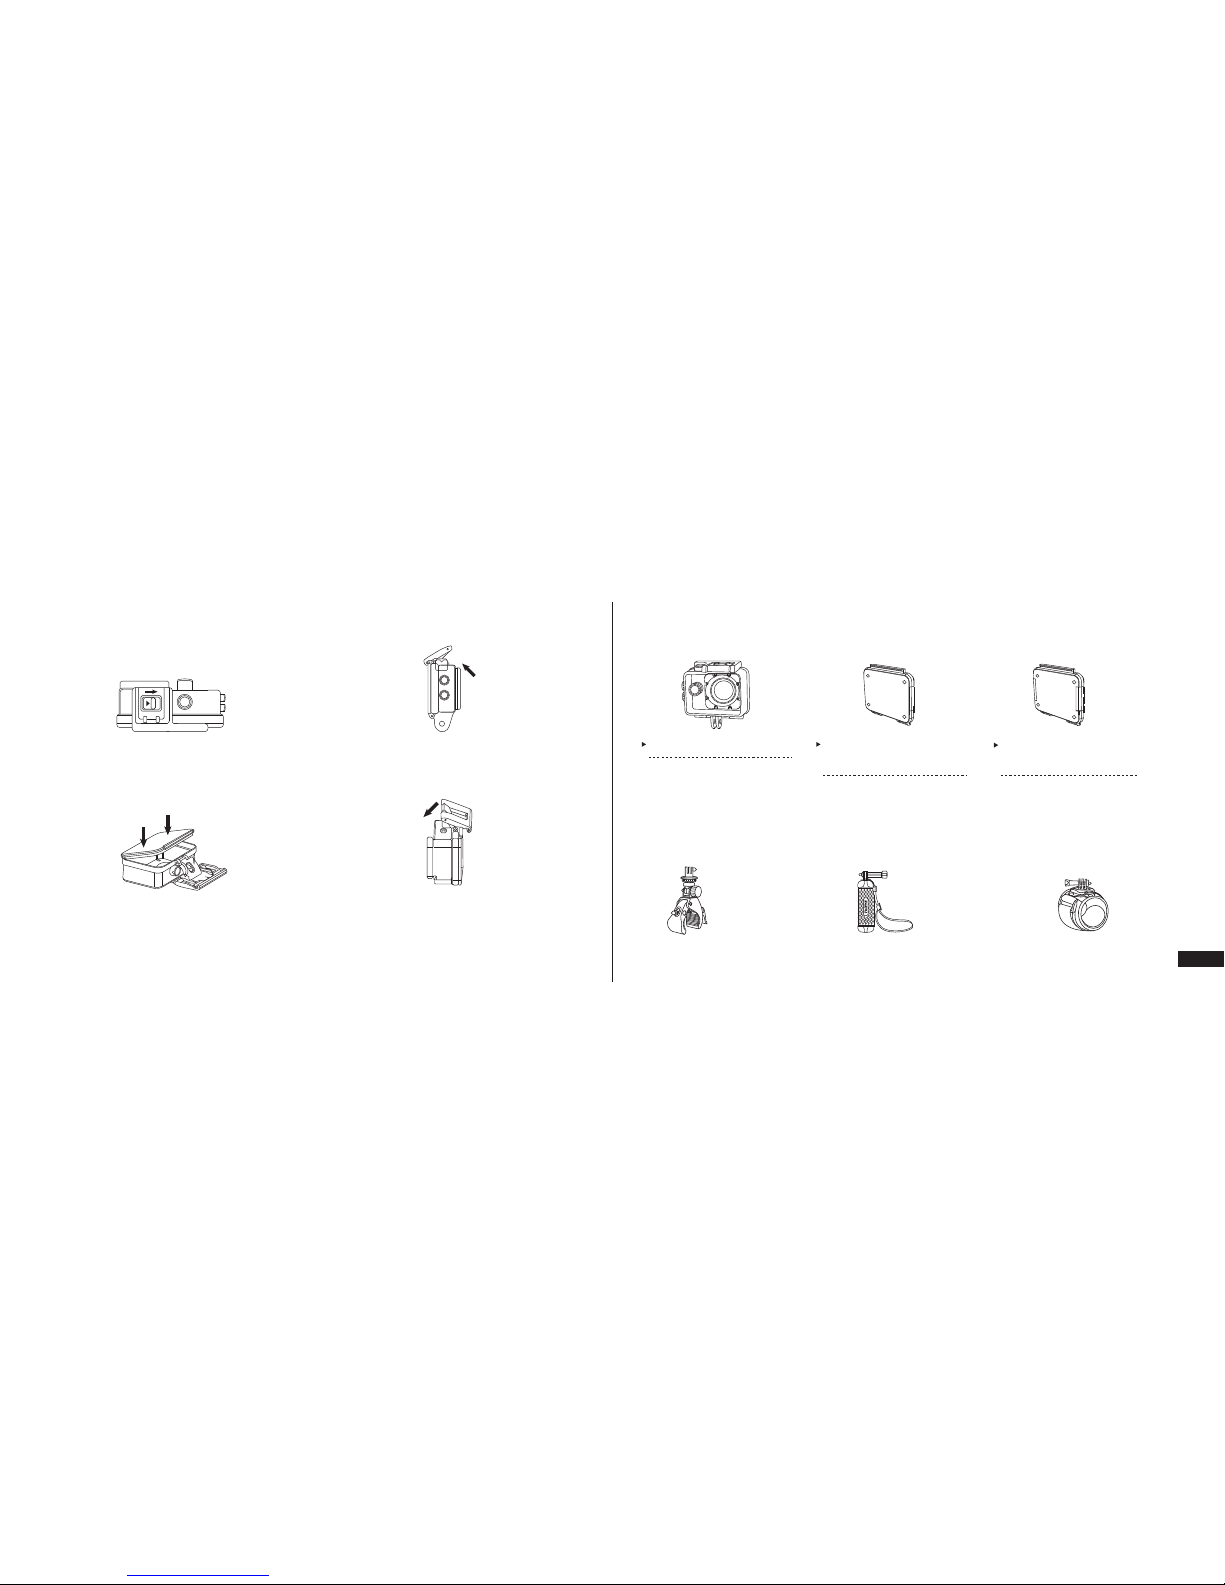
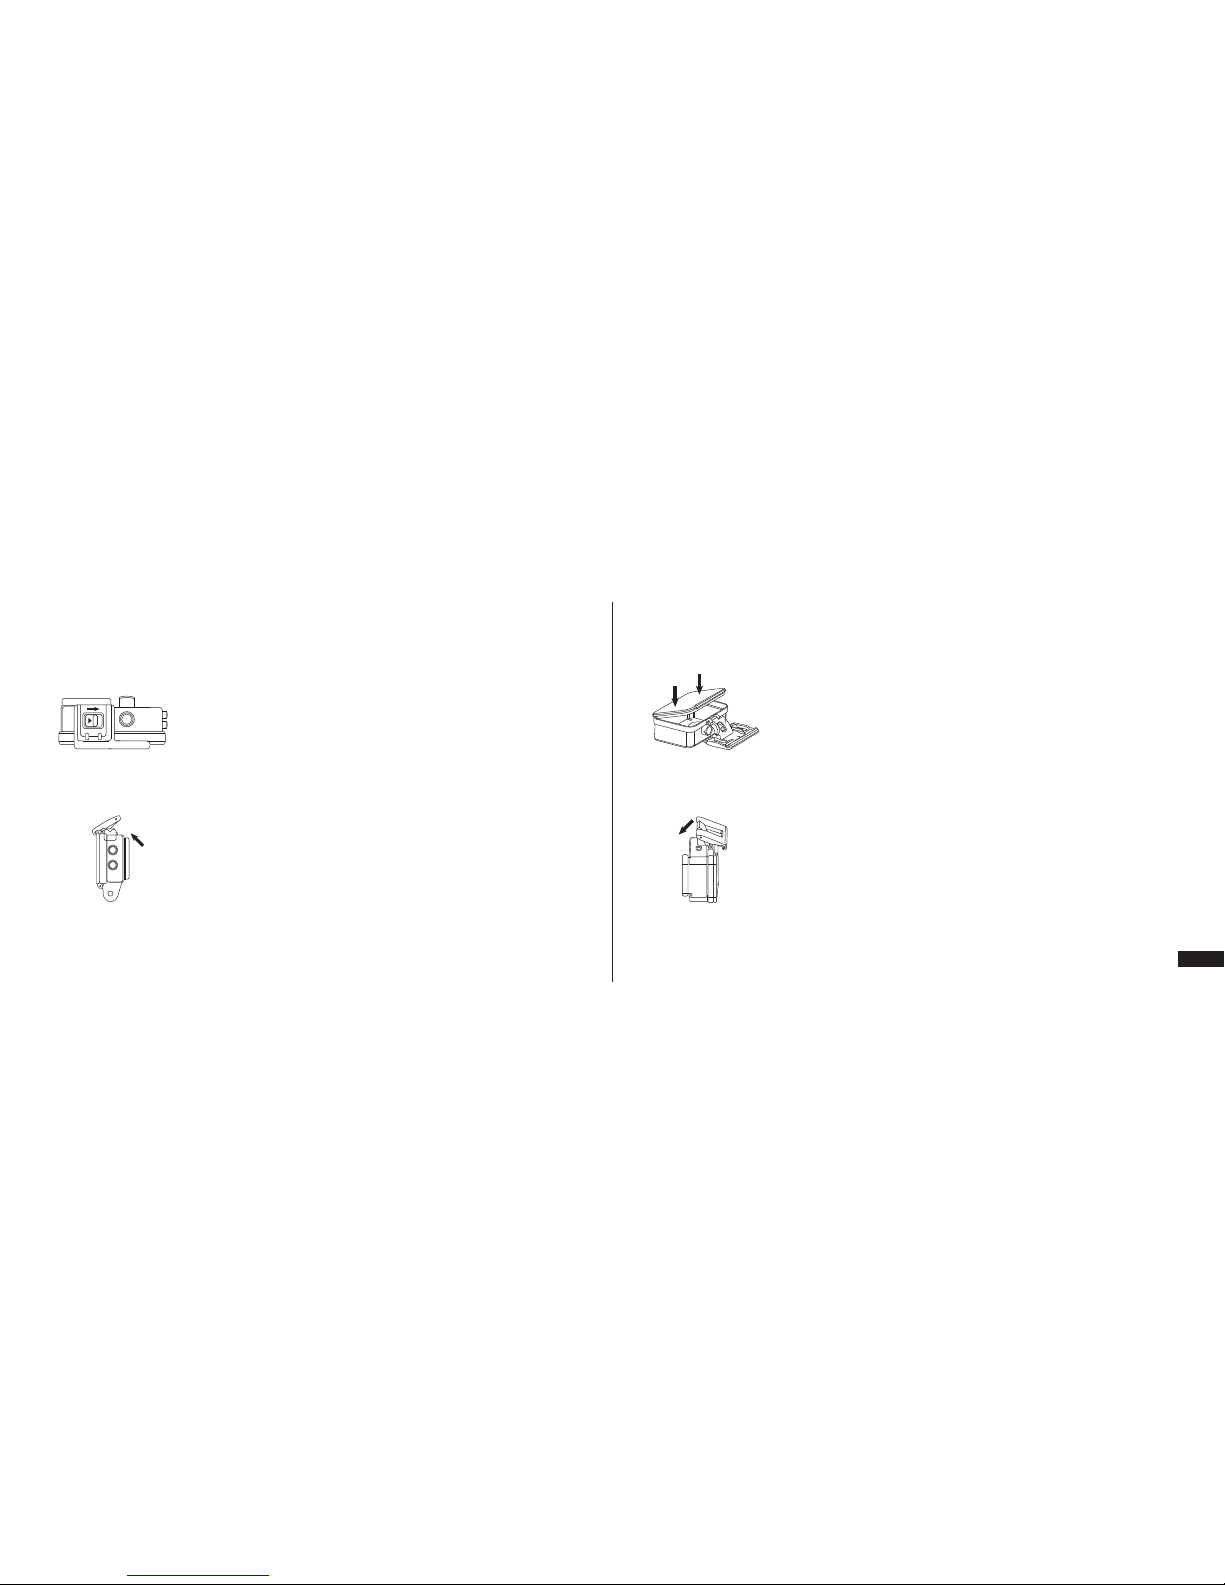
①When opening the waterproof housing,
first move the top switch o the right as
arrow below.
②Then pull up the buckle and the
waterproof housing is open.
③When closing the waterproof housing,
press both sides tightly with both of your
hands as arrow below.
④Down against the buckle of the
waterproof housing.
Necessary Accessories | Installation Necessary Accessories | Special Note
Optional Accessories | Sold Separately
Waterproof Housing
Please test the housing
by placing it in water
before diving.
Waterproof Backdoor
Support up to 197' (60m)
waterproof level.
Additional Skeleton
Backdoor
Not waterproof, enables
enhanced audio capture
during activities.
Floating Hand GripBike Mount Wrist Strap
11
繁體中文 物品清單 - 1
運動攝像機 防水殼 非防水殼後蓋 長轉軸
標準卡扣 平面粘貼底座 底座粘膠×2弧面粘貼底座
物品清單 - 2
電池 Micro USB線 清潔布 說明書
13
基本操作
插入Micro SD卡
·可支援32G Class10或UHS-1高速卡,需單獨購買。
·為確保Micro SD 卡保持良好狀態,請定期將其重新格式化。重新格式化會消除您的所有內
容,因此請確保先導出照片和視頻。
充電
可直接用隨附的USB數據線連接電腦或電源適配器充電,當充電指示燈為藍色常亮時,表示正
在充電,直到充電指示燈熄滅表示充電完成。
開關機
電源開機:短按電源/模式鍵“ ”開機。
電源關機:長按電源/模式鍵“ ”(3s)關機
模式切换
重復按電源/模式鍵“ ”即可切換菜單。可選模式如下:錄影模式、拍照模式、照片連拍、定
時自拍、設置模式。
1.
2.
3.
4.
外觀介紹
1
2
3
4
6
7
8
9
10
11
12
13
15
14
16
5
快門/OK鍵
充電指示燈1
上調鍵
電源/模式鍵
下調鍵/WiFi鍵
揚聲器
工作指示燈1
170°廣角鏡頭
麥克風
Micro USB接口
HDMI接口
充電指示燈2
工作指示燈2
Micro SD卡槽
2.0”顯示屏
電池蓋
1
2
3
4
5
6
7
8
9
11
12
13
14
15
16
10

15
設置模式
在設置模式下,按壓OK鍵“ ”進入菜單設置;按上調鍵和下調鍵翻閱菜單,按OK鍵進入
二級菜單或選擇相關功能,再按OK键保存当前设置并退出二级菜单,或按電源/模式鍵退出二
級菜單。
使用注意事項
·固件App昇級
為了確保您的相機一直保持最完美的使用體驗,請及時更新固件和App。
在昇級時,請確保相機連接電源或者電池電量在50%以上。
7.
8.
錄影模式
① 普通攝像:按壓快門鍵“ ”進行錄像,再次按壓快門鍵,可停止錄像。
② 錄像分辨率:4K 10fps·2.7K 20fps·1080P 30fps·720P 60fps
③ 循环录影:以3分鐘為時長進行的視頻錄製與存儲,當存儲卡存滿以後,最新的視頻將自動
覆蓋最早的視頻,形成循環錄製。
拍照模式
① 圖像分辨率:12M(4000x3000) / 8M(3264x2448) / 5M(2560x1920) / 2M(1920x1080)
② 定時自拍:設定2秒后拍攝一張照片。
③ 照片連拍:單次連拍3張照片。
④ 延時拍照:以2/3/5/10/20/30/60秒為時間間隔連續自動拍照。
5.
6.

17
① 打開防水殼時,請先將頂部開
關向右撥動,如箭頭示意!
② 向上拉起防水殼的扣位,
打開防水殼。
③ 蓋緊防水殼時,請按箭頭指示,
兩手同時壓緊兩側。
④ 向下壓住防水殼扣位。
基本配件 丨安装方式App连接
通过扫描二维码或访问官网 www.thieye.com.cn 下载ThiEYE App。
短按相機下調键/WiFi鍵“ ”,當屏幕出現“Waiting for WiFi Connection ”標誌時表明相機
WiFi已開啟。
用手機連接相機WiFi(名稱:ThiEYE _ CAM,密碼1234567890),打开App,点击 " 连接
相机 " 按钮。
通过手机App观看并操作相机。
DOWNLOAD ON THE
App Store
1.
2.
3.
4.

19
基本配件 | 特別說明
| 單獨售賣
可選配件
防水殼
潛水前先不要放入相機,
請先試水。
標準後蓋
支持最深60米防水保護。
非防水殼後蓋
不防水,但能增強收音功能。
漂浮柄自行車支架 腕帶
Liste des articles - 1 Français
Caméra d'action Boîtier étanche Couverture
non-imperméable
Long Arbre rotatif
Boucle standard Flat adhesive
de montage
Sticker
adhésif x 2
Installation
d'adhésif à arc

21
Liste des articles – 2
Batterie Câble USB Micro Chiffon de
nettoyage
Guide de
démarrage rapide
Apparence
Bouton d'obturateur / OK
Indicateur de charge
Bouton Haut
Bouton Puissance / Mode
Bouton Bas / Bouton wifi
Haut-parleur
Indicateur de travail
Objectif grand-angle 170°
Microphone
Interface USB
Interface HDMI
Indicateur de charge
Indicateur de travail
Slot de carte Micro SD
2,0''écran
Couverture de la batterie
1
2
3
4
5
6
7
8
9
11
12
13
14
15
16
10
1
2
3
4
6
7
8
9
10
11
12
13
15
14
16
5

23
Commutation de mode
Appuyez plusieurs fois sur la touche Alimentation / Mode " " pour basculer le mode. Les
modes optionnels sont les suivants: mode vidéo, mode photo, Photos en rafale, Retardateur,
Mode de réglage.
Mode vidéo
① Vidéo normale: appuyez brièvement sur le bouton de l'obturateur " " pour commencer
l'enregistrement, appuyez de nouveau sur pour arrêter l'enregistrement.
② Résolution d'enregistrement: 4K 10fps · 2.7K 20fps · 1080P 30fps · 720P 60fps
③ Enregistrement en boucle: 3 minutes pour la durée de l'enregistrement vidéo et de
stockage, lorsque la carte mémoire est pleine, la dernière vidéo couvrira automatiquement
la première vidéo, un enregistrement en boucle.
Mode photo
①Résolution d'image: 12M(4000x3000) / 8M(3264x2448) / 5M(2560x1920) / 2M(1920x1080)
②Retardateur: régler le 2 secondes après avoir pris une photo.
③Photos en rafale: Prise de vue en continu unique 3 photos.
Opération de base
Insérez la carte Micro SD
· Peut soutenir 32 Class10 ou UHS-1 carte à grande vitesse, besoin d'acheter séparément.
· Suivez la flèche du couvercle de la batterie, allumez le couvercle de la batterie et insérez la
carte SD dans la position de la fente SD
Charger la batterie
Peut être directement connecté à l'ordinateur ou à l'adaptateur secteur avec le câble USB,
Lorsque le voyant de travail est bleu fixe, cela signifie qu'il se recharge jusqu'à ce que le
voyant de travail s'éteigne pour indiquer que le chargement est terminé.
Allumer/ éteindre la caméra
· Pour allumer:
Appuyez brièvemen sur le Bouton Puissance / Mode " " pour allumer l'appareil photo
· Pour éteindre:
Appuyez longuement sur le Bouton Puissance / Mode " " (3s) pour éteindre la caméra
1.
2.
3.
4.
5.
6.

25
④Photo en retardé: au 2 / 3 / 5 / 10 / 20 / 30 / 60 secondes pour l'intervalle de temps de prise
de vue automatique en continu.
Mode de réglage
En mode réglage, appuyez sur le bouton d'obturateur / OK " " pour accéder aux paramètres
du menu, appuyez sur la touche haut et bas pour lire le menu, appuyez sur OK pour accéder
au second menu ou sélectionnez la function appropriée. Quittez le menu secondaire ou
appuyez sur le bouton d'alimentation / mode pour quitter le menu secondaire.
Précautions d'utilisation
· Mise à niveau de l'application du firmware
Afin de vous assurer que votre appareil photo a toujours été l'expérience la plus parfaite,
veuillez mettre à jour le micrologiciel et l'application.
Lors de la mise à niveau, assurez-vous que l'appareil photo est connecté à l'alimentation ou
que le niveau de la batterie est supérieur à 50%
7.
8.
Connexion APP
S'il vous plaît scanner le code QR sur la case de couleur pour télécharger ThiEYE App,
ou télécharger à partir de notre site officiel www.thieye.com.
Appuyez le bouton bas / Wi-Fi " ", l'écran LCD affiche "Waiting for WiFi Connection",
indique que la caméra WiFi est allumée.
Connectez votre smartphone à réseau Wifi (Nom: ThiEYE _ CAM,Mot de passe:
1234567890),puis ouvrez l'application et cliquez sur le bouton "Connect".
Voir et contrôler votre appareil photo sur un smartphone via App.
1.
2.
3.
4.
DOWNLOAD ON THE
App Store
27
①Lorsque vous ouvrez le boîtier étanche,
déplacez d'abord le commutateur supérieur
vers la droite, comme indiqué par la flèche!
②Tirez la boucle du caisson
étanche, ouvrez le caisson étanche
③Lors du serrage du caisson étanche,
appuyez sur les flèches et appuyez sur les
côtés des deux côtés.
④En bas contre la boucle du
caisson étanche.
Accessories | Installation des accessories Accessoiresde base | Instructions spéciales
Accessoires optionnels | Vendu séparément
Caisson étanche
Ne placez pas la caméra
avant la plongée, essayez
d'abord l'eau.
Porte de derrière
standard
Soutenez la protection
étanche la plus profonde
de 60 mètres
Couverture non-
imperméable à l'eau
Non étanche, mais peut
améliorer la fonction radio
Poignée flottanteSupport de vélo Bracelet

29
Lieferumfang-2
Akku Mikro-USB-Kabel Reinigungstuch Anleitung
Lieferumfang-1
Deutsch
Action cam Unterwassergehäuse Rückenklappe
(nicht wasserdicht)
Lange Schraube
Standard
Steckschnalle
Flache
Befestigung
Kleber
Aufkleber × 2
Gebogene
Befestigung

31
Opération de base
Speicherkarte einsetzen
· Es kann meisten 32G Class 10 oder UHS-1 Highspeed-Karte unterstützen, muss aber
separat erworben werden
· Um es sicherzustellen, dass Ihre Micro SD-Karte in gutem Zustand ist, formatieren Sie sie
bitte regelmäßig. Beim Neuformatieren wird alles auf der Speicherkarte gelöscht. Speichern
Sie daher zuerst die Fotos und Videos.
Akku Aufladen
· Zum Aufladen schließen Sie das mitgelieferte Ladekabel an einen PC oder an ein USB
Steckernetzteil an, während die Kamera, in der Akku eingesetzt wird, sich schon mit der
Ladekabel verbindet. Das Statusanzeigelämpchen 1 während dem Aufladen dauerhaft blau
leuchtet, bedeutet dies, dass der Akku jetzet aufgeladen wird, wenn das Lämpchen aus wird,
bedeutet es, dass der Ladevorgang fertig ist.
1.
2.
Außenansicht der Kamera
AUSLÖSE-/AUSWAHLKNOPF
Statusanzeigelämpchen 1
(Beim Aufladen)
Obere Pfeiltaste
STORM/MODUS-Schalter
Untere Pfeiltaste / Wi-Fi EIN/AUS
Lautsprecher
Statusanzeigelämpchen 1
170°Weitwinkelobjektiv
Mikrofon
USB-Schnittstelle
HDMI-Schnittstelle
Statusanzeigelämpchen 2
(Beim Aufladen)
Statusanzeigelämpchen 2
Micro SD Kartensteckplatz
2.0” Bildschirm
Batterie-Abdeckung
1
2
3
4
5
6
7
8
9
11
12
13
14
15
16
10
1
2
3
4
6
7
8
9
10
11
12
13
15
14
16
5

33
③ LOOP-AUFNAHME: Videoaufnahme und -speicherung in 3 Minuten, wenn die
Speicherkarte voll ist, deckt das neueste Video automatisch das früheste Video ab, um eine
Loop-Aufnahme zu bilden.
FOTO
①Bildauflösung: 12M(4000x3000) / 8M(3264x2448) / 5M(2560x1920) / 2M(1920x1080)
②Selbstauslöser: Im Selbstauslöser-Modus nimmt die i30+ nach einem Countdown von 2
Sekunden ein einziges Photo auf.
③LOOP-AUFNAHME: Videoaufnahme und -speicherung in 3 Minuten, wenn die
Speicherkarte voll ist, deckt das neueste Video automatisch das früheste Video ab, um eine
Loop-Aufnahme zu bilden.
④ ZEITRAFFERFOTOS: Im Zeitrafferfotos-Modus nimmt die i30+ in Abstand von 2s / 3s / 5s
/ 10s / 20s / 30s / 60s ein einziges Photo auf, bis man wieder einmal auf den Auslöser
betätigen, die Aufnahmevorgang wird dann gestoppt.
6.
Anschalten / Ausschalten
·Anschalten: den Schalterknopf " " kurz drücken.
·Ausschalten: Drücken Sie Ein-/Ausschalter/Modus Taste " " ca. 3 Sekund, dann wird es
ausschalten.
KAMERAMODI-UMSCHALTEN
Auf den STORM/MODUS-Schalter " " der eingeschaltete Kamera mehrmals kurz zu
drücken, um die Modi der Kamera durchzublättern.
Die Modi ändern sich in folgender Reihenfolge:
VIDEO→FOTO→SCHNELLE BILDFOLGE(Serienaufnahme) →Selbstauslöser→
EINSTELLUNGEN
VIDEO
① Aufnahme: Kurz auf den Taste " " drücken, um die Aufnahme zu starten, drücken Sie
erneut, um die Aufnahme zu beenden.
② Videoauflösungen: 4K 10fps · 2.7K 20fps · 1080P 30fps · 720P 60fps
3.
4.
5.

35
EINSTELLUNGEN
In diesem Modus durch Drücken auf AUSLÖSE-/AUSWAHLKNOPF umschalten, um die
Menüeinstellungen aufzurufen. Im Menü navigieren Sie jeweils mit der oberen oder unteren
Pfeiltaste zum gewünschten Menüpunkt, drücken Sie den AUSLÖSE-/AUSWAHLKNOPF, um
in den gewünschten Menüpunkt einzusteigen und Veränderungen vorzunehmen. Wiedermal
auf diesen Knopf drücken werden die Veränderungen gespeichert und sich das Menü
verlassen.
Vorsichtsmaßnahmen für den Einsatz
·Aktualisierung der Firmware-App
Um sicherzustellen, dass Ihre Kamera in bestem Zustand bleibt,, aktualisieren Sie bitte die
Firmware und App rechtzeitig.
Stellen Sie beim Aktualisieren sicher, dass die Kamera an die Stromversorgung
angeschlossen wird oder deren Akkuleistung noch von über 50% bleibt .
7.
8.
App Connection
Laden Sie ThiEYE App herunter, indem Sie den QR-Code scannen oder besuchen Sie die
Website www.thieye.com.
Drücken Sie die Untere Pfeiltaste/Wi-Fi EIN/AUS " ", wenn das Symbol " Waiting for WiFi
Connection " anzeigt, dass das WiFi der Kamera eingeschaltet ist.
Verbinden Sie Ihr Kamera-WiFi (Name: ThiEYE_CAM, Passwort 1234567890) mit Ihrem
Mobiltelefon, öffnen Sie die App und klicken Sie auf die Schaltfläche " Connect camera ".
Beobachten und bedienen Sie die Kamera über Ihre mobile App
1.
2.
3.
4.
DOWNLOAD ON THE
App Store
37
Necessary Accessories | Installation
①Um das wasserdichte Gehäuse zu öffnen, drehen Sie zuerst
den oberen Schalter nach rechts, in die gleiche Richtung wie der
Pfeil!
②Die Schnalle der wasserdichten Gehäuse heraufzuziehen,
dann lässt das wasserdichtes Gehäuse öffnen
③Um die wasserdichte Schale zuzumachen, drücken bitte auf
die beide Seiten der wasserdichten Gehäuse, was wie der
Richtungspfeil angezeigt!
④Drücken Sie die Schnalle des wasserdichten Gehäuses.
Necessary Accessories | Installation
Table of contents
Languages:
Other THIEYE Action Camera manuals


