THIEYE CarView 2 User manual

PCARVIEW-V1.0
USER MANUAL
Dual Lens Mirror Dash Cam
CarView 2

USER MANUAL
Guide de démarrage rapide
Deutsche Anleitung
Guida di Operazione Rapida
取り扱い説明書
Manual de usuario
Руководство пользователя
01
13
25
37
49
61
73
...........................................
.........................
......................................
........................
............................................
........................................
.........................
ThiEYE Social Media
Facebook YouTubeOfficial Website
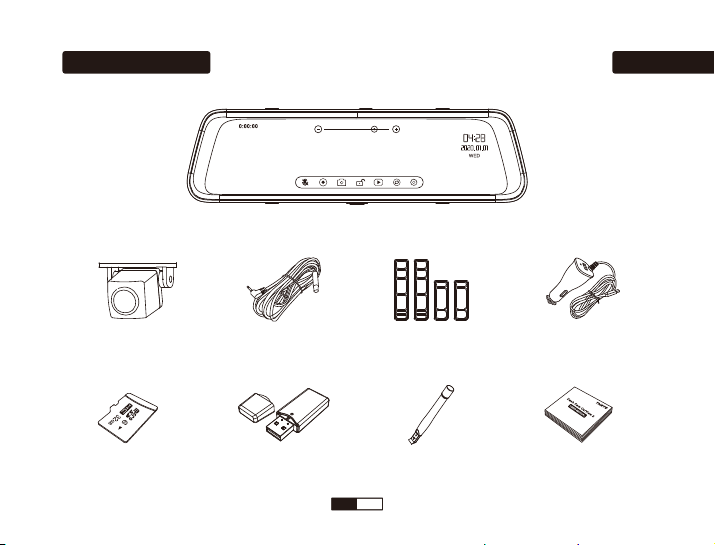
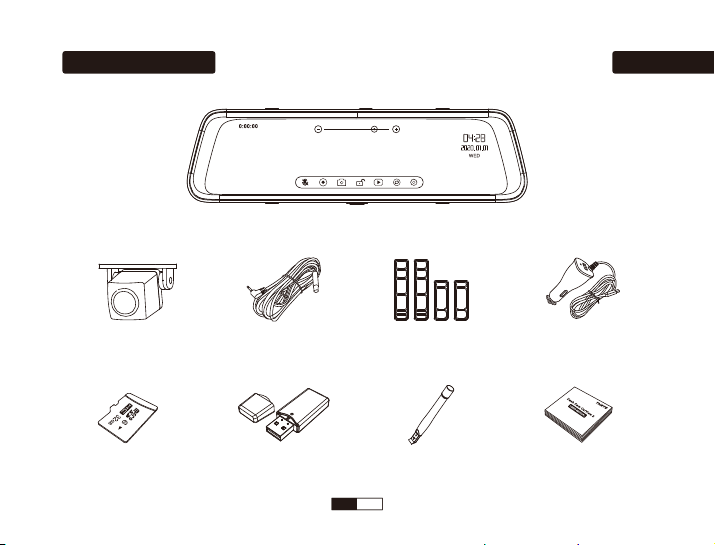
What’s Included
32GB Micro SD Card
English
Rear Camera
Mirror Dash Cam
SD Card Reader
8m Rear Camera Cable
Pry Tool
Mounting Strap * 4
User Manual
Car Charger with
Additional USB
01EN

Layout
10” IPS Ultra HD Full-Size Touch Screen
IP67 Water Resistant Rear Camera
170° Wide Angle Rear Lens
Speaker
Reset
Power Button
170° Wide Angle Front Lens
Mini USB Port
Micro SD Slot
Rear Camera Port
GPS (Not Enabled)
Back Clip Fixed Hook
1
2
3
4
5
6
7
8
9
10
12
11
10 11
8
1 4 5
6
7
9
12
Stretchable & Adjustable Lens
2 3
02EN
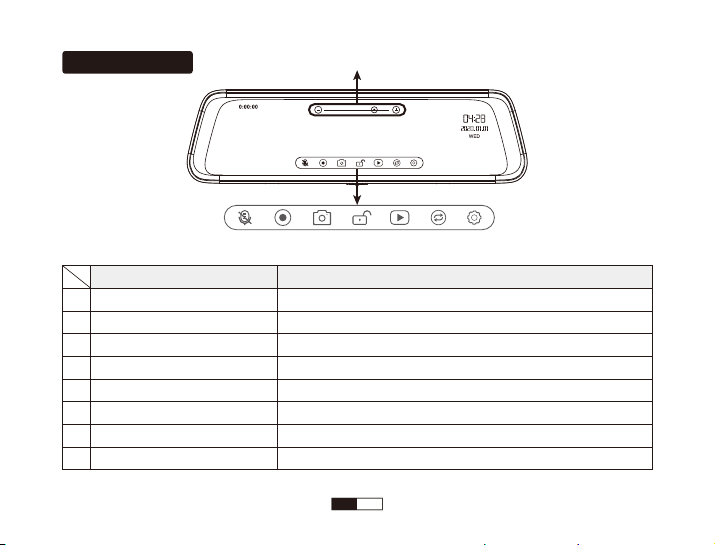
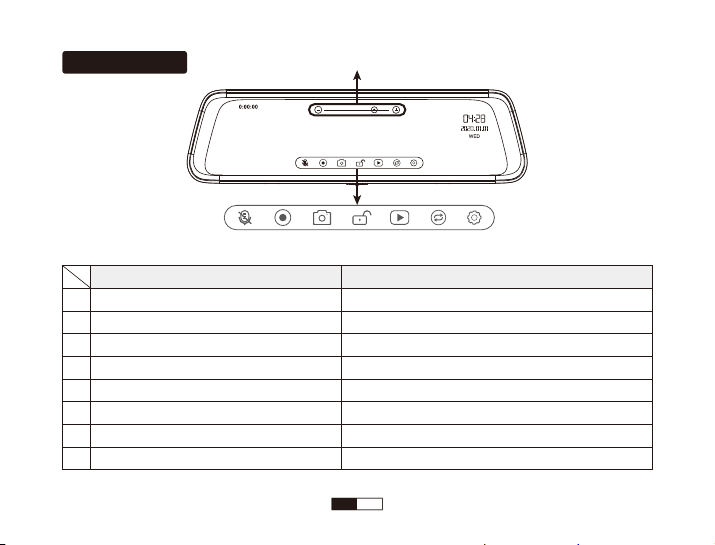
Touch Screen
ABCDEFG
A
B
C
D
E
F
G
H
Operation
Tap the Audio On / Off Icon
Tap the Video Recording Icon
Tap the Photo Taking Icon
Tap the Lock Icon
Tap the Playback Icon
Tap the Switch Icon
Tap the Menu Icon
Tap the “ + ” or “ - ” Icon
Function
Open / Close Audio Recording
Start / Stop Video Recording
Snap a Photo
Manually Lock File
Playback the Videos or Photos
Switch the View between Front Camera and Rear Camera
Enter the Setting Menu
Adjust the Brightness of the Screen
H
03EN
Basic Operation
More Gestures Operation:
☆Swipe left or right on the touch screen to switch the view between front and rear camera.
☆Swipe up or down on the touch screen to fine tuning the angle of the front and rear camera.
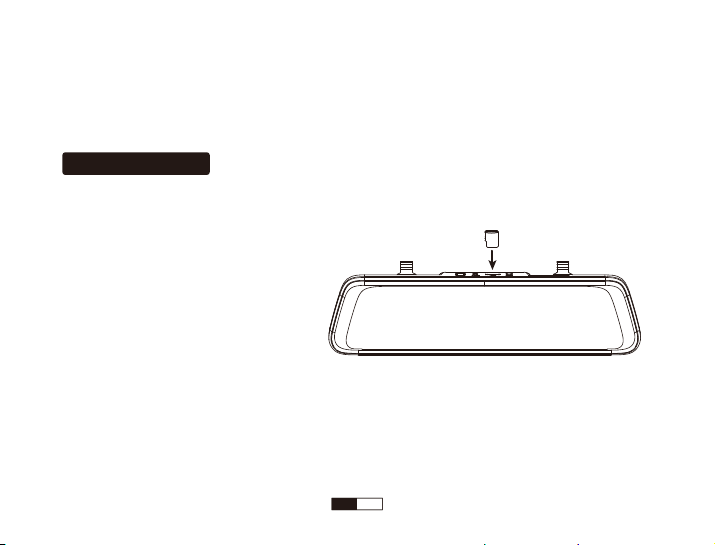
1. Insert a Micro SD Card
We recommend to use up to 64G Micro SD Card.
Please format the Micro SD Card in the camera before first use.
Note:
* To keep your Micro SD card in good condition, please format it regularly. As reformatting erases all of your
contents, be sure to back up your photos and videos first.
* Ensure that the device is completely power off before removing the Micro SD card to avoid damages to the
memory card.
* To prevent loss of important data, frequently copy recorded videos from Micro SD card to another storage
device such as personal computer.
04EN

2. Power On / Off
The camera is designed to power on and start recording automatically when the car power adapter is plugged to
power source.
①Auto Power On / Off with Ignition
When powered by the car charger, the dash camera will automatically turn on when you start your car engine.
When turning off your car, the camera will automatically turn off after approximately 5 seconds.
②Manual Power On / Off
To manually turn the camera On / Off, press and hold the power button at least 3 seconds.
Note:
* In low power status, the dash cam will be automatically shut down after it displays low battery.
3. Video Mode
In the main interface, tap the Video Recording Icon to start recording, the screen will appear a red dot and flash
slowly, indicating the video is recording.
4. Photo Mode
In the main interface, tap the Photo Taking Icon to snap a photo.
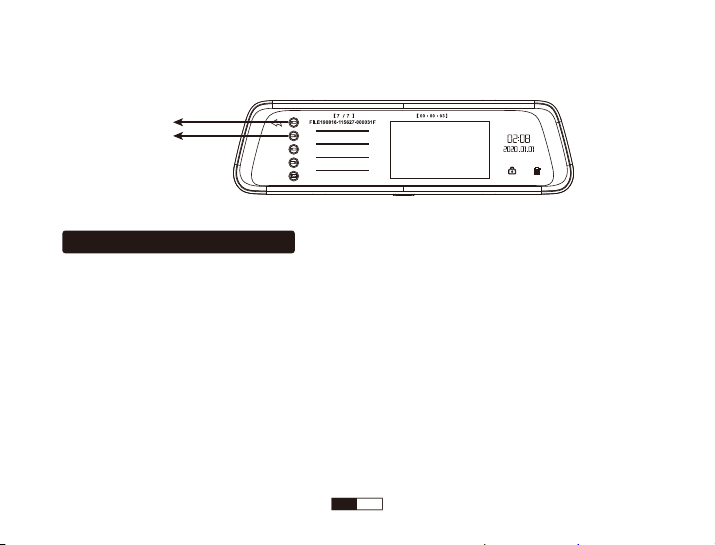
5. Playback Mode
In the main interface, tap the Playback Icon to watch the videos or photos saved in SD card.
05EN
In the main interface, tap the Menu Icon, enter the setting menu. Here is the description of main functions.
1. Video Resolutions (Front Camera): FHD 1080P 30fps / HD 720P 30fps
2. Loop Recording
In the case of recording and saving at interval of 1 / 3 / 5 minutes, the dash cam will automatically overwrite the
earliest file in the memory card once the card is full.
3. Night Mode
You can Turn On / Off this function according to the different situations. This function will improve the quality of
the video captured in dark environments.
Note:
* Before playback the video, please stop video recording first.
0
Front Camera Video
Rear Camera Video
Menu Settings Instruction
06EN

4. Two-way Video
When Turn On this function, Front Camera & Rear Camera will recording videos at the same time, otherwise,
only the Front Camera will recording the video.
5. G-sensor
G-sensor will lock the file when detecting a collision during the recording. The G-sensor sensitivity can be
selected OFF / High / Middle / Low in the menu.
6. Parking Monitor
When the car is parked and the Parking Monitor has been turned on, the dash cam will activate and start
recording automatically once it detects a collision. And it will turn off after continuously recording 30 seconds.
Note:
* Only turn on the Parking Monitor while parking, the dash cam will record when detecting a collision. It means
that you do not need to turn on G-sensor.
7. Rear Mirror
First of all, you must connect a rear camera to the recorder with the extension of the long line. This function is
turned on by default.
When this function is on, the image displayed by the dashcam is a mirror image (reversal of right and left), which
07EN

is the same as that shown in the car rearview mirror.
8. Screen Saver
When recording
If you turn on Screen Saver Mode, the screen display will be turned off after a period of inactivity, but the camera
is still recording when the screen display turns off.
The options of Screen Saver are 1 min, 3min and off. To turn on the screen display again, please tap the touch
screen.
9. Date / Time
Set date firstly by tapping the Up / Down Icon. Tap the OK Icon after done and move the cursor to the next spot
on the right.
This setting is to set correct date and time on the dash cam for video recording and camera shooting.
10. Format
All files will be deleted in format mode. To enable the micro SD card to work immediately after installation, we
recommend to format the micro SD card on dash cam before installation.
11. Default Setting
In default setting, all user information set before will be cleared. When you encounter any problem with the dash
cam, you can try to fix it by resetting to default setting.
08
EN
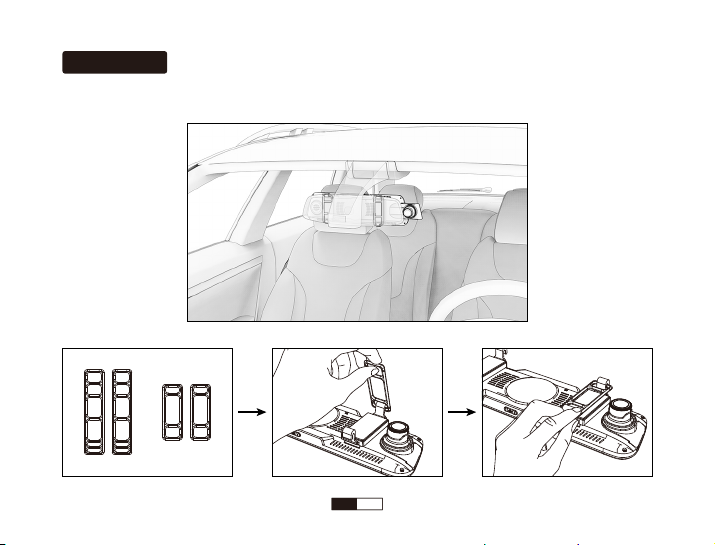
Installation
1. Install the Mirror Dash Cam to the Car
Or
09
EN
3. Install the Rear Camera
The installation location of rear camera is actually quite flexible, so there are two highly recommended locations
with different angles of visions.
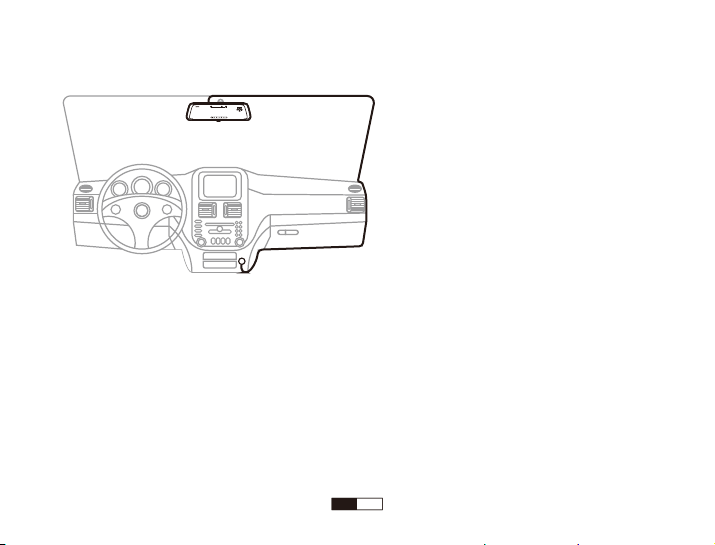
2. Front Camera Installation Wiring Diagram
10
EN

A: The best location of vision from height, which has a full range view, and is very easy to install.
B: Traditional rear camera location, bring limited vision (upper), and professional assistance is required when
installing.
Note: The installation illustrations are for your reference only. The placement of the devices and cables may vary
depending on the car model. If you encounter any problems during installation, contact a skilled installer (such as
the service personnel of the car) for assistance.
A
B
Mounted properly as shown in the picture,
to avoid image shown on the dashcam upside down.
11
EN
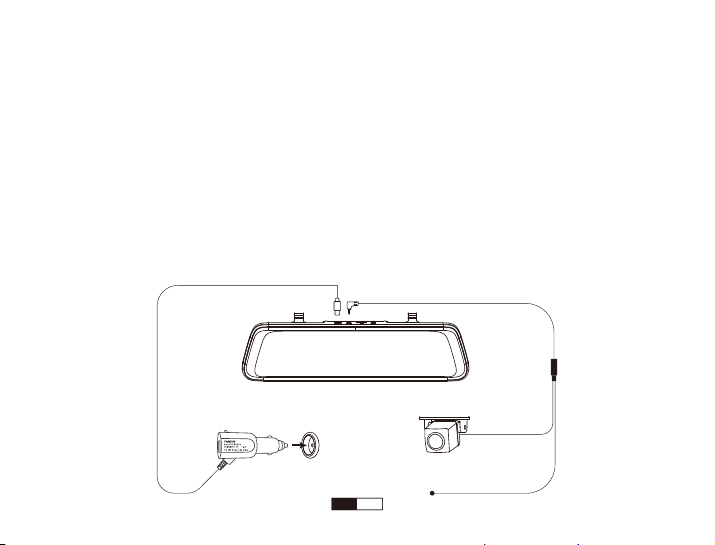
4. Connect to Power
①Plug the Rear Camera Cable (26ft) into the AV Port of the Front Camera, and plug the other end of the Rear
Camera Cable into the Rear Camera.
Note: The red wire is to connect the reversing light. While on reverse gear, making the dash camera's screen
automatically changes to rear view when the car is placed in reverse.
②Connect the power cable to Mini USB port of the dash cam.
③Plug the car charger adapter end of the power cable into a vehicle power socket.
④The car charger with additional USB, you can keep the dash cam charging on the go, and at the same time
charge your smart phone or pad with the same charger.
Front Camera
Rear Camera
Rear Camera Cable (26ft)
The Red Wire
Car Charger
AV-IN PortMini USB Port
12
EN
Emballage inclus
Carte Micro SD 32Go
Français
Caméra Arrière
Dash Cam Miroir
Lecteur de carte SD
Câble 8m pour
caméra arrière
Outil de levier
Sangle de
montage * 4
Mode d’emploi
Chargeur de voiture
avec USB additionnel
13
FR

Disposition
10Ӄcran Tactile IPS Ultra HD de Pleine Taille
Caméra arrière IP67 résistant à l'eau
Objectif Arrière Grand Angle 170 °
Haut-parleur
Réinitialisation
Bouton d’alimentation
Objectif Avant Grand Angle 170 °
Port Mini USB
Fente pour carte Micro SD
Port de caméra arrière
GPS (Non Activé)
Crochet fixe à clip arrière
1
2
3
4
5
6
7
8
9
10
12
11
10 11
8
1 4 5
6
7
9
12
Objectif Extensible et Réglable
2 3
14
FR
Écran Tactile
ABCDEFG
A
B
C
D
E
F
G
H
Opération
Appuyez sur l'icône Audio On / Off
Appuyez sur l'icône d'enregistrement vidéo
Appuyez sur l'icône de prise de photo
Appuyez sur l'icône de verrouillage
Appuyez sur l'icône de lecture
Appuyez sur l'icône de commutation
Appuyez sur l'icône du menu
Appuyez sur l'icône “+” ou “-”
Fonction
Ouvrir / Fermer l'enregistrement audio
Démarrer / Arrêter l'enregistrement vidéo
Prendre une photo
Verrouiller manuellement le fichier
Lecture des vidéos ou des photos
Basculer la vue entre caméra avant et caméra arrière
Entrer dans le menu de réglage
Ajuster la luminosité de l'écran
H
15
FR

Opération de base
Plus de gestes opération:
☆Faites glisser l'écran tactile vers la gauche ou vers la droite pour permuter la vue entre la caméra avant et la
caméra arrière.
☆Faites glisser l'écran tactile vers le haut ou le bas pour régler l'angle de la caméra avant et arrière.
1. Insertion d’une carte Micro SD
Il est recommandé d’insérer une carte Micro SD de niveau 10 ou UHS-1 jusqu’à 64G.
Veuillez formater la carte Micro SD dans la caméra avant la première utilisation.
Conseils:
* Veuillez périodiquement reformater la carte Micro SD pour la maintenir en bon état, et sauvegarder vos photos
et vidéos avant le formatage pour éviter toute perte.
* Assurez-vous que l'appareil est complètement éteint avant de retirer la carte Micro SD afin d'éviter d'endo
mager la carte mémoire.
* Pour éviter la perte de données importantes, copiez fréquemment des vidéos enregistrées de la carte Micro SD
vers un autre périphérique de stockage, tel qu'un ordinateur personnel.
16
FR

2. Mise Sous tension / Hors tension
La camera est conçue pour s'allumer et démarrer l'enregistrement automatiquement lorsque l'adaptateur secteur
est branché sur le secteur.
①Mise Sous Tension / Hors Tension Automatique
La caméra de voiture, alimentée par le chargeur de voiture, sera automatiquement mise sous tension en cas
d’allumage, et sera automatiquement mise hors tension environ 5 secondes après que le moteur de la voiture
s’est éteint.
②Mise Sous Tension / Hors Tension Manuelle
Veuillez longuement appuyer sur le bouton d’alimentation pour au moins 3 secondes pour manuellement mettre
sous tension / hors tension la caméra de voiture.
Conseils:
* En cas de faible consommation d’énergie, la caméra de voiture de bord s’éteindra automatiquement après avoir
affiché une batterie faible.
3. Mode Vidéo
Dans l'interface principale, appuyez sur l'icône d'enregistrement vidéo pour démarrer l'enregistrement. Un point
rouge apparaît et un clignotement lent indique que la vidéo est en cours d'enregistrement.
4. Mode Photo
Dans l'interface principale, appuyez sur l'icône Prendre une photo pour prendre une photo.
17
FR

is the same as that shown in the car rearview mirror.
8. Screen Saver
When recording
If you turn on Screen Saver Mode, the screen display will be turned off after a period of inactivity, but the camera
is still recording when the screen display turns off.
The options of Screen Saver are 1 min, 3min and off. To turn on the screen display again, please tap the touch
screen.
9. Date / Time
Set date firstly by tapping the Up / Down Icon. Tap the OK Icon after done and move the cursor to the next spot
on the right.
This setting is to set correct date and time on the dash cam for video recording and camera shooting.
10. Format
All files will be deleted in format mode. To enable the micro SD card to work immediately after installation, we
recommend to format the micro SD card on dash cam before installation.
11. Default Setting
In default setting, all user information set before will be cleared. When you encounter any problem with the dash
cam, you can try to fix it by resetting to default setting.
Dans l'interface principale, appuyez sur l'icône du menu, entrez dans le menu de configuration.
Voici la description des fonctions principales.
1. Résolutions vidéo (Caméra Frontale): FHD 1080P 30fps / HD 720P 30fps
2. Enregistrement en boucle
En cas d’enregistrement et de sauvegarde à intervalle de 1 / 3 / 5 minutes, la caméra de voiture recouvrira
automatiquement des fichiers les plus anciens dans la carte mémoire une fois que la carte est remplie.
5. Mode Lecture
Dans l'interface principale, appuyez sur l'icône de lecture pour regarder les vidéos ou les photos enregistrées sur
la carte SD.
Remarque: Avant de lire la vidéo, veuillez d'abord arrêter l'enregistrement vidéo.
0
Vidéo de la caméra avant
Vidéo de la caméra arrière
Instruction des réglages du menu
18FR
Table of contents
Languages:
Popular Automobile Accessories manuals by other brands


Great day
Great day Bad Boy PowerLoader PLBB1 Instructions for installation and use

Blue Corvus
Blue Corvus The Bird Rechargeable user guide

Whispbar
Whispbar K361W Fitting instructions

Leer
Leer 217988 Installation instructions & owner's manual

Steinhof
Steinhof P-054 FITTING AND OPERATION MANUAL

WALMEC
WALMEC 3028 manual