Third Eye X2 User manual

1
© ThirdEye Gen, Inc. 2019
ThirdEye Gen, Inc. “ThirdEye” retains and reserves all rights. Other company and product
names may be trademarks or registered trademarks of the respective owners with whom
they are associated. ThirdEye may update this guide from time to time. You should ensure
you are using the most current version which can be found at https://www.
thirdeyegen.com.
ThirdEye Part #: 7002 | Rev 2.5 June 2019

2
Welcome to Mixed Reality
Congratulations on getting your ThirdEye X2 Mixed Reality (MR) Glasses — a
powerful, stereoscopic 3D, see-through mixed reality technology. The X2 MR Glasses
allow you to merge the real world with virtual worlds.
This user guide will take you through the basic set-up of the X2. While the X2
possibilities are infinite, thankfully its setup is not.
This user guide is also available online: www.thirdeyegen.com.
Specifications and instructions included in this document are subject to be updated or
modified at ThirdEye’s discretion. Contact ThirdEye or ask any support questions using
the support email, support@thirdeyegen.com.
Additional instructional information or videos can also be found on the ThirdEye
website, social media, and at www.thirdeyegen.com/forums.
Customer Support
For questions and additional support information not found within this guide, contact
Developer Support
For developer support, documentation, please visit
https://www.thirdeyegen.com/documentation/
or contact [email protected].
Important: Please read this entire guide thoroughly before using your X2 MR
Glasses.

3

4
Table of Contents:
Welcome to X2 MR Glasses --------------- 2
What Comes with X2 MR Glasses? --------------- 5
Overview X2 MR Glasses --------------- 6
Turning on X2 MR Glasses for first time --------------- 9
Head Motion “Gaze” UI Controls --------------- 11
Audio UI Controls --------------- 14
Gesture Controls --------------- 22
The Home Screen --------------- 23
Download Apps from the App Store --------------- 25
ThirdEye MR Workspace --------------- 26
VisionEye SLAM SDK --------------- 29
Developers and Resellers --------------- 30
More X2 MR Glasses Features --------------- 32
Notices --------------- 49

5
What comes with your X2 MR Glasses?
1. X2 MR Glasses
2. USB Type A-C Power Adapter
3. USB Type A-C Cable (for charging and data transfer)
4. Head-strap
5. X2 Portable Carrying Case
6. Microfiber Cleaning Cloth
7. Earphones
8. User Guide
6
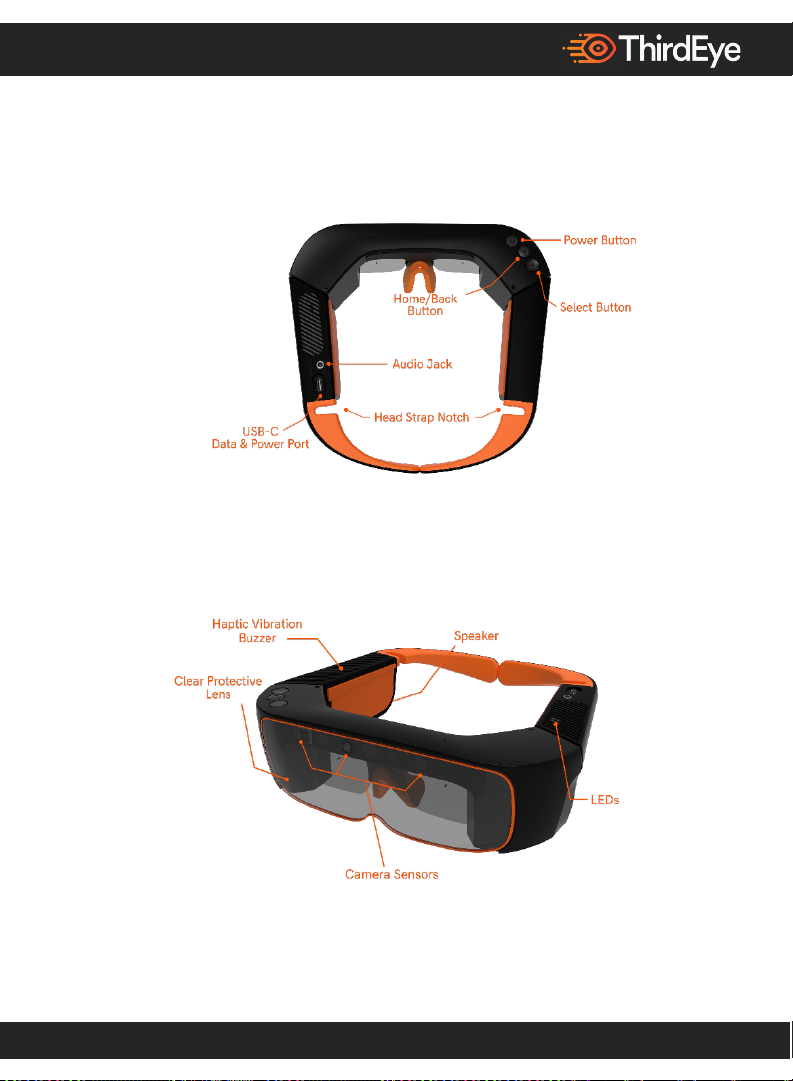
Overview of the X2 MR Glasses:
Top View
Front Angle View

7
Direct Front View

8
Main Buttons Controls:
The Three Buttons are “Power,” “Home/Back,” and “Select”
1. Power On: Short press (click) the power button to turn on. You will see the
white LED light turn on immediately and will hear the haptic buzzer make a
noise. The X2 displays will turn on a few seconds later. If the white LED or
displays do not turn on that means battery is low. Connect to your provided
charger and you will see the orange LED light up to indicate the X2 is charging.
2. Enter Sleep Mode: While your X2 displays are on, short press the power button
to enter sleep mode. The displays turn off in sleep mode. In sleep mode, the
device is not off only the displays are.
3. Exit Sleep Mode: Short press the power button again to exit sleep mode.
4. Power off: While your X2 is on, long press (click and hold for 3 seconds) power
button to turn the system off. You will see a pop-up with the message “shutting
down” indicating the X2 is shutting down automatically.
5. Power Reset: Press and hold the power button for 30 seconds to force a power
reset. During a hard power reset, the device can't be plugged in to a charger or
computer.
6. Home/Back: Press the home/back button to return to the previous screen or
home screen.
9
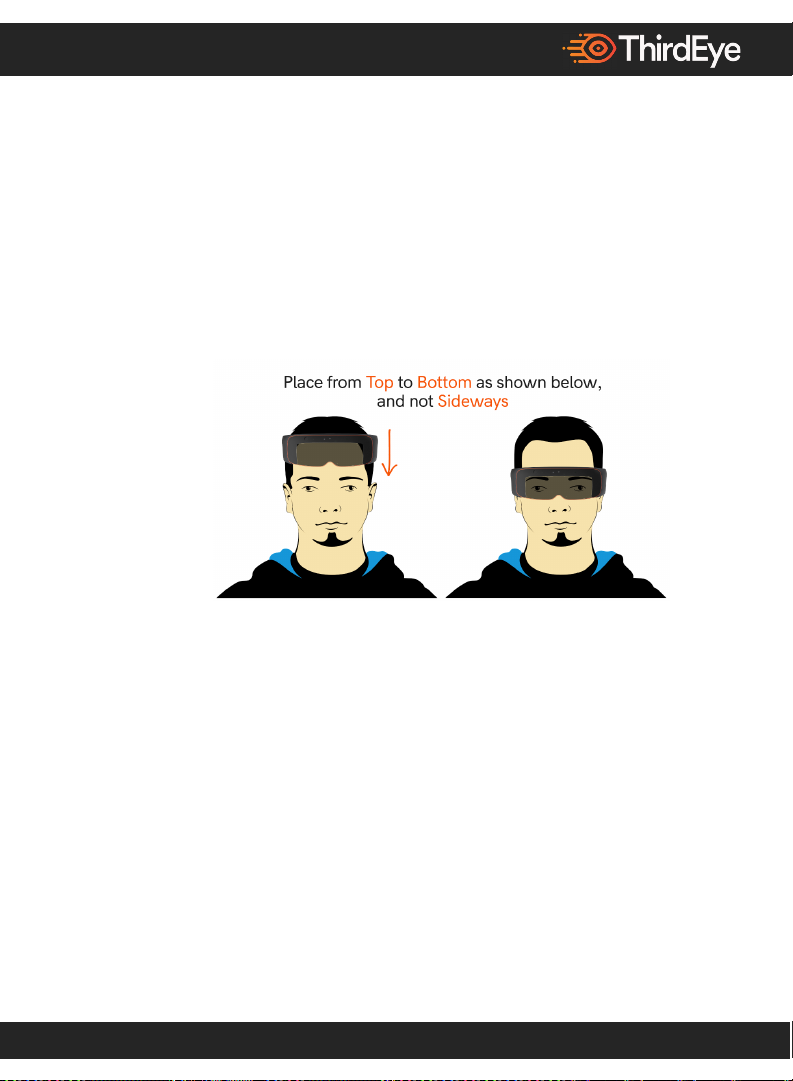
Turning on the X2 MR Glasses for the first time:
The first time you turn on the X2 MR Glasses, you will be taken through a brief
setup process. Please follow the below steps.
1. Put on the X2 from top down (see below picture). Attach the head strap to the
head strap notch if necessary.
2. Turn on the X2 by pressing and holding the power button. You will see the white
LED light turn on automatically and will hear the haptic buzzer make a noise. It
takes a few seconds after pressing the power button for the displays to turn on
with the ThirdEye logo. If the white LED or displays do not turn on that means
battery is low. Connect to your provided charger and press the power button. You
will see a battery charge icon if battery is low. After charging for some time,
press and hold the power button and the ThirdEye logos will display for the
normal power up process.
3. Once the displays are on, you will be taken to the home screen. If the screen or
icons seem blurry, this may be because the X2 is not positioned properly on your
face. Adjust it up or down on your nose, modify the flexibility of the nosepiece

10
if needed, and use the head strap if necessary, to position properly on your face
until you can view the full screen properly.
4. On the home screen you will see tutorial apps for the gaze/audio/gesture controls.
Look at the tutorial with your head to move the cursor and click by pressing the
physical “select” button or via the automatic head motion gaze click. The tutorial
will go through how to use the different user interface methods and
control/activate/deactivate them.
11
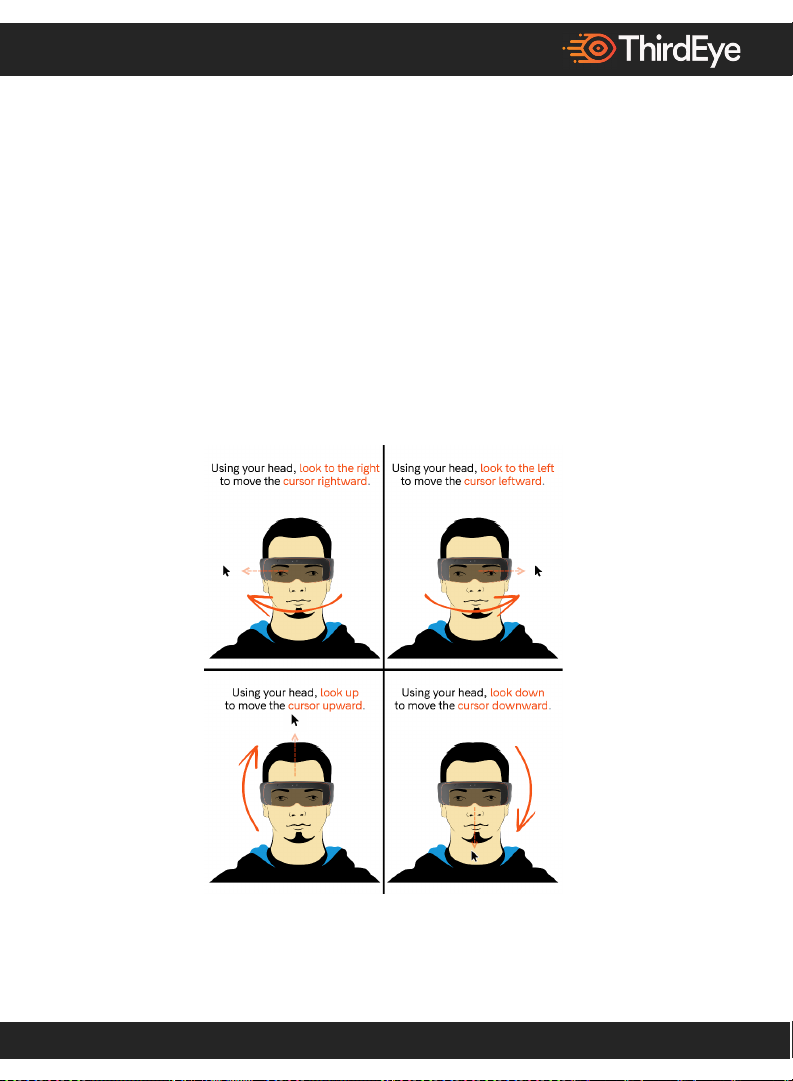
Head Motion “Gaze” UI Controls
There are multiple methods of user interface (UI) controls on the X2 MR Glasses.
1. Move/Click/Drag and Drop/Long Press: Using your head look up, down,
left, and right to move the cursor along with your head motion. Upon
looking at an icon, the Gaze UI cursor automatically “clicks” by just staring
at the icon for a couple seconds. You can drag and drop an icon by looking
at an icon and pressing/holding the “select” button. To “long press,” press
and hold the “select” button.
2. Gaze UI Tab: The Gaze UI controls tab is located at the top left. Each UI
button corresponds to a different function. You can move this UI controls
12
tab anywhere else on the home screen by looking at the UI tab and pressing
and holding the “select” button to drag and drop the UI Controls tab to a
different section of the screen.
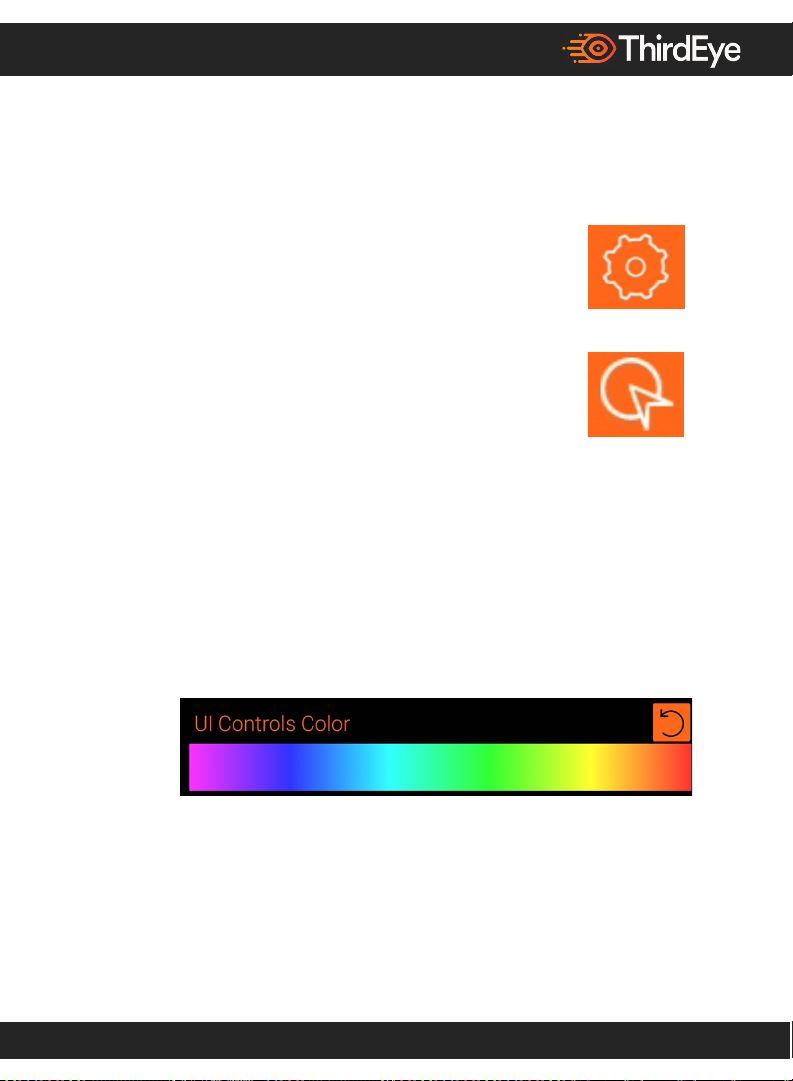
3. Settings: The “settings” gear on the UI tab allows you to
customize the user interface per your individual preference.
Below are some of the customizations available:
i. Enable/Disable Auto-Click: To enable auto-click,
click on the icon displayed on the right which can be
found on the Gaze UI tab. If you want the automatic
clicking to stop, scroll down to the “disable auto-click.” After disabling
this, to click on something you have to look at the icon and press the
“select” button.
ii. Change Color/Size of UI Tab and Cursor: To change the color,
scroll to the UI controls color and drag and drop it to whichever color
you prefer. There is also an option to change the size of the UI tab
from small, medium and large per your preference.
iii. Change Speed of Cursor Auto-Click: Increase or decrease the speed
of how fast the cursor automatically clicks when above an icon.

13
iv. Change Speed of Cursor Movement: You can increase or decrease
how fast the cursor moves with your head motion speed.
v. Enable/Disable Gaze UI Controls: You can disable the head motion
gaze UI controls in settings if you want to use audio, gestures or a
wireless controller instead. Note: If you disable the head motion gaze
UI controls, you will need to use some other form of UI control (audio,
gestures, a Bluetooth controller device, or Vysor app on a computer.)
To re-enable the head motion gaze UI controls, click on the Gaze UI
app or enable in settings.
vi. Restart Gaze UI Tutorial: You can always redo the initial tutorial
via the Gaze UI tutorial button in settings.
4. Hide UI Tab from Top: To minimize the UI tab, click on
the “ThirdEye” logo next to the “settings” icon in the UI tab.
This will minimize the UI tab. To reopen the UI tab, look
at the “ThirdEye” logo on the bottom right and click on it. You can move
the minimized UI tab anywhere on the screen via the same “drag and drop”
method. Remember where you moved it so you can reopen it later.
5. Previous Screen (Back/Home) Functionality While Gaze
UI Is On: If the gaze controls are enabled, to go back to the
previous screen, you can click on the “back” icon on the gaze
UI controls or press the physical “back” button.

14
Audio UI Controls
The X2 MR Glasses support audio commands in English using a custom speech
recognizer. The device uses the latest technology for advanced noise
cancellation. Speech recognition works in various environments.
• The wake-up word to enter audio command mode is "Okay ThirdEye."
• You can say "Stop listening" to go back to turn off audio commands.
Upon saying the wake-up word, the X2 MR Glasses will make an audible “ring”
sound and display text on screen to let you know the X2 MR Glasses are listening
for audio commands. You can say multiple audio commands in a row; however,
if you are going to be talking in the meantime that could trigger commands
unintentionally.
You can say “show commands list” to get a scrolling list displayed of all the
audio commands in case you forget any.
When you say, “stop listening,” the X2 MR Glasses will make an audio “ring”
sound to let you know it has turned off audio commands.
ThirdEye Global Audio Commands:
The below audio commands are global commands meaning that they can be used
on any screen after saying the wake-up word. They will work on the home screen
and in any third-party app, unless the third-party app developer specifically
deactivated a global command.

15
Global Audio Commands
Meaning
Sleep Mode
X2 sleep mode
Show Commands List
Provides user a list of currently active
voice commands in its own activity screen
Wake Up
Return from sleep mode to the previous
screen
Shutdown ThirdEye
Android turn off – X2 shuts down
Back Button
Mimics the Android back button
Navigates to the previous or home screen
Home Screen
Navigates to home screen of X2
Open Camera
Opens built-in Android camera app
Take Picture
Takes a picture and saves it to gallery
Can be used at any time
Start/Stop Recording
Starts recording a video, displays a
preview window on the top left corner of
the screen
Stops recording a video, hides the preview
window
Saves the video to the media gallery
Can be used at any time
Open Store
Opens ThirdEye App Store app
Open Workspace
Open ThirdEye Mixed Reality Workspace
application
Gallery
Opens media gallery application
Files App
Opens file manager application
16
Open/Close Thermal
Opens and closes the thermal sensor feed
application
Take Thermal Picture
Takes thermal feed picture and saves it
into media gallery
Flashlight On/Off
Turns on/off flashlight (Android torch
functionality)
Screenshot
Takes screenshot of Android screen and
saves it into gallery
Volume Up/Down
Increases/decreases the volume one step
Brightness Up/Down
Increase/decrease the display brightness
level by 10%
Brightness High/Max
Sets display brightness level to high
Brightness Medium
Sets display brightness level to medium
Brightness Low
Sets display brightness level to low
Rotation On/Off
Turn on/off sensor-based screen rotation
Mute Sound/Off
Mute on/off
Cursor Up/Down/Left/Right
Moves the system cursor/highlight
Cursor Select
Selects the currently highlighted object
Head Motion On/Off
Head motion UI controls appear/turn off
Gaze Click On/Off
The automatic stare clicking starts / the
automatic stare clicking stops. Only
physical clicking via select button will
click

17
Motion Select
“Clicks” whatever the head motion pointer
is over
Voice Commands Off
Turns the audio command off completely
To turn them back on, click on the “VUI
on” icon on the home screen
System Settings
Goes to Android settings
Wireless Settings
Goes to Android Wi-Fi settings
Bluetooth Settings
Goes to Android Bluetooth settings
Recent Apps
Open applications running in the
background
Close App
Closes the highlighted application in
recent apps screen
Internet
Opens up system level internet browser
(Firefox app)
Android Debugging On/Off
Turns debug mode on/off
Launcher Dark Mode
Makes background home screen black
“transparent”
Launcher Light Mode
Makes background home screen light
My Applications | Open App
Drawer
Opens up “my applications” folder on the
home screen
Show Desktop | Close App
Drawer
Returns to the simplified applications
desktop screen
About ThirdEye Device
Opens “about device” in Android settings
Check ThirdEye Update
Automatically checks for updates
18
Download ThirdEye Update
Now/Later
If update exists and if device battery is
50% or more or connected to charger,
OTA update will commence. If less than
50%, text box comes up saying “connect
to charger – battery percent for OTA must
be at least 50%”
Install ThirdEye Update
Now/Later
Will install the OTA update now or at a
later time
Scroll Up/Down/Left/Right
Scrolls the screen up/down/left/right
Voice Typing
Activates the voice keyboard
(Note: The soft keyboard must be visible
on-screen to accept voice typing
commands)
Opening User-Installed Apps:
User-installed apps are automatically added to the global command list when
they are installed. Say “open” and the app’s label to open it. For example, to open
an app called “Strike Force,” simply say “open Strike Force.”
Voice Typing:
When the voice keyboard is activated, the following commands are made
available.
Voice Typing
Activates the Voice Keyboard (Note: The soft
keyboard must be visible on-screen to accept
voice typing commands)
Commands
Meaning

19
Spacebar
Adds a single space
Enter
Presses the enter key
Backspace/Delete
Deletes the last character
Clear Text
Clear the text
Caps On
Uses capital letters
Caps Off
Switches to lowercase letters
Clear Text
Clears text in the active text edit box
Cursor Left
Moves the text cursor one character to the left
Cursor Right
Moves the text cursor one character to the right
Cursor Home
Moves the text cursor to the beginning of the
text box
Cursor End
Moves the text cursor to then end of the text box
Typing
Letters/Numbers/Symbols
To type a letter, you can either use the NATO
alphabet (“Alpha” for A, “Bravo” for B, etc.) or
say “Letter A/B/C...” for letters or use a
combination of both
For numbers, you can say “Number 1/2/3”
For symbols, you can say the name of the
symbol
For example: To type “hello :-) 123,” (1) say
"Okay ThirdEye" to wake up system, (2) say
"voice typing” to activate system, (3) next say:
"hotel, letter e, lima, letter l, letter o, space,
colon, minus, closed parenthesis, space, number
This manual suits for next models
1
Table of contents


