Thomas&Betts 65U User manual

Contents:
• (A) Line side (Receptacle) housing
• (B) Load side (Plug) housing
• (C) Fuse holder
• (D) Connecting link (SDK only)
• (E) Fuse (Not included)
• Assembly Dowel
• Lubricant
Read and understand all instructions and
safety information before use. Be aware
of proper usage and potential hazards.
IMPORTANT
Step 1
• Measure cable diameter. Refer to Table 1, select
corresponding section on molded sleeve. Cut off remaining
sections of housing to size referenced in Range column,
Table 1. Example: If cable OD is 0.390 inch, it falls within the
AWG 4-2 range - cut at 4-2 line.
Step 2
• Thoroughly clean approximately 8" along load side cable end.
Apply lubricant and insert cable through small hole in load
side (plug) housing. Push through a sufficient distance to
WARNING: Risk of shock, disconnect
power before installation
CAUTION: Product must be installed by a
qualified electrician in accordance with
national and local electrical codes.
CAUTION: Identify LINE and LOAD sides
of wiring and molded connector bodies
before beginning installation. These
instructions are not intended as a
substitute for adequate training or
experience in such safety practices. These
instructions do not attempt to provide for
every possible contingency.
(A) (B)
(C)
(E)
(D)
⅜" Strip
length
Load side
(plug) housing
Insert
8"
Table 1
Range Cable O.D. (inch)
14 -10 0.120-0.205
8-6 0.195-0.330
4-2 0.320-0.430
1 of 2
INSTALLATION INSTRUCTIONS
Street lighting kit, 65U / SLK / SDK
Inline fuse / Disconnect
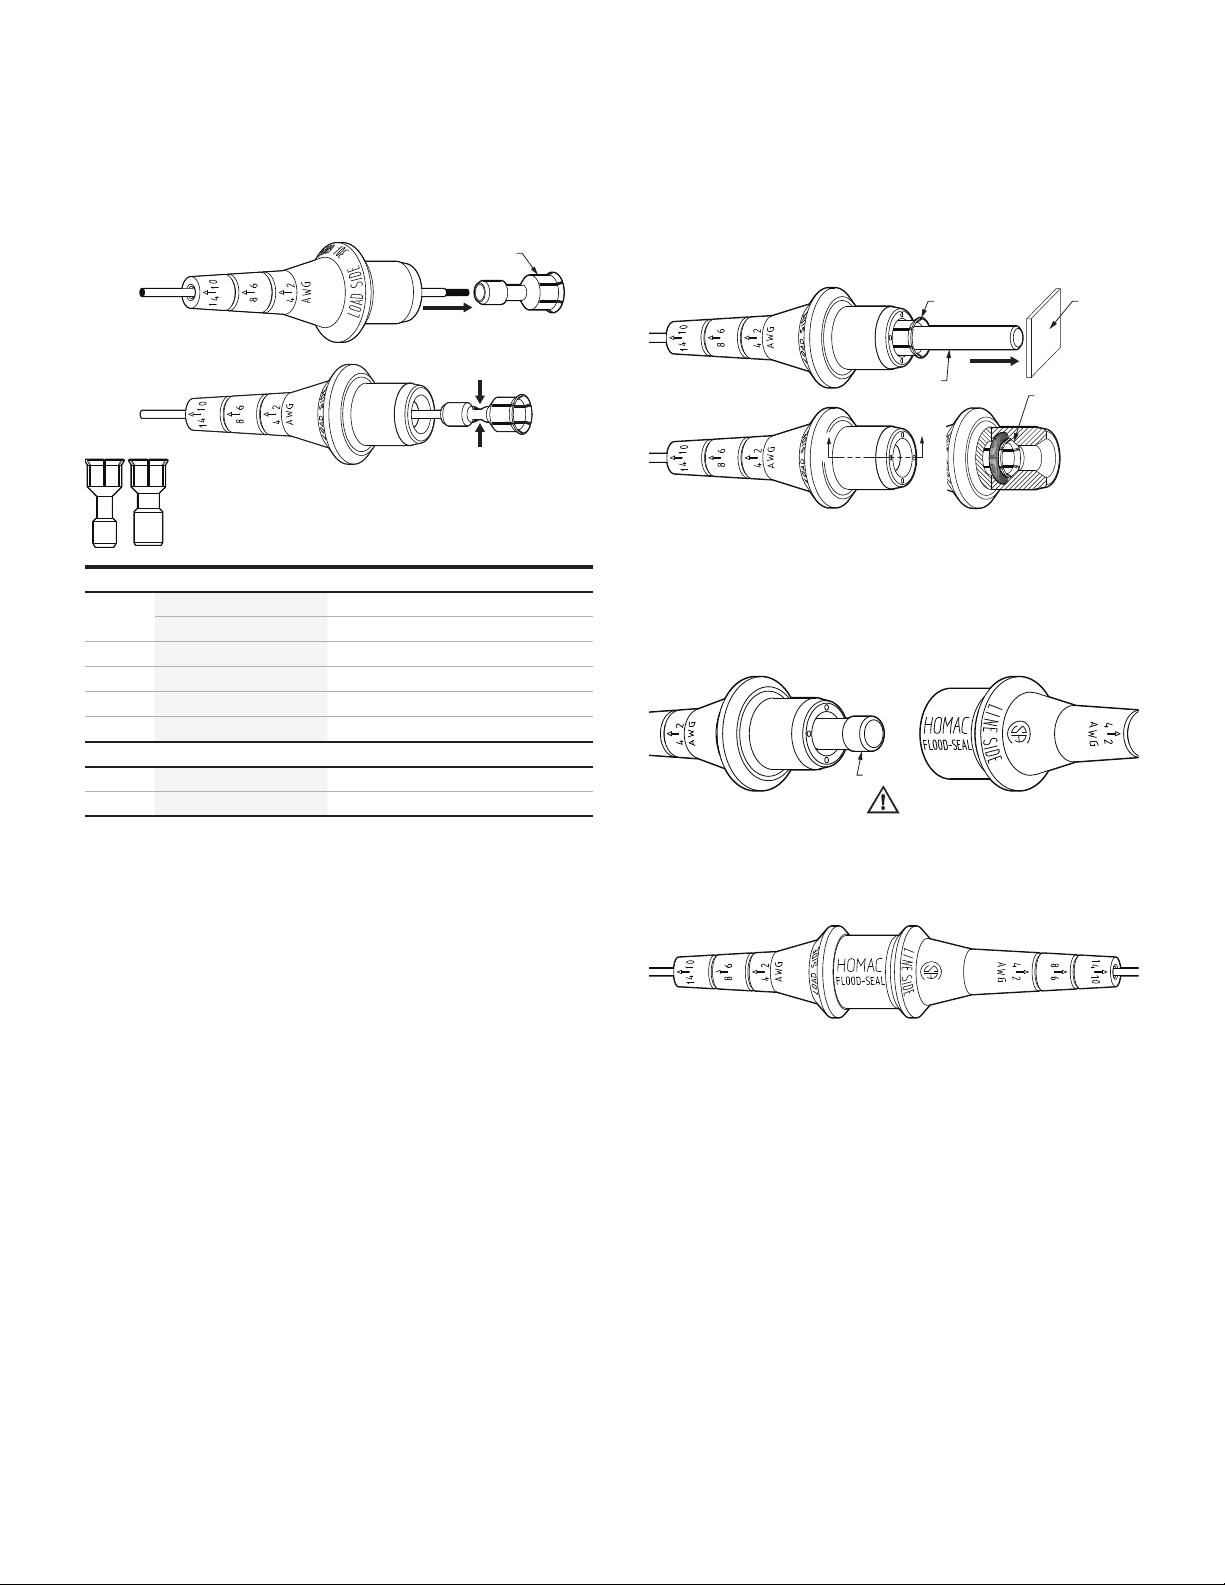
• Apply lubricant lightly to outside of fuse holder. Place the
wood dowel into socket and position the free end of dowel
against a firm surface. Push the load side (plug) housing
forward until fuse holder snaps into position. Wipe off any
excess lubricant.
STEP 5
• Repeat all the above steps with line side (receptacle) housing.
STEP 6
•
link into the plug (load side) housing.
STEP 7
• Connect load side (plug) and line side (receptacle) housings
together.
STEP 3
• Insert cable into crimp barrel of fuse holder and crimp. Refer
to Table 2 for suggested tool and die.
STEP 4
Fuse holder
Crimp
Insert
Fuse holder
Wood dowel
Firm
Surface
Fuse holder
in lock position
Push
A
Section A-A
A
1
23
Crimp location
Fuse
WARNING:
DO NOT use glass body fuse
Table 2
Crimp
area
Conductor size AWG Recommended tool and dies
Stranded Solid T&B tool No. Die type
114 12, 14 WT111M “C” cavity
110,12 8, 10 WT111M “C” cavity
2 8 6 TBM45S “Blue” cavity
2 6 4 TBM45S “Blue” cavity
Large contact
3 4 2 TBM45S “Gray” cavity
3 2 —TBM45S “Brown” cavity
Street lighting kit, 65U / SLK / SDK | Installation Instructions | 233_R2 | 0054416 C
We reserve the right to make technical
changes or modify the contents of this
document without prior notice. With
regard to purchase orders, the agreed
particulars shall prevail. ABB does not
accept any responsibility whatsoever for
potential errors or possible lack of
information in this document.
We reserve all rights in this document and
in the subject matter and illustrations
contained therein. Any reproduction
– in whole or in part – is forbidden without
prior written consent of ABB.
Copyright© 2019 ABB. All rights reserved.
—
tnb.abb.com (US/Latin America)
tnb.ca.abb.com (Canada)
abb.com
Warranty: tnb.abb.com/ecpwarranty
2 of 2
This manual suits for next models
2
Other Thomas&Betts Lighting Equipment manuals


