Thomashilfen ThevoTherapy Series User manual

User manual – ThevoTherapy 1 and 2.......................................................... 12
Bedienerhandbuch – ThevoTherapy 1 und 2 ................................................ 5
ThevoTherapy
Handleiding – ThevoTherapy 1 en 2............................................................. 24
Manuale per l‘uso – ThevoTherapy 1 e 2...................................................... 18
Brukerhåndbok – ThevoTherapy 1 og 2........................................................ 30
Instrukcja dla użytkownika – ThevoTherapy 1 i 2................................... 36


(1) (2)
(3) (4) (5)
(6) (7) (8)
(9) (10) (11)

5
(12) (13) (14)
(15)
(17) (18) (19)
(20)
(16)

5
Sehr geehrte Nutzer,
mit Ihrem ThevoTherapy haben Sie ein innovatives Produkt aus dem Hause Thomashilfen erworben. In mehrjähriger
Forschungsarbeit wurde ein neuartiges Sitz-Konzept für Therapiestühle entwickelt, das zu den sichersten und
fortschrittlichsten Sitzsystemen auf dem Markt gezählt werden kann.
Damit die Handhabung des Therapiestuhles für Sie und besonders auch für das Kind sicher, praktisch und komfortabel
ist, lesen Sie bitte zuerst diese Bedienungsanleitung.
Sollten Sie trotzdem noch Fragen oder Probleme haben, wenden Sie sich bitte an Ihren zuständigen Fachhandel oder
direkt an uns.
Wir möchten Sie in diesem Zusammenhang auch auf unsere Internet-Site www.thomashilfen.de aufmerksam machen,
auf der Sie aktuelle Informationen abrufen können.
Unsere Adresse: Thomashilfen für Behinderte
GmbH & Co. Medico KG
Walkmühlenstraße 1
D - 27432 Bremervörde
Tel.: 0 47 61 / 88 60
www.thomashilfen.de
Inhalt Seite
Sicherheitstechnische Kontrollen und Wartungsintervalle ................................................................................. 6
Allgemeine Sicherheitshinweise ....................................................................................................................... 6
Zweckbestimmung und Einsatzorte.................................................................................................................. 7
Anwendungsrisiken und Kontraindikationen..................................................................................................... 7
Technische Daten ............................................................................................................................................ 7
Aufstellen und Montage................................................................................................................................... 7
Zusammenfalten .............................................................................................................................................. 7
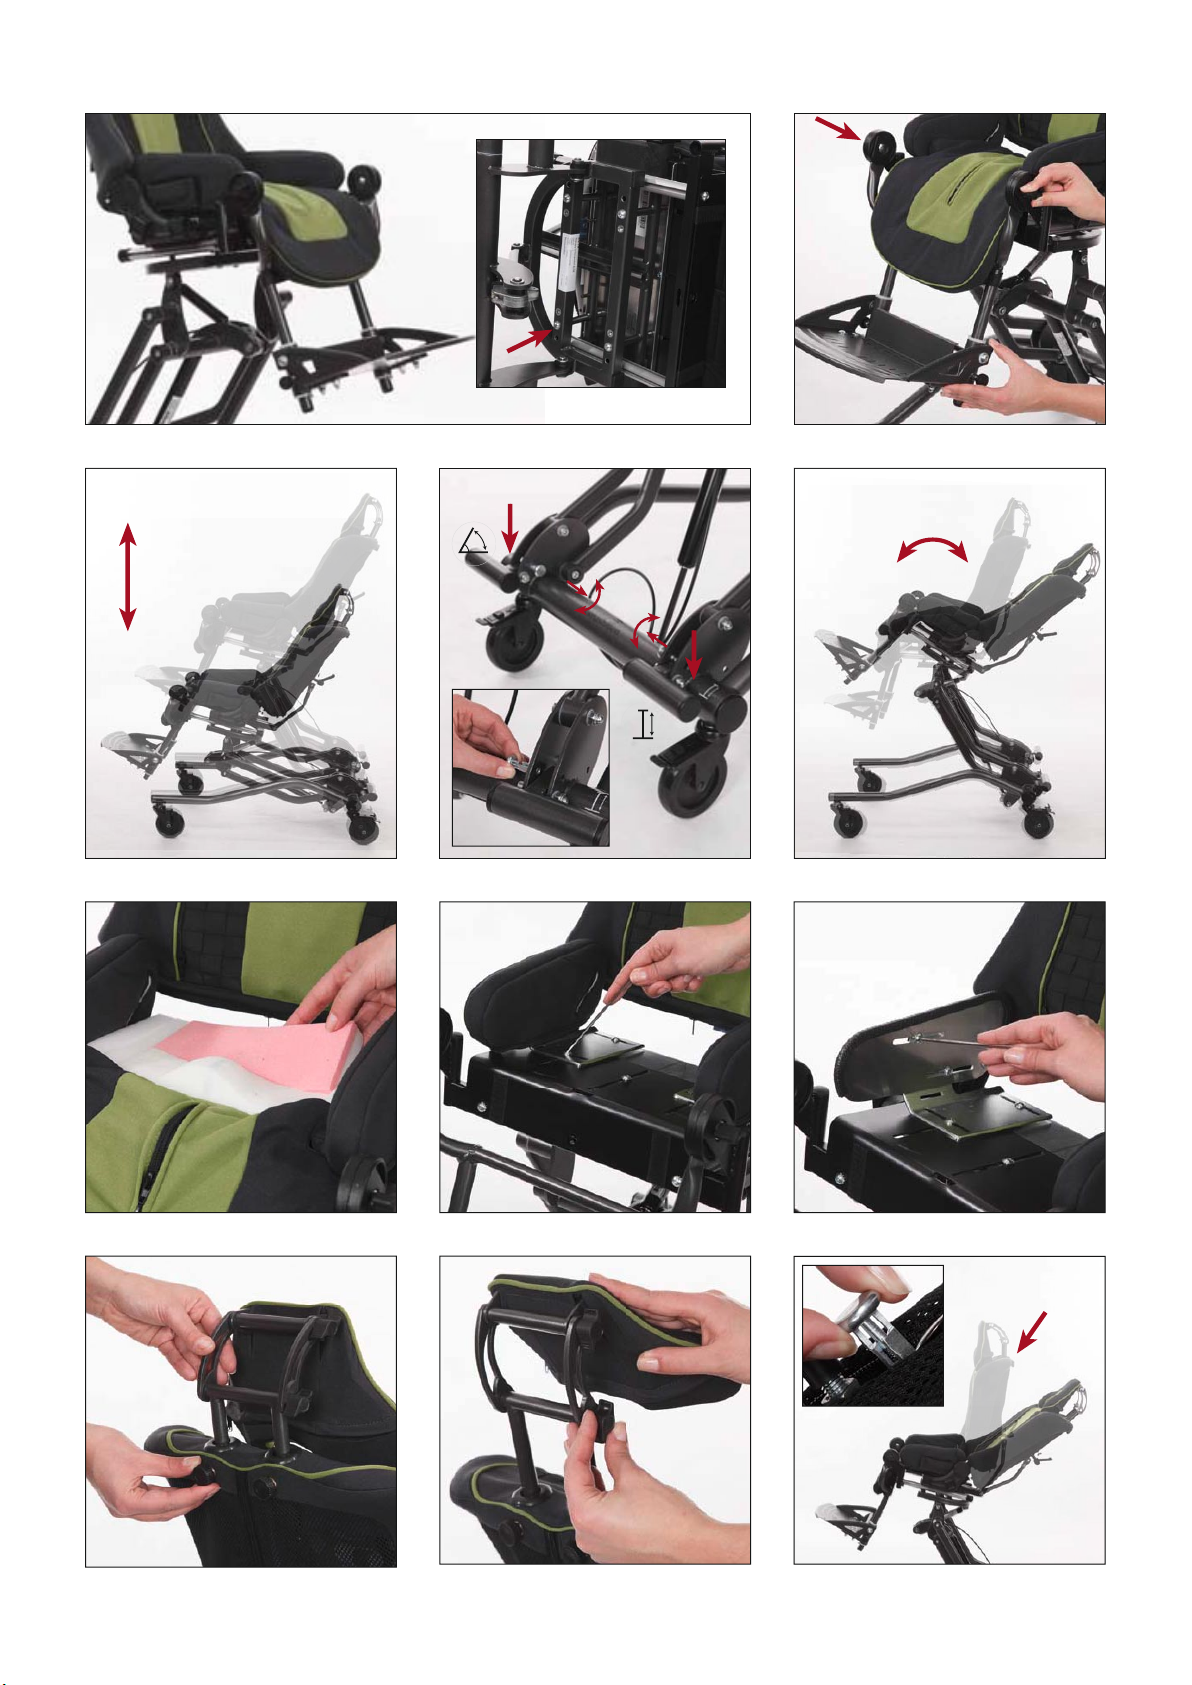
Sitzhöhenverstellung........................................................................................................................................ 8
Sitzwinkelverstellung ....................................................................................................................................... 8
Sitzpolster........................................................................................................................................................ 8
Sitzbreite ......................................................................................................................................................... 8
Sitztiefe ........................................................................................................................................................... 8
Rückenhöhe .................................................................................................................................................... 8
Kopfstütze ....................................................................................................................................................... 8
Rückenlehnenverstellung per Gasdruckfeder.................................................................................................... 9
Unterschenkellänge ......................................................................................................................................... 9
Fußwinkel........................................................................................................................................................ 9
Kniewinkel....................................................................................................................................................... 9
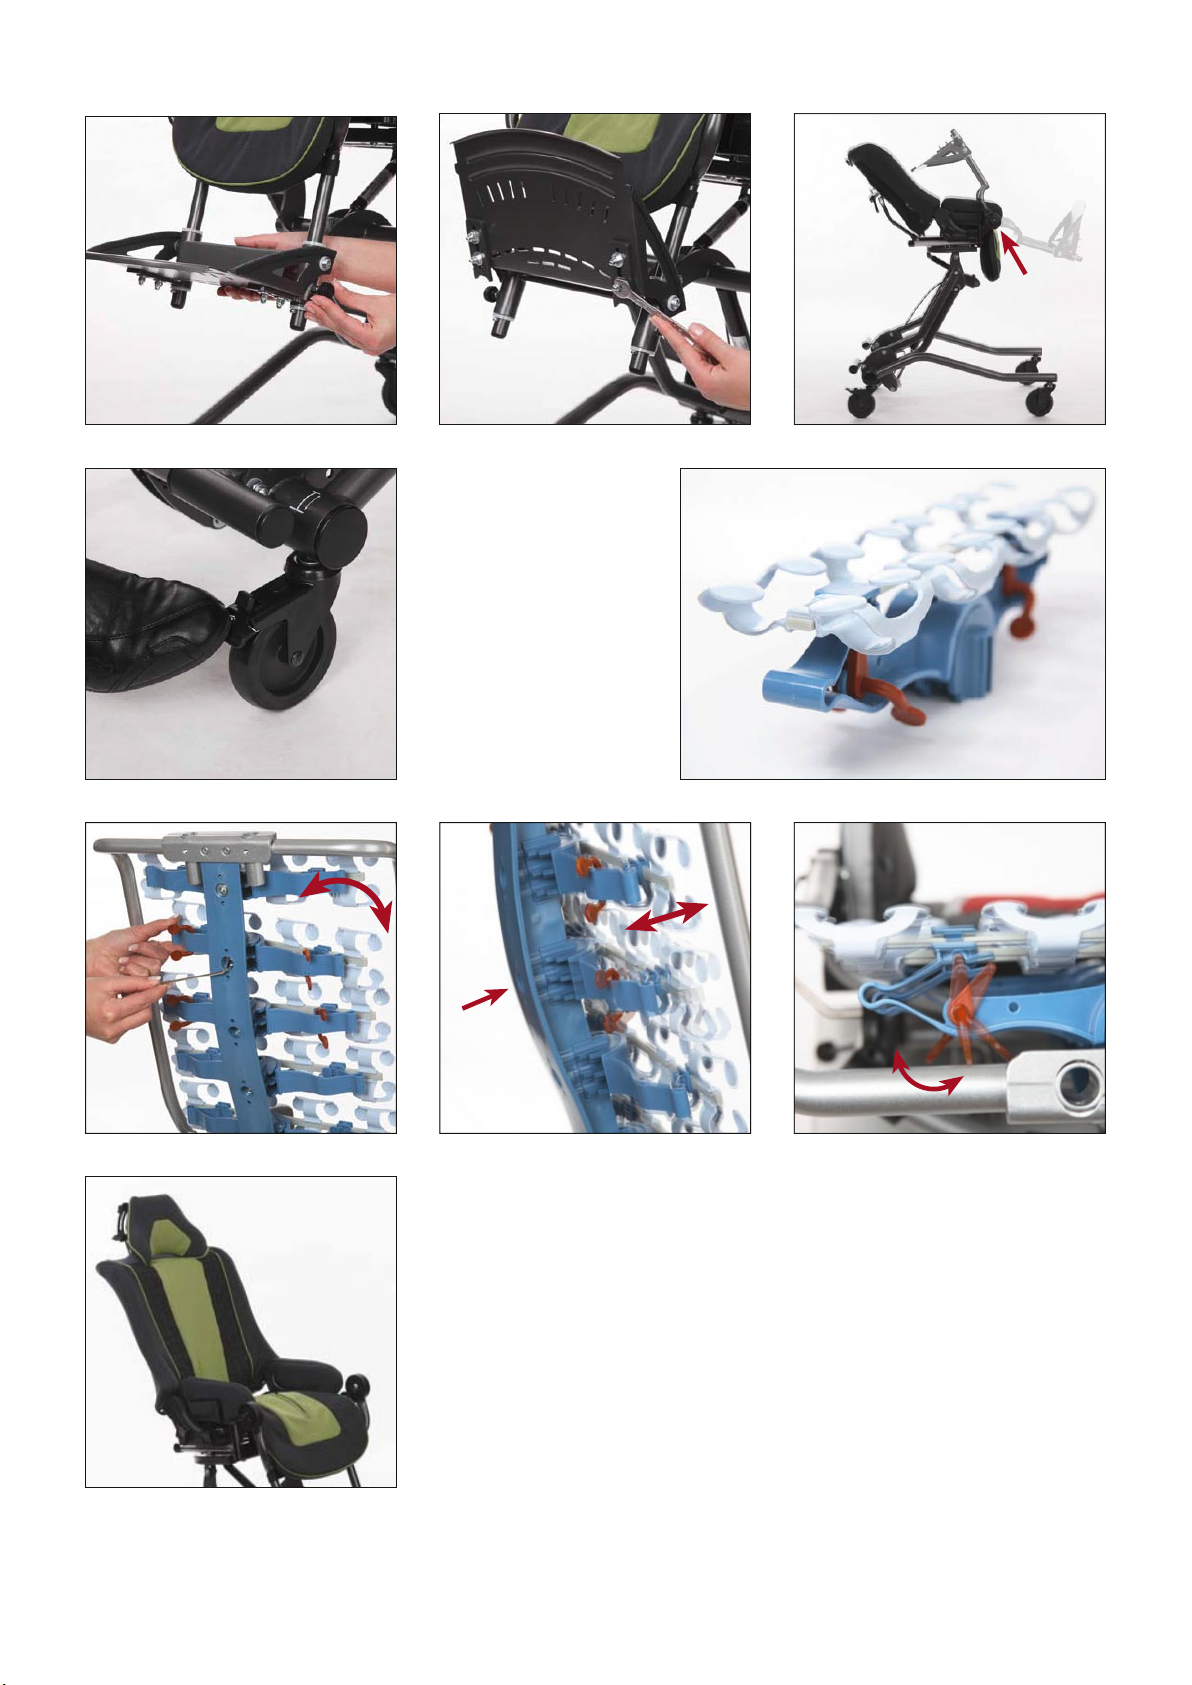
Feststellbremsfunktion ..................................................................................................................................... 9
Federelement................................................................................................................................................... 9
Federwegbegrenzer ......................................................................................................................................... 9
FGF-Leiste ....................................................................................................................................................... 9
Flügelfeder....................................................................................................................................................... 10
Einstellungsempfehlung für den ThevoSeat....................................................................................................... 10
Reinigungs-, Desinfektions- und Pflegehinweise............................................................................................... 10
Garantiebedingungen / CE - Kennzeichnung .................................................................................................... 10
Wartungsplan - jährliche Inspektion / Wiedereinsatz........................................................................................ 11

7
6
Sicherheitstechnische Kontrollen und Wartungsintervalle
èEine regelmäßige Kontrolle aller Bedienelemente und Befestigungsschrauben sollte jeden Monat durchgeführt werden.
Der Schiebeschlitten sollte von Sand freigehalten werden.
èBitte denken Sie daran, nach jeder Einstellung die Schrauben, Klemmhebel (Hüftwinkelverstellung) und Fußpedale
(Sitzwinkel und –höhe) wieder festzustellen bzw. zu arretieren.
Bitte beachten Sie folgende Sicherheitshinweise:
èBitte beachten Sie beim Umgang mit dem ThevoTherapy, besonders bei der Inbetriebnahme, die Empfehlungen
im Bedienerhandbuch.
èBitte halten Sie Ihre Kinder von der Verpackung fern, es besteht Erstickungsgefahr.
èWir empfehlen Ihnen, die Sitztiefe und Unterschenkellänge mindestens alle 3 Monate den aktuellen
Körpermaßen Ihres Kindes anzupassen. Dies sollte gegebenenfalls unter Zuhilfenahme Ihres Therapeuten /
Orthopädietechnikers geschehen.
èAktivieren Sie nach dem Einstellen der Sitzhöhe, des Sitzwinkels und des Hüftwinkels stets die Verriegelung.
èAchten Sie darauf, dass Sie sich nicht die Finger beim Verstellen einklemmen.
èAchten Sie darauf, dass Sie sich beim Hochklappen der Fußstütze und Einstellen der Sitzhöhe nicht verletzen.
èWICHTIG: Verwenden Sie für alle Einstellungen an der Sitzeinheit den beiliegenden Inbusschlüssel
(Innensechskant 3mm).
èWenn Sie Zweifel über die richtige Benutzung des ThevoTherapy haben, erkundigen sich bei Ihrem Händler, um
falsche Einstellungen zu vermeiden.
èDas Anbringen von nicht aufgeführtem Zubehör in dem Handbuch sollte aus Sicherheitsgründen von einem
Spezialisten ausgeführt werden.
è
Bitte überlasten Sie Ihren ThevoTherapy nicht und beachten Sie die maximale Zuladung (s. technische Daten).
èLassen Sie Ihr Kind beim Ein- und Aussteigen in oder aus dem ThevoTherapy nicht unbeaufsichtigt, bei zu starker
Belastung der Fußstütze besteht die Gefahr des Abrutschens oder des Kippens.
èWir empfehlen, das Kind immer mit dem 2-Punkt-Beckengurt oder mit einem anderen Rückhaltegurt (als Zubehör
erhältlich) zu sichern und das Kind niemals unbeaufsichtigt im ThevoTherapy zu lassen.
èBeim Hineinsetzen und Herausnehmen des Kindes müssen die Räder gebremst sein.
èRäder bremsen, wenn der ThevoTherapy steht, damit er nicht unabsichtlich wegrollt.
èVermeiden Sie ungebremstes Fahren gegen Hindernisse.
èACHTUNG: Nasse Räder können die Bremswirkung beeinträchtigen. Bei einem Stopp oder Transfer bitte unbedingt
auf einen sicheren Halt achten, so dass ein unbeabsichtigtes Wegrollen / -rutschen vermieden wird.
è
Heben Sie den ThevoTherapy nur an fest verschweißten oder fest verschraubten Bauteilen an. (Rahmenrohr an den
Vorder- und Hinterrädern)
èBitte vermeiden Sie unebenen Untergrund, da so der ThevoTherapy eventuell kippen könnte.
èÜberfahren Sie Bodenschwellen nur mit auf den Hinterrädern angekipptem Gestell (nach oben - rückwärts ziehen,
nach unten - vorwärts langsam herablassend).
èTreppen dürfen nur mit Hilfe von Begleitpersonen überwunden werden. Sind Einrichtungen wie z. B. Aufzüge
vorhanden sollten diese benutzt werden. Fehlen solche Einrichtungen, sollte das Hindernis durch Tragen von zwei
Helfern, ohne Kind, überwunden werden.
èBeim Befahren von Steigungen und Gefällen ist auf eine erhöhte Aufmerksamkeit zu achten, um ein Umkippen
oder Wegrollen des ThevoTherapy oder ein Herausfallen des Kindes zu vermeiden.
èDas Abstellen des ThevoTherapy an Gefällstrecken sollte vermieden werden.
èWischen Sie ab und zu mal den Schmutz von den Rädern. Verwenden Sie aber keine starken Lösungsmittel.
è Bei einer hohen Sonneneinstrahlung kann es auf dem dunklen Polster zu hohen Oberflächentemperaturen
kommen.
èSetzen Sie den Gasfedern keinen zu hohen Druck oder Temperaturen aus.
èLösen Sie keine Schrauben oder nehmen Sie keine heraus, wenn dies nicht angegeben ist.
èVorsicht beim Umgang mit Feuer.
Tipp: Mehr Informationen finden Sie auch auf unserer Internet-Site unter www.thomashilfen.de

7
Zweckbestimmung und Einsatzorte
ThevoTherapy bietet Kindern mit Behinderungen einen aufrechten, bewegten Sitz für den Innenbereich, der für die
Verwendung auf festem ebenem Grund geeignet ist. Durch die variable Sitzhöhe ist er sowohl zu Hause als auch in
Institutionen wie Kindertagesstätten einsetzbar. Das Kind kann so in der Regel auf Augenhöhe mit anderen Kindern oder
Erwachsenen am Tisch oder in anderen Situationen sitzen. Die Microstimulation im Rücken erlaubt ein stabiles Sitzen, sie
gibt Halt und Beweglichkeit zur gleichen Zeit.
Anwendungsrisiken und Kontraindikationen
Bei sachgerechtem Gebrauch können Risiken bei der Anwendung ausgeschlossen werden. Kontraindikationen sind nicht
bekannt.
Technische Daten
ThevoTherapy 1 2
Sitztiefe 19 - 30 cm 27 - 38 cm
Sitzbreite 19 - 31 cm 25 - 36 cm
Rückenhöhe 47 - 65 cm 64 - 78 cm
Unterschenkellänge 17 - 30 cm 25 - 36 cm
Kniewinkel (in 15° Schritten verstellbar) 90° bis 180° 90° bis 180°
Hüftwinkel 90° bis 122° 90° bis 122°
Fußwinkel 78° bis 100° 78° bis 100°
Größe Fußstütze (B x T) 28,5 x 18 cm 33 x 21 cm
Gesamtmaß Sitz (B x H x L) 38 x 78 x 54 cm 45 x 101 x 66 cm
Faltmaß Sitz (B x H x L) 38 x 41 x 57 cm 45 x 48 x 74 cm
Belastbarkeit Sitz 35 kg 40 kg
Sitzneigung -4° to +31° -4° to +31°
Sitzhöhe mit Sitzeinheit 26 - 66 cm 26 - 66 cm
Gesamtmaß Untergestell (B x H x L) 54 x 59 x 73 cm 54 x 59 x 73 cm
Faltmaß Untergestell (B x H x L) 54 x 24 x 73 cm 54 x 24 x 73 cm
Schiebegriffhöhe (Zubehör) 80 - 102 cm 80 - 102 cm
Adapterhöhe 20 - 59 cm 20 - 59 cm
Radgröße Schwenkräder (vorne) 100 mm 100 mm
Radgröße Schwenkräder (hinten mit Feststellbremse) 100 mm 100 mm
Belastbarkeit Untergestell 50 kg 50 kg
Gewicht (gesamt) 19,9 kg 21,4 kg
Aufstellen und Montage
Das Untergestell ist bereits komplett montiert und wird in zusammengefaltetem Zustand geliefert. Die Zugschnäpper an
den Fußpedalen lösen und mit einer Viertel-Drehung arretieren. Dann können Sitzhöhe und ggf. Sitzwinkel eingestellt
werden. (Abb. 3-5)
Die Sitzeinheit auf dem Adapter am Untergestell platzieren und mit den vier beigelegten Schrauben und den
Unterlegscheiben befestigen (Abb. 1). Zum Abnehmen die vier Schrauben wieder entfernen.
Die Fußstütze muss an den Kniegelenken befestigt werden. Dazu die Rastergelenke übereinander platzieren und mit den
Schrauben, den Unterlegscheiben (von innen) und Flügelmuttern (von außen) befestigen (Abb. 2).
Zusammenfalten
Die Rückenlehne in maximale Liegeposition bringen, die Fußstütze in den Sitz schwenken, dazu das Kniegelenk lösen
und die Fußstütze einklappen (Abb. 2). Sitzneigung in die waagerechte Position bringen und die Sitzschale bis auf den
Boden senken (siehe Sitzhöhenverstellung).
Achtung: Beim Zusammenfalten ein Rahmenteil mit einer Hand festhalten, um ein Umkippen auszuschließen
und stets darauf achten, dass Sie sich nicht die Finger einklemmen.

8
Sitzhöhenverstellung
Die Sitzeinheit kann bis auf den Boden abgesenkt werden. Dazu das rechte Fußpedal an der
Hinterseite vom Untergestell betätigen (Abb. 3-4). Dann kann die Sitzeinheit (am Rücken, an
den Armlehnen oder am Schiebebügel, falls vorhanden) nach unten gedrückt oder leicht nach
oben gezogen werden, bis die gewünschte Höhe erreicht wurde. Sie wird auf der gewünschten
Höhe befestigt, indem der Fuß vom Pedal genommen wird. Während der Sitz benutzt wird,
kann die Höhe eingestellt werden. Unter Umständen könnte es jedoch notwendig sein, dass
zwei Leute den Sitz in die gewünschte Höhe heben müssen. Die Sitzhöhenverstellung kann
aus Sicherheitsgründen gesperrt werden. Die Verstellung ist gesperrt, wenn der Zugschnäpper
links neben dem Pedal eingerastet ist. (Abb. 4) Die Sicherung wird aufgehoben, indem der
Zugschnäpper herauszogen und um eine Viertelumdrehung gedreht wird.
Sitzwinkelverstellung
Mit dem Pedal auf der hinteren linken Seite vom Untergestell kann der Sitzwinkel eingestellt
werden (Abb. 4-5). Zuerst die Bremsen fixieren. Dann kann die Sitzeinheit (am Rücken, an
den Armlehnen oder am Schiebebügel, falls vorhanden) nach vorne gedrückt oder nach hinten
gezogen werden, bis der gewünschte Winkel erreicht wurde. Sie wird im gewünschten Winkel
befestigt, indem der Fuß vom Pedal genommen wird. Während der Sitz benutzt wird, kann
der Winkel eingestellt werden. Versichern Sie sich unbedingt vorher, ob das Kind mit einem
Beckengurt oder ähnlichem gesichert ist. Unter Umständen könnte es jedoch notwendig sein,
dass zwei Leute den gewünschten Sitzwinkel einstellen müssen. Die Sitzwinkelverstellung kann
aus Sicherheitsgründen gesperrt werden. Die Verstellung ist gesperrt, wenn der Zugschnäpper
rechts neben dem Pedal eingerastet ist. (Abb. 4) Die Sicherung wird aufgehoben, indem der
Zugschnäpper herauszogen und um eine Viertelumdrehung gedreht wird.
Wichtig: Die Sitzhöhenverstellung und die Sitzwinkelverstellung sollte gesichert sein, während der Sitz benutzt wird.
Achtung: Bei der Sitzhöhenverstellung und der Sitzwinkelverstellung muss das Sitzsystem vor und während des
Verstellens von einer Person mit beiden Händen gesichert werden, um ruckartige Positionsveränderungen
für das Kind zu vermeiden. Wir empfehlen, diese Einstellung ohne Kind in der Sitzeinheit vorzunehmen.
Sitzpolster
Das Sitzpolster kann individuellen an die Bedürfnisse des Kindes angepasst werden. Dazu den Reißverschluss am
Sitzpolster öffnen und die einzelnen Schaumteile wie gewünscht platzieren. (Abb. 6)
Sitzbreite
Verschraubung der Sitzseitenführung von oben mit einem Inbusschlüssel lösen und Seitenelemente entsprechend
verschieben. (Abb. 7)
Sitztiefe
Die Inbusschrauben (auch für Sitzbreiten-Einstellung) auf der Sitzfläche lösen und Sitzplatte nach vorne herausziehen.
(Abb. 7)
Tipp: Zum leichten Einstellen der Sitztiefe mit einer Hand die vordere Kante der Sitzfläche greifen und mit der anderen
am unteren Rückenende (mittig) gegenhalten.
Die Sitzseitenführung kann ebenfalls in der Tiefe eingestellt werden. Dazu die beiden Schrauben lösen, die gewünschte
Tiefe einstellen und die Schrauben wieder festziehen (Abb. 8).
Rückenhöhe
Die zwei Rändelmuttern am Rücken der Sitzeinheit lösen und die gewünschte Höhe einstellen. (Abb. 9)
Hinweis: Bei einer niedrigen Rückenhöhe sollte das oberste Federelement entfernt werden, um eine ergonomisch
korrekte Sitzhaltung zu ermöglichen. (siehe Federlement)
Kopfstütze
Durch Lösen der zwei Flügelmuttern an der Kopfstütze kann die Höhe und der Winkel der Kopfstütze individuell
angepasst werden. (Abb. 10)

9
Rückenlehnenverstellung per Gasdruckfeder
Der Auslösekopf oben an der Rückenlehne ist durch eine Arretierung gesichert. Zum Lösen der Arretierung den
Auslösekopf leicht anheben und bei einer Viertel-Drehung wieder einrasten lassen. Der Rückenwinkel kann jetzt
eingestellt werden. Dazu mit einer Hand die Rückenlehne sichern und mit der andern Hand den Auslösekopf runter
drücken. Die Lehne durch drücken oder anheben in gewünschte Position bringen und den Auslösekopf wieder los lassen.
Die Sitzeinheit gleitet automatisch auf den Schienen nach vorne und verlagert den Schwerpunkt. Nach der Verstellung
sollte darauf geachtet werden, dass der Auslösekopf wieder arretiert ist. (Abb. 11)
Unterschenkellänge
Durch Lösen der Rändelmuttern rechts und links an der Seite der Fußstütze wird die Arretierung gelöst. Die Fußstütze
ist stufenlos in der Höhe verstellbar. (Abb. 12)
Fußwinkel
Rechts und links an der Unterseite der Fußstütze die vier Schrauben lösen und den gewünschten Fußwinkel einstellen.
Die Schrauben wieder fest anziehen. (Abb. 13)
Kniewinkel
Kniewinkel durch Lösen der seitlichen Flügelschrauben (beidseitig) einstellen. (Abb. 14)
Tipp: Zum leichteren Ein- und Aussteigen kann die Fußstütze hochgeklappt werden.
Feststellbremsfunktion
Feststellen / Lösen der Rollen
Die Hinterräder sind mit gut zugänglichen und leicht bedienbaren Feststellern ausgerüstet. Zum fixieren die Feststeller
nach unten drücken. Werden die Feststeller wieder nach oben gedrückt sind die Rollen wieder frei beweglich. Die
Bremsen blockieren sowohl das Rollen als auch die Schwenkbarkeit der Räder, so dass das Untergestell allein über die
Hinterräder sicher gebremst wird. (Abb. 15)
Federelement
Die beweglichen Federelemente ermöglichen und fördern die individuelle Bewegung der Kinder. (Abb. 16)
Rotationswinkel
An der Rückseite der Sitzeinheit die mittlere Inbusschraube lösen und den gewünschten Rotationswinkel des
Federelementes einstellen. Danach die Schraube wieder anziehen. (Abb. 17)
Hinweis: Zum Demontieren des gesamten Federelementes die mittlere Inbusschraube lösen und das Federelement
nach vorne herausnehmen.
Tiefenverstellung
Bevor die Tiefenverstellung in Richtung des Kindes vorgenommen werden kann, muss die Inbusschraube für die
Einstellung des Rotationswinkels gelöst werden (siehe oben). Nun kann an der Rückseite der Sitzeinheit die obere und
untere Inbusschraube nach rechts gedreht werden und das komplette Federelement bewegt sich nach vorne, in Richtung
des Kindes. Wird die Inbusschrauben nach links gedreht, bewegt es sich wieder zurück. Nach der Anpassung muss die
mittlere Inbusschraube (für den Rotationswinkel) wieder angezogen werden. (Abb. 18)
Federwegbegrenzer
Die roten Federwegbegrenzer befinden sich im Federelement. Durch sie kann der Federweg der FGF-Leiste je nach
Bedarf begrenzt werden.
Zum Begrenzen des Federweges den Feststeller von außen nach innen drücken, bis er in der Aufnahme einrastet. Zum
Lösen wieder komplett nach außen drücken. (Abb. 19)
Bei Verwendung des Gurtbügels kann es zu einer Einschränkung beim Verstellen der Federwegbegrenzer kommen. Dann
das Federelement leicht nach vorne drücken.
Tipp: Zum leichteren Verstellen die FGF-Leiste von vorne leicht anheben.
FGF-Leiste (flexible Glasfaser-Leiste)
Diese Leisten werden aus einem ermüdungsfreien Material durch modernste Glasfasertechnologie (Pultrusion) hergestellt.
Sie gewährleisten neben einer hohen Lebensdauer auch einen optimalen Sitzkomfort. Dieser wirkt sich unmittelbar
positiv auf den Wahrnehmungsprozess des Kindes aus.

10
Flügelfeder
Die Flügelfedern passen sich optimal an die Körperkonturen der Kinder an und geben Bewegungsimpulse weiter. Jede
Flügelfeder kann bei Bedarf verschoben oder auch entfernt werden, um eine individuelle Anpassung zu gewährleisten.
Zum Entfernen die Flügelfeder mit beiden Händen oben und unten nach vorne zusammendrücken.
Einstellungsempfehlung für den ThevoSeat
1. Das Kind in die Sitzeinheit setzen.
2. Becken ausrichten.
3. Die Federelemente an die individuellen ergonomischen Bedürfnisse des Kindes durch die Einstellung des
Rotationswinkels und der Tiefe der Federelemente anpassen.
4. Mit weiterem Zubehör kann die Versorgung des Kindes optimiert werden.
5. Nach spätestens 24 Stunden muss die erste Anpassung überprüft werden.
Reinigungs-, Desinfektions- und Pflegehinweise
Polster
Alle Polster sind mit wenigen Handgriffen leicht abzunehmen. Der 100 % Trevira CS Stoff ist ein hochwertiges
Gewebe, waschbar bis 40° C. Wir weisen darauf hin, dass auch hochwertige Stoffe durch dauerhafte und intensive
Sonneneinstrahlung oder häufiges Waschen ausbleichen können. Das Polster ist schwer entflammbar (BS 5852 part 1).
(Abb. 20)
Klettverschlüsse
Um die Funktionsfähigkeit der Klettverschlüsse zu erhalten, die Klettbänder mit einer Bürste ab und zu abbürsten. Beim
Waschen die Klettbänder immer schließen.
Untergestell
Das ThevoTherapy Untergestelle sind aus hochwertigem Stahl- und Aluminiumrohr hergestellt. Dieses ist mit einer
widerstandsfähigen Pulvereinbrennlackierung beschichtet, das mit handelsüblichen Seifen (Neutralseife) gereinigt und
desifiziert werden kann.
Garantiebedingungen / CE - Kennzeichnung
Die Firma Thomashilfen ist zertifiziert nach ISO-Norm DIN EN ISO 13485:2003 und verbürgt sich für die Qualität der
von ihr gelieferten Produkte. Bei der Wahl des Materials sowie der Verarbeitung werden höchste Produktionsstandards
zugrunde gelegt. Alle Teile werden grundsätzlich einer Endkontrolle unterzogen.
Thomashilfen bietet Ihnen ab Kaufdatum eine 3-jährige Garantie auf alle Rahmenteile. Die Garantie umfasst alle
Ansprüche, die die Funktion beeinträchtigen. Ausgenommen sind Schäden, die durch unsachgemäße Handhabung
(z. B. Überbelastung), sowie natürlichen Verschleiß entstehen.
ThevoTherapy entspricht den Anforderungen der europäischen Norm EN 12182 und 12183 und ist mit einer
CE-Kennzeichnung versehen.
Wir wünschen Ihnen viel Freude an Ihrem ThevoTherapy Therapiestuhl!

11
Wartungsplan - jährliche Inspektion / Wiedereinsatz
Vorbereitung
Eine Bedienungsanleitung muss dem Produkt beiliegen. Sollte keine verfügbar sein, fordern Sie diese beim Hersteller an.
Machen Sie sich mit den Funktionen des Produktes vertraut. Sollten Sie das Produkt nicht kennen, studieren Sie vor der
Prüfung die Bedienungsanleitung. Reinigen Sie das Produkt vor Prüfbeginn. Beachten Sie ggf. in der Bedienungsanleitung
enthaltene Pflegeanweisungen und produktspezifische Prüfanweisungen.
Service und Reparaturen am Reha-Wagen dürfen nur vom autorisierten Fachhandel durchgeführt werden. Wenden
Sie sich bei Problemen an den Fachhändler, der Ihnen den Wagen angepasst hat. Bei Reparaturen erhalten Sie dort
ausschließlich Original Ersatzteile. Informationen zu autorisierten Fachhändlern in Ihrer Nähe erhalten Sie an unserer
Info-Hotline: 0 47 61/ 88 6-0.
Pos. Bereich
þ = erledigt Prüfung (Inspektion / Wiedereinsatz)
Funktion Beschäd. Verform. Ersetzen
1 Sitz I/W I/W I/W
2 Winkelverstellung I/W I/W I/W
3 Höhenverstellung I/W I/W I/W
4 Sitz-Polster I W
5 Fehlende Kappen und Stopfen I/W
6 Rücken I/W I/W I/W
7 Winkelverstellung I/W I/W I/W
8 Höhenverstellung I/W I/W I/W
9 Rücken-Polster I W
10 Schiebebügel I/W I/W I/W
11 Schiebebügelüberzug I W
12 Untergestell I/W I/W I/W
13 Bereifung I I I W
Optionen
14 Kopfstütze I/W I/W I/W
15 Kopfstützen-Polster I W
16 Thoraxpelotten I/W I/W I/W
17 Thoraxpelotten-Polster I W
18 Armlehnen I/W I/W I/W
19 Armauflagen I W
20 Hüftpelotten I/W I/W I/W
21 Hüftpelotten-Polster I W
22 Abduktionskeil I/W I/W I/W
23 Abduktionskeil-Polster I W
24 Tibiapelotten I/W I/W I/W
25 Tibiapelotten-Polster I W
26 Therapietisch I/W I/W I/W
27 Begurtung I/W I/W I/W
Die Wartung wurde durchgeführt von: am:

12
Dear user,
The ThevoTherapy chair you have purchased is an innovative product made by Thomashilfen. After several years of
research, a new concept in seat design for therapy chairs has been developed that ranks among the safest and most
advanced seating systems on the market.
Please read the instruction manual before use to ensure that handling of the ThevoTherapy chair is safe, practical and
comfortable for you and your child.
Should you have any further questions or issues, please contact your specialised supplier or Thomashilfen directly.
For more information about Thomashilfen and our products, please visit our website at www.thomashilfen.com
Our address: Thomashilfen für Behinderte
GmbH & Co. Medico KG
Walkmühlenstraße 1
D - 27432 Bremervörde
phone: +49 (0) 47 61 / 886-68 or -63
www.thomashilfen.com
Contents Page
Safety-related checks and maintenance intervals.............................................................................................. 13
General safety instructions............................................................................................................................... 13
Purpose and use.............................................................................................................................................. 14
Risks and contraindications.............................................................................................................................. 14
Technical data ................................................................................................................................................. 14
Setting up and assembly .................................................................................................................................. 14
Folding ............................................................................................................................................................ 14
Seat height adjustment..................................................................................................................................... 15
Seat tilt-in-space adjustment ............................................................................................................................ 15
Seat cushion .................................................................................................................................................... 15
Seat width adjustment ..................................................................................................................................... 15
Seat depth adjustment ..................................................................................................................................... 15
Back height adjustment.................................................................................................................................... 15
Headrest adjustment........................................................................................................................................ 15
Backrest adjustment by gas spring.................................................................................................................... 15
Lower leg length adjustment............................................................................................................................ 16
Foot angle adjustment...................................................................................................................................... 16
Knee angle adjustment .................................................................................................................................... 16
Parking brake function..................................................................................................................................... 16
Spring element................................................................................................................................................. 16
Spring movement limiters ................................................................................................................................ 16
FGF-track......................................................................................................................................................... 16
Wing suspension ............................................................................................................................................. 16
Recommendations for the adjustment of the ThevoSeat ................................................................................... 17
Cleaning, disinfecting, and care instructions .................................................................................................... 17
Terms of guarantee / CE mark.......................................................................................................................... 17

13
Safety-related checks and maintenance intervals
èAll operating elements and fastening screws should be checked every month. The telescopic sliding plate should
remain free of dirt and sand.
èPlease bear in mind that the screws and release handles (hip angle adjustment) should be secured after each
adjustment.
Please observe the following general safety instructions:
èWhen handling ThevoTherapy, especially when setting up, please observe the recommendations in the user
manual.
èPlease keep packaging material away from children to avoid the risk of choking.
èWe recommend that you adjust the seat depth and lower leg length according to the current body size of your child
at least every 3 months. If necessary, ask your therapist / orthopaedist for assistance.
èPlease bear in mind to engage the locking device after adjusting the seat height, seat angle, and hip angle.
èPlease be careful not to catch your fingers when carrying out adjustments.
èBe careful not to harm yourself when folding up the footrest or adjusting the seat height.
èIMPORTANT: Use the attached Allen key for all adjustments (Allen screw 3mm/0.1").
èIf you have doubts about the correct use of ThevoTherapy consult your local dealer to avoid incorrect adjustments.
èFor safety reasons accessories not mentioned in this user manual should be mounted by specialists only.
è
Please do not overload your ThevoTherapy and observe the maximum load capacity (see technical data).
èOnly one child should be seated in ThevoTherapy.
èDo not leave your child unattended when getting in or off ThevoTherapy. Excessive load of the footrest may lead to
slipping off or tipping.
èWe recommend that you always secure your child with the 2-point pelvic belt (standard equipment) or another
retention belt (available as an accessory), and never leave the child unattended in ThevoTherapy.
èAlways lock the brake before placing or removing the child from ThevoTherapy.
èAlways lock the brake when the chair is stationary to avoid rolling.
èAvoid any obstacles in the way of the chair, do not push the chair into them.
èATTENTION: Wet wheels may affect the braking action. When stopping or halting for a longer period of time you
should apply the foot brake to prevent inadvertent rolling.
è
When lifting ThevoTherapy make sure to hold it at tightly welded or tightly screwed component parts only (frame tube
at front and rear wheels).
èPlease avoid uneven ground, as this may cause ThevoTherapy to tip over.
èGround beams should be passed over only when the base frame is tilted to stand on the rear wheels (going upwards
– pull backwards, going downwards – lowering slowly).
èStairs must only be taken with the aid of an accompanying person. If available, elevators or similar equipment should
be used. If such equipment is unavailable, the obstacle should be passed with the chair being carried by two persons,
without the child sitting in it.
èPlease be careful when pushing on slopes to avoid ThevoTherapy tipping over or rolling away, or your child falling
out of the chair.
èParking ThevoTherapy on slopes should be avoided.
èFrom time to time you should wipe off the dirt from the wheels. Use a damp cloth and make sure you dry thoroughly.
Do not use strong solvent.
è High solar radiation may lead to high surface temperature on the dark upholstery material.
èDo not expose the gas springs to high pressure or temperatures.
èDo not loosen or remove any screws unless otherwise stated.
èKeep ThevoTherapy away from naked flames.
Tip: You may find additional information at our web site www.thomashilfen.com

14
Purpose and use
ThevoTherapy provides disabled children with an upright, dynamic seat for indoors, which is suitable for the use on solid,
at ground. Due to the variable seat height it is appropriate for use both at home or in institutions, e.g. day-care centres.
The child is normally enabled to sit at eye level with other children or adults at the table or in other situations. The Micro-
Stimulation in the back caters for stable seating, providing hold and mobility at the same time.
Risks and contraindications
Proper handling may avoid any use-related risks. No contraindications are known.
Technical data
ThevoTherapy 1 2
Seat depth 19 - 30 cm / 7.5 – 11.8" 27 - 38 cm / 10.6 – 15"
Seat width 19 - 31 cm / 7.5 – 12.2" 25 - 36 cm / 9.8 – 14.2"
Back height 47 - 65 cm / 18.5 – 25.6" 64 - 78 cm / 25.2 – 30.7"
Lower leg length 17 - 30 cm / 6.7 – 11.8" 25 - 36 cm / 9.8 – 14.2"
Knee angle 90° to 180° 90° to 180°
Hip angle 90° to 122° 90° to 122°
Foot angle 78° to 100° 78° to 100°
Size of foot rest (w x d) 28.5 x 18 cm / 11.2 x 7" 33 x 21 cm / 12.9 x 8.3"
Overall dimensions Seat (w x h x l) 38 x 78 x 54 cm / 45 x 101 x 66 cm /
15 x 30.7 x 21.3" 17.7 x 39.8 x 26"
Folding dimensions Seat (w x h x l) 38 x 41 x 57 cm / 45 x 48 x 74 cm /
15 x 16.1 x 22.4" 17.7 x 18.9 x 29.1"
Carrying capacity Seat 35 kg / 77.2 lb 40 kg / 88.2 lb
Seat tilt-in-space -4° to +31° -4° to +31°
Seat height with seat unit 26 - 66 cm / 10.2 – 26" 26 - 66 cm / 10.2 – 26"
Overall dimensions Indoor-Frame (w x h x l) 54 x 59 x 73 cm / 54 x 59 x 73 cm /
21.3 x 23.2 x 28.7" 21.3 x 23.2 x 28.7"
Folding dimensions Indoor-Frame (w x h x l) 54 x 24 x 73 cm / 54 x 24 x 73 cm /
21.3 x 9.5 x 28.7" 21.3 x 9.5 x 28.7"
Push bar height (accessory) 80 - 102 cm / 31.5 – 40.2" 80 - 102 cm / 31.5 – 40.2"
Adapter height 20 - 59 cm / 7.9 – 23.2" 20 - 59 cm / 7.9 – 23.2"
Size of swivel wheels (front) 100 mm / 3.9" 100 mm / 3.9"
Size of swivel wheels (rear with brake) 100 mm / 3.9" 100 mm / 3.9"
Carrying capacity Indoor-Frame 50 kg / 110.2 lb 50 kg / 110.2 lb
Weight 19.9 kg / 43.9 lb 21.4 kg / 47.2 lb
Setting up and assembly
The base frame is supplied already fully mounted and folded together. Loosen the locking pin at the foot pedal and lock
it by doing a quarter turn. You can now adjust the seat height and, if necessary, the seat tilt-in-space. (fig. 3-5)
Place the seat unit onto the adapter of the base frame and attach it using the 4 screws and washers provided (fig. 1).
To take off the seat unit just remove the 4 screws again.
The footrest is to be fixed to the knee joints. Place the grid joints one upon the other, and connect them with the screws
and the washers (coming from the inside) and wing nuts (coming from the outside). (fig. 2)
Folding
Bring the backrest to the maximum horizontal position, loosen the knee angles and swivel the footrest over and down
onto the seat unit (fig. 2). Move the seat tilt adjustment to a horizontal position and lower the seat unit down to the
ground (see seat height adjustment).
CAUTION: Hold the frame with one hand when folding to avoid it tipping over. Be careful not to catch your fingers.

15
Seat height adjustment
The seat unit can be lowered down to the ground. Apply the right foot pedal at the back of
the base frame (fig. 3-4). Now push the seat unit down (at the back, the armrests or the push
bar, if available) or pull it upwards until the desired height is reached. To keep the height,
simply remove your foot from the pedal. The seat height can also be adjusted during use of
the chair. It may then be necessary for two people to lift the seat to the desired height. For
safety reasons the seat height adjustment can be locked. The adjustment is locked when the
locking pin to the left of the pedal is engaged (fig. 4). To unlock, pull out the locking pin and
do a quarter turn.
Seat tilt-in-space adjustment
To adjust the seat tilt-in-space, use the pedal on the left side of the rear frame (fig. 5). First,
engage the brakes. Now either push the seat unit forwards (at the back, the armrests or the
push bar, if available) or pull it backwards until the desired angle is reached. To keep the
angle, remove your foot from the pedal. The seat tilt-in-space can also be adjusted during
use of the chair. It may then be necessary for two people to adjust the desired seat angle. For
safety reasons the seat tilt-in-space adjustment can be locked. The adjustment is locked when
the locking pin to the left of the pedal is engaged (fig. 4-5). To unlock, pull out the locking
pin and do a quarter turn.
IMPORTANT: The seat height adjustment and seat tilt-in-space adjustment should always be locked during
use of the chair.
CAUTION: When adjusting the seat height or seat tilt-in-space one person must secure the seating systems with both
hands to avoid sudden changes of the child’s position. We recommend carrying out this setting without
the child in the seat unit.
Seat cushion
The seat cushion can individually be adjusted to the special needs of the children. Open the zipper at the cushion and
place the foam parts as desired. (fig. 6)
Seat width
Loosen the hip seat guide screws from above using an Allen key and shift the hip guides accordingly. (fig. 7)
Seat depth
Loosen the Allen screws (also for the adjustment of the seat width) on the seating surface and pull out the seat plate.
(fig. 7)
Tip: For easy adjustment of the seat depth, grip the front edge of the seat with one hand and press against bottom
part of the backrest (concentric) with the other hand.
The depth of the hip guides can be adjusted, as well. Loosen the two screws, adjust the desired depth, and retighten the
screws. (fig. 8)
Back height
Loosen both knurled nuts at the back of the seat unit and adjust the desired height. (fig. 9)
Note: The upper spring element should be removed for low back heights in order to facilitate an ergonomically correct
sitting posture. (s. spring element)
Headrest
The height and angle of the headrest may be adjusted individually by loosening both wing nuts on the headrest.
(fig. 10)
Backrest adjustment by gas spring
The release button at the top of the backrest has a safety lock. To unlock, slightly lift the release button and let it click
into place again after a quarter turn. Now, you can adjust the back angle. Hold the backrest with one hand and press
the release button down with the other hand. Adjust desired position by pushing or lifting the backrest. Then release the
button again. The seat unit automatically slides forwards on its rails, shifting the centre of gravity. (fig. 11) Make sure to
relock the release button after each adjustment. (fig. 11)

16
Lower leg length
Release the locking device by loosening the knurled nuts on the right and left of the footrest. The height of the footrest
can be freely adjusted. (fig. 12)
Foot angle
Loosen the four screws on the right and left of the rear side of the footrest and adjust the desired foot angle. Retighten
the screws. (fig. 13)
Knee angle
Set the knee angle by loosening the side wing screws (on both sides). (fig. 14)
Tip: The footrest can be flipped up to facilitate getting on and out of the chair.
Parking brake function
Locking / releasing the castors
The rear castors are equipped with easily accessible and easy to use brakes. To lock the castors press the locking device
down. By pushing the locking device up again the castors become flexible. The brakes prevent the castors both from
turning and from swivelling, so that the base frame can be safely parked via the rear wheels alone (fig. 15).
Spring element
The movable spring elements allow and facilitate the children’s individual mobility. (fig. 16)
Angle of rotation
Loosen the central Allen screw at the back of the seat unit and adjust the desired angle of rotation of the spring element.
Retighten the screw. (fig. 17)
Note: To dismount the whole spring element, loosen the central Allen screw and remove the spring element in
forward direction.
Depth adjustment
In order to adjust the depth in the direction of the child, loosen the Allen screw for the adjustment of the rotation angle
(s. above). Now the upper and lower Allen screw at the back of the seat unit can be turned to the right, and the whole
spring element moves forward in the direction of the child. If the Allen screw is turned to the left, it moves back again.
After adjustment, the central Allen screw (for the rotation angle) should be retightened. (fig. 18)
Spring movement limiters
The red spring movement limiters are located inside the spring element. The displacement of the FGF track can be limited
as required.
To limit the spring travel, press the securing device inward until it engages into place. Press outward for loosening. (fig. 19)
The adjustment of the spring movement limiters may be restricted when the belt bow is used. In such cases, slightly press
the spring element forward.
Tip: Slightly lift the FGF track from the front for easier adjustment.
FGF-track (flexible fibre glass track)
These tracks are made of fatigue-proof material using the latest fibre glass technology (pultrusion). Apart from high
durability, they also ensure optimal sitting comfort, which results in the child’s positive perceptive process.
Wing suspension
The wing suspensions optimally fit the body contour of the child and transmit movement impulses. Each wing suspension
may be shifted or removed as necessary in order to ensure individual adaptation. To remove the wing suspension, press
the top and bottom forward with both hands.

17
Recommendations for the adjustment of the ThevoSeat
1. Place the child into the ThewoSeat unit.
2. Align the pelvic.
3. The spring elements can be adjusted to the child’s individual ergonomic requirements by regulating the angle of
rotation and depth of the spring elements.
4. The child’s care may be optimized with additional accessories.
5. The initial adjustment should be checked after 24 hours at the latest.
Cleaning, disinfecting and care instructions
Cushions
All cushions may be removed in only a few steps. The 100 % Trevira CS fabric is a top quality textile, washable at 40° C /
104° F. Please note that even high-quality fabrics may fade when exposed to permanent and intense sunlight. The cushion
is made of low flammability materials (BS 5852 part 1). (fig. 20)
Velcro fastening
Occasionally, clean the Velcro ribbon with a brush in order to preserve the functionality of the Velcro fastening. Always
close the Velcro ribbons at washing.
Chassis
The ThevoTherapy chassis is manufactured from high-quality steel and aluminium tubing which is coated with a robust
heat-enamel finish; and can be cleaned using commercially available no-toxic soap (neutral soap).
Terms of guarantee / CE mark
Thomashilfen is certified in accordance with the ISO standard DIN EN ISO 13485:2003 and guarantees the quality of
the products they supply. Both material selection and processing meet the very highest manufacturing standards. Every
single part is subjected to final inspection.
Thomashilfen offers you a guarantee of 3 years for all frame parts, commencing on the date of purchase. This guarantee
incorporates all claims which influence functionality. Damages due to improper use (e.g. overloading), and natural wear
and tear are excluded.
ThevoTherapy meets the requirements of the European standards EN 12182 and 12183 and is provided with a CE
marking.
Enjoy your ThevoTherapy therapy chair!

18
19
Cari genitori,
con ThevoTherapy avete acquistato un prodotto innovativo della ditta Thomashilfen. In molti anni di ricerca è stato sviluppato
un nuovo concetto di seduta per sedie terapeutiche che contano tra i sistemi più sicuri e moderni presenti sul mercato.
Per garantire l‘uso della sedia terapeutica sicuro, pratico e confortevole per Voi e soprattutto per il Vostro bambino,
preghiamo di leggere prima il presente manuale.
Se ciononostante, voi aveste ancora delle domande o se si presentassero dei problemi non esitate a contattare il rivenditore
specializzato o direttamente la nostra ditta.
In questo contesto, desideriamo segnalarle anche la nostra pagina Internet www.thomashilfen.com, dalla quale potrà
richiamare le informazioni attuali.
Il nostro indirizzo: Thomashilfen für Behinderte
GmbH & Co. Medico KG
Walkmühlenstraße 1
D - 27432 Bremervörde
telefono: +49 (0) 47 61 / 886-68 or -63
www.thomashilfen.com
Indice Pagina
Controlli relativi alla sicurezza e intervalli di manutenzione............................................................................. 19
Istruzioni per la sicurezza generali................................................................................................................... 19
Destinazione d‘uso e luoghi di impiego........................................................................................................... 20
Rischi nell‘impiego e controindicazioni............................................................................................................ 20
Dati tecnici...................................................................................................................................................... 20
Apertura e montaggi........................................................................................................................................ 20
Piegare ............................................................................................................................................................ 20
Regolazione dell‘altezza della seduta............................................................................................................... 21
Regolazione dell‘angolazione della seduta ....................................................................................................... 21
Cuscino ........................................................................................................................................................... 21
Larghezza di seduta......................................................................................................................................... 21
Profondità di seduta ........................................................................................................................................ 21
Altezza dello schienale.................................................................................................................................... 21
Poggiatesta ...................................................................................................................................................... 21
Regolazione dello schienale mediante molla a gas........................................................................................... 22
Lunghezza della zona polpacci........................................................................................................................ 22
Angolazione della zona piedi .......................................................................................................................... 22
Angolazione zona ginocchio............................................................................................................................ 22
Funzione freno bloccabile ............................................................................................................................... 22
Elemento elastico............................................................................................................................................. 22
Limitatore della corsa elastica.......................................................................................................................... 22
Listello FGF ..................................................................................................................................................... 22
Molle alettate .................................................................................................................................................. 23
Consiglio di regolazione per la ThevoSeat ....................................................................................................... 23
Istruzioni di pulizia, disinfezione e cura........................................................................................................... 23
Condizioni di garanzia / Marcatura CE............................................................................................................. 23

18
19
Controlli relativi alla sicurezza e intervalli di manutenzione
èControllare regolarmente, almeno una volta al mese tutti gli elementi di comando e le viti di fissaggio. Tenere pulita
e priva di sabbia la slitta scorrevole.
èLa preghiamo di ricordarsi di serrare e bloccare le viti, la leva (regolazione dell‘angolazione della zona anche) e i
pedali (angolazione e altezza di seduta) dopo aver effettuato una qualsiasi regolazione.
Preghiamo di rispettare le seguenti istruzioni per la sicurezza:
èDurante l‘uso della ThevoTherapy, soprattutto durante la messa in funzione, seguire i consigli del manuale.
èPreghiamo di tenere i bambini fuori dalla portata dell‘imballaggio, poiché questo potrebbe causare soffocamento.
èConsigliamo di adattare ogni tre mesi la profondità di seduta e la lunghezza della zona polpacci alla grandezza del
corpo del bambino. Eventualmente farsi aiutare dal terapeuta o dal tecnico ortopedico.
èDopo aver regolato l‘altezza e l‘angolazione di seduta e l‘angolazione della zona anche attivare sempre il blocco.
èDurante la regolazione, stare attenti a non incastrare le dita tra i componenti.
èFare attenzione a non ferirsi alzando il poggiapiedi e regolando l‘altezza della seduta.
èIMPORTANTE: per tutte le regolazioni della seduta, utilizzare la chiave a brugola acclusa (esagono cavo da 3mm).
èIn caso di dubbi sull‘uso corretto della ThevoTherapy, consultare il rivenditore per evitare regolazioni sbagliate.
èPer motivi di sicurezza, il montaggio di accessori non elencati nel manuale deve essere affidato a specialisti.
è
Non sollecitare troppo la ThevoTherapy e rispettare la portata massima (vedi dati tecnici).
èNon lasciare il bambino incustodito mentre monta nella ThevoTherapy e scende dalla ThevoTherapy, se il poggiapiedi
viene caricato troppo c‘é il pericolo che la sedia si ribalti o di scivolare.
èConsigliamo di assicurare il bambino sempre con una cintura a 2 punti o con un altro tipo di bretellaggio (disponibile
come accessorio) e di non lasciare mai il bambino incustodito nella ThevoTherapy.
èBloccare sempre le ruote quando si fa sedere il bambino o quando lo si tira fuori.
èBloccare le ruote quando la ThevoTherapy è ferma per evitare che si muova accidentalmente.
èEvitare di andare a sbattere contro degli ostacoli con violenza.
èATTENZIONE: le ruote bagnate potrebbero compromettere l‘effetto di frenata. Quando ci si ferma o durante un
trasferimento accertarsi di una stabilità sicura in modo da evitare che la sedia corra via o scivoli inavvertitamente.
è
Sollevare la ThevoTherapy solo afferrando componenti saldati o avvitati (tubo del telaio base sulle ruote anteriori e
posteriori).
èEvitare pavimenti non piani altrimenti la ThevoTherapy potrebbe inclinarsi e cadere.
èSorpassare piccoli gradini del pavimento solo con le ruote posteriori, con il telaio base inclinato (verso l‘alto - tirare
all‘indietro, verso il basso far scendere lentamente).
èLe scale possono essere transitate solo con l‘aiuto di un‘altra persona. Se sono presenti dispositivi, come ad esempio
ascensori, si prega di usarli. Se mancassero dispositivi del genere, questi ostacoli dovranno essere superati con due
aiutanti, senza bambino dentro.
èQuando si percorrono salite o discese occorre prestare estrema attenzione, per evitare che la ThevoTherapy si
capovolga o corra via, oppure che il bambino cada fuori.
èNon posteggiare la ThevoTherapy su tratti inclinati.
èPulire ogni tanto lo sporco sulle ruote. Non usare però solventi forti.
è Se esposto ai raggi solari forti, i cuscini neri possono raggiungere alte temperature.
èNon esporre le molle a gas a pressioni o a temperature elevate.
èNon svitare né togliere nessuna vite se ciò non è stato espressamente indicato.
èFare attenzione quando si usa del fuoco.
Consiglio: maggiori informazioni si trovano sulla nostra homepage www.thomashilfen.com

20
21
Destinazione d‘uso e luoghi di impiego
ThevoTherapy consente ai bambini disabili, di sedere in modo eretto e nel contempo mobile. È adatta all‘uso in ambienti
interni con pavimenti solidi e piani. L‘altezza di seduta variabile può essere utilizzata sia a casa che in asili o istituzioni
per l‘infanzia. Il bambino ha così modo stare seduto per esempio a tavola con altri bambini o con adulti alla stessa altezza
degli occhi. La miscrostimolazione sulla schiena consente una postura stabile, dando sostengo e allo stesso tempo
mobilità.
Rischi nell‘impiego e controindicazioni
L‘impiego corretto non comporta rischi. Non è conosciuta alcuna controindicazione.
Dati tecnici
ThevoTherapy 1 2
Profondità di seduta 19 - 30 cm 27 - 38 cm
Larghezza di seduta 19 - 31 cm 25 - 36 cm
Altezza schienale 47 - 65 cm 64 - 78 cm
Lunghezza zona polpacci 17 - 30 cm 25 - 36 cm
Angolazione zona ginocchio 90° bis 180° 90° bis 180°
Angolazione zona anche 90° bis 122° 90° bis 122°
Angolazione zona piede 78° bis 100° 78° bis 100°
Grandezza poggiapiedi (L x P) 29,8 x 17,5 cm 33,5 x 21,5 cm
Dimensioni complessive seduta (L x A x P) 38 x 78 x 54 cm 45 x 101 x 66 cm
Dimensioni da piegata seduta (L x A x P) 38 x 41 x 57 cm 45 x 48 x 74 cm
Portata seduta 35 kg 40 kg
Inclinazione seduta -4° to +31° -4° to +31°
Altezza seduta con unità di seduta 26 - 66 cm 26 - 66 cm
Dimensioni complessive Telaio base (L x A x P) 54 x 59 x 73 cm 54 x 59 x 73 cm
Dimensioni da piegato Telaio base (L x A x P) 54 x 24 x 73 cm 54 x 24 x 73 cm
Altezza delle manopole per spingere (accessori) 80 - 102 cm 80 - 102 cm
Altezza adattatore 20 - 59 cm 20 - 59 cm
Grandezza ruote pivotanti (anteriori) 100 mm 100 mm
Grandezza ruote pivotanti (posteriori con freno bloccabile) 100 mm 100 mm
Portata Telaio base 50 kg 50 kg
Peso 19,9 kg 21,4 kg
Apertura e montaggio
Il telaio base è già montato e viene fornito piegato. Allentare le chiusure a scatto del poggiapiedi e bloccarle con un
quarto di giro. A questo punto regolare l‘altezza e l‘angolazione di seduta (fig. 3-5).
Posizionare l‘unità di seduta sull‘adattatore del telaio base e fissarla con le quattro viti e le rondelle accluse (fig. 1). Per
separarli, basta svitare di nuovo le quattro viti.
Il poggiapiedi deve essere fissato sullo snodo della zona ginocchio. A questo scopo posizionare gli snodi ad incastro uno
sopra l‘altro e fissarli con le viti e le rondelle (dal lato interno) e con i dadi ad alette (dall‘esterno). (fig. 2)
Piegare
Portare lo schienale nella massima posizione distesa, ribaltare il poggiapiedi sul sedile, allentando lo snodo della zona del
ginocchio e ribaltando in su il poggiapiedi (fig. 2). Portare l‘inclinazione di seduta in orizzontale e abbassare la seduta
fino al pavimento (vedi regolazione dell‘altezza di seduta).
Attenzione: per piegare la sedia afferrare con una mano una parte del telaio, per evitare che la sedia cada e fare
attenzione a non schiacciarsi le dita.
This manual suits for next models
2
Table of contents
Languages:
Other Thomashilfen Wheelchair manuals