9
8
96353273 PD 10/2018
-Remplacer toute protection fissurée.
-Les luminaires classe II doivent être
installés de façon à ce que la partie
métallique ne soit pas en contact avec
l'installation électrique connectée à la terre.
ATTENTION:Les luminaires classe I
doivent être reliés à la terre.
-Ce luminaire fonctionne à une tension
nominale qui doit être coupée avant
toute intervention sur l'appareillage.
-Toute modification de cet appareil est interdite.
-Ersätta alla spräckta skyddsplåtar.
-Klass II armaturer måste installeras så
att nakna metalldelar i armaturen inte
är i kontakt med någon elektrisk
installation,kopplad till en skyddledare.
VARNING:Klass I armaturer måste vara
jordade.
-Denna armatur fungerar med högspänning
som måste vara frånslagen fore ingripande
i driftdonen.
-Alla ändringar i denna armatur är förbjuden.
-Sostituire sempre tutte le protezioni
danneggiate.
-Gli apparecchi in classe II devono essere
installati in modo che le parti metalliche
non siano in contatto con apparati elettrici
collegati a terra.
ATTENZIONE:Gli apparecchi in class I
devono essere collegati a terra.
-Questo apparecchio funziona a tensione
nominale,questa deve essere interrotta
prima di ogni intervento sul gruppo di
alimentazione.
-Ogni modifica dell' apparechio à proibita.
-Replace any cracked protective shield.
-Class II luminaires must be installed so
that exposed metal work of the luminaire
is not in contact with any part of the
electrical installation connected to a
protective conductor.
WARNING:Class I luminaires must be
earthed.
-This luminaire operates at mains voltage
which must be switched off before
intervention in control gear.
-Any modification to this luminaire is forbidden.
-Ersetze jede gebrochene Schutzscheibe.
-Schutzklasse II Leuchten müssen so
installiert werden,daß berührbare
Metallteile nich mit einem,an dem
Schutzleiter angeschlossenen Teil der
elektrischen Installation in Kontakt
kommen können.
ACHTUNG:Schutzklasse I Leuchten
müssen geerdet sein.
-Diese Leuchte wird mit Netzspannung
betrieben.Bevor Eingriffe am
Vorschaltgerät vorgenommen werden
sowie vor Wartung und Installation,ist die
Versorgungsspannung abzuschalten.
-Jede Änderung an dieser Leuchte ist verboten.
FRANCAIS SVERIGE ITALIANO
-Rikkoontunut suojalasi vaihdettava
välittömästi uutsen vastaavaan.
-Asennettaessa suojausluokan II valaisinta
on peruseristetyn johdon ja kosketeltavien
metalliosien välinen kosketus tehokkaasti
eristettävä.
VAROITUS:
Suojausluokan I valaisin
täytyy maadoittaa.
-Verkkojännite on kytkettävä pois ennen
valaisimen huoltotoimenpiteitä.
-Valaisimen rakennetta el saa muuttaa.
SUOMI
ENGLISH DEUTSCH
II=OFF
I=ON
II=OFF
DIMMING
I=ON
II=OFF
DIMMING
1
2
3
DA
DA
SD
N
L
2
34
4
4
1
T20
I=ON 50%
8 hours
II=OFF
BPS
1
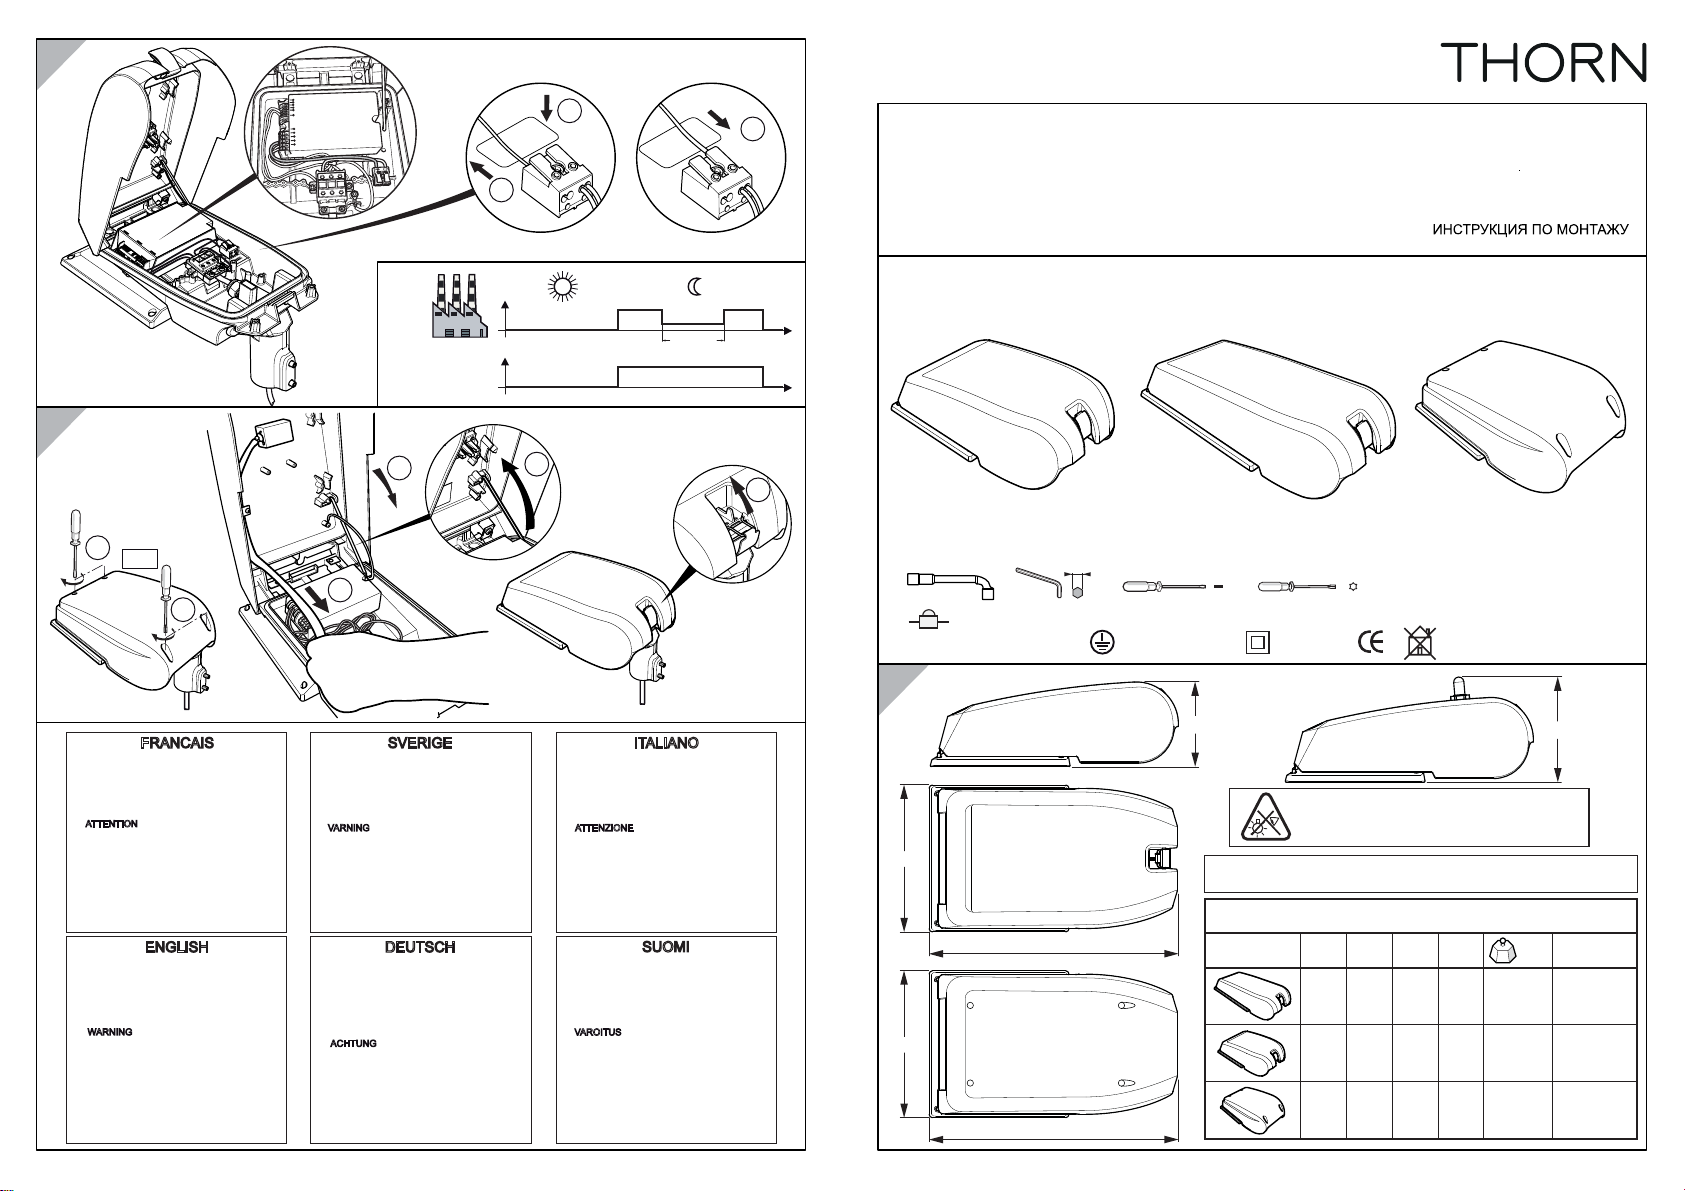
CIVITEQ
CIVITEQ S CIVITEQ L CIVITEQ S PC
CIVITEQ RF
TYPE : CIVITEQ S
CIVITEQ L
0RQWiåQtQiYRd
CZ Istruzioni di montaggio
IT Szerelési útmutató
HU Notice de montage
FR Asennusohje
FI
Paigaldusjuhend
EE Monteringsvejledning
DK
Montageanleitung
DE
Montavimo Instrukcijos
LT
Installation instructions
UK
Installationsanvisning
SE
RU
Instrukcja montazu
PL Monteringsanvisning
NO Instalacijas instrukcija
LV
96353273 PD 10/2018
IK08
CLASS I CLASS II
13 4
IP66
T20
B
A
HH1
LED
SCx
CIVITEQ
5,7 0,045
(kg)
A
230 390 133 165
9,6 0,074230 580 134 166
4,8 0,045230 390 133 165
BHH1
B
A
100% 100%
100%
mm mm mm mm
The luminaire with clear optic should be
positioned so that prolonged staring into
the luminaire at a distance <1.5 m is not expected.
The light source of this luminaire is not replaceable; when the light source
reaches its end of life the whole brick shall be replaced


