Tibo Plus 2 User manual

User Guide
Plus 2 Speakers | Plus 3 Speakers
Turn it back on
Please read this user manual carefully before using your Plus 2 and 3 Speakers and retain for future reference.
AUX
2x
Optical
Plus 2 Speakers
Plus 3 Speakers

2
Turn it back on
A triangle with a
lighting symbol draws
the user’s attention to
“dangerous voltage”
without insulation in the cabinet,
which may be high enough to
entail a risk of an electric shock.
A triangle with an ex-
clamation mark draws
the user’s attention to
important instructions
for use and maintenance in the ac-
companying manual, which should
be studied and adhered to.
The symbol for a
CLASS II (double
insulation) product.
Safety precautions
Warning:
To minimise the risk of re or electric shock, do not expose the unit to liquid or moisture. Do not open the cabinet
as it contains dangerous voltages. Only qualied technicians are allowed to carry out repair and service of this
system.
If the plug of the power cord needs to be replaced. It is important that the replacement is identical to the plug that
needs to be replaced, or that the new plug has been recommended by the manufacturer.
Caution:
To avoid electric shock, it is important to insert the plug correctly into the wall outlet.
Warning:
It is important that you read and observe both the instructions in this manual and the instruction on the unit.
Keep this manual for safe future reference. This unit was designed and manufactured with a view to providing
maximum safety for the user. Incorrect use of the unit may cause an electric shock or re. The protection devices
built into this unit will protect the user if the procedures below are observed in connection with installation, use
and repair. This unit is fully electronic and contains no parts that can be repaired by the user.
Do not remove the covers. Risk of dangerous voltage. Only qualied technicians are allowed to repair the unit.
Important safety instructions
Read the manual
After unpacking the unit, please read the manual care-
fully and observe all the instructions given.
Power supply
Only the power supply indicated on the rating plate
must be used for this unit. If you are not sure which
power supply you have, please contact your local
dealer.
Earthing or polarisation
If the plug cannot be inserted properly into the socket,
or if the plug does not t, the unit must not be used in
your country.
Ventilation
The cabinet is provided with slots and openings to
ensure ventilation and reliable operation and to protect
the unit against overheating. Do not block or cover
these openings. The openings must never be blocked,
for instance by placing the unit on a bed, a sofa, a
carpet or similar surface.
Heat
Do not place the unit near sources of heat such as
radiators, ovens or other units that produce heat.
Water and moisture.
The unit must not be placed close to water, such
as bathtub, wash basin, kitchen sink or washing
machine, in a damp cellar or close to a swimming
pool, etc.
Cleaning
Unplug the unit before cleaning. Do not use liquid de-
tergents and aerosol cleaning agents. Use a dry cloth.
Power cords
Wiring must be organised to prevent people from step-
ping on the cables and to avoid pinching by objects
placed on or beside them. Take special care around
sockets and plug boxes and where the power cords
leave the unit.
Lightning
Unplug the unit for additional protection during storms
or when the unit is not used for prolonged periods.
This will prevent damage to the unit from lightning and
power surges.
SAFETY

3
Turn it back on
IMPORTANT SAFETY INSTRUCTIONS
Penetration of objects and liquid
Never push any foreign objects through the openings into the unit, as they may touch dangerous voltage points
or short-circuit parts and cause re or an electric shock. Do not spill liquid onto the unit.
Accessories
Do not place the unit on unstable surfaces such as a trolley, stand, tripod, shelf or table. The
unit may fall and cause serious injury to persons or damage to the unit. Use only trolley, stand,
tripod, shelf or table that is very stable or provided with the unit. The unit must be installed in
accordance with the manufacturer’s instructions and by means of installation equipment recom-
mended by the manufacturer. If the unit is placed on a trolley, the trolley must be moved very
carefully. Sudden stops, unnecessary force and uneven surfaces may cause the trolley to turn
over.
Loads
Do not place heavy loads on the unit and do not step on it. The load may fall and cause serious injury to persons
or damage to the unit.
Damage
Unplug the unit and contact qualied technicians in the following cases:
A. If the power cord or the plug is damaged.
B. If liquid has been spilled on the unit or objects have fallen into the unit.
C. If the unit has been exposed to liquid or moisture.
D. If the unit does not work properly after adhering to the instructions in the operation manual. Only the settings
described in the operation manual must be made as incorrect setting may result in damage and often will
make it difficult for a qualied technician to make the unit work properly again.
E. If the unit has been dropped or damaged in any other way.
F. When the operation of the unit changes drastically, the unit requires service.
Service
Do not attempt to carry out any service work by yourself. By opening or removing the cover, you will be exposed
to dangerous voltage or other hazards. Any service work should be carried out by qualied technicians.
Recycling
If at any time in the future you need to dispose of this product please note that waste electrical
products should not be disposed of with household waste. Please recycle where facilities exist.
Check with your Local Authority or retailer for recycling advice.
Approval
This product complies with European Low Voltage and Electromagnetic Compatibility Directives
when used and installed according to this instruction manual.
Overloading
Do not overload wall outlets or extension cords as this can result in the risk of re or electric shock. Overloaded
AC outlets, extension cords, frayed power cables, damaged or cracked wire insulation, and broken plugs are
dangerous. They may result in electric shock or re hazard. Periodically examine the power cable - if its appear-
ance indicates damage or deteriorated receptacles have it replaced by your service technician.
Heat dispersion
Leave at least 10 cm of space between the top, back and sides of the unit and the wall or other components for
proper ventilation.
4
Turn it back on
Please save your packaging as you will need this in the event of warranty/service repair or support. We are
unable to carry out warranty/service if you are unable to package it correctly. The safest way to package your
item in the event of warranty/service repair is in it’s original box/packaging.
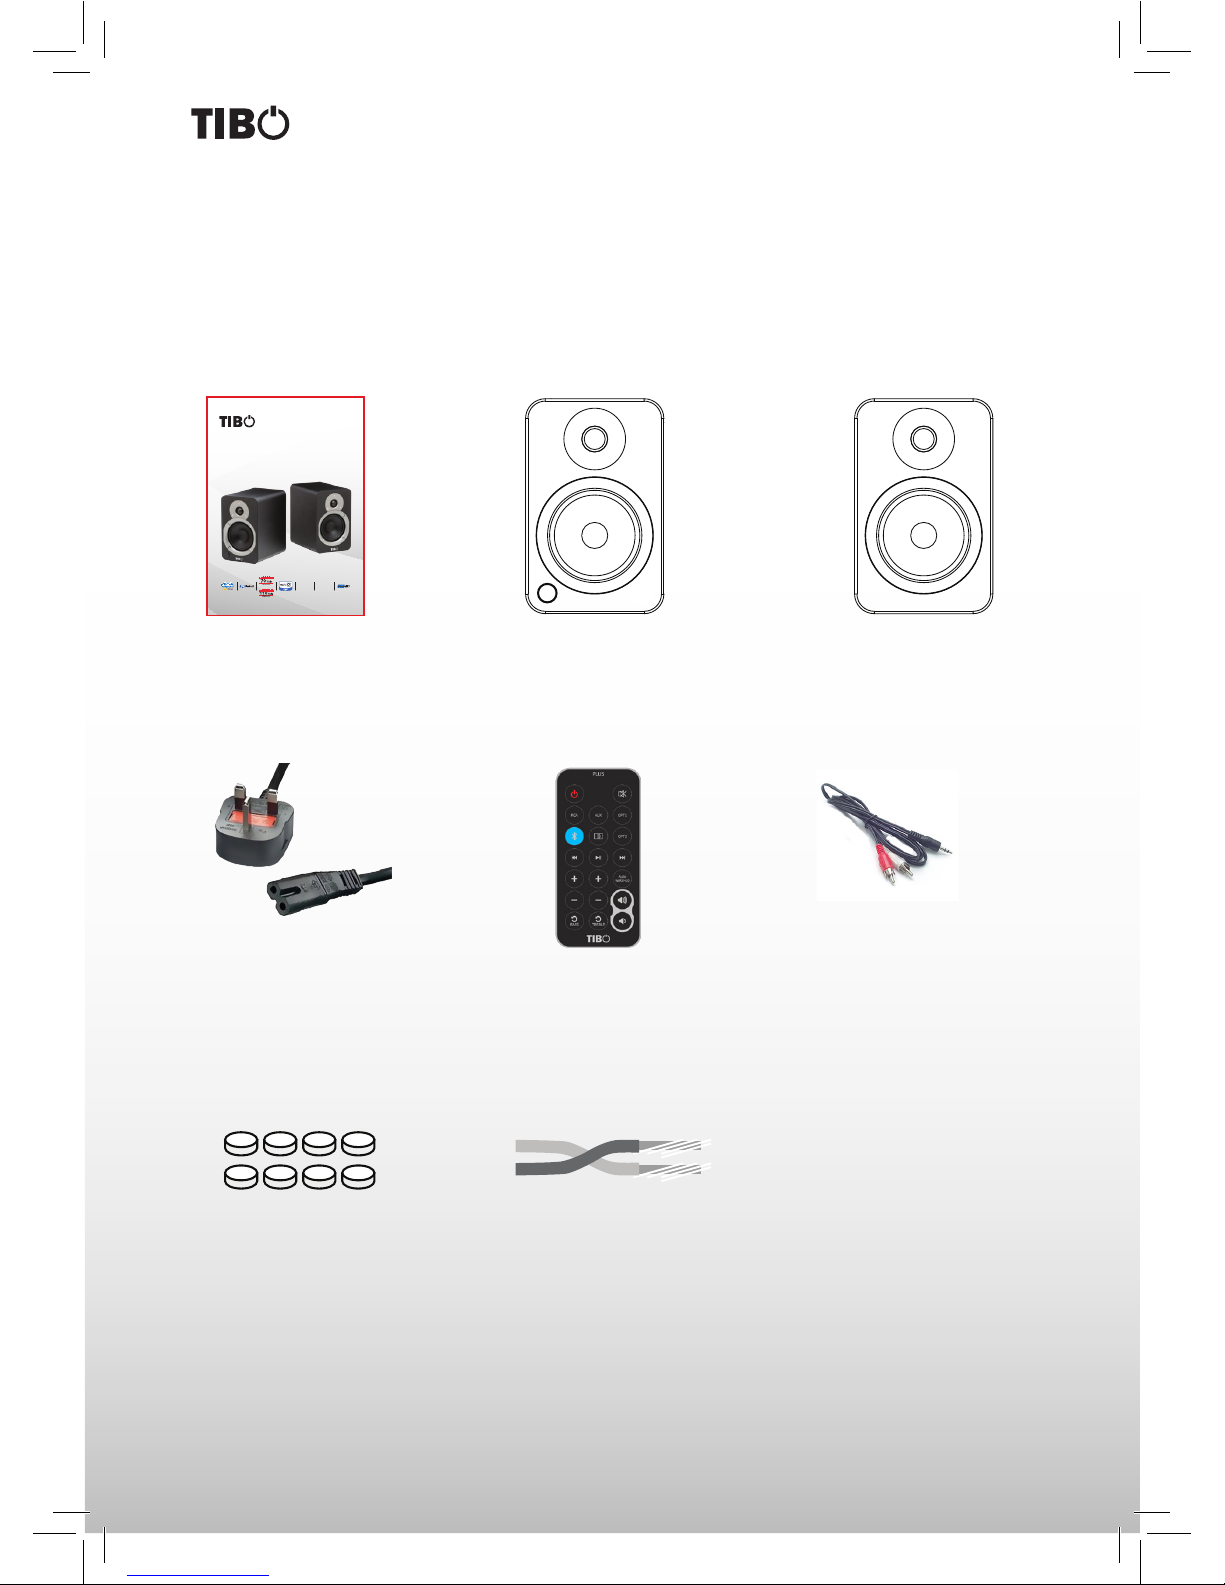
INCLUDED IN THE BOX
1 x User Manual 1 x Plus Passive Speaker
(Right Channel)
1 x 3.5mm to RCA cable
1 x Plus Active Speaker
(Left Channel)
1 x Mains Plug
8 x Self-Adhesive Rubber Feet
1 x Remote Control
(Battery included)
1 x Speaker Wire
Accessories
Included with the Plus speakers are the following accessories:
User Guide
Plus 2 Speakers | Plus 3 Speakers
Turn it back on
Please read this user manual carefully beforeusing your Plus 2 and 3 Speakers and retain for future reference.
AUX
2x
Optical
Plus 2 Speakers
Plus 3 Speakers

5
Turn it back on
FRONT PANEL
1. Silk Dome Tweeter
2. Woofer Driver
3. LED Remote Control Sensor
REAR PANEL
4. RCA L/R Input
5. 3.5 mm Stereo Mini-Jack AUX Input
6. Subwoofer Output
7. Optical 1 and Optical 2 Inputs
8. Volume Knob
9. Right Channel Output Terminals (+ and −) for Passive Speaker Connection
10. USB Charge Port (5 V 2.1A)
11. ON / OFF Switch
12. AC Input Connection (100 V - 240 V 50/60 Hz)
Volume/Input Select Knob
Speakers volume knob functions as an input
select knob as well.
Push the knob to select an input source
- it cycles through the following inputs
depending on what input source was last
used.
RCAAUXOPT1OPT2BLUETOOTH
Press and hold volume knob for few seconds
to switch Plus system ON of OFF.
The Plus speaker System has a multifunctional display that lights up in response to a remote control command.
The possible readouts and their meanings are shown below.
Orange Light
Plus speakers are in Stand by mode.
Blue Light
Plus speakers are in Operating mode.
Flashing Orange Light
Plus speakers are in Mute mode.
Blinking Blue Light
Increase/Decrease: Volume/Bass/Treble.
Switch between inputs.
Flashing White and Steady Blue Light
Plus speakers are in Bluetooth Pairing
mode.
Steady White and Steady Blue Light
Plus speakers are in Bluetooth Playing
mode.
FRONT & REAR PANELS
DISPLAY INDICATIONS
2
3
1
5
4
6
8
7
9
10
11
12
8
5
4
6
7
9
10
11
12
Plus 2 Speakers Plus 3 Speakers

6
Turn it back on
REMOTE CONTROL
1. Stand by – press to enter stand by mode or return to playback
mode.
2. Mute.
3. Inputs – Optical, Coaxial, Line-in (RCA)
4. Bluetooth – Bluetooth for pairing or select Bluetooth input.
5. Pair - Press this button to start pairing with Bluetooth device.
6. Previous track (Bluetooth function).
7. Play/Pause (Bluetooth function.)
8. Next track (Bluetooth function).
9. Auto Wake-up – automatically turn ON the Plus speakers (while
the unit is Switched Off) when audio signal is detected from either
RCA, AUX, OPT1, OPT2 or Bluetooth.
10. Bass – increase/decrease bass.
11. Treble – increase/decrease treble.
12. Volume – increase/decrease.
13. Reset – reset Bass output.
14. Reset – reset Treble output.
Note: By default auto wake-up function is deactivated as this saves
standby power consumption.
Auto Wake-Up Off: power consumption < 0.5 W
Auto Wake-Up On: power consumption < 3 W
Replacing the battery
Be careful to ensure that it is correctly inserted according to the
polarity markings (+/–). You should only use the battery specied for
this system (CR 2032).
Note: The batteries provided are designed for test use and may
therefore have a shorter lifespan.
Press Pull
+
CR 2032
1 2
3
4
12
9
678
5
14
11
13
10

7
Turn it back on
SETTING UP YOUR SPEAKERS
The powered speaker system is designed for either bookshelf or stand mounting. The stands should be of rigid
construction, between 45 cm to 69 cm high and preferably have spikes.
The space between the two speakers and the distance from the listener is important. If the speakers are
positioned too close or too far apart, stereo imaging will not be fully developed.
Speakers are designed to perform optimally positioned at least 20 cm from the rear wall in an average listening
room. However, it may not be possible to install the speakers in this position and since rooms vary in shape, size,
and furnishing, a certain amount of experimentation is necessary to determine the most suitable position.
Moving the speakers very close to the rear wall will enhance the bass frequencies but will tend to reduce
soundstage depth, while moving the speakers away from the rear wall will tend to have the opposite effect. Avoid
positioning the speakers close to or in the corners of the room, as this will excite undesirable room coupling in
the low and middle frequencies. If the width of the rear wall is limited then toe-in the speakers slightly to reduce
reections. Room characteristics and positioning have a profound effect on the performance of the speakers, so
time and effort devoted to achieving the optimum positions will be rewarded.
Ensure that the ON/OFF Switch is in the OFF position.
Connect the two speakers together as shown below using the supplied speaker cable. Connect the RED (+)
and BLACK (−) terminals from the active speaker (left channel) to the corresponding terminals on the passive
speaker (right channel). If you wish to place your speakers further apart than the supplied cable will reach, we
recommend that you purchase a heavier gauge of speaker cable to minimize signal loss.
Follow the instructions on the ensuing pages to connect your audio sources to speakers. The examples in the
following pages are not meant to be exhaustive - just examples.
Connect the power cord from active speaker to the wall outlet.
Plus 2 Speakers Plus 3 Speakers
ATTENTION
When connecting audio cables the ON/OFF Switch must be turned OFF. After connecting all cables, the unit can
be turned ON.
When the volume is high, this system can produce noise levels that could permanently damage your hearing.
Plus speakers are a self-powered speaker system. Do not connect the speaker terminals to the speaker outputs
of a stereo amplier. Damage may occur. Use only the power cord provided with the speakers.

8
Turn it back on
CONNECTING AUDIO SOURCES
TIBO Plus speakers feature a high quality DAC (digital-to-analog converter) that supports data streams up to
24-bit/192 kHz resolution.
TIBO Plus speakers support Bluetooth 4.0 with aptX CODEC technology.
Use the appropriate audio cable to connect your audio source components to your speakers.
Refer to the following diagrams on connectivity options.
Analogue Inputs
The Plus speakers have two options for analogue audio connections.
RCA - Connect the RCA L&R audio output from a TV or other source to the RCA sockets.
3.5 mm Stereo mini jack - The 3.5mm input jack is ideal for connecting to the headphone output of an external
audio source
PHONO PRE-AMP
TURNTABLE
LAPTOP
MP3
AUDIO
IN
OUT
CD / DVD
MP3 DOCK
R
3.5mm
L
R
L
(if necess ar y)*
ATTENTION
*Some models of turntables include a built-in Phono Pre-Amp.

9
Turn it back on
DIGITAL OPTICAL INPUT
TOSLINK® connector for connection to the digital optical output on a TV or other source. If there is a choice
between digital or analogue connection to the Plus speakers choose digital for superior audio quality. When the
digital source is active the status LED will be Blue.
OPT 1
OPT 2
GAME CONSOLE
TV
S
DIGITAL DOCK
MEDIA PLAYERS

10
Turn it back on
PLAYBACK VIA BLUETOOTH
Pair with a Bluetooth device
1. With your Bluetooth device and the TIBO Plus speakers system both turned ON, press the Bluetooth button
on the Plus speakers remote control to make the Plus speakers system discoverable.
2. The white ashing light will appear on the Plus speakers display to show that the system is discoverable.
3. Set your Bluetooth device to discoverable so it can discover (refer to your Bluetooth device guide for details)
TIBO Plus speakers system. Locate the Bluetooth device list in the user interface of your device.
4. From the Bluetooth device list, select the device named “TIBO Plus 2 or Plus 3” (depending on which model
you have).
5. If your Bluetooth device prompts you for a access code, enter digits 0000 (four zeros) and press OK. Some
devices also ask you to accept the connection. Your Bluetooth device indicates when pairing is complete.
6. The Plus speaker system indicates pairing is complete when ashing white light goes to steady white.
Connecting a paired device
To connect a previously paired device, turn On the device and press BLUETOOTH button white ashing light
appears on the TIBO Plus speaker display. TIBO Plus speaker reconnects automatically and white ashing light
goes to steady white.
1

11
Turn it back on
USB CHARGING OPERATION
CONNECTING A SUBWOOFER
Plus speakers feature one 5 V 2.1 A USB charging port on the back panel. This is a convenient power
source to charge your devices.
When Plus speakers are in playback mode (LED blue) and standby mode (LED yellow), the port is active,
and whatever device is connected is able to draw up to 2.1 Amp. of power.
Plus speakers are equipped with an RCA connector to provide output signal to a powered subwoofer.
Simply connect a single RCA subwoofer cable from the SUB OUT connection on the Speakers to the AUDIO
INPUT on your subwoofer. If your subwoofer has a stereo L/R RCA input, either left or right inputs will work.
L
L
R
R
Use either L or R
inputs

12
Turn it back on
TROUBLESHOOTING
Problem Cause Solution
No Power.
AC power cord is not connected to the power
supply or is not connected to a power supply
correctly.
Please check that the AC power cord is connected
correctly.
There is no
sound or is
distorted.
• The audio cables aren’t connected correctly.
• The volume is set to the minimum level.
• The sound is switched OFF.
• Turn up the volume.
• Press MUTE on the remote control to switch On the
sound. Press PLAY/PAUSE.
Plus speakers
hums.
• Signal lines from source device to Plus speakers
too long.
• Signal line used is not fault-protected or the
protection has been damaged (defective).
• Ground loop (ripple pickup) generated.
• Another piece of equipment on the same circuit
has no interference suppression (e.g. fridge).
• Use shorter signal line.
• Change signal line for a fault-protected line.
• A ground loop can be generated when two or
more devices connected via a signal line (synch)
are plugged into separate sockets (e. g. amplier
and computer). Plug all devices connected to the
Plus speakers into a multiple socket output using
safety plugs.
• Switch off possible sources of interference to
test; unplug the device concerned to see if the
humming noise disappears or connect the source
of interference to a different circuit. (Where
necessary take advice from your electrician). Insert
a special “ferrite common mode lter” (available
from specialist retailers) between the amplier and
the Plus speakers to eliminate the humming. Turn
the power plug round to reduce the so-called ripple
voltage (particularly important if the source device
is not earthed).
The remote
control does not
function.
• There is no battery in the remote control.
• The batteries are at.
• The remote control isn’t pointed to the remote
sensor.
• The remote control is out of operating range.
• The unit is turned Off.
• Install one CR 2032 battery into remote control.
• Replace the battery with new one.
• Make sure that the remote control is pointed to the
remote control sensor.
• Make sure the remote control is within the
operating area.
• Switch Off the unit and disconnect it from the AC
outlet. Then power it On again.
No playback via
Bluetooth.
• There is no connection between the Plus
speakers and the Bluetooth end device.
• The Bluetooth end device is paired but no
playback takes place.
• Connect your Bluetooth end device as described
(refer to your Bluetooth device user manual).
• The Bluetooth end device must be connected
again.
»You are out of range.
»Set the volume on the mobile end device to
maximum
»Increase the volume of the Plus speakers.
»Ensure that interference sources like a WLAN
router or laptop are not set up in direct proximity
of the Plus speakers.
»Concurrent operation of WLAN and Bluetooth
from a Bluetooth end device is not possible
without interferences in most cases. (Disable
WLAN at your mobile device.)

13
Turn it back on
TECHNICAL SPECIFICATION
Plus 2 Specication
Power output 2 x 35 Watts RMS
Tweeter 1” silk dome
Woofer 4” paper cone
Nominal Impedance 4 Ohm
Sensitivity 2.83v (1W/1m) 85 dB
Input sensitivity 550 mV
Total Harmonic Distortion < 0.3%
Frequency Response 60 – 20,000 Hz
Amplier Class D digital
Wireless technology Bluetooth 4.0, supports aptX codec
Inputs 2 x Optical, 1 x RCA, 1 x 3.5 mm jack,
Outputs 1 x Subwoofer
USB Port for charging only 5 V 1A
Input Voltage, Frequency AC 100 V - 240 V 50/60 Hz (auto switching)
Standby Power Consumption < 0.5 W
Dimensions (WxHxD) 132 x 210 x 197 mm (each speaker)
Weight (Active) 3.1 kg
Weight (Passive) 2.4 kg
Plus 3 Specication
Power output 2 x 55 Watts RMS
Tweeter 1” silk dome
Woofer 5.25” paper cone
Nominal Impedance 4 Ohm
Sensitivity 2.83v (1W/1m) 88 dB
Input sensitivity 550 mV
Total Harmonic Distortion < 0.3%
Frequency Response 50 – 20,000 Hz
Amplier Class D digital
Wireless Technology Bluetooth 4.0, supports aptX codec
Inputs 2 x Optical, 1 x RCA, 1 x 3.5 mm jack,
Outputs 1 x Subwoofer
USB Port (for charging only) 5 V 1A
Input Voltage, Frequency AC 100 V - 240 V 50/60 Hz (auto switching)
Standby Power Consumption < 0.5 W
Dimensions (WxHxD) 168 x 268 x 235 mm (each speaker)
Weight (Active) 4.2 kg
Weight (Passive) 3.6 kg

14
Turn it back on
CONTACTS
Tibo Ltd.
DSV House,
Maidstone Road,
Milton Keynes
MK10 0AJ
United Kingdom
tel.: +44 (0) 845 2711 906
e-mail: info@tibo-electronics.com
Proof of purchase (attach your receipt here).
Bluetooth® word mark and logos are registered trademarks owned by Bluetooth SIG, Inc. Is under license. The
aptX® mark and the aptX logoare trade marks of CSR plc or one of its group companies and may be registered
in one or more jurisdictions. Other trademarks and trade names are those of their respective owners.

15
Turn it back on

Turn it back on
www.tibo-electronics.com
This manual suits for next models
1
Table of contents
Other Tibo Speakers manuals

Tibo
Tibo Kameleon Touch User manual

Tibo
Tibo Sphere Range User manual

Tibo
Tibo Bond 3 User manual

Tibo
Tibo Plus 1.1 User manual

Tibo
Tibo Kameleon Touch User manual

Tibo
Tibo TI1000 User manual

Tibo
Tibo Plus 1.1 User manual

Tibo
Tibo Vogue 3 User manual

Tibo
Tibo Plus 2.1 User manual

Tibo
Tibo Urban 500 User manual


