Tidel TACC-VI User manual
450-0447-001 Rev. C
TACC-VI

Tidel would like to thank you for purchasing this TACC-VI product.
To maintain proper working order, we recommend you read this
manual completely and perform the preventive maintenance
routines at the suggested intervals.
The Manufacturer’s Warranty is limited to defects in workmanship
and equipment hardware.
Repairs due to lack of Preventive Maintenance (and Preventive
Maintenance itself), are not covered by the Manufacturer’s
Warranty.
ITEMS THAT REQUIRE PREVENTIVE MAINTENANCE
Bill Acceptor - Pages 19 - 22
Clean with Cleaning Cards on a routine basis (dependent on
location’s volume of trafc) or manually at suggest intervals.
Screen Protector - Page 31
Should be replaced when the Touchscreen response becomes
erratic.
Printer - Page 33
Paper cutter should be cleared of paper shavings occasionally
by using compressed air.
Additional items not covered by warranty, but not limited to:
1st trip costs to diagnose reported problems
Additional time on site due to customer delays
Abuse
After Hours, Weekend or Holiday service
Bill Jams
Cassettes damaged due to mis-handling
Consumables - Paper, keys, dipsticks, bags, screen protectors, etc
Costs outside those associated with the repair of the equipment
Damage due to spillage
Equipment or software upgrades
Equipment resets
Failures due to insect/animal/rodent habitation
No problem found when the Service Provider arrives on site
Part replacement when the reported problem cannot be duplicated
Phone xable problems
Printer jams or paper loading errors
Problems due to incorrect Bag or Cassette installation
Report balancing inquiries and disputes
Screen protector damage or replacement
Telephone, network or utility failures
Touchscreen/Display damage
User programming problems

Contents
Component Location 2
Initial Start-up 6
Mandatory Programming 7
Printer Information 8
Touchscreen Layout/Entry 9
Operations Performed From the Main Screen 10
Courier Key Operations 13
Door (Vault), Opening and Operations 14
Inserting/Retrieving Manual Drops 16
Emptying the Bill Acceptor 19
Bill Acceptor Cleaning/Jam Removal 20
Tube Vending Operations 23
End Of Day/Shift Operations 26
Adjusting Vault Contents 27
Moving Vault Contents 28
Printing Reports 29
Adding a Clerk 30
Screen Protector Replacement 31
Troubleshooting 32
License Agreement 36
Warranty Policy 37

2
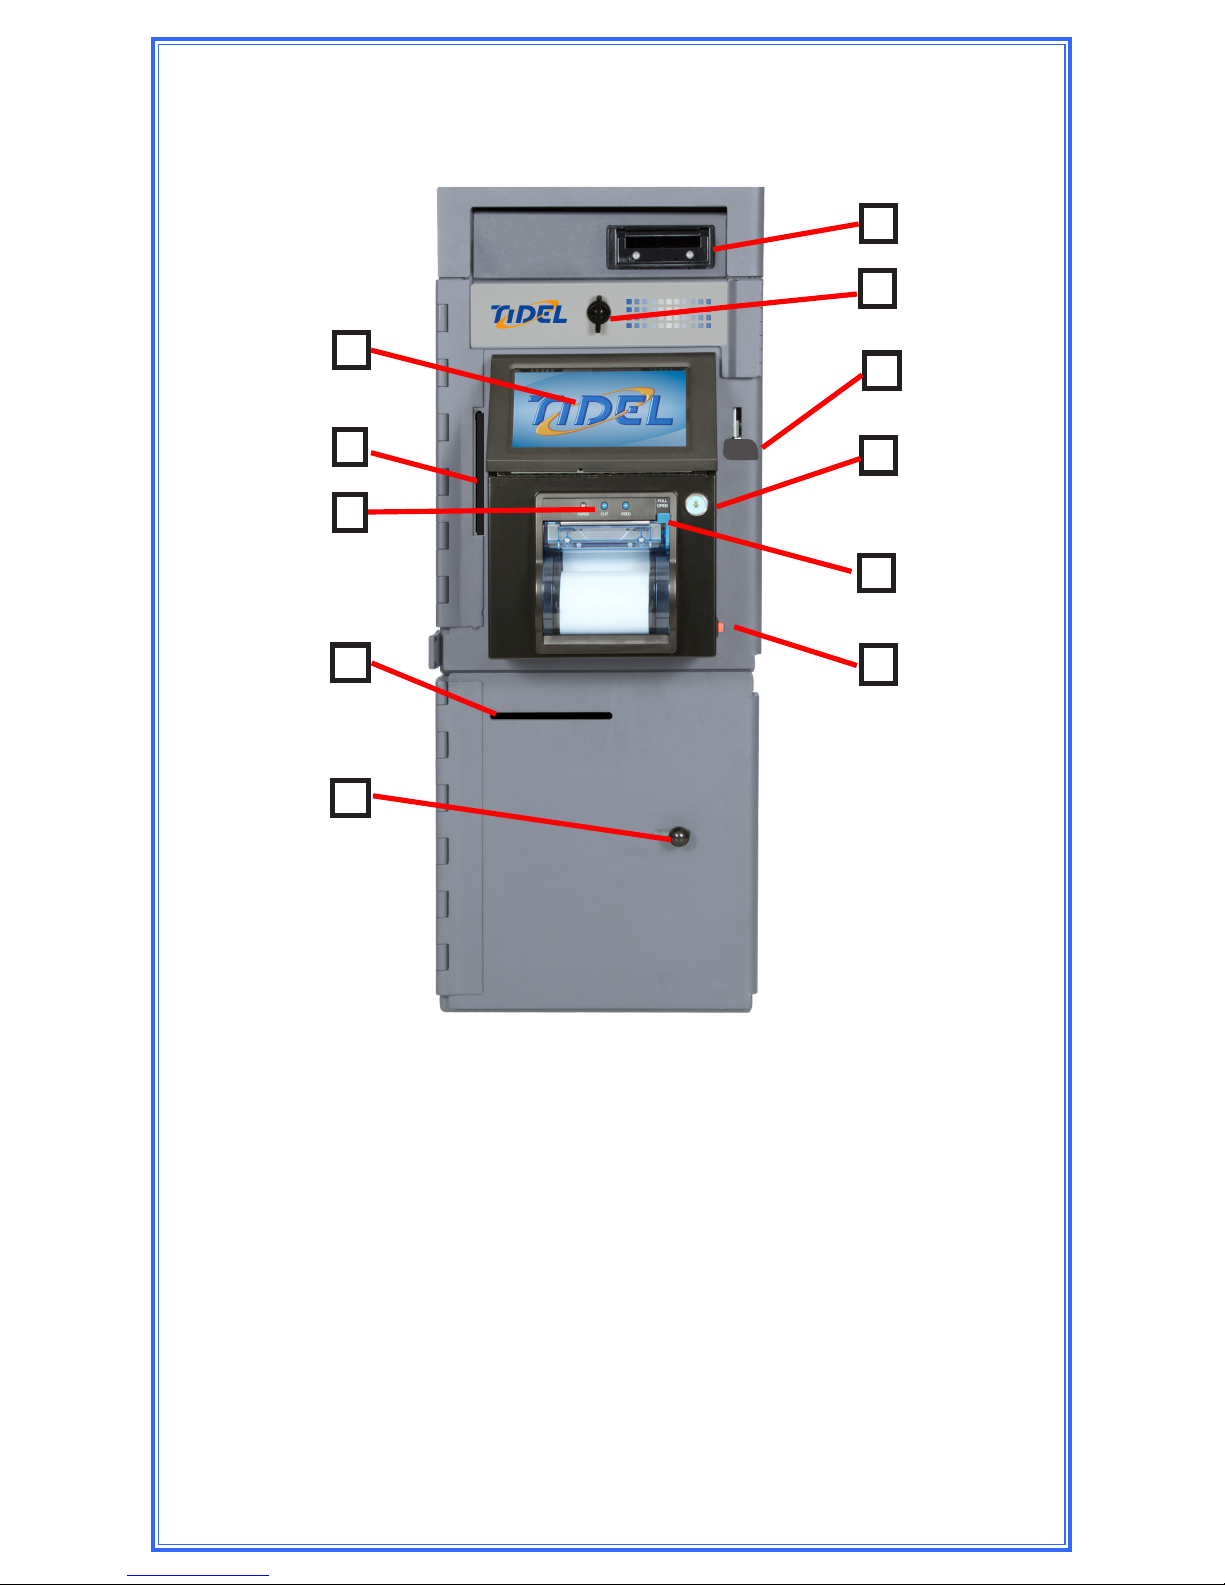
TACC-VI Controller
1) Bill Acceptor (MEI Single Note Feed pictured)
2) Bill Acceptor Maintenance Door
3) Bill Acceptor Vault Door Lever
4) i-Key Socket
5) Printer Paper Loading Door Release Lever
6) On/Off Switch and Electrical Breaker
7) Display - Touchscreen
8) Courier Tray Insertion Slot
9) Paper Feed/Cut Button
1
2
8
9
3
6
7
4
5
3
6
TACC-VI with Drop Vault Base
1) Bill Acceptor (MEI Single Note Feed pictured)
2) Bill Acceptor Maintenance Door Latch
3) Bill Acceptor Vault Door Lever
4) i-Key Socket
5) Printer Paper Loading Door Release Lever
6) On/Off Switch and Electrical Breaker
7) Display - Touchscreen
8) Courier Tray Insertion Slot
9) Paper Feed/Cut Buttons
10) Drop Vault Insertion Slot
11) Drop Vault Door Handle
1
2
9
5
3
8
7
4
10
11
4
6
TACC-VI with Mailbox Drop Base
1) Bill Acceptor (MEI Single Note Feed pictured)
2) Bill Acceptor Maintenance Door Latch
3) Bill Acceptor Vault Door Lever
4) i-Key Socket
5) Printer Paper Loading Door Release Lever
6) On/Off Switch and Electrical Breaker
7) Display - Touchscreen
8) Courier Tray Insertion Slot
9) Paper Feed/Cut Buttons
10) Mailbox Drop Vault Insertion Door
11) MAilbox Drop Vault Door Handle
1
2
9
5
3
8
7
4
10
11

5
TACC-VI with Tube Vend Module
1) Bill Acceptor (MEI Single Note Feed pictured)
2) Tube Vending Vault Lock (Maintenance Door)
3) Tube Insertion Holes
4) Bill Acceptor Vault Door Lever
5) i-Key Socket
6) Printer Paper Loading Door Release Lever
7) On/Off Switch and Electrical Breaker
8) Tube Retrieval Ramp
9) Bill Acceptor Maintenance Door Handle
10) Display - Touchscreen
11) Courier Tray Insertion Slot
12) Printer Feed/Cut Buttons
13) Drop Vault Insertion Slot
14) Drop Vault Door Handle
1 2
8
9
4
3
6
7
11
10
13
12
5
14

6
The following options may be displayed at start-up:
“Would you like to Perform End User Setup”
XYES - Will prompt the selection of “Customer Specic”
settings.
Select the appropriate Customer
XNO - Will allow the user to navigate the menus without
loading Customer settings
WARNING: If “NO” is selected, the display will prompt for
the END USER SETUP each time the unit is reset - until a
Customer is selected.
“Enter the Executive PIN”
XThis prompt indicates no setup information has been
entered.
All Setup (Policy) parameters, Currency and Dispense
selections and User information must be manually
programmed.
See Mandatory Programming on the following pages.
“Log In (Main Screen)”
XThe unit has been pre-programmed at the factory for
customer settings, the customer must provide the Log In
codes.
“Store Name/Number”
Tap the Touchscreen icon until the desired characters appear (4 to
16 characters) and press “DONE”.
NOTE: To bypass the Store Number entry, select “GO BACK”.
Initial Startup

7
Date and Time
Log In > More > Date/Time
a) Enter the Date and time (note date format).
b) Select AM or PM (if applicable), then select “ENTER”.
c) Select “GO BACK” until the Main Screen appears.
Clerk and Manager Codes
Log In > Accounts > (select account type) > Add
a) Enter the desired PIN Code (4 to 9 numbers) and
select “ENTER”.
b) Verify the PIN Code - Re-Enter the PIN Code and
select “ENTER”.
c) Enter the Name - Tap the Touchscreen icon until the
desired characters appear and press “DONE” (2 to 8
characters).
d) Set the User’s privileges from the available menus
and select “SAVE” to exit.
Select “ADD” to enter another account.
Select “GO BACK” to select a different account type.
Tube Vending Operations
Step 1: Congure column amount (the amount in a single tube, in
each column).
Log In > Cash Control > Congure Columns
a) Select the desired column.
b) Select the Denomination type.
c) Select the number of bills per tube and select
“ENTER” (Bills only).
d) Select another column or select “DONE” to exit and
save your settings.
Mandatory Programming
8
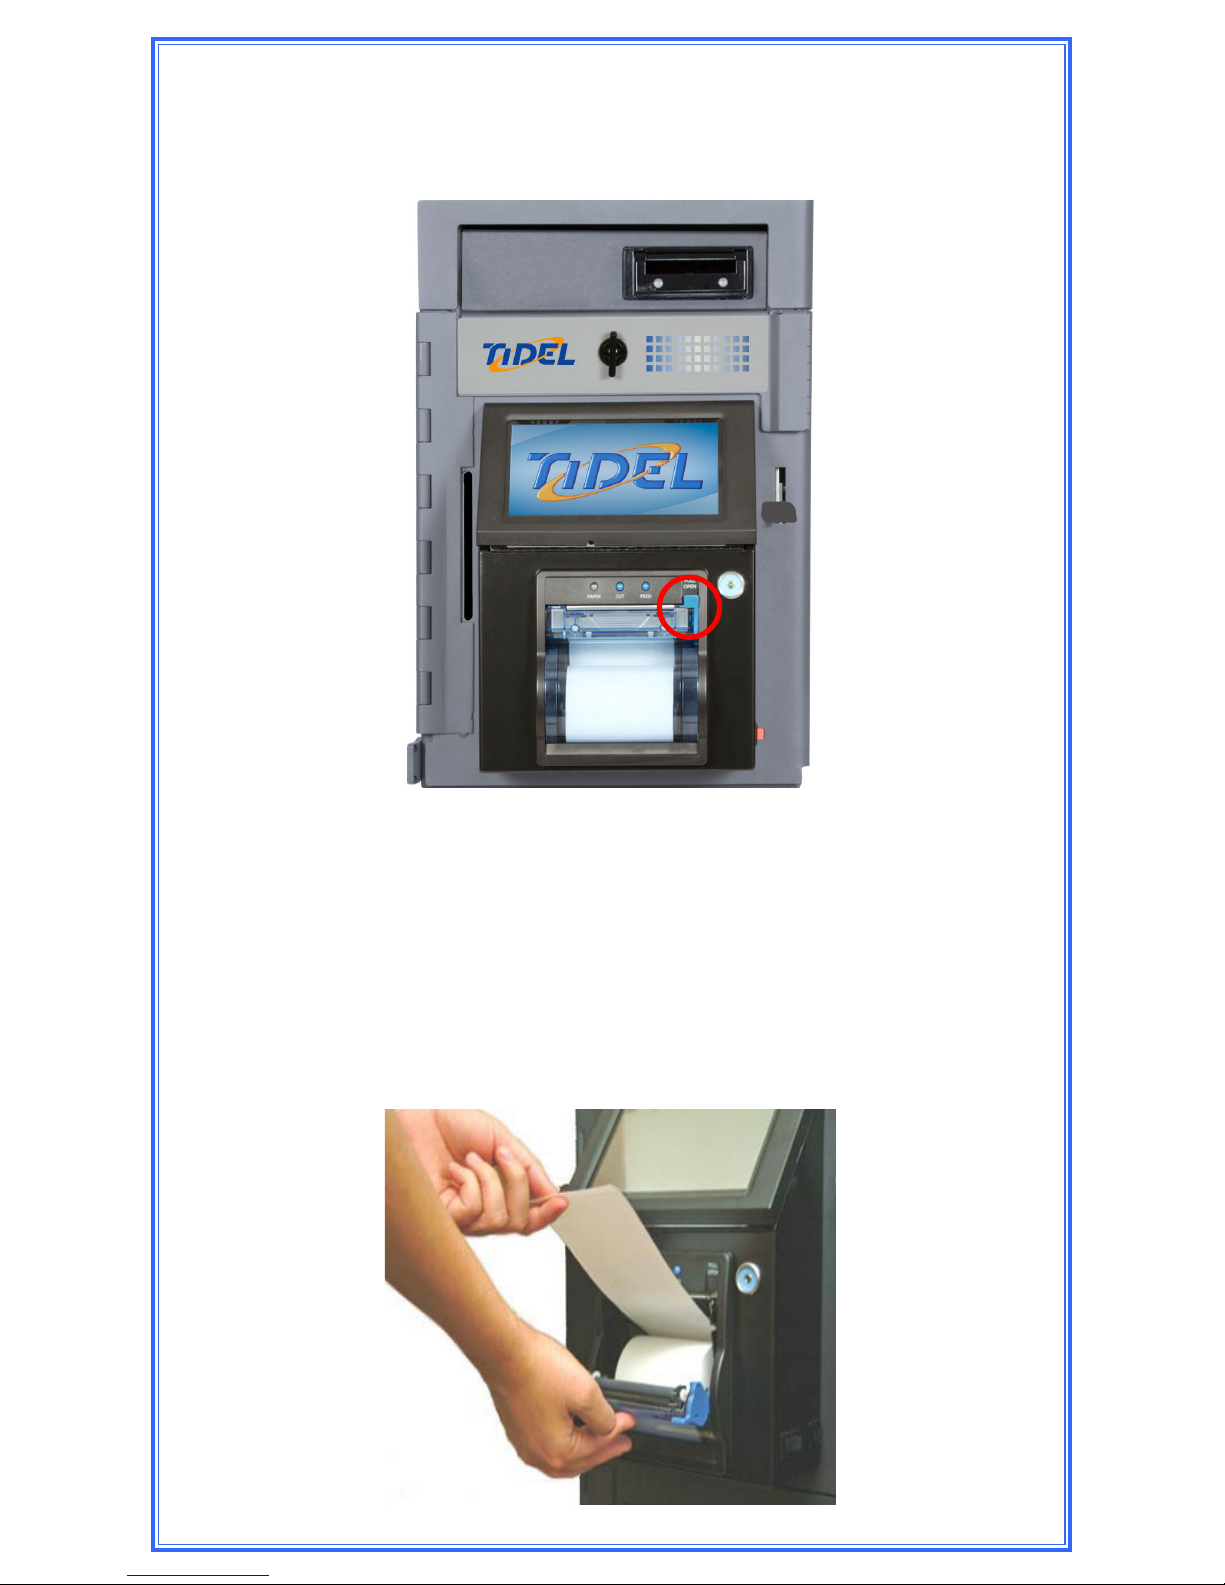
Step 1: Press down on the Paper Door Release Button to expose
the paper tray.
Step 2: Pull enough paper off the roll to extend out of the paper
tray and place the paper into the tray so the paper comes
off the top off the roll.
Step 3: Close the Paper Tray Door and press the “CUT” button to
remove the excess paper extending out of the tray.
Step 4: Press the Paper Feed Button to insure paper feeds
properly.
Built-In Printers

9
Name
NOTE: The top of the Display indicates the current screen.
XUse your ngertips to “tap” in selections. Do not use sharp,
pointed objects to select entries.
To enter a character:
Tap the corresponding icon repeatedly until the desired
selection is displayed.
To advance to the next character:
Pause entry selection for 1-2 seconds, then continue with
the next character.
To backspace 1 character or clear an entry:
Select “Clear”.
To exit an Entry screen:
Select “Done”.
To exit a Menu screen:
Select “Go Back”.
To enter a space:
Select the “789_” icon until an underscore “_” is
displayed.
Touchscreen Layout/Entry
DEF GHIABC
MNO PQRJKL
VWX YZ0STU
456 789_123
Clear Go BackDone
10
Main Screen Operations
XSelecting an icon on the Main Screen will prompt the User
for code entry.
XSelections that appear on the Main Screen will vary
depending on the conguration and type of add-on modules
equipped with the unit.
Buy Change
This feature will require the user to insert bills into the Bill
Acceptor before funds can be dispensed.
(Time delay does not apply to the dispensing process when
this feature is selected)
a) As bills are inserted into the Acceptors, dispense
selections equal to the “Deposit Credit” will appear
on the display.
b) As funds are dispersed, selections larger than the
“Deposit Credit” will be removed from the display.
c) Press Done to exit the Buy Change menu
Note: Any unused “Deposit Credit” cannot be carried over to the
next vending transaction.
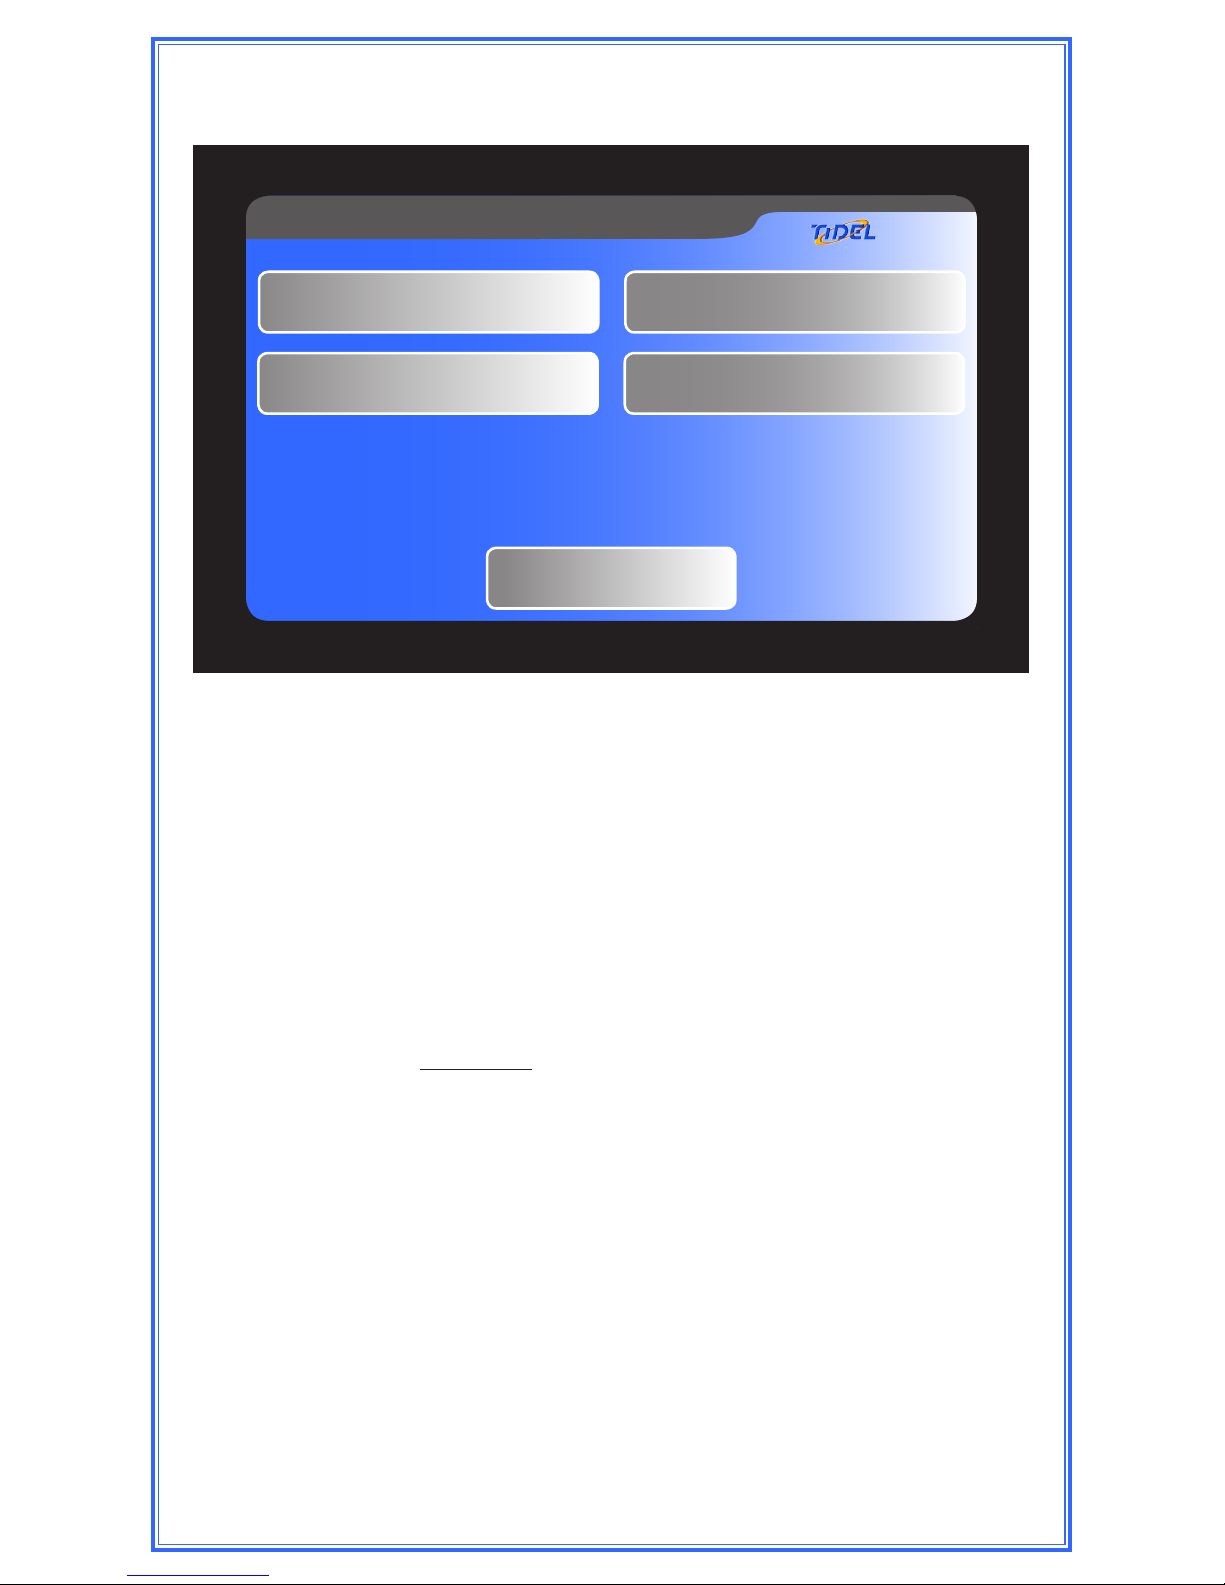
Sentinel Main Screen, version 4.60
Log-In
Vend Tube Insert Bills
Load Tubes Vault Drop

11
Main Screen Operations
Insert Bills
1) After code entry, the Bill Acceptor will become active. Bills
can be inserted into the Bill Acceptor.
Note: Approximately 25 bills can be inserted into a Bulk Note Bill
Acceptor in a single transaction.
2) The Bill Acceptor will become inactive 30 seconds after the
last bill was inserted or when “Done” is selected.
Bills that have been marked inside the “Keep Out” area (with
security marking pens, ink pens, pencils, etc...), are likely to
be rejected by the bill acceptors.
Load Tubes (using a Clerk log-in code)
1) The user may be prompted to select the assigned register (If
applicable).
2) The user will be prompted to select the column and the
number of tubes to be loaded.
Load Tubes (using a Manager log-in code)
1) The Manager may be prompted to select the register
containing funds used to ll the columns (If applicable).
XThe “Are you going to ll the columns?” will appear.
YES - The tube count in all columns will be set to 11.
NO - Column selection will appear, allowing the Manager to
select columns and the number of tubes inserted.
2) The prompt “Did the money come from the Change Fund?”
may appear.
Selecting “YES” will deduct the total amount of the
tubes loaded from the Reserve Change Fund.
Keep Out Area

12
Log In
1) The user will be prompted to enter a Clerk, Manager or
Executive code to access the appropriate menus.
Vault Drop
1) The user may be prompted to select tracking information
prior to making a drop (Register Number/Name, Check
Number, Reference Number, etc...).
2) The user may be prompted to select the compartment the
drop is being placed in (Drop or Courier Tray).
3) The user will be prompted to select the Drop Type (Cash,
Check, Other).
4) The user will be prompted to enter the amount of the drop
and verify the amount of the drop.
NOTE: If more than 128 vault drops are performed without
moving the drops out, the oldest drops will be deleted
as the new drops are added. (see Moving Vault
Contents in this manual)
Vend Tube
1) The user may be prompted to select the assigned register (If
applicable).
2) The user will be prompted to select the column a tube will
dispense from (If applicable).
3) After a tube is vended, the VEND TUBE icon will display
“Report Problem”. Selecting this item will allow the User to
report one of the following conditions:
XGot the wrong stuff - The user will be prompted to
enter the amount that was actually in the tube.
XNothing came out - No tube was dispensed.
XThe tube was empty - Nothing was in the tube.
XThe vend was OK - No problem will be reported.
The above reported problems will be noted on the
Summary, Shift and Transaction Reports.
Main Screen Operations

13
Courier Log On Options
When a Courier i-Key is placed in the socket on the front of
the Control Panel, the following Menu selections may appear
(dependent on access privileges):
XPrint Reports
Reports can be printed from this menu.
XNotation
A 1-16 character notation can be entered each time “YES”
is selected (up to sixteen times).
Notations entered will appear on the report that is printed
after the Courier closes the door.
Examples:
If the Courier wants the notes to appear on the report
for the CURRENT pick-up (such as courier tray amounts
included in the pickup), the notations should be entered
BEFORE the door is shut and locked.
If the Courier wants the notes to appear on the report for
the NEXT pick-up (such as seal numbers, cassettes serial
numbers), the notations should be entered AFTER the
door is shut and locked.
XOpen Vaults
If the Courier has access to only one vault, the door can
be opened after this menu item is selected.
If the Courier has access to multiple vaults, additional
selections available to the Courier may be displayed.
Store Personnel may be required to provide additional log-
in (dependent on access restrictions).
XChange Pin
Allows the Courier to change the existing PIN number.
XClean Acceptors
Allows the Courier to access the Bill Acceptor Cleaning
Menu.
14
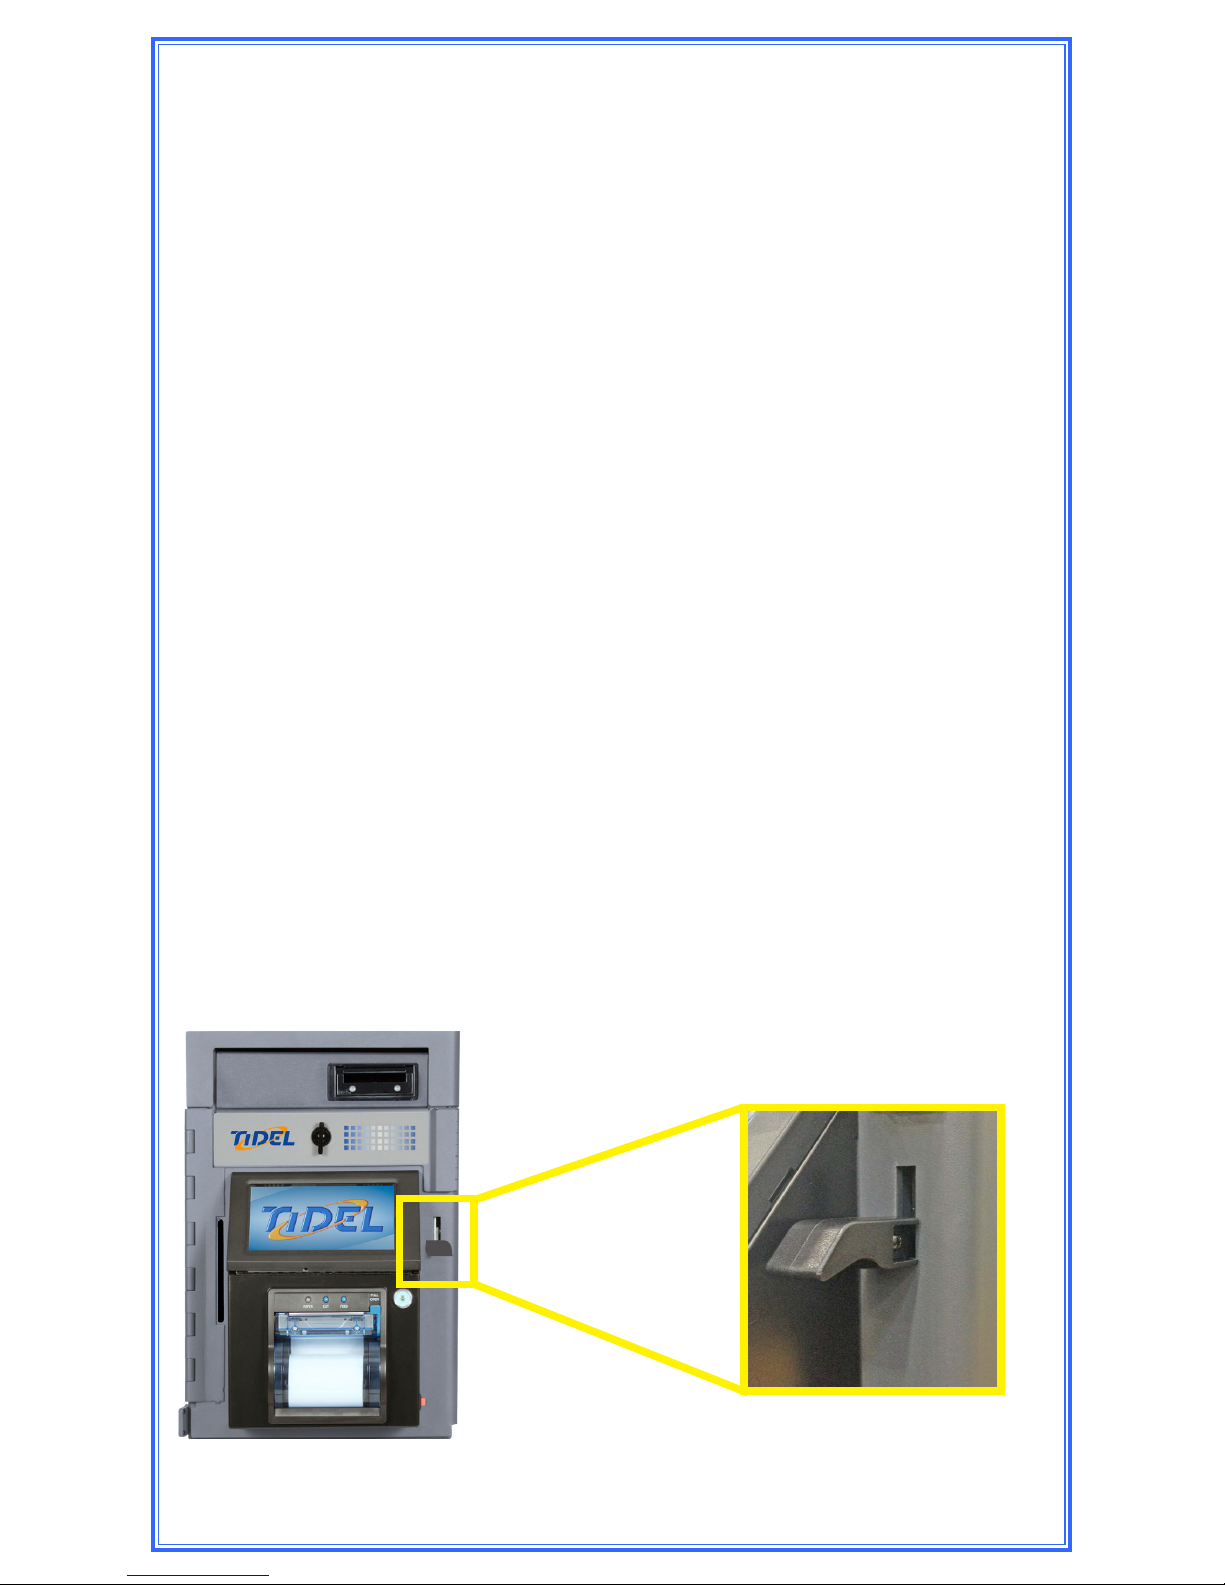
Opening the Bill Acceptor Vault
TACC-VI Controller
Step 1: Navigate to the “Open Vault” Menu and select the desired
vault.
Log In > (enter code) > Open Vault > Acceptor Vault
Note: If the vault does not appear as a selection, the
user does not have the ability to open the vault.
Bill Acceptor Vault
Opening this vault will expose the Bill Acceptor Cassettes.
Step 2: After the door opening delay time has expired, the top line
of the Display will indicate “Vault Wait Complete”.
XWhen the door opening delay time is achieved, there
is a 10 minute access window to open the door.
XIf the Door is not opened during the 10 minute access
period, restarting the opening procedure will be
required.
Step 3: Navigate to the “Open Vault” Menu and select the desired
vault again.
Step 4: Lift the Handle to unlock the Vault.
Step 5: When the door is closed, the handle will automatically drop
to the locked position.
15
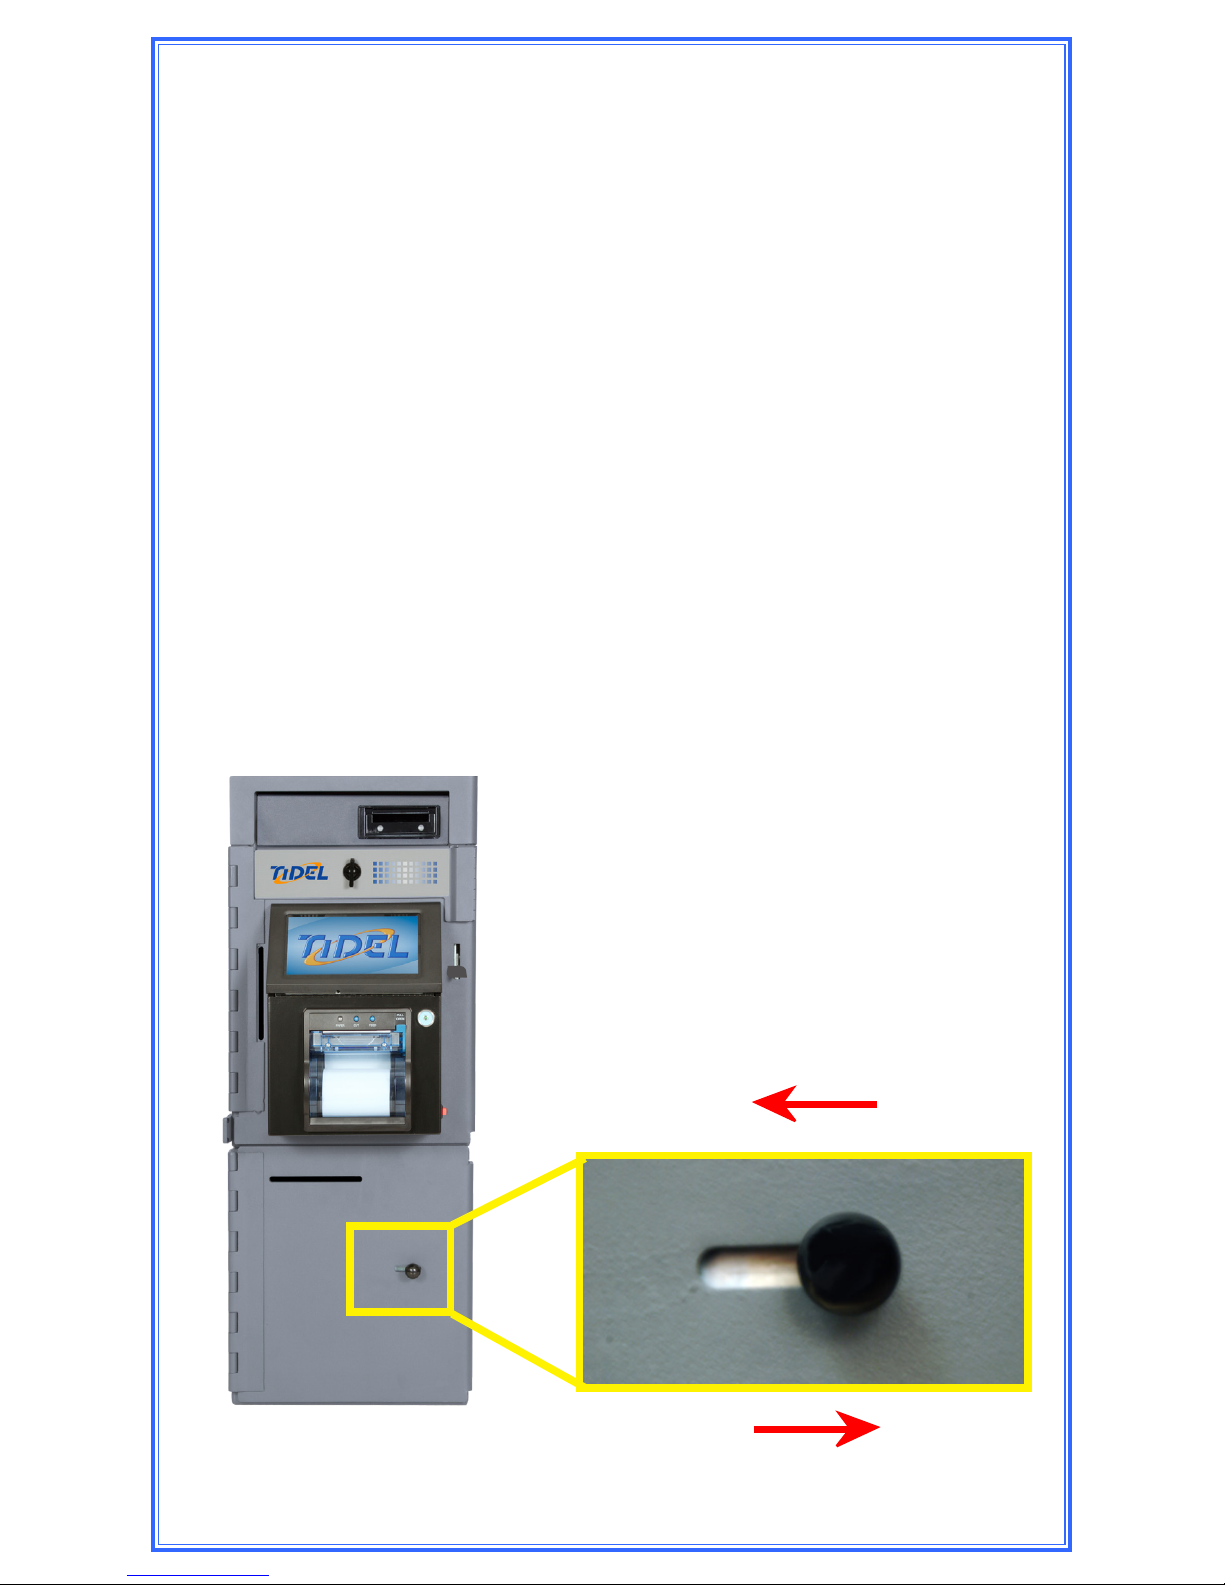
Opening the Drop Vault Door
TACC-VI with Drop Vault Base
Step 1: Navigate to the “Open Vault” Menu and select the Drop
Vault.
Log In > (enter code) > Open Vault > Drop Vault
Step 2: After the door opening delay time has expired, the top line
of the Display will indicate “Vault Wait Complete”.
Step 3: Navigate to the “Open Vault” Menu and select the Drop
Vault.
Log In > (enter code) > Open Vault > Drop Vault
Step 4: Slide the handle to open the Drop Vault.
NOTE: A “Move Vault Contents” must be performed after
Drops have been removed or accounting records will be
inaccurate.
Lock
Unlock

16
Inserting Manual Drops
TACC-VI
Drops placed in the “Upper Insertion Slot”
can only be retrieved by opening the Bill Acceptor Vault.
Items placed in the Upper Insertion Slot can also be collected by
Armored Car Couriers
The Upper Insertion Slot is typically
used for Armored Car collection
(Courier Tray)
The Lower Insertion Slot is typically
used for register overow, drops and
items not inserted into Bill Acceptors
Inserting Manual Drops
TACC-VI with Drop Vault Base

17
Removing the Drop Vault Contents
If Drops are being transferred to the Courier Tray:
Step 1: Navigate to the “Cash Control Menu” and select DROPS
TO COURIER TRAY.
Log In > (enter code) > Cash Control > Drops to
Courier Tray
Step 2: The unit will display the drop contents.
Step 3: Select “Done” (The reports will reect that all contents in
the Drop Vault were moved to the Courier Tray).
Step 4: Drops can be inserted into the Upper Insertion Slot in the
front of the Bill Acceptor Vault Door.
If Drops are being transferred to the Reserve
Change Fund or being removed from the unit
Step 1: Navigate to the “Cash Control Menu” and select MOVE
VAULT CONTENTS.
Log In > (enter code) > Cash Control > Move Vault
Contents
Step 2: The user should select DROP from the “Move From” menu.
Step 3: The user will be prompted to select where drops are being
“Moved To”.
XOutside - Reports will show drops were removed
from the unit
XReserve Change Fund - Reports will show the drops
were added to the store operating funds
Step 4: Select “Done” to complete the Drop move.

18
Retrieving Items from the
Courier Tray
Step 1: Open the Bill Acceptor Vault Door to access the Courier
Tray.
If the Acceptor Vault was opened by a Courier
a) The Courier will perform the necessary steps to clear the
contents of the Courier Tray.
b) The Courier Report will reect the amounts removed.
If the Acceptor Vault was opened by an Employee
a) A “Move Vault Contents” must be performed to clear the
Courier Tray amounts from the accounting reports.
Step 1: Navigate to the “Cash Control Menu” and select MOVE
VAULT CONTENTS.
Log In > (enter code) > Cash Control > Move Vault
Contents
Step 2: The user should select Courier Tray as the “Move From”
location.
Step 3: The user will be prompted to select where drops are being
“Moved To”.
XOutside - Reports will show drops were removed
from the unit
XReserve Change Fund - Reports will show the drops
were added to the store operating funds
Step 4: Select “Done” to complete the Courier Tray move.
Table of contents
Other Tidel Safe manuals


