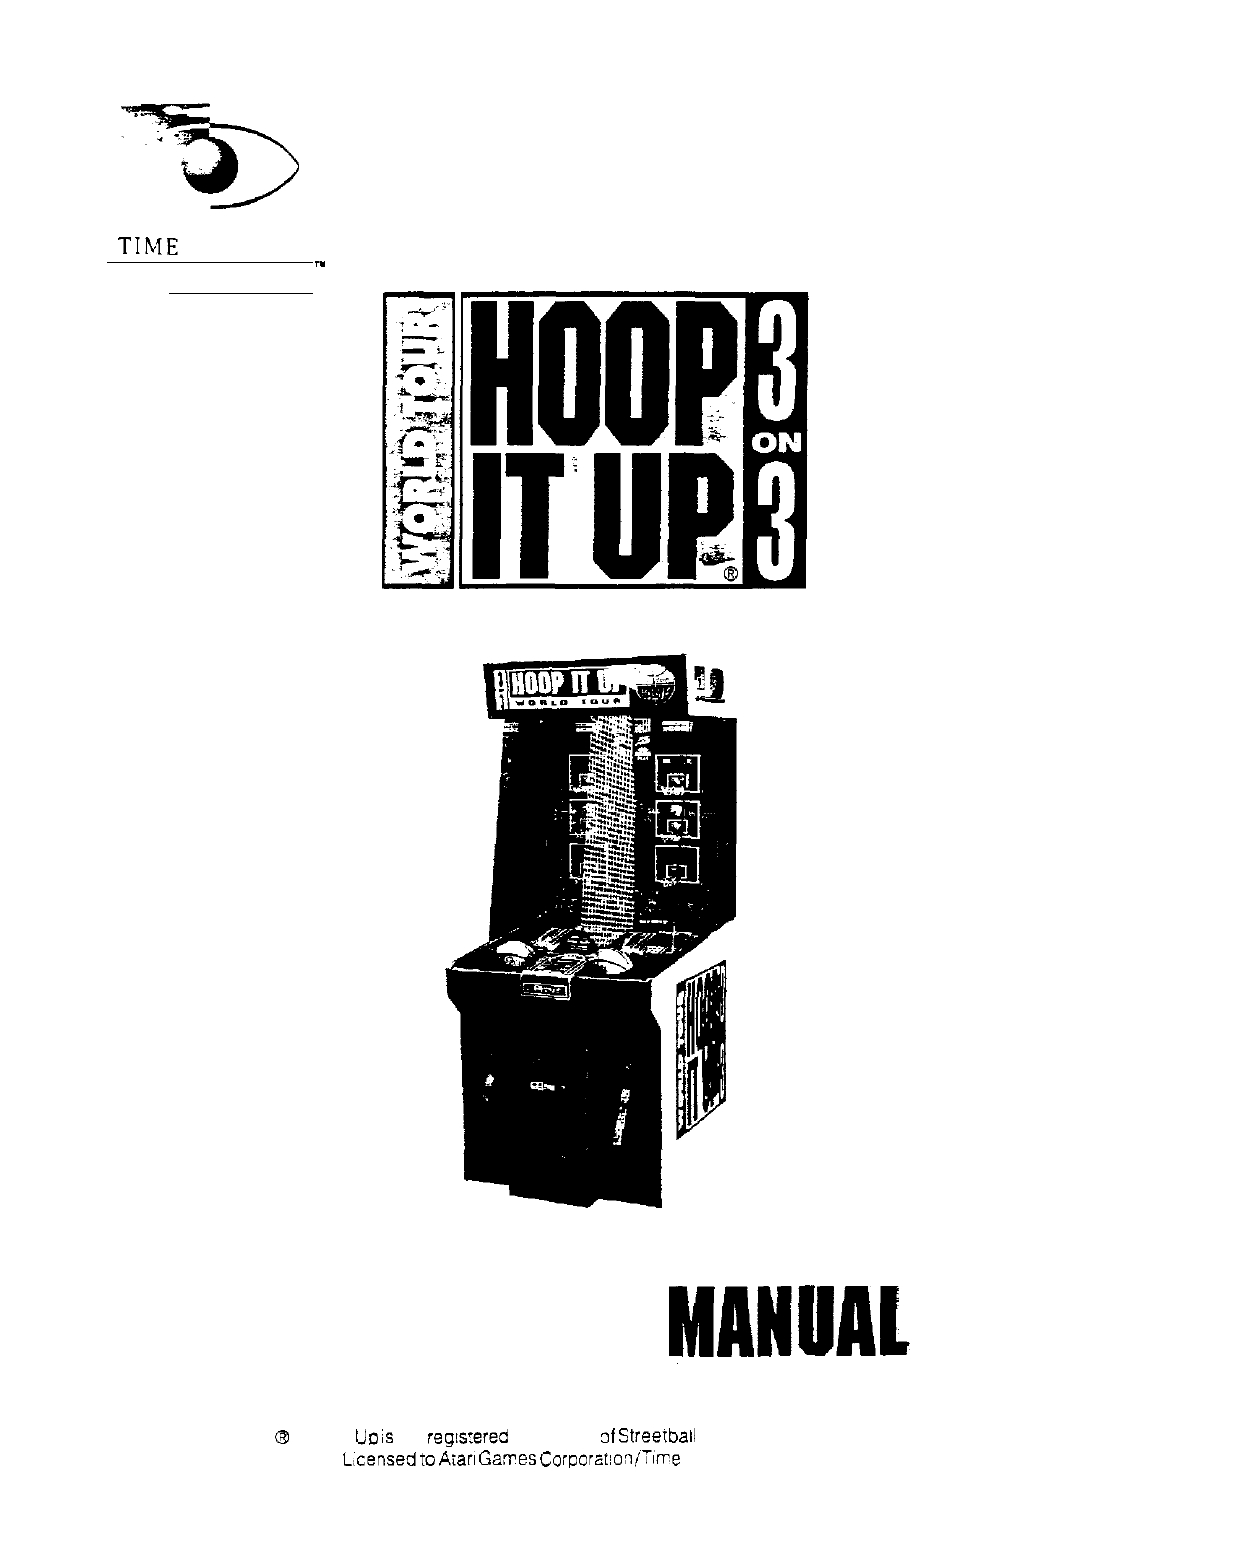
Time Warner Interactive Hoop It Up 3 on 3 User manual
TIME
WARNER
,.
INTERACTIVE
OPERATOR’S
@
HOOD It
Uo
is
the
reg!srered
trademark
3f
Streerbail Sports Ventures Partners
L,censed to
Atari
Gares
Corporit~onlTime Warner Interactive.
Copyright
0
1995
by
Atari Games
Corporation/Time Warner Interactive.
All rights reserved.
No
parr
of this
publicarion
may be
rcproduccd
by any mc-
chanical.
phorographic
or electronic process, or in the form of
a phonographic recording.
not
may
it
be
rrorcd
in a
rcrriwal
sysrem.
rransmirrcd,
or
c&r&e
copied for public or privarc
use,
without
permission from rhe publisher.
The
game play.
aJl
graphic designs. thin technical manual.
iu
accompanying
schemaric
diagrams, and the display manual
are
prorccred
by rhc U.S. Copyright Act of 1976.
This Acr provider for
rubsranrial
penalties for violating feder-
al copyright laws. Courts can impound infringing articles
while
legal
action
is
pending.
If
infringers
arc
convicred,
courts
can
order
desrrunion
of the infringing articles.
In addition, the Act provides for
paymenr
of
staturo~
dam-
ages of up
10
850,000 per infringing transaction in certain
cases.
Infringers
may also have
to
pay
cosu
and
attorneys’ fees
and face an
imprironmcnr
of
up
to
five years as well
as
fmcs
of up
co
$250,000 in the case of individuals and up
to
S500.000
in the
cast
of
corpoarions.
Atari
Games Corporation/Time Warner Interactive will
ag-
gressively
enforce
ir.s
copyrights against infringers. We will
use
ail
lega
means
co
immediately halt any
manufacrurc,
disrri-
burion,
or
opcrarion
of a copy of
games
made by us. Anyone
who purchases such copier risks forfeiting such a game.
Published
byz
Atari
Gamer
Corporation/Time Warner Interactive
675
Sycamore
Drive
Milpiras,
California 95035
Prinrcd
in
chc
U.S.A.
u/95
Produced by the Time Warner
Inreranive
Technical Publica-
tions Department.
Design,
Wriring
and Ediring:
Andrea
Dencker
Technical
Illusrrations:
John
Pasrrikar
and
Maylan
Wang
WARNING
Use of
non-TWi
parrs or modifications of
any
T!me
Warner
Interac6ve
game
orcuit-
ry
may adverse/y affect
the
safety of your
.game.
and may cause injury to you and
your players.
YOU
may void
rhc
game
warclmy
(printed on the
inside
back
COVCI
of this manual) if you do any of
rhe
following
l Substitute non-Time Warner Interac:ive (TWi)
pam
in
the
game.
.Modify or alter any circuits in
the
game
by using
kirs
01
pans
nor supplied by Time Warner lnrcractive.
This cquipmcnt generarcs, uses, and can
ndiare
radio
frequenq
energy and if not installed and used in accordance wirh the in-
struction manual, may
cauc
inrerfcrcncc to radio
communica-
tions. It has been teared and found
m
comply with
die
limits for
a Class A compuring device
punuanr
m
Subpan
]
of Parr 15 of
Federal Communications Commission (FCC)
R&s,
which are
designed
to
provide reasonable pmrecrion
a@nst
such inrerfer-
encc
when operated in a commercial cnvironmcnt. Opcrarion of
rhis
equipment in a
residcnrial
area or modification
to
this
equipmenr
is
likely m
caw
inrcriercncc, in which case
rhc
user,
ar
his own
expense,
will be required
to
rake
whatever
mea~u~cs
may be required
co
correct the inrcrfuence. If you suspect inter-
ference from a Tune Warner inrcracrive game
ar
your iocarion.
check
rhc
following:
All
ground wires in the game are properly connected
as
shown in
the
game wiring diagram.
The
power
cord
is
properly plugged into
a
grounded
dim-
wire oudet.
On
games
provided with an Elecrromagnetic
lnrerfcrence
(EMI) ground
plant,
he
sure
that
rhe
game
;Irintcd-circuit
boar&
(PCBs)
are
properly
insralled on ine EMI ground
plane and thar the
end
board is secureiy
inscalled
with
ail
scww
in place and cighrencd.
you
arc
still unable
m
s&e
rhe
inrclfcrence problem. please
canracr
Luromer
>erwcc
ar
Time
Wamcr
Inrcracrive.
See the in-
side front
cover
of this manual for service in your
area.
WARNING
Properly
Ground the Game. Players
mzy
receive an
electrical
shock if this game is nor properly grounded! To avoid
elccrri-
cal shock. do not plug in rhe game until
i[
has been inspecrcd
and properly grounded. This game should only be plugged
inro
a
grounded
three-wire ourlet. If you have only a Two-wire
ourler,
we recommend you hire a licensed electrician
ro
insrail
a
rhree-wire
groundedoutler.
AC Power Connection. Before you plug in rbc game, be
sure
rhar
rhc game’s power
supply
can accepr rhc AC line
volrage
in your
locxion.
The line voltage
requirements
are
listed
in
Chapter 1 of rhis manual.
Disconnect Power During Repairs. To avoid electrical shock,
disconnect rhe game from rhc AC power before removing or
repairing
any
pan
ofcbc
game.
Use
Only
Time Warner Interactive (TVZ) Parrs. To
main-
rain the safety of your
TWt
game, use only
TWi
parrs when
you repair it. Using non-TWi parrs or modifying the game
circuitry may be dangerous, and could injure you and your
.playcrs.
Use
the
Proper Fuses. To avoid electrical shock,
use
replace-
menc fuses which
are
specified
in.&
parrs
list
for this
game.
Rcplacemenr
fuses musf march
chose
replaced in fuse type,
voltage rating, and
currem
raring. In addition, rhc fuse
cover
must
be in
place
during
game
operation.
CAUTION
Properly
Atrach
All Connectors. Make sure
char
rhc
conncc-
~01s
on each printed circuit board (PCB) are properly plugged
in. The connecmr~
are
keyed to
tic
only one way. IF they do
nor slip on easily, do
not
force
them. If you
I~YCIIC
a
conncc-
tar,
ir may damage your game and void your warranty.
Ensure the Proper AC Line
Frequency.
Games
manufacrurcd
for
opcrarion
on 60 Hz line power (wed in
rhc
United Starer)
mux
nor be operated in countries
with
50 Hz line power
(used in Europe). If a 60 Hz machine operates on
50
HZ
line
power. the fluorescent line ballasr
uansformer
will overhear
and
caue
a
porenrial
fire
h-d.
Check the product
identifi-
carion label on your machine for rhe line frequency required.
ABOUT NOTES, CAUTIONS, AND
WARNINGS
In
TWI
publications. norcs,
anions
and warnings have
rhe
following meaning:
NOTE
-
A highlighted piece of information.
CAUTION
-
Equipmcnr
and/or
par
can bc damaged
or
destroyed if
insrructions
arc nor followed. You
will
void
&c
warranty on
TV&
primed-circuit boards and
parts
rhcrcon,
if
equipment or
pans
are
damaged
or destroyed due
co
failure
of
following
inrrrucrions.
WARNING
-
Players
and/or
technicians can be
Lulled
or
injured if
insrmcrions
arc nor followed.
P&cautions
de’Emploi
GEnirales
;I*
iii

MISES
EN GARDE
L4errcz
Ic
jeu
i
la
term
Lcr
joueun
risquenr
de
rcccvoir
une
d&-barge
tlecrriquc
si
Ic
jcu
n’csr
pas
corrccremen~
mis
i
la
terre!
Pour
Cviter
les
dtcharges
ilcctriques.
asuez-vows
quc
le
jcu
est
cor~ccfemen~
mis
e
la
rerrc
avan
de
lc
bran&r.
Brancha-lc
uniquemenr
dam
une
prisc
rripolairc
avec
mist
B
la
term.
Si
YOU
n’avez
pas
de
prise
rripolaire,
il
esr
recommand6
de faire
appel
B
un
tlectricien
brevcri
pour en
insraIler
unc.
Si la
cons~lc
de
com-
mande
n’csr
pas
correctemcnt
miw
i
la tcre,
!es
joucurs
risquem
dc
recevoir
unc
d&barge Clecrrique! Si une reparation qucl-
conque a
CrC
f&e
stu
la console de commande,
assu~ez+zw
que
le
fd
de
mix
B
la rerrc est solidemcnt
attach&
B.
I’inrkieu
de
la
console.
Ceci
fair, verrouillez
Ic
jcu.
Branchemcnt sur
sec~eur.
Avant de brancher lc jcu. xw.uez-vous
que
son
bloc
d’alimencation
csc
comparibk
zvcc
la
cension
seacur
locale.
La
condirions d’alimenrarion du jeu
appamkxnr
au
premier chapirre de la
prCsence
rake.
DCbrancha
le
jeu
du secreur
avam
uue
rCparatioo. Pour &irer
les
dtcharges electriques,
debrancha
le
jcu du secreui avant de
le
dtmonter
ou dc
Ic
rtparer.
Utilirez
uniquemax
des
piker
TWi.
Pour
&irer
les
risques
d’accidents,
utiiisa
mujoun
des
pikes
TWi
pour hparer
Ic
jeu.
CemQloi
de
pikes
d’autres marques ou la modificarion da cir-
cuim
du
jeu
sonr
potenriellemcnt
dangcreux pour
Ic
r~parateur
er
pour
1cs;0ueurs.
Ucilisez les fusibles
appropriks.
Pour
kvvircr
les
dkhargcs
&c-
triques,
rcmplaca
lcs
fusiblcs par
ceux
indiquk
dam la nomen-
claturc du
jeu.
Lcs
furibies dc rechangc
d&em
ke
du meme
type,
de
la meme tension ct de la mtmc
inrensiti
que crux
d’o-
riginc.
ATTENTION
Acachn
correcwmem
tous les
connecreus.
r\ssurn-vous
que
mus
lcs
connec~eurs
sent
bien
c&h&s
dam
1~5
cants
circuits.
Ces
conncneurs
sonr
d&s
d’un
dkrampcur
qui
tvirc
les
errcun
de branchemenr.
S’ils
s’c&hcnr
di&ilemenr,
nc forcez
pas.
Si
vous
brancha
un
~onncctcu
k
l’envers,
vous
risqun
d’cndom-
mager
le
jeu
CL
d’en
annulcr
!a
gaIa.nric.
V&i&z
la
frCqucncc
de ligne du
cotram
sectcur.
Les
jcw(
fab-
riques pour
foncrionner
a
unc frequencc de lignc de 60 Hz
(fr~quencc
urilisk
en Amerique du
Nerd)
ne
doivenr
pas
erre
u&s&
dam
ks
pays donr le
cowant
a
une
frequencc dc
50
Hz
(Europe).
Si
YOUS
branchez
un
apparcil
congu
pour unc
frequence
dc 60 HZ
SUI
un
cowam
June
frriquence de
50
HZ,
IC
rransformarcur
b&.x
de I’klairagc tluoresccnt surchauffera,
ce
qui
prknrc
dcs
risque
d’incendie.
Vi&z
la
fr$uence
de iigne
requise
par
vorre
machine:
clie
esr
indiqute
SW
sa
plaque
sign&-
riquc.
REMARQUES, AVERTISSEMENTS
ET MISES EN GARDE
Dam
les
publications
d’TW,
les
conventions. en cc
qui
concene
les
remarques,
avertissemcnn
ct
mires en garde. sonr
!es
iuivanres:
REMARQUE
-
Sen
k
anirer
i’arccnrion
sur
un
point
panic&-
er.
AVERTISSEMENT
-
Lc
non-rcspecr dcs direcriver
prbenre
des risques
d’endommagemcnr
erlou
dc
desrrucrion
pour
1:
martriel
erlou
Its
pikes.
En
cas
d’endommagcment ou de
de-
srmcrion du
markiel
ou
dcs
pikes,
risulianr
du non-respecr dcs
directives, la garanrie offcrte sur Its
canes
circuix
TWi
er
ks
pi&s
mnnues
lWi
scn
annulte.
MISER
EN GARDE
-
k
non-respect da directives
prCsenre
des
risqlres
de
blessures
ou Zaccidcnts morrefr pour
les
joueua
criou
lcs
reparareurs.
1
Set-Up
How
t,,
&This
,&m,al
I-1
......................
Operating the Game
............................
1-2
InstalIario”
...................................
1-2
Install
rhe
Pla,+ield
Balls
.....................
1-2
Load
rhe
Ticker Dispensers
...................
l-2
Level
the
Game
............................
1-Z
Change
rhc
Bonusl?ckcrs Sign (Optional)
.......
l-2
Special Precautions
.............................
I-2
Inrpccring
rhc
Game.,
..........................
1-3
Controls and Switch Loarions
....................
1-3
Power On/Of
Swirch
and Main
Fuse
...........
l-3
licker
Dispensers.
..........................
l-3
Liquid-Crysral
Display and Keypad. ............
I4
Adjust
Canrrasr
of LCD
.....................
I4
Volume
Conrrol..
..........................
14
BaIamx
..................................
I4
Ticket Counrer
............................
l-4
Coin C
OunIer
............................. 14
Setting
the
Coin, licker and Game
Oprions
..........
1-5
Game
Play.
...................................
l-5
Inrroducrion ..............................
I-5
Game
Play
Hinrs
............................
1-5
Game Play.
...............................
1-5
Advanced
Game Mode
.......................
l-5
2 Test Functions
Inuoduction
......................
............
2-l
Usiig the
Liquid-Crystal
Display on the Game PCB
.....
2-2
Attract-Mode
(Accounrmg)
Funcrrons.
..............
2-2
Program Modes. ...............................
2-2
Set
Panmercrs Mode ........................
2-2
Set Cost $/Game ........................... 24
Test
Functions. ...................... ....... 24
Display Mcmary
..............................
.24
3 Troubleshooting
&
Maintenance
Inrroducrmn 3-l
Maintcnancc
Froccdurcs
3-2
Introdunion
3-2
Cleaning
Procedure
for Coin Mechanisms. 3-3
Cleaning
Proccdurc
for
Ticker Dispensers
.
.
3-3
Cleaning Procedure for Ball Shoorcr 3-3
Troubleshooring
Proccdurcs
3-3
Repair
Proctdures
34
Introduction 34
Ball Shoorcr Spring and
Pisron.
3-4
Replacing
rhc
Bail
Shooter Motor
or
Oprics.
34
BaU
Shoorcr
Rigbc/l_efr
Tiir
Adjustment 3-5
Basketball
Control.
3-5
Speaker 3-5
Acrracrion
Panel
Fluorcsccnr
Light 3-5
Plq+ield
Incandcsccnr
Ligbho
3-5
Backbovd and
Playfield
Components 3-6
System
Logic
Assemblies
3-6
4 Parts Illustrations
Part
Ordering Information
4-I
For
fig-xc
and page numbcrs,
see
the list of
itiusrrarions
chat
follows.
5
Wiring
Diagrams
Inrroducrion
5-l
For
tigurc
and page numbers,
see
the
lisr
of
ilhtsrrarions
that
foUows.
Figure
l-1
Operator Conrrols on Hoop
Ir
Up
GamcPCB
_,
._.
l-4
Figure 2-l
D&led
View of Keypad.. 2-2
Figure 3-l
Ball Shooter
Adiusrmcnt
3-4
Figure
4-I
Figure 4-2
Figure
b-3
Figure 4-4
Figure
4-j
Figure 4-6
Figure 4-7
Figure
4-8
Cabinet-Mounted
Assemblies,
From
View 4-2
Cabincr-LMounred
Assemblies,
Rear
View, 4-3
Backboard i\ssembly 44
conrrol Panel
Assembly
4-j
Bellows (Basketball)
C0nrr01
Assembly
4-6
B$l
Shooter Assembly. 4-7
OwlUnder
Coin Door Assembly. 4-8
Power
Supply
Assembly
.4-
10
Table
l-1
Table 2-l
Table
2-2
Table 3
-I
Game
Specificarions
................
!
-3
Summary
0fAccccounring
Funtions.
.....
L-2
Summary of Recommended
Swings
far
All
Paramcrers.
.......................
2-3
General
Troublcshooring.
............
3-2
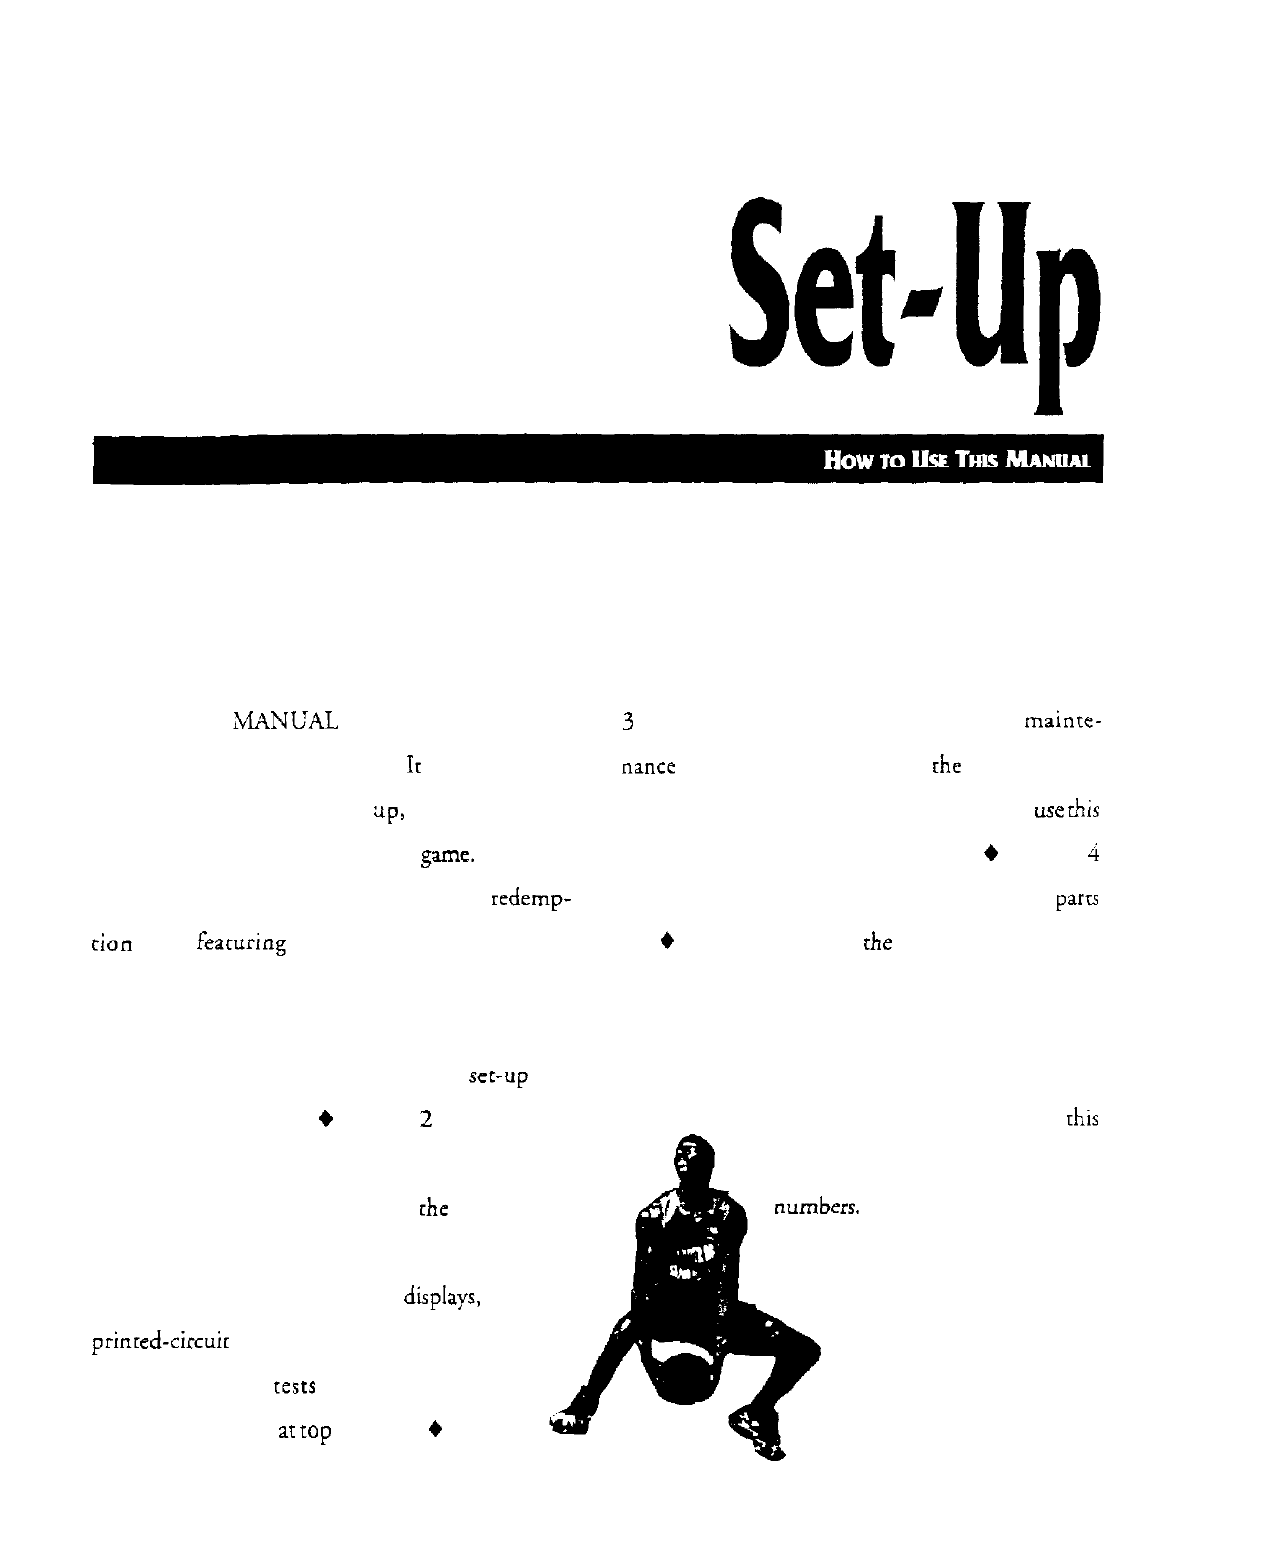
CHAPTER I
T
HIS iMANUAL IS written for operators
and service personnel.
It
provides infor-
mation for setting q3, playing, testing,
and maintaining your Hoop It Up” game.
Hoop It Up is a two-player basketball
rcdemp-
cion
game
featuring
real basketball controls that
shoot air-activated balls into miniature hoops and
nets.
Chapter 1 of this manual contains
set-up
and
game play information.
9
Chapter
2
contains a de-
scription of the test functions and option settings.
The test modes are important in rhc Hoop It Up
game. Using the tests, you can troubleshoot the large
light-emitting diode (LED) score
diplays,
the game
printed-circuit
board, and the controls. You should
regularly do these tests to keep your game in
peak condition and
at
top
earnings. +Chapter
3
contains a troubleshooting table, plus
mainre-
nance
and repair procedures for rhe game compo-
nents. If you have problems with your game,
use
this
chapter to troubleshoot and repair it.
+
Chapter
4
contains the illustrations and Score Board PCB paru
list.
4
Chapter 5 contains
the
game wiring diagram
and the Score Board PCB schematic diagram.
Copies of the game PCB schematic are available free
of charge by contacting our Customer Service
Dept.: see the inside front cover of this
manual for the address and telephone

.Make
note
of the
power
consumprion
when you sef up
[his
game
so char you do nor overload your electrical circuit. See
Table
l-1
for the power
consumprion
and the orhcr
important
spcciticacions
of rhis game.
*
Be
sure
ro
nvirch
rhe power OFF before
replaying
any
pans
or
coooecringldisconnccting
[hc
elecrriczl
connec-
mrs.
*
DO NOT
atrempr
co
repair rhe printed-circuit boards
(PCB)
yourself. This will void rhe
warranty.
The PCBs
conrain
semi&e
componcnrs
char could easily be dam-
---A
l...
FL-
~-9ll
inrrmai
w&age
of a multi-mctcr. Always
d&E-U
“,
5l.L
>,.l....
I..._..._
return
rhe fatdry PCB
IO
your distributor for repair.
*
When unplugging rhe game from rhe electrical
ourlcr.
grasp rhe plug, NOT rhc cable.
*
Make
complete
connecrions
co
all rhc PCBs and ocher
parts of rhc
circuit.
insuff%enc
insertion of ICs and con-
necfors
will lead to unreliability and possible damage ro
the machine.
Input
curnnt 3 Amos
Linr
Fuse
Rating 3 Amps, 250
V
Slow-B!ow
Line Voltaar
!02
to 132 VAC. 60 Hz
Temmwatum
37’
io
100” F
(5’
to 36”
C)
Humiditv Not
!c
exceed 95%
ieIat,ve
Width-
31.25 Inches
(80
cm)
Depth’
Height’
Weight’
‘Unboxed
35 inches (69 cm)
75 inches (190 cm)
350
lbs.
(159 kg)
Table
1
-
1
Game
Speclficatlons
Inspecting the Game
Inspccr
your Hoop
ir
Up game
carefully
IO
ensure
char rhe
game is
complere
and was delivered to you in good condition.
Inspea
ihe
cabincr
as
follows:
I. Examine rhe
exterior
of rhc cabinet for
denrs,
chips, or
broken
parrs.
2.
Open rhc lower-rear access panels. Unlock and open rhc
coin door.
inspccr
rhe
interior
ofche
cabiner
as follows:
a. Check char all plug-in
connectors
on the
cabiner
har-
nesses are firmly
plugged
in. Do nor forcc the connec-
tors
rogcdxr.
The
connectors
are keyed so
rhey
fit only
in [he
prapcr
oricnrarion.
A reversed connector
can
damage
a printed-circuit board
(PCB1.
This will void
your warranty.
Ensure char ail plug-in inregrarcd circuits on each PCB
are
tirmly plugged into their
sackecs.
Check char
the
liquid crystal display (LCD) on rhe
Game PCB is securely plugged inro
irs
header
connec-
[or.
The game will nor qpcrnu if this display is loose.
Inspect
rhc power cord for any
cus
or
dents
in rhc in-
s&ion.
inspect
the power supply. Make
we
char
the
COIICCI
t&es aIe
;naiiea.
t_n
correcrly. Check
that
the green ground
wires
are con-
nected.
Inspect
orhcr
sub-assemblies. such
1s
rhc controls,
primed-circuit boards. and
spcakerr.
Make
sure
rhar
they are
mounrcd
securely and
that
rhc ground
wi:es
UC
connected.
Controls and Switch
Locations
All rhe
conrrols
are
located
in the lower rear of rhe cabinet or
behind
rhc coin doors. The following paragraphs describe
these locarions in more derail.
Three
small
potcnriomcrcrs
are mounted on the Hoop It Up
game PCB.
To
adjust
rhesc,
you need a small (jeweler‘s)
Aar-
head or Phillips-head screwdriver.
Power On/Off Switch and Main Fuse
The
power on/off switch is a
rogglc
switch
locarcd
on rhe
power
cnuy
mod&,
above
chc
cabineri
lower rear panel. This
is also the
locarion
of rhc
game’s
main fuse.
Ticket Dispensers
Two
ticker
dispensers, one for each playcr, are
standard
in the
Hoop It Up game. Servicing information on
ihc
mechanisms
is provided in rhc
Deirronic
Labs ticker dispenser manual,
which was included in your Hoop It Up game.
Liquid-Crystal Display and Keypad
These
componenrs
arc
mounted on the Hoop
Ir
Up Game
PCB
locared
inside
the
lower rear
access
panel. (Refer
IO
Fig-
ure l-1 for
rhe
locations of all operator
controls
on the game
PCB.) Use the
keypad
IO
set rhe game
paramerers
(optionsi,
game cosr, and to perform
rhe
tcsr
funcrionr.
To access rhe game PCB, unlock
the
lower rear panel and
press
rhe
appropriarc
keypad
purhburtonr
while rhe power is
I-3
Liquid-Crystal Display
Liquid-Crystal
(LCD) Contrast Adjustment
Display Keypad
;J
Balance
(for
Di.9tc.rtion
Ellminafion)
Figure
l-1 Operator Controls on Hoop
ft
Up Came PC6
turned on. You may
need
co
use a Aashlighr
10
read the LCD.
A small LCD
contr~r
adjustment porenriomercr is available
next
to
the LCD;
[his
brightens
or
darkens rhe display (see
furrhcr
derails in
rhc
following section).
Refer
IO
Chapter 2 of
this
manual for
more
information on
the game parameters and
KCSI
functions.
Adjust Contrast of LCD
Turning rhis
parenriomcrer
(labeled LCD
Conrrasr)
all
rhe
way
counrerclockwisc
increases rhe
conrrasr
10
maximum.
This maximizes rhc legibility of the
characrcn
shown on the
LCD.
Volume Control
The
volume
adjusrmenr
porcntiomerer
is on the game PCB.
Turning rhis
porenriomcrcr
in
smail
increments adjusts rhc
currenfvolume
sexing.
Balance
This porenriomercr is intended for eliminating sound
distor-
rion
in Hoop
Ir
Up. Ir should be
ICI
about in rhe middle. If
you hear
disrorred
round, cum
rhir
porenriomcrer
until rhe
sound improves.
Ticket Counter
The
mechanical
ticker counter is
locared
inside rhe upper coin
door. It is
mounred
against rhe inrcrnal wood
pa&.
Note
rhar
a
scparare
rescrrable
ticker counter is available in rhe game
sofnvarc.
Rcfcr
to
Chapter
2 for more derails.
Coin Counter
The
mechanical
coin
counter
is
iocarcd
below rhc coin box.
inridc the lower coin door. Again, a
xparatc
reserrablc
win
counter is available in rhc game
sofnvarc.
Refer
IO
Chapter 2
for more details.
Settins
the Coin,
Ticket and Game
Options
The
Hoop
It
Up coin and game
oprionr
arc ser in rhe
rest
modes.
Ncase
refer
IO
Chapter
2
for rhe
recommended
rer-
rings and the procedure for scrring rhe options.
1.4

NOTE
To
maximize earnings, refer to Chapter 2
for how to fine-tune the
t&?tpayout.
Came
Play
This
sccrion
describes
the
features and play of
rhe
Hoop It Up
game.
Hoop
It
Up is a unique
baskcrball
redemption game with
IWO-
player comperirion. Based on the
successful
“3 on 3” basket-
ball
tournament
event
of the same name. Hoop
Ir
Up is
d
head-to-head game
chat
has
players
shooting for triple slam-
dunk
acrion.
Two players campcre in a rimed game for rhe high score. Us-
ing a real basketball control
m
shoot air-activated balls, players
rry
IO
score
with
single, double or rriple
baskcrs.
Bonus
points
arc awarded for triple barkers.
.4n
onL-cotur
announcer.
themed music. and a large LED
score
display add
ro
rhe fun
and excitement. Additional play modes include one player
agtinsr
rhc
clock, and an advanced game
option
where players
show
foor
lir
baskem
Came
Play Hints
Players
should arrempr
ro
score
as
many
triple
bakers
as
passi-
ble
to
obtain
rhe highest score possible. A triple basket is
awarded
an
additional 3 points, therefore scoring a total of 12
points.
There arc
two
aspecrs
IO
consistently achieving the highest
scores
ar
Hoop It Up -shot pacing and
ball
placemcnr.
Came
Play
The goal is
IO
achieve rhe highest
score
possible before
rhe
game rimer sounds. ending
rhe
game. For ticker dispensing,
players are
awarded
rickets based on score and number of
u-
pie
baskeo. which are operator adjusrablc. An audio cue of
“That’s
a new
rccard!”
will
be sounded when a player’s score is
equal
to
OI
greater
rhan
rhe
prior high score. The high
score
is
displayed and retained indefinitely, unless
KSCI
through the
option menu. (Refer
IO
Chapter 2 for derails on how
ro
reset
the high score.)
In a
head-m-head
compcririon,
if
the
scores
are
tied, the
game
will go into overtime, extending
rhe
game
timer
anorher
10
seconds. The first
player
to
score
a barker wins. If players arc
unable
m
score
during the extended rime, rhe game
will
end
in a
tie.
Advanced Game
Mode
During an advanced
game,
players must artcmpr
co
sham balls
into
whichever
baskets
are
lir
by red
LEDs.
Double and
rriple
baskers
.a
awarded after
first
scoring a
lir
basker.
There
are
no
bonus points
given
during an advanced game.
To
cnrcr
the advanced game
mode,
players must hold
rhe
starr
button down while
inserring
coins and then relcax it.
AC
this
point. rhe srarr
burron
should be
lir.
indicating credit for
coin(s)
inscred.
To smrt an advanced game, press the
sc.src
burron.
1.
When selecting rhe advanced
game.
coins must be
insert-
ed
ant
game
ar
a
rime.
2.
For head-w-head comperirion. only
onrpkz~cr
needs
to
se-
leer
the advanced game if both players wanr
co
be in rhe
advanced game mode.
3.
The advanced
game
mode cannot be accessed if there ace
existing
crcd-
Players should develop a
rhyrhmic
shooting pace in
srri~king
rhe
haI
control, therefore allowing each ball loaded
into
rhc
shooter
to
settle
in. Too
fasr
a pace
!eads
to
inaccurate
shoor-
ing and
more
bouncing balls
more
frcquenr blocked
shots. As for ball place-
menc. though, there
may be
different
ways
of making a triple
has-
ker
01
12-point
play:
backboard
or
bank
shots
may
provide rhc
most
cansis~ent
method
ufgerring
triple
baskets.
in the play&Id. These
I
ate
obsraclcs
that
lead
I-j

in
on the game. The game
defauirs
IO
normal game mode
for the remaining
crcdirr.
unless
players
inserr addirional
coins
10
acrivacc
the advanced game
mode.
CHAPTER 2
U
SE THE HOOP IT UP” test func-
tions
IO
check the condition of the
game circuitry and controls. You will
see the test-function information on rhe
liquid-
crystal display (LCD) installed on the game princ-
ed-circuit board. Also, you can use
rhe
LCD and
kepad
to set the game parameters and game cost.
Perform the test when you
first
ser
up the game,
each time you collect the money, or when you sus-
chapter describes the
mes-
sages displayed in he rest
functions and explains
pect
game problems. This
each of the tests. The
lest
descriptions and explanations
are arranged in the order they appear as you step
&rough
the entire sequence.
Using the
Liquid-
Crystal Display on the
Game PCB
,A4
accounting displays. option
adjusrmenrs.
and tesrs are
made using
cbe
keypad wirh cighr pushburrons
located
on rhc
Hoop
Ir
Up Game
Primed-Circuir
Board
(PCB).
The liquid-
crystal
display ncxr co
obese
pushburrons shows which
resr
or
option
you are
currenrly
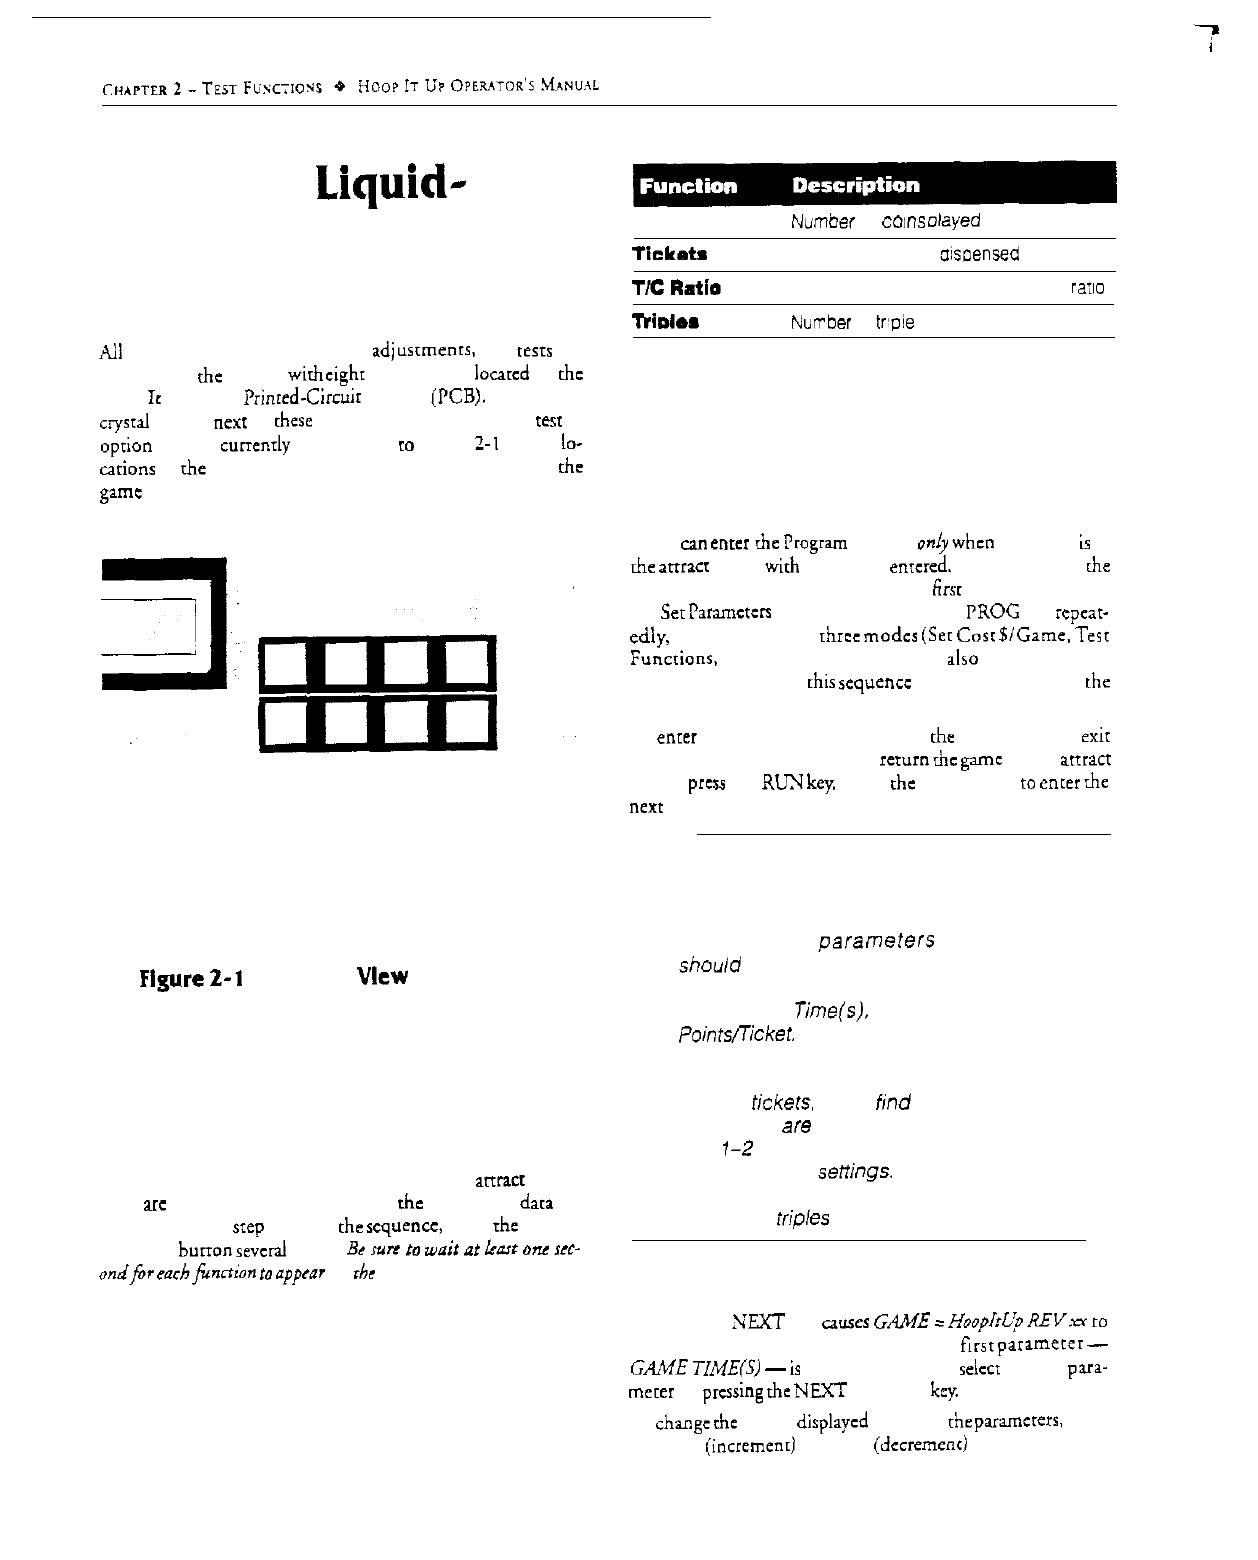
using. Refer mFigure
2-1
for rhc
ID-
cations
of
the
LCD, keypad, and other user controls on the
game board.
Figure
2-l
Detailed
View
of
Keypad
Attract-Mode
(Accounting) Functions
Four accounting functions are available in the arrracr mode.
They arc lisrcd in Table 2-I and show rhe accounting
data
for
Hoop It Up. To srep through rhe scquencc, press the NEXT
or LAST
burron
several rimcs.
Be
WY
TO
wair
of
Last
OM
ICC-
ondfbr
mrbjboion
10
apprnr
on
rhc
LCD.
Coins
Tickrts
Number
of
corns
Dlayed
Number of tickets
aisoensed
Tzc
Ratio
Tickets-dispensed-to-coins-played
raila
Trimlos
Number
of
Wpie
baskets made
Table 2-l Summary of Accounting
Functions
Program Modes
You
can
cncer
the
Program
Mode
oniy
when
rhe game
is
in
the
atfracr
mode
with
no credits
enrcrcd.
To do so, press
&he
PROG key on rhe PCB keypad. The
firsr
mode displayed is
the Set
Paramcrrr
mode. If you press rhe PROG key
xpear-
cdly,
rhc remaining
rhrcc
modcs
(Set
Corr
$/Game.
Tcrr
Funcrions,
and Display Memory) are also displayed. The
game cycles through this
requencc
each rime you press the
PROG key.
To
enter
one of the four modes, press
cbe
NEXT key. To exit
from rhe Program Mode and
rem111
rhc game to rhe
atrracr
mode,
press
the
RLJX
key.
Press rhe PROG key
co
enter
die
next mode.
NOTE
Adjusting the Payout
Percentage
Three of the
paramerers
listed below
should be adjusted to achieve your de-
sired payout percentage. The parameters
are Games
T;ne(s),
Bonus Tickets and
Pojnts/Ticket.
For the Bonus Tickets para-
meter, we recommend using 5 tickets.
However, you could set this number to 4 or
even 3
t;ckets,
if you find that your aver-
age triples
are
too high. You should aver-
age
I-2
trip/es per game, based on our
recommended
sett;ngs.
Use the account-
ing functions to determine your average
number of
tr;p/es
per game.
Set
Parameters
Mode
Pressing the
NEXT
key cxuses
GAME
1
HoopJtL:n
REV.=
to
be momentarily displayed. Then rhe
first
paramcrer
-
GAME
TZME(S)
-
is
displayed. You can
selecr
another
para-
me~cr
by pressing
rhe
NEXT
or LAST
key.
To
change
ihc values
dirplaycd
in any of the paramcrerr. press
rhe INC
(increment)
or DEC (dccremenc) key. Then press
Attract Repeat Time
45
seconds
Award 1
Award 2
03
points
03
001nts
Award
3
03
points
Bonus
Tickets
05
!ickets
Game 2
Basket
03 pants _
Minimum Tickets
/A##%
Ppvovtj
01 ticket
Miss
timold
05
seconds
l&a
on?
1
[Y-l
Ticket Sound On?
(Payola
saund
On?)
1 [on]
Cnablr Tickets?
(Enable
Pay?) 1 [enablea]
PointwTicket
(Points/Pay)
012
pmts
Attract
Ball
Load
Every 2
minutes
Rasot
TiokeVCoin
0
[don’t reset]
Reset
Mpl.?
0
[donut
reset]
Reset
High Score?
0
[don’t reset]
(select
rkt/%wn~
0
=
ncms
[a/so avaii-
able is 1 = token or
coin hopper]
Tkl
Mech
Sale&or 0
=
Deltrorics ia!so
avaIlable
is 1 =
Corn
Controls]
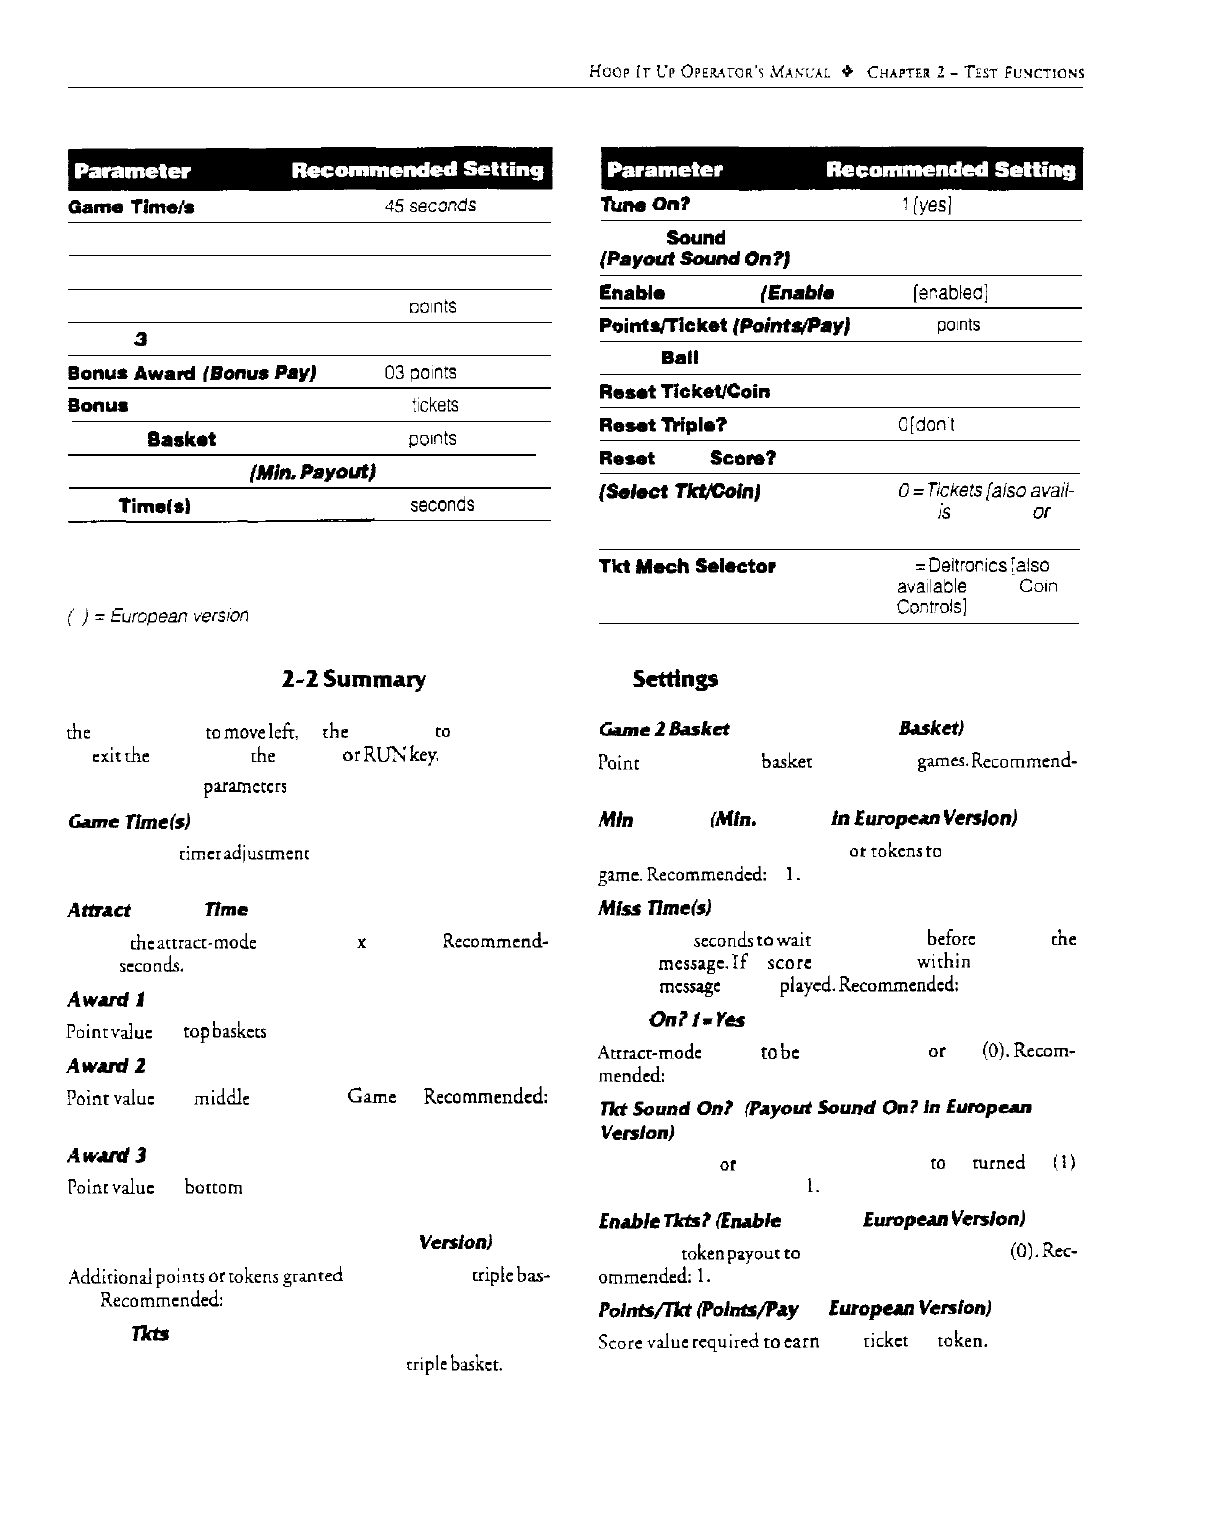
Table 2-Z
Summay
of Recommended
Settings
for All Parameters
the
ENTER key to move left, or rhe EXIT key
co
move right.
To
exit
rhe mode, press the PROG ur
RLW
key.
The following 18
paramercrr
are available:
Game
Time(r)
Game clock
rimcr
adjustmenr
(number of seconds For game
duration). Recommended: 45 seconds.
Ateact
Repeat Time
Iniriarc
the
atrracr-mode
audio every
x
seconds. Recommcnd-
ed: 45
rcconds.
Awud
1
Point
value
for
rap
barkcrs
in Game 1. Recommended: 03.
AW.UdZ
Poinr
value
for middle baskets in
Game
1.
Recommended:
03.
AWUd3
Painr
vduc for
bottom
baskets in Game 1. Recommend&
03.
Bonus Award (Bonus Pay In European
Ver+lonl
Additional paints
01
tokens
granted for making a
rriplc
has-
kct.
Recommended:
03.
Bonus
Tkts
Number of rickets dispensed for making a
rriple
basket. Rec-
ommended: 05.
&me
2
Barkd
(Advanced Game Basket)
Point
value for each
basket
in advanced
games.
Recommcnd-
ed: 03.
Mln
Tickets (Min. Payout
In
Europem
Ver+ion)
Minimum number of tickers or
rokcns
m
be paid for any
game.
Recommended:
0
1.
Miss
Time(s)
Number of
seconds
IO
wait for a basket
beforc
playing
the
“bad”
mcssagc.
If
a
score
is received
within
this rime. a
“good” mcssagc will be
played.
Recommcndcd:
05.
Tune On?
I-Yes
Atrracr-mode
audio
m
be turned on (1)
or
off (0).
Rccom-
mended:
1.
Special ticket- or r&en-dispensing audio
m
be turned on
(1)
or off (0). Recommended:
I.
Enable
Tkts?
habk
Pay? In
Eumpe.~
V’erslon)
Ticker or
token
p;lyour
to
be enabled (1) or disabled (0).
Ret-
ommended:
I.
Polnts/lkt
@‘olnts/Pay
In European
Version)
Score
value
required
IO
cam
one
rickct
or
token.
Recom-
mended: 012.
2-3

Atir
Ball
Load
~ttracr-made
i‘caruie:
loads
one
bail inro each shooter
wc’y
x
minurew.
Recommended: 2.
Rst
rht/Coln
This paramercr affccrs the first rhrcc accounting
funcrions
I;red
in Table
2.1
To c!car
the
internal
sofwarc
rickcr and
c”i”
counters and
rhe
rickets-to-coins
ratio. choose 1:
10
leave
the
COU”~IS
inracr. choose 0. Rccommcnded: 0.
NOTE
Both mechanical counters are not affecfed
by this parameter
Reset Triple?
Clears rhe
inrcrnal
triple
basket
c”u”ter
(1)
or
leaves
the
cou”cer
intact
(0).
Recommended: 0.
Rst
HI
Scorr?
Clears rhe high score and
rcser
it
to
zero (I) or leaves the high
score
inrasr
(0).
Rccommendcd:
0.
Sel
Tkt/Coin
(Appears
Only
In
Eumpun
Version)
?.w.ilable in the European
version
only, this
paramcrcr
allows
you
m
relecr
ticker dispensing (0) “I a coin/token hopper (1).
Recommended:
0.
Tkt
Mech
kl
Allow
you
ro
rdecr
which brand of
ricker-dirpcnsing
mccha-
“ism you have insraIled in your game: 0
=
Delrronics,
I =
Coin
Conrmls.
Recommended: 0.
set
cost
S/Game
The
12
pxamerers
in
[his
mode
derermine
the number of
coins required
For
l-12 games. The game is shipped with
rhesc
serringr:
1
game/l coin.
2
gamcsi2
coins~,
12
gamcril2
coins.
You must not
wr
any of rhc coins required to 0. Also,
the
“umber
mu.w
nor
decrasc
in value as the “umber of games
increases.
For exampie. if
You
XI
1
game/Z
coins, rhcn you
musr
scr 2
games/4
coins,
3
games/6
coins all rhc way up
10
12
&csl24
coins.
To select one
af
the
12
para-
mews,
prcsr the
NDCT
“c
LAST
key.
To change the
coinage values displayed
“exr to each
paramercr,
use
ihe
INC
or
DEC
keys. To se-
3?-
li
UPd
leer
rhc column of the “umber you want mchange,
press
the
ENTER
key
to
move
let?.
and the
WT
key
10
move right.
To exit this mode, press either rhc PROG “I RUN key.
Test Functions
LED
Display
Test
Cydcs
through all audio. This rest is mainly for Time Warner
Inreractive
Customer Scrvicc
use,
so
char
they
can
check rhar
rhe
audio
circuirry
is
working
prop&
Press
INC
co
select
the
“cxt
sound, then press ENTER
to
hear
ir.
Note:
The
Channel
I
sounds should work,
but
rhe Channel 2 sounds do
“or. because
this
game uses one
channel
of
audio.
Memory
Test
A
s&running
resr of all memory
companenrs.
Wlxn
com-
plercd,
you should see the message
Memory
Okay
Press EXIT
when you arc done.
Tlckcts
A Test
Tesrs
the lefi ticker dispenser, by dispensing rwo rickets from
the mechanism.
nckeb
B
rest
Tests rhc
right
ticker
dispenser.
by dispensing twb tickers
From
chc
mechanism.
Port B Output+. Port C inputs, Extended Input%
Extended Outputs. ZSOMA
Out/l-07,
and
IZSMA
out
16-02
The remaining
cesrs
allow technicians
co
tar
various
outpurs
and inputs. These
cescs
arc for Time Warner
Inreracrivc
Cus-
tomc1 Sewicc “se only.
Display Memory
This rcsr is for Time Warner
Inrcracrivc
Customer Service
use.
IO
check the
contents
of memory during troubleshoot-
,“&

CHAPTER 3
ubleshooting
Maintenance
T
HIS CHAPTER contains maintenance,
troubleshooting and repair procedures
for
your Hoop It Up” game. The maintexnnce
section gives information on cleaning the parts. The
troublrshooting
section contains scvcral tables
to
help
dewmine
the sourer
of
a
prob-
km
and the steps
necessaq~
TO repair
it. The repair section contains
the
sreps
necessay
to remove and in-
stall the serviceable parts. Togeth-
I
er,
these three
srcrions
providr a
complete guide to srrvicing your I
Hoop It Up game.
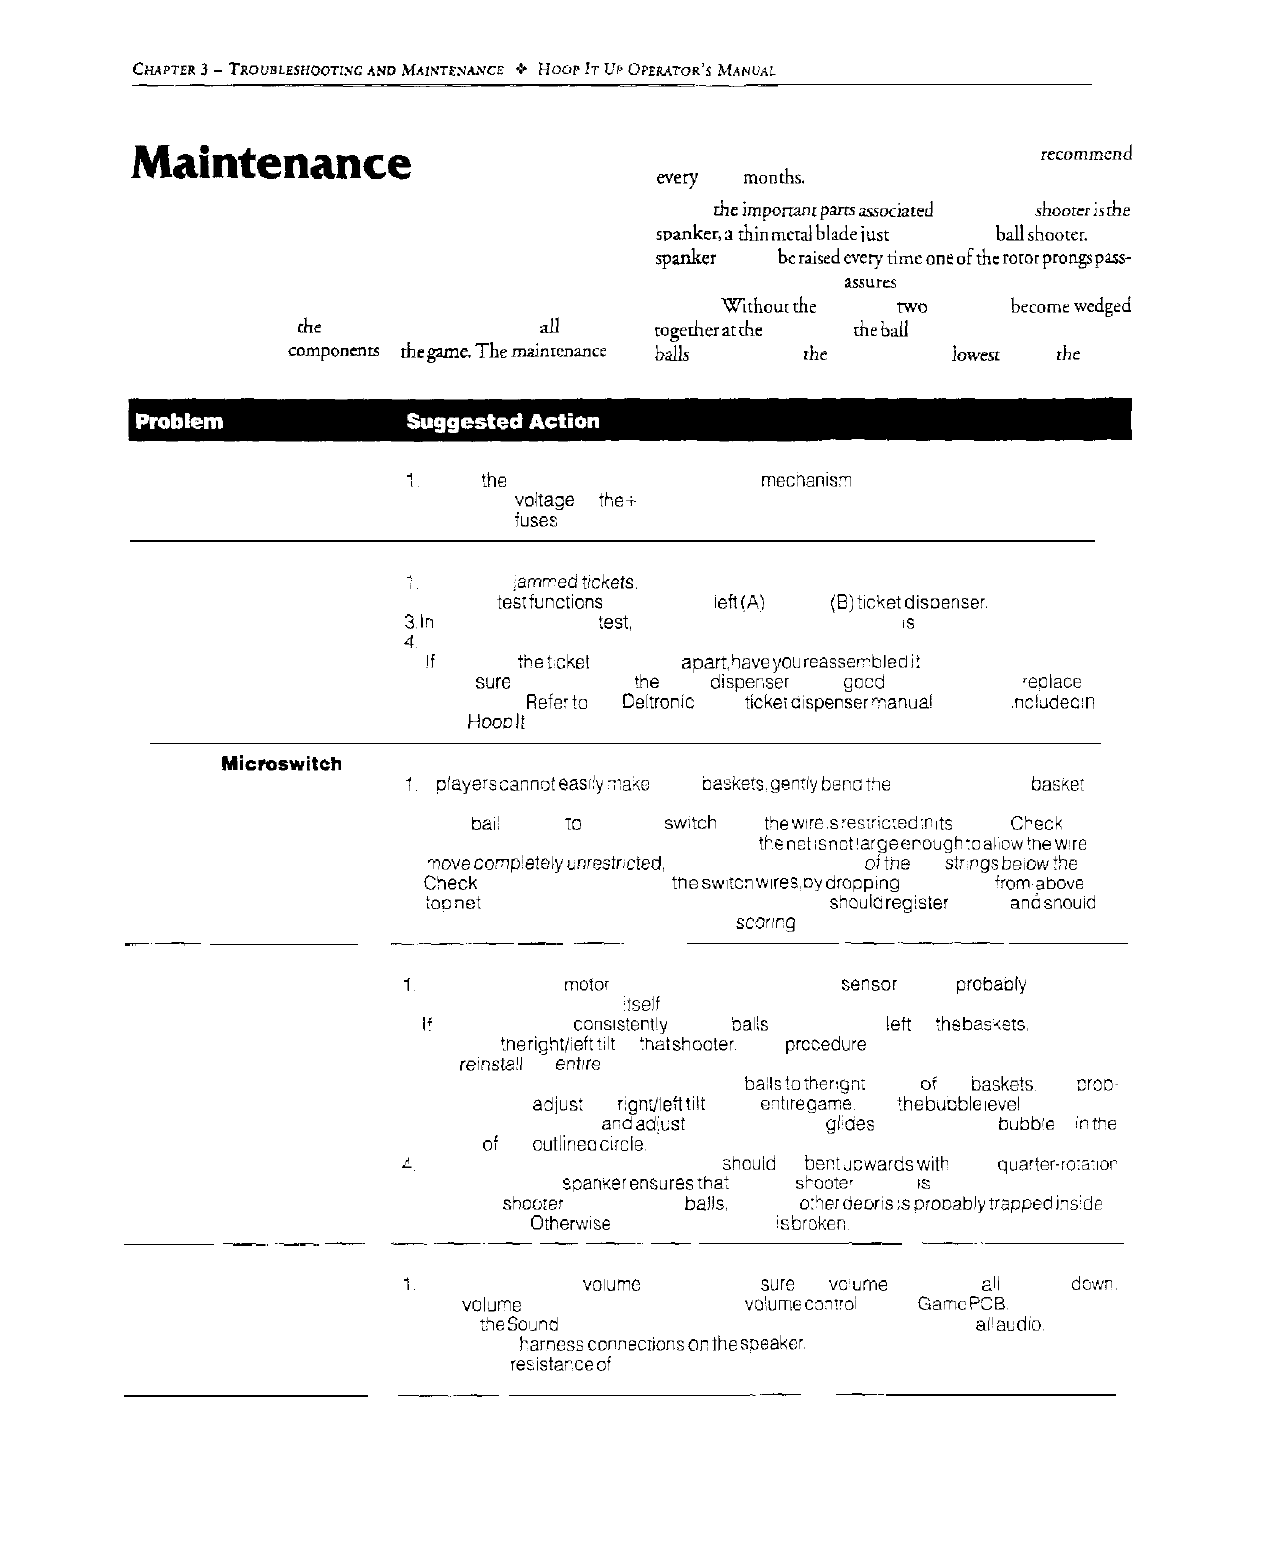
Procedures
procedures should be performed regularly. We
recommend
every 3-4 months.
One of rhc
imponanr
pars
associared with the ball shoorer ir
rhe
spanker,
1
rhin
mcrai
blade
iut
behind the bzll sboorcr. The
rpankcr
should
be
raised
every
time
one
ofthe
roroc
prongs
pass-
es by it. The spanker
assucs
char the bail shooter is always
loaded. ‘X+hour the spanker.
two
balls can become wedged
rogerher
ar
dx
high end of ihe ball shooter ramp. preventing any
balls
from reaching
rhe
air cylinder, the lowest part of
the
ramp.
Introduction
This section describes the maintenance procedures for
all
of the
major assemblies and
componcn~~
of
rbe
game.
Thhe
mainr~nancc
Coin Mechanism Problems
1,
Check
!he
wiring connections to the coin
mecnanis!?
2. Check the
voltqe
to
the
i
side of the mechanism.
3. Check the iuses on the power supply.
Ticket Dispenser Problems
:.
Check for
,amrred
trckets.
2. Use the tes!
funcrions
to check the
left
!A!
or right
(5)
ticket disoenser.
3,
In
the Set Parameters
rest,
make sure Enable Ticket Payout
#s
turned on (1).
4,
Check the harnesses and connectors.
5.
!f
you took Ike Wket dispenser apart,
have
you
reasser?bled
;!
correctly?
6. Make
sure
all the parts of
!he
ticket
dispwser
are in gocd order. Repair or
*eplace
pairs
as needed.
Refer
!o
the Deltronic Labs ticket oispenser
?~nua!
that was ,nclJdec
in
your
HOOD
It up game.
1.
If players cannel easily
:?ake
triple
bake&
gently
beno
r’le
iron: of the top
baswt
slightly upwards.
Basket & Microswitch Problems
_-
Ball Shooter Problems
2. If the ball comes
IO
rest on a switch wire, ttie
we
,s
?es;:ic:ed
:n
its
travel.
CNxk
by
pressing on the clear disc. If the hole in
ti-8
net
IS
not
!a!ge
erough
:o
allow
!ne
‘wre
to
?love
conpietely
unrestricted,
use scissors to cut one
oi
ine net
stwgs
beiow
i’le
‘we.
3. Check for proper operation of tne
swcn
wes;
oy
dropplng a few balls
+rom~?bove
the
:op
ne: straighi downwards. All three switch wires
shoula
register scores
ano
snouid
allow the bails to fall all the way down.
scorlrg
a triple basket.
_~_~_
_~
~_~
__
__~____
_~
~__~
-~
Sound Problems
3-2
1,
If the bail shooter
moror
spins constantly, the optical
censor
wire is probaoly broken, or
ii nor, the optical sensor
:tself
is defective.
2. Ii one bail shooter
cons~sIent!y
shoots
SalIs
to the right or
!ef!
of
:he
basiets,
you need
to adjust
!ne
rigbtiieft
!llt of
:nat
shooters
(This prccedure should be necessary only if
you
reinsta!l
the
entire
ball shooter assembly.)
3. If both ball shooters consistently shoot balls
!o
ihe
r:gn:
or left oi the
baske!s,
you
“100~
ably need to adjus: the
rlgnVleX
tilt
of the
en!lre
gene. Use ‘he
bilsble
revel
inside the
bottom of the game,
and
adjust all four ad&able glides (feet) until the bubble is
In
ffie
center
o:
the outlineo
wcle
C.
Make sure rhe spanker is working: it
shouid
be
bent
~cwards
with
each
quarler-:o:a:~or
of the rotor. The
epan~er
enwres
the: the bail
si-oote,
always
is
fed with bails
5. If the ball shoo:er doesn’t shoot bails, foam of
o:wr
deoris
:s
prooably frepped
ins’de
of
the shooter,
Othewse
the spring or pistor
is
brokec,
-~
~_~.
-
__~~
-
__
._~.
1.
Check the speaker
volume
setting: make
wre
the
wume
isn’t tuned
EII
the way
dwn.
The volume is controlled with the small
vo:ume
coxoi
on the
Game
PCS
2. Check
:he
Swnd
Test in the Tes: Functions. This test cycles through
al!
audio
3. Check the i-amess
connecrions
on
ihe
speaker,
4. Check the
recistarce
oi
the speaker for 4 Ohms
__~_
.-
-~
Table 3-l General Troubleshooting
WARNING
Before
performing
any maintenance or
repairs,
p/ease observe
all
of the
following
safeiy
precaubons:
1.
2.
3.
4.
llm
the
game’s power
off.
Unplug the power cord from the
elecrr/-
Cal
socket.
Secure
ioose
&thing
such as ties and
iong
s&eves
that couid get caught
with-
;n
the
game.
Secure long
ha/r.
Remove
alimetaljeweiry
such as watch-
es and necklaces that could conduct
e/ectr;cily
:rom
tne
game’s power sources.
-__
Cleaning Procedure for Coin
Mechanisms
Rrguia~
uss
oithc
coin
mechanism
can
resulr
in a build-up of
residue and
dirr.
To
&an
rhe
win mechanism,
prrform
rhr
fo-
lowing
sreps
(plrzx
r&r
ro
Chapter 4 for
drrailed
parr
infoor-
marion
on
rhr
coin
door!:
1.
2.
3.
4.
5.
6.
_
Open
rhe
upper
coin
door.
Open
rhe
gacc
on
the
door
char
COVTIS
the
masner.
Usi:
rhe
blade of a screwdriver
IO
scrape
away
any
meral
filings
rhar
have collected on
rhe
mrgnet.
Clean
rhe
loose
dust and
dirt
from
rhe
coin mechanism
with
a iinr-fire
rag
or a
soft
brush.
Clean
the din and residue from the coin
parh
with a tooth-
brush. Hot,
soapy
warer
may
bc
used
IO
help
dir~olve
dirt
and
residue.
Close
the
gare
on
rhe
door
covrring
the
magner.
Ther.
&se
rhc
upper coin door.
CAUTION
Never iubricaie the coin mechanism with
Oil
or grease.
Cleaning Procedure for Ticket
Dispensers
Regular
use
of
rhc
ricker
dirpenscrs
can
resulr
in a built-up of
paper
dusr,
residue, and
dim
Far derailed maintenan:e and
pan
informarion
on
the
ticker
dispcnsrr,
refer
10
the
Delrronic
Labs
ticker
disprnscr
manal
thar
~3s
included in your
Hoop
It
Up game.
Cleaning Procedure for Ball Shooter
Ir
is
possible far
rhe
hall
shooter assembly
m
become dogged
with
riny
parri&
of
foam
from inside
rhc
baskerball
conrrai.
If
this
occursI
you will
need
a can of compressed air, preferably with a
rhin
nozzle
tube, and a
&an
cloth.
Follow
these
rreps
and refer
TO
Figure 4-6:
1.
2.
3.
4.
_
Unlatch the
control
panel. Loosen and
remove
rhe
hose
clamp
thar
is
arrached
m
rhe
hose
connecm
irh?
borram
metal
cylinder
under the
ball
shoot&
insert
a screwdriver or pen into the
metal
tube,
and push the
white piston inside
until
ir
xxhes
the
upper end.
while
holding
rhe
piston in,
spray
compressed
3ir
into
.zll
four
cylinder
erhaux holes (see Figure 44 for
their
locarioni).
Any
debris
inside should hr
ejecred
pasr
rhr screwdriver
inro
,your
hand.
CAUTION
Never lubricate the baii shooter
,with
WD-40
or
any other
lubr;can:.
The shooter
w#/
be-
come clogged and
srop
working if you use
any
lubr;cant.
Simpiy keep the bali shooter
clean and free of any debris by blowing air
fhrough
rhe
four
cyhder
exhaust ho/es as
described in
t,be
previous steps.
Troubleshooting
’
Procedures
You should
pinpoinr
the
cauc
of a m&unction by using
rhc
ic~t
procedures
descrihcd
in Chapter
1.
Any
repairs.
othrr than
minor
proc&reS
such
as
bulb
repiaccmenr
or mechanism
cleaning, should bc
n&red
ro
quaiificd xrvjce
personnri.
Repair
Prckeclures
Introduction
This
x&on
describes the repair
procedurcr for all
of
the major
assemblies
2nd
componrnrr of the

game.
Before
performing any repairs,
useTable
3-l
CO
hel?
dis-
cover
the
source of
the
problem. The
Mainmanc~
Fbccdum
sec.
don
cm
also
bc
a good
staring
point for
fuing
many game prob-
lems before beginning
what
might
be
unnecessary
repairs.
Ball Shooter Spring and Piston
If
you have
blown
air
inm
the ball shooter and it
rriil
does not
work, this indicates
thar
the
spring
or
piston has failed. To
replace either ofthese parts, follow these
srcps
and
refer
CO
Fig-
ure 4-6:
1.
2.
3.
4.
5.
6.
7.
Unlock the control panel.
Remove the hear-shrink
tubing
or
rape
char
is used
CO
seal
rbe
botrom
of
rhe
ball
shooter against air leakage.
Rcmove
rhe
set
SCICW
and spring
lockwashcr
that
secure rhe
metal hose connector
m
the
borrom
of the
bzil
shooter.
Carefully lower
rhe
hose and
irs
c~nnecror.
Wirh
yotir
orb-
er
hand, catch
rhr
pisran
and spring before
rheyfall
out of
the bail shooter.
inscrr
a new
piston
and/or
spring into
rhe
ball shooter. The
largr
end of
the
piston
must
face
down.
Watb
one hand, hold
the
piston
inside
rhc
ball
shoorer.
WI&
your
ocher hand,
inserr
the
hose
wnn~cmr
into
rhc
bot-
tom of the
ball
shooter. Reinstall the
xt
screw
xnd
spring lock
washer.
Raeal
rhc
area
nexr
to
the
scr
screw by using rape.
Replacing the Bail Shooter Motor
or Optics
To replace
c&r
the
motor
or
rhe
optics
in
the
ball shooter.
you
may be able
IO
leave rhe ball shooter
asembly
insrailed
in
rhe
awe.
Howwer,
accez
is
much
easier
ifyou
remove
the
ball
shoor-
er
assembly from the game.
1.
2.
3.
4.
5.
6.
7.
Unlock
ihe
upper
rear
access
panel and open
the
back-
board. Unscrew
rhc
three hold-down screws along the
bar-
mm
edge
of
the
divider
ne:.
Remove the
three
scww
rhar
sccuc
the
floor-pa&
metal
ramp.
Lifr
up
rhe
ramp and slide it
out
from
undrr
the ball
shoorcrs.
&larch
and open
rhe
control
panel.
Disconnecr
the
motor
harness assembly
under
the
hall
shooler.
Loosen
rhe
screw
on
the
hose
where
ir
is
artached
IO
the
hose
connector
(under
the
ball shooter). Slide rhe
hosr
oifirom
the
hose
connectoar.
Remove
rhe
four
nun
from
undernearh
the
ball
shoorer
assembly.
Being
careful
so that you
don’r
fear
the
decal on
rap
of the
spanker,
gcdy
lifr
up rhe spanker blade. Remove
the
ball
shooter
assrmbly.
At
rhis
point
the
nxxor
or
optics
can
be
replaced on
rhr
ball
shoorcr.
If
you
need
to
replace the opria,
remove
rhe hot-melt adhe-
sive
thar
secures both halves
afrhe
~prical
syysrcm.
Then
pull

the LED and
aprical
sensor our of
their
spacers on each side
of the shooter frame.
Ball Shooter Right/Left Tilt
Adjustment
If the ball shooter consistently shoots bails to the
right
OI
I&
of
rhe
bakers,
you need
co
adjust
the
right/left
rilr
of the shooter.
!This pmcedure should be necessary only
ifyou
reinstail the entire
ball
shooter
assembly.)
To
adjust
rhe ball shooter, you will
riced
a X-inch open or
bor-
end
wench.
iollow
&SC
srcps and refer
ro
Figure 3-1:
1,
Reassemble the ball shooter parrs
as
shown in Figure 4-6, if
necesvq
Then reinsrall rhe shoorer into the
playfield
1s
described in the previous secrion. Do nor
yer
latch the
cow
rrol
panel
shur.
2.
Allowing each ball
m
se&
complcrely
into
the ball shoot-
er. shoor
reveal
balir
ar
the
bakers.
Check where most of
the
balls hit ihe backboard.
3.
If
the
bails are all shooting
co
the
rightof
the baskets, swing
down
theconrrol
panel. Adiusr the
right/left
rilr
bylooren-
ing
the
right
front
locknut under
rhe
rhoorer. Then tighten
rhe
/q’?
front locknut. Continue shooting balls and adiusr-
ing rbe
lockours
unril
most of the balls hir
the
ccmer
of rhe
backboard. Once the
adjurmenr
is
sarisfaccory,
snug the right
from
locknut againsr the
play&Id.
If
:he
balls
shoot
ro
d-x
left,
reverse the previous adjusrmcnr proccdurc.
Basketball Control
Over
&IS
the
Spading
baskcrball cover will
become
worn.
You should replace it before ir wears through, ro avoid players
destroying
d;e
foam underneath. The control will still operate co:-
reedy
if&e
ball
is worn smooch To replace the
cover,
refer to Fig-
ure
4-4
and 4-5, and follow these
sreps:
1.
2.
3.
4.
5.
6.
Open
rhe
conrrol by
releasing
both spring draw latches. These
are
locard
inside
md
above rhr upper coin door.
Remove the four locknuts and
flar
washers under rhc
bz-
kerball (bellows) assembly, and the four spacers and carriage
bolts above the basketball. Lifi
rhe
assembly up.
For ease in handling, you may wanr
ro
remove the hose
that
is attached directly
to
rhe
borrom
of
rhe
manifold place.
Loosen
all
four hose clamp
screws,
and remove the hose
clamp
scr
complerely. Remove the basketball cover from
die
manifold place.
Innall
a
XVJ
basketball
cover,
making sure
ic1
cut edge is com-
pletely
flub
with
rhe manifold
platr.
ReinsraIl
rhe
remaining
parrs
in rhe
rcvene
order, making sure
the reed valve is properly placed
(complercly
flar on the
manifold
plarej.
Speaker
The Hoop
It
Up game speaker is
located
under rhe conrrol
panel,
ar
the fmnr of rhe game. The speaker provides the music
and sounds for the
garx
and self-rests. Speaker faiiure can be
che
came
of
distoned
or
no
sound. To replace
rhe
speaker, follow
these
rreps and refer
to
Figure 4-1:
1.
Remove the four screws securing
the
speaker grille. Remove
rhe
speater
grille by pulling
it
out;
then
ser
it aside.
2.
Remove the four rpexker mounting screws, and lift our rhe
spe&r.
3.
Disronnecr
the harness from
rhr
speaker, including the
earth ground clip.
4.
Replace and reinstall rhe
spc$icr
in rhe reverse order.
Attraction Panel Fluorescent Light
To replace rhe arrracrion-panel light bulb, follow thcsc removal
and
insrallarion
srcps:
1.
7.
3.
4.
5.
Remove the
three
Phi!lipr-head
screws securing rhe upper
arrclcrion
rerainer
ar
rhe
rap of dre game. Lifi out the
arrrac-
<ion
shield
xnd
graphics t&n.
Remove the cardboard raining clips one at a rime by
prcss-
ing on the circular rab and pulling the clip
toward
you.
Route
ihe bulb toward you while
gently
pulling on
<he
bulb ro remove ir.
lnsrall
a
newfluorescenr
light and
rotare
it
10”
co
lock it in
place. Reinsrall the reraining clips.
Close up the attraction panel area by replacing the graphics
fdm. rhe shield, and rhe upper retainer.
Playfield Incandescent Lights
To replace either of rhe playfield area
incanderccnr
light
bulbs.
follow these removal and installation steps:
I.
To
gain
access
wthe incandescenr lights.
firsr
rwnove the flu-
orescent lighr (see the previous section).
2.
Reach in above the
“eggcrcrare”
light difhwer, and
unsc~w
the
incandescent light bulb.
3.
Screw in a
newlighr
bulb inro the socket. Reinstall
the
flu-
orescent light.
4.
Reinstall the attraction shield, graphics film, and rerainer.
Backboard and
Playfield
Components
The
rep&able
pa-rs
on
rhe
backboard
xre
the
ners,
microArch
es, and Ping-Pang-type barkerbails on rhc
play&Id.
To replace
these
parrs,
open
ihe
upper rear access panel, and follow rhc
insrructions
below.
3-5
Table of contents
Popular Arcade Game Machine manuals by other brands

My Arcade
My Arcade STREET FIGHTER II CHAMPION EDITION Micro Player... user guide

AINSWORTH
AINSWORTH A620 Service manual

IGS
IGS WAHLAP TECH OverTake owner's manual

Atari
Atari STEEPLECHASE OPERATION, MAINTENANCE & SERVICE MANUAL

Atari
Atari PONG 4P Operation manual

Merit
Merit FORCE Elite Removal/Installation Instructions


MD SPORTS
MD SPORTS CBF056 018M Assembly instructions

PlayMechanix
PlayMechanix Terminator Salvation Super Deluxe Setup and Operation Service Manual

MD SPORTS
MD SPORTS FS058Y21006 Assembly instructions

MD SPORTS
MD SPORTS WM CANADA Assembly instructions

MecPower Tecway
MecPower Tecway POLICE MOTO manual

Atari
Atari Super Breakout OPERATION, MAINTENANCE & SERVICE MANUAL