Timex W231 User manual

W231 CEU 714-095003

English page 1
Deutsch Seite 21
Español página 41
Português página 63

TIMEX® WATCHES
Congratulations on purchasing your TIMEX® watch.
Please read these instructions carefully to
understand how to operate your Timex timepiece.
Your watch may not have all of the features
described in this booklet. Please look for your style.
For more information and to register your product
please visit:
www.timex.com
STYLE 1 STYLE 2 STYLE 3

TABLE OF CONTENTS
1Screw-Down Crown
2Water and Shock Resistance
4Automatic Style 1
7Automatic Style 2
9Automatic Style 3
11 How to Adjust Bracelets
13 Warranty
ENGLISH

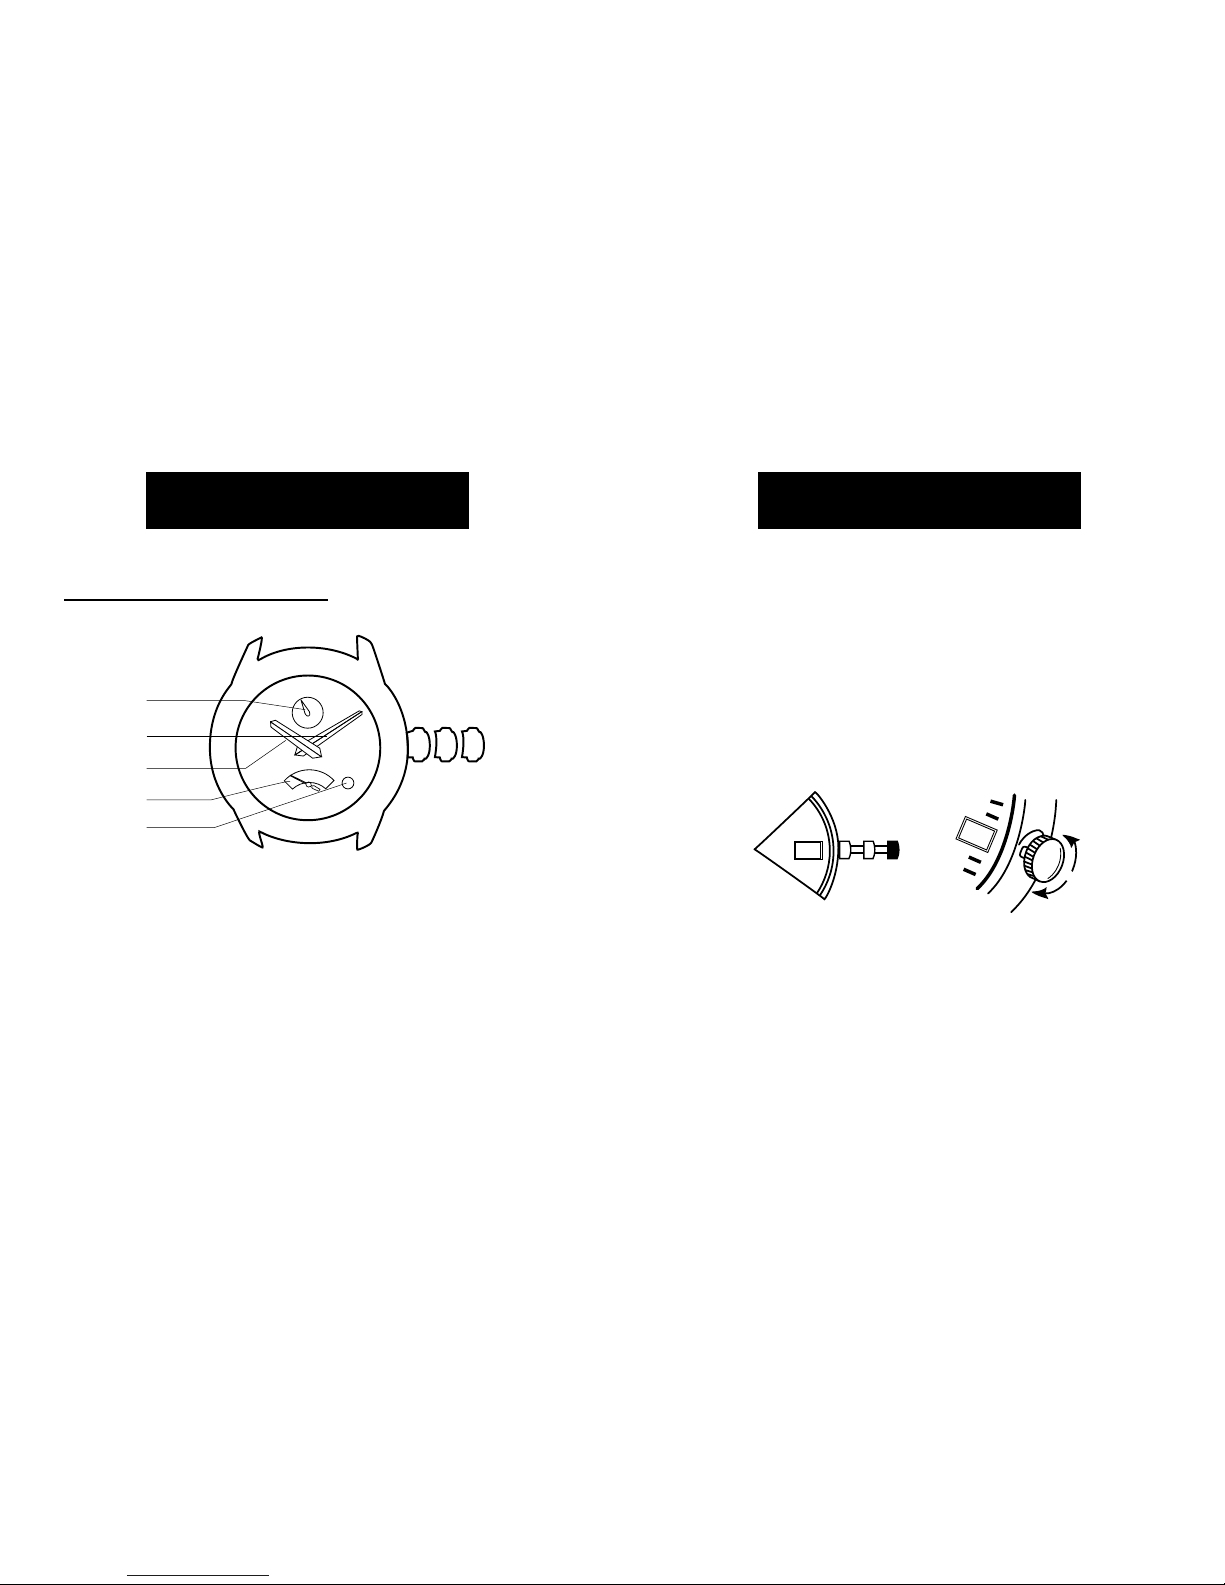
SCREW-DOWN CROWN
Some deep-depth water-resistant watches require
the setting crown to be screwed in to secure water-
resistance.If your watch case has a protrusion with
screw threads,the crown must be screwed in after
setting the watch.
To screw in, push the crown firmly against the
threaded protrusion and hold in while turning the
crown clockwise.Continue to screw in the crown
until it is tight. You will need to unscrew the crown
(counterclockwise) before pulling it out the next time
you want to set your watch.
1
ENGLISH

3. Screw-in setting crown and case back must be
screwed into case to assure water-resistance
(see Set Time for Style 1).
4. Rinse watch with fresh water after exposure to
salt water.
5. Shock-resistance will be indicated on the watch
face or caseback. Watches are designed to pass
ISO test for shock-resistance.However,care
should be taken to avoid damaging the crystal.
3
ENGLISH
2
ENGLISH
WATER AND SHOCK RESISTANCE
If your watch is water-resistant, meter marking or
(O) is indicated.
*pounds per square inch absolute
WARNING: TO MAINTAIN WATER-RESISTANCE,
DO NOT PRESS ANY BUTTONS OR PULL OUT
THE CROWN UNDER WATER UNLESS YOUR
WATCH IS INDICATED AS 200 METER WATER-
RESISTANT.
1. Watch is water-resistant only as long as crystal,
crown and case remain intact.
2. Watch is not a diver watch and should not be
used for diving.
Water-Resistance Depth p.s.i.a. * Water Pressure
Below Surface
50m/164ft 86
100m/328ft 160
200m/656ft 284
HOW TO SET “FAST DATE”
3-Position Crown:
Unscrew crown until you reach position “2” and turn
counterclockwise until correct date appears.
NOTE: Date may need to be manually updated at
the end of each month by following above procedure
(otherwise it will continue to 31 and then roll over to
01 each month).
HOW TO WIND YOUR WATCH
From crown position 1, turn crown clockwise to wind
watch.
5
ENGLISH
4
ENGLISH
14
I
I
14
1 2 3
AUTOMATIC STYLE 1
TO SET TIME
1) Unscrew crown and pull out to position 3. Turn to
correct time.
2) Push crown in firmly and screw clockwise to
restart.
Watches with date: Note correct time of day (A.M.
or P.M.) for proper date function. (Please see illustra-
tion above for 24-HR dial.)
24 Hour Hand
Minute Hand
Hour Hand
Calendar
Power Indicator 1 2
3

AUTOMATIC STYLE 2
TO SET TIME
1) Pull crown to position 2 and turn crown to set
correct time.
2) Push crown in to restart.
HOW TO WIND YOUR WATCH
From crown position 1, turn crown clockwise to
wind.
7
ENGLISH
POWER RESERVE
The watch is self-winding.If you wear your watch
every day,there should be no need to wind it every
24 hours,unless the power reserve shows “LOW”.
The maximum power reserve is at least 36 hours.The
power reserve indicator shows you how much power
remains. You should wind your watch when the indi-
cator hand is near “LOW”.
6
ENGLISH
Second Hand
Minute Hand
Hour Hand
21

9
ENGLISH
POWER RESERVE
Once you begin to wear the watch, the movement
of your wrist will generate power to keep the watch
running.
NOTE: The maximum power reserve is at least
36 hours.
8
ENGLISH
AUTOMATIC STYLE 3
TO SET TIME
1) Pull crown to position 2 and turn crown to set
correct time.
2) Push crown to restart.
TO SET DATE
With a blunt object, press recessed button at
8 o’clock position. Each button press advances date
one day.
Power Indicator
Retrograde date
1 2
Second Hand
Hour Hand
Minute Hand
Recessed button

HOW TO ADJUST BRACELET
(Variations of the following
bracelet sections apply to all
watch models).
FOLDOVER CLASP
BRACELET
1. Find spring bar that con-
nects bracelet to clasp.
2. Using a pointed tool, push
in spring bar and gently
twist bracelet to disen-
gage.
3. Determine wrist size,then
insert spring bar in correct
bottom hole.
4. Push down on spring bar,
align with top hole and
release to lock in place.
11
ENGLISH
Note: After the date has reached “31” the hand will
fly back down to “1”.
HOW TO WIND YOUR WATCH
From crown position 1, turn crown clockwise to
wind.
POWER RESERVE
Once you begin to wear the watch, the movement of
your wrist will generate power to keep the watch
running.
NOTE: The maximum power reserve is at least
36 hours.The power reserve indicator shows you
how much power remains. You should wind your
watch when the indicator hand is near “LOW”.
10
ENGLISH
Fig. 1
Fig. 2
Fig. 3
Table of contents
Languages:
Other Timex Watch manuals

Timex
Timex Performance Watch User manual

Timex
Timex Ironman User manual

Timex
Timex 170-095004 NA User manual

Timex
Timex W-187 User manual

Timex
Timex DGTL MAKO User manual

Timex
Timex 94 User manual

Timex
Timex 131-095000 User manual

Timex
Timex W-102 User manual

Timex
Timex W-52 User manual

Timex
Timex W-199 User manual

Timex
Timex Expedition 567-095006 NA User manual

Timex
Timex W-193 User manual
Timex
Timex Health Tracker Manual

Timex
Timex 81 User manual

Timex
Timex Expedition WS4 User manual

Timex
Timex 155-095000 User manual

Timex
Timex W206 User manual

Timex
Timex W-232 User manual

Timex
Timex 939-095000 User manual

Timex
Timex Ironman SLEEK 250-LAP User manual


