Tisira TIT63E User manual

TM
USER MANUAL
600 // INDUCTION HOB - TOUCH
TIT63E
IMPORTANT // Please ensure that you read through this manual prior to installation and use.
This user manual contains important information to ensure optimal performance and keep you safe.
Please retain your proof of purchase, as this will be needed in the event that you require a warranty
service. Remember to keep this user manual for future reference.
www.tisira.com
Version 3.0

Page 2 Induction Hob User Manual
Contents
Contents 2
Warning & Safety Instructions 3 - 4
Product Overview 5
Product Installation 6 - 7
Operating Instructions 8 - 17
Cleaning And Maintenance 17
Electrical Connection 18
Notes 19

Induction Hob User Manual Page 3
IMPORTANT // To ensure best performance, avoid risk of damage or accidents.
Please read the operating instructions prior to rst time use.
Important Safety Instructions
• No combustible material or products should
be placed on this appliance at any time.
• Please make this information available to
the person responsible for installing the
appliance as it could reduce your installation
costs.
• In order to avoid a hazard, this appliance
must be installed according to these
instructions for installation.
• This appliance is to be properly installed and
earthed only by a suitably qualied person.
• This appliance should be connected to
a circuit which incorporates an isolating
switch providing full disconnection from the
power supply.
• Failure to install the appliance correctly
could invalidate any warranty or liability
claims.
Health Hazard
• This appliance complies with electromagnetic
safety standards. However, persons with
cardiac pacemakers or other electrical
implants (such as insulin pumps) must consult
with their doctor or implant manufacturer
before using this appliance to make sure that
their implants will not be aected by the
electromagnetic eld. Failure to follow this
advice may result in death.
Hot Surface Hazard
• During use, accessible parts of this appliance
will become hot enough to cause burns.
• Do not let your body, clothing or any item
other than suitable cookware contact the
ceramic glass until the surface is cool.
• Never leave metal objects (such as kitchen
utensils) or empty pans on the cooktop as
they can become hot very quickly.
BEWARE // magnetisable metal objects worn
on the body may become hot in the vicinity of
the cooktop. Gold or silver jewellery will not be
aected.
• Keep children away.
• Handles of saucepans may be hot to touch.
Check saucepan handles do not overhang
other cooking zones that are on.
• Keep handles out of reach of children.
• Failure to follow this advice could result in
burns and scalds.
Cut Hazard
• The razor-sharp blade of a cooktop scraper is
exposed when the safety cover is retracted.
• Use with extreme care and always store
safely and out of reach of children.
• Failure to use caution could result in injury
or cuts.
Warning & Safety Instructions

Page 4 Induction Hob User Manual
Important Safety Instructions Cont.
• Never leave the appliance unattended when
in use. Boilover causes smoking and greasy
spillovers that may ignite.
• Do not place or leave any magnetisable
objects (e.g. credit cards, memory cards)
or electronic devices (e.g. computers, MP3
players) near the appliance, as they may be
aected by its electromagnetic eld.
• Never use your appliance as a work or
storage surface.
• Never use your appliance for warming or
heating the room.
• Aer use, always turn o the cooking zones
and the cooktop as described in this manual
(i.e. by using the touch controls). Do not rely
on the pan detection feature to turn o the
cooking zones when you remove the pans.
• Do not allow children to play with the
appliance or sit, stand, or climb on it.
• Do not store items of interest to children
in cabinets above the appliance. Children
climbing on the cooktop could be seriously
injured.
• Do not leave children alone or unattended in
the area where the appliance is in use. This
appliance is not intended for use by persons
(including children) with reduced physical,
sensory or mental capabilities, or lack of
experience and knowledge, unless they
have been given supervision or instruction
concerning use of the appliance by a person
responsible for their safety.
• Do not repair or replace any part of the
appliance unless specically recommended
• in the manual. All other servicing should be
done by a qualied technician.
• Do not use a steam cleaner to clean your
cooktop.
• Do not place or drop heavy objects on your
cooktop.
• Do not stand on your cooktop.
• Do not use scourers or any other harsh
abrasive cleaning agents to clean your
• cooktop, as these can scratch the ceramic
glass.
• Do not operate your cooktop by means of an
external timer or separate remote-control
system.
• This appliance is intended to be used in
domestic households only.
Warning & Safety Instructions

Induction Hob User Manual Page 5
1. Surface of the Induction Hob
2. Induction Heater
3. Touchscreen Control Panel
2 x Ø145, 2 x Ø180 Induction Heaters and the Touchscreen
Control Panel
Product Overview
Dimensions Unit Measurement
Height-Width-Depth mm 58 x 590 x 520
Kitchen counter cutting measure mm 560 x 490
Hob Specifications Unit Rate
Ø145mm Heater Zone KW 1.4
Ø145mm Heater Zone P KW 1.8
Ø180mm Heater Zone KW 2.0
Ø180mm Heater Zone P KW 2.6
Other Specifications Unit Rate
Total Power Consumption KW 6.6-7.2
Voltage V220-240V AC
380-415V 3N AC
Package Dimensions (width-depth-height) mm 655 x 630 x 165mm
Net Weight Kg 8,2
Gross Weight Kg 9,4
ø145
ø180
ø145
ø180

Page 6 Induction Hob User Manual
Product Installation
Wick-Seal Application To Underside Of
The Device
• Wick seal should be applied under the device in
order to prevent materials (such as water and
oil that can boil over) to go under the device
in case of a spill-over while cooking or heating
procedure.
• Push gently to put the device into its place on the
countertop. If there is a built-in oven under the
hob, arrange the relevant cupboard as shown in
the gure below in order to allow ventilation.
• Leave a space of minimum 5 mm under the
countertop at the front.
Placing The Hob To Kitchen Countertop
Place the hob onto a countertop that is resistant
to 90°C at least. There mustn’t be an open-top
drawer below the device. In the event that there is
a cupboard under the device, put a horizontal plate
at 175 mm (at least) from the countertop level. This
part between the plate and the device must always
be kept empty.
58
Dimensions In mm
MIN 50
MIN 50

Induction Hob User Manual Page 7
Min. 40 mm
Product Installation
Placing The Device Worktop
Assembly Diagram Of The Hob
5 mm

Page 8 Induction Hob User Manual
A Word On Induction Cooking
Induction cooking is a safe, advanced, eicient, and economical cooking technology. It works by
electromagnetic vibrations generating heat directly in the pan, rather than indirectly through heating
the glass surface. The glass becomes hot only because the pan eventually warms it up.
Before Using Your New Induction Hob
• Read this guide, taking special note of the ‘Safety Warnings’ section.
• Remove any protective lm that may still be on your Induction hob.
Using The Touch Controls
• The controls respond to touch, so you don’t need to apply any pressure.
• Use the ball of your nger, not its tip.
• You will hear a beep each time a touch is registered.
• Make sure the controls are always clean, dry, and that there is no
object (e.g. a utensil or a cloth) covering them. Even a thin lm of
water may make the controls diicult to operate.
• Adjust the heat setting by sliding the slide controls
Choosing The Right Cookware
CAUTION // Only use cookware with a base suitable for induction cooking. Look for the induction
symbol on the packaging or on the bottom of the pan.
• You can check whether your cookware is suitable by carrying out a magnet test. Move a magnet
towards the base of the pan. If it is attracted, the pan is suitable for induction.
• If you do not have a magnet:
• 1. Put some water in the pan you want to check.
• 2. If does not ash in the display and the water is heating, the pan is suitable.
• Cookware made from the following materials is not suitable: pure stainless
steel, aluminium or copper without a magnetic base, glass, wood,
porcelain, ceramic, and earthenware.
Operating Instructions

Induction Hob User Manual Page 9
Operating Instructions
Do not use cookware with jagged edges or a curved base.
Always li pans o the ceramic hob – do not slide, or they may scratch the glass.
Make sure that the base of your pan is smooth, sits at against the glass, and is the same size as the
cooking zone. Always centre your pan on the cooking zone.
Using Your Induction Hob
To Start Cooking
1. Touch the ON/OFF control.
Aer power on, the buzzer beeps once, all displays show “ – “ or “ – – “, indicating
that the induction hob has entered the state of standby mode.
2. Place a suitable pan on the cooking zone that you wish to use
Make sure the bottom of the pan and the surface of the cooking zone are clean
and dry.

Page 10 Induction Hob User Manual
Operating Instructions
Table Pot Sizes
NOTE // Cooking information provided on the table are for informative purposes only.
Normal Hob Small Hob
• Fits automatically to
the pot.
• Distributes the power
in the most appropriate
way.
• Provides excellent
heat dissipation.
• Suitable for all kinds
of cooking.
• Slow cooking (sauces,
creams, etc.)
• Preparation of small
portions or portions
for one person.
Ø18cm
10cm..........20cm
Ø14.5cm
9cm..........18cm

Induction Hob User Manual Page 11
Operating Instructions
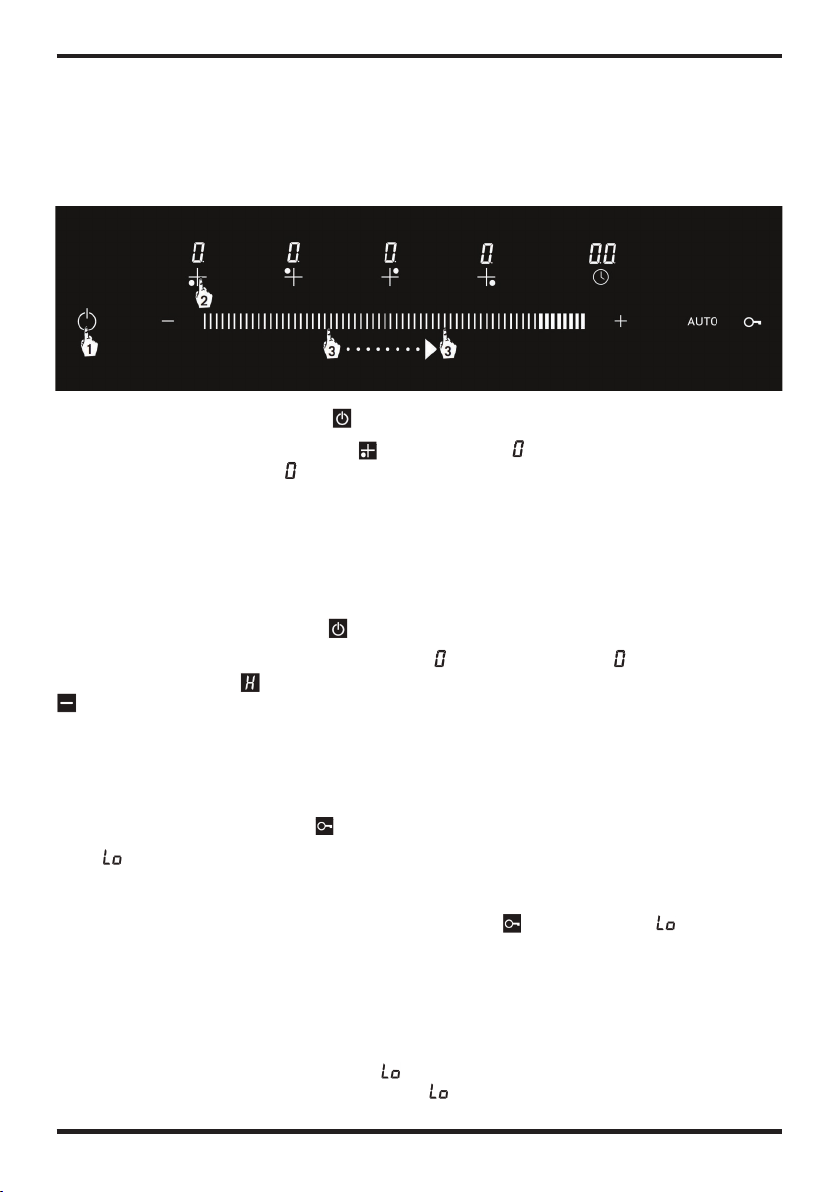
Control Panel
NOTE // The unit is ready to operate 1 second a er it is connected to the mains power supply. All the
LEDs and indicators are illuminated for 1 second.
Turning The Appliance On
The unit is switched on by pressing the button. The symbol is displayed on all indicators. If the
glass temperature above the hob is above 45°C, the and symbols are displayed on the screen of
corresponding hob one a er the other. ( = 0.5 seconds, = 0.5 seconds)
Turning The Appliance O
The unit is switched o by pressing the button. Even if the child lock is active on the timer indicator,
it is possible to switch o the appliance by pressing the button.
WARNING // The electronics remain active for 1 minute. If there is no cooking level or selected timer in
this time interval, the appliance shall automatically switch to “Off Mode” with a beep.
NOTE // If the symbol is ashing on any of the displays of the hob, the hob switches o
automatically a er 60 seconds when the symbol disappears.
Residual Heat Indicator
If the symbol is ashing on the touch panel of the stove, then the relevant hob is still hot. It can be
used to heat a small amount of food.
WARNING // When the power is cut o , the heat indicator does not light up and does not warn the user
against the heat.
WARNING // The residual heat indicator of each cooking zone remains active until the measured glass
temperature is lower than + 45°C.
1. On/Off function
2. Timer down
3. Cooking area temperature level
4. Timer up
5. Automatic quick cooking
function
6. Child lock function
7. Lower le cooking area
8. Upper le cooking area
9. Upper right cooking area
10. Lower right cooking area
11. Timer function
The unit is switched on by pressing the button. The symbol is displayed on all indicators. If the
The unit is switched o by pressing the button. Even if the child lock is active on the timer indicator,
it is possible to switch o the appliance by pressing the button.
The unit is switched on by pressing the button. The symbol is displayed on all indicators. If the
glass temperature above the hob is above 45°C, the and symbols are displayed on the screen of
corresponding hob one a er the other. ( = 0.5 seconds, = 0.5 seconds)
glass temperature above the hob is above 45°C, the and symbols are displayed on the screen of
corresponding hob one a er the other. ( = 0.5 seconds, = 0.5 seconds)
If the symbol is ashing on any of the displays of the hob, the hob switches o
If the symbol is ashing on the touch panel of the stove, then the relevant hob is still hot. It can be
automatically a er 60 seconds when the symbol disappears.
Page 12 Induction Hob User Manual
Operating Instructions
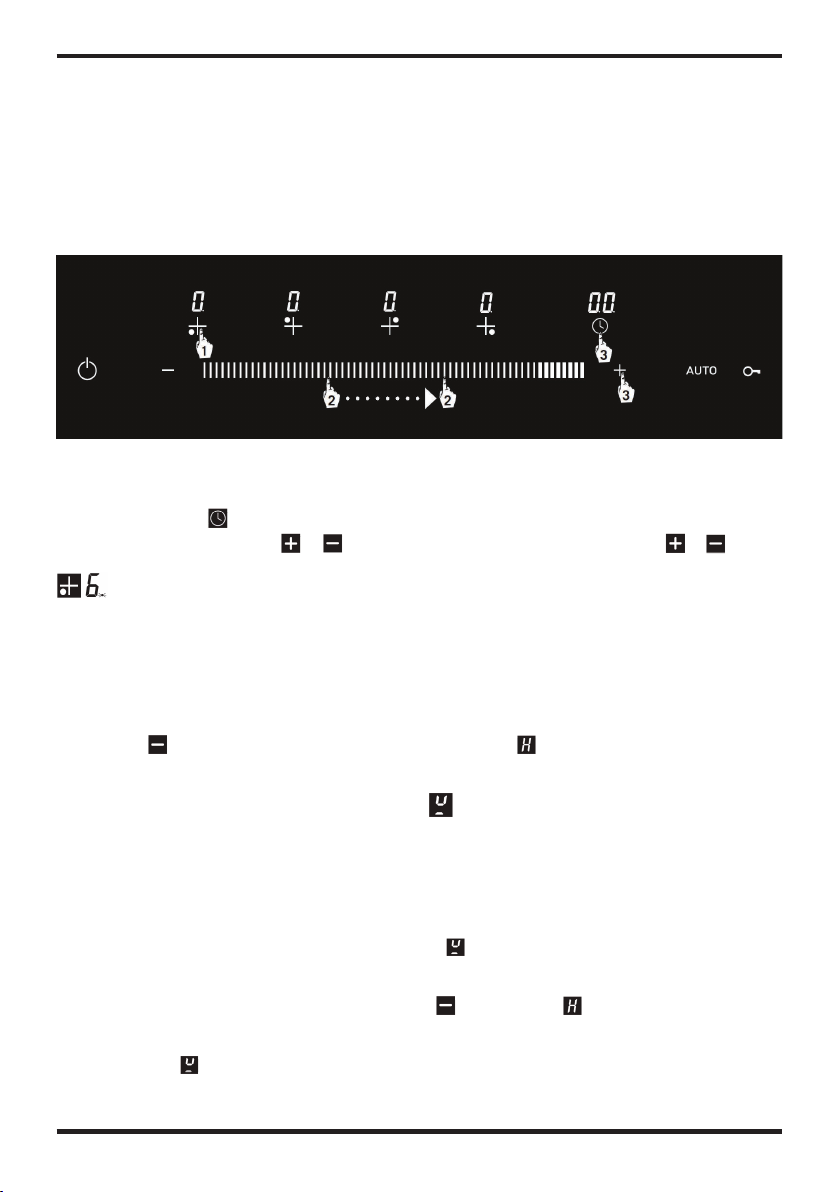
1. Stove is switched on by pressing the button.
2. Relevant hob is selected by pressing the symbol once. The symbol ashes for 5 seconds at the
display of the selected hob. The symbol is displayed at all other displays.
3. By sliding your nger to the le or right on the slider, you may adjust the power level of the relevant
hob from 1 to 9.
Turning the Cooking Areas O :
A selected hob may be turned o in 3 ways.
1. It may be turned o by pressing the key.
2. A er selecting the relevant hob, it is brought to the temperature level. The temperature value
ashes for 5 seconds. The symbol ashes if the relevant hob is still hot at the end of this period. The
symbol is displayed if the relevant hob is not hot.
3. Relevant hob may be switched o by setting a timer for it. When the time has expired, the hob set by
the timer automatically switches o with a beep.
Child Lock Function
1. Child lock is activated by pressing key once to prevent undesired operations.
2. The symbol is displayed on the timer display.
3. When the key lock is activated, all buttons except the ON/OFF control are deactivated.
4. To deactivate the child lock function, just press and hold the key for 3 seconds. symbol on the
timer indicator is turned o when the time has expired.
If the child lock function is active before switching o the stove, it shall be active when the stove is
turned on again. When the xxx key is pressed, symbol is displayed again on the timer display. Child
lock shall be deactivated to operate the hob again.
WARNING // Child lock is deactivated in case of a power outage.
WARNING // When the child lock is active, the symbol and remaining time are alternatively
displayed on the timer display if timer is active, too ( = 2 seconds, remaining time = 2 seconds).
Turning the Cooking Areas On
1. Stove is switched on by pressing the button.
1. It may be turned o by pressing the key.
2. Relevant hob is selected by pressing the symbol once. The symbol ashes for 5 seconds at the
4. To deactivate the child lock function, just press and hold the key for 3 seconds. symbol on the
2. The symbol is displayed on the timer display.
4. To deactivate the child lock function, just press and hold the key for 3 seconds. symbol on the
When the child lock is active, the symbol and remaining time are alternatively
displayed on the timer display if timer is active, too ( = 2 seconds, remaining time = 2 seconds).
1. Child lock is activated by pressing key once to prevent undesired operations.
symbol is displayed if the relevant hob is not hot.
ashes for 5 seconds. The symbol ashes if the relevant hob is still hot at the end of this period. The
2. Relevant hob is selected by pressing the symbol once. The symbol ashes for 5 seconds at the
2. A er selecting the relevant hob, it is brought to the temperature level. The temperature value
2. A er selecting the relevant hob, it is brought to the temperature level. The temperature value
2. Relevant hob is selected by pressing the symbol once. The symbol ashes for 5 seconds at the
display of the selected hob. The symbol is displayed at all other displays.

Induction Hob User Manual Page 13
Operating Instructions
Timer Functions
There are two types of timer functions.
1. Independent Timer Function - It may be set when setting mode of any hob is not active. It may be
used as an alarm, too. Independent timer continues to operate when any cooking area is started
to be used (level > 0). Timer may be set as long as the timer selection is active (the minute on the
display ashes for 5 seconds).
To set the timer;
1. Timer may be set from 1 to 99 minutes by using the or keys when the stove is on or timer
may be set from 1 to 99 minutes by pressing the symbol once and then using or keys
when the stove is on.
2. Countdown starts directly with the nal setting a er the timer is set. A er 5 seconds, timer setting
mode period ends automatically and timer display indicates the set time value.
To change the time for independent timer;
A er pressing the symbol once, it may be reset to the desired time using or keys, or the time
may be changed directly by the or keys without selecting the timer.
Buzzer sounds when the set time has expired and timer display ashes . Just press any key on the
touch panel to end the buzzer.
WARNING // Buzzer ends automatically a er 2 minutes when no key is touched.
WARNING // Turning o the stove (pressing on/o button) stops the independent timer.
Timer does not resume when the stove is turned on.
Timer may be set from 1 to 99 minutes by using the or keys when the stove is on or timer
may be set from 1 to 99 minutes by pressing the symbol once and then using or keys
may be set from 1 to 99 minutes by pressing the symbol once and then using or keys
may be changed directly by the or keys without selecting the timer.
A er pressing the symbol once, it may be reset to the desired time using or keys, or the time
A er pressing the symbol once, it may be reset to the desired time using or keys, or the time
Timer may be set from 1 to 99 minutes by using the or keys when the stove is on or timer
may be set from 1 to 99 minutes by pressing the symbol once and then using or keys
may be changed directly by the or keys without selecting the timer.
A er pressing the symbol once, it may be reset to the desired time using or keys, or the time
Buzzer sounds when the set time has expired and timer display ashes . Just press any key on the
Page 14 Induction Hob User Manual
Operating Instructions
2. Cooking Area Timer Function
To set the timer;
1. Select the relevant hob to be set while the stove is on
2. Set the temperature level to the desired level from 1 to 9 using the slider.
3. A er pressing the symbol once while temperature level setting period is active (for 5 seconds),
the desired time is set using or keys, or the desired time is set directly by the or keys.
The point next to the temperature level on the hob, for which the remaining time is being
displayed, ashes.
WARNING // If more than one timer is active, timer display indicates the lowest remaining time value
a er the 5-second setting period. The point next to the hob, for which the remaining time is being
displayed, ashes.
A buzzer sounds and the programmed cooking area nishes the cooking function a er the set time has
expired. The symbol is displayed on the touch screen and the symbol ashes if the cooking area
is still hot.
POT IDENTIFICATION / FOCUSING (No Pot Warning)
Power is applied to the area covered by the base of the pot on the relevant hob only for induction
cooking. Base of the pot is detected by the induction system.
Cooking is stopped if there is no pot (either there is no pot or the pot is not induction compliant) when
the cooking is started or if the pot is removed from the hob while cooking. No pot warning is displayed
on the touch panel for the relevant hob a er 5 seconds .
No pot warning lasts 55 seconds. If there is no pot on the hob when this time has expired, cooking area
is turned o automatically and the panel displays the symbol or the symbol if the cooking area
is hot.
WARNING // The symbol ashes for 55 seconds on the relevant that gives the no pot warning.
Setting for cooking timer is also expired when this time expires.
the desired time is set using or keys, or the desired time is set directly by the or keys.
A er pressing the symbol once while temperature level setting period is active (for 5 seconds),
the desired time is set using or keys, or the desired time is set directly by the or keys.
the desired time is set using or keys, or the desired time is set directly by the or keys.
expired. The symbol is displayed on the touch screen and the symbol ashes if the cooking area
The
on the touch panel for the relevant hob a er 5 seconds .
expired. The symbol is displayed on the touch screen and the symbol ashes if the cooking area
the desired time is set using or keys, or the desired time is set directly by the or keys.
is turned o automatically and the panel displays the symbol or the symbol if the cooking area
is turned o automatically and the panel displays the symbol or the symbol if the cooking area

Induction Hob User Manual Page 15
Operating Instructions
High Power Function (Boost)
You may use the high power function (boost) for cooking faster.
To use the boost function,
1. Determine the relevant hob, and set the desired power level from 1 to 9.
2. Activate the boost function by pressing BOOST key once and the symbol ashes for 5 seconds on
the display for the relevant hob.
The maximum period for the BOOST function is 5 minutes. When the time has expired, the relevant
hob resumes cooking with power level initially set.
You may end the BOOST function using the slider for the relevant hob.
WARNING: Boost function cannot be set at the same time for the vertical hobs.
Automatic Quick Cooking Function (Auto)
Automatic quick cooking function facilitates cooking. BOOST time for automatic quick cooking varies
as per the selected power level. Times are given in the table below.
To use the auto cooking function,
1. Determine the relevant hob for cooking while the stove is on, and set the desired power level using
the slider.
2. Press AUTO once while the setting mode is active and auto quick cooking shall be activated for the
period of the selected power level. ‘A’ symbol ashes for 5 seconds on the display of the relevant
hob.
3. You may end the auto cooking function using the slider a er selecting the relevant hob.
key once and the symbol ashes for 5 seconds on
Power Level Auto Cooking Time Power Level Auto Cooking Time
1 10 6 30
2 30 7 40
3 50 8 50
4 65 9 10
5 20

Page 16 Induction Hob User Manual
Operating Instructions
Code Error Auto Cooking Time Power Level
F3 / F4 Induction stove coil temperature
sensor error
Please contact the manufacturer
F9 / FA IGBT temperature sensor error Please contact the manufacturer
E1 / E2 Improper supply voltage Please check whether the supply
voltage is normal
E3 Induction stove coil temperature
sensor high temperature warning
Please contact the manufacturer
E5 IGBT temperature sensor high
temperature warning
Please start cooking again aer the
pot is cooled
Energy Saving:
Induction cooking zones automatically adapt to the base dimensions of cooking containers to a
certain extent.
Place the cooking container on the cooking surface before turning on the heater. Induction heaters
contain a sensor that detects the existence of the cooking container.
Use the containers with their lids closed in order to shorten cooking times. Lower the heating when it
starts to boil.
Do not use too much water or oil in order to shorten the cooking time.
Use your device witn an appropriate temperature of cooking.

Induction Hob User Manual Page 17
Operating Instructions
Cleaning And Maintenance
Wait for the glass section of the device to cool down completely before starting cleaning. Do not use abrasive
clothes, spray cleaners or sharp objects in cleaning the glass panel.
Clean burned food residues with a damp and soapy cloth.
Sticky food must be cleaned immediately before the glass cools down when they are spilt on the hob.
Any dusts to accumulate on the surface must be cleaned with a damp cloth.
Color changes that may take place on the ceramic glass surface will not aect the functional structure and
durability of the hob. Such color changes will arise from not cleaning burned residues on the surface, abrasion
of the glass surface by the pots and pans used and use of inappropriate cleaning material. Using special
ceramic glass cleaner when the glass is
Information on the table above is only for guidance.
HEATING ADJUSTMENT USAGE
0 Off
1-3 Keeping Hot
4-5 Slow Heating/Cooking
6-7 Reheating, Fast Cooking
6-7 Boiling
9 Maximum Level
P Maximum Power

Page 18 Induction Hob User Manual
Electrical Connection
Please take into consideration the following points before connecting the device to the mains:
The voltage of the mains must be the same as the voltage written on the capacity label contained on the
device.
The electrical wiring to which the device will be connected must be able to bear the power value written on the
capacity label.
The electrical wiring to which the device will be connected must contain a ground connection conforming to
e ective regulations.
The fuse box to which the device will be connected must be located in a place, where it can be easily reached
a er the device is placed in position.
If the electrical wiring to which the device will be connected does not contain a mains connection cable
speci c to the device, the necessary wiring must have been prepared by an expert electrician before the device
is placed in position.
The power supply cable must absolutely be in away from heat sources and must never be exposed to
temperatures 50 degrees higher than the room temperature.
Mains Connection Diagram of the Device

Induction Hob User Manual Page 19
Notes

CONTACT DETAILS
AUSTRALIA
ARISIT PTY LIMITED
40-44 Mark Anthony Drive
Dandenong South, VIC 3175
Australia
P // 1300 762 219
F // 03 9768 0838
NEW ZEALAND
ARISIT PTY LIMITED
PO Box 68-140
Newton, Auckland 1145
New Zealand
P // 09 306 1020
F // 09 302 0077
Tisira is committed to ongoing research
and development. Every effort has been
made to ensure all information in this
service manual is correct at time of going
to print. Dimensions should be used as
a reference only and actual dimensions
should be taken from the physical
product only.
Manufacturer reserves the right to
change specications without notice.
Table of contents
Other Tisira Hob manuals

Tisira
Tisira TG60 User manual

Tisira
Tisira tIs90b User manual

Tisira
Tisira TCT60 User manual

Tisira
Tisira TCT90 User manual

Tisira
Tisira TGWF31G User manual

Tisira
Tisira TIT60 User manual

Tisira
Tisira TGWF30G User manual

Tisira
Tisira TIT60 User manual

Tisira
Tisira TIS60B User manual

Tisira
Tisira TCT91 User manual


