TKD AIRSON 232.30 User manual
ENGLISH
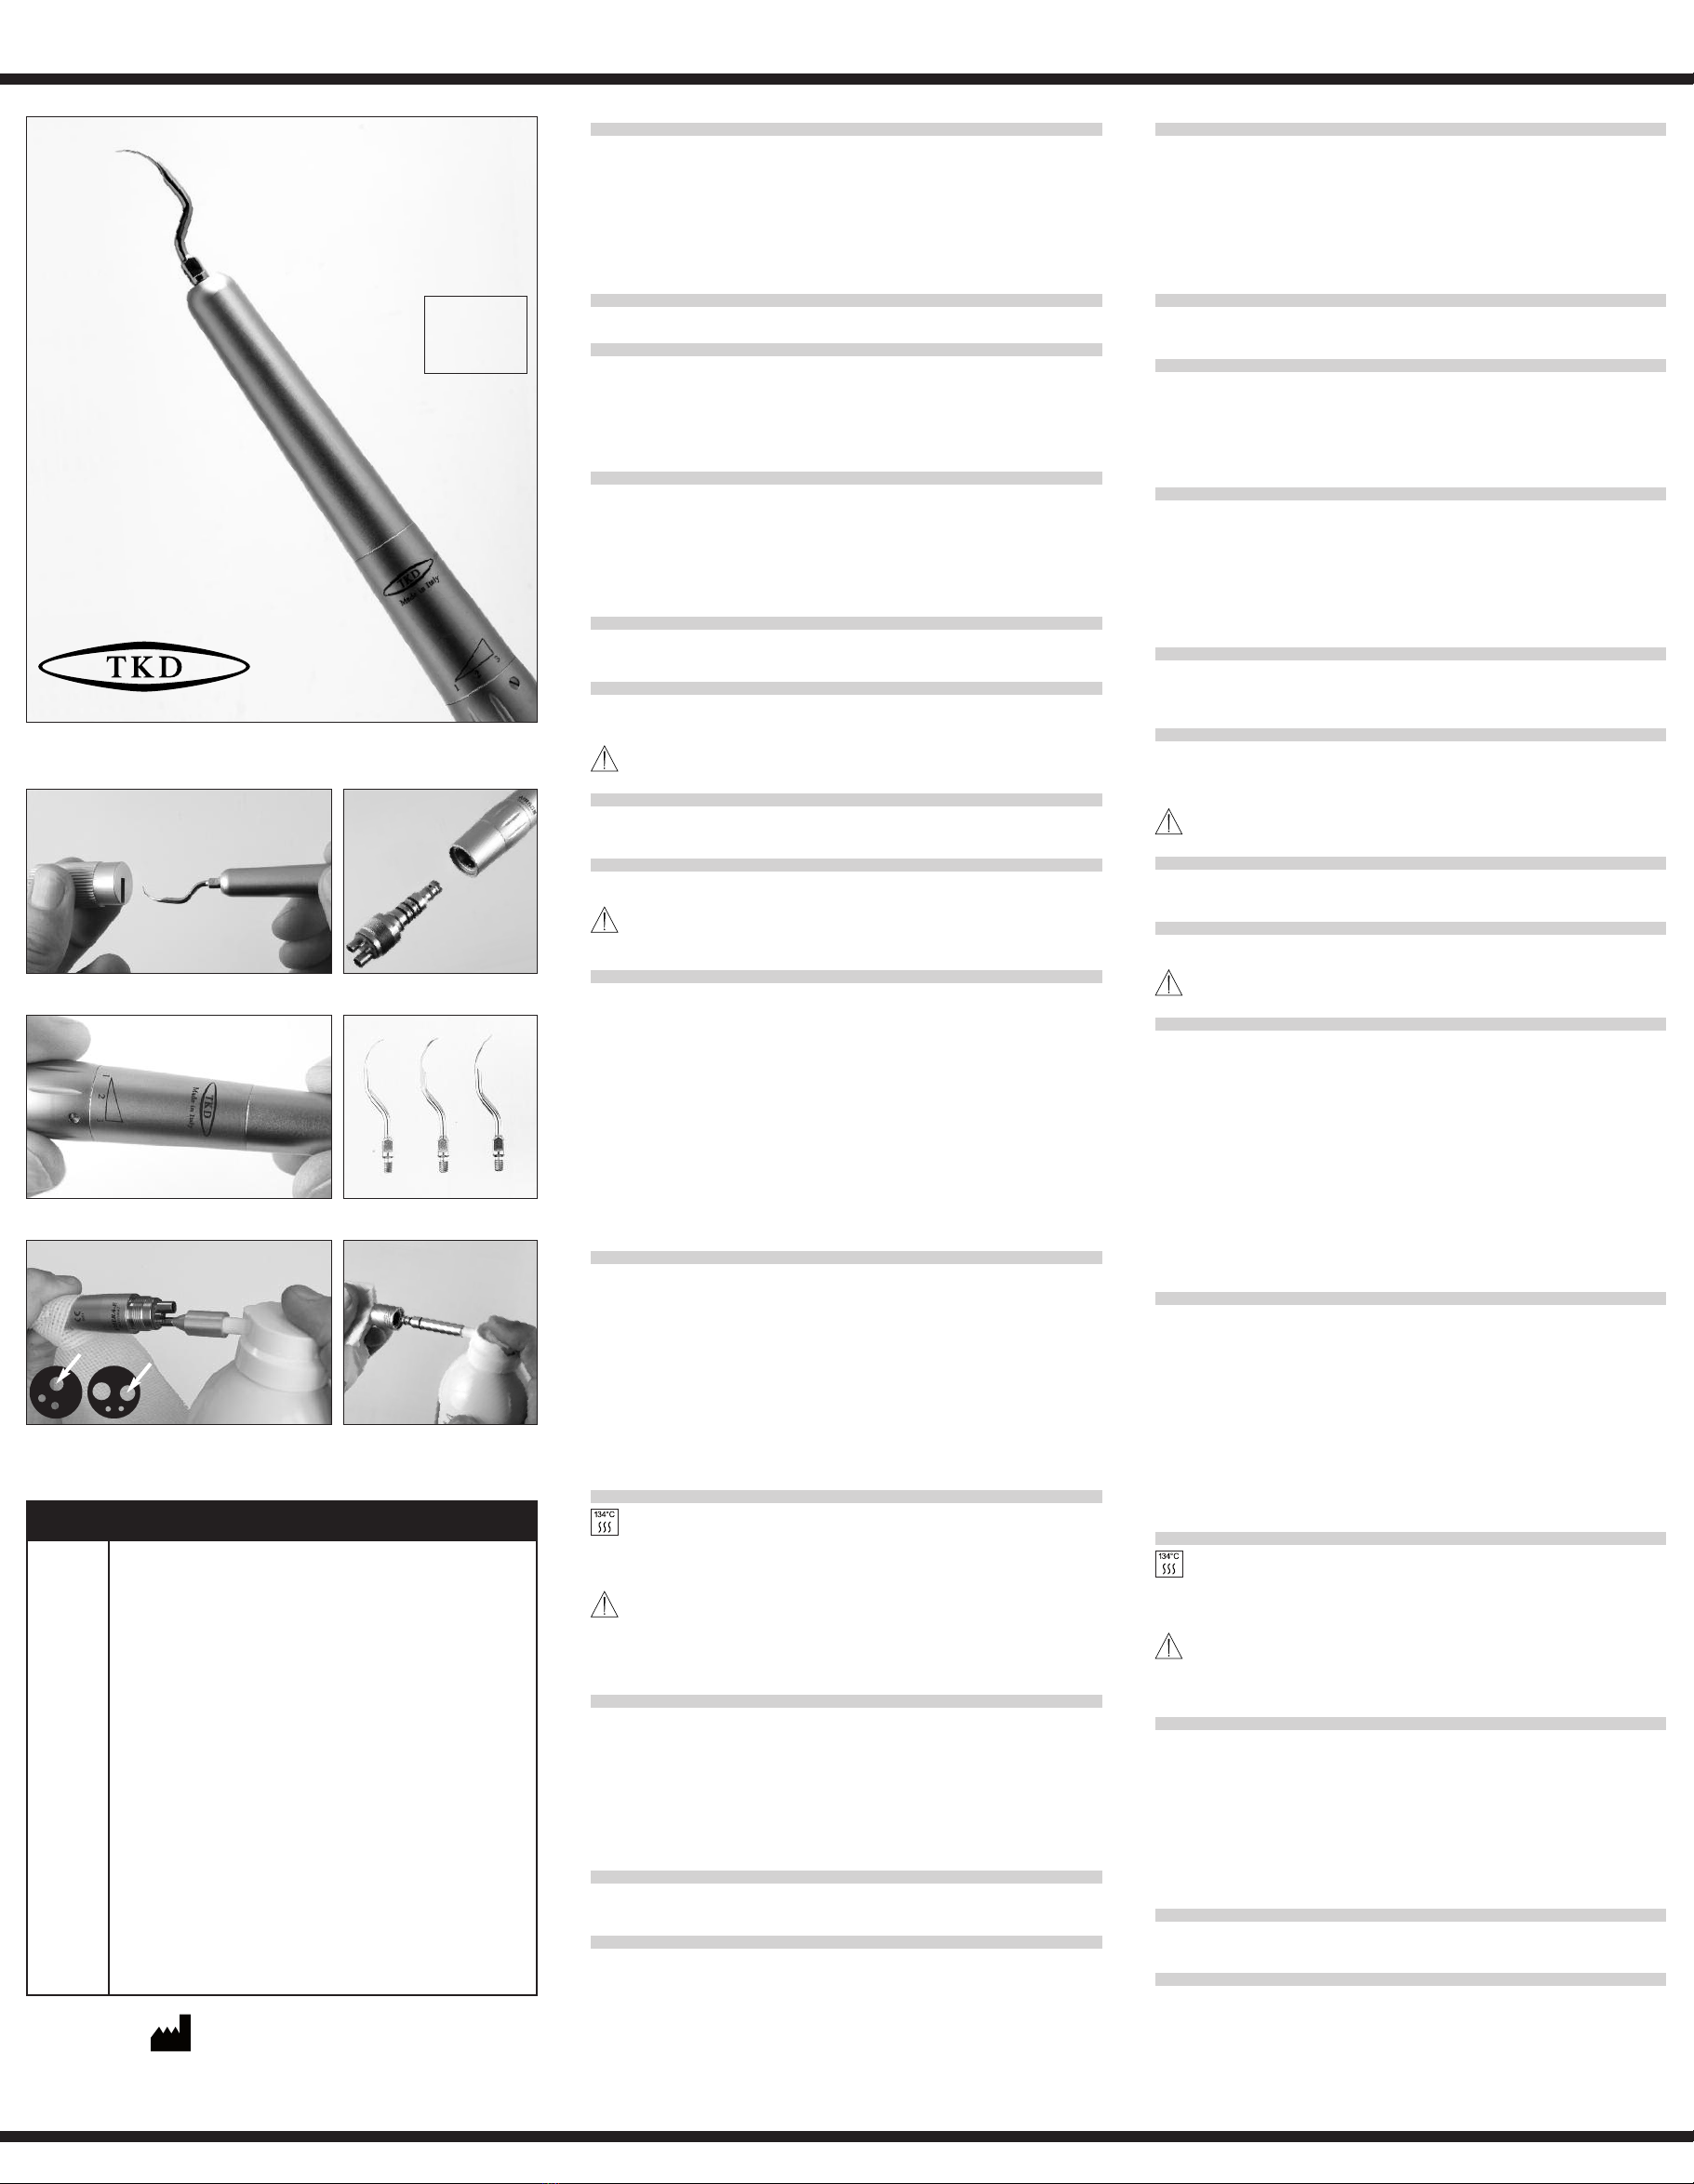
DESCRIPTION
Pneumatic scaler, compliant to ISO 15606 Standard.
The scaler can be used for prophylaxis procedures employing the TKD inserts
listed below.
Weight without insert: 64 g.
Frequency of vibrations: 6000 ÷ 6700 Hz.
Maximum noise level: 73 dBA (@3.0 bar)
This medical device meets the requirements of the European Directives
93/42/EEC (Class IIa) and 2007/47/EC.
CONTENTS
AIRSON®scaler, 3 Inserts, a insert-fitting wrench.
CONNECTION
The AIRSON®air scaler can be connected to any unit supplied with a
standard turbine hose.
The AIRSON®scaler with quick connection (Fig. 2) must be used together
with the G ROFLEX®(REF 316.30 or REF 316.40) or MULTIflex®quick
couplings, whereas the other models with 3-hole or 4-hole connection (ISO
9168 Standard) can be directly connected to the unit hoses.
AIR PRESSURE
Recommended air pressure is 2.4 ÷ 3.0 bar (34.8 ÷ 43.5 psi).
Maximum air consumption is 22 Nl/min (@3.0 bar).
Check air pressure by means of a gauge (REF 129.40) connected between
the scaler and the supply hose.
Supplied air must be perfectly dry and well-filtered, kept at constant pressure.
Impurity or residues in the compressed air may cause the scaler to
malfunction.
COOLING
Operating water pressure for cooling spray must be 0.5 ÷ 2.5 bar. Water
flow rate is higher than 50 ml/min (@2.0 bar). Water must be well-filtered.
FITTING OF INSERTS
Select the right type of insert according to the operation to be performed and
screw it manually onto the scaler. The insert must then be moderately
tightened using the supplied key (Fig. 1).
Inserts must always be removed after use.
Do not fit inserts while the scaler is running.
POWER ADJUSTMENT
Power may be increased or decreased by rotating the ring nut located at the
bottom of the scaler (Fig. 3).
MAINTENANCE OF INSERTS
The shape and weight of each insert are the result of a precise design
optimisation so as to obtain maximum performance.
Therefore any alteration, breaking, twisting or wearing of the insert can cause
abnormal operation: in such case it is strongly recommended that the insert be
replaced.
UTILISATION OF INSERTS (Fig. 4)
INSERT #1 UNIVERSAL
Treatment of the interdental joint.
Treatment of the neck and subgingival region.
INSERT #2 EXTRA FINE
Interproximal treatment and treatment of periodontal pouches.
INSERT #4 SPATULA
Treatment of major deposits.
INSERT #5 CONDENSATION
For condensation of amalgams
INSERT #6 CONDENSATION
For condensation of amalgams
INSERT #7 DECEMENTATION
For decementation of crowns
MAINTENANCE
In order for the instrument you have purchased to be helpful in your
profession for a very long time, carefully repeat the following operation
weekly.
Detach the scaler from the supply hose and lubricate using the special can
(REF 120.00), as shown on Fig. 5. The SO2000 service oil (or any other
lubricating oil for dental scalers) must be inserted into instrument air input.
Press once only.
In case of scaler with quick connection, insert the special nozzle reducer
(REF 120.02) and lubricate as shown on Fig. 6.
Immediately after, screw the scaler back to the hose (or reconnect it to the
quick coupling) and operate the instrument for a few seconds, until the
characteristic hissing sound can be heard.
STERILIZATION
The scaler, the wrench and inserts can be sterilized in autoclave at
134 °C/2 bar (273 °F/29 psi).
The scaler must always be sterilized without the insert on.
Before sterilization, remove residues and carefully clean the instrument.
During sterilization, metal parts of different kinds should not come into contact
with each other. To avoid this possibility, wrap the objects in a cloth or place
them in a sterilisable bag.
The G ROFLEX®quick couplings cannot be sterilized.
CLEANING AND DISINFECTION
Clean with a cloth soaked in a disinfectant containing:
- glutaraldehyde up to 2%
- O-phenylphenol
- alcohols based on ethanol
Products not recommended: disinfectants containing benzalkonium chloride.
The instrument cannot be immersed in any kind of liquid. inserts can be
cleaned in a ultrasonic tank or with a germicidal cleanser.
The screw thread can be properly cleaned with a cotton bud soaked in
alcohol.
GUARANTEE
The device carry a 12-month guarantee against all defects of construction. Guar-
antee validity is subject to specific conditions.
SERVICE
In case of malfunction and for any overhaul and repair work, please contact
your usual supplier or apply directly to TKD.
TeKne Dental s.r.l.
Via del Pescinale, 77 - 50041 Calenzano (FI) - Italy
[email protected] www.teknedental.com
Pneumatic scaler
Ablatore pneumatico
Zahnsteinentferner
Détartreur pneumatique
Detartrador neumático
Operating instructions
Istruzioni per l’uso
Bedienungsanleitung
Mode d’emploi
Modo de empleo
g
0051
TeKne Dental
Fig. 1
Fig. 3
Fig. 5
Fig. 2
Fig. 4
Fig. 6
#1 #2 #4
REF 316.30 G ROFLEX®coupling for 3-hole connection / Raccordo 3-vie / Schnellkup-
plung für 3-Loch Anschluβ/ Raccord pour raccordement 3 voies / Racor
para enlace 3 vías
REF 316. 0 G ROFLEX®coupling for 4-hole connection / Raccordo 4-vie / Schnellkup-
plung für 4-Loch Anschluβ/ Raccord pour raccordement 4 voies / Racor
para enlace 4 vías
REF 129. 0 Air pressure gauge for 4-hole connection / Manometro per attacco 4 vie /
Manometer für 4-Loch Anschluβ/ Manomètre pour raccordement 4 voies /
Manómetro para enlace 4 vías
REF 120.00 SO2000 Service oil / Lubrificante / Schmiermittel / Lubrifiant / Lubricante
REF 120.01 Nozzle / Beccuccio / Kanüle / Buse / Boquilla /
REF 120.02 Nozzle for rapid connection / Beccuccio per attacco rapido / Kanüle für
Schnellkupplung / Buse pour connexion rapide / Boquilla para conexión
rápida
REF 230.01 Insert #1 / Inserto #1 / Ansatz #1 / Insert #1 / Inserto #1
REF 230.02 Insert #2 / Inserto #2 / Ansatz #2 / Insert #2 / Inserto #2
REF 230.0 Insert #4 / Inserto #4 / Ansatz #4 / Insert #4 / Inserto #4
REF 230.05 Insert #5 / Inserto #5 / Ansatz #5 / Insert #5 / Inserto #5
REF 230.06 Insert #6 / Inserto #6 / Ansatz #6 / Insert #6 / Inserto #6
REF 230.07 Insert #7 / Inserto #7 / Ansatz #7 / Insert #7 / Inserto #7
REF 230.80 Wrench / Chiavetta / Schlüssel / Clef / Llave
REF 230.90 Cartridge / Cartuccia / Kartusche / Cartouche / Cartucho
ACCESSORIES AND SPARE PARTS / ACCESSORI E RICAMBI / ZUBEHÖR UND ER-
SATZTEILE / ACCESSOIRES ET RECHANGES / ACCESORIOS Y RECAMBIOS
REF 232.30
REF 232.40
REF 232.52
Fig. 5
MULTIflex®is a registered trademark of Kaltenbach & Voigt GmbH, Germany.
AIRSON®ITALIANO
DESCRIZIONE
Ablatore pneumatico, conforme allo Standard ISO 15606.
L’ablatore può essere usato per interventi di detartrasi utilizzando gli inserti
TKD elencati sotto.
Peso senza inserto: 64 g.
Frequenza delle vibrazioni: 6000 ÷ 6700 Hz.
Livello massimo di rumore: 73 dBA (@3,0 bar).
Questo dispositivo medico è conforme ai requisiti delle Direttive Europee
93/42/CEE (Classe IIa) e 2007/47/CE.
CONTENUTO DELLA
CONFEZIONE
Un ablatore pneumatico AIRSON®, 3 inserti, una chiavetta per il montaggio
degli inserti.
COLLEGAMENTO
L’ablatore AIRSON®può essere collegato al posto di una turbina su
qualsiasi riunito.
L’ ablatore AIRSON®con attacco rapido (Fig. 2) necessita di un raccordo
rapido G ROFLEX®(REF 316.30 o REF 316.40) oppure MULTIflex®, mentre
le versioni con attacco fisso 3 vie o 4 vie (Standard ISO 9168) possono
essere avvitate direttamente al tubo del riunito.
PRESSIONE ARIA
La pressione d aria raccomandata è 2,4 ÷ 3,0 bar.
Il massimo consumo d’aria è 22 Nl/min (@3,0 bar).
Controllare la pressione mediante un manometro (REF 129.40) collegato tra
lo strumento e il terminale di uscita del tubo di alimentazione.
L’aria di alimentazione deve essere secca e ben filtrata, a pressione
costante.
Impurità o residui presenti nell’aria compressa potrebbero causare un
funzionamento anomalo dell’ablatore.
RAFFREDDAMENTO
La pressione dell’acqua per lo spray di raffreddamento deve essere 0,5 ÷
2,5 bar. La portata dello spray è superiore a 50 ml/min (@2,0 bar).
L’acqua deve essere ben filtrata.
MONTAGGIO DEGLI INSERTI
Selezionare l’inserto in funzione dell’intervento da eseguire ed avvitarlo
manualmente sul manipolo. Terminare tale operazione mediante l’apposita
chiavetta (Fig. 1), avendo cura di esercitare una sufficiente torsione, ma
senza forzare eccessivamente.
Gli inserti devono essere sempre rimossi dopo l’uso.
Non inserire gli inserti con l’ablatore attivato.
REGOLAZIONEDELLA POTENZA
Per regolare la potenza al livello ritenuto ottimale, ruotare la ghiera prevista
sul manipolo in prossimità del connettore (Fig. 3).
MANUTENZIONE DEGLI INSERTI
La forma e il peso di ogni inserto sono ottimizzati al fine di ottenere la
massima resa.
Pertanto ogni modifica, rottura, piegatura o consumo dell’inserto provoca ano-
malie di funzionamento: in tale caso procedere alla sostituzione dell’inserto.
UTILIZZAZIONE DEGLI INSERTI (Fig. 4)
INSERTO #1 UNIVERSALE
Trattamento degli interstizi.
Trattamento del colletto e regione sottogengivale.
INSERTO #2 EXTRA FINE
Trattamento interprossimale e delle sacche periodontiche.
INSERTO #4 SPATOLA
Trattamento di grossi depositi.
INSERTO #5 CONDENSAZIONE
Per la condensazione di amalgame
INSERTO #6 CONDENSAZIONE
Per la condensazione di amalgame
INSERTO #7 DECEMENTAZIONE
Per la decementazione di corone
LUBRIFICAZIONE
Affinché lo strumento che avete acquistato vi sia di aiuto nella vostra
professione per lungo tempo, ripetere con cura l’operazione descritta di
seguito settimanalmente.
Separare l’ablatore dal tubo di alimentazione e lubrificare mediante
l’apposita bomboletta (REF 120.00), come indicato in Fig. 5. Il lubrificante
SO2000 (o qualsiasi altro olio lubrificante per manipoli dentali) deve essere
introdotto all’ingresso dell’aria di alimentazione. Premere una sola volta.
Nel caso di ablatore con attacco rapido, applicare l’apposito adattatore
(REF 120.02) sulla bomboletta e lubrificare come mostrato in Fig. 6.
Riavvitare l’ablatore al tubo di alimentazione (o riconnetterlo al raccordo
rapido) e attivare lo strumento per qualche secondo fino a quando non avrà
acquisito il sibilo caratteristico.
STERILIZZAZIONE
L’ablatore, la chiavetta e gli inserti possono essere sterilizzati in autoclave a
vapore d’acqua fino a 134 °C/2 bar.
L’ablatore deve essere sterilizzato senza alcun inserto montato.
Prima di sterilizzare, rimuovere i residui e pulire accuratamente lo strumento.
Durante la sterilizzazione, pezzi metallici di natura differente non devono toc-
carsi. Per evitare tale possibilità, porre i pezzi in una busta per sterilizzazione.
I raccordi rapidi G ROFLEX®non sono sterilizzabili in autoclave.
PULIZIA E DISINFEZIONE
Utilizzare un panno impregnato di un disinfettante a base di:
- gluteraldeide fino al 2%
- O-fenilfenolo
- alcool etilico
Prodotti sconsigliati: disinfettanti a base di benzalconio cloruro.
È assolutamente vietato immergere lo strumento in qualsiasi tipo di liquido.
Gli inserti possono essere puliti in una vasca ad ultrasuoni o con sostanze
chimiche germicide.
Usare un bastoncino di cotone imbevuto di alcol etilico per pulire la sede
filettata degli inserti.
GARANZIA
Il dispositivo è garantito da tutti i difetti di fabbricazione per un periodo di 12 mesi.
La validità della garanzia è soggetta a specifiche prescrizioni.
ASSISTENZA TECNICA
In caso di funzionamento anomalo dello strumento, e per qualunque
revisione o riparazione, rivolgersi al Vostro rivenditore di fiducia o
direttamente a TKD.
DESCRIPCIÓN
Detartrador neumático, conforme con el Standard ISO 15606.
El detartrador puede ser utilizado para intervenciones de detartraje
empleando los insertos TKD enumerados a continuacíon.
Peso sin inserto: 64 g.
Frecuencia de vibración: 6000 ÷ 6700 Hz.
Nivel sonoro máximo: 73 dBA (@3,0 bar)
Este dispositivo médico cumple con los requisitos de las Directivas Europeas
93/42/CEE (Clase IIa) y 2007/47/CE.
DOTACIÓN
Un detartrador AIRSON®, 3 insertos, una llave para acoplar los insertos.
ACOPLAMIENTO
El detartrador AIRSON®puede conectarse a cualquier tipo de unidad en
lugar de una turbina.
El detartrador AIRSON®con empalme rápido (Fig.2) necesita un racor
rápido G ROFLEX®(REF 316.30 o REF 316.40) o MULTIflex®, mientras
que las versiones con empalme 3-orificios o 4-orificios (Standard ISO 9168)
pueden ser atornilladas directamente a la manguera del equipo.
PRESIÓN DE AIRE
La presión de aire recomendada es 2,4 ÷ 3,0 bar.
El consumo máximo de aire es 22 Nl/min. (@3,0 bar).
Controlar la presión mediante un manómetro (REF 129.40) unido al terminal
de salida de la manguera de alimentación.
El aire de alimentación debe ser seco y bien filtrado, a presión constante.
Impurezas o residuos presentes en el aire comprimido podrían causar un
funcionamiento anómalo del aparato de ablación.
ENFRIAMIENTO
La presión del agua por el spray de enfriamiento debe ser 0,5 ÷ 2,5 bar. La
capacidad del spray es mayor de 50ml/min (@2,0 bar). El agua debe ser
bien filtrada.
MONTAGE DE LOS INSERTOS
Seleccionar el inserto en función de la intervención por efectuar y atornillarlo
manualmente a el detartrador, terminando la operación con la llave
correspondiente, teniendo cuidado de ejercer una torsión suficiente (Fig. 1).
Los insertos se deberán quitar siempre después de haber sido usados.
No introducir los insertos con el detartrador activado.
REGULACIÓN DE LA POTENCIA
El aumento o la disminución de la potencia se producen por rotaciones de
la abrazadera prevista en lo detartrador próxima al empalme (Fig. 3).
MANTENIMIENTO DE LOS INSERTOS
La forma y el peso de cada uno de los insertos han sido optimizados a fin
de obtener el máximo rendimiento.
Por lo tanto, cualquier modificación, rotura, dobladura o desgaste de los in-
sertos provoca anormalidades funcionales: en estos casos debe sustituirse el
inserto.
EMPLEO DE LOS INSERTOS (Fig. 4)
INSERTO #1 UNIVERSAL
Tratamiento de los intersticios.
Trattamiento del cuello y espacios subgingivales.
INSERTO #2 EXTRA FINE
Tratamiento interproximal y de las bolsas periodontales.
INSERTO #4 ESPÁTULA
Tratamiento de los depósitos gruesos.
INSERTO #5 CONDENSACIÓN
Para la condensación de amalgamas
INSERTO #6 CONDENSACIÓN
Para la condensación de amalgamas
INSERTO #7 AFLOJAMIENTO
Para aflojamiento de coronas
LUBRIFICACIÓN
Para que el instrumento que Vd. ha adquirido le preste buenos servicios en
su trabajo el mayor tiempo posible, repetir cada semana con cuidado la
operación descrita a continuación.
Separar el detartrador de la manguera y lubrificar con el correspondiente
atomizador (REF 120.00), como se indica en la Fig. 5. El lubricante
SO2000 (o cualquier otro aceite lubricante para piezas de mano dentales)
se introduce en la entrada de aire de alimentación. Presionar una sola vez.
Si el instrumento dispone de conexión rápida, introducir el correspondiente
adaptador (REF 120.02) en el atomizador y lubrificar como se indica en la
Fig. 6.
Seguidamente, volver a atornillar el detartrador a la manguera (o volver a
conectarlo al racor rápido) y poner en marcha el instrumento por unos
segundos hasta que se oiga el típico pitido.
ESTERILIZACIÓN
El detartrador, la llave y los insertos pueden ser esterilizados en autoclave a
134 °C / 2 bar.
El detartrador se debe esterilizar siempre sin inserto.
Antes de esterilizar, remover los residuos y limpiar cuidadosamente el
instrumento.
Durante la esterilización, las piezas metálicas de naturaleza diferente no deben
tocarse. Para evitar ese posibilidad, colocar los objetos en una bolsa esterili-
zable.
Los racores rápidos G ROFLEX®no son esterilizables.
LIMPIEZA DESINFECCIÓN
Utilizar un paño embebido con un desinfectante a base de:
- Gluteraldehídos hasta el 2%
- O-fenilo-fenol
- Alcohol etílico
Se desaconseja la utilización de desinfectantes a base de benzalconium
cloruro. Está absolutamente prohibido sumergir el instrumento en cualquier
tipo de líquido.
Los insertos se pueden limpiar dentro de una cubeta de ultrasonidos y con
sustancias químicas germicidas.
Usar un bastoncillo de algodón impregnado de alcoholpara limpiar el
roscado de lo insertos.
GARANTÍA
El dispositivo está garantizado por todos los defectos de fabricación por un
período de 12 meses.
La validez de la garantía está sujeta a específicas prescripciones.
ASISTENCIA TÉCNICA
En caso de funcionamento anómalo del instrumento o para cualquier revisión
o reparación, dirigirse a su distribuidor o directamente a TKD.
ESPAÑOL
BESCHREIBUNG
Luftbetriebener Zahnsteinentferner, konform mit der Norm ISO 15606.
Der Zahnsteinentferner kann unter Verwendung der aufgelisteten Einsätze TKD
für Eingriffe im Bereich der Zahnsteinentfernung verwendet werden.
Gewicht ohne Einsatz: 64 g.
Schwingungsfrequenz: 6000 ÷ 6700 Hz.
Max. Geräuschpegel: 73 dBA (@3,0 bar).
Dieses medizintechnische Produkt ist konform mit den Anforderungen der
Europäischen Richtlinien 93/42/EWG (Klasse IIa) und 2007/47/EG.
PACKUNGSINHALT
Ein luftbetriebener Zahnsteinentferner AIRSON®, 3 Einsätze, ein Schlüssel zur
Montage der Einsätze.
ANSCHLUSS
Der Zahnsteinentferner AIRSON®lässt sich an jede mit einem
Standardschlauch für Turbinen ausgestattete Behandlungseinheit anschließen.
Der Zahnsteinentferner AIRSON®mit Schnellkupplung (Abb. 2) benötigt eine
Schnellkupplung G ROFLEX®(REF 316.30 oder REF 316.40) oder
MULTIflex®, während die Ausführungen mit festem 3- oder 4-Wegeanschluss
(ISO-Norm 9168) direkt an den Schlauch der Behandlungseinheit
angeschraubt werden können.
LUFTDRUCK
Der Luftdruck sollte 2,4 ÷ 3,0 bar betragen.
Der max. Luftverbrauch beträgt bei 22 Nl/min (@3,0 bar).
Den Druck mithilfe eines an das Instrument und das Ausgangsendstück des
Versorgungsschlauchs angeschlossenen Druckmessers (REF 129.40) prüfen.
Die Versorgungsluft muss immer trocken und gut gefiltert sein sowie einen
konstanten Druck aufweisen.
Verunreinigungen oder Rückstände in der Druckluft können Funktionsstörungen
des Zahnsteinentferners hervorrufen.
KÜHLUNG
Der Wasserdruck für das Kühlspray muss 0,5 ÷ 2,5 bar betragen. Der
Spraydurchsatz liegt über 50 ml/min (@2,0 bar). Das Wasser muss gut
gefiltert sein.
MONTAGE DER EINSÄTZE
Den Einsatz in Abhängigkeit von dem auszuführenden Eingriff auswählen und
von Hand auf das Handstück schrauben. Die Montage mit dem
mitgelieferten Schlüssel (Abb. 1) abschließen, wobei gut, aber nicht zu fest
angezogen werden sollte.
Die Einsätze sind nach der Verwendung immer zu entfernen.
Keine Einsätze bei aktiviertem Zahnsteinentferner einsetzen.
LEISTUNGSREGULIERUNG
Für eine jeweils als optimal erachtete Leistungseinstellung den am Handstück
nahe dem Verbinder (Abb. 3) sichtbaren Schraubring drehen.
INSTANDHALTUNG DER EINSÄTZE
Form und Gewicht eines jeden Einsatzes wurden in Hinblick auf eine
maximale Leistungsabgabe optimiert.
Jede Veränderung, jeder Bruch, Verbiegung oder Abnutzung des Einsatzes be-
wirkt deshalb Funktionsstörungen: In diesem Fall muss der Einsatz ausgewech-
selt werden.
VERWENDUNG DER EINSÄTZE (Abb. 4)
EINSATZ #1 UNIVERSAL
Behandlung von Zahnzwischenräumen.
Behandlung von Zahnhals und subgingivalen Bereichen.
EINSATZ #2 EXTRA FEIN
Interproximale Behandlung und Behandlung von
periodontalen Taschen.
EINSATZ #4 SPATEL
Behandlung von starken Ablagerungen.
EINSATZ #5 KONDENSATION
Für Amalgam-Kondensation
EINSATZ #6 KONDENSATION
Für Amalgam-Kondensation
EINSATZ #7 DE-ZEMENTIERUNG
Für Krone-DeZementierung
SCHMIERUNG
Zur Gewährleistung eines langfristig hilfreichen Arbeitsinstruments, den
nachfolgenden Vorgang wöchentlich sorgfältig wiederholen.
Das Handstück vom Versorgungsschlauch trennen und mit der vorgesehenen
Flasche (REF 120.00) gemäß den Angaben auf Abb. 5 schmieren. Das
Schmiermittel SO2000 (oder jedes andere Schmieröl für dentale
Handstücke) ist in den Eingang der Versorgungsluft einzuführen. Nur einmal
auf die Flasche drücken.
Bei Zahnsteinentfernern mit Schnellkupplung den hierzu vorgesehenen
Adapter (REF 120.02) auf das Spray setzen und gemäß Abb. 6 schmieren.
Das Handstück erneut auf den Schlauch schrauben (oder an die
Schnellkupplung anschließen) und das Instrument einige Sekunden lang
betätigen, bis es seinen charakteristischen Zischton abgibt.
STERILISATION
Der Zahnsteinentferner, der Schlüssel und die Einsätze können in einem Was-
serdampfautoklaven bei bis zu 134 °C / 2 bar sterilisiert werden.
Der Zahnsteinentferner muss immer ohne montierten Einsatz sterilisiert
werden. Vor der Sterilisation Rückstände beseitigen und das Instrument
sorgfältig reinigen.
Während des Sterilisationsvorgangs dürfen sich Metallteile unterschiedlicher
Natur nicht berühren. Zur Vermeidung dessen, die Teile in einen Sterilisations-
beutel legen.
Die Schnellkupplungen G ROFLEX®lassen sich nicht im Autoklaven
sterilisieren.
REINIGUNG UND DESINFEKTION
Einen mit Desinfektionsmittel auf der Basis folgender Inhaltsstoffe getränkten
Lappen verwenden:
- Glutaraldehyd bis zu 2 %
- O-Phenylphenol
- Äthylalkohol
Nicht empfehlenswerte Produkte: Desinfektionsmittel auf der Basis von
Benzalkoniumchlorid.
Es ist absolut verboten, das Instrument in Flüssigkeiten beliebiger Art zu
tauchen.
Die Einsätze können im Ultraschallbad oder mit keimtötenden chemischen
Substanzen gereinigt werden.
Ein mit Äthylalkohol getränktes Wattestäbchen für die Reinigung der
Gewindeaufnahme der Einsätze verwenden.
GARANTIE
Für die Vorrichtung wird für alle Herstellungsfehler für einen Zeitraum von 12
Monaten garantiert. Die Gültigkeit der Garantie unterliegt spezifischen Bedin-
gungen.
TECHNISCHER KUNDENDIENST
Bei Funktionsstörungen des Instruments sowie für jeden beliebigen Eingriff zur
Überholung oder Reparatur wenden Sie sich bitte an einen Händler Ihres
Vertrauens oder direkt an TKD.
DEUTSCH FRANÇAIS
DESCRIPTION
Détartreur pneumatique, conforme au Standard ISO 15606.
Le détartreur peut être utilisé pour interventions de détartrage en utilisant les
inserts TKD indiqués ensuite.
Poids sans insert: 64 g.
Fréquence de vibration: 6000 ÷ 6700 Hz.
Niveau sonore maximum: 73 dBA (@3,0 bar).
Ce dispositif médical est conforme aux qualités requises par les Directives
Européennes 93/42/CEE (Classe IIA) et 2007/47/CE.
CONTENU DE LA BOTE
Détartreur AIRSON®, 3 inserts, une clef pour le montage des inserts.
CONNEXION
Le détartreur AIRSON®peut être connecté sur toutes les unités à la place
d’une turbine.
Le détartreur AIRSON®avec attachement rapide (Fig.2) s’utilise avec le
raccord rapide G ROFLEX®(REF 316.30 ou REF 316.40) ou MULTIflex®,
alors que les autres versions avec attachement 3-voies ou 4-voies (Standard
ISO 9168) se vissent directement sur le tuyau d’alimentation.
PRESSION D’AIR
La pression d air conseillée est de 2,4 ÷ 3,0 bar.
La consummation d’air maximum est de 22 Nl/Min (@3,0 bar).
Vérifier la pression à l’aide d’un manomètre (REF 129.40) relié au terminal
de sortie du tuyau d’alimentation.
L’air d’alimentation doit être sec et bien filtré, à pression constante.
Des impuretés ou des résidus se trouvant dans l’air comprimé peuvent
provoquer un fonctionnement anormal du détartreur.
REFROIDISSEMENT
La pression d’eau pour le spray de refroidissement doit être de 0,5 ÷ 2,5
bar. La capacité du spray est supérieure à 50 ml/min. (@2,0 bar). L’eau doit
être bien filtrée.
MONTAGE DESINSERTS
Sélectionner l’insert selon l’opération envisagée et le visser manuellement sur
le détartreur ; terminer cette opération par la clef adéquate, en veillant à
exercer une torsion suffisante (Fig. 1).
Les inserts doivent toujours être enlevés après l’usage.
Les inserts ne doivent pas être vissés avec l’instrument activé.
REGLAGE DE LAPUISSANCE
L’augmentation ou la diminution de la puissance s’effectuent par rotation de
la bague prévue sur le détartreur à proximité de l’attachement (Fig. 3).
ENTRETIEN DES INSERTS
La forme et le poids de chaque insert sont le résultat d’une étude pour obtenir
le meilleur rendement.
Par conséquent, chaque modification, cassure pliage ou usure de l’insert pro-
voque des anomalies sur le bon fonctionnement. Dans ce cas, procéder au
changement d’insert.
UTILISATION DES INSERTS (Fig. 4)
Utiliser seulement les inserts originaux TKD décrits ci-dessous.
INSERT #1 UNIVERSEL
Traitement des interstices.
Traitement du collet et des régions sous-gingivales.
INSERT #2 EXTRA FINE
Traitement interproximale et des sacs périodontiques.
INSERT #4 SPATULE
Traitement des gros dépôts.
INSERT #5 CONDENSATION
Pour condensation d’amalgames
INSERT #6 CONDENSATION
Pour condensation d’amalgames
INSERT #7 DESSERRAGE
Pour desserrage de couronnes
LUBRIFICATION
Pour que l’instrument que vous venez d’acquérir vous rende le plus long
temps possible de bons services dans votre travail, répéter chaque semaine
avec soin l’opération décrite ci-dessous.
Retirer la pièce à main du tuyau d’alimentation et lubrifier avec le atomiseur
(REF 120.00) (voir Fig. 5).
Le lubrifiant SO2000 (ou n’importe quelle autre huile lubrificante pour pièces
à main dentaires) doit être introduit à l’intérieur de la prise d’air
d’alimentation. Appuyer une seule fois.
Dans le cas d’un instrument à attachement rapide, appliquer l’adapteur
spécifique (REF 120.02) sur le atomiseur et lubrifier (voir Fig. 6).
Revisser alors le détartreur immédiatement sur le tuyau (ou la raccorder à le
raccord rapide) et mettre l’instrument en marche pendant quelques secondes
jusqu’à ce que l’on entende le sifflement typique.
STÉRILISATION
Le détartreur , la clef et les inserts peuvent être stérilisés en l’autoclave jusqu’à
134 °C/2 bar.
Éviter de stériliser avec l’insert monté sur l’instrument.
Avant la stérilisation, enlever les résidus et nettoyer soigneusement
l’instrument.
Pendant la stérilisation, les pièces métalliques de nature différente ne doivent
pas se toucher. Afin d’éviter cette possibilité, placer les objets dans un sac sté-
rilisable.
Les raccords rapides G ROFLEX®ne peuvent pas être stérilisés en autoclave.
NETTO AGE ET DESINFECTION
Utiliser un chiffon imbibé d’un désinfectant à base de:
- Gluteraldehydes jusqu’à 2 %
- O-phényle-phénol
- Alcool éthylique
L’utilisation de désinfectants à base de benzalconium chlorure est à
déconseiller. Il est strictement défendu de tremper l’instrument dans un liquide
quelconque.
Les inserts peuvent être nettoyés dans un bac à ultrasons ou avec composants
chimiques germicides.
Employer un coton tige imbibé d’alcool pour nettoyer le siège fileté pour les
inserts.
GARANTIE
Le dispositif est garanti pour tout défaut de fabrication pour une période de
12 mois. La validité de la garantie est sujette à des prescriptions particulières.
ASSISTANCE TECHNIQUE
En cas de mauvais fonctionnement et pour toutes révisions et réparations,
s’adresser à votre fournisseur habituel ou directement à TKD.
AIRSON/TKD232.X /Rev.11.2015
This manual suits for next models
2
Other TKD Dental Equipment manuals


