TMG TMG-GSW40 User manual

Rotary Surface Cleaner Washer
MODEL: TMG-GSW40
PRODUCT MANUAL
4000PSI, 21” Surface Cleaner,16” Water Broom
Please read the product manual completely before assembly
Check against the parts list to make sure all parts are received
Wear proper safety goggles or other protective gears while in assembly
Missing parts or questions on assembly?
Please call: 1-877-761-2819 or email: cs@tmgindustrial.com
Do not return the product to dealer, they are not equipped to handle your requests
WWW. TMGINDUSTRI AL.COM Toll Free:1- 877-7 61- 2819

Contents
1. Introduction....................................................................................................................................................................................02
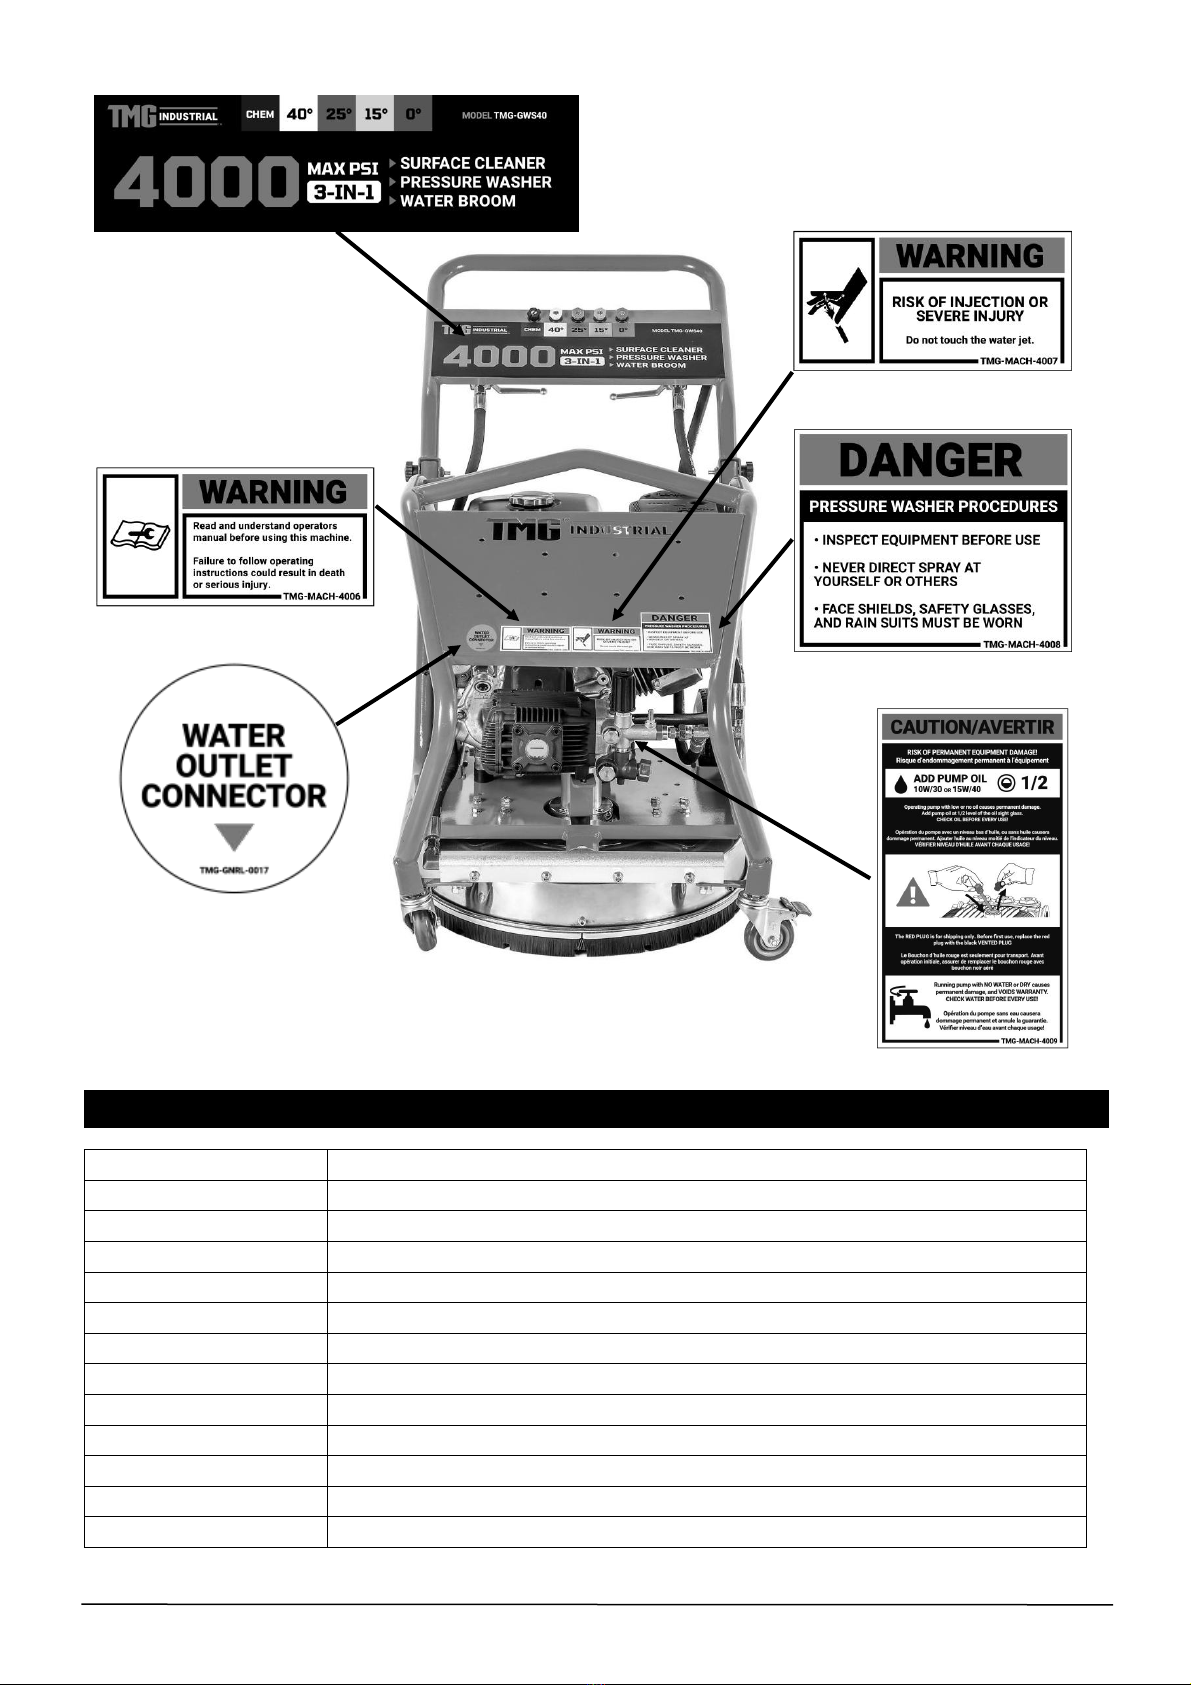
2. Products Identification...................................................................................................................................................................03
3. Safety Guidelines...........................................................................................................................................................................03
4. Products Specifications.................................................................................................................................................................07
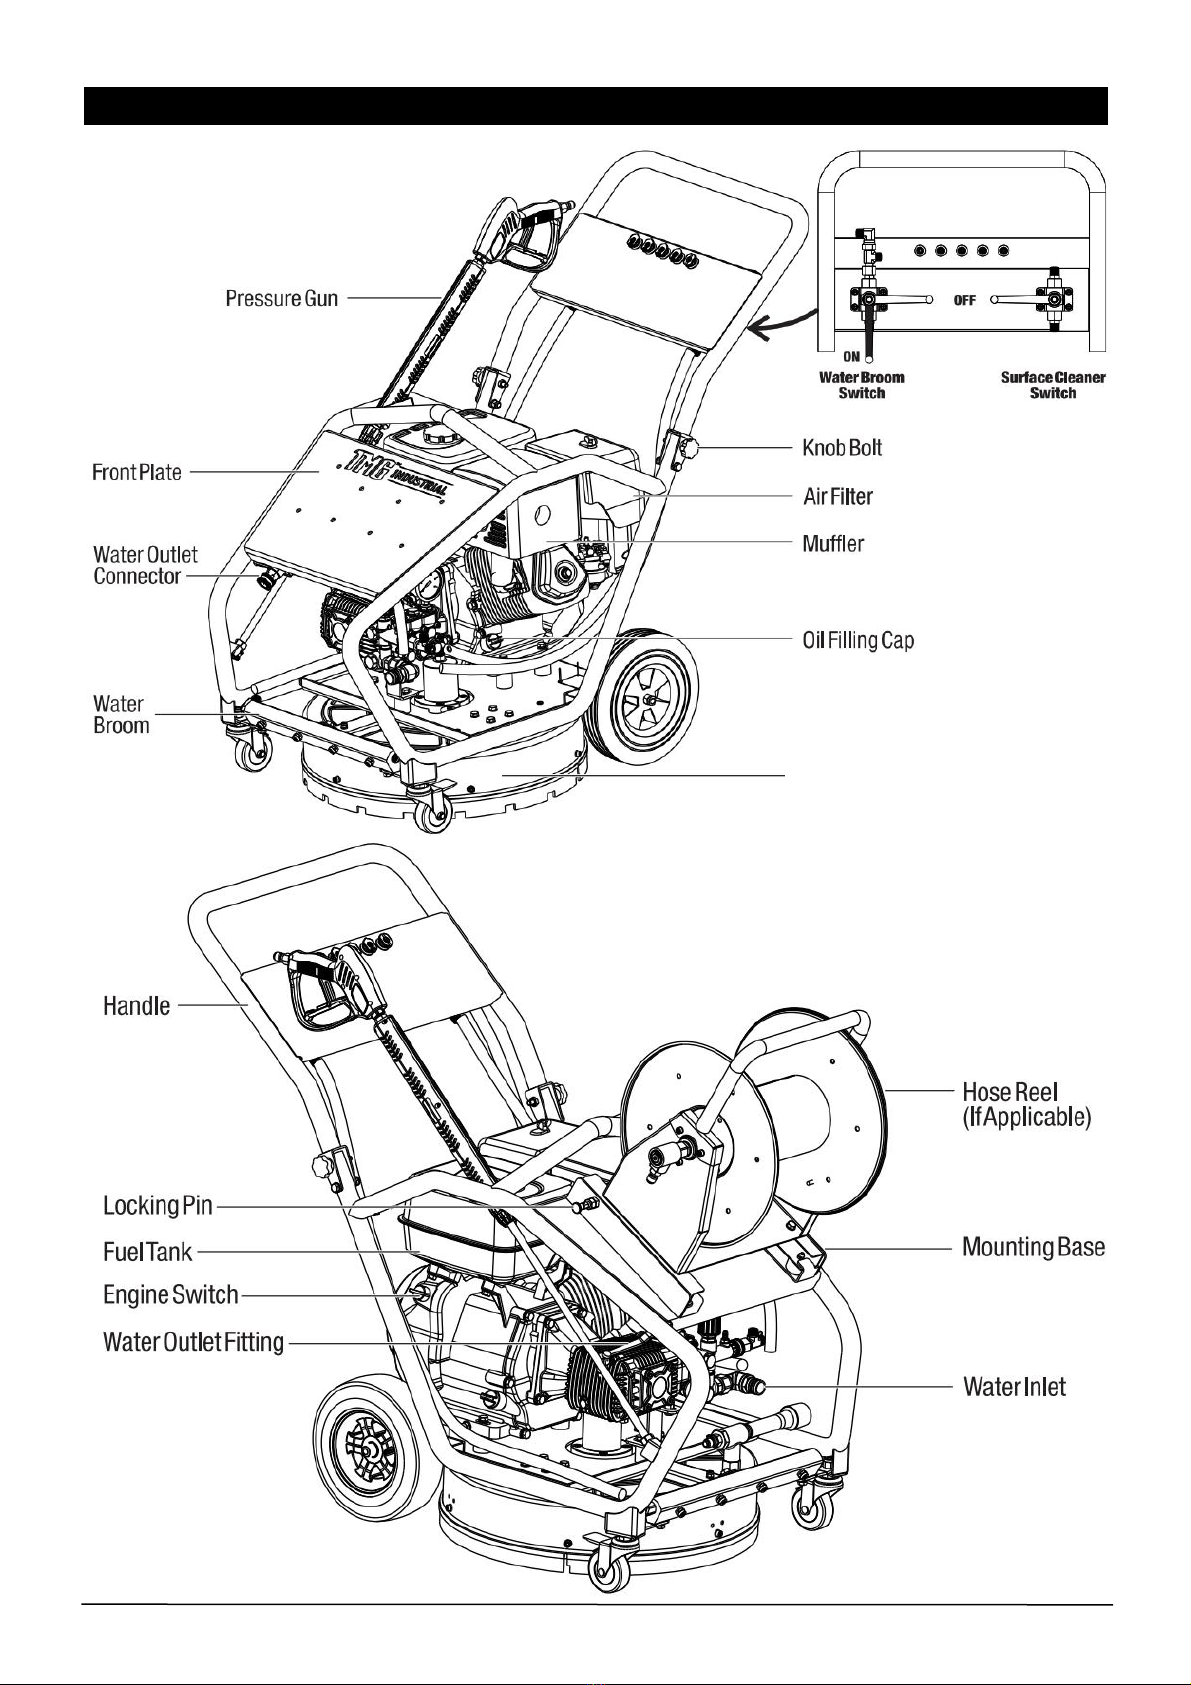
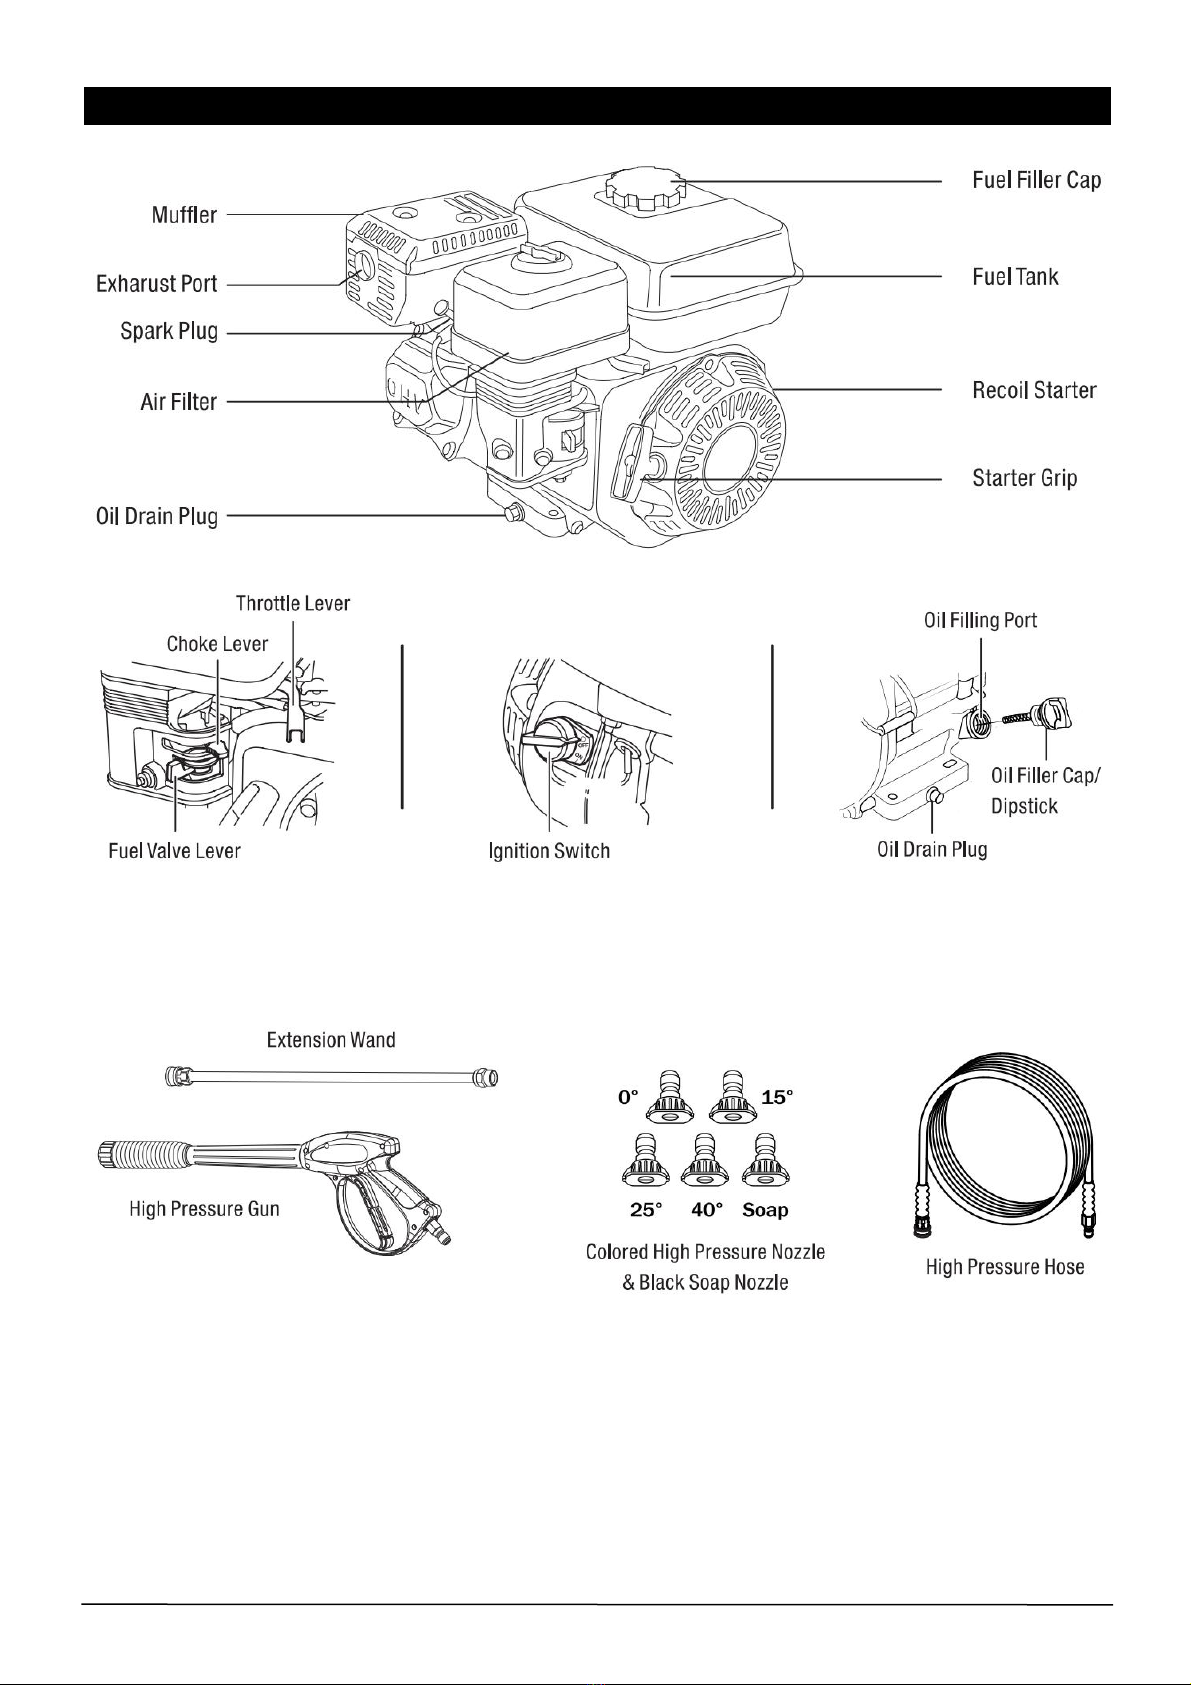
5. Parts Identification and Features...................................................................................................................................................08
6. Unpacking &Assembly...................................................................................................................................................................12
7. Setting Up the Before Use.............................................................................................................................................................12
8. Safe Working Environment............................................................................................................................................................15
9. Start up and Stopping Procedure..................................................................................................................................................16
10. Operation.......................................................................................................................................................................................17
11. Stopping the Pressure Washer......................................................................................................................................................18
12. Using Nozzles................................................................................................................................................................................18
13. Adjusting Spray Pressure..............................................................................................................................................................19
14. Using Chemicals & Detergents......................................................................................................................................................19
15. Maintenance..................................................................................................................................................................................20
16. Storage.......................................................................................................................................................................................... 22
17. Troubleshooting.............................................................................................................................................................................23
18. Pressure Washer Exploded View & Parts List................................................................................................................................26
Disclaimer:
The information in this document is to the best of our knowledge true and accurate, but all
recommendations or suggestions are made without guarantee. Since the conditions of use are beyond
their control, the factory disclaim any liability for loss or damage suffered from the use of this data or
suggestions. Furthermore, no liability is accepted if use of any product in accordance with this data or
suggestions infringes any patent. The factory reserve the right to change product specifications and
warranty statements without further notification. All images are for illustration purposes only.
1. Introduction
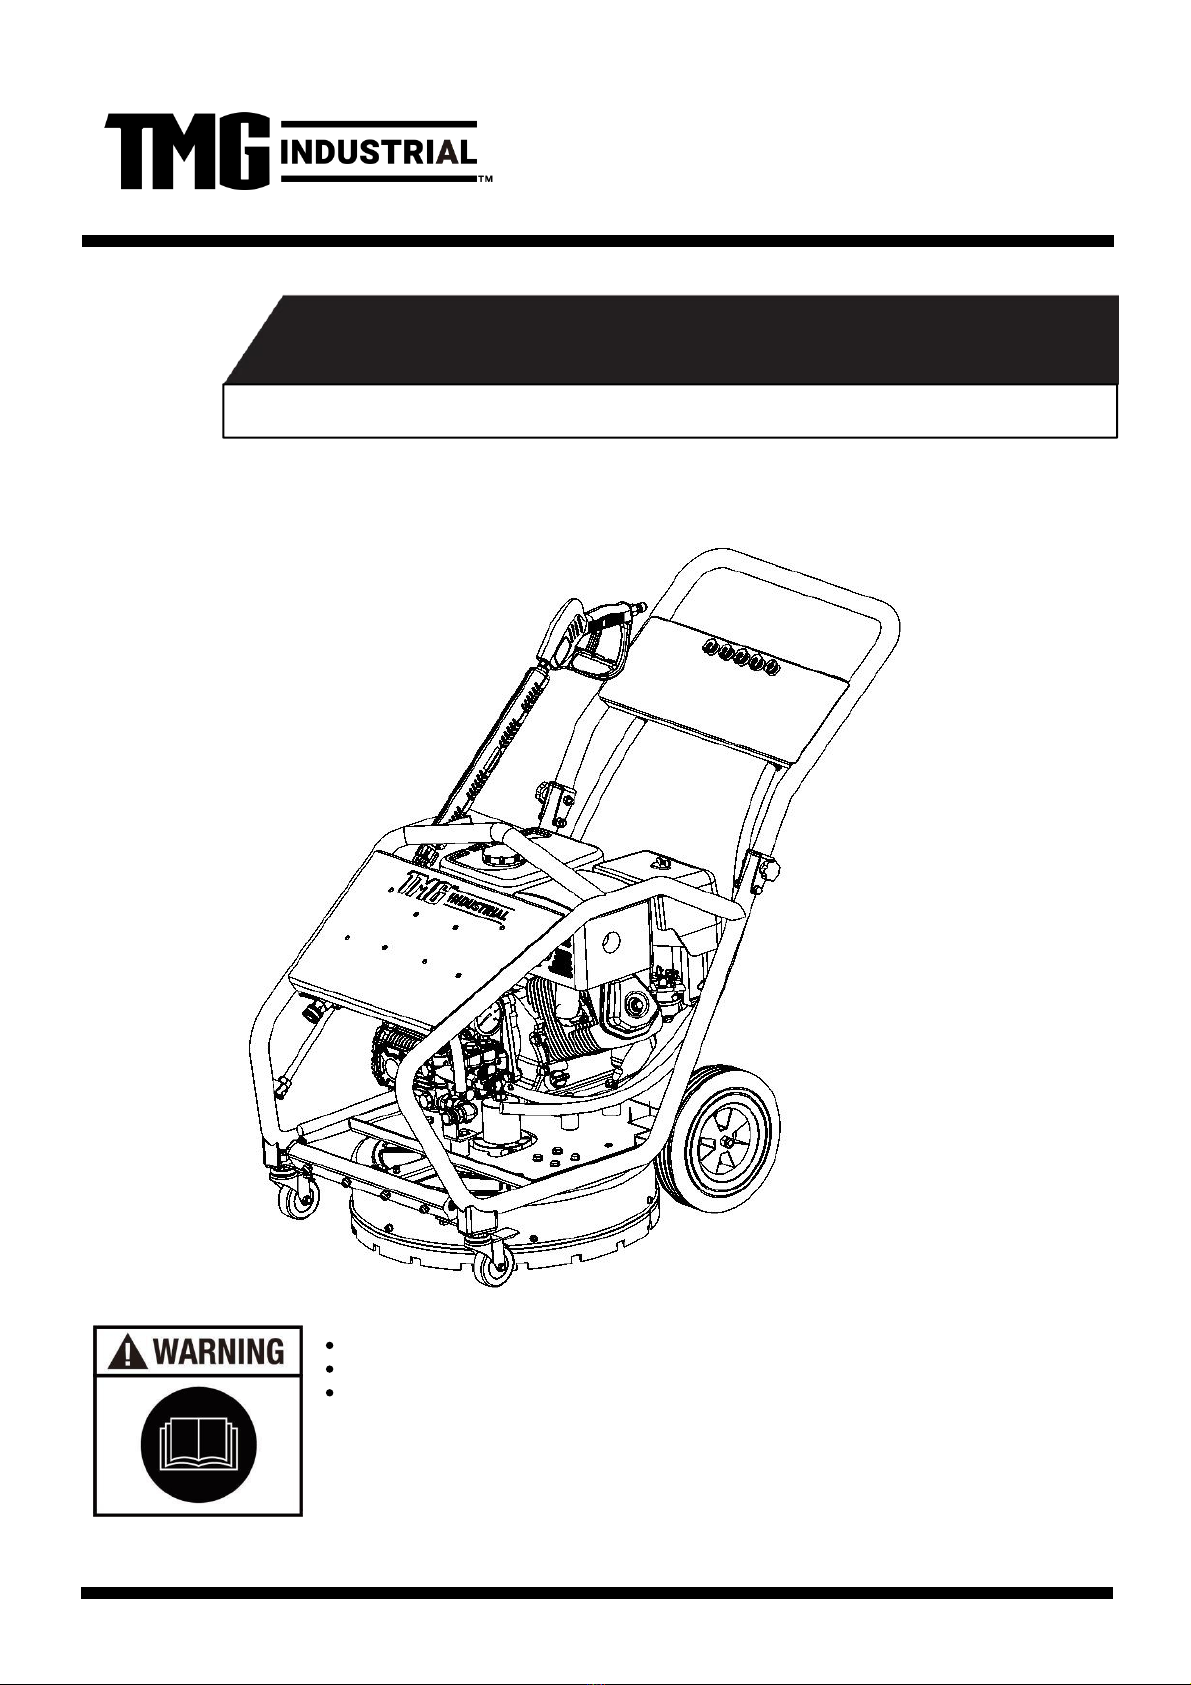
Thank you for purchasing this Professional Power Equipment Product.
Please read the following instructions carefully to help to ensure your personal safety and the correct assembly, use and
maintenance of this equipment. Please ensure that you have read and understand the information contained in the manual before
attempting to use the equipment. This equipment should only be used by trained and fully competent individuals, in a safe working
environment. Please ensure that the appropriate safety equipment is worn at all times and that the product is not adapted or
modified in anyway.
Please note that the contents of this instruction manual are based on the latest product information available at the time of
publication and that the manufacturer reserves the right to make changes at any time without notice.
W W W . T M G I N D U S T R I A L . C O M P 0 2 / 3 1 T o l l F r e e : 1 - 8 7 7 - 7 6 1 - 2 8 1 9

2. Products Identification
RECORD IDENTIFICATION NUMBERS
If you need to contact an Authorized Dealer for information on servicing, always provide the product model and identification
numbers. You will need to locate the model, revision and serial number for the machine and record the information in the places
provided below. You will also need the model and serial number for the engine on your machine.
1. Date of Purchase:
2. Dealer Name:
3. Dealer Phone:
4. Unit Model Name:
5. Pump Model & Serial Number:
6. Engine Model & Serial Number:
NOTE: Check the article 5.1 (page 7) for the location of the pump model & serial no. on the pump. Check the engine operators
manual for the location of these numbers.
3. Safety Guidelines
This manual contains information that is important for you to know and understand. This information relates to protecting YOUR
SAFETY and PREVENTING EQUIPMENT PROBLEMS. To help you recognize this information, we use the symbols below. Please
read the manual and pay attention to these sections.
Improper maintenance and operation are responsible for the majority of accidents involving gas pressure washers. The largest
portion of these could be prevented by recognizing the basic safety rules and precautions. Most accidents can be avoided if the
operator recognizes a potentially hazardous situation before it happens and by observing appropriate safety rules and procedures
as outlined in this manual. Basic safety precautions are outlined in the SAFETY portion of this manual and throughout the text in
this manual where a potential hazard might occur. Hazards that MUST be avoided to prevent serious injury follow headers marked
DANGER or WARNING. These same precautions are placed as labels on the tool itself. NEVER use this pressure washer for
applications that are NOT specified in this manual.
CAUTION indicates a potentially hazardous situation
which, if not avoided, may result in minor or moderate
DANGER indicates an imminently hazardous situation
which, if not avoided, will result in death or serious
WARNING- READ AND FOLLOW ALL INSTRUCTIONS
• Failure to follow all instructions in this manual may result in severe
personal injury or death. Keep this manual and refer to it for Safety
Instructions, Operating Procedures, and Warranty.
WARNING indicates a potentially hazardous
situation which, if not avoided, could result in death
or serious injury.
CAUTION used without the safety alert symbol indicates
a potentially hazardous situation which, if not avoided,
may result in property damage.
W W W . T M G I N D U S T R I A L . C O M P 0 3 / 3 1 T o l l F r e e : 1 - 8 7 7 - 7 6 1 - 2 8 1 9

3. Safety Guidelines (continued)
ALWAYS Operate pressure washer in a well ventilated area. Avoid enclosed areas such as garages, basements ,etc.
ALWAYS Keep exhaust gas from entering a confined area through windows, doors, ventilation intakes, or other openings.
ALWAYS follow manufacturers recommendations, use a respirator or mask whenever there is a chance that vapors may
be inhaled.
ALWAYS use the only fluids specifically recommended for high pressure washers.
NEVER operate unit in a location occupied by humans or animals.
NEVER use chlorine bleach or any other corrosive compound.
ALWAYS shut off engine and allow it to cool a least 2minutes before adding fuel to the tank.
ALWAYS use care in filling tank to avoid spilling fuel. Move pressure washer away from fueling area before starting engine.
ALWAYS Keep maximum fuel level below top of tank to allow for expansion.
ALWAYS operate and fuel equipment in well ventilated areas free from obstructions. Equip areas with fire extinguishers suitable
for gasoline fires.
ALWAYS keep pressure washer a minimum of four feet away from surfaces (such as houses, automobiles, or live plants) that
could b e damaged from muffler exhaust heat.
ALWAYS store fuel in an OSHA approved container, in a secure location away from work area.
NEVER spray flammable liquids
NEVER operate pressure washer in an area containing dry brush or weeds.
•Keep the area of operation clear of all persons, particularly small children, pets and obstacles.
•Do not operate the product when fatigued or under the influence of alcohol or drugs. Stay alert at all times.
•If engine does not start after two pulls, squeeze trigger of gun to relieve pump pressure. Pull starter cord slowly until resistance
is felt Then pull cord rapidly to avoid kickback and prevent hand or arm injury.
•Do not overreach or stand on an unstable support.
•The cleaning area should have adequate slopes and drainage to reduce the possibility of a fall due to slippery surfaces.
•Be extremely careful if you must use the pressure washer from a ladder, scaffolding, or any other similar location.
•Beware of kick-back force and the sudden torque on the spray gun assembly when operating the trigger. Firmly grasp spray
gun with both hands to avoid injury when spray gun kicks back.
DANGER- RISK TO BREATHING
• Running engine gives off carbon monoxide, an odorless, colorless, poison gas.
• Breathing carbon monoxide can cause nausea, fainting or death.
• Some chemicals or detergents may be harmful if inhaled or ingested, causing
severe nausea, fainting or poisoning.
DANGER-RISK OF EXPLOSION OR FIRE
• Fuel and its vapors are extremely flammable and explosive.
• Fire or explosion can cause severe burns or death.
WARNING-RISK OF FALL HAZARD
• Use of pressure washer can create puddles and slippery
surfaces.
• Kickback from spray gun can cause you to fall.
W W W . T M G I N D U S T R I A L . C O M P 0 4 / 3 1 T o l l F r e e : 1 - 8 7 7 - 7 6 1 - 2 8 1 9

3. Safety Guidelines (continued)
ALWAYS point spray gun in safe direction and squeeze trigger, to release high pressure, every time you stop engine.
NEVER place hands in front of nozzle.
MAKE SURE hose and fittings are tightened and in good condition. Never hold onto the hose or fittings during operation.
DO NOT allow hose to contact muffler.
NEVER attach or remove wand or hose fittings while system is pressurized.
NEVER use a spray gun which does not have a trigger lock or trigger guard in place and in working order.
ONLY USE hose and high pressure accessories rated for pressure higher than your pressure washer's p.s.i.
To relieve system pressure, shut off engine, turn off water simply, and pull gun trigger until water stops flowing.
DO NOT allow CHILDREN to operate pressure washer.
NEVER repair leaking connections with sealant of any kind. Replace o-ring or seal.
NEVER connect high pressure hose to nozzle extension.
DO NOT secure spray gun in open position.
DO NOT leave spray gun unattended while machine is running.
ALWAYS be certain spray gun, nozzles and accessories are correctly attached.
NEVER aim spray gun at people, animals, or any electrical device and the machine itself.
DO NOT use acids, gasoline, kerosene, or any other flammable materials in this product. Use only household detergents,
cleaners and detergents recommended for use in pressure washers.
Wear protective clothing to protect eyes and skin from contact with sprayed materials.
DO NOT use chlorine bleach or any other corrosive compound.
Unplug any electrically operated product before attempting to clean it.
Direct spray away from electric outlets and switches.
NEVER spray near power source.
DO NOT touch the plug with wet hands.
WHEN SERVICING THE PRESSURE WASHER: Disconnect the spark plug wire and place it where it cannot contact the plug.
DO NOT check for spark with the plug removed. Use only approved spark plug testers.
WARNING-RISK TO FLUID INJECTION
• The high pressure stream of water that this equipment produces
can cut through skin and its underlying tissues, leading to serious
injury and possible amputation. Spray gun traps high water
pressure, even when engine is stopped and water is disconnected,
which can cause injury.
WARNING-RISK OF ELECTRICAL SHOCK
• Risk of electrocution.
• Contact with power source can cause electric shock or bum.
DANGER- RISK OF CHEMICAL BURN
• Use of acids, toxic or corrosive chemicals, poisons, insecticides, or any
kind of flammable solvent with this product could result in serious injury
or death.
W W W . T M G I N D U S T R I A L . C O M P 0 5 / 3 1 T o l l F r e e : 1 - 8 7 7 - 7 6 1 - 2 8 1 9

3. Safety Guidelines (continued)
During operation, touch only the control surfaces of the pressure washer.
Keep children away from the pressure washer at all times. They may not be able to recognize the hazards of this product.
DO NOT let hoses come in contact with very hot engine muffler during or immediately after use of your pressure washer.
AVOID hot exhaust gases.
NEVER operate pressure washer without protective housing or covers.
DO NOT wear loose clothing jewelry or anything that may be caught in the starter or other rotating parts.
Tie up long hair and remove jewelry.
ALWAYS wear safety goggles when using this equipment or in vicinity of where equipment is in use.
Before starting the pressure washer, be sure you are wearing adequate safety goggles.
NEVER substitute safety glasses for safety goggles.
NEVER pull water supply hose to move pressure washer. This could damage hose and/or pump inlet.
DO NOT use hot water, use cold water only.
NEVER turn water supply off while pressure washer engine is running or damage to pump will result.
DO NOT stop spraying water for more than two minutes at a time. Pump operates in bypass mode when spray gun trigger is
not pressed. If pump is left in bypass mode for more than two minutes internal components of the pump can be damaged.
Before starting pressure washer in cold weather, check all parts of the equipment to be sure ice has not formed there.
DO NOT use the pressure washer if excessive noise or vibration is present. Have it repaired immediately.
DANGER-- RISK OF HOT SURFACES
• Contact with hot surfaces, such as engines exhaust components,
could result in serious bum.
DANGER- RISK OF MOVING PARTS
• Starter and other rotating parts can entangle hands, hair, clothing,
or accessories.
DANGER- RISK OF EYE INJURY
• Spray can splash back or propel objects.
PLEASE WEAR PROPER APPAREL AND PROTECTORS
Proper Apparel
Electrically
Non-conductive Gloves
Ear Protection
Nonskid Footwear
CAUTION-IMPROPER TREATMENT OF PRESSURE WASHER CAN DAMAGE IT
AND SHORTEN ITS LIFE AND VOID YOUR WARRANTY
W W W . T M G I N D U S T R I A L . C O M P 0 6 / 3 1 T o l l F r e e : 1 - 8 7 7 - 7 6 1 - 2 8 1 9

4. Products Specifications
Model No.
TMG-SCW40
Max Pressure
4000PSI
Max Flow
4.5GPM
Pump Model
TMG-PMP48,Triplex, Engine Direct Drive
Power and Type
KOHLER CH440, Manual Start
High Pressure Hose
ID5/16" x 30FT
Nozzle
0°、15°、25°、40°and Soap
Surface Cleaner
21”
Water Broom
16”
Spray Gun
36”
Wheel
2PCS X 3”, 2PCS X 10”
Shipping Weight
195 lb
Shipping Size
35”x23.5”x33”
W W W . T M G I N D U S T R I A L . C O M P 0 7 / 3 1 T o l l F r e e : 1 - 8 7 7 - 7 6 1 - 2 8 1 9

5. Parts Identification and Features
W W W . T M G I N D U S T R I A L . C O M P 0 8 / 3 1 T o l l F r e e : 1 - 8 7 7 - 7 6 1 - 2 8 1 9
Surface Cleaner

5. Parts Identification and Features (Continued)
5.1 Triplex Pump
5.2 Surface Cleaner
W W W . T M G I N D U S T R I A L . C O M P 0 9 / 3 1 T o l l F r e e : 1 - 8 7 7 - 7 6 1 - 2 8 1 9

5. Parts Identification and Features (Continued)
5.3 Engine
5.4 Standard Accessories
W W W . T M G I N D U S T R I A L . C O M P 1 0 / 3 1 T o l l F r e e : 1 - 8 7 7 - 7 6 1 - 2 8 1 9

5. Parts Identification and Features (Continued)
5.1 General Technology
PSI: Pounds per square inch -common unit measure used for water pressure, air pressure, hydraulic pressure and pounds of
force.
GPM: Gallons per minute (liters per minute [metric]) -common unit measure used for flow rate of water.
Bypass Mode:In bypass mode, high pressure pump recirculates water because spray gun trigger is not pulled.
5.2 High Pressure Washer Pump
1. Pump Model & Serial Number: It contains the year, month and day of production, and can track the batch of materials
assembler and tester. Please provide the serial no. along with the pump model and version when ordering spare parts and
reporting any issues of concern.
2. Pressure Adjusting Knob: To raising or reduce the pressure by turn the knob.
3. Detergent Injector: Use to siphon detergent or other pressure washer chemicals into the low pressure stream.
4. Water Outlet Connector: To connect high pressure hose.
5. Water Inlet With Filter Screen: Connect garden hose here, and always have the filter screen present in it.
6. Red Shipping Plug Attached With Vent Plug: the pump is ship with red shipping plug to prevent oil leaking during transportation.
Replace with the attached vent plug before using.
7. Thermal Relief Valve: Cycles water through pump when water reaches 125-155 °F (50-68 °C). Warm water will discharge from
pump onto ground. This valve can prevent internal pump damage.
8. High Pressure Turning Valve: This is a valve can discharges the air in the pump and water in-taking pipe line, enhance pump
sucking ability, and allow to suck from the barrel and 1M deep.
5.3 Engine
1. Air Cleaner/Filter: Protects engine by filtering dust and debris out of intake air.
2. Fuel Tank: Fill tank with regular unleaded fuel. Always leave room for fuel expansion.
3. Throttle Lever: Sets engine in starting mode for recoil starter.
4. Choke Lever: Prepares a cold engine for starting.
5. Fuel Valve Lever: Used to turn fuel on and off to engine.
6. Recoil Starter: Use for starting the engine manually.
7. Ignition Switch: Set this switch to "On" before using recoil starter. Set switch to "Off" to switch off engine.
8. Oil Fill Cap: Fill engine with oil here.
5.4 Accessories
1. Extension wand: To attach the spray tips on it.
2. High Pressure Hose: Connect one end to the water pump and the other end to the spray gun.
3. Spray Gun: Controls the application of water onto cleaning surface with trigger device. Includes safety latch.
4. Spray Tips: 0/15/25/40 degree and soap nozzle for various high pressure cleaning applications.
W W W . T M G I N D U S T R I A L . C O M P 1 1 / 3 1 T o l l F r e e : 1 - 8 7 7 - 7 6 1 - 2 8 1 9

6. Unpacking & Assembly
6.1 Unpacking
1.Carefully cut the box down the sides then remove the tool and any accessories from the box. Make sure than all items are
included
2. Remove and discard the clear cap securing the operator's manual
bag to the pump breather tube.
3. Inspect the tool carefully to make sure no breakage or damage
occurred during shipping.
4. Do not discard the packing material unit you have carefully
inspected satisfactorily operated the tool.
5. If any parts are damaged or missing, please contact with the
dealer.
6.2 Assembly the Handle
1. Unscrew the Knob Bolt and Lift the handle up, alignment the
hole, put through the Knob Bolt and fix with the nut.
2. Put the Hose Reel Onto the Frame (If Applicable)
Pull the Locking Pin out, put the hose reel inside the base
and place under the hooker, alignment the locking hole and
put back the locking pin to lock the hose reel in place.
7. Setting Up Before Use
7.1 Adding Oil to Triplex Pump
1. Using an 17mm open-end wrench or socket wrench, remove shipping plug from pressure pump. Discard shipping plug.
2. Remove pump breather plug from parts bag and insert it into pressure pump.
3. Tighten pump breather plug securely by hand. Do not use open-end wrench
or socket wrench to tighten.
4. Check the sight glass to ensure pump oil is at 1/2 of the sight glass level.
5. Add oil to pressure pump if level is below indicator on oil gauge.
6. Oil type API SFSAE10W-30 or 15W/40.
7. Change after the first 30 hours, then subsequently 100 hours.
8. We recommend the use high-quality NON-DETERGENT oils, if classified
for service SF, SG, SH, SJ or higher. DO NOT use special additives.
Outdoor temperatures determine the proper oil viscosity.
** Below 40°F (4°C) the use of SAE 30 will result in hard starting.
** Above 80°F (27°C) the use of 10W30 may cause increased oil
consumption. Check oil level more frequently.
Unit is heavy. Do not attempt to lift and remove the pressure
washer unit from the carton.
Operating the pump with low oil or no oil can cause permanent damage
and VOIDS THE WARRANTY. Check the pump oil level to make sure it is
correct.
W W W . T M G I N D U S T R I A L . C O M P 1 2 / 3 1 T o l l F r e e : 1 - 8 7 7 - 7 6 1 - 2 8 1 9

7. Setting Up Before Use (Continued)
7.2 Add Oil To The Engine
1. Place pressure washer on a flat, level surface.
2. Clean area around oil fill and remove yellow oil fill cap.
3. Using oil funnel (optional), slowly pour contents of provided oil bottle into
oil fill opening.
3. Replace oil fill cap and fully tighten.
7.3 Add Fuel To the Engine
DO NOT use unapproved gasoline such as E85 (85% ethanol/15% gasoline).
DO NOT mix oil with gasoline.
DO NOT modify engine to run on alternate fuels.
Mix in a fuel stabilizer when adding fuel to pressure washer to protect fuel
system from forming gum deposits. If engine doesn’t run properly after fueling,
switch fuel brands. The engine is certified to run on gasoline. The emission
control system for this engine is EM (Engine Modifications).
WHEN ADDING FUEL TO PRESSURE WASHER, OBSERVE THE
FOLLOWING STEPS:
1. Turn pressure washer OFF and let it cool for at least two minutes before
removing fuel cap. Loosen fuel cap slowly to release pressure.
2. Fill fuel tank outdoors.
3. DO NOT overfill fuel tank. Leave room for fuel to expand.
4. Wait for spilled fuel to evaporate before cranking engine.
5. Keep fuel away from sparks, open flames, pilot lights, heat and other ignition
sources.
6. DO NOT light a cigarette or smoke near open fuel tank or container.
7. Clean area around fuel fill cap and slowly remove cap to allow any pressure
to escape.
8. Slowly add unleaded gasoline (A) to fuel tank (B). Use extreme caution not
to fill fuel above baffle (C).This allow appropriate space for fuel expansion.
9. Install fuel cap and allow any spilled fuel to evaporate before starting engine.
Failure to use fuel as recommended in
this manual will void the warranty.
Improper treatment of pressure washer
can damage it and shorten its life.
DO NOT attempt to crank or start the engine before it has been
properly serviced with the recommended oil. This may result in an
engine failure.
Fuel and fuel vapor are extremely
flammable and explosive. Fire or
explosion from misuse of fuel can
cause severe burns and even
death.
W W W . T M G I N D U S T R I A L . C O M P 1 3 / 3 1 T o l l F r e e : 1 - 8 7 7 - 7 6 1 - 2 8 1 9

7. Setting Up Before Use (Continued)
7.4 Attaching High Pressure Hose to Spray Gun
1. Pull back the slip ring on quick-disconnect fitting of high pressure hose.
2. Insert quick-disconnect plug on spray gun into female quick-disconnect
on high pressure hose
3. Release slip ring on female quick-disconnect and twist. Listen for CLICK to
ensure both quick-disconnects are coupled.
4. Pull the hose and gun in opposite direction to ensure they do not separate.
7.5 Connecting Spray Wand to Spray Gun
1. Thread spray wand onto spray gun.
7.6 Attaching High Pressure Hose to Water Outlet Connector
1. Similarly, attach other end of high pressure hose to high pressure outlet on
pump. Pull down on collar of quick connect, slide onto pump and let go of
collar. Pull on hose to be sure of tight connection.
7.7 Turn On The Water Outlet Ball Valve
1. Hold the knob and turn 90 degree that alignment with outlet fitting.
7.8 Connect Hose and Water Supply to Pump
1. Similarly, attach other end of high pressure hose to high pressure outlet on
pump. Pull down on collar of quick connect, slide onto pump and let go of
collar. Pull on hose to be sure of tight connection.
2. Before connecting garden hose to water inlet, inspect inlet screen.
Clean screen if it contains debris or have it replaced if damaged.
DO NOT run pressure washer if inlet screen is damaged.
3. Run water through your garden hose for 30 seconds to clean out any debris.
IMPORTANT: DO NOT siphon standing water for the water simply.
Use ONLY cold water (less than 104°F/40°C).
4. Connect the garden hose (not to exceed 50 feet in length and with
the ID no less than 1/2") to the water inlet.Tighten by hand.
5. Turn ON the water, squeeze the trigger to purge the pump system
of air and impurities.
•DO NOT attempt to crank or start the engine before it
has been properly serviced with the recommended oil.
This may result in an engine failure.
•There MUST be at least ten feet (3 M) of unrestricted
Garden hose between the pressure washer inlet and
any device, such as a vacuum breaker or check valve.
•Damage to equipment resulting from failure to follow
this instruction will VOID WARRANTY.
W W W . T M G I N D U S T R I A L . C O M P 1 4 / 3 1 T o l l F r e e : 1 - 8 7 7 - 7 6 1 - 2 8 1 9

8. Safe Working Environment
Pressure Washer Location
Clearances and Air Movement
Place pressure washer in a well ventilated area, which will allow for removal of deadly exhaust gas. Do not place pressure washer
where exhaust gas could accumulate and enter inside or be drawn into a potentially occupied building. Ensure exhaust gas (A) is
kept away from any windows, doors, ventilation intakes, or other openings that can allow exhaust gas to collect in a confined area.
Prevailing winds and air currents should be taken in
.
•Exhaust heat/gases can ignite combustibles, structures or
damage fuel tank causing a fire.
Keep at least 5 ft. (1.5 m) clearance on all sides of pressure
washer including overhead.
W W W . T M G I N D U S T R I A L . C O M P 1 5 / 3 1 T o l l F r e e : 1 - 8 7 7 - 7 6 1 - 2 8 1 9
•Running engine gives off carbon monoxide, an odorless, colorless, poison gas.
•Breathing carbon monoxide can cause headache, fatigue, dizziness, vomiting,
confusion, seizures, nausea, fainting or death.
Operate pressure washer ONLY outdoors.
Keep exhaust gas from entering a confined area through windows, doors,
ventilation intakes, or other openings.
DO NOT start or run engine indoors or in an enclosed area, even if windows and
doors are open

9. Startup Procedure
9.1 How to Start Your Pressure Washer
To start your pressure washer for the first time, follow these instructions
step-by-step. This starting information also applies if you have let the pressure
washer sit idle for at least a day.
1. Place pressure washer near an outside water source capable of supplying
water at a flow rate at least 5GPM/19LPM and no less than 20PSI/1.3BAR at
pressure washer end of garden hose.
2. Check that high pressure hose is tightly connected to spray gun and pump.
3. Make sure unit is in a level position.
4. Uncoil high pressure hose completely before using pressure washer.
5. Connect garden hose to water inlet on pressure washer pump.
6. Turn ON water, point gun in a safe direction and squeeze trigger to purge
pump system of air and impurities.
7. Attach wand to spray gun. Tighten by hand.
8. Choose the nozzle you want to use, pull back on collar of quick connector,
insert nozzle and release collar. Tug on nozzle to make sure it is securely in
place.
9. Rotate fuel shut-off valve to " OPEN ” position.
10. Move throttle control lever 1/3 toward “ FAST ” Position.
11. Move choke lever to “ CHOKE ” position.
NOTE: For a warm engine, be sure the choke lever is in the " RUN ” position.
IMPORTANT: Before starting the pressure washer, be sure you are wearing
adequate safety goggles.
12. When starting engine, position yourself as recommended below and
grasp starter grip handle and pull slowly until you feel some resistance.
Then pull rapidly to start engine.
13. Return starter grip handle slowly. DO NOT let rope
“snap back" against starter.
14. When engine starts, slowly move choke lever to " RUN ” position,
as engine warms. If engine falters, move choke lever to “ CHOKE "
position, then to " RUN ” position.
15. After each starting attempt, where engine fails to run, always point gun
in safe direction and squeeze spray gun trigger to release high pressure.
16. If engine fails to start after six pulls, move choke lever to “ RUN “ position,
and repeat steps 13 through 15.
IMPORTANT: Allow the Engine to run at no load, low pressure for five minutes
after each start-up so Engine can stabilize.
• RISK OF EYE INJURY.
Spray can splash back or propel objects.
• Always wear safety goggles when using this equipment or in vicinity of where
equipment is in use.
• Before starting the pressure washer, be sure you are wearing adequate safety
goggles.
• NEVER substitute safety glasses for safety goggles
W W W . T M G I N D U S T R I A L . C O M P 1 6 / 3 1 T o l l F r e e : 1 - 8 7 7 - 7 6 1 - 2 8 1 9

10. Operation
1. Washing With Water Broom
1. Ensure all connections are secure. Turn the water supply completely "ON".
(DO NOT START PRES-SURE WASHER!)
2. Turn the Water Broom Switch ON, water will begin flowing from the nozzles
of the Surface Cleaner. Ensure nozzles are not clogged and spray pattern is
not erratic. Change nozzles before proceeding if problems exist.
3. Turn the other Water Outlet and Surface Cleaner Switch OFF..
4. Start the pressure washer follow the starting procedure.
5. Walk slowly behind the pressure washer, cleaning as you go.
2. Washing With Surface Cleaner
1. Clear any loose debris from the area to be cleaned.
2. Ensure all connections are secure.Turn the water supply completely "ON".
(DO NOT START PRES-SURE WASHER!)
3. Turn the Surface Cleaner Switch ON, water will begin flowing from the nozzles
of the Surface Cleaner. Ensure nozzles are not clogged and spray pattern is
not erratic. Change nozzles before proceeding if problems exist.
4. Turn the other Water Outlet and Water Broom Switch OFF..
5. Start the pressure washer follow the starting procedure.
6. Walk slowly behind the pressure washer, cleaning as you go.
1. Spray Gun Operation 2. Water Broom or Rotating Washing Operation
Never attempt to clean surface with objects that protrude from
the surface being cleaned. Striking any raised obstacle during
operation will damage machine. If contact does occur and
results in vibration when operating machine, STOP and
replace spray bar.
W W W . T M G I N D U S T R I A L . C O M P 1 7 / 3 1 T o l l F r e e : 1 - 8 7 7 - 7 6 1 - 2 8 1 9

11. Stopping the Pressure Washer
How to Stop Your Pressure Washer
1. To stop the engine using the ON/OFF switch: Turn the Ignition switch to OFF, close the fuel valve.
2. To stop the engine using the Fuel Valve: Close the Fuel Valve and wait for the engine to stop.
NOTE: Avoid letting fuel remain in the carburetor for lone periods as this can clog carburetor passages with impurities resulting in
malfunctions.
3. ALWAYS point spray gun in a safe direction, press red button and squeeze trigger to release retained high water pressure.
IMPORTANT: Spray gun traps high water pressure, even when engine is stopped and water is disconnected.
12. Using Nozzles
12.1 Attaching Pressure Nozzles to Spray Wand
1. Engage trigger lock on spray gun.
2. Pull slip ring on female quick-disconnect fitting of spray wand back.
3. Insert nozzle into female quick-disconnect socket on spray wand.
4. Release slip ring on female quick-disconnect and twist. Listen for “lick” to
ensure both quick-disconnects are coupled.
4. Pull high pressure nozzle and spray wand in opposite direction to ensure they
do not separate.
12.2 Nozzle Size Guide
The pressure washer comes with five spray nozzles. Each nozzle is color coded and delivers a specific spray pattern and pressure
for a particular cleaning job. The size of the nozzle determines the size of the fan spray and the pressure out of the nozzle.
The are stored in receptacles on a panel mounted to the handle of the washer. Colors on the panel identify nozzle location and
spray panel.
0°Nozzle - Red: This nozzle delivers a pinpoint stream of pressurized water and is
extremely powerful. It covers only a small area of cleaning. This nozzle should only
be directed at surfaces that can withstand high pressure such as metal or concrete.
Do not use this nozzle to clean wood.
15°Nozzle - Yellow: This nozzle delivers a powerful 15 degree spray pattern for
intense cleaning of small areas. This nozzle should only be used on areas and
materials that can withstand high pressure.
25° Nozzle - Green: This nozzle delivers a 25 degree spray pattern for intense
cleaning of larger areas. This nozzle should only be used on areas that can
withstand pressure from this nozzle.
40°Nozzle - White: This nozzle delivers a 40 degree spray pattern and a less powerful
stream of water. This nozzle can cover a wide area and should be used for most
general cleaning jobs.
Chemical Nozzle - Black: This nozzle is used to apply special chemicals and cleaning
solutions. This nozzle produces the weakest pressure stream of the five nozzles.
•Pressure washer produces fluid pressures and velocities high enough to penetrate
human and animal flesh which could result in serious injury or amputation.
•Do not point pressure washer in direction of people or animals.
•High velocity fluid spray can cause objects to break, propelling particles at high
speeds..
W W W . T M G I N D U S T R I A L . C O M P 1 8 / 3 1 T o l l F r e e : 1 - 8 7 7 - 7 6 1 - 2 8 1 9

13. Adjusting Spray Pressure
Pressure Rinsing
1. Remove black spray tip from nozzle extension.
2. Select and install desired high pressure spray tip.
3. Keep spray gun a safe distance from area you plan to spray.
4. Increase (decrease) spray pressure by turning pressure control knob
clockwise (counterclockwise).
5. Apply a high pressure spray to a small area and then check surface for
damage. If no damage is found, you can assume it is okay to continue
rinsing.
6. Start at top of area to be rinsed, working down with same overlapping
strokes as you used for cleaning.
14. Using Chemicals & Detergents
NOTE: Use only detergents designed for pressure washers; household detergents, acids, alkalines, bleaches, solvents,
flammable material, or industrial grade solutions can damage the pump. Many detergents may require mixing prior to use.
Prepare cleaning solution as instructed on the solution bottle.
14.1 Set Up Procedure:
1. Attach the chemical hose onto the barbed fitting situated near the back of
the high pressure hose connection.
2. Press the other end of the chemical hose (with the filter attached) into the
container holding the chemicals or detergents you are using.
3. Attach the chemical nozzle onto the lance as shown previously.
14.2 Chemical Cleaning
1. Spray the chemicals onto a dry surface using the procedures outlined in
previous sections. Start at the lower portion of the cleaning area and
working upwards, using long, even, overlapping strokes.
2. Always ensure that the filter is fully submerged in the cleaning solution at
all times.
3. Allow the detergent to soak in for 3-5 minutes before washing and rinsing.
4. Re-apply as needed to prevent the surface from drying. Do not allow the
detergent to dry on to the cleaning surface to prevent streaking.
NOTE: Detergent cannot be applied with the high pressure spray tips (white,
green, yellow or red)
14.3 After Chemical Cleaning
IMPORTANT: You will need to flush the detergent siphoning system after each
use by placing the filter into a bucket of clean water then run the pressure
washer in low pressure for 1 -2 minutes.
1. After using chemicals, soaps and detergents it is necessary to thoroughly clean the pressure washer.
2. Place the chemical hose in a container of clean water.
3. Turn on the pressure washer and hold the trigger on the spray gun top draw clean water through the system to clean it
thoroughly.
W W W . T M G I N D U S T R I A L . C O M P 1 9 / 3 1 T o l l F r e e : 1 - 8 7 7 - 7 6 1 - 2 8 1 9

15. Maintenance
To ensure efficient operation and longer life of your pressure washer a routine maintenance schedule should be prepared and
followed. If the equipment is used in unusual conditions such as high-temperature or dusty conditions more frequent maintenance
checks will be required.
15.1 Engine:
Check the engine regularly, replace oil, clean spark plugs and maintain parts as required.
15.2 Pump Oil:
Change the pump oil regularly. Change the pump oil after the first 50 hours of work and successively every 200 hours.
In either case ensure that the oil is changed at least once a year. Check with your nearest Dealer for advice on the best Pump Oil
to use with this equipment if you are unsure.
15.3 Nozzle Unclogging:
If the nozzle becomes clogged with dirt and debris excessive pressure can build up. If the nozzle becomes partially clogged or
restricted the pump pressure will fluctuate and can become harmful and dangerous.
Clean the nozzle immediately and follow these instructions:
1. Shut-off the engine and turn off / disconnect the water supply.
2. Pull the trigger on the gun to relieve any water pressure.
3. Disconnect the lance from the gun.
4. Remove the nozzle from the lance - remove any obstructions
with the nozzle cleaning tool and back flush with clean water.
5. Direct the water supply into the spray wand end to back flush
loosened particles for 30 seconds.
6. Reassemble the nozzle onto the lance.
7. Reconnect the lance to the gun and turn on the water supply.
8. Start the washer pump and place the lance into the high
pressure setting to test.
15.4 Cleaning The Water Filter:
The water filter should be checked regularly and cleaned if necessary:
1. Remove the filter by grasping the end and removing it from the water
inlet on the pump.
2. Clean the filter by flushing it with water on both sides.
3. Re-insert the filter in the water inlet on the pump.
Before performing any maintenance be aware that the equipment should be completely shutdown,
depressurized and allowed to cool down. This will ensure that no injuries can be sustained by moving parts,
water pressure or hot surfaces.
Engine contains flammable fuel do not smoke near or work near naked flames while maintaining this
equipment. Please note: All repairs should be carried out by Dealer approved engineers. All replacement
parts should be supplied or recommended by the Dealer. Any unapproved repairs or modifications will
invalidate the warranty.
Avoid prolonged or repeated skin
contact with used motor oil.
Used motor oil has been shown to cause skin cancer in certain
laboratory animals. Thoroughly wash exposed areas with soap
and water.
W W W . T M G I N D U S T R I A L . C O M P 2 0 / 3 1 T o l l F r e e : 1 - 8 7 7 - 7 6 1 - 2 8 1 9
Table of contents
Other TMG Pressure Washer manuals