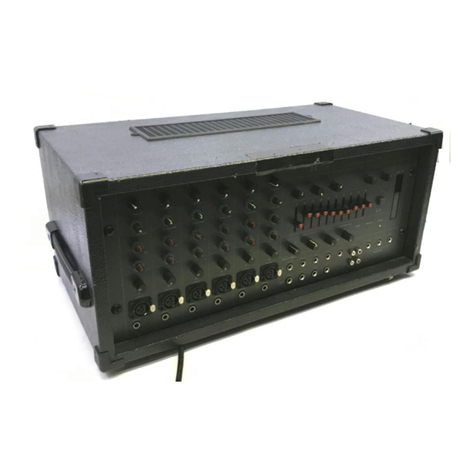
Front Panel
Reverb Control
(REV)
This control determines the
level of signal assigned to the
reverb mixing buss. Rotating
the control clockwise increase
the amount of reverb in that
channel.
High Equalizer Control
(HI H)
The high EQ control alters the
high frequency response, pro-
viding ±13dB at 5kHz, and
±15dB at 15kHz of continuous-
ly variable active shelving
equalization. The "0" detented
position provides flat audio re-
sponse.
Middle Equalizer Control
(MID)
The mid EQ control provided
±15dB of continuously variable
active peaking equalization at
2kHz, and has a flat audio re-
sponse when set to the "0"
detented position.
Input Level Control
(LEVEL)
The level control provides con-
tinuously variable adjustment
of the channel output to the
program mixing buss, thus de-
termining the level of that chan-
nel in the main sound system
mix. Since the reverb signal is
"post" this control, an increase
in the level of the channel's
output will also result in a
corresponding increase in the
reverb effect of that channel.
The nominal level of the input
level control is at the "10" posi-
tion.
Tape Level Control
(TAPE)
This control sets the overall
level of the Tape input signal.
Reverb Control
(REV)
This control adjusts the amount
of reverb signal that is returned
to the program buss and thus
the level of reverb contained in
the main sound system.
Foldback Master Control (FB)
The FB master control adjusts
the overall combined signal
level of the four independent
channel level controls, and thus
the level of the entire on-stage
monitor mix.
System Level Control
(SYSTEM LEVEL)
The System level (PGM) control
adjusts the overall combined
signal level of the four indepen-
dent channel level controls, and
thus the level of the main sound
system.
Low Equalizer Control
(LOW)
The low EQ control provides
±13dB at 100Hz, and ±15dB at
50Hz of continuously variable
active shelving equalization.
The "0" detented position pro-
vides flat audio response.
EQ Control
(EQ)
Rotating the control clockwise
decreases the low frequency
signal, and rotating the control
counter clockwise decreases
the high frequency signal. The
center position provides flat au-
dio response.
Tape Input Jacks
(TAPE)
These R A pin jacks are wired
in parallel, with an input level
of -10dB.
Power Indicator LED
(POWER)
The indicator LED lights when
the power switch is "on".
Power Amp Protection Indica-
tor
(PROTECT)
The indicator LED lights if the
power amplifier output is
shorted, if the temperature of
the unit rises above acceptable
levels, or if D is drifted to the
speaker output. If the LED
should light, speaker wiring
and ambient temperature of the
MX-101 should be checked. If
the LED remains lighted, the
unit should be referred to qual-
ified service personnel for re-
pair.
High Impedance Connectors
(HI H Z)
These connectors are unba-
lanced, standard 1/4" phone
jacks with an input impedance
of 100k ohms, and an input
level of -35dB. When a plug is
inserted into the high-Z input,
the coresponding XLR connec-
tor is automatically switched
out of the input circuitry.
Power Amp Compression In-
dicator
(COMP)
The comp LED lights when the
internal compressor is acti-
vated. The compressor is pro-
vided to protect speaker sys-
tems by compressing the input
signal level of the power ampli-
fier when clipping occurs in the
output stage. Frequent flashing
of the LED is not reason for
alarm. However a constant or
steady light indicates that the
MX-101 is being over-driven
and that the internal power
amplifier is possibly "under po-
wered" for that application. The
output level of the MX-101
should be decreased until the
LED only flashes intermittently.
Low Impedance Connectors
(LOW
Z)
The XLR connectors are low
impedance, electronically ba-
lanced inputs with an input
impedance of 1k ohms.
Note:
The MX-101 protection circuit-
ry will (1) detect 'faulty condi-
tions' within the power ampli-
fier, (2) give a visual indication,
and (3) automatically shut
down until the fault condition
is alleviated. This special cir-
cuitry ensures maximum re-
liability and virtually elimin-
ates equipment damage due to
unsafe or fault conditions.
Please refer to fault protection
table on page 4 for full explana-
tion of this important feature.
— 3 —


