TOHATSU Dr. H User manual

1
User Manual

2
Contents
1. Precautions when using. ............................................................................................................................. 3
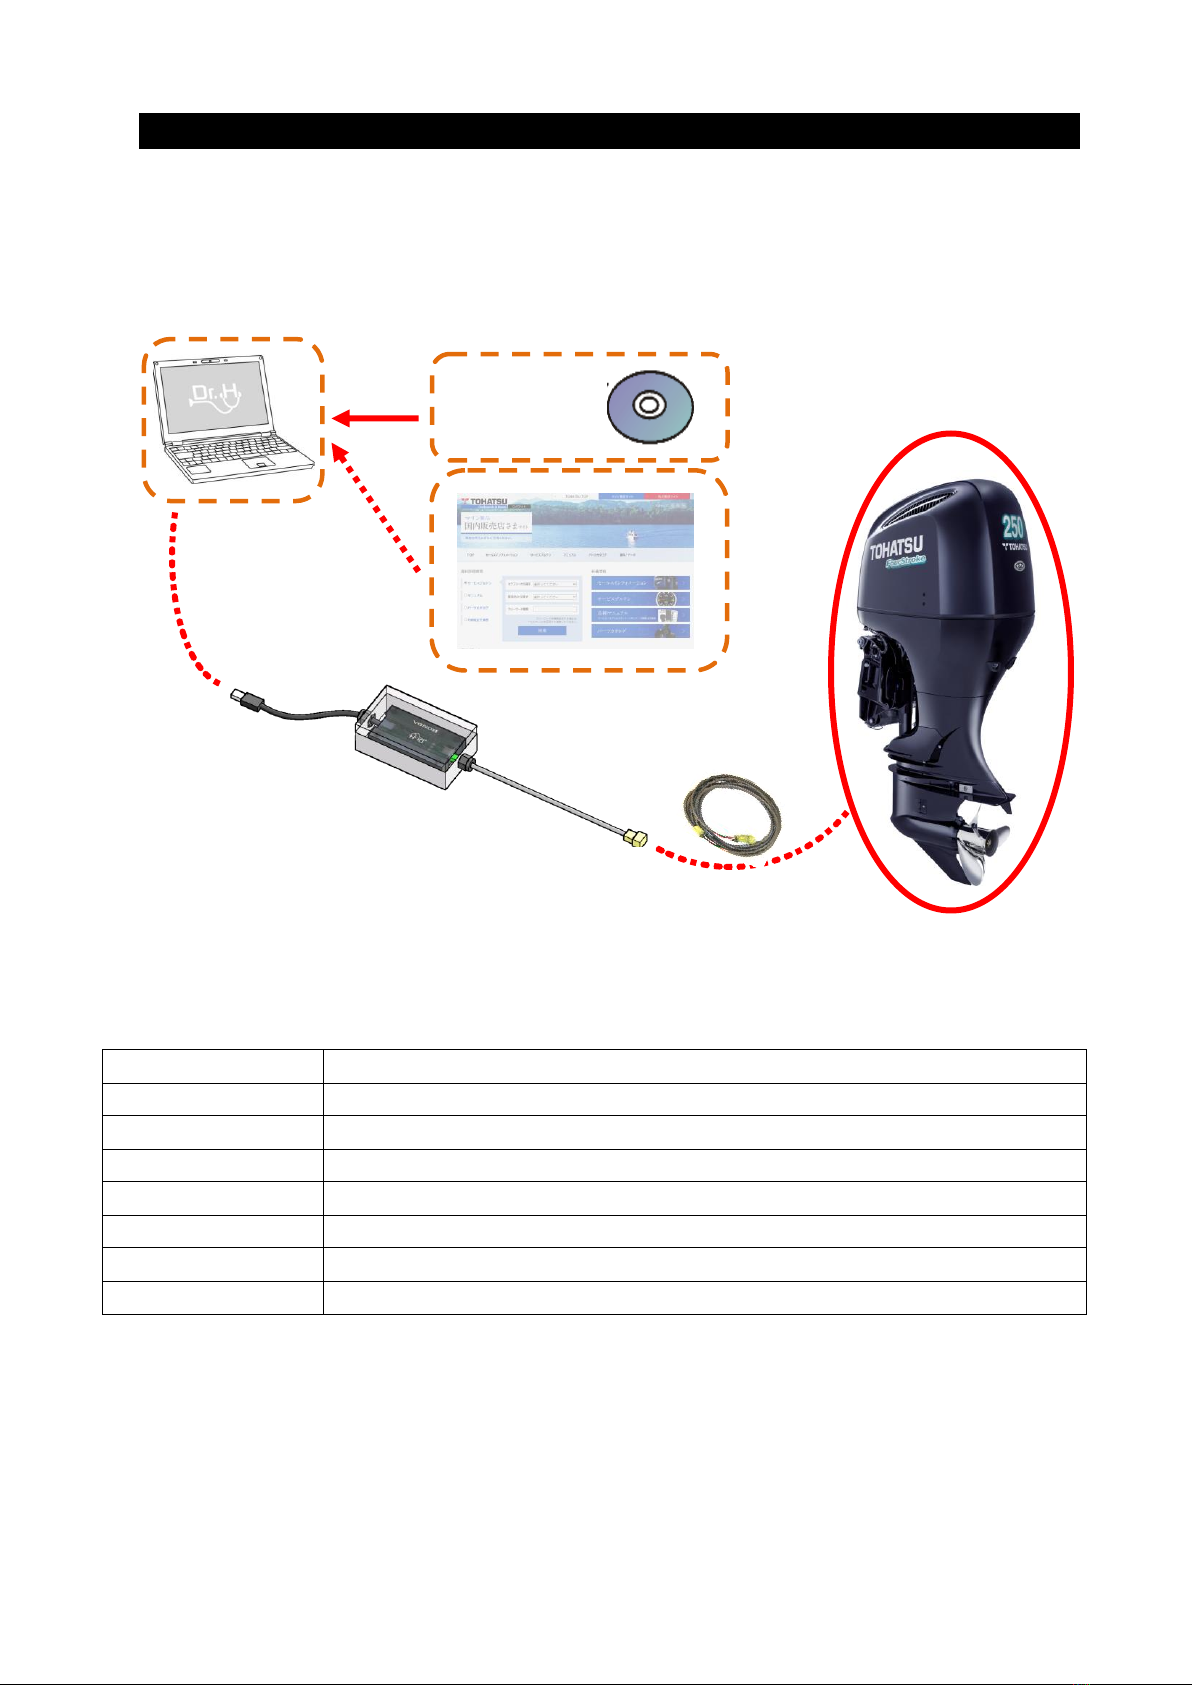
2. Outline of system......................................................................................................................................... 5
3. Compatible models...................................................................................................................................... 6
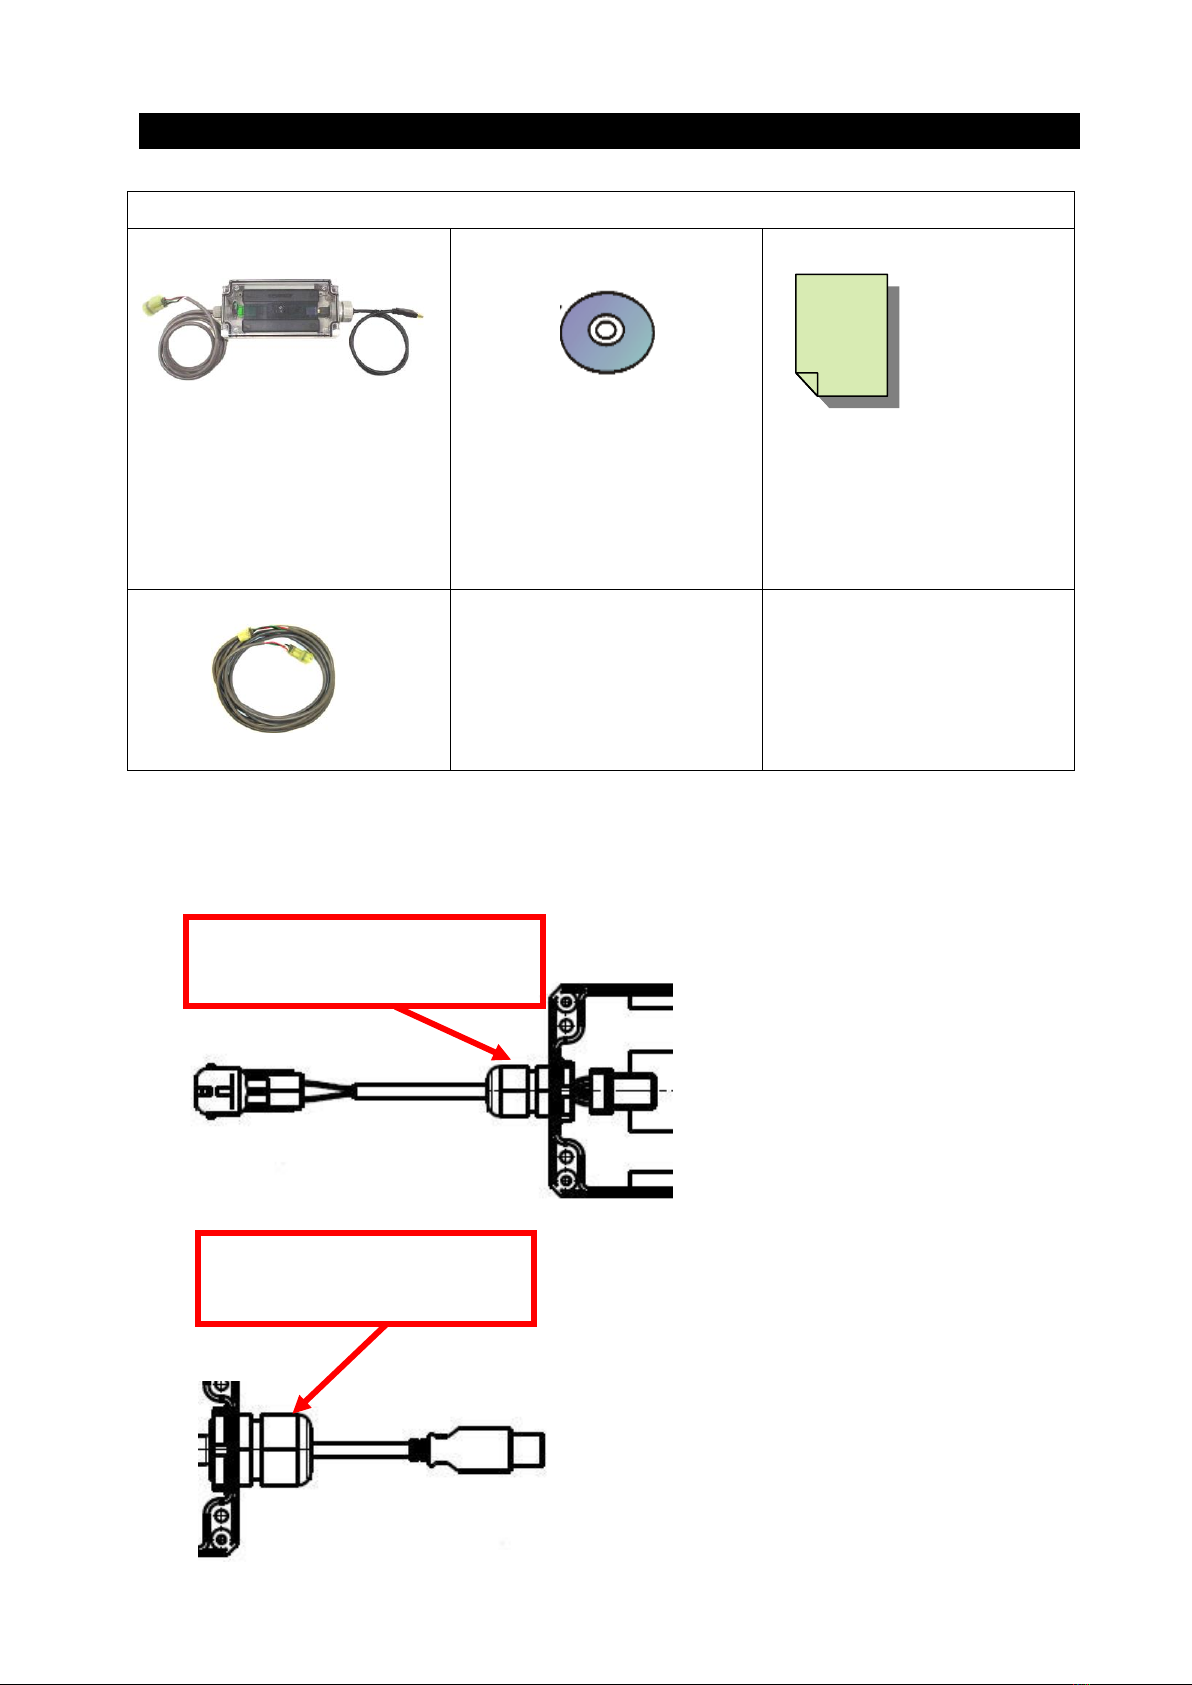
4. Components................................................................................................................................................ 7
5. Preparation before installing software......................................................................................................... 8
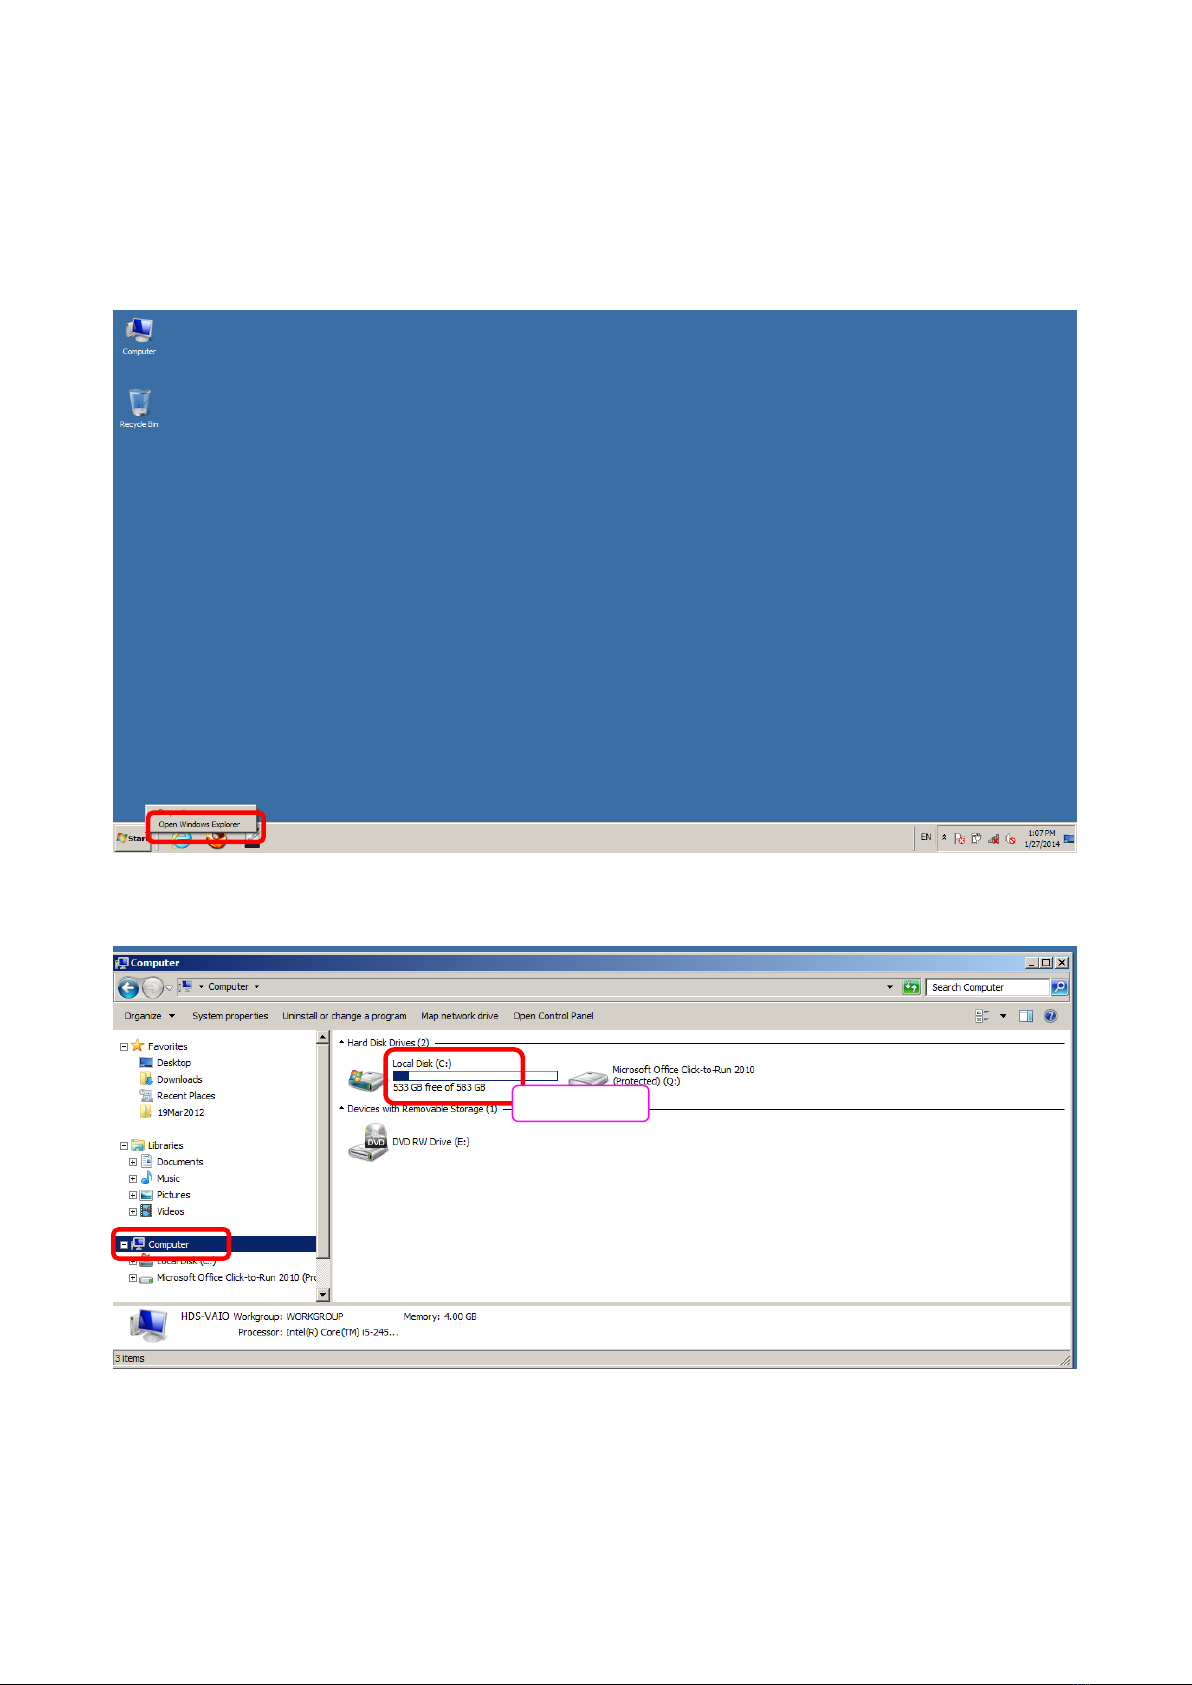
5 - 1. Confirm PC environment .............................................................................................................. 9
5 - 1 - 1. How to check OS, CPU, memory and free space on the hard disk. ................................. 9
5 - 1 - 2 . How to check display resolution...................................................................................... 13
5 - 2. Setting up PC.............................................................................................................................. 13
5 - 2 - 1. Stopping the screen saver............................................................................................... 13
In cases of Windows 7 and Windows 8............................................................................................ 13
5 - 2 - 2. How to set “Sleep after” and “Hibernate after” ................................................................ 15
6. Installing Base Software............................................................................................................................ 21
7. Installing Model Software.......................................................................................................................... 26
8. USB driver installation............................................................................................................................... 29
9. Communication unit settings..................................................................................................................... 31
10. Connecting to products ............................................................................................................................. 32
11. Failure diagnosis ....................................................................................................................................... 40
11 - 1. DTC............................................................................................................................................. 40
11 - 2. All history .................................................................................................................................... 41
11 - 3. Data list....................................................................................................................................... 42
Data list Procedures......................................................................................................................... 43
Data list Sub-windows function ........................................................................................................ 44
Graph display function...................................................................................................................... 45
Snapshot function............................................................................................................................. 50
ECU reset function ........................................................................................................................... 56
11 - 4. Simple diagnosis......................................................................................................................... 57
11 - 5. Function test ............................................................................................................................... 62
11 - 6. Device Configuration .................................................................................................................. 63
11 - 7. Onboard Snapshot...................................................................................................................... 67
12. FAQs ......................................................................................................................................................... 71
13. Terminology............................................................................................................................................... 72

3
Introduction
Thank you for purchasing Dr. H.Please read these instructions carefully and take care to use Dr. H properly.
1. It is prohibited to reproduce this user manual in whole or in part without prior consent.
2. The contents and illustrations in this user manual may change without notification.
Trademarks
Windows is the registered trademark of Microsoft Corporation. All other brands or product names are the
trademarks of those companies.
1. Precautions when using.
Please read the following before using Dr. H
Adequate consideration for safety has been taken in regard to this product. However, please make sure that
you only use this product after reading what is written in sections with the mark displayed below, and in the
Warning and Caution sections.
The mark displayed below is to ensure the proper usage of this product to prevent the (unlikely) occurrence of
faults or damage.
Danger
Failure to follow these
instructions may result in
death or serious injury
Warning
There is a possibility of death
or serious injury should these
instructions not be followed
Caution
Failure to follow these
instructions may result in
injury
■Do not disassemble or modify
・Do not disassemble or modify the Dr. H unit (communication unit), or the attachments or any of the
optional items. This can cause overheating, burns, electric shock, injury and malfunction. The warranty
shall be invalid if disassembled even just once.
■Handling AC adapter (optional item)
・Do not touch the socket plug with wet hands. This may result in electric shock.

4
Advice
Handling this product
■Do not expose to water
・The Dr. H unit (communication unit) and USB cables do not conform to waterproof specifications.
・Do not expose to high temperatures or sea (salty) breeze for extended periods. Condensation may form
inside the unit due to sudden changes in the surrounding temperature. This may occur, for example,
when bringing the product suddenly from a cold place into a warm room.
*Use the optional waterproof box when exposed to splashing water or snowfall. (Refer to P*- Components)
・Do not drop the Dr. H unit (communication unit) or place anything on top of it. This could damage it or
cause it to malfunction.
・Do not use the Dr. H unit, attachments or optional goods if dented, cracked, damaged etc.
・Connect the end of the cable securely after checking for corrosion or damage to the connectors on the Dr.
H unit. Do not use force to connect or disconnect. This may damage it or cause it to malfunction.
Handling the optional items
■Handling the waterproof box (optional item)
・Do not drop the waterproof box.
・If the unit is dirty, wipe it with a soft, dry cloth.If the dirt does not come off, wipe it with a soft cleaning cloth
that has been dipped in diluted mild detergent and has been firmly wrung. Do not use organic solvents
such as alcohol. This may cause warping or discoloration.
・The case satisfies IP65 regulations. However, it is not guaranteed to be waterproof.
■Handling the AC adapter (optional item)
・Using an AC adapter outside the voltage range of 100-240V could result in fire or electric shock.
・Connect the plug securely and fully into the socket. When removing the plug from the socket, do not pull it
forcefully.
・Do not use if the main unit or cord is corroded, damaged, or dented etc., as this can result in fire or
electric shock.
・The AC cable may be different according to the plug being used. Make sure to use the right AC cable with
the right plug.
■Handling the battery harness (optional item)
・Misuse can cause accidents so handle with care.
・Always connect to a 12V battery. Connecting to a battery other than a 12V battery can result in a
flammable explosion, fire, or electric shock.
・When connecting the battery harness, always make sure not to short-circuit the + and - terminals.
・Connect battery harness in such as way that a loose gap is left, in order to prevent it from becoming
detached when in use.
・Do not use if the harness is corroded, damaged, or dented etc., as this can result in fire or electric shock.
・Fix the red clip to the battery's plus terminal and the black clip to the battery's minus terminal.
・When connected in reverse, the damaged equipment or battery may explode.

5
2. Outline of system
Outline:
The Dr. H diagnostic system consists of basic software, model software, and a communication unit.
Function:
Main function
Explanation
DTC
This is the DTC (Diagnostic Trouble code) mode contained in the ECU.
All DTC History
Displays data when the DTC contained in the ECU appears.
Data list
Displays sensor, actuator, ECU internal data in real time.
Graph mode
A function for making line graphs.
Snapshot
Possible to record the existent values for items on the data list.
Simple diagnosis
A mode that enables a simple diagnosis
Function test
Automatically runs each device to enable its condition to be tested.
Outboard
Download
PC
Extension
Harness
Basic software
Model software
Tohatsu distributor Web site
Latest model software available
When the model software
is updated, install model
software from web site
*If you were a dealer (not a distributor), you cannot enter to the Tohatsu distributor we site. Please ask about latest software to your
distributor.

6
*The Dr. H system complies with the USA FCC Standard.
Specifications: Communication unit
Conditions of
use
Temperature range:-25℃~+40℃
Environment: Water-free, dirt-free etc. locations.
Input
specifications
Input voltage: 5V
Current: 100mA
Name and address of suppliers
Tohastsu corp.
3-5-4, Azusawa, Itabashi-ku, Tokyo, 174-0051, Japan
3. Compatible models
BFT250A
BFT90A
BFT225A
BFT75A
BFT200A
BFT60A
BFT150A
BFW60A
BFT115A
*As of April, 2015
*Some models may not be sold depending on the region.

7
4. Components
Dr. H standard kit waterproof type
1.
Caution
*Sometimes the waterproofing
may be lost due to excessive
water exposure.
*Do not disassemble
2. Software CD
Dr.H Base software, Model
software, User manual included
3. Instructions
4. Extension harness
DLC cable extension
* Should the position of the marking for the waterproof case connector become misaligned, realign using
the specified torque value. Failure to do so can result in water or dirt getting inside.
Tightening torque:
For USB cable 2.0N.m.(0.20kgfm)
Tightening torque:
On DLC panel 0.55N.m.(0.55kgfm)

8
5. Preparation before installing software
Main points:
The Dr. H software consists of two types of software; base software and model software
Diagram 1 shows the 6 steps to be followed in sequence, including installation.
Diagram 1
*Use equipment that conforms to the following:
OS Windows XP, Windows Vista, Windows 7 and Windows 8
CPU Intel Pentium III 600MHz or AMD Athlon 1.0 GHz or higher
Memory 512 MB RAM or higher
Port USB port
Disk device CD-ROM drive
Free space in hard disk 1 GB free space
Display 1024 x 768 or 1280 x 1024 resolution
* The memory capacity and free space on the hard disk will vary between PCs.
* Using models with only a small amount of free hard disk space can lead to deficient memory or similar
memory problems.
* Operations may be different depending on the model of PC used.
Communications unit
settings
System standby, hibernate
Installing base software/installing USB drive
Installing model software
Stopping screensaver
Confirming PC
environment

9
5 - 1. Confirm PC environment
5 - 1 - 1. How to check OS, CPU, memory and free space on the hard disk.
1) In the case of Windows 7
1. Right-click on the "start" button and select "Open Windows Explore".
(If the My Computer icon is already on the desktop, click this.)
2. Click “Computer" to check the free space on the hard disk.
Free space

10
3. Click “System properties”to confirm your PC's operating environment.
OS
CPU / Memory

11
2) In the case of Windows 8
1. Right-click on the "start" button and select "File Explore" to check the free space on the hard disk.
Free space

12
2. Right-click on the "start" button and select "System" to confirm your PC’s operating environment..
OS
CPU / Memory

13
5 - 1 - 2 . How to check display resolution.
In cases of Windows 7 and Windows 8
Right-click on the desktop and select "Screen resolution”. Confirm the resolution.
This completes the explanation on how to check the operating environment. Proceed to the remaining steps.
5 - 2. Setting up PC
Close all other programs when installing.
If the PC's screen saver is activated or other applications are operating during the software installation, the
installation may fail and defects may appear when Dr. H is run.
5 - 2 - 1. Stopping the screen saver
In cases of Windows 7 and Windows 8
Right-click on the desktop, select "Personalize”and click “Screen Saver”
Communications unit settings
Installing model software / USB driver
Installing base software
System sleep, hibernate
Stopping screensaver
Confirming PC environment

14
Select “None”and click OK.
This completes the explanation for stopping the screen saver. Proceed to the remaining steps.
Communications unit settings
Installing base software
System sleep, hibernate
Confirming PC environment
Stopping screensaver
Installing model software / USB driver

15
5 - 2 - 2. How to set “Sleep after” and “Hibernate after”
Set the PC so that the PC does not sleep or hibernate when the Dr. H application software is starting up.
1) In the case of Windows 7
1. Select "Start"→"Control Panel".
2. Click "Power Options"

16
3. Click “Change when the computer sleeps”.
4. Click “Change advanced power settings”.

17
5. Double-click “Sleep after”. Click “On battery”and “Plugged in”, click the arrow, and then click “Never”.
6. Double-click “Hibernate after”. Click “On battery”and “Plugged in”, click the arrow, and then click “Never”.

18
2) In the case of Windows 8
1. Right-click on the "start" button and select "Power Options".
2. Click "Change when the computer sleeps".

19
3. Click "Change advanced power settings".
4. Double-click “Sleep after”. Click “On battery”and “Plugged in”, click the arrow, and then click "Never".

20
5. Double-click "Hibernate after". Click "On battery" and "Plugged in", click the arrow, and then click
"Never".
This completes the explanation for the settings for system sleep and hibernate. Proceed to the remaining
steps.
Communications unit settings
Installing model software / USB driver
Installing base software
System sleep, hibernate
Confirming PC environment
Stopping screensaver
Table of contents