Tokenworks CardVisor ID Instructions for use
CardV isor®ID Scanner
Hardw are User Manual
3 5 1 1 Silve rside Rd, Suite 1 0 5
Wilmington, DE 1 9 8 1 0
Phone : (8 0 0 ) 5 7 4 5 0 3 4
www.CardViso r.c o m - Pro duc t Info rmatio n Suppo rt@ To ke nWo rks .c o m
www.To ke nWo rks.c o m - Co mpany Info rmatio n Re visio n: 1 .0 August 2 0 0 5

Card Viso r Hardware Manual Page 2 o f 3 2
About T his Docum ent
This do c ume nt de s c ribe s ho w to us e the CardVis o r®ID hardware . The firs t part o f
the manual applie s to all ve rsio ns o f the pro duc t. The latte r part c o ntains spe c ific
ins truc tio ns fo r c us to me rs with the 2 D Bar Co de Re ade r Cradle .
This do c ume nt sho uld be use d in c o njunc tio n with the Handspring Viso r us e r manual
(o n the Hands pring CD o r available o n-line at Handspring.c o m), and the CardViso r
So ftware Us e r m anual that de tails installatio n and use o f PC data transfe r so ftware .
What’s in t he box
Ma gne tic St ripe Re a der Only Version
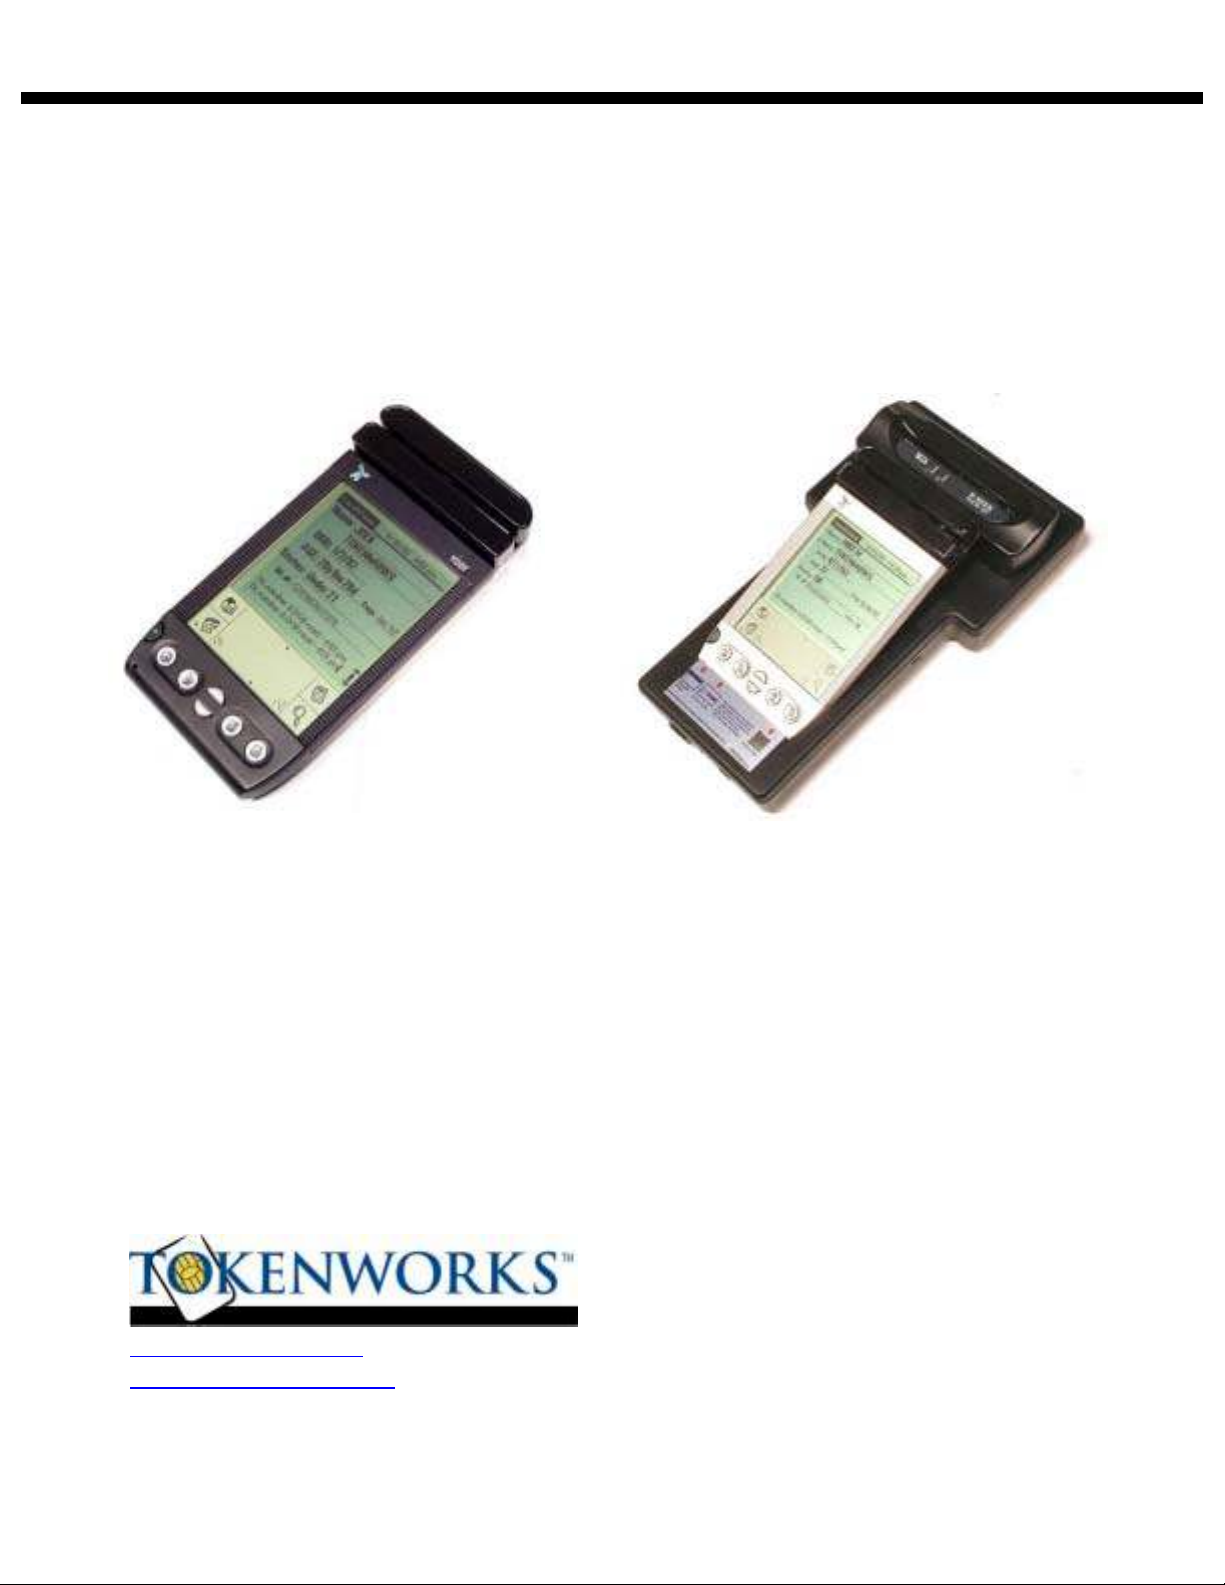
1 . CardTo o l®Re ade r with CardVis o r®so ftware installe d in flash me mo ry.
2 . Handspring Vis o r Handhe ld c o mpute r
3 . USB Ho tSync ™ cradle
4 . Gre e n Handspring CD with Palm De s kto p so ftware and Ho tSync Manage r
5 . To ke nWo rks®White CD with Use r Manuals and VIP/ Banne d list utilitie s
6 . Two AAA alkaline b atte rie s.
Bar Code Re ader & Ma gne tic St ripe Version
1 . CardTo o l®Re ade r with CardVis o r®so ftware installe d in flash me mo ry.
2 . Bar Co de Re ade r Cradle with AC c harging adapte r
3 . Handspring Viso r De luxe o r Handspring Viso r Pro Handhe ld c o mpute r
4 . USB Ho tSync ™ c radle o r USB Ho tsync ™ c harging Cradle with AC adapte r (Pro
Ve rs io n)
5 . SC-2 0 0 0 USB Ho tsync c able
6 . Gre e n Handspring CD with Palm De s kto p so ftware and Ho tSync Manage r
7 . To ke nWo rks®White CD with Use r Manuals and VIP/ Banne d list utilitie s
8 . Two AAA alkaline b atte rie s and wall c harge r with fo ur 8 0 0 mAh AAA re c harge able
batte rie s (no n-Pro Ve rsio n).

Card Viso r Hardware Manual Page 3 o f 3 2
Ta ble of Cont e nt s
About This Document____________________________________________________ 2
What’s in the box _______________________________________________________ 2
Magnetic Stripe Reader Only Version____________________________________ 2
Bar Code Reader & Magnetic Stripe Version______________________________ 2
Table of Contents _______________________________________________________ 3
Handspring Visor Button & Icon Layout ____________________________________ 4
Inserting the CardTool ___________________________________________________ 5
CardVisor Application Installation _________________________________________ 5
Main Screen Description_______________________________________________ 6
Swiping a Magnetic Card _________________________________________________ 6
CardVisor Options Menu _________________________________________________ 7
Age Threshold and Alarms _____________________________________________ 8
Memo Pad _____________________________________________________________ 8
Protecting ID Scanner Data _______________________________________________ 9
Tip - Appending Notes to Swipe Data via MemoPad __________________________ 11
Appending Notes to License Data (CardVisor III feature) ______________________ 12
CardVisor IV – Anti Card Pass Back_______________________________________ 13
Automatic Anti Pass-Back Database Management ________________________ 13
CardTool Removal _____________________________________________________ 14
Maintenance and General Care___________________________________________ 14
Resetting the Handheld _________________________________________________ 15
Performing a soft reset _______________________________________________ 15
Performing a Hard Reset _____________________________________________ 16
Power Down Reset - AAA battery devices only ___________________________ 17
Battery Life ___________________________________________________________ 17
Trouble Shooting – Handheld Computer & Magnetic Stripe Reader _____________ 19
For ID Scanners with Bar Code Reader Cradle ______________________________ 20
Parts Diagram – Bar Code Reader Cradle __________________________________ 21
Controls Diagram ______________________________________________________ 22
Inserting Handheld into Bar Code Reader Cradle ____________________________ 23
How to scan a Driver’s license with a 2D Bar Code ___________________________ 24
How to scan a Driver’s license with a 2D Bar Code ________________________ 24
Connecting Bar Code Reader Cradle to PC for HotSyncing ____________________ 25

Card Viso r Hardware Manual Page 4 o f 3 2
Battery _______________________________________________________________ 26
Charging the Bar Code Reader Cradle __________________________________ 26
Battery Life of Bar Code Reader Cradle_________________________________ 26
Charging the Handspring Visor Pro (optional) in the Bar Code Reader Cradle 26
Trouble Shooting – related to Bar Code Reader Cradle ________________________ 27
Copyright_____________________________________________________________ 28
Limited Warranty - CardTool®reader and/or CardVisor®software ______________ 28
Age Verification Calculation Limitations ________________________________ 29
State and Local Privacy Laws, Ordinances or Rules _______________________ 29
Graffiti Table _________________________________________________________ 30
Ha ndspring V isor But ton & Ic on La yout
Sho wn are the butto ns
and ic o ns re fe rre d to
thro ugho ut this manual.
No te the lo c atio n o f the
Date Bo o k b utto n, Me nu
ic o n and Me mo Pad
butto n. The po we r butto n
is to the le ft o f the Date
Bo o k butto n.

Card Viso r Hardware Manual Page 5 o f 3 2
Inse rt ing the CardTool
To inse rt the CardTo o l, align the unit with the Hands pring e xpansio n slo t (se e figure
1 ) and gradually inse rt the unit. It sho uld ins e rt smo o thly until it make s c o ntac t with
the e xpans io n slo t s to ps . Do no t fo rc e the unit into the e xpansio n slo t. If re s is tanc e
is s ignific ant, withdraw CardTo o l and e nsure the re are no fo re ign o bje cts in the
e xpans io n slo t and that CardTo o l is pro pe rly aligne d with the Viso r e xpansio n slo t,
the n try again.
Figure 1 – CardTo o l Re ade r ins erting into Handspring Vis o r Springb o ard e xpa ns io n s lo t
Ca rdV isor Applic at ion I nsta lla tion
The CardViso r so ftware is sto re d in the flash me mo ry o f the CardTo o l re ade r and
auto matic ally launc he s afte r plugging in the CardTo o l re ade r into the handhe ld. A
we lco me s cre e n appe ars whic h ins truc ts the use r to pre s s the Date Bo o k b utto n to
launc h the m ain s cre e n o f CardViso r magne tic s tripe a pplic atio n (sho wn b e lo w). If
the b ar c o de re ade r c radle is installe d, the n pre s sing the Addre s s Bo o k butto n will
launc h the bar co de versio n o f CardVis o r.
It is VITAL to c he c k the date and time displaye d in the top right c o rne r o f the s cre e n.
If the date is no t c o rre c t, the n the c alc ulate d age will b e inc o rre c t! To se t the
date / time , c lic k o n the Applic atio ns Ic o n (lo o ks like a small ho use in the graffiti are a),
the n c lic k o n the ‘Pre fs’ ic o n. Tap o n the b o x, whic h c o ntains the date o r time , and
the n fo llo w the pro mpts to c hange . De tails als o pro vide d in the Hands pring Us e r
guide .

Card Viso r Hardware Manual Page 6 o f 3 2
Make Sure Date & Time at the to p o f the fo rm is c urre nt
CardVis o r III & IV Main Sc re e n CardVis o r I & II Main Sc re e n
Ma in Sc re en De sc ript ion
The m ain sc re e n is whe re the m agne tic c ard data and status is dis playe d afte r e ac h
swipe . At the bo tto m o f the sc re e n is a dialo g bo x whe re us e r me ssage s suc h as
“Swipe Again” are displaye d.
Sw iping a Magnetic Card
1 . With the CardVis o r a pplic atio n running o n the Hands pring Vis o r, ho ld the unit in
yo ur le ft hand (if yo u are a le fty, ho ld the unit in yo ur right hand).
2 . Us ing the o the r hand, ho ld the drive rs lic e nse with the MagStripe fac ing to wards
yo u and swipe the c ard to wards yo ur bo dy. The above illustratio n is fo r a right-
hande d pe rs o n.
3 . Ensure that the magne tic card’s edge re mains in full c o ntac t with the base of the
card slo t, swipe the c ard c o mple tely thro ugh the c ard slo t.
4 . It do e s no t matte r whic h way the c ard is swipe d, but it is impo rtant that the c ard
is no t ske we d / tippe d during the swipe . Ske wing o c curs if the c ard is tilte d o r
lifte d as it is swipe d thro ugh the s lo t.
5 . The CardViso r age ve rific atio n so ftware will dis play the drive rs lic e ns e info rm atio n
o n the s cre e n afte r a suc c e ssful swipe and s to re the data in the Viso r me mo pad
applic atio n.

Card Viso r Hardware Manual Page 7 o f 3 2
Tip: Try a fe w prac tic e s wipe s , ho ld the magne tic c ard in the c e nte r and m aintain
pre ssure o n the bo tto m e dge o f the c ard as it trave ls thro ugh the slo t. Expe rime nt
with the s pe e d and o rie ntatio n. So me find it e asie r to ho ld the Handspring Vis o r with
the s cre e n facing le ft o r right and swiping the c ard ve rtic ally thro ugh the c ard slo t.
CardV isor Opt ions M enu
The Optio ns me nu is us e d to c o nfigure the s o ftware . To ac c e ss it, c lic k o n the Me nu
Ic o n, jus t b e lo w the Applic atio n ico n (small ho us e in the graffiti are a -se e pre vio us
diagram). De pe nding o n the ve rs io n o f CardViso r so ftware , the re are thre e o r fo ur
ite ms o n the Optio ns me nu. The Re s e t o ptio n will re -initialize the CardTo o l hardware .
If the unit is no t re spo nding to a c ard swipe , try the re se t o ptio n. If suc c e ssful, the
“Swipe A Card” me ssage will be displaye d. If no t, se e the tro uble s ho o ting s e ctio n in
this do c um e nt.
Optio ns Me nu o f CardVis o r
CardVis o r I and II do NOT ha ve the
‘Te s t VIP/ Banne d Da tab ase ’ ite m
Sc re e n Afte r Re se t Co mm and
The ‘ Abo ut CardViso r’ dis plays info rmatio n o n the applic atio n and its de ve lo pe r. The
‘Age Thre sho ld and Alarms’ ite m se ts the age
thre s ho lds fo r vario us alarm e ve nts, alarm so unds ,
and dis play o ptio ns. Se e the Age Thre s ho ld and Alarm
se c tio n in this do c ume nt fo r additio nal de tails . The
‘Te s t VIP / Banne d Database ’ ite m is pre s e nt in
CardVis o r III & IV and sho uld be run whe ne ve r a ne w
Banne d/ VIP database is lo ade d into the handhe ld.
What is the Graffiti Area?
The Graffiti writing are a is divid e d into two pa rts: o ne
fo r writing le tte rs , and o ne fo r writing num be rs . The
little "ab c" o r "1 2 3 " a t the b o tto m c o rne rs o f the
Gra ffiti writing a re a te ll yo u whe re to write le tte rs o r
num be rs. Yo u c an also tap the "abc " o r "1 2 3 " to
b ring up the o ns c re e n ke yb o ard.

Card Viso r Hardware Manual Page 8 o f 3 2
Age T hre shold and Alarm s
The Age Thre sho ld and Alarm s cre e n c o nfigure s at what age CardViso r will alarm at
and what alarm so und will be playe d. The re are six so unds available fo r the unde r
1 8 , unde r 1 9 , under 2 0 , unde r 2 1 , and e xpire d lic e ns e c o nditio ns . Afte r s e le c ting a
ne w so und, CardVis o r will play it b e fo re updating the dis play.
The Expire d alarm m ay no t be disable d, o nly the alarm s o und may be c hange d. The
Happy Birthday song may be dis able d by un-c he c king the c he c k bo x. If c he c ke d, o ne
may se le c t e ithe r the lo ng o r sho rt ve rsio n o f the Happy Birthday. The Visual
indic atio n o f a birthday will be dis playe d o n the main s cre e n status line .
If the Age YYMMDD ite m is c he c ke d, the n the age will b e displaye d in ye ars mo nths
and days. This allo ws o ne to s e e ho w c lo s e so me bo dy’ s birthday is and wis h the m a
pre -happy birthday. If un-c he c ke d, the n the age is displaye d just in ye ars.
Me mo Pad
Pre ss the Me mo Pad Butto n to s e e the sto re d lic e ns e data. Tapping o n e ac h line will
pro vide a de taile d vie w o f the swipe d lic e ns e data. The drive r's lic e nse data is
pars e d and sto re d as Me mo s in Me mo Pad applic atio n (built-in Palm OS applic atio n)
unde r the CardVisor c ate go ry. Sho wn b e lo w is a list o f Pars e d transac tio ns o n the
main Me moPad sc re e n. On the right is the de taile d data sho wing the fo llo wing
pars e d info rm atio n; Firs t, Middle , Last Name , Title (Jr., Sr., II, 3 rd, etc.), Addre ss, City,
State , Zip, Drive r's Lic e nse numbe r (0 2 1 3 6 5 4 4 2 4 ), Expiratio n date (YYYYMMDD),
Date o f Birth YYYYMMDD o f birth, Ge nde r (M/ F), the s tatus o f the swipe (OK, Under
1 8 , Under 1 9 , ID Expire d, e tc.), and the sc an date & time . Also sho wn are the fie ld
se parato r c harac te rs (^), use d whe n im po rting the data into pro grams like Mic ro so ft
ACCESS o r Mic ro so ft Exc e l.
Unde r 1 8 and Unde r 2 1
age alarms c o nfigure d.
Po p Up me nu fo r Unde r 2 0
Alarm
Happy Birthday So ng –
Lo ng o r Sho rt Ve rs io n

Card Viso r Hardware Manual Page 9 o f 3 2
Me mo Pad s ho wing all
me mo Catego rie s
Pars e d Da ta in Card Vis o r
Ca te go ry
Individua l Me mo sho wing
pars e d data
In additio n to the parse d data, an unpars e d re c o rd is als o sto re d in the Me mo Pad
applic atio n unde r the RawData c ate go ry. This pro vide s a c o nve nie nt me tho d to c ro ss
c he c k the pars e d info rm atio n, pro vide te c hnic al fe e dbac k to To ke nWo rks and ve rify
additio nal fie lds fro m the drive r's lic e nse ..
Unparse d Data in
‘RawData’ Cate go ry
Individua l Me mo sho wing
unpars e d da ta
Be fo re a ne w Me mo is s to re d in Me mo Pad, the last me mo is c o mpare d to the ne w
pe nding Me m o. If it is ide ntic al in e ve ry re spe c t, inc luding the date and time stamp,
the n the ne w me mo is no t s to re d. If the ne w Me m o diffe rs in just the time , it is s till
sto re d. This fe ature pre ve nts re dundant Me mo s fo r the same lic e ns e swipe d
re pe ate dly in s uc c e ssio n.
Prot ect ing I D Scanne r Dat a
This fe ature s ho uld be use d with c autio n as fo rge tting the PIN c o de will re quire
e rasing all s ave d transac tio n data. Drive rs Lic e nse Transac tio n data re c o rds are
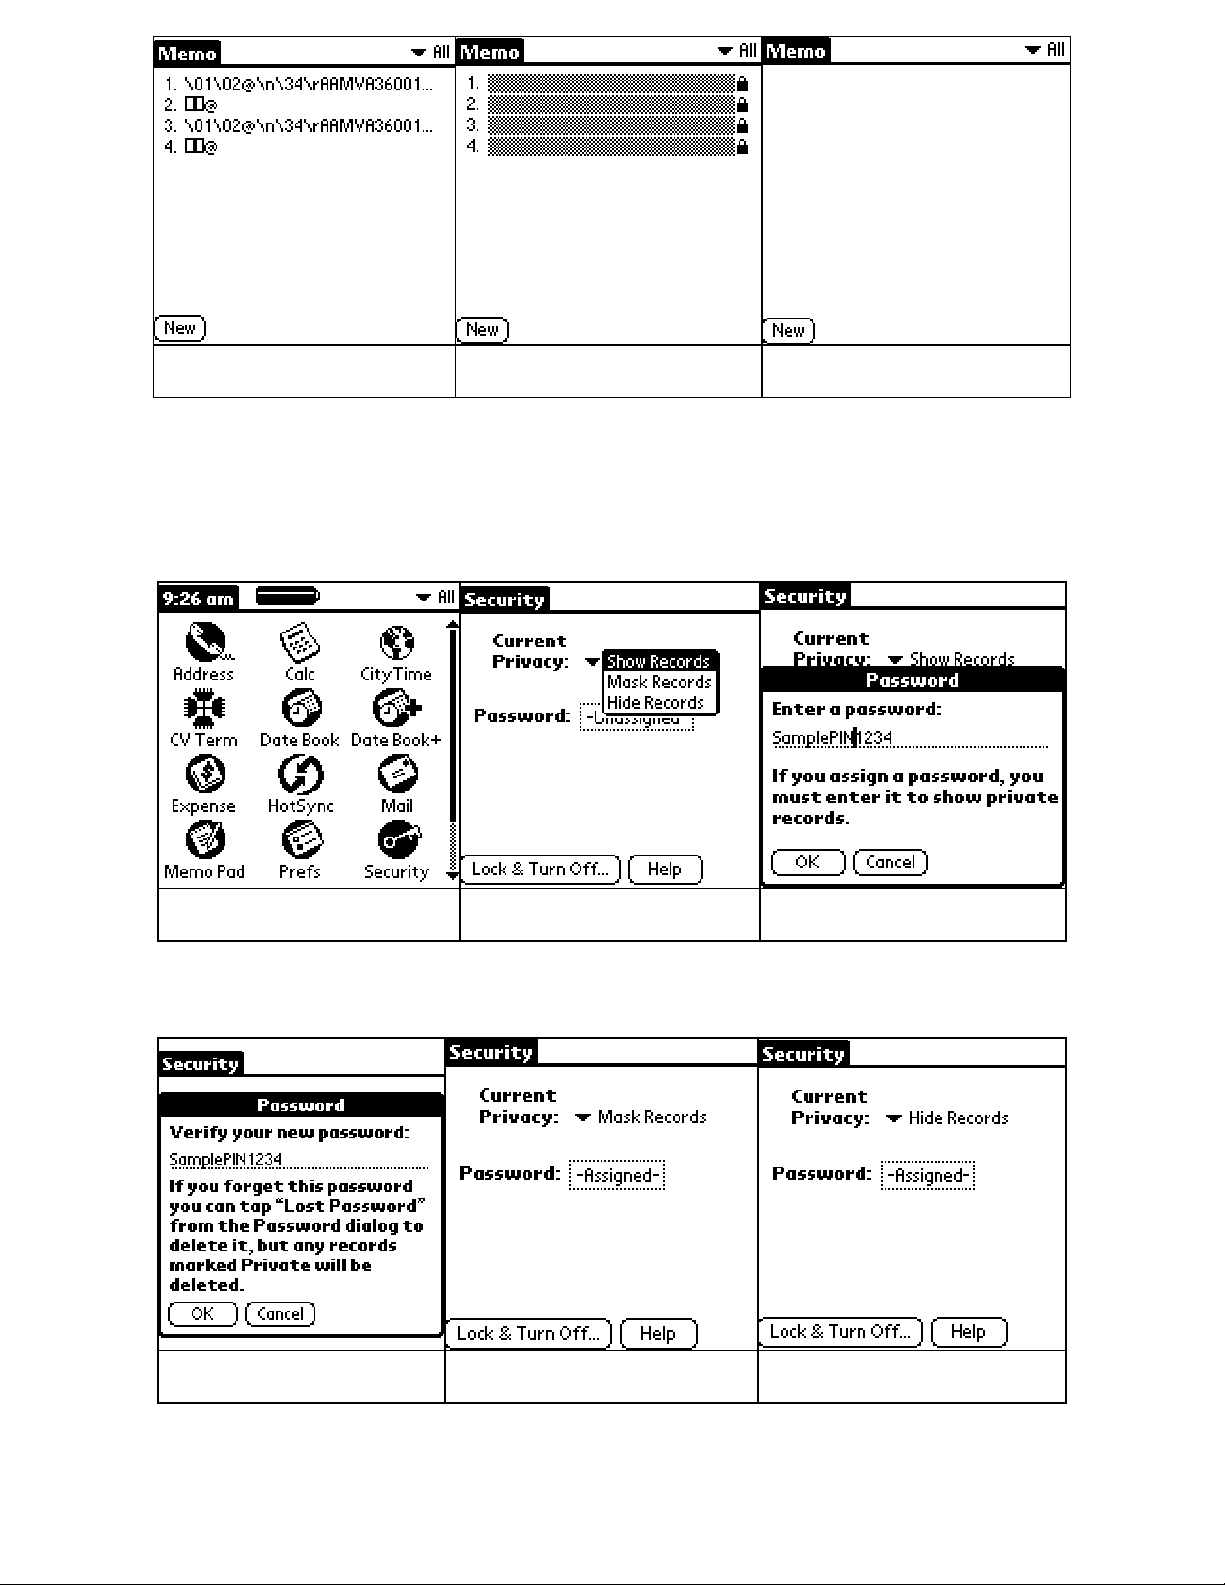
sto re d as Me mo s (in Me mo Pad applic atio n ) and are m arke d Private b y the CardViso r
so ftware . The y may be hidde n o r maske d by e nte ring a use r s e le c te d PIN c o de via
the s e c urity applic atio n (o ld fashio n ke y ic o n o n ho me sc re e n). Sho wn b e lo w is
what the trans ac tio n data sto re d in Me m o Pad lo o k like whe n maske d o r hidde n.
Card Viso r Hardware Manual Page 1 0 o f 3 2
Transac tio n Data Visib le Transac tio n Data Mas ke d Tra ns ac tio n Data Hidde n
To s e t the PIN c o de , se le c t the Se c urity Applicatio n (sho wn be lo w) fro m the Ho me
sc re e n. The n se le c t Mask Re co rds o r Hide Re co rds fro m the Curre nt Privac y Me nu.
Se le c ting e ithe r will pro mpt a Passwo rd o r PIN c o de to be e nte re d, whic h mus t the n
be c o nfirme d.
Se c urity App.-lo we r right Se le ct Sho w o r Ma sk Ente r Pa ss wo rd
No te : If the PIN c o de o r Passwo rd is fo rgo tte n, the re is no way to re c o ve r it via the
standard s e c urity applic atio n. Re s e tting the Passwo rd will de le te all the transac tio n
data. Use this fe ature with c autio n.
Co nfirm Pass wo rd Mas k Re c o rds Enable d Hide Re c o rds Enable
Card Viso r Hardware Manual Page 1 1 o f 3 2
No te : This s am e PIN c o de c an b e to 'lo c k' the s ys te m so that turning it bac k o n
re q uire s the PIN c o de . Se e the Hands pring Use r
guide fo r using this fe ature . Again, use the PIN
co de fe ature with cautio n as fo rge tting the PIN c o de
re q uire s a hard re s e t whic h will e rase all data in the
handhe ld.
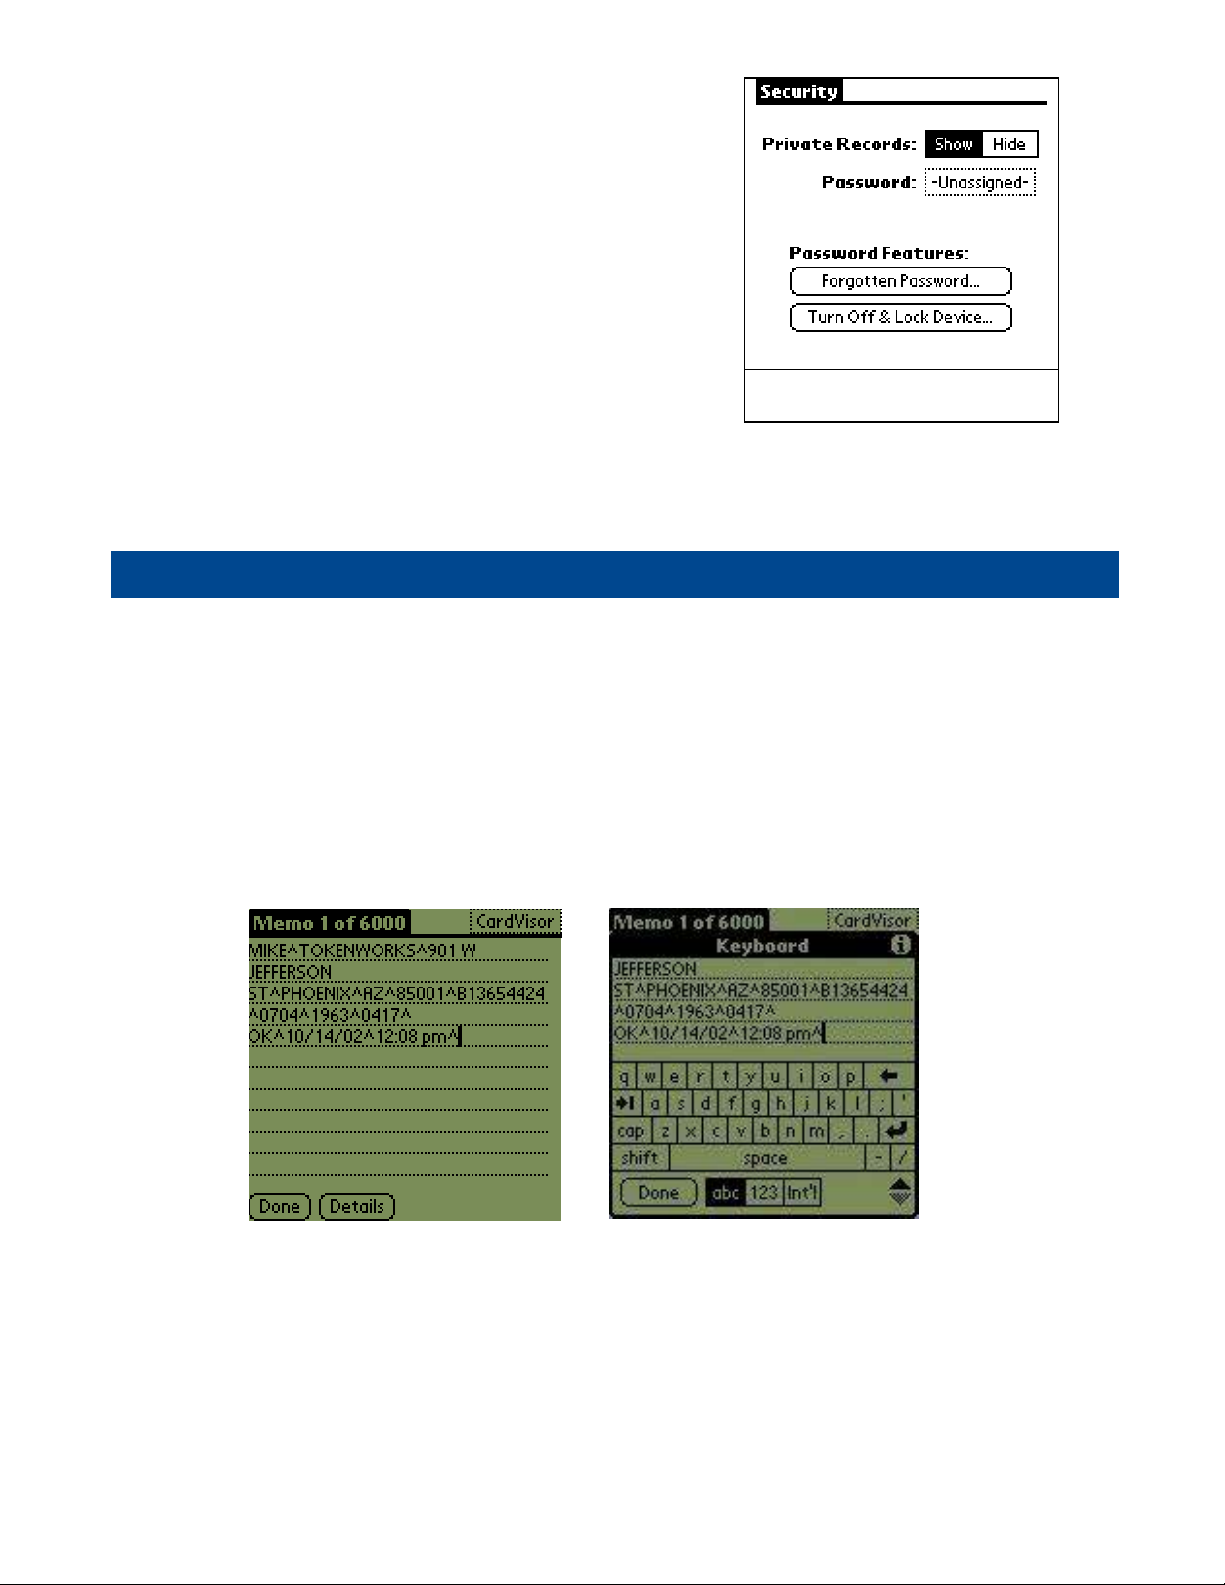
No te : Ve rs io n 3 .5 o f the Palm OS Se c urity
applic atio n (Platinum, Ne o , Prism, Pro , Edge ) allo w
private data to b e hidde n o r m as ke d. Ve rs io n 3 .1
(De luxe & So lo have ve rsio n 3 .1 ) can o nly hide
private data. Be lo w is the Se c urity Sc re e n fro m
ve rsio n 3 .1 .
Tip - Appending N ot es t o Sw ipe Data via M emoPad
Afte r a lic e ns e has be e n swipe d, it is po s sible to add o ne o r m o re c o mme nts that will
be uplo ade d to o ne o r m o re c o lum ns in the Exc e l s pre ad she e t. This is a gre at way
fo r CardVis o r III & IV c lie nts to m ark a c us to me r as a VIP o r Banne d individual. It is
als o an e as y way to re c o rd additio nal fields suc h as email addre sse s o r pho ne
numbe rs . Whe ne ve r the Exc e l impo rt wizard s e e s the ^ c haracte r, it puts the
fo llo wing data into the ne xt c o lum n o f the spre ads he e t. At the e nd o f e ac h parse d
string (CardVis o r Cate go ry Me mo ), the re is the c arat c haracte r. Just tap the s tylus at
the e nd o f the line and start making no te s. No te s c an be m ade us ing the ke yb o ard
o r via Graffiti (s e e Graffiti chart in this manual).
Ins e rtio n po int sho wing c urs o r
after last carat (^) characte r
Adding d ata to a Me m o e ntry using
the ‘ Ke ybo ard’ ins te ad o f Graffiti.
Se c urity Palm OS ve r. 3 .1

Card Viso r Hardware Manual Page 1 2 o f 3 2
Additio nal c o lumns c an b e adde d to the s pre ads he e t b y appe nding additio nal ^
c harac te rs . Se e the Graffiti c hart o n ho w to write this c harac te r. No te : It is no t
ne c e ssary to have a c arat symbo l as the last c harac te r in the m e mo . Exc e l will put
the last fie ld in the pro pe r co lumn with o r witho ut a c arat symbo l at the e nd.
Appe nding Notes t o Lic ense Dat a (Ca rdV isor II I feat ure)
CardVis o r III so ftware allo ws additio nal no te s (up to 8 0 c harac te rs ) to be adde d to
the Parse d Lic e ns e Data Me m o . This is us e ful fo r re c o rding marke ting info rmatio n
suc h as pho ne numbe rs and e mail addre ss o r o the r signific ant info rmatio n abo ut an
individual.
Afte r Lic e ns e Sc a n Input No te (e ma il addre s s) Afte r hitting Appe nd b utto n –
No te Co nfirm atio n Me ssage
Only o ne no te c an be appe nde d to a lic e ns e that is swipe d suc ce ssive ly. In o the r
wo rds, if a lic e nse is swiped and a no te is appe nde d and the same lic e nse is swipe d
again and a ne w no te is appe nde d, the s e co nd no te will re plac e the firs t no te . If a
multiple fie ld no te is de sire d, the n ins e rt the ‘ ^’ c harac te r be twe e n e ac h fie ld whe n
inputting the no te .
Me mo e ntry after adding ‘ VIP’ to
the e nd o f the s tring
Me mo e ntry afte r adding ‘VIP’ & e m ail
addre s s to the e nd o f the . No te : ‘ ^’
c haracte r be twe e n fie lds
Card Viso r Hardware Manual Page 1 3 o f 3 2
Ca rdV isor IV – Ant i Ca rd Pa ss Ba ck
CardVis o r®IV age ve rific atio n s o ftware has all the fe ature s o f CardVis o r III plus an ID
Anti-Pass-Bac k fe ature . This fe ature m ay be us e d se ve ral ways;
• at the front door to detect licenses which ar e 'Passed- Back ' t o out siders,
• at t he bar t o ident ify individuals w ho are consum ing t oo m uch, or
• at t he bar t o ident ify individuals who are purchasing for their underage friends.
• at the front door t o confirm ret urning pat rons have paid cover charge.
• helps det ect fake I Ds which have t he sam e 'cloned' dat a st ripe.
So me c lubs us e the ID Pass-Back de te c tio n to e nsure wrist bands o r ink stamps have
no t be e n trans fe rre d fro m e xiting c us to me rs . If a c usto me r's ID was sc anne d whe n
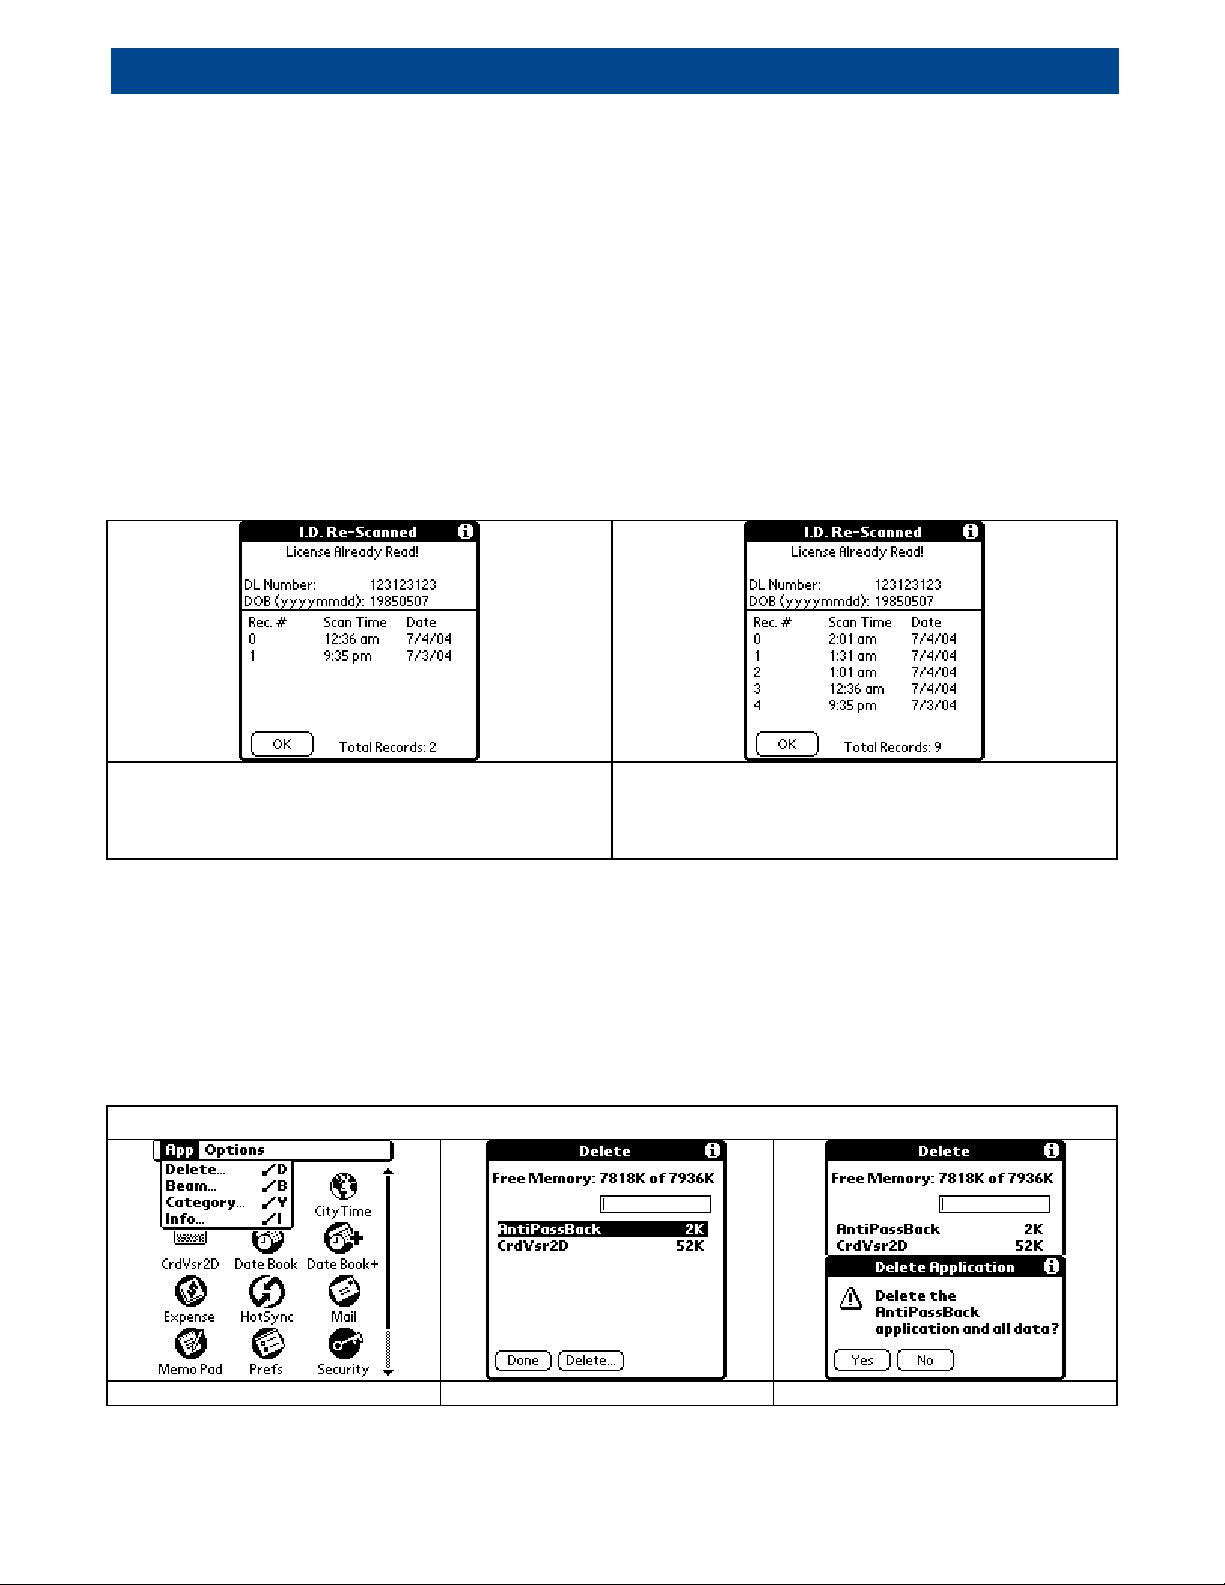
the y firs t e nte re d and we re bande d/ marke d, the n whe n the y le ave & re turn, an 'ID
Pass-Bac k' alarm sho uld be ge ne rate d whe n the ID is re s canne d.
Sho ws lic e ns e num be r, DOB with c urre nt
scan time at the top o f the list and
pre vio us s c ans b e lo w.
Multiple sc ans in a sho rt pe rio d o f tim e
may indic ate o ve r se rving o r drinks are
be ing purc has e d fo r unde rage frie nds
Automa tic Anti Pass-Bac k Da taba se M anagem ent
The databas e us e d by the Anti Pass-Bac k c o de is auto matic ally de le te d afte r 1 2
ho urs o f inac tivity. In no rmal o pe ratio n, this me ans the database is c le are d and
re ady fo r use o n a nightly bas is , assuming no IDs are swipe d fo r 1 2 ho urs. This
auto matic manage me nt fe ature c an be o ve r ridde n by manually de le ting the
database fro m the handheld c o mpute r's m e mo ry.
Manually de le tio n o f Anti Pass-Bac k database
Select Delet e f rom main menu Select Ant iPassBack Dat abase Conf irm Delet ion
Card Viso r Hardware Manual Page 1 4 o f 3 2
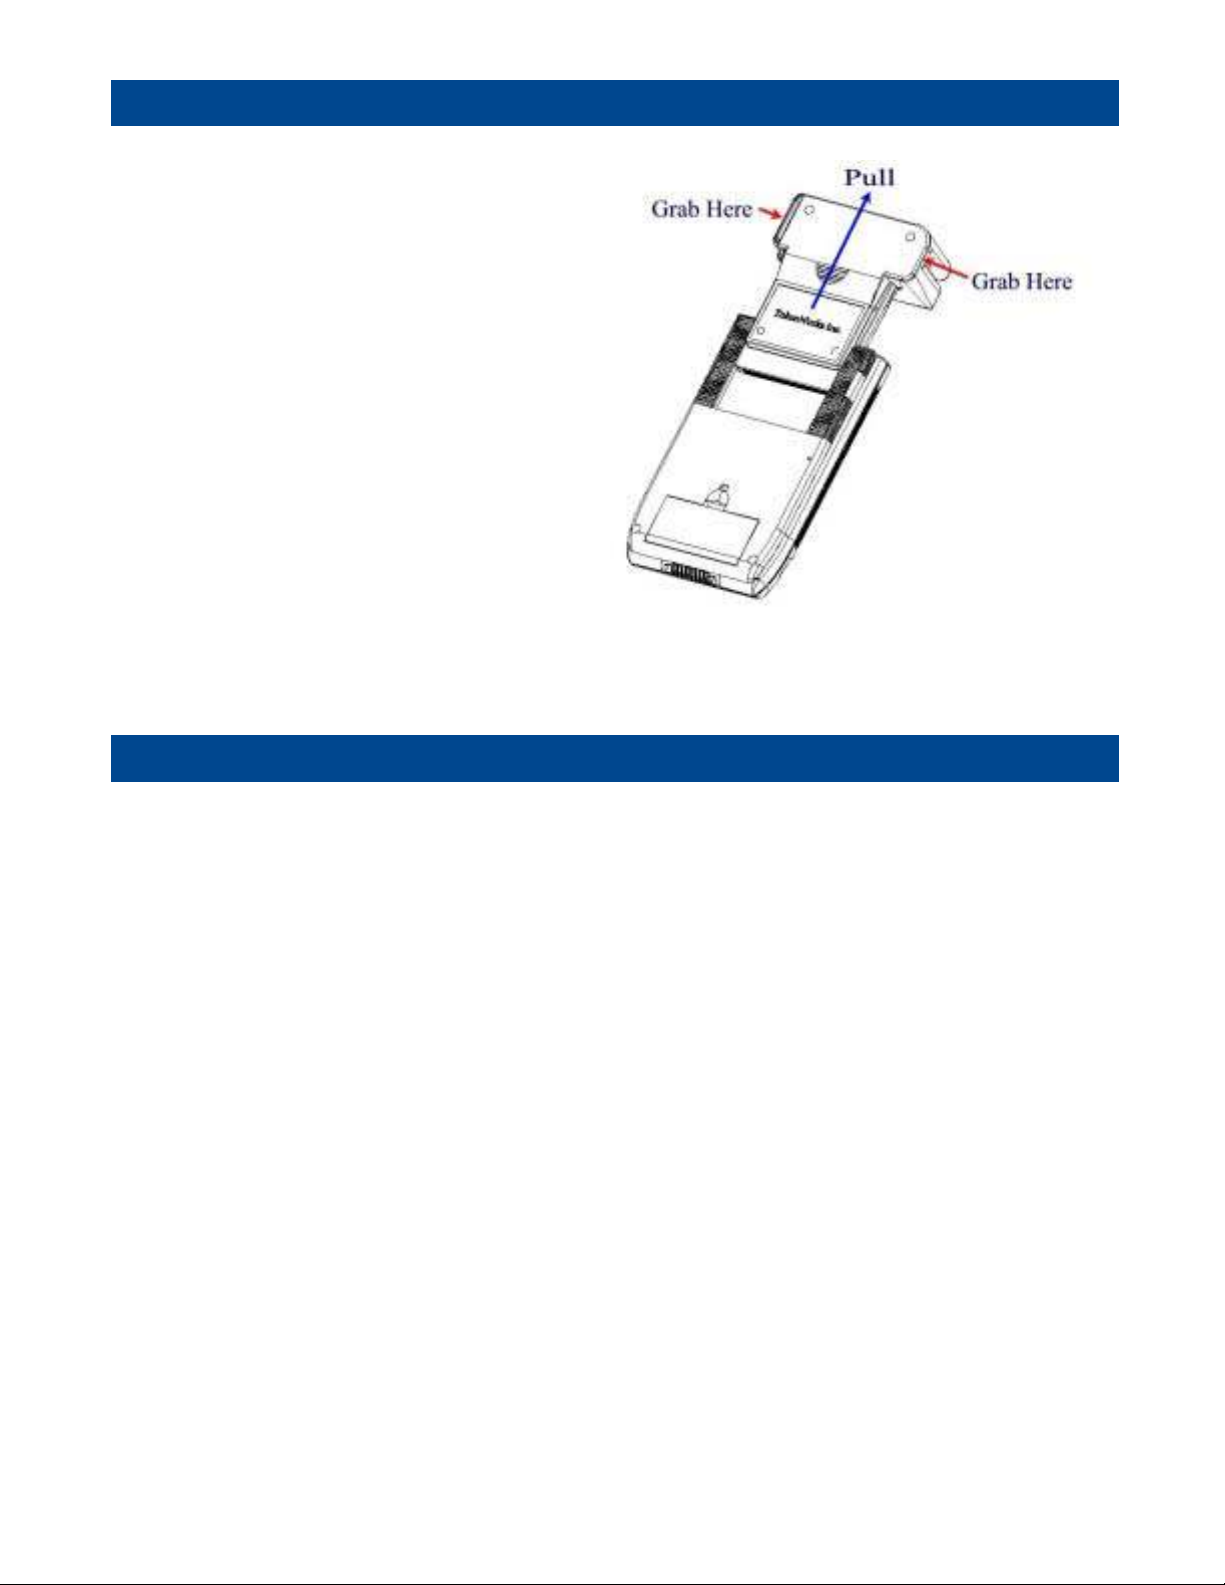
CardTool Rem oval
To re mo ve the CardTo o l, e ithe r
use the thumb stop o n the back
o f the unit to gradually push it
o ut o f the e xpansio n slo t o r grab
the CardTo o l at the base o f the
c ard slo t and pull it away fro m
the Hands pring Viso r in the
same plane as the e xpans io n
slo t. Try no t to grab the
CardTo o l by the to p and bo tto m
but rathe r e ac h side at the b ase
o f the c ard slo t. Grabbing the
to p and bo tto m o f the CardTo o l
will ge ne rate a fo rc e c o mpo ne nt,
whic h will inc re ase the fric tio n
and make it harde r to re mo ve . No te : If the Vis o r is turne d o ff, re mo val o f the CardTo o l
(o r any o the r mo dule ) turns the Vis o r o n.
Ma int enance a nd Ge nera l Care
• The CardTo o l is no t wate rpro o f. Do no t e xpo se to rain o r m o is ture
• Do no t dro p the CardTo o l o r s ubjec t it to stro ng impac t.
• Pro te c t it fro m te mpe rature e xtre me s. Do no t le ave o n the das hb o ard o f a c ar
o n a ho t day and ke e p it away fro m he ate rs and o the r he at s o urc e s.
• Do no t s to re o r us e yo ur CardTo o l in any lo catio n that is e xtre me ly dusty, damp
o r we t.
• Ens ure the magne tic he ads are o c c asio nally c le ane d with c o mm e rc ially
available magne tic c le aning cards.
• Cle an e xte rio r o f c ase with a dry lint fre e c lo th and do no t us e abrasive c le aning
pro duc ts .
Card Viso r Hardware Manual Page 1 5 o f 3 2
Resett ing the Handhe ld
Unde r no rmal c irc umstanc e s, yo u will no t have to use the re se t butto n. On o c c asio ns ,
ho we ve r yo ur handhe ld may no lo nge r re spo nd to b utto ns , c ards wipe s o r sc re e n
taps . In this c as e , yo u ne e d to pe rfo rm a re se t to ge t yo ur handhe ld running again.
Performing a soft re se t
A so ft re s e t te lls the handhe ld to s to p what it’s do ing and start o ve r again. All re c o rds
and e ntrie s sto re d in yo ur handhe ld are re taine d with a so ft re s e t.
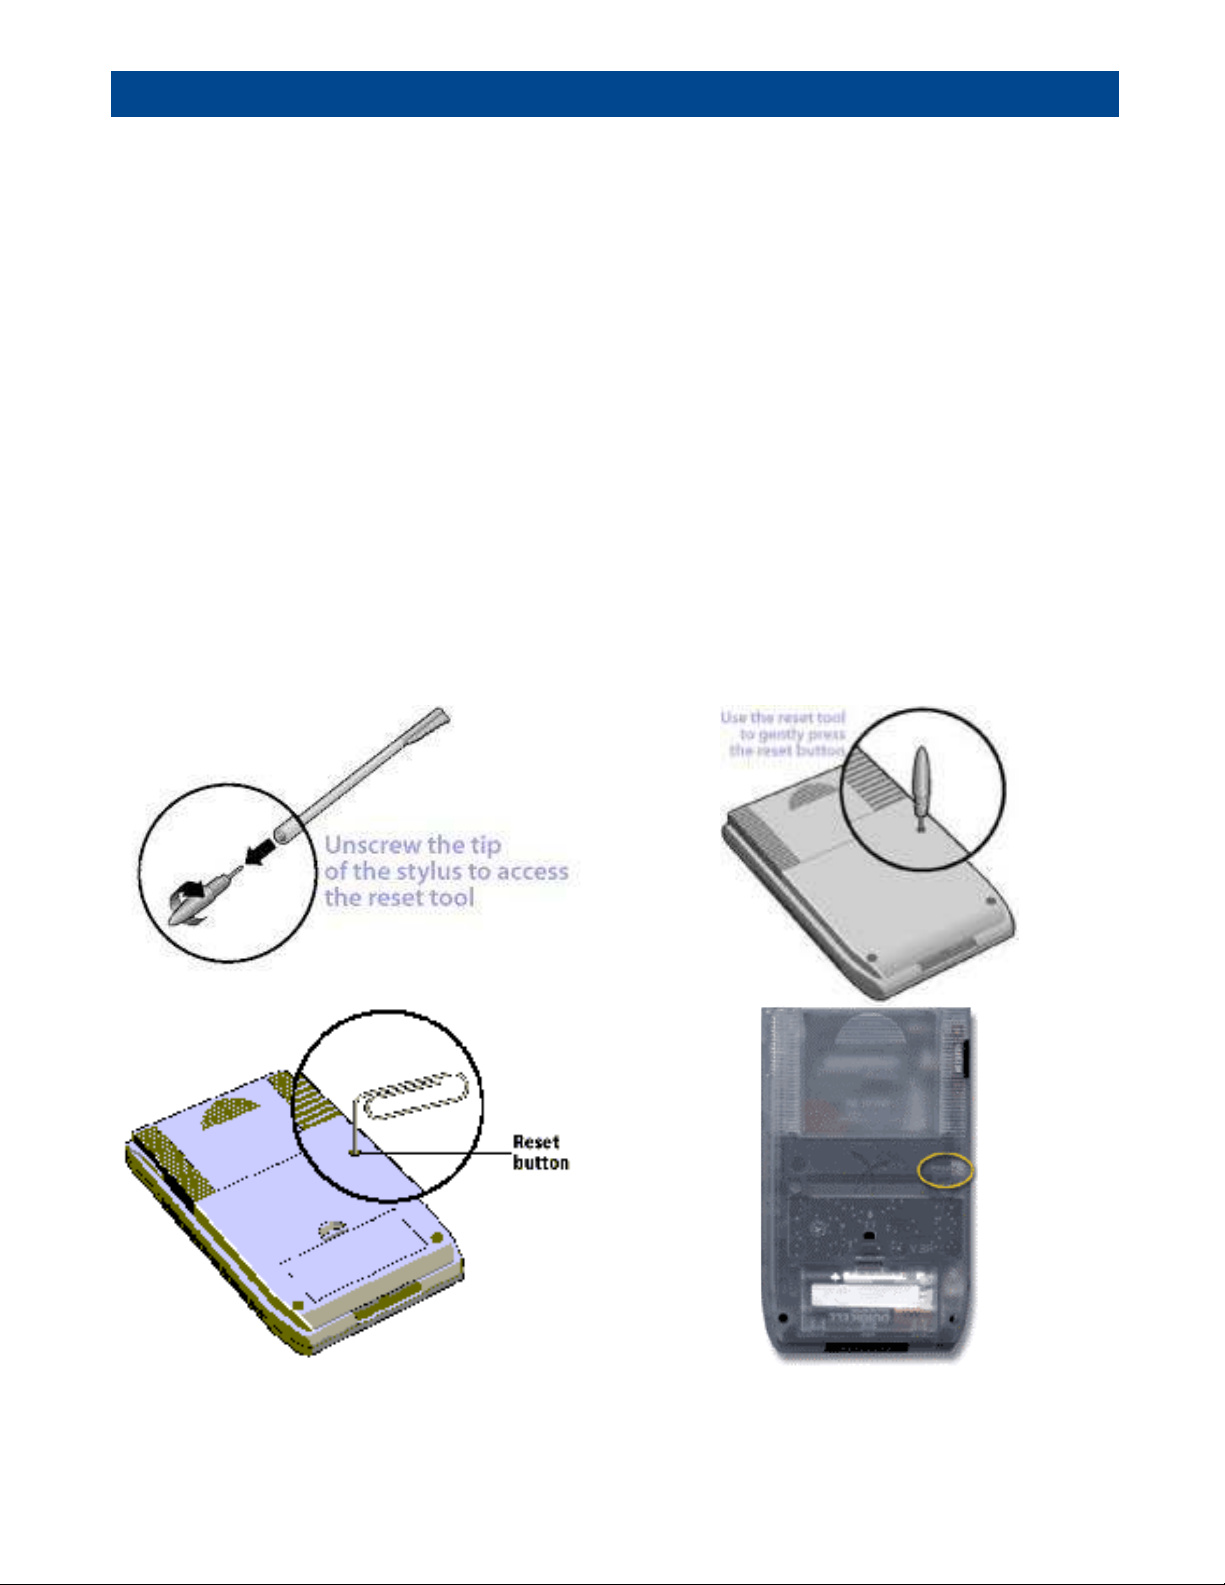
Lo c ate the Stylus o n the right s ide o f the handhe ld. If yo u uns c re w the tip o f the
Stylus (the e nd yo u write with), yo u'll no tic e a blunt plastic pin, whic h fits e xac tly into
yo ur handhe ld's re s e t ho le . Or, yo u c an unfo ld a pape r c lip (o r s im ilar o bje c t without a
sharp tip), to ge ntly pre s s the re s e t butto n inside the ho le o n the bac k pane l o f yo ur
handhe ld. Afte r a so ft re s e t, the Ge ne ral Pre fe re nc e s s cre e n will display the c urre nt
time and date. Make sure the date / time is ac c urate be fo re pro c e e ding. Re mo ve
and re -ins e rt the CardTo o l re ade r to re -as so ciate the Date Bo o k b utto n with the
CardVis o r applic atio n. The n pre ss the Date Bo o k butto n and swipe a c ard.
Lo c atio n o f Re set Ho le – Viso r De luxe , Pro , Ne o ,
Platinum,
Card Viso r Hardware Manual Page 1 6 o f 3 2
Performing a Hard Rese t
Warning: A HARD RESET WILL ERASE ALL TRANSACTION DATA
Do n't pe rfo rm a hard re s e t unle s s the s o ft re se t has no t wo rke d and yo u've bac ke d
up yo ur data, o r yo u're willing to lo s e the trans ac tio n data.
To pe rfo rm a hard re se t:
1 . Ho ld do wn the po we r (o n/ o ff) b utto n o n yo ur de vic e . The po we r butto n o n
Viso r o rganize rs is o n the fro nt.
2 . While ho lding do wn the po we r butto n, turn o ve r yo ur de vic e s o that yo u c an
se e the b ac k o f it. Using the re se t to o l, an unfo lde d pape r c lip o r a similar
small blunt-tippe d o bje ct, ge ntly pre ss the re se t ho le o n the b ac k. Se e
Whe re 's the re se t ho le in the Hardware Re fe re nc e Guide .
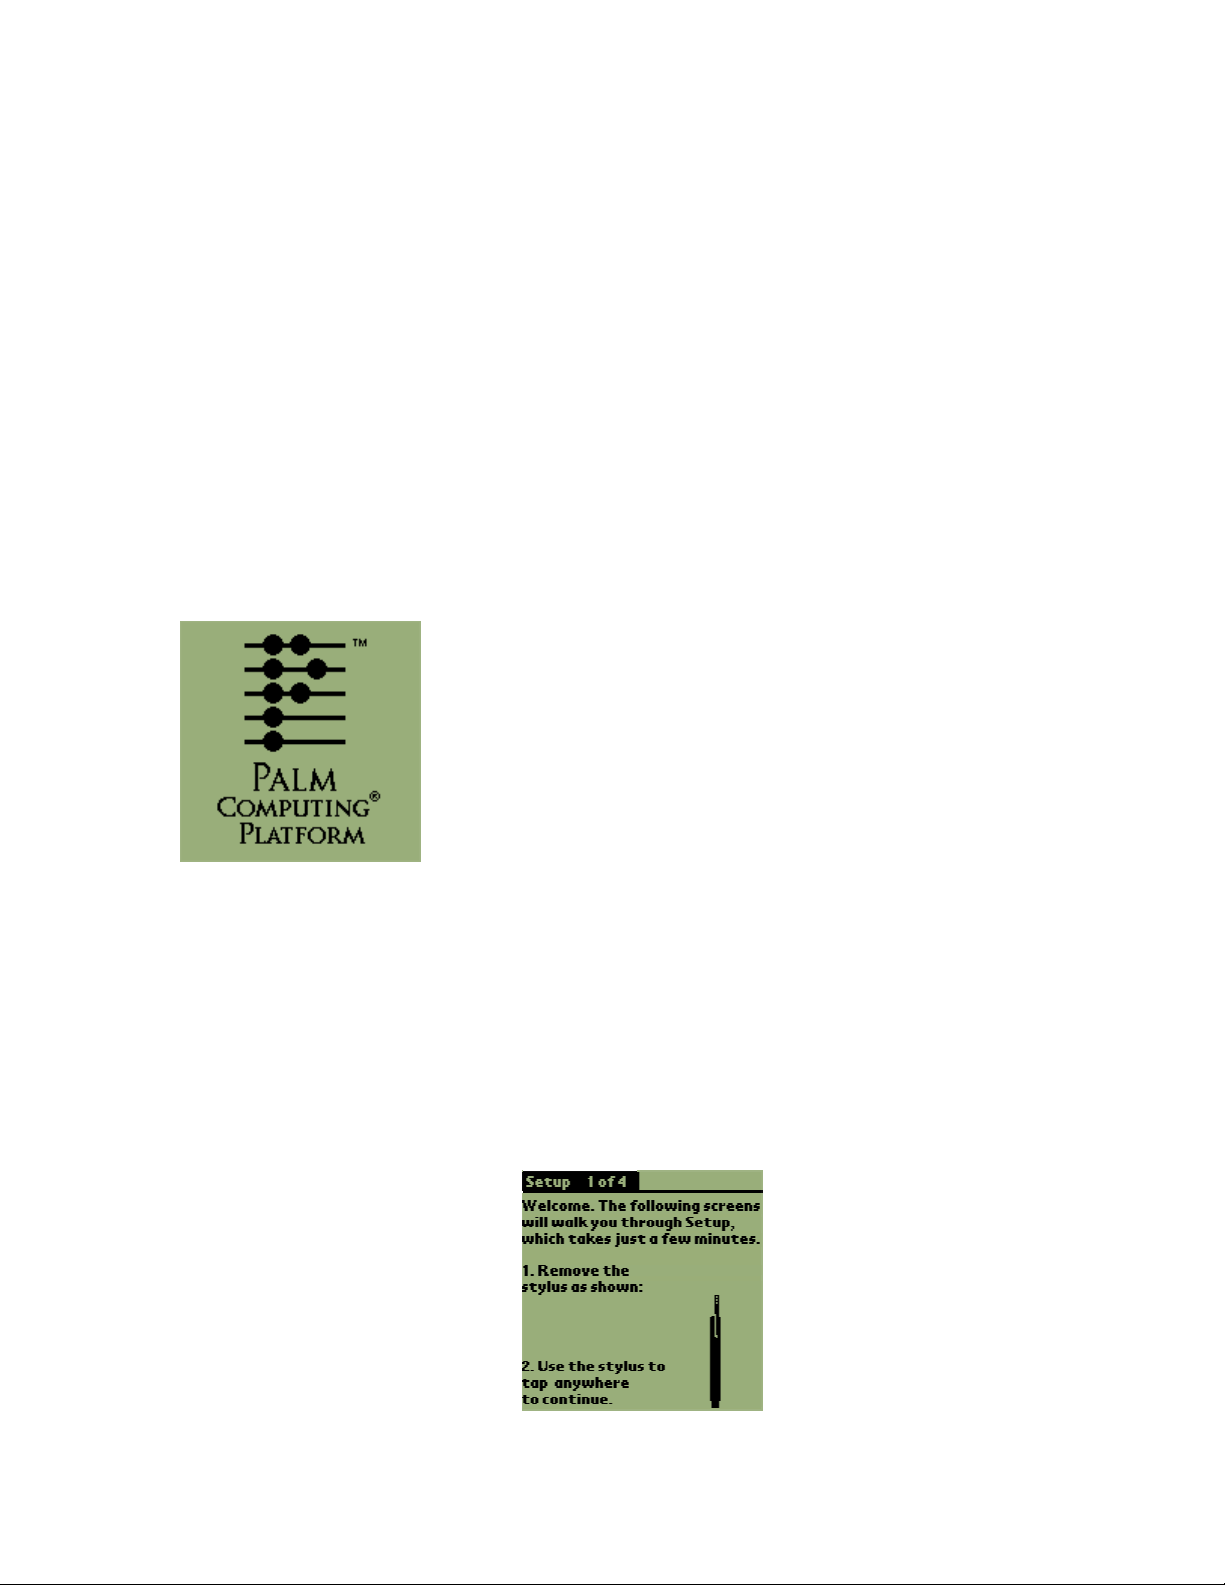
3 . Whe n the de vic e 's s c re e n displays the Palm Co mputing Platfo rm lo go , re le ase
the po we r butto n.
4 . A me ssage will appe ar warning that yo u are abo ut to e rase all the data sto re d
o n yo ur handhe ld. In re spo nse , do o ne o f the fo llo wing:
o Pre ss the up sc ro ll butto n o n the fro nt pane l o f yo ur handhe ld to
c o mple te the hard re se t, e rasing e ve rything o n yo ur de vic e
o r
o Pre ss any o the r b utto n to be gin a so ft re se t, le aving yo ur data intac t.
5 . Yo ur de vic e will the n take yo u thro ugh a se rie s o f s cre e ns to c alibrate the
digitize r and ve rify the time a nd date .
No te : A hard re s e t do e s no t de le te the c urre nt date and tim e . It do e s re s to re o the r
se ttings to the fac to ry de fault. .

Card Viso r Hardware Manual Page 1 7 o f 3 2
Pow er Dow n Rese t - AAA bat tery devic es only
A po we r do wn re se t e rase s all the data o n yo ur de vice , inc luding a fe w se ttings (like
date and time ) whic h are unto uc he d by a hard re s e t. By re mo ving yo ur AAA batte rie s,
yo u allo w the c apac ito r to drain, e s se ntially re turning yo ur de vice to its "facto ry s tate ."
A po we r do wn re se t is o nly fo r de vic e s that us e AAA alkaline b atte rie s (i.e . no t a
re c harge able handhe ld).
Warning: A po we r do wn re se t will e rase e ve rything o n yo ur de vic e e xce pt the
CardVis o r pro gram, whic h is s to re d in the CardTo o l re ade r. All yo ur data will be
re m o ve d, and fo rmats, pre fe re nc e s and o the r se ttings are re sto re d to the ir fac to ry
de fault se ttings . Do n't pe rfo rm a po we r do wn re se t unle ss yo u've bac ke d up yo ur
data, o r yo u're willing to lo se e ve rything. A POWER DOWN RESET WILL ERASE ALL
TRANSACTION DATA
1 . Re mo ve the AAA batte rie s fro m the b ac k o f yo ur handhe ld.
2 . Le ave the batte rie s o ut o f the handhe ld fo r at le ast 3 0 minute s .
3 . Pe rfo rm five o r mo re soft reset s in a ro w, e ve n if the sc re e n do e s no t appe ar to
turn o n.
4 . Inse rt the b atte rie s. If yo u have any do ubts abo ut ho w o ld yo ur batte rie s are ,
re plac e the m with ne w AAA alkaline b atte rie s, pre fe rably a go o d brand
o ptim ize d fo r lo w-drain de vic e s .
5 . If yo ur de vic e do e sn't auto matic ally turn o n whe n yo u ins e rt the b atte rie s (o r if,
o nc e it turns o n, the date and time have no t be e n re se t), yo u have n't
suc c e ssfully pe rfo rme d a po we r do wn re se t. Try the ste ps abo ve again. Wait a
little lo nge r this time be fo re ins e rting the batte rie s, and pe rfo rm a fe w m o re
so ft re s e ts while the b atte rie s are o ut.
6 . Afte r a suc c e ssful po we r do wn re se t, yo u’ll ne e d to pe rfo rm all the s te ps
asso ciate d with s e tting up the de vic e like s e tting the time , ins e rting the
CardTo o l re ade r, e tc .
Batte ry Life for Handheld Com put er
The CardTo o l use s the batte ry po we r fro m the Handspring Viso rhandhe ld
c o mpute r. If yo u le ave the m o dule ins talled and use it e ve ryday, yo u c an e xpe c t a
fre s h s e t o f alkaline AAA batte rie s to last abo ut 2 -3 we e ks o r 6 0 0 0 swipe s , whic he ve r
c o me s firs t. To c o ns e rve batte ry life , re m o ve the CardTo o l fro m the Viso r whe n no t in
us e .
1 . If the b atte rie s be c o me lo w in the c o urs e o f no rmal use , an ale rt appe ars o n the
handhe ld sc re e n de s c ribing the lo w batte ry c o nditio n. If this ale rt appe ars ,
pe rfo rm a Ho tSync ® o pe ratio n to b ac k up yo ur data b e fo re yo u re plac e the

Card Viso r Hardware Manual Page 1 8 o f 3 2
batte rie s. This he lps pre ve nt ac cide ntal data lo ss.
2 . Whe n re plac ing the b atte rie s b e gin by turning yo ur handhe ld o ff (so the re is no
sc re e n dis play). Ne ve r re mo ve the b atte rie s while yo ur handhe ld is turne d o n.
Whe n re plac ing the batte rie s , always us e ne w alkaline batte rie s. Batte rie s fro m
o the r de vic e s (TV re mo te , e tc .) will no t have e no ugh po we r to turn o n the Viso r.
3 . Whe n yo u re mo ve the b atte rie s, the b uilt-in b ac kup po we r o f yo ur handhe ld
maintains m e mo ry data fo r a pe rio d o f up to o ne minute . Whe ne ve r yo u re mo ve
the b atte rie s , re plac e the m im me diate ly. If yo u e nc o unte r any diffic ultie s in the
c o urs e o f batte ry re plac e me nt, re install the o riginal batte rie s and wait a fe w
minute s fo r the backup po we r to re c harge .
4 . If yo u le ave draine d batte rie s in yo ur handhe ld fo r an e xte nde d pe rio d o f time , yo u
will lo s e all o f the s to re d data. If yo u install use d batte rie s in yo u handhe ld, the
handhe ld may lo ck up. If this happe ns, re place the batte rie s with ne w o ne s and
re s e t yo ur handhe ld. (Se e “ Re se tting the handhe ld” se c tio n o f this guide fo r
de tails .) Afte r yo u re se t yo ur handhe ld, pe rfo rm a Ho tSync o pe ratio n to re sto re the
data fro m yo ur de skto p c o mpute r.
5 . Fo r Handspring Vis o rs with built-in re c harge able Lithium Io n batte rie s (Pris m,
Edge , Pro ), re turn the unit to the c harging base o r bar c o de re ade r c radle unde r
AC po we r whe ne ve r no t in us e . No te : This e ns ure the s e mo de ls ge t the ir batte rie s
c o nstantly to ppe d o ff.
6 . Fo r Handspring Vis o rs using alkaline b atte rie s , c o nside r purc hasing re c harge able
NiMH AAA batte rie s. A lis t o f batte rie s/ c harge rs is pro vide d o n the To ke nWo rks
we b site in the suppo rt se c tio n.

Card Viso r Hardware Manual Page 1 9 o f 3 2
Trouble Shoot ing – Ha ndhe ld Com put er & M a gne tic St ripe Re ader
Pro b le m Po s sib le Pro b le m Po s sible So lutio n
Viso r is stuc k in
po we r d own mo de
Try s o ft re se t – turn o ve r Ha nds pring Vis o r s o that yo u c an se e the b ac k o f it.
Us ing the re se t to o l, a n unfo lde d pa pe r c lip o r a s im ila r s ma ll b lunt-tippe d
o bje c t, ge ntly pre s s the re se t ho le o n the b ac k. Se e the Re s e tting the
Handhe ld se c tio n.
Batte rie s a re lo w o r
de a d
Re pla ce the b atte rie s a nd try s o ft re s e t. If this do e s no t wo rk, try diffe re nt
b atte rie s fo llo we d by ano the r s o ft re se t. If unit s till do e s wo rk, try hard re se t.
If a hard re s e t do e s no t wo rk, the n try a Po we r Do wn. Se e the Re s etting the
Handhe ld se c tio n.
Batte rie s o n Viso r
are ins ta lle d
inc o rre c tly.
Re ins tall b atte rie s c o rre ctly. Make s ure the (+) and (-) signs on the b atte rie s
line up with the s igns o n the ins ide o f the batte ry c o mpa rtm e nt. No te : if
b atte rie s we re m is -ins talle d, the n re mo ve batte rie s , wait 2 0 m inute s fo r
inte rnal c ap ac ito r to dis c harge and re ins tall
Unit d o e s no t po we r
up – Sc re e n Bla nk
Hardwa re fa ilure Co ntac t To ke nWo rks Te c hnic al s up po rt. No te : if Ha nds pring Viso r no t
purchas e d fro m To ke nWo rks , the n c o ntac t Handspring te chnic al supp o rt at
www.ha nd spring.c o m
Magne tic s tripe is
dirty
Cle a n s tripe with s o ft c lo th.
Ma gne tic Card m ay
be da ma ge d
Try ano the r c ard.
Card To o l is hung Run Re se t m e nu ite m fro m ma in m e nu. If s till e xpe rie nc ing pro b le ms ,
pe rfo rm so ft re s e t with s tylus o r p ape r c lip. Se e the Re s e tting the Ha ndhe ld
s e ctio n.
Ma gne tic Card m ay
be m is s-aligne d
during card swipe
Ensure c ard is be ing he ld flus h to b ase o f c ard trac k during swipe . Try s wiping
at diffe re nt s pe e ds , in a diffe re nt d irec tio n, ho ld ing the c ard a t diffe re nt
lo c a tio ns , o r c hanging the o rie ntatio n o f the Ha nd spring.
Card Vis o r is no t
de c o d ing s wipe d
cards - "swipe
again" dis playe d
Firmware m e mo ry
re q uire s re flas h
Re m o ve and re ins e rt CardTo o l re a de r. If Card We lc o me app lic atio n
auto ma tically re fla she s firmware , the n this pro ba bly will re so lve the pro b le m .
If no t, Re mo ve and re ins e rt Card To o l re a de r aga in. Do no t hit OK butto n to
la unc h Ca rd Vis o t b ut ins te ad, s e le c t p ull-do wn me nu ico n (b e lo w ho us e ic o n
in graffiti are a), and tap o n ‘ re flash no w’ me nu ite m. This will fo rc e a firm ware
re fla she d .
Card Vis o r do e s no t
re s po nd to c ard
s wipe and d o es no t
display ‘ Swipe A
Card’ me ss age
whe n first
la unc he d. Card To o l is hung Run Re se t m e nu ite m fro m ma in m e nu. If s till e xpe rie nc ing pro b le ms ,
pe rfo rm so ft re s e t with stylus o r pa pe r c lip.
Card Vis o r
applic a tio n no t
vis ib le o n Main
applic a tio n
la unc he r s c re e n
Cate go ry no t s e t to
All o r unfile d.
Se le ct All o r unfile d in the to p right c o rne r o f the s c re e n.
Card Vis o r do e s no t
la unc h whe n Da te
Bo o k butto n is
pre ss e d
Date Bo o k b utto n
no t as so c iate d with
Card vis o r Applic atio n
Re m o ve and Re ins e rt the CardTo o l re a de r. This will a uto matic ally as so c iate d
the CardVis o r app lic atio n with the Da te Bo o k and Addre s s Butto ns (Ad dre s s
Butto n is fo r bar c o de s ve rs io n o nly)
Swipe data no t
displaye d in
Me m o Pad
Applic atio n
The Me mo Pad
Cate go ry is se t to
displa y o nly pe rso na l
o r b us ine s s m e mo s .
Change Cate go ry to ‘ All’ o r ‘ CardViso r.’ To s e e Unparse d lic e ns e d ata, se t
c ate go ry to ‘RawData’

Card Viso r Hardware Manual Page 2 0 o f 3 2
For ID Scanners w it h Bar Code Rea de r Cradle
This section applies to customers with the Bar Code Reader Cradle
Bar Co d e Re ade r Cra dle Upgrad e
Custo me rs may upgrade a m agne tic
stripe ve rs io n by purc hasing the Bar
Co de Re ade r Cradle
1 . Bar Co de Re ade r Cradle
2 . SC-2 0 0 0 Ho tSync Cable with
Ho tSync butto n
3 . AC – DC Po we r supply.
4 . Wall Charge r & 4 AAA NiMh
re c harge able batte rie s (no t
sho wn)
CV_ I_BC, CV_II_ BC, CV_III_BC
CardVis o r so ftware lo ade d into the
CardTo o l®Re ade r, a Handspring™
Viso r™ handhe ld c o mpute r, the Bar
Co de Re ade r Cradle with AC adapte r,
a USB Ho tsync ™ Cradle , Palm ™
De skto p applic atio n fo r Windo ws ™ o r
Macinto sh™, SC-2 0 0 0 USB Ho tsync
c ab le , a wall c harge r with fo ur
8 0 0 mAh AAA re c harge able b atte rie s,
CardVis o r CD and do c um e ntatio n.
CV_ II_ BC_ Pro , CV_ III_ BC_ Pro , CV_IV_ BC_ Pro
Pac kage inc lude s CardViso r s o ftware
lo ade d into the CardTo o l®magne tic
c ard re ade r, a Hands pring™ Viso r™
Pro handhe ld c o mpute r, the Bar
Co de Re ade r c radle with AC adapte r,
a USB Ho tsync ™ c harging Cradle with
AC adapte r, Palm™ De s kto p
applic atio n fo r Windo ws™ o r
Macinto sh™, SC-2 0 0 0 USB Ho tsync
c ab le , CardViso r CD and
do c ume ntatio n.
Other manuals for CardVisor ID
1
Table of contents
Other Tokenworks Scanner manuals

Tokenworks
Tokenworks IDVisor Smart User manual

Tokenworks
Tokenworks IDVisor M310 User manual

Tokenworks
Tokenworks IDVisor Z22 CounterTop User manual

Tokenworks
Tokenworks IDvisor Mobile User manual

Tokenworks
Tokenworks CardVisor User manual

Tokenworks
Tokenworks IDVisor Touch User manual

Tokenworks
Tokenworks CardVisor Instructions for use

Tokenworks
Tokenworks CardVisor ID User manual

Tokenworks
Tokenworks AgeVisor Touch User manual


