Tokyo Shinyu Silwatch User manual

Indicating with vibration and characters
Indicating with vibration and characters
Indicating with vibration and characters
User’s Manual
TREMBLING
TREMBLING
TREMBLING
TREMBLING
TREMBLING
Tokyo Shinyu Co., Ltd.
Manufacturer & Sales
Shinjuku KM Bldg. 6F, 1-14-5 Shinjuku, Shinjuku-ku, Tokyo 160-0022, Japan
http://www.shinyu.co.jp/
E-mail : info@shinyu.co.jp
TEL
+81-3-3358-8000
FAX
+81-3-3358-6330
Revised September 2019
2019
MODEL
Ver.1.0
SYSTEM
ONE-WAY
Communication
Japan Smart Energy Co., Ltd.
This CO2reduction attestation was given after Japan Smart Energy Co., Ltd. examined and checked this printing system.
It has participated in the forest regeneration enterprise (3,000 trees in the quasi-national park) of Bali state in Indonesia through printing by MCP.
CO2emissions of this printed matters was reduced by
17.85 kg by reusing the 1.76-kg aluminum plate which is
used in the printing process of Tokyo Shinyu Co., Ltd
Minus Carbon Printing Systems
The amount of CO2reduction of 17.85 kg
Equals to CO2quantity absorbed in one year by
about 1.28 trees of Japanese cedar of 50 years
of old (22 m in height and 26 cm in diameter).
(Source: Forestry white paper)
Height
22 m
Diameter
26 m

Thank you for purchasing a "Silwatch". Please use it correctly after fully reading
this operation manual before use. Please keep this User’s Manual at hand and
read it if needed.
Before Use
Safety Information
・・・・・・・・・・・・・・・・・・・・・・・・・・・・・・・・・・・・・・・・
1
Handling Requirements ・・・・・・・・・・・・・・・・・・・・・・・・・・・・・・・・・・・・ 1
About Radio Waves ・・・・・・・・・・・・・・・・・・・・・・・・・・・・・・・・・・・・・・・ 1
Daily Care ・・・・・・・・・・・・・・・・・・・・・・・・・・・・・・・・・・・・・・・・・・・・・・・ 2
Troubleshooting ・・・・・・・・・・・・・・・・・・・・・・・・・・・・・・・・・・・・・・・・・・ 2
Charging Silwatch
・・・・・・・・・・・・・・・・・・・・・・・・・・・・・・・・・・・・・・・・
2
Part Names and Functions
Wristwatch Receiver (SWR-2130T) ・・・・・・・・・・・・・・・・・・・・・・・・・・ 3
Charger (SWC-1140) ・・・・・・・・・・・・・・・・・・・・・・・・・・・・・・・・・・・・・・ 4
Repeater (SW-0123T) ・・・・・・・・・・・・・・・・・・・・・・・・・・・・・・・・・・・・・ 4
Transmitter (SW-N124T) ・・・・・・・・・・・・・・・・・・・・・・・・・・・・・・・・・・・ 5-6
Preparation for Using Silwatch
Charge the wristwatch receiver
・・・・・・・・・・・・・・・・・・・・・・・・・・・・
7-8
Power ON ・・・・・・・・・・・・・・・・・・・・・・・・・・・・・・・・・・・・・・・・・・・・・・・ 9
How to Use
Setting Menu ・・・・・・・・・・・・・・・・・・・・・・・・・・・・・・・・・・・・・・・・・・・・・ 10
Received history ・・・・・・・・・・・・・・・・・・・・・・・・・・・・・・・・・・・・・・・・・ 11
Time setting ・・・・・・・・・・・・・・・・・・・・・・・・・・・・・・・・・・・・・・・・・・・・・ 12
Alarm setting ・・・・・・・・・・・・・・・・・・・・・・・・・・・・・・・・・・・・・・・・・・・・・ 13-14
Buzzer setting ・・・・・・・・・・・・・・・・・・・・・・・・・・・・・・・・・・・・・・・・・・・・ 15
Wireless setting ・・・・・・・・・・・・・・・・・・・・・・・・・・・・・・・・・・・・・・・・・・ 16
Display setting ・・・・・・・・・・・・・・・・・・・・・・・・・・・・・・・・・・・・・・・・・・・ 17
Operation setting ・・・・・・・・・・・・・・・・・・・・・・・・・・・・・・・・・・・・・・・・・ 18
Eco mode ・・・・・・・・・・・・・・・・・・・・・・・・・・・・・・・・・・・・・・・・・・・・・・・ 19
Set while charging ・・・・・・・・・・・・・・・・・・・・・・・・・・・・・・・・・・・・・・・・ 20-21
How to Attach/Detach Band ・・・・・・・・・・・・・・・・・・・・・・・・・・・・・・・・ 21
FAQ ・・・・・・・・・・・・・・・・・・・・・・・・・・・・・・・・・・・・・・・・・・・・・・・・・・・・・・ 22
Specifications ・・・・・・・・・・・・・・・・・・・・・・・・・・・・・・・・・・・・・・・・・・・・・ 23
Table of Contents

Before Use
1 2
Safety Information
Keep in mind that it may cause an unexpected injury by wearing wristwatch receiver when falling to the ground or contacting with other peoples. When
you touch especially infants, be extra cautious of an injury or allergy.
Insert firmly the AC/DC adaptor to be connected to the transmitter, the repeater, and the charger so that there is no loosening. If the insertion is
insufficient, it may cause ignition, failure, electric shock, and fire.
Do not use or leave it in the places of high temperature (near fire, near a stove, under the flaming sun, etc.). It may cause ignition, burst, failure, and fire.
Do not put it in a microwave oven, a high pressure container, etc. It may cause ignition, burst, failure, and fire.
Do not put it in fire or overheat it. It may cause ignition, burst, failure, and fire.
Do not decompose or modify or repair by yourself. It may cause ignition, failure, electric shock, and injury. Tokyo Shinyu Co., Ltd. shall not be liable to
any fault arisen from modification in this product. Modification of the transmitter violates radio law.
Although the wristwatch receiver has waterproofing performance, if it should be used in wet condition, such as water, it may cause failure.
Do not charge when the wristwatch receiver is in wet condition. It may cause electric shock, failure and fire. The failure by charging in wet condition is
not covered by the warranty and cannot be repaired.
Pull out the AC/DC adaptor of the transmitter and the repeater from the outlet for safety when they have not been used for a long time, such as a travel.
Remove the batteries if used. It cause fault current, leakage and failure.
Install and fix the transmitter, the repeater and the wiring cord so that they are not wound round a head or hands and feet. It may cause an unexpected
injury. Fix especially the microphone code for baby sensors firmly in a bit shorter. Keep in mind that there is a possibility of winding round a head or
hands and feet, or swallowing.
About Radio Waves
When the transmitter, the repeater, and the wristwatch receiver are used near the consumer electronics, such as OA equipment, such as a personal
computer and a printer, television, a microwave oven, and cold storage, the travel distance of the electric wave may become short.
The travel distance of the electric wave may become short according to the status of use of steel rod, concrete, heat insulating materials, fireproof
glass, etc. which block advance of the electric wave.
Handling Requirements
Although the wristwatch receiver has the waterproofing performance of daily life water resistance, it is not necessarily full water proof. Do not operate in
the condition where it is flooded with water inside the main body or in rain and with water drops. Water may permeate and the inside corrodes. When
proved as a result of examination that it is failure by these wet conditions, it is not covered by the warranty.
Do not pour water on the transmitter, the repeater and the charger. The transmitter, the repeater and the charger are not water proved.
Keep it in mind that if excessive force is applied to the wristwatch receiver, the LCD screen, the internal substrate, etc. will be damaged and fails. It is
not covered by the warranty even if there is no breakage outside.
Attach neither the transmitter nor the repeater in the places where such as the outdoors and a bathroom where water may exist. Do not also attach
them in the places where the door, the sliding door, etc. vibrate. It may cause the injury and product failure by falling on the ground.
Avoid excessive hot, low temperature and humid. (Use it within the limits of the operating temperature.)
Wipe dirty with soft cloth. Do not use benzene, thinner alcohol, detergent, etc. as the exterior and characters may deteriorate. When dust etc. adheres,
use it after wiping off lightly with soft cloth etc.
Although the LCD screen currently used for the wristwatch receiver is made from very advanced technology, the dots (points) which are not turned on
in part and the others (points) which are always turned-on may exist. Please note that these are not failure.
When it is moved to the warm room suddenly from the cold outdoors and when used in the place where the humidity is high or the humidity changes
suddenly such as near the outlet of the air-conditioner, etc., water drops may be attached to the inside of the wristwatch receiver (it is called dew
condensation). Keep in mind that it may cause corrosion and failure by humidity if it is used under such conditions.
Do force neither a nail nor a hard object on the LCD screen or the surface of the button strongly. It may cause development of cracks or breakage.
Wipe the LCD screen with a dry soft cloth. It may cause failure if a glass cleaner etc. is used.
The transmitter has structure which cannot be decomposed easily in order to prevent illegal modification. Modification is forbidden by radio law as well.
Charge before use when using it for the first time or when it has not been used for a long time. (During charge, although the main body may get warm, it
is not unusual.)
The lithium ion battery of the wristwatch receiver may be activated and operated in stable condition by repeating charge and discharge about 2 to 3
times before use.
When the fresh battery is exhausted in short time after being charged and the phenomenon in which consumption of the battery becomes earlier than
before may have been caused by the dirt of the battery or the battery contacts of the main body and the characteristics of lithium ion battery.
The phenomena in which consumption of the battery becomes earlier than before and the new battery is exhausted in short time after being charged
may be caused by the dirt which is adhered to the contacts of the wristwatch receiver and the battery contacts of the charger except that a remaining
amount of the battery life has decreased. As a result, required electric current may be unable to be taken out or the reaction of the wristwatch receiver
may become blunt by insufficient charging.
Daily Care
*Common Matters
As water and sweat adhering to the casing or the band may soil a cuff or may cause a rash, wipe them off with soft cloth etc.
Do not use a detergent for cleaning. The casing and the band may deteriorate.
*Wristwatch Receiver
When the charging terminals become dirty, wipe gently by soft projection, such as a swab.
*Charger
When the charging terminals become dirty, wipe with soft cloth etc. gently.
Troubleshooting
If you think it may have failed, charge a little early after checking a remaining amount of the battery of the wristwatch receiver. Check connection of the
AC adaptor of each equipment if it still is not improved. When the transmitter and the repeater are used by the battery, check whether a remaining
amount of the battery life has run out or it is installed firmly. When not improved, do not hesitate to ask our company or a dealer.
Warning Do not decompose or touch the inside with power on.
There is a possibility of an electric shock.
Charging Silwatch
*Charging
The lithium ion battery deteriorates rapidly by an overcharge and over-discharge. In the case of dead battery, charge promptly.
* The over-discharge means that the battery is used up until a remaining amount of the battery life will be 0% and left (discharged further) as is. The
overcharge means that the battery is charged further continuously for a long time in spite of fully charged.
Use the charger for exclusive use only for charging. It may cause an accident if other chargers are used for charging.
Remove the fully charged Silwatch from the charger within two to three days. If the fully charged battery is left for a long period of time, the battery is
adversely affected (overcharge etc.).
Do not use the charger in the wet condition. It may cause an electric shock and a short circuit.
Use the voltage only specified in the name plate of the charger. It may cause insufficient charging and overcharging.
Do not disassemble the charger. The device may be affected adversely.
Do not use the damaged charging cord. It may cause a short circuit or a fire.
*Precautions for Storage
Do not store Silwatch in the place of a high temperature. It may cause deteriorating the battery. Avoid especially in the train under blazing heat, etc.
When not in use for a long period of time (one week or more), remove Silwatch from the device. When storing Silwatch for a long time in the condition
with charging about 50%, it is recommended to store it in the place at temperature of 20 °C or less. Also when you storing it in a good environment,
charge once in a month (about 50%). Charge it fully once in three months when auxiliary charge is not possible once a month.
* The battery may deteriorate by leaving it in deep discharging condition (0%).
*Precautions for Use
Be sure to read user’s manual of Silwatch before using it.
Do not use Silwatch when it gets wet. It may cause failure.
Connect Silwatch to the charger correctly. When connection is insufficient, it may cause short-circuit by contact failure, or the device may not
operate.
Do not charge in the place where it is filled with heat. Do not charge at temperature of 0 °C or less or 40 °C or more.
Do not apply a strong impact or make a hole with a nail etc. to Silwatch. It may cause breakage, deformation and short-circuit, and it is extremely
dangerous.
Stop using it, if you notice the abnormalities (high temperature, bulging, etc.) of Silwatch. If using it continuously with abnormal conditions, the device
will be adversely affected and it is extremely dangerous.
When available time becomes a half as compared with the time of a new battery, it shall be judged as available life and replacement of battery is
recommended. It changes with frequency in use, storage environment, etc.
*Features of Lithium-Ion Battery
There is almost no memory effect, and capacity will not be decreased even if it repeats extension charge.
The protective circuit and the control device are incorporated in order to improve safety to the lithium ion battery
The lithium ion battery has a high energy density and compact and lightweight.
The lifetime of the lithium ion battery built in Silwatch is specified as 300 to 500 cycles.
The lifetime cycle changes greatly with service conditions, frequency, storage states, etc. a lot. Therefore, the maximum cycles cannot be
guaranteed. The available time will become shorter while using continuously even for a highly efficient battery similar to mobile phones and personal
computers, etc. Repeating frequently using Silwatch until complete stop of operation or operating it again a little later after a dead stop may shorten
the lifetime of the battery substantially.
Lithium ion batteries are consumable goods. Replace the battery promptly when the lifetime came to an end.
The lithium ion battery is used for Silwatch. Sufficient performance could be demonstrated with the wrong use and storage, and the cases were reported
that deterioration has been progressed or generation of heat, or deformation and breakage has occurred. In order to use the battery safely and correctly,
read this manual carefully.
Replacement of the battery is carried out in a responsible way by our company for a fee.
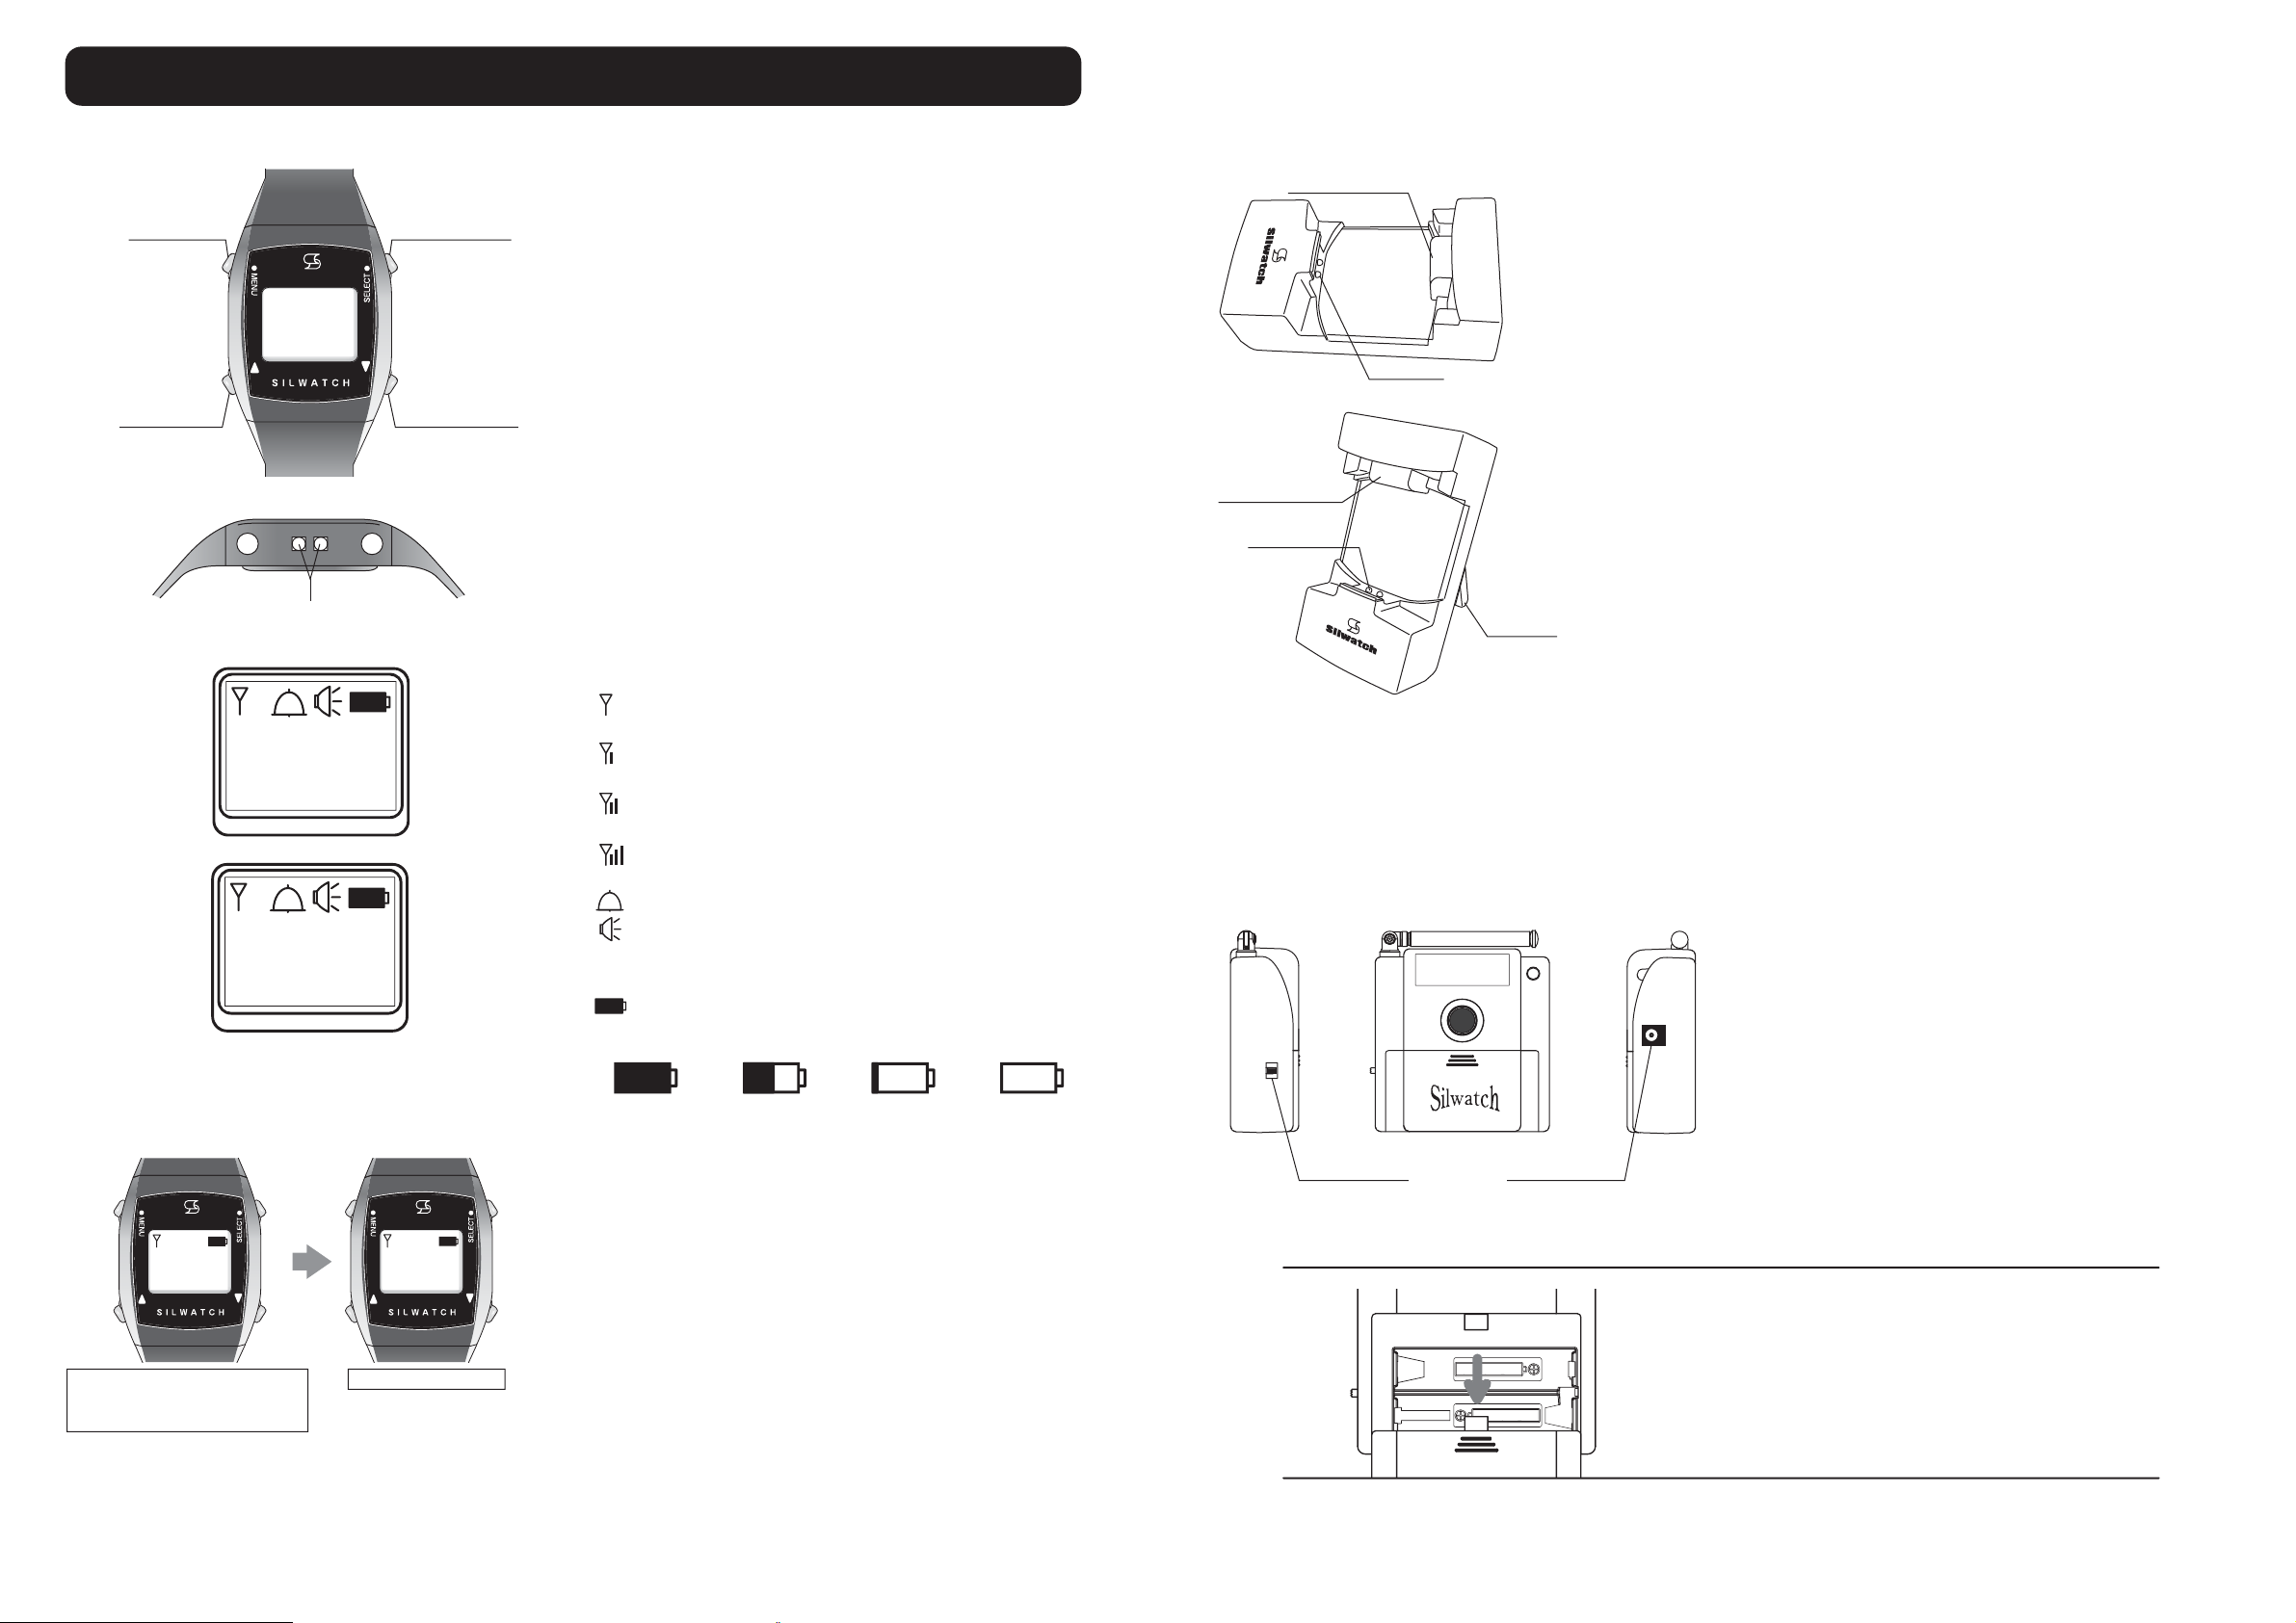
* Symbol Meaning
: Displayed when the Wireless setting is ON. It is in a
receivable state.
: One antenna is displayed when detecting an incoming
signal.
: Two antennas are displayed when it starts acquiring the
signal.
: Three antennas are displayed on completion of acquiring
the signal, and it starts vibration and a message display.
: This icon is displayed when the Alarm setting is ON.
: This icon is displayed when the Buzzer setting is ON. A
buzzer sounds on receiving or when an alarm is
activated.
: The battery level is displayed at 4 levels.
10 : 12
Call
1. Wristwatch Receiver (SWR-2130T)
Part Names and Functions
①MENU button ②SELECT button
③UP (▲) button
<Normal screen>
<On receiving>
④DOWN (▼) button
<Front>
<Side>
<Screen on receiving>
[Basic Operation]
・The LCD screen of the wristwatch receiver always displays
time in 24-hour format.
・When the wristwatch receiver receives a signal from the
transmitter, the LCD screen is lit (backlight) and a message
is displayed, along with vibration for notice.
・It returns to the normal time display after the vibration for
about 5 seconds (5 times) and backlight and message
display for about 8 seconds.
・If you want to release the vibration, etc. halfway through the
receiving, press and hold (for about 2 seconds) any of MENU,
SELECT, UP (▲) or DOWN (▼).
・The arrival distance of a radio wave is estimated to be about
170m.
(Note) It takes about 4 seconds for the wristwatch receiver to receive
a signal transmitted from the transmitter.
Full Half Charge required Empty
Vibration for about 5 seconds (5 times)
Backlight and message display for
about 8 seconds
Return to Normal screen
2. Charger (SWC-1140)
[Basic Operation]
・Setting the wristwatch receiver to the charger displays
“Charging” to start charging.
・The charging is complete in about 3 hours. (Completing the
charging is not displayed on the screen.Long press the
MENU button (for about 2 seconds).)
[Attention]
When you charge the battery at the time of purchase or in an
empty-battery state, completing the charging is not displayed
on the screen. Long press the MENU button (for about 2
seconds). The time is displayed.
* Time may not be matched.
3. Repeater (Optional) (SW-0123T)
<Left side> <Front> <Right side>
②9 VDC
input terminal
①Power switch
Upper: ON/Lower: OFF
[Basic Operation]
・The repeater receives a signal transmitted from the
transmitter, and transmits the signal.
* A signal transmitted from the repeater delays for about 8
seconds.
* The push-button of the repeater is disabled and it is not
usable.
* The repeater can work with either two AAA batteries or the
AC adapter.
3 4
Repeater
AAA batteries
AAA batteries
①Terminal: Used to charge the battery of the
wristwatch receiver receiver.
②Receiver holder: While charging, the charging terminals
of the receiver is held down by the
spring not to come off.
③Stand: For charging, make sure to put up the
stand.
How to Replace Batteries of
Repeater
・Push down the battery cover and slide it down to remove.
・Put two AAA batteries into it, taking care of the direction of
(+) and (-).
・Put the battery cover back on, and push it until it sounds
snap.
①MENU button: Used to turn the power on.
While setting, pressing the MENU
button cancels the setting and returns
to the time display.
②SELECT button: Used to enter the settings menu.
Used as a select button of the setting.
③UP (▲) button: Used to move forward a display such
as t he settings menu.
④DOWN (▼) button: Used to move back a display such as
the settings menu.
Time is displayed by 24-hour format.
Backlight: Lights for 8 seconds by pressing the
button or on reception.
⑤Charging terminal:
They are terminals to charge the battery.
Use a dedicated charger to charge.
⑤Charging terminal
①Terminal
②Receiver holder
③Stand
②Receiver holder
①Terminal
Call 10 : 10
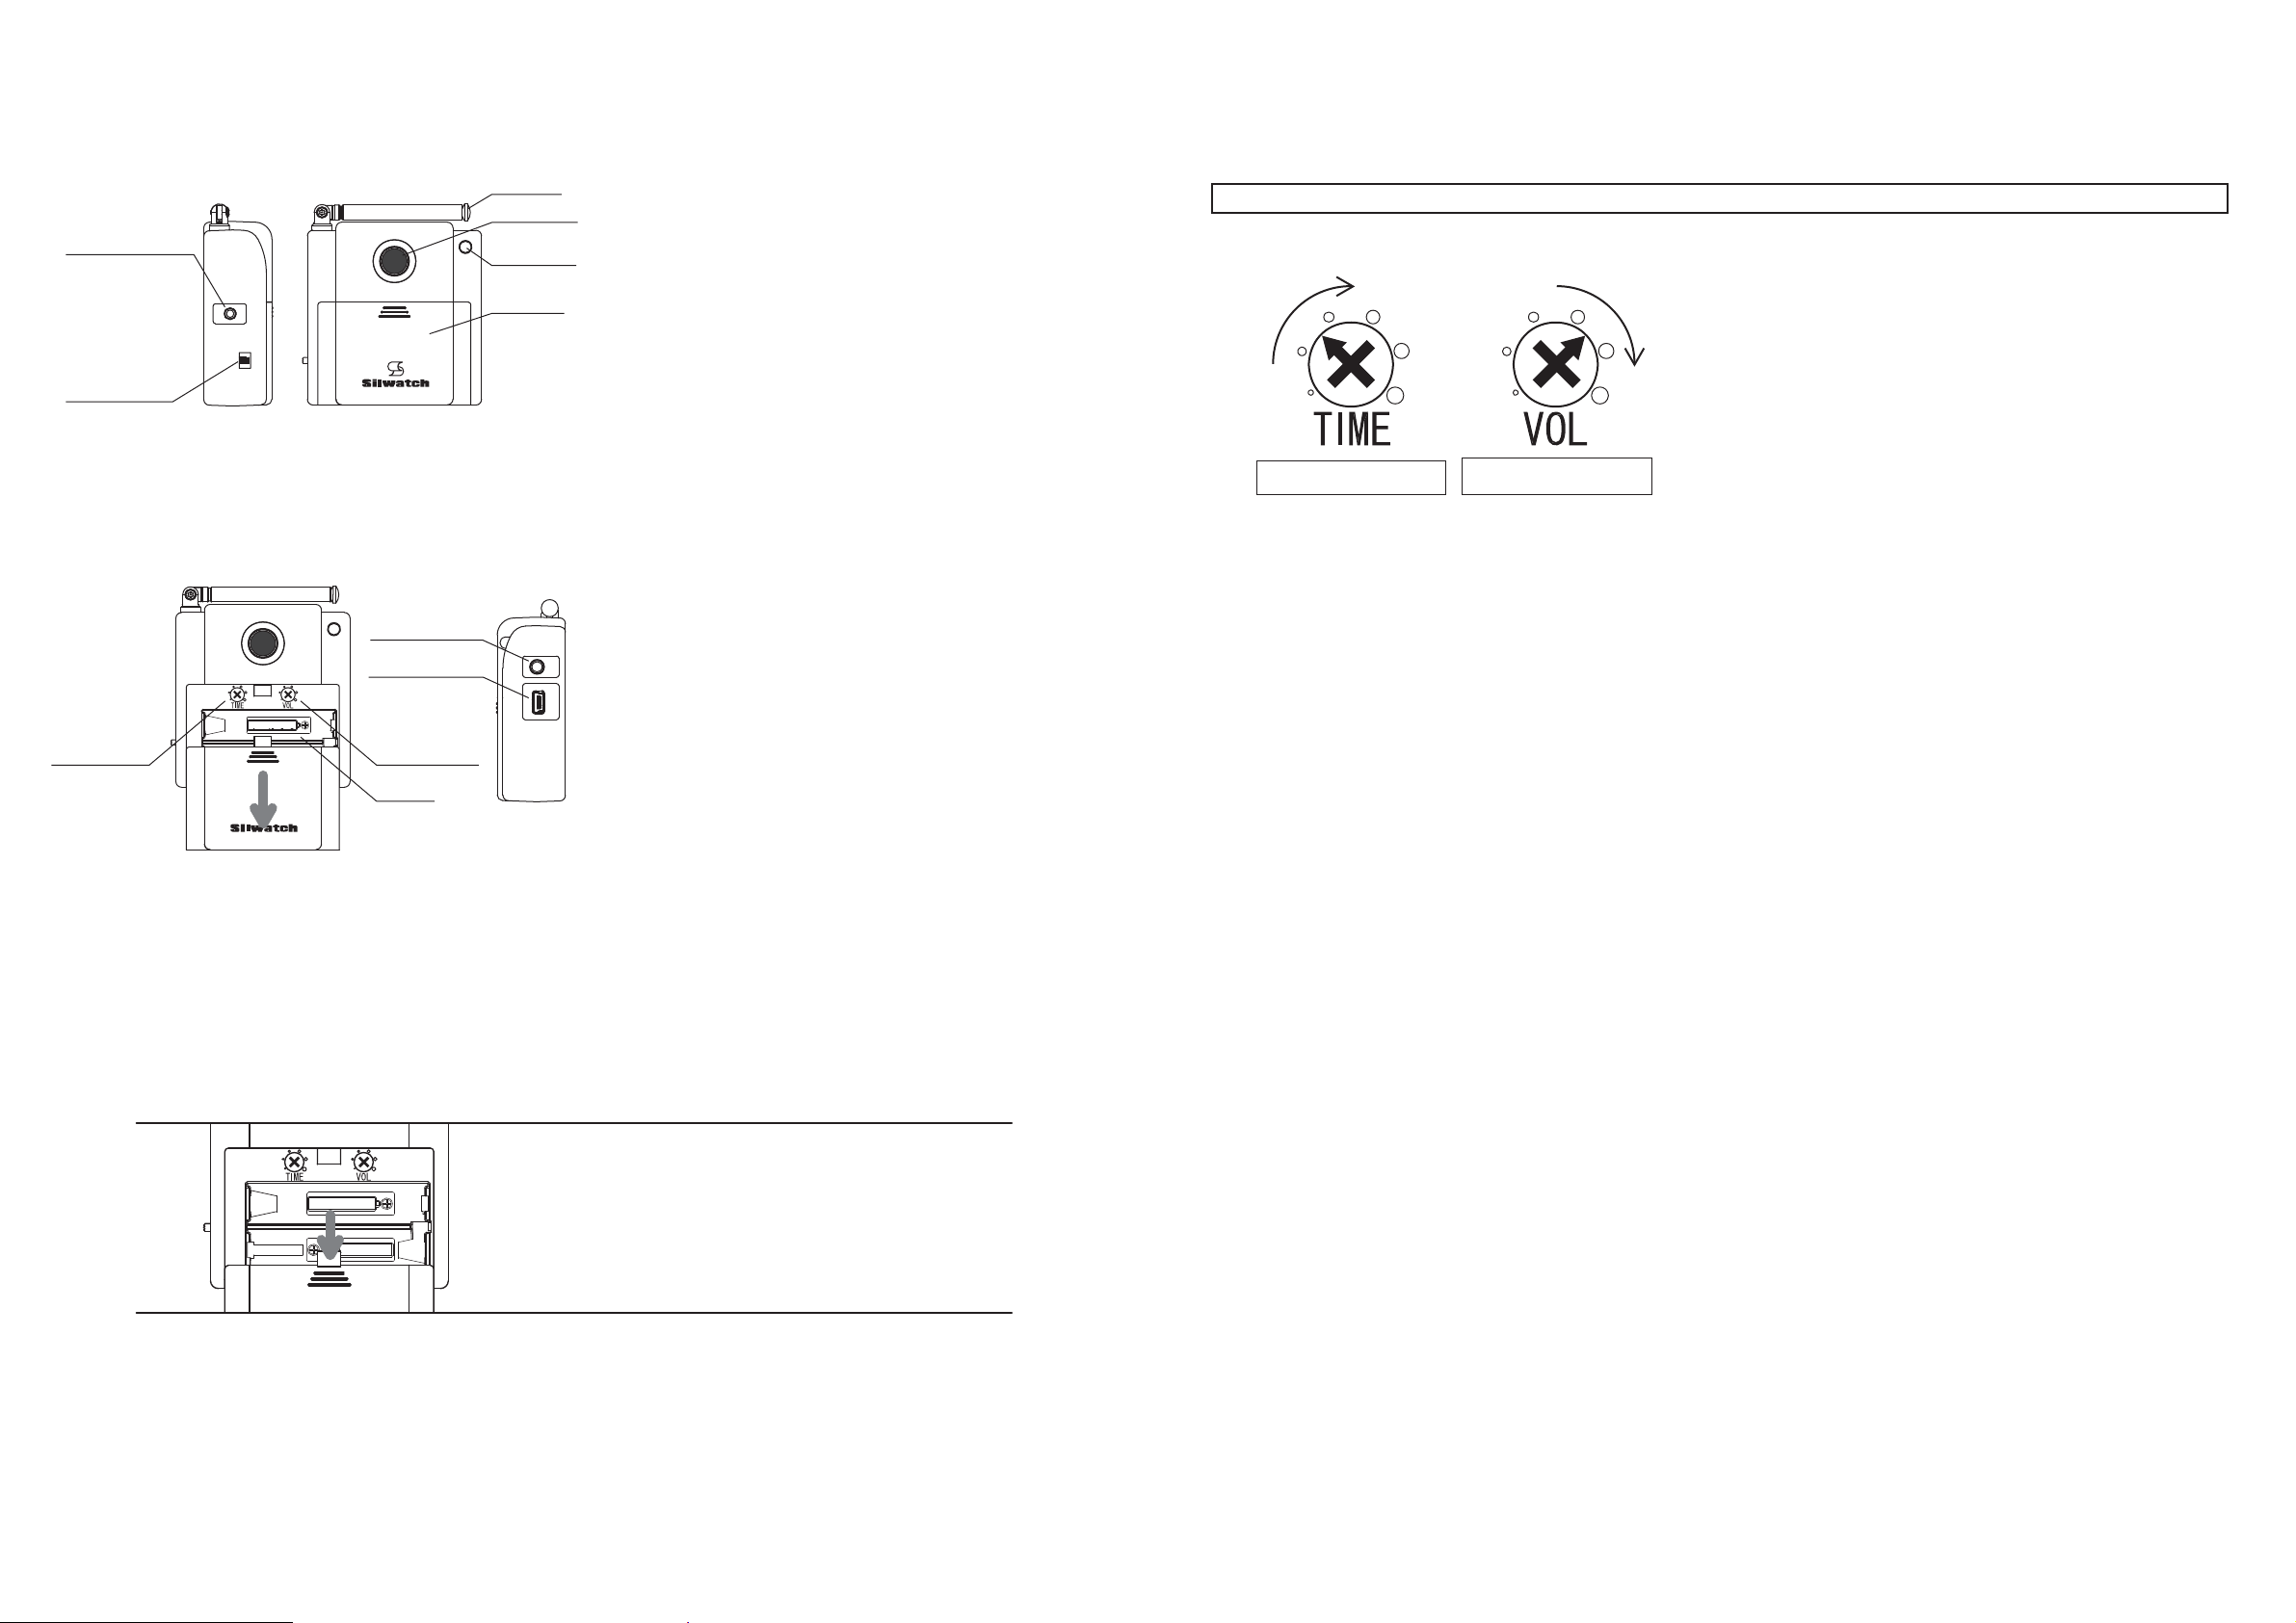
4.Transmitter (SW-N124T)
AAA batteries
<Left side> <Front>
<Right side>
<Battery cover opened>
①External contact
input terminal ⑤Transmission
lamp
③Antenna
⑨Audio input
terminal
⑩USB mini B
terminal
⑥Battery
cover
④Transmission
button
②Power switch
Upper: ON/Lower: OFF
⑧
Volume input
sensitivity
adjusting dial
⑦Audio detection
time adjusting dial
①
External contact input terminal (φ2.5 stereo super mini plug jack):
Connect the dedicated external input cord. It supports
one-contact input and two-contact input.
②Power switch: Turn the power switch ON (upper side) to use.
③Antenna:
Extend the antenna vertically to use. To maximize the
performance of the transmitter, extend the antenna full to
use.
④Transmission button: Press the button to call.
⑤Transmission lamp: The lamp blinks for about 10 seconds in
green color while transmitting the radio wave.
⑥Battery cover: Slide down to open the battery cover to
replace the AAA batteries.
⑦Audio detection time adjusting dial:
Adjusting the detection time of the external audio can deter
malfunction. Turn the dial to the left to decrease the value as long as
detection is possible.
⑧Volume input sensitivity adjusting dial:
Adjusting the input level of the external audio can deter malfunction.
Turn the dial to the left to decrease the value as long as detection is
possible.
⑨Audio input terminal (φ3.5 monaural mini plug jack):
Connect each dedicated external input cord. It supports audio input,
light sensor input and fax input.
⑩USB mini B terminal:
Connect the accessory dedicated AC adapter. It can also take the
power from the PC with a USB mini B cord.
How to Replace Batteries of Transmitter
・Push down the battery cover and slide it down to remove.
・Put two AAA batteries into it, taking care of the direction of
(+) and (-).
・Put the battery cover back on, and push it until it sounds
snap.
Batteries
[Basic Operation]
・When pressing the transmission button, the transmission lamp blinks
for about 10 seconds to transmit a signal.
・When the flat microphone, pin microphone or light sensor connected
to the audio input terminal responds, the transmission lamp blinks
for about 10 seconds to transmit a signal.
・When the bell flasher connected to the audio input terminal responds
to fax (phone) reception, the transmission lamp blinks for about 10
seconds to transmit a signal.
・When a contact signal is input from the contact input cord connected
to the external contact input terminal, the transmission lamp blinks
for about 10 seconds to transmit a signal.
・The transmitter works with two AAAbatteries or the AC adapter.
(If you use batteries and AC adapter together, the power on the AC
adapter is given priority. In addition, remove the batteries when not
in use for a long time.)
* When you use with batteries, and pressing the transmission button
does not get the transmission lamp blink, it is expired battery life, so
replace the AAA batteries.
・The transmitter works with two AAA batteries or the AC adapter.
(If you use batteries and AC adapter together, the power on the AC
adapter is given priority. In addition, remove the batteries when not
in use for a long time.)
Audio detection time
adjusting dial
*Adjust to be as less sensitive as possible.
Volume input sensitivity
adjusting dial
1. Press the transmission button in advance to make sure the display
appears on the receiver.
2. When turning the dial to the left, the point that stops is the lowest
sensitivity. Turning the dial to the right increases the sensitivity. In
installing, turn the both dials to the right with a screwdriver, etc. and
turn them to the left little by little (decrease sensitivity) from a high
sensitivity state to test whether the flat microphone or light sensor
responds.
3. Test the audio detection time adjusting dial repeatedly to be as less
sensitive as possible.
4. Similarly, test the volume input sensitivity adjusting dial repeatedly to
be as less sensitivity as possible.
Use the transmitter after installing it at the place where you use it, such
as the guests coming or fax machine.
* For the installation method, refer to the attachment “Installation
Manual”.
Long
Large
*When connecting a cord (for flat microphone, optical sensor, fax) to the audio input terminal, make sure to adjust the dial.
5 6
AAA batteries
AAA batteries
The battery is not charged enough at the time of purchase. When you
use for the first time or “Charge required” is displayed because of the
low battery level, charge it to use.
Check the direction of the charging terminals carefully to charge
them.
Fit the wristwatch receiver into the charger firmly. Inadequate fitting
can cause the charge from stopping halfway through.
Do not charge with the wristwatch receiver wet. It may cause electric
shock, failure and fire. The failure due to charging in wet is out of
warranty, not repairable.
Do not charge near water, source of fire, or things that are fragile. It
may cause electric shock, failure and fire. The failure due to
charging in wet is out of warranty, not repairable.
If you charge the battery by the head of a bed or near things that are
fragile, be careful for a tumble or fall.
①Put the left side of the wristwatch receiver into the electrodes of the
charger and press the right side of the receiver. (Fig. 1)
②Lower the wristwatch receiver and adjust the position of the charging
terminal. (Fig. 2)
③“Charging” is displayed on the LCD screen of the wristwatch receiver
and it starts charging. (Fig. 3)
* For charging, make sure to put up the stand as Fig. 3 to use.
Battery Life on Charging
In case of full charge, the battery lasts for about 4 days on reception
of 5 or 6 times per day.
The built-in battery of the wristwatch receiver is a consumable
supply. It is time for replacement when the usable time with a full
charge gets extremely short. Please contact us or your vendor.
* Do not replace the battery on your own.
How to Check Charging Timing
When Charge required is displayed on the wristwatch receiver,
charge the battery soon.
Full Half Charge required Empty
When the battery icon is empty, it gets unreceivable and the power
turns OFF.
We recommend to charge the battery before the battery icon is
empty.
Preparation for Using Silwatch
Charge the Wristwatch Receiver
Using Charger / Integrated Adapter
(Fig. 1)
(Fig. 2)
(Fig. 3)
Set the both terminals of the charger and
the receiver to fit properly.
■Message Display While Charging
・While charging, you can check if it is charged by the blinked
message “Charging”.
・While charging, the Alarm function and the Buzzer function are OFF
regardless of the settings.
・While charging, the normal reception function is OFF (without
antenna icon).
* You can change on “Set while charging”. (Page 20)
* When “Set while charging” is ON, a received message is
displayable even while charging.
* Check “Set while charging.” (Page 20)
■Caution on handling charger
・Trash or dirt on the charging terminals of the receiver and the
charger can cause hard to charge, so wipe them clean with a soft
cloth, etc. before charging. Before cleaning the charging terminals,
unplug the power cord just in case.
・The charging is complete in about 3 hours. (The charging is
complete in about 3 hours. * At Default Setting)
・
Long press the MENU button (for about 2 seconds) turns the power on.
* For how to turn on the power, refer to page 9.
7 8
・The receiver cannot receive for about 3 minutes after putting it into
the charger. (The mark is not also displayed.)
* In case “Set while charging” is ON
・Depending on the model, it is receivable right after starting charging
( mark displayed).
* For the details, refer to “Set while charging” on page 20.
■Integrated AC Adapter
The cord of the AC adapter is shipped in a small and rounded state; a
long time use of the cord with it kept bent can cause breaking of wire
due to deformation of the cord. Use the AC adapter with the cord as
straight as possible, especially get the both ends straight to use.
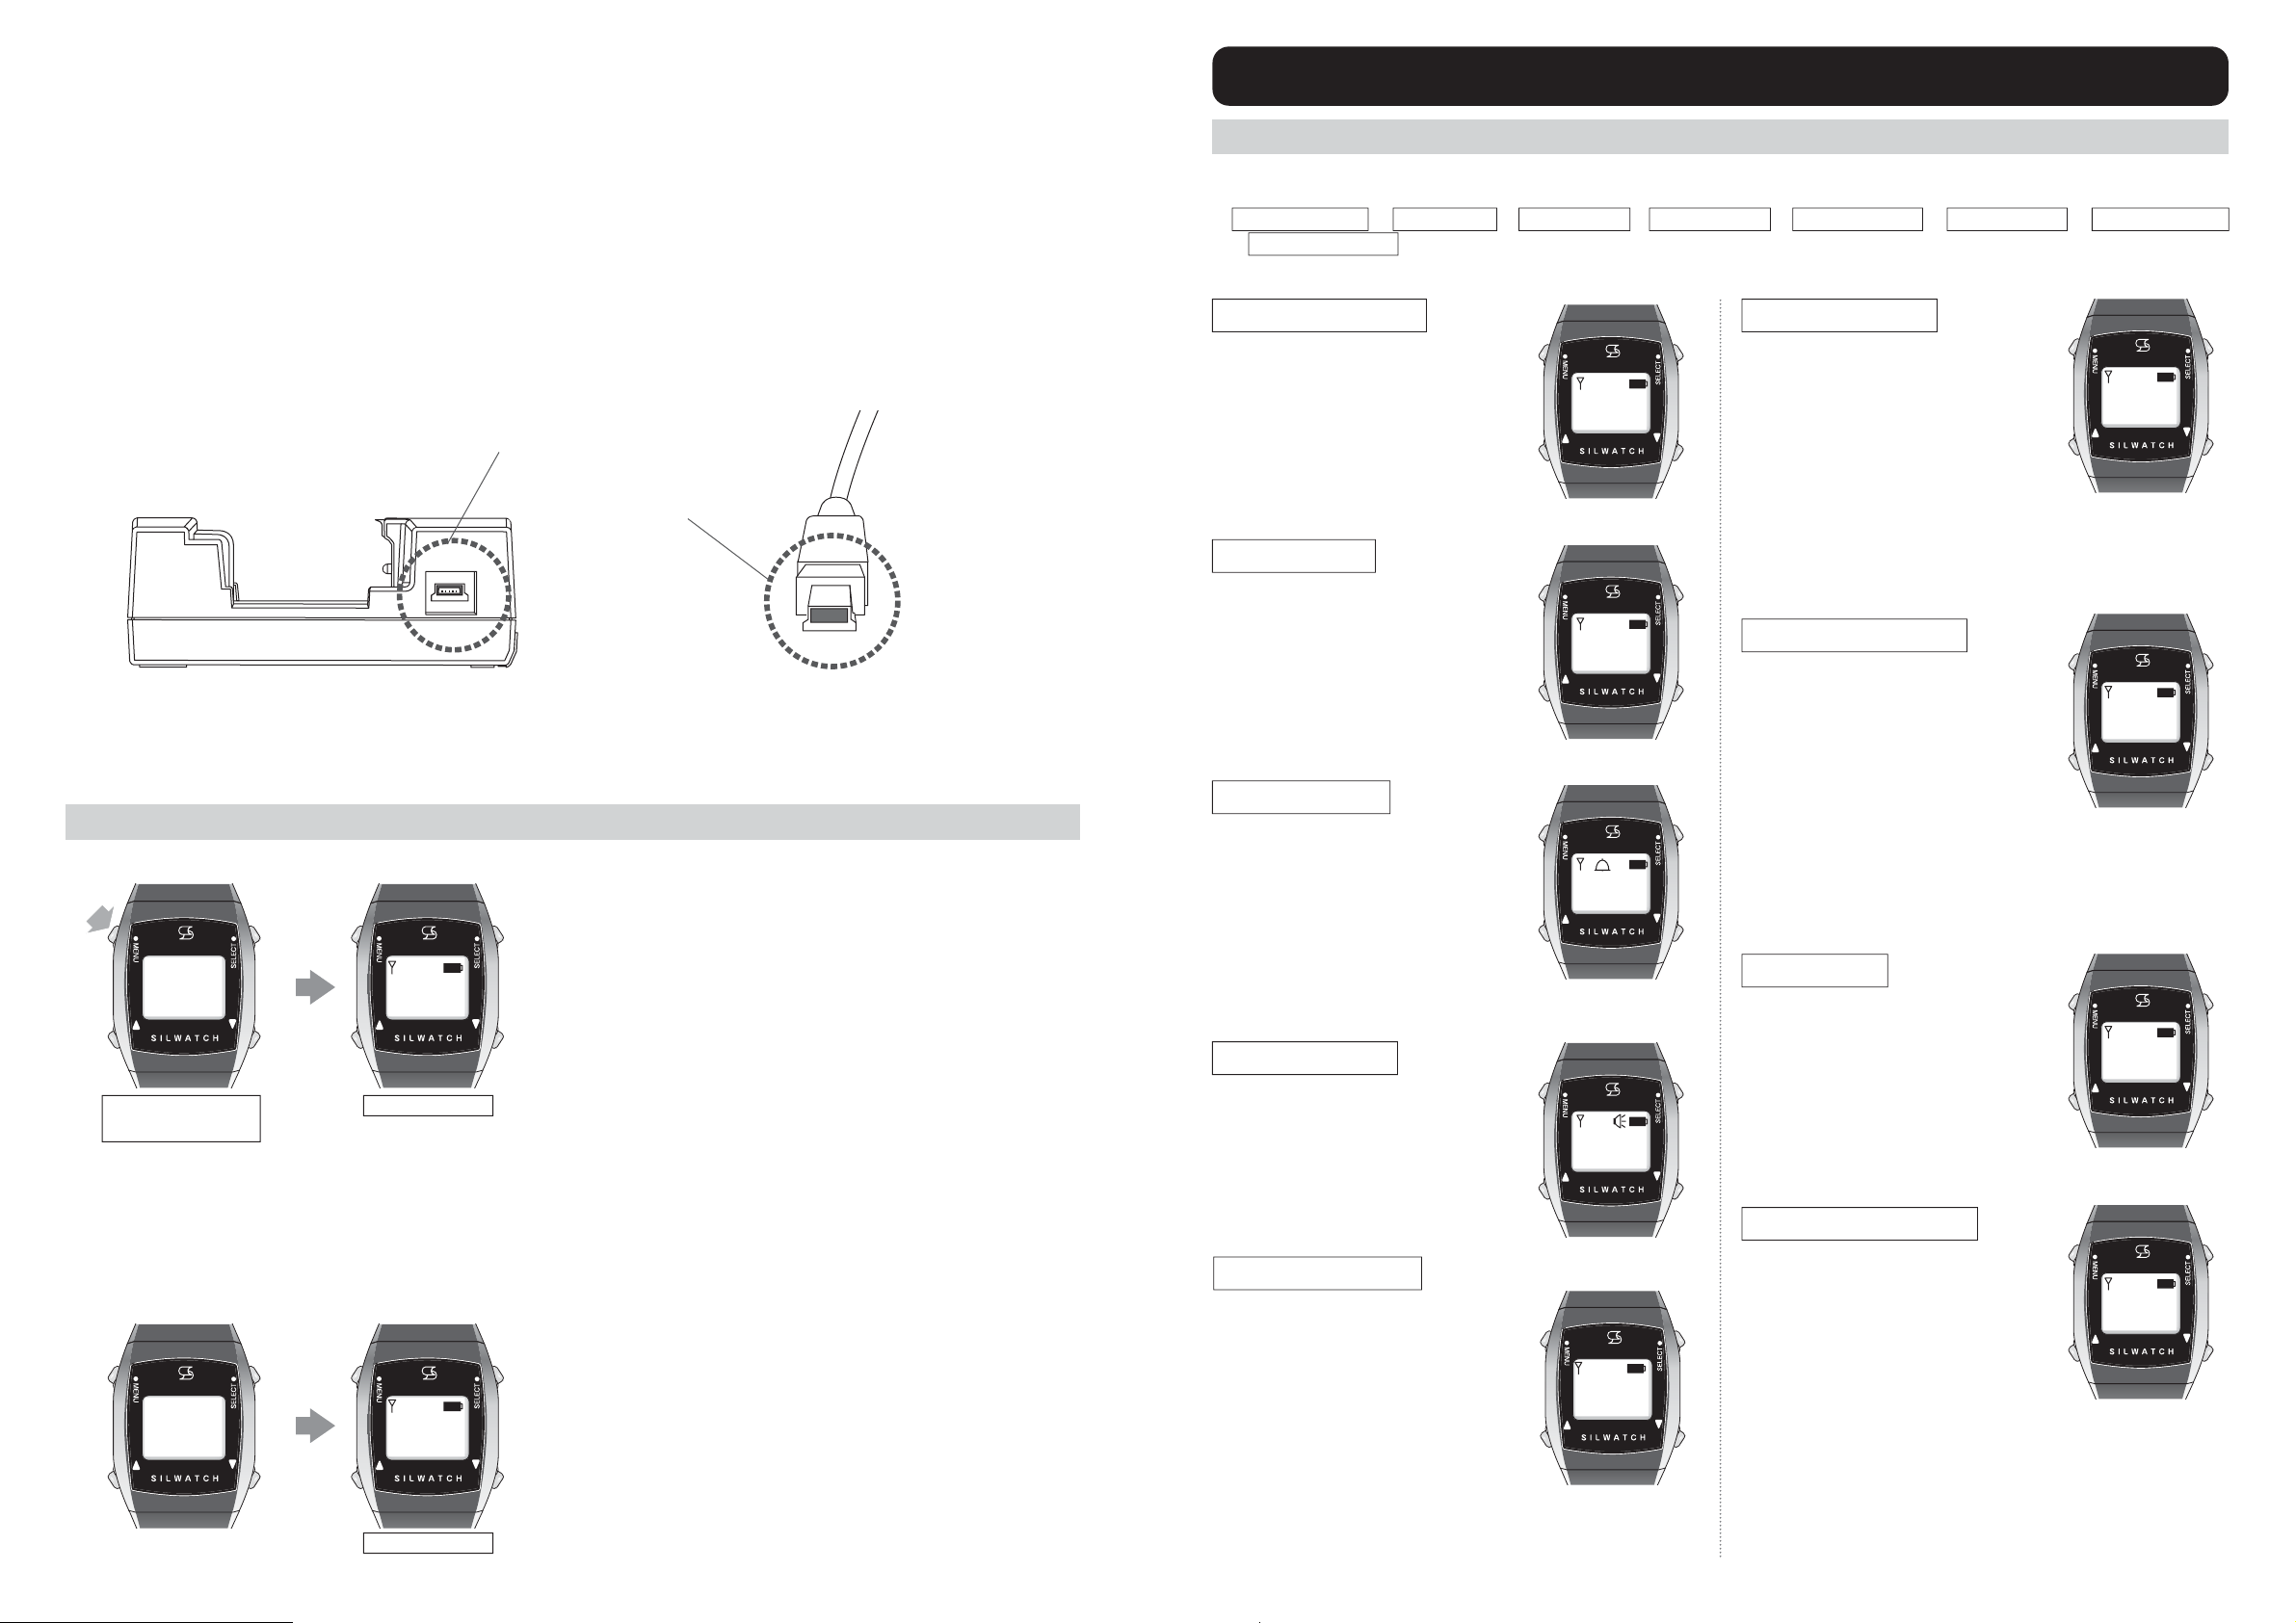
■Cleaning Charger
・Soak the alcohol in a cotton swab, etc. to clean the dirt of the
electrodes.
* Recommended goods: Alcohol for fuel with a concentration of
90% or more and cotton swabs
* Warning: Do not ever short the electrodes.
(Do not use) Lubricant CRC556, etc., gasoline, petroleum,
kerosene
Do not ever short
the electrodes.
Receiver terminal
Terminal of the
charger
Charging
9 10
[Attention]
When you purchase or charge from a charge empty state,
there is no screen display even when charging is completed.
Long press the MENU button (for about 2 seconds). The time
is displayed.
* The time may not be correct.
* Perform Time setting. (page 12)
[How to Turn On Power]
Long press the MENU button (for about 2 seconds). The time
is displayed.
* The time may not be correct.
Long press MENU
(about 2 sec) The time appears
The time appears
MENU
button
* If "Charge required" is displayed while there is a residual
amount of battery charge, or if charging is completed when
the Receive ON while charging is set, then the letter of
"Charging” disappears and the time will be displayed.
Power ON
* The setting menu is switched to
Received history →Time setting →Alarm setting →Buzzer setting →Wireless setting →Display setting →Operation setting
→Set while charging in that order. (When operating UP (▲) button)
* Receives when a radio wave comes from the transmitter during setting.
How to Use
Received history
You can confirm what content was
notified (received) at what time.
You can register up to 10 Received
histories.
Buzzer setting
You can set so as to allow the buzzer
to be sounded when receiving or
alarming.
ON ⇒Buzzer mark lights up
Buzzer is sounded
OFF ⇒Buzzer mark disappears
No buzzer is sounded
Wireless setting
You can set so as not to receive even
when a radio wave comes from the
transmitter.
* When Wireless OFF appears, the
antenna mark disappears.
*
Only the Clock/Alarm clock functions
can be used. Please be careful.
ON ⇒Antenna mark appears
Receive
OFF ⇒Antenna mark disappears
Do not receive
Alarm setting
You can set the Alarm clock time. You
can set to three alarms.
* Alarms 1/2 will not stop until you
stop them by yourself.
Be sure to stop any of the four buttons
by long pressing (about 2 seconds).
ON ⇒Vibrates at the set time
OFF ⇒
Does not vibrate at the set time
Time setting
You can set the current time.
Display setting
You can set so as not to display the
Normal screen.
* The clock/antenna mark/battery
mark are not displayed.
* The light is put on.
* Displayed when receiving/charging.
* Displayed during various settings.
ON ⇒Normal screen is displayed
OFF ⇒
Normal screen is not displayed.
Operation setting
You can turn off the power of
wristwatch receiver.
*
If the Operation OFF is set, all of
reception, alarm, etc. do not vibrate.
* Set when not using for a while.
*
To turn on the power, long press
(about 2 seconds) the MENU button.
OFF ⇒Power OFF
Set while charging
You can set so as not to receive a
radio wave from the transmitter
during charging.
ON ⇒Receive
OFF ⇒Do not receive
Eco mode
Turn ON the Eco mode, put out the
backlight, which is put on during reception
ringing, to improve the battery life.
ON ⇒Backlight is put out during
reception ringing
OFF ⇒Backlight is put on during
reception ringing
Setting Menu
■Inserting Charger
When inserting the AC adapter into the USB terminal of the
charger, fit the both forms of the jack (A) on the charger and
the plug (B) of the AC adapter correctly. A forceful insert can
cause damage of the jack, so check the both forms carefully.
(A)
(B)
10 : 10
10 : 10
Charging
Received
history
Wireless
setting
Display
setting
Time
setting
Alarm
setting
Buzzer
setting
Set while
charging
Operation
setting
Eco mode

Received History *You can confirm what content was notified (received) at what time.
①Long press (about 2 seconds) the SELECT button. Received history
screen is displayed.
SELECT
button
Long press SELECT
(about 2 sec) Received history screen appears
⑤To see the next history, press the UP (▲) button, then the next
history is displayed.
* Beyond this point, operate from step ③, then you can confirm the
Received content.
Press UP (▲) once
SELECT
button
Press SELECT once History 01
The time appears
②Press the SELECT button once History 01 and Received time is
displayed.
Example: History 01 19 : 00
(When there is no Received history, it is displayed as "-- : --".)
History 02
The time appears
SELECT
button
Press SELECT once
Example It means wanting to receive a signal of Guests coming
at 19:00.
The received content appears
③Press the SELECT button once. Received content is displayed.
SELECT
button
Press SELECT once History 01
The time appears
④Press the SELECT button. Return to History 01 screen.
UP (▲)
button
Press MENU once Normal screen is displayed
⑥Press the MENU button to return to the Time display.
MENU
button
Press UP (▲) once Next history appears
UP (▲)
button
Switch Display
*
You can save up to 10 Received history , and when you press the UP
(▲) button (in step ②), the screen displays are switched to History 01,
History 02 …in that order.
Press DOWN (▼) once Received history screen appears
* Press the DOWN (▼) button from the History 01 screen to return to
the Received history screen
DOWN(▼)
button
11 12
Time Setting *You can set the current time.
Example: When adjusting to 10:10 am * Time is displayed by 24-hour format.
①Long press (about 2 seconds) the SELECT button.
Received history screen is displayed.
SELECT
button
Received history
screen appears
SELECT
button
Press SELECT Time setting screen appears
MENU
button
SELECT
button
②Press the UP (▲) or DOWN (▼) button to display the Time
setting screen. When the Time setting screen is displayed,
press the SELECT button once.
Press UP (▲) or DOWN (▼) until
Time setting screen appears Press SELECT
UP(
▲
)
button DOWN(
▼
)
button
④Adjust the hour(s) and determine by pressing the SELECT
button once. The minute(s) blinks.
SELECT
button
Press SELECT [Min.] blinks.
Adjust Hour(s) with UP
(▲) or DOWN (▼)
③The hour(s) blinks. Adjust the hour(s) with the UP (▲) or
DOWN (▼) button.
[Hour] blinks.
Forward Back
Adjust Hour(s) with UP
(▲) or DOWN (▼)
⑤Adjust the minute(s) with the UP (▲) or DOWN (▼) button.
Forward Back
⑥Adjust the minute(s) and determine by pressing the SELECT
button once. Return to the Time setting screen.
MENU button once Adjusted time appears
⑦When you press the MENU button, the display is returned to
the Time display and the adjusted time is displayed.
Long press SELECT
(about 2 sec)
12 : 00 Received
history
Received
history History 01
19 : 00
Guests
coming
History 01
19 : 00
Guests
coming History 01
19 : 00 History 01
19 : 00 Received
history
History 02
18 : 50
History 01
19 : 00
12 : 00
History 02
18 : 50
History 01
19 : 00 History 01
18 : 50
10 : 00 10 : 00
10 : 0012 : 00
Time
setting
Received
history
Received
history
12 : 00
10 : 00
Time
setting
10 : 10
10 : 10
Time
setting

Alarm Setting *You can set the time of Alarm clock.
Example: When you adjust the Alarm clock to 06:30 am
*Time is displayed by 24-hour format.
①Long press (about 2 seconds) the SELECT button. Received history
screen is displayed.
SELECT
button
Received history screen appears
⑤Adjust the hour(s) and determine by pressing the SELECT button
once. The minute(s) blinks.
SELECT
button
Press SELECT
②Press the UP (▲) or DOWN (▼) button to display the Alarm setting
screen. When the Alarm setting screen is displayed, press the
SELECT button once.
Press SELECT
UP(
▲
)
button DOWN(
▼
)
button
Press UP (▲) or DOWN (▼) until
Alarm setting screen appears
SELECT
button
③The Alarm 1 screen is displayed, and press the SELECT button
once.
Alarm 1 screen appears Press SELECT
SELECT
button
④The hour(s) blinks. Adjust the time you want to wake up with the UP
(▲) or DOWN (▼) button.
[Hour] blinks Adjust the hour(s) with
UP (▲) or DOWN (▼)
Forward Back
[Min.] blinks
⑦When there is a minute, determine by pressing the SELECT button,
then Alarm 1 OFF is displayed.
SELECT
button
Press SELECT
Adjust the minute(s) with
UP (▲) or DOWN (▼)
⑥Adjust the minute(s) with the UP (▲) or DOWN (▼) button.
Forward Back
Press UP (▲) or DOWN (▼)
to select OFF
To cancel the alarm, turn it OFF in step ⑧.
Press UP (▲) or DOWN (▼)
to select ON
⑧Choose ON with the UP (▲) or DOWN (▼) button.
UP(
▲
)
button DOWN(
▼
)
button
Alarm1 OFF
Long press SELECT
(about 2 sec)
13 14
⑨When you press the SELECT button, theAlarm 1 screen is displayed
and the set time is displayed.
When the Alarm is ON, the mark is displayed.
SELECT
button
Press SELECT
⑩Press the MENU button to return to the Time display.
Press MENU once
DOWN(
▼
)
button
How to Stop Alarm (Vibration)
Press any of the four buttons until the vibration stops.
The time display appears
MENU
button
⑪Vibrates when the set time reaches.
SELECT
button
MENU
button
UP(
▲
)
button DOWN(
▼
)
button
Press UP (▲) once Next alarm appears
UP(
▲
)
button
About Switching Display
* You can register up to three alarms, and when you press the UP (▲)
button (in the step ③), the screen display switches to Alarm 01,
Alarm 02 … in that order.
Press DOWN (▼) once Alarm setting screen appears
* Press the DOWN (▼) button from the Alarm 01 screen to return to
the Alarm setting screen.
■Alarm Setting (Alarm Setting 3 / Snooze Function)
* The snooze function stops 30 minutes after the snooze starts.
* Long press (5 seconds) any of the four buttons to stop the snooze
function.
* Long press (1 second) any of the four buttons to pause snooze
temporarily, then start snooze again after 5 minutes. Stops by a
maximum of 6 times.
* When the snooze function starts, the bell icon (paint-out) will be
displayed at the top of the screen.
10 : 10 Received
history
Alarm
setting
Received
history
Alarm1 OFF
08 : 00
Alarm1 OFF
08 : 00
06 : 00
08 : 00
Alarm1 ON
Alarm1 OFF
06 : 30
06 : 30
06 : 0006 : 00
Alarm1 ON Alarm1 ON
06 : 30 Alarm1 ON
06 : 30
Alarm2 OFF
00 : 00
Alarm
setting
Alarm1 ON
06 : 30
06 : 30
06
: 30
10 : 10
Alarm1 ON
06 : 30

Buzzer Setting *You can set so as to allow the buzzer to be sounded when receiving or alarming. The default setting is OFF.
ON ⇒mark appears Buzzer is sounded
OFF ⇒mark disappears No buzzer is sounded
①Long press (about 2 seconds) the SELECT button. Received history
screen is displayed.
SELECT
button
SELECT
button
Received history screen appears
②Press the UP (▲) or DOWN (▼) button to display the Buzzer setting
screen. When the Buzzer setting screen is displayed, press the
SELECT button once.
UP(
▲
)
button DOWN(
▼
)
button
Press SELECT
Press UP (▲) or DOWN (▼) until
Buzzer setting screen appears
③Buzzer OFF screen is displayed.
Press UP (▲) or DOWN (▼)
to select OFF
To cancel the Buzzer setting, turn it OFF in step ④.
④Choose ON with the UP (▲) or
DOWN (▼) button.
Press UP (▲) or DOWN (▼)
to select ON
UP(
▲
)
button DOWN(
▼
)
button
Buzzer
OFF
⑤Press the SELECT button to display the Buzzer setting screen.
When the Buzzer ON is set, the mark is displayed.
SELECT
button
Press SELECT
⑥Press the MENU button to return to the Time display.
MENU
button
Press MENU once The time display appears
Long press SELECT
(about 2 sec)
15 16
Wireless Setting *You can set so as not to receive even when a radio wave comes from the transmitter. The default setting is ON.
*When the Wireless OFF is set, the mark disappears.
*Please note that only the clock/Alarm clock functions can be used.
ON ⇒mark appears Receive
OFF ⇒mark disappears Do not receive
①Long press (about 2 seconds) the SELECT button. Received history
screen is displayed.
SELECT
button
Received history screen appears
SELECT
button
②Press the UP (▲) or DOWN (▼) button to display the Wireless
setting screen. When the Wireless setting screen is displayed, press
the SELECT button once.
UP(
▲
)
button DOWN(
▼
)
button
Press SELECT
Press UP (▲) or DOWN (▼) until
Wireless setting screen appears
③Wireless setting screen is
displayed.
Press UP (▲) or DOWN (▼)
to select ON
When setting up wireless, turn it ON in step ④.
Press UP (▲) or DOWN (▼)
to select OFF
④Choose Wireless OFF with the
UP (▲) or DOWN (▼) button.
UP(
▲
)
button DOWN(
▼
)
button
Wireless
ON
⑤Press the SELECT button to display the Wireless setting screen.
SELECT
button
Press SELECT
⑥Press the MENU button to return to the Time display.
* It does not receive a radio wave from the transmitter.
MENU
button
Press MENU once The time display appears
ReceiveDo not receive
■Attention!
When Wireless OFF is set (when the mark disappears), a
radio wave from the transmitter cannot be received!
For example, it does not vibrate even when there is guests
coming!!
Be sure to use with the mark displayed.
Long press SELECT
(about 2 sec)
10 : 10 Received
history
Buzzer
setting
Buzzer
ON
10 : 10
Buzzer
setting
Received
history Buzzer
setting
Buzzer
OFF
Buzzer
ON
10 : 10 Received
history
Wireless
setting
Received
history
Wireless
ON
Wireless
OFF
10 : 1010 : 10
10 : 10
Wireless
setting
Wireless
setting
Wireless
OFF

Display Setting *You can set such that the Time display does not appear. Power saving mode. The default setting is ON.
* The clock/antenna mark/battery mark are not displayed.
* The light is put on.
* Displayed when receiving/charging.
* Displayed during various settings.
ON ⇒Normal screen is displayed
OFF ⇒Normal screen is not displayed.
①Long press (about 2 seconds) the SELECT button. Received history
screen is displayed.
SELECT
button
Received history screen appears
SELECT
button
Long press SELECT
(about 2 sec) Received history screen appears
SELECT
button
②Press the UP (▲) or DOWN (▼) button to display the Display setting
screen. When the Display setting screen is displayed, press the
SELECT button once.
UP(
▲
)
button DOWN(
▼
)
button
SELECT button
Press UP (▲) or DOWN (▼) until
Display setting screen appears
Press UP (▲) or DOWN (▼)
to select ON
Display ON screen is displayed.
Display
ON
③Display ON screen is displayed.
Press UP (▲) or DOWN (▼)
to select OFF
④Choose Display OFF with the
UP (▲) or DOWN (▼) button.
UP(
▲
)
button DOWN(
▼
)
button
⑤When you press the SELECT button, all indications disappear.
* The light is put up and the message when received is displayed.
SELECT
button
SELECT button All indication disappears
★
Long press (about 2 seconds) the SELECT button. Since the
Received history screen is displayed, various settings can be made.
■Attention!
When you set to Display OFF, all indications disappear.
Not displayed when charging is complete.
* "Charging" while charging is
displayed.
Long press SELECT
(about 2 sec)
17 18
Operation Setting *You can turn off the power of wristwatch receiver. The default setting is ON.
* When the Operation OFF is set, all of reception, alarm, etc. do not
operate.
* Set when not using for a while.
* To turn on the power, long press (about 2 seconds) the MENU
button.
OFF ⇒Power OFF
①Long press (about 2 seconds) the SELECT button. Received history
screen is displayed.
SELECT
button
Received history screen appears
SELECT
button
②Press the UP (▲) or DOWN (▼) button to display the Operation
setting screen. When the Operation setting screen is displayed,
press the SELECT button once.
UP(
▲
)
button DOWN(
▼
)
button
SELECT button
Press UP (▲) or DOWN (▼) until
Operation setting screen appears
③Operation ON screen is
displayed.
Press UP (▲) or DOWN (▼)
to select OFF
④Choose Operation OFF with the
UP (▲) or DOWN (▼) button.
⑤Press the SELECT button to display the Operation setting screen.
SELECT
button
SELECT button
■How to Turn On Power
Long press (about 2 seconds) the MENU button. The Normal
screen is displayed.
* The time may not be correct.
■Operation setting OFF by long pressing the button
Operation setting OFF can be attained by long pressing
(5 seconds) the SELECT ▲DOWN button.
Note) The Operation setting OFF may not be attained
sometimes by pressing and holding the SELECT ▲DOWN
button for 5 seconds. This is caused by lowering the priority of
processing (internal to CPU) of the Operation setting OFF.
After waiting a short time, you can attain the Operation setting
OFF by long pressing the button.
MENU
button
Normal screen is displayed
Long press SELECT
(about 2 sec)
Long press SELECT
(about 2 sec)
Power turns off
⑥Press the MENU button to turn off the power.
MENU
button
Press MENU once
Operation
OFF Operation
setting
Operation
setting
10 : 10
Operation
OFF
Operation
ON
Operation
setting
Received
history
Received
history
10 : 10
Display
OFF
Received
history
10 : 10 Received
history
Display
setting
Received
history
Display
ON
Display
OFF

Set While Charging
*Even when a radio wave comes from the transmitter during charging, it can be prevented from being received. The default setting is OFF.
ON ⇒Receive
* When setting to ON, you will not be able to receive for about 3
minutes after installing the charger.
( mark is also not displayed. After about 3 minutes, the mark will
be displayed and you will be able to receive.)
OFF ⇒Do not receive
* During charging it cannot be received. (Default setting)
* All indications disappear after removed from the charger or after
charging is completed.
When using, long press (about 2 seconds) MENU button to turn on
the power.
①Long press (about 2 seconds) the SELECT button. Received history
screen is displayed.
SELECT
button
Long press SELECT
(about 2 sec) Received history screen appears
SELECT
button
②Press the UP (▲) or DOWN (▼) button to display the Set while
charging screen. When the Set while charging screen is displayed,
press the SELECT button once.
UP(
▲
)
button DOWN(
▼
)
button
Press SELECT
Press UP (▲) or DOWN (▼) until
Set while charging screen appears
Press UP (▲) or DOWN (▼)
to select ON
If you want to receive when charging, please turn ON in step ③.
Receive
ON
③Choose Receive OFF with the UP (▲) or DOWN (▼) button.
Press UP (▲) or DOWN (▼)
to select OFF
UP(
▲
)
button DOWN(
▼
)
button
④Press the SELECT button to display the Set while charging screen.
SELECT
button
Press SELECT
19 20
Eco Mode
①Long press (about 2 seconds) the SELECT button.
Received history screen is displayed.
SELECT
button
Received history screen appears
SELECT
button
②Press the UP (▲) or DOWN (▼) button to display the Eco mode
screen. When the Eco mode screen is displayed, press the SELECT
button once.
UP(▲)
button
DOWN(▼)
button
Press SELECT
Press UP (▲) or DOWN (▼) until
Display setting screen appears
③Eco OFF screen is displayed.
Press UP (▲) or DOWN (▼)
to select ON
④Choose Eco ON with the UP (▲) or DOWN (▼) button.
UP(▲)
button DOWN(▼)
button
⑤Press the SELECT button to display the Eco mode screen.
SELECT
button
Press SELECT Eco mode screen appears
Long press SELECT
(about 2 sec)
Display
OFF
⑥Press the MENU button to return to the Time display.
NEMU
button
Press MENU The time appears
10 : 10 Received
history
Eco mode
Received
history
Eco OFF
Eco ON
■Firm Version
・Operation is not affected.
・You can check the Firmware Version by menu selection.
10 : 10
10 : 10
Received
history
Set while
charging
Received
history
Receive
OFF
Set while
charging
Receive
OFF
Eco mode
Eco mode

21 22
F A Q
Q: The power of the wristwatch receiver cannot
be turned on.
A: If the MENU button is held down (for about 2
seconds), the power will be turned on and time will
be displayed.
Q: Time will be returned to "00:00".
A: If charge goes out, the all settings will be returned
to default. Set up time.
⇒ page 12
*
It is recommended to charge, before charge goes out.
Q: While time had been displayed, suddenly
vibration started.
A: The alarm setting is activated.
It will stop, if either of four buttons is held down.
Turn the alarm setting OFF in order to cancel the
alarm.
⇒ pages
13
-
14
Q: It seems that the sound has also been
heard when vibrating.
A: The buzzer setting is set to ON. Turn the buzzer
setting OFF.
⇒page 15
Q: It does not react to the guests coming etc.
A: Check if the marking of the antenna is displayed.
⇒ page 16
Q: When the button is pressed the light will be
turned on, but nothing is displayed.
A: Display setting is OFF. Turn the display setting ON.
⇒ page 17
Q: Silwatch will not be used for a while. How to
turn off the power?
A: Set the operation setting OFF.
⇒ page 18
Q: I would like to set up to receive during
charge.
A: Set the “Set while charging” ON.
⇒ pages
20-21
Q: When charging for a while, the display
"under charge" disappeared and time is
displayed. Is it not charged?
A: The charge is complete as time will be
displayed when the charge was completed.
Usually, the charge will be completed in about 3
hours from empty condition.
*
In case “Set while charging” is ON
⇒ pages
7-8
Q: It cannot charge, even if the wristwatch
receiver is connected with the charger.
A: Check an orientation of the wristwatch receiver when
connecting. It cannot charge, unless the terminal of
the receiver and the charging terminal of the charger
match.
⇒ pages
7-8
Q: Nothing is displayed when disconnected
from the charger.
A: The “Set while charging” is OFF. Switch the power
on after holding down the MENU button (for about 2
seconds).
⇒ pages
20-21
Q: When the transmission lamp of the
transmitter is pressed, it will vibrate but it
does not react to the sound of the guests
coming.
A: Adjust the audio detection time adjusting dial and the
volume input sensitivity adjusting dial of the
transmitter.
⇒ pages
5-6
⇒
pages
5-6
⇒
pages
2
0
-2
1
⇒
pages
7-
8
⇒
page 15
⇒
page 16
⇒
page 17
⇒
pages
7-
8
⇒
pages
2
0
-2
1
⇒
page 18
⇒
page 12
⇒
pages
1
3
-
1
4
How to Attach/Detach Band
①When Detaching
②When Attaching
The time display appears
⑤Press the MENU button to return to the Time display screen.
*This setting may not be available depending on model.
* When the Receive OFF is set, the mark disappears during
charging, and a radio wave from the transmitter is not received.
MENU
button
Press MENU once
■How to Turn on Power
Long press (about 2 seconds) the MENU button. The Normal
screen is displayed.
* The time may not be correct.
MENU
button
Normal screen is displayed
Long press MENU
(about 2 sec)
10 : 10
10 : 10
Set while
charging
Lift up while pulling the band
obliquely upward
Align the groove of the band with the
guide and push in from the screen side
Attach the short band at the top of the
screen and the long band at the bottom.
23 24
Specifications
This product is a wave communication system. Operation failure may occur according to a surrounding radio wave condition.
The specifications may be changed without notice for improvement.
The certificate of the technical standard conformance of the specified low power radio
station has been obtained based on radio law for the transmitter and the repeater. The
license application for a radio station is unnecessary. Accordingly, observe the
following strictly.
●The label attached to the product is the marking for the certificate of the technical
standard conformance. Do not remove it by any means.
●The products with the labels cannot be disassembled or modified for use.
●Use of illegally modified products shall be subject to punishment.
(The transmitting range will be extended 300 meters for every
additional repeater.)
*1. The battery life for a receiver is based on a normal use (5 to 6 times
a day with clock display turned on).
*2. Two AAA batteries for a transmitter or a repeater are sold eparately.
Frequency
Transmitting output
Transmission range (m)
Power source
Current rating
External dimensions (mm)
Weight (g)
Operating temperature
Water resistance
Battery life
Accessory
Specification
Wristwatch-type
receiver
426 MHz range
170 (estimate)
−
Lithium ion
battery 3.7V
150mA MAX
43 × 38 × 16
Approx. 45
-10 °C to +50 °C
Daily life
water resistance
Lithium ion
battery 3.7V
(built-in)
4 days (*1)
Charger
Approx. 60
-10 °C to +50 °C
100-240VAC,
50/60Hz - 5VDC
adapter
−
−
−
−
−
70mA MAX
84 × 46 × 31
Transmitter
426 MHz range
100-240VAC, 50/60Hz
- 5VDC adapter or
2 AAA batteries
50mA MAX
65 × 62 × 23 (excluding antenna and protrusions)
Approx. 80
-10 °C to +50 °C
100-240VAC,
50/60Hz - 5VDC
adapter
Specified low-power
radio 1 mW
−
−
2.5 months (*2)
(when the power is always on)
1 year (*2)
(when the power is always on)
Repeater
426 MHz range
Specified low-power
radio 1 mW
300 (estimate)
Approx. 80
-10 °C to +50 °C
100-240VAC,
50/60Hz - 9VDC
adapter
−
15mA MAX
100-240VAC,
50/60Hz - 5VDC
adapter
100-240VAC, 50/60Hz
- 5VDC adapter or
2 AAA batteries
This manual suits for next models
1
Table of contents


