Versez exactement 80 ml (2,7 oz liq.) dans la cuve
du stérilisateur. Une ligne très pratique indique la
mesure de 80 ml sur vos biberons closer to nature®.
AVERTISSEMENT:SI VOUSVERSEZ PLUS DE 80 ML
D'EAU DANS LA CUVE DU STÉRILISATEUR, LA
DURÉE DU CYCLE SERA PLUS LONGUE. SI LA
QUANTITÉ D'EAU EST INFÉRIEURE À 80 ML, IL SE
PEUT QUE LES ARTICLES NE SOIENT PAS STÉRILISÉS
CONVENABLEMENT.
Assemblez la tige centrale et le plateau
inférieur dans la cuve du stérilisateur.
2
16
32
16
3
Placez les biberons dans les emplacements
du plateau inférieur amovible, goulots vers
le bas. Si vous utilisez les biberons
anti-colique closer to nature®, placez les
biberons dans les emplacements, tel
qu'illustré.
4 5
Mettez le plateau supérieur amovible en place.
4 5
MESURES DE SÉCURITÉ IMPORTANTES VEUILLEZ LIRE
TOUTES LES INSTRUCTIONS POUR USAGE DOMESTIQUE
UNIQUEMENT
Des consignes de sécurité élémentaires devraient être respectées lors de l'utilisation d'appareils
électriques, y compris les suivantes :
• AVERTISSEMENT : POUR VOUS PROTÉGER DES CHOCS ÉLECTRIQUES, ÉVITEZ D'IMMERGER LE
CORDON, LA FICHE OU LE STÉRILISATEUR DANS DE L'EAU OU DANS UN AUTRE LIQUIDE
• Ne pas placer à proximité des plaques chauffantes ou des brûleurs à gaz chauds de la cuisinière,
ou sur ceux-ci, ni dans le four chaud.
• Ne pas utiliser à l'extérieur.
• Toujours utiliser sur une surface plane résistant à la chaleur.
• Le produit est pourvu d'un dispositif d'enroulement du cordon à la base de l'appareil afin de
vous permettre d'ajuster la longueur du cordon de façon sécuritaire. Nous vous recommandons
de maintenir le cordon à la plus courte longueur possible. Évitez de laisser le cordon
d'alimentation pendre à l'extrémité de la table ou du comptoir ou toucher des surfaces chaudes.
• N'utilisez aucun appareil dont la fiche ou le cordon d'alimentation est endommagé ou après
avoir constaté que l'appareil était le moindrement abîmé ou ne fonctionnait pas bien. Aucun
entretien, autre que le nettoyage et le détartrage, n'est nécessaire pour cet appareil. Retournez
l'appareil au centre de service agréé le plus proche pour un examen, une réparation ou un réglage.
• Le fabricant recommande de ne pas utiliser d'accessoires avec cet appareil, puisque cela pourrait
causer des blessures.
• N'utilisez pas l'appareil à des fins autres que l'usage pour lequel il a été conçu.
• Ne placez jamais d'objets sur le stérilisateur.
• Un cordon d'alimentation court devrait être utilisé afin de réduire les risques associés au fait de
s'emmêler dans un long fil ou de trébucher à cause de celui-ci.
• Des cordons d'alimentation amovibles plus longs ou des rallonges sont disponibles et peuvent
être utilisés, à condition de faire preuve de prudence lors de leur utilisation.
• Si vous utilisez un cordon d'alimentation amovible plus long ou une rallonge :
1) Les caractéristiques électriques indiquées sur le cordon amovible ou sur la rallonge devraient
être au moins aussi élevées que les caractéristiques électriques de l'appareil; et
2) Le cordon devrait être placé de façon qu'il ne pende pas du comptoir ou de la table où il
pourrait être tiré par des enfants ou faire trébucher quelqu'un par accident.
• Lorsque l'appareil est de type mis à la terre, la rallonge doit être de type mis à la terre à trois broches.
• Gardez toujours le stérilisateur et sa fiche hors de la portée des jeunes enfants.
• L'utilisation de l'appareil par des enfants, ou lorsque ceux-ci se trouvent à proximité, nécessite
une surveillance attentive.
• Cet appareil ne doit pas être utilisé par des personnes (y compris les enfants) ayant des capacités
physiques, sensorielles ou mentales réduites ou manquant d'expérience ou de connaissances,
sauf si elles ont pu bénéficier d'une surveillance ou d'instructions préalables concernant
l'utilisation de l'appareil par l'entremise d'une personne responsable de leur sécurité.
• N'ouvrez pas l'appareil pendant qu'il est en marche, car il contient de l'eau bouillante. Prenez
garde à la vapeur qui s'échappe des évents à vapeur du couvercle.
• Gardez toutes les composantes hors de la portée des enfants.
• Lorsqu'il est en marche, le stérilisateur contient de l'eau chaude et de la vapeur.
• Soyez extrêmement prudent lorsque vous utilisez ou déplacez un appareil contenant de l'huile
chaude ou tout autre liquide chaud.
• Ne touchez pas de surfaces chaudes. Utilisez les poignées ou boutons.
• Débranchez toujours l'appareil de la prise de courant lorsque vous ne l'utilisez pas. Laissez-le
refroidir avant d'ajouter ou d'enlever des pièces.
• Laissez toujours l'appareil refroidir pendant 3 minutes avant de l'ouvrir.
• Soyez prudent lorsque vous soulevez couvercle afin d'éviter les brûlures.
• Aucun entretien, autre que le nettoyage et le détartrage, n'est nécessaire pour cet appareil.
• Tout autre entretien devrait être effectué par un centre de service agréé.
• Avant de brancher le stérilisateur pour la première fois, assurez-vous que la tension est compatible
avec votre alimentation électrique en vérifiant sur l'étiquette apposée sur la base de l'appareil.
Closer to Nature® electric steam sterilizer
Avant d'utiliser votre stérilisateur électrique à vapeur closer to nature, veuillez vous assurer de bien lire toutes les instructions.
Veuillez conserver ces instructions pour consultation ultérieure, car elles contiennent des renseignements importants. Ce stérilisateur
est conçu pour être utilisé avec les biberons Closer to Nature et Ultra de Tommee Tippee®. Le stérilisateur peut contenir jusqu’à cinq
biberons Close to Nature® et quatre biberons Ultra.
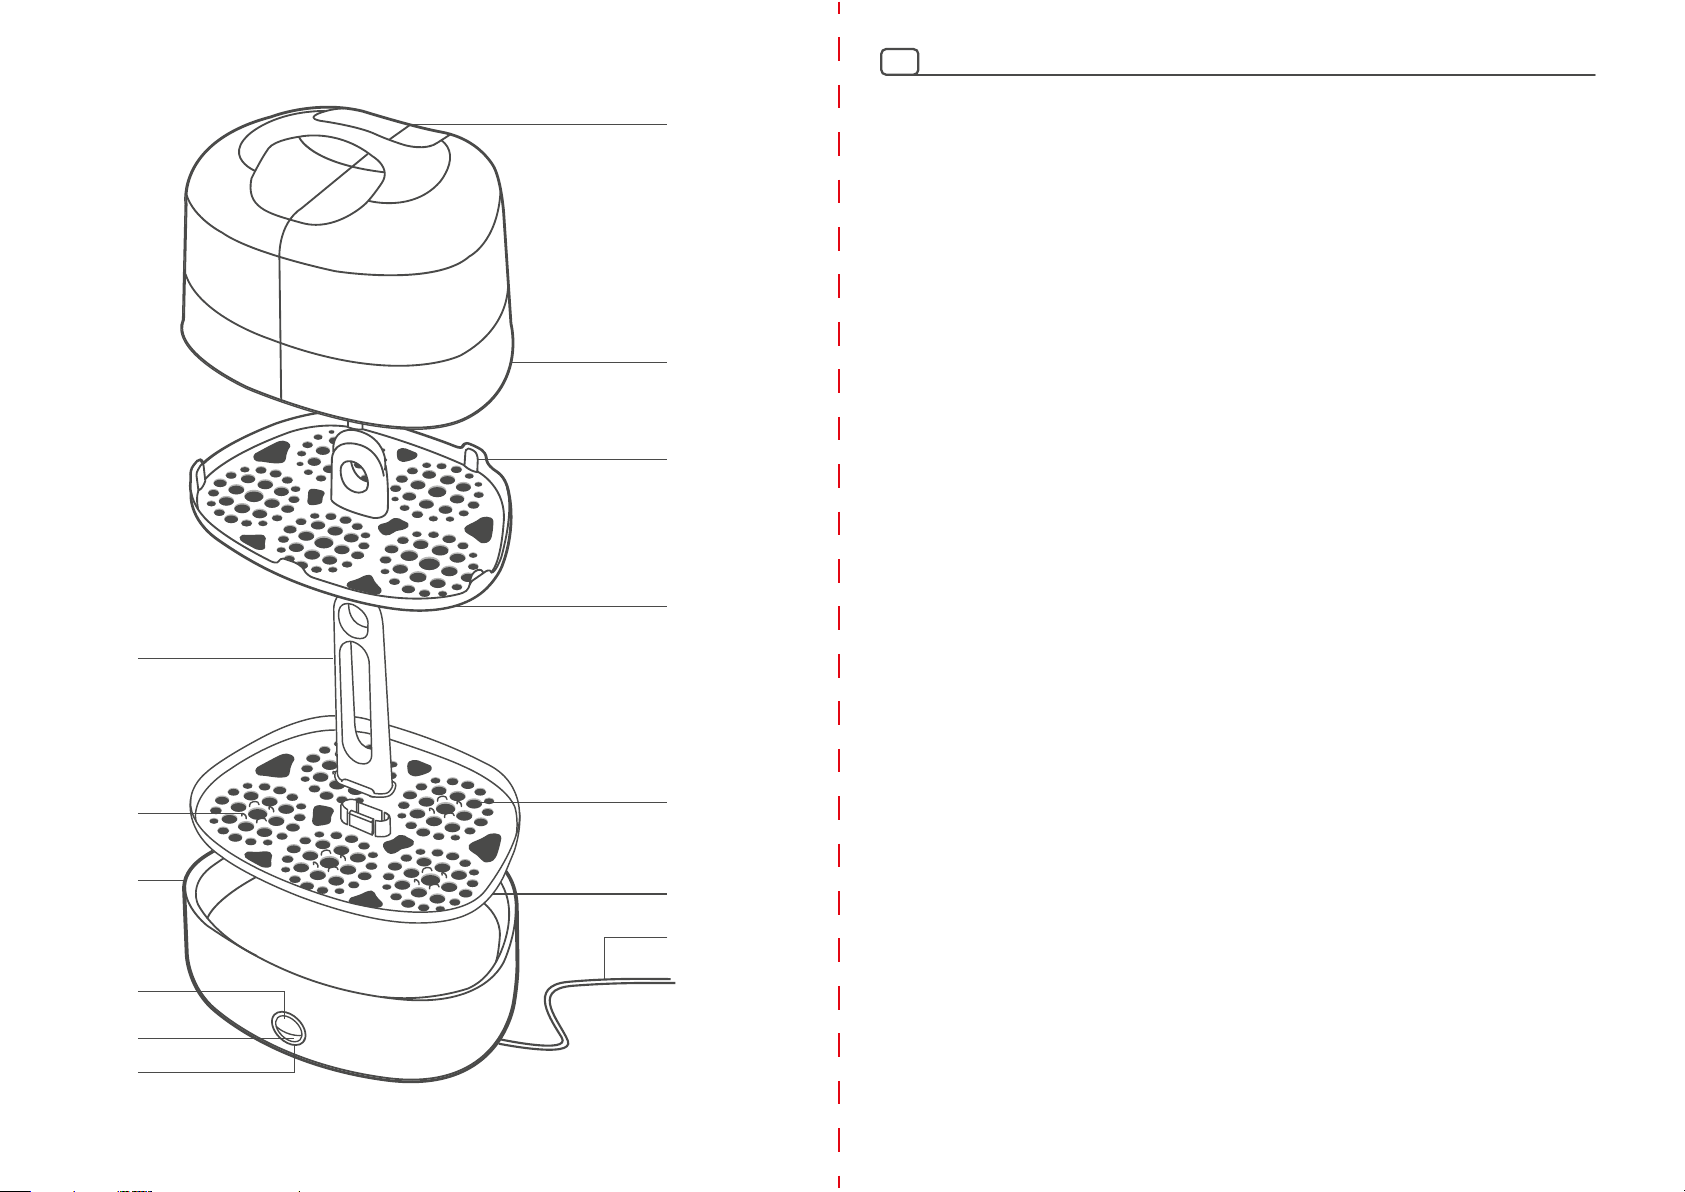
GUIDE DES PIÈCES (voir le schéma)
A. Plateau inférieur amovible
B. Plateau supérieur amovible
C. Tige centrale
D. Emplacement pour goulot de biberon closer to nature®
E. Emplacement pour valve anti-colique closer to nature® (pour la stérilisation des biberons anti-colique closer to nature®)
F. Emplacement pour capuchon de biberon
G. Couvercle du stérilisateur
H. Cuve pour stérilisateur
I. Cordon d'alimentation avec fiche
J. Bouton d’allumage
K. Bouton d’annulation
L. Arrêt et voyant de stérilisation
M. Évents à vapeur
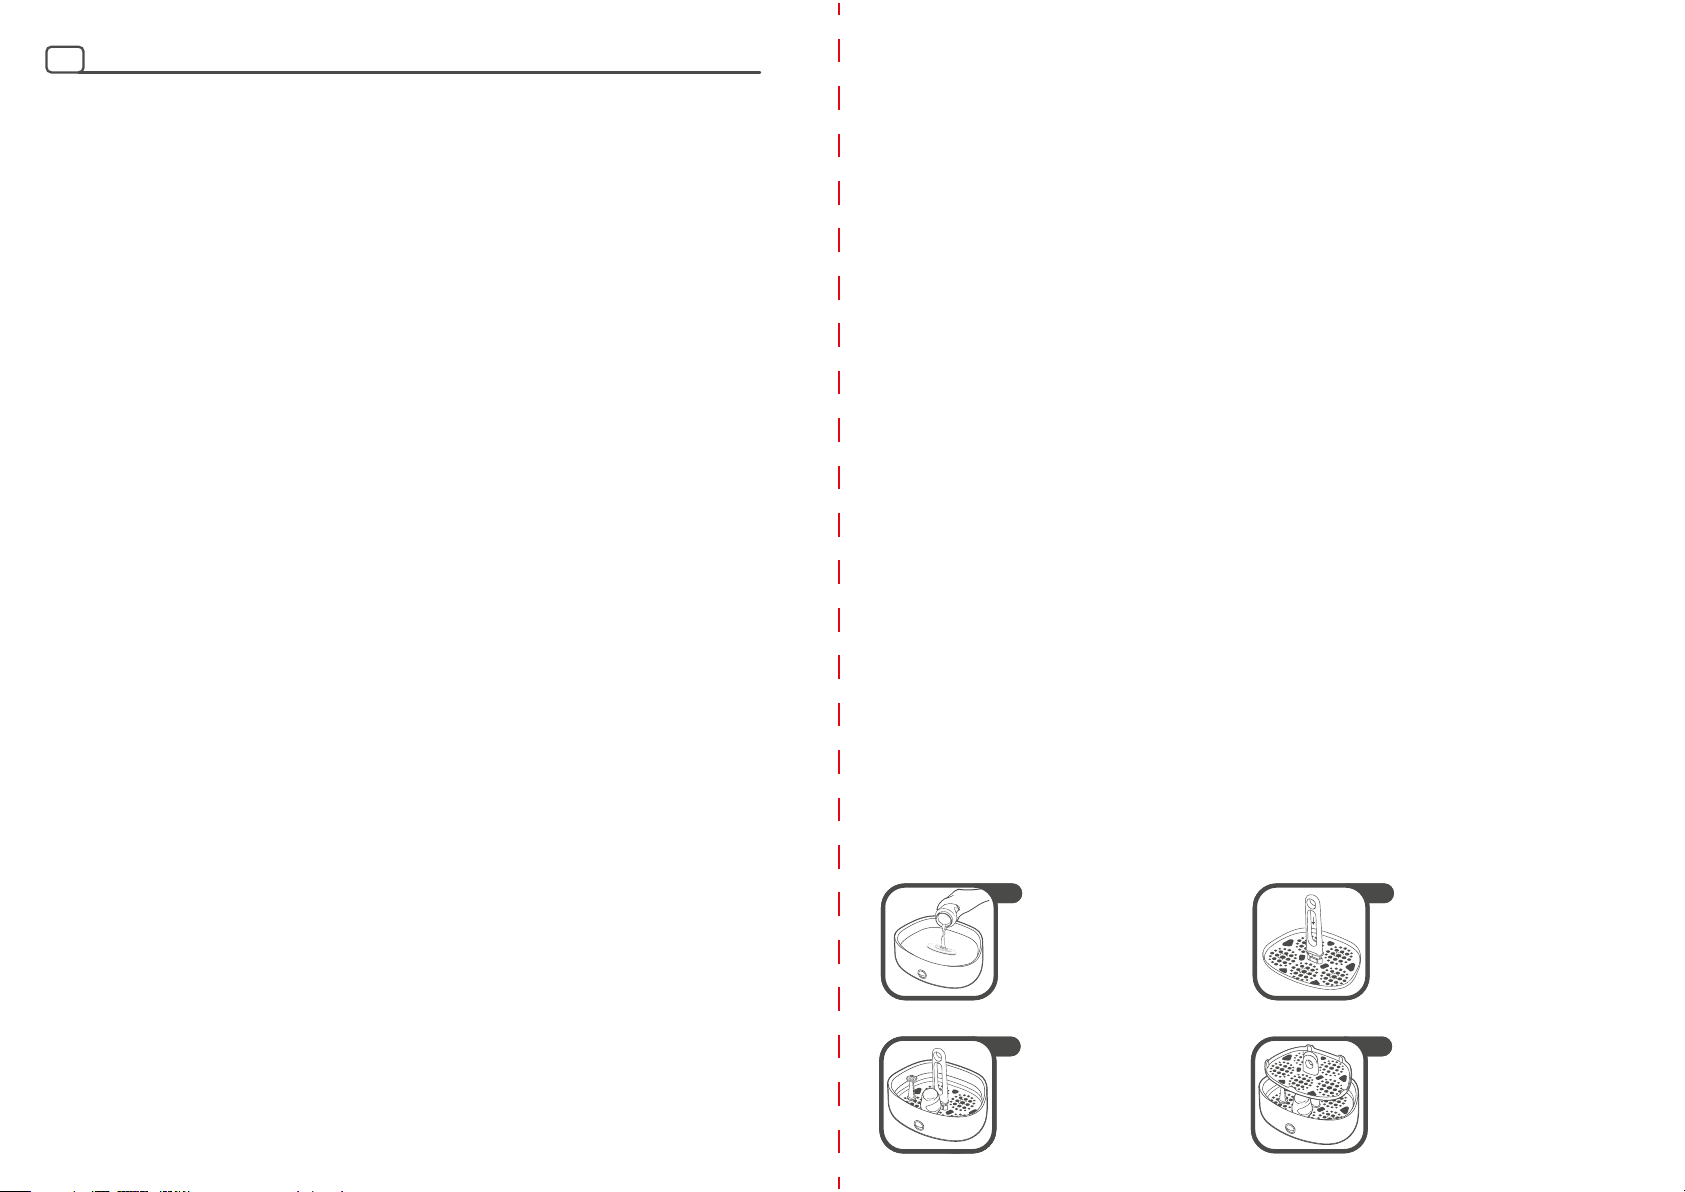
CONSIGNES IMPORTANTES POUR LA PRÉPARATION DE VOTRE STÉRILISATEUR AVANT SA PREMIÈRE UTILISATION:
1. Ne branchez pas l'appareil à la prise de courant à cette étape-ci.
2. Retirez tous les objets de l'intérieur de la cuve du stérilisateur.
3. Versez exactement 80 ml (2,7 oz liq.) dans la cuve du stérilisateur. Une ligne très pratique indique la mesure sur vos
biberons closer to nature®.
4. Assemblez le plateau inférieur blanc (A), la tige centrale (C) et le plateau supérieur (B), puis placez-les dans la cuve du stérilisateur.
5. Ajoutez le couvercle.
6. Branchez le cordon d'alimentation à votre prise de courant. Le bouton marche/arrêt et le voyant de stérilisation devraient s'allumer
automatiquement. S'ils ne s'allument pas, appuyez sur le bouton marche/arrêt et le voyant orange s'allumera pour indiquer que la
stérilisation a débuté.
7. Le voyant s'éteindra lorsque la stérilisation sera terminée.
8. Laissez l'appareil refroidir pendant 3 minutes avant de la débrancher.
9. Retirez le plateau inférieur, la tige centrale et le plateau supérieur, videz l'eau restante et essuyez. Votre stérilisateur peut
maintenant être utilisé.
POUR OBTENIR DES INSTRUCTIONS SUR LA FAÇON DE NETTOYER OU DE STÉRILISER LES BIBERONS TOMMEE TIPPEE® CLOSER TO
NATURE®, VEUILLEZ CONSULTER LE LIVRET FOURNI SÉPARÉMENT.
UTILISATION DU STÉRILISATEUR ÉLECTRIQUE À VAPEUR. Il n'est pas nécessaire de préchauffer l'appareil.
1. Avant de commencer la stérilisation, lavez les biberons et les accessoires d'alimentation à l'eau chaude savonneuse ou au
lave-vaisselle (panier supérieur seulement) afin d'éliminer tout résidu de lait. Séparez l'ensemble des pièces à laver et réassemblez
la tétine et la bague de serrage pour la stérilisation.
AVERTISSEMENT :LE PRODUIT POURRAIT ÊTRE TACHÉ S'IL ENTRAIT EN CONTACT AVEC DES ALIMENTS À BASE D'HUILE
(p. ex., SAUCES À BASE D'HUILE OU DE TOMATES).
• Fixez toujours le cordon d'alimentation à l'appareil en premier, puis branchez la fiche à la prise
murale. Pour débrancher, placez toutes les commandes en position arrêt, puis retirez la fiche de
la prise murale.
• Assurez-vous de remplir la cuve d'eau avant de mettre l'appareil en marche.
• Ajoutez toujours exactement 80 ml (2,7 oz liq.) avant d'utiliser l'appareil. Si vous ne mettez pas
suffisamment d'eau dans le stérilisateur, ou si vous en mettez trop, celui-ci ne fonctionnera
pas correctement.
CONSERVEZ CES INSTRUCTIONS
6
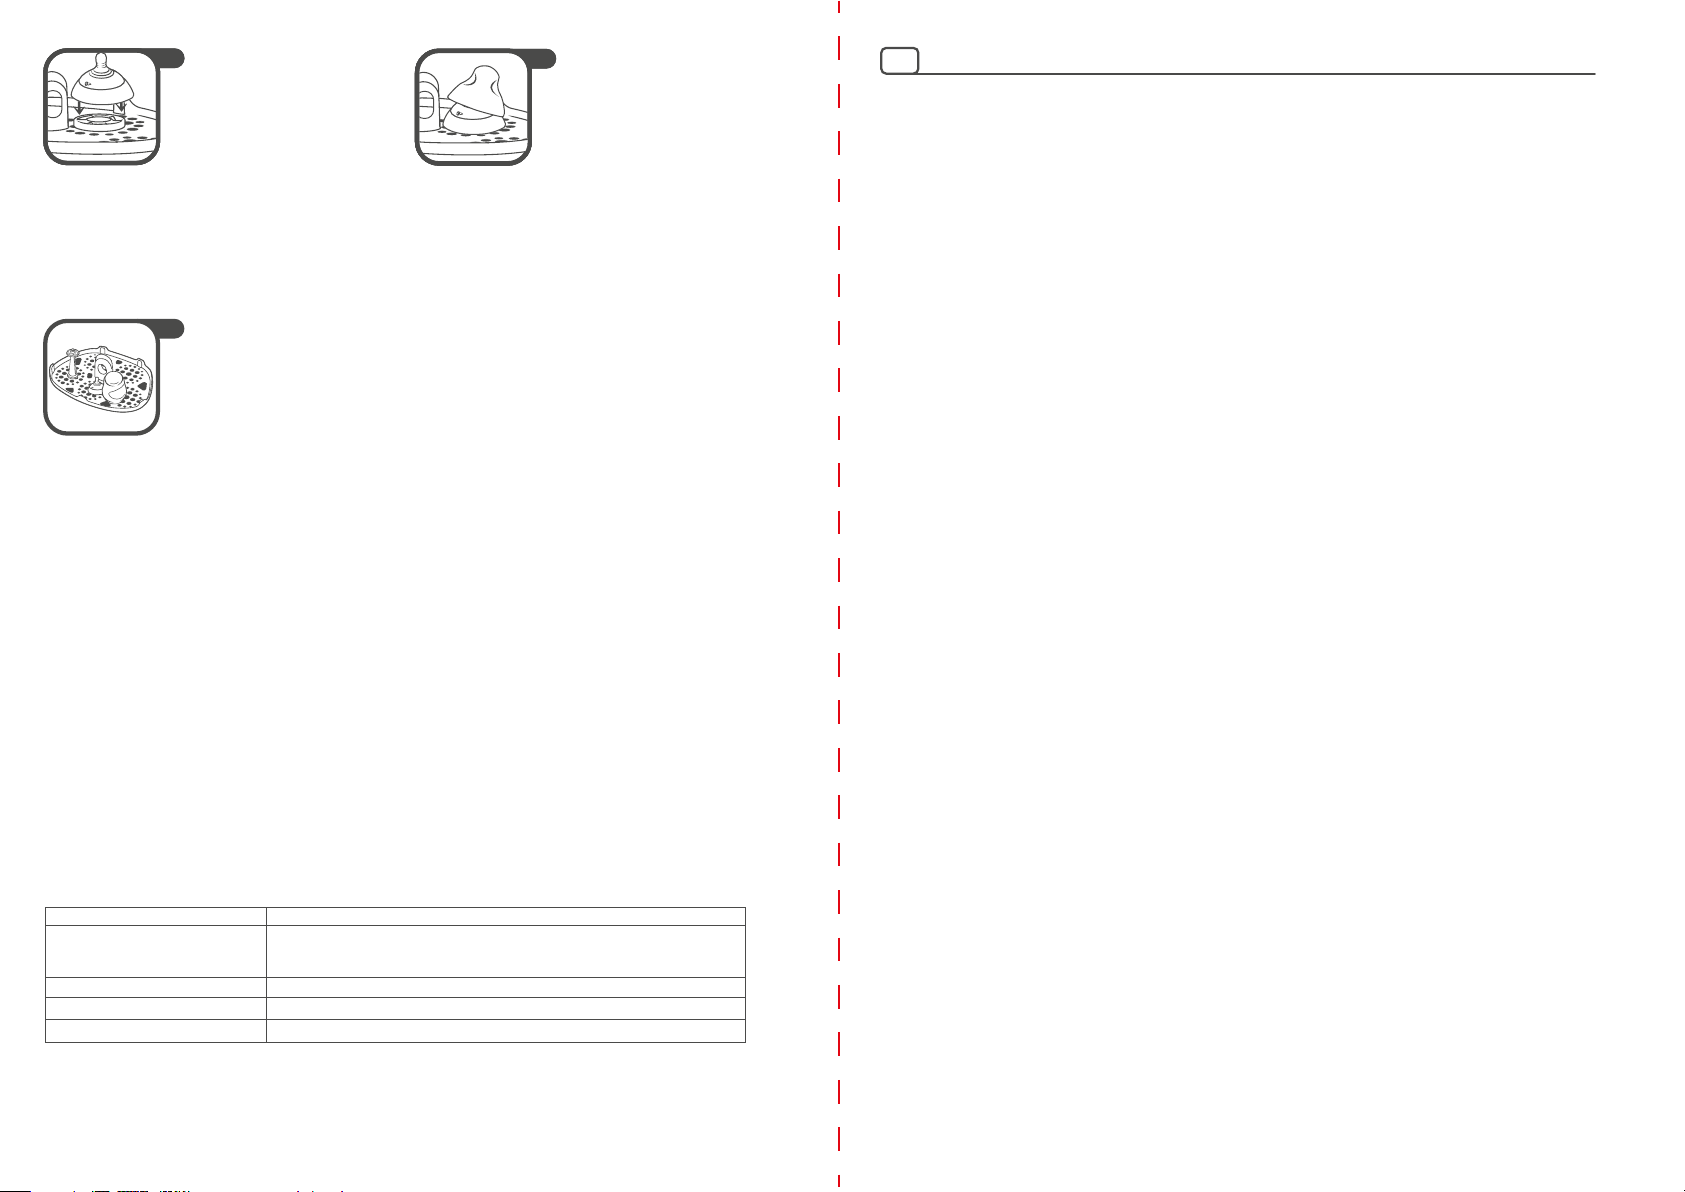
Insérez les capuchons dans les emplacements à
capuchon du plateau supérieur amovible afin
qu'ils pendent au-dessus de la tétine et de la
bague de serrage mais sans être entièrement
enfoncés.
7
Placez les tétines et les bagues de serrage
assemblées dans les emplacements du
plateau supérieur amovible. Il est important
de ne pas mettre les capuchons sur la tétine
et la bague de serrage.
667
6
8. Placez le couvercle sur la cuve du stérilisateur.
9. Branchez l'appareil et mettez-le en marche.
10. Appuyez sur la touche marche/arrêt; le voyant orange s'allumera. Cela indique que la stérilisation a débuté.
11. Le voyant s'éteindra lorsque la stérilisation sera terminée.
12. Laissez l'appareil refroidir pendant 3 minutes avant de l'ouvrir.
13. Le contenu restera stérile pendant 24 heures si le stérilisateur n'est pas ouvert.
14. Lavez-vous soigneusement les mains avant de manipuler les articles stérilisés. Soyez prudents, car ces derniers seront très chauds.
16. Videz l'appareil et rincez-le afin de prévenir l'accumulation de tartre.
NETTOYAGE DE VOTRE STÉRILISATEUR ÉLECTRIQUE
Après chaque utilisation, débranchez l'appareil et laissez-le refroidir. Videz l'appareil de l'excès d'eau et essuyez-le avec un chiffon
humide seulement. Afin de ne pas endommager l'appareil, évitez d'utiliser des produits abrasifs ou de permettre que celui-ci entre en
contact avec des solvants ou des produits chimiques puissants.
DÉTARTRAGE
Procédez au détartrage de votre stérilisateur toutes les 4 semaines afin de garantir un bon fonctionnement. Pour le détartrage de
votre stérilisateur électrique :
1. Videz le stérilisateur et essuyez l'intérieur de celui-ci avec une éponge ou un chiffon humide.
2. Versez 1 tasse de vinaigre blanc.
3. Turn sterilizer on and run for 5 minutes.
4. Débranchez l'appareil et laissez-le refroidir, puis versez tout excédent de liquide dans l'évier. Rincez bien l'intérieur du stérilisateur
à l'eau tiède et utilisez une éponge ou un chiffon humide propre afin d'enlever tout dépôt s'étant détaché au cours du processus
de nettoyage ou de détartrage.
5. Rebranchez l'appareil et ajoutez la quantité d'eau que vous utilisez habituellement pour un chauffage normal. Mettez l'appareil et
marche et faites-le fonctionner pendant 5 minutes afin d'enlever tout dépôt supplémentaire. Une fois cette étape terminée, rincez
de nouveau le stérilisateur et utilisez-le de la façon habituelle.
Retirez les articles stérilisés. Les pinces à tétine peuvent être utilisées pour retirer les
articles de petite taille. Le couvercle, une fois retiré et posé à plat, se transforme en une
autre surface de travail hygiénique pouvant servir à préparer les biberons.
15
PROBLÈME SOLUTION
Le stérilisateur ne fonctionne pas Vérifiez que le cordon d'alimentation est branché
à l'appareil ainsi qu'à la prise de courant.
Vérifiez le bon fonctionnement de la prise de courant
en y branchant un autre appareil.
Vapeur excessive Les articles n'ont pas été insérés convenablement dans
le stérilisateur. Consultez les instructions d'utilisation.
Le stérilisateur laisse des traces
sur les biberons
Un détartrage du stérilisateur est nécessaire.
Consultez les instructions de nettoyage.
La durée du cycle de
stérilisation est trop longue.
Il y a trop d'eau dans le stérilisateur. Utilisez
exactement 80 ml (2,7 oz liq.) d'eau.
RÉSOLUTION DES PROBLÈMES