Tonax Soolai SPL-1600R User manual


INDEX
I.SPL-1600R Special Features…………………………………………………..4
II. SPL-1600R Parts Instruction………………………………………………….5
III. SPL-1600R Operation Control……………………………………………….6
IV. SPL-1600R How to enter setting mode………………………………...........9
V. SPL-1600R Parameter setting………………………………….………….....10
1. Set Channel group / Channel / Frequency………………………………....10
2. Set Pilotone……………………………………………………………..........11
3. Set Name……………………………………………………………………..11
4. Set Noise Lock (SQ)…………………………………………........................12
5. Set Locking / Unlocking………………………………………………….....12
6. Set Contrast………………………………………………………………….13
7. SetAuto Shutdown………………………………………………………….13
8. Set Language channel switch……………………………………………….14
9. Exit of operating menu ………………………………………………….....14
VI. SPL-1600R Monitoring Mode………………………………………….…...15
VII. SPL-1600R Updating Mode…………………………………………………15
VIII. SPL-1600T Parts Instruction……………………………………………...16
IX. SPL-1600T Operation Control………………………………………………17
X. SPL-1600T How to enter setting mode…………………………………........19
XI. SPL-1600T Parameter setting……………………………………………….20
1. Set Channel group / Channel / Frequency……………………….………...20
2. Set Microphone Gain………………………………………………………..21
3. Set Name……………………………………………………………………..22
4. Set RF Power Output………………………………………………………..22
5. Set Locking / Unlocking…………………………………………………..…23
6. Set Contrast…………………………………………………………………..23
7. Set Language channel switch………..……………………………………....24
8. Set Pilotone…………………………………………………………………...25
9. Exit of operating menu………………………………………………………25
XII. WT-1600 Parts Instruction……………………………………………………26
XIII. WT-1600 Operation Control…………………………………………………28
XIV. WT-1600 How to enter setting mode………………………………………..31
XV.WT-1600 Parameter setting……………………………………………….32

2
1. Set Channel group / Channel / Frequency………………..........................32
2. Set PHATOM…………………………………………………………….....33
3. Set Name…………………………………………………………………….33
4. Set RF Power Output…………………………………………………........34
5. Set Locking / Unlocking………………………………………………….....34
6. Set Contrast…………………………………………………………............35
7. Set Language channel switch…………………………..………………......35
8. Set Pilotone……………………………………………………………….....36
9. Exit of operating menu………………………………………………..........36
XVI. WI-1600 Special Features………………………………………………….37
XVII. WI-1600 Parts Instruction………………………………………………..38
XVIII. WI-1600 Operation Control……………………………………………..41
XIX. WI-1600 How to enter setting mode……………………………...............46
XX. WI-1600 Parameter setting…………………………………………………47
1. Set Channel group / Channel / Frequency…………………………..........47
2. Set Pilotone……………………………………………………….................48
3. Set Name…………………………………………………………….............48
4. Set Noise Lock (SQ)………………………………………………………...49
5. Set Locking / Unlocking…………………………………………………….49
6. Set Contrast………………………………………………………………....50
7. Set Language channel switch…………………………..…………………..50
XXI. Application Sample………………………………………………...............51
XXII. Main Specification…………………………………………………….......55

3
Ⅰ. SPL-1600R Special Features
Unique design of welcome-screen, editing and displaying salutatory, themes and
LOGO.
Switching 32 language-channels quickly, language name / channel simultaneously
changed at the display.
UHF band PLL synthesized design.
Channel group design, with 32 channels in User Group, frequency and name
changed easily.
Super mini, light weight and metal shell design.
"Digital Pilotone & Noise Lock" dual-squelch Circuitry eliminates signal and
random noise interference.
High performance double-IF circuit design.
RF Track tuning Filtering technique with SAW RF filters to get high anti-
interference.
128*64 dot matrix double-color OLED display.
Name, channel group, channel, frequency, volume, battery, RF level, Audio level,
RF power and lock Mode at OLED display.
Digital 16 -step volume control of receiver.
Digital 21-step SQ adjusting of receiver.
Panel lock with password.
Built-in Lithium ion polymer battery, continuously working 11-13 hours.
Auto shutdown function, it will auto shutdown when no signal been received.
Unique clip-worn design.
Variously charging equipments for choice, convenient to charge, disinfect, store
and carry.

4
Ⅱ. SPL-1600R Parts Instruction
(1). OLED Status display
(2). Power On / Off button.
(3). Tie pillar or 1/4 wavelength flexible antenna.(Tailor-made)
(4). 3.5 mm stereo jack socket for earphones.
(5). "+" button
(6). "-" button
(7). SET button.
(8). Charging & welcome display updating contacts.
(9). Display of channel group, Channel group "1-7", User Group "U".
(10).Channel display.
(11).Frequency display, frequency of 32 channels in User Group can be user-defined.
(12). Name display, combined by 12 characters
(13). Earphone output volume display.
(14). Received signal strength indicator
(15). Changing channel display.
(16). Lock mode icon (lock mode is activated).
(17). Battery status display.
(18). Audio level indication.
(19).Audio overloads display.
5
Ⅲ. SPL-1600R Operation Control
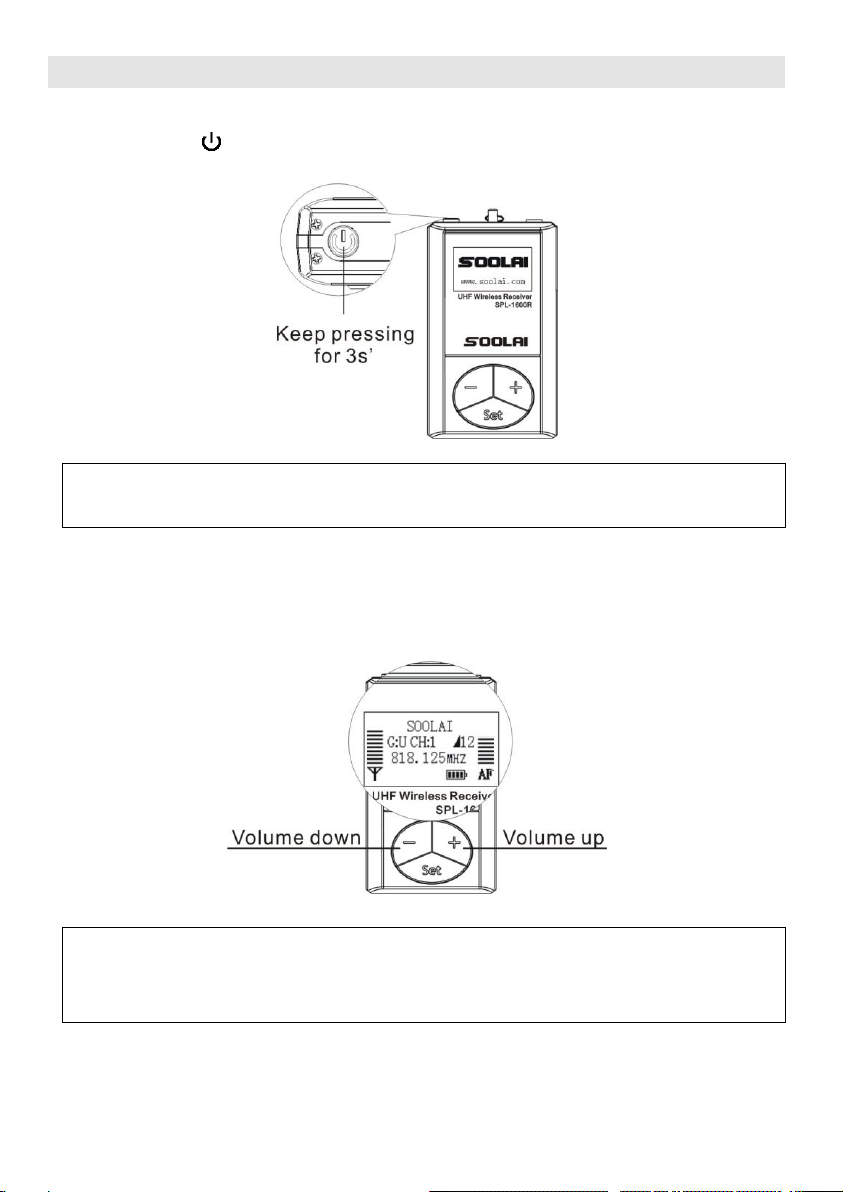
1. Turn On / Off the unit
Keep pressing " " button for 3 seconds to turn on/off the unit.
Remark: If the unit cannot be turned on, please charge the unit first.
2. Volume control
Earphone volume can be adjusted through "+" or "-" button.
Warning: Please turn down the volume of receiver to the minimum before
plugging in the headphones.
6
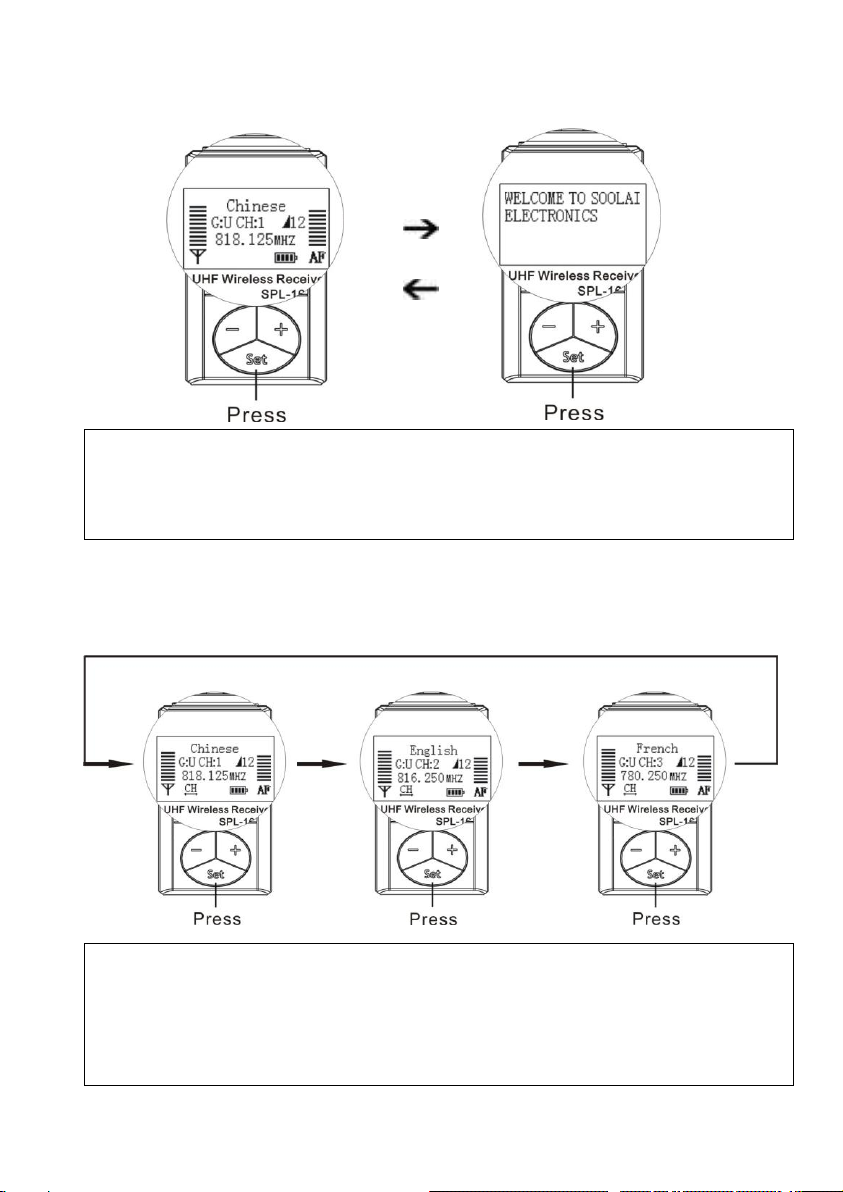
3. Welcome screen switch
Press "Set" button to switch welcome screen.
Remark:
- To realize this function, please set『Switch CH(G:U)』to "Disable".
- You can update the screen display through Software S-WELCOME.
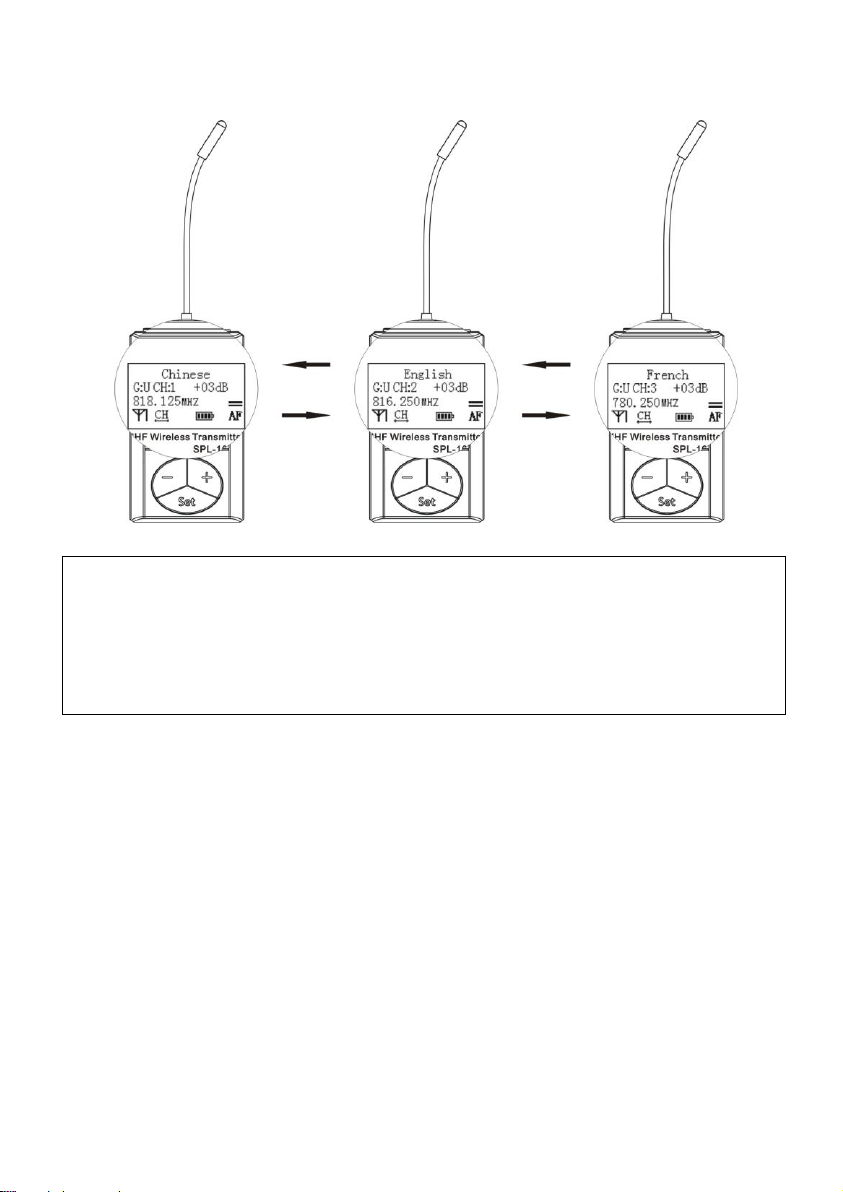
4. Fast switch between Languages (channel)
Press "Set" button to switch language.
Remark:
- To realize this function, please set『Switch CH(G:U)』to "Enable".
- Channel group should be set to "U" and at least two channels have been set to
right frequency.

7
5. Prechecking
Please check the Received signal strength indicator on display to see if there is any
frequency interference before you use, detailed procedure as follows:
1) Make sure transmitter is off.
2) Turn on the receiver and connect the earphone (earphone is antenna), then check
the Received signal strength indicator.
- If there is no RF level display, it means no frequency interference. You can use this
frequency.
- If there is RF level display, it means the frequency is interfered. The stronger
interference is, the more the RF level appears. Please choose another frequency.

8
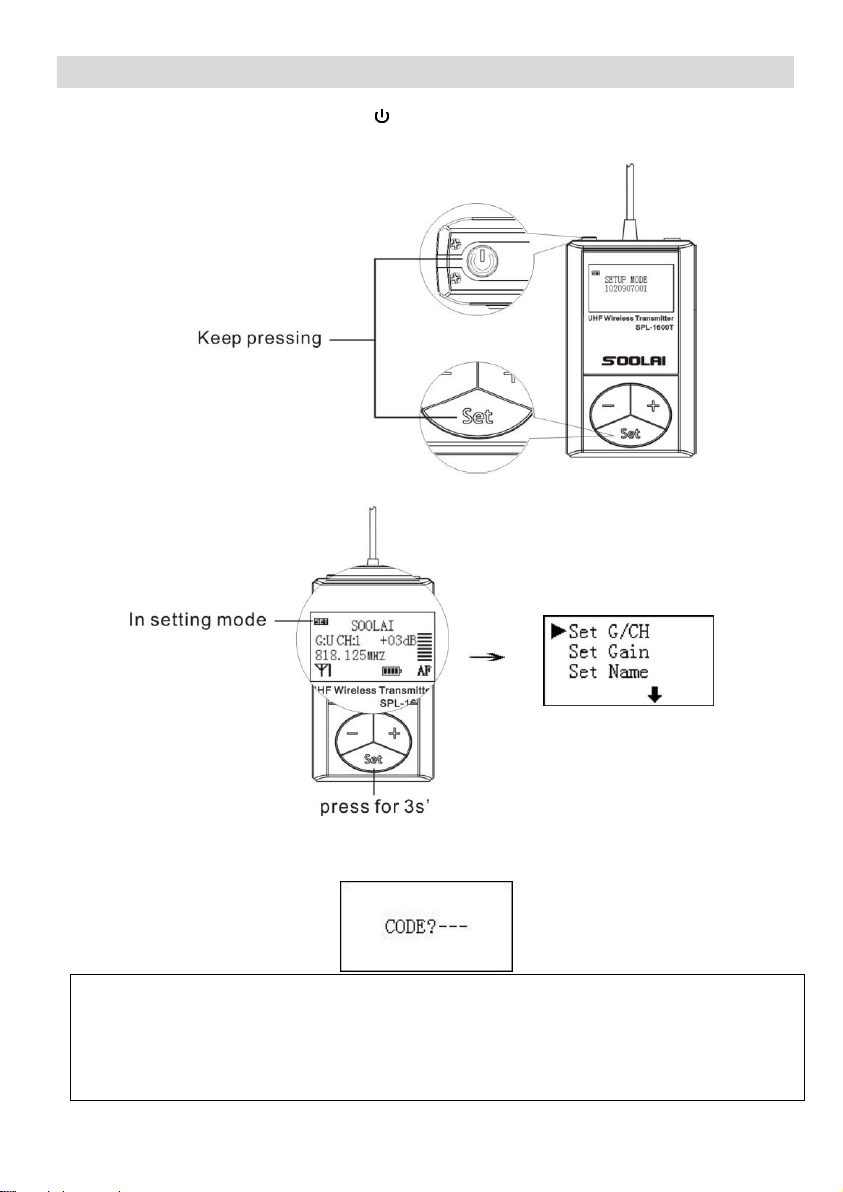
Ⅳ.SPL-1600R How to enter setting mode
1. In power off state, keep pressing " " and "Set" buttons simultaneously for 3
seconds to enter setting mode.
2. In setting mode, keep pressing "Set" buttons for 3 seconds to enter setting menu.
3. You have to enter the correct code via "+" or "-"button, press "Set" button to enter
menu.
Remark:
- Initial code is "+++".
- Please try below code when you lost. There are sixteen code combinations you can
press buttons as below: "---","+++","-++", "+--", "--+","++-","-+-","+-+".
9
Ⅴ.SPL-1600R Parameter Setting
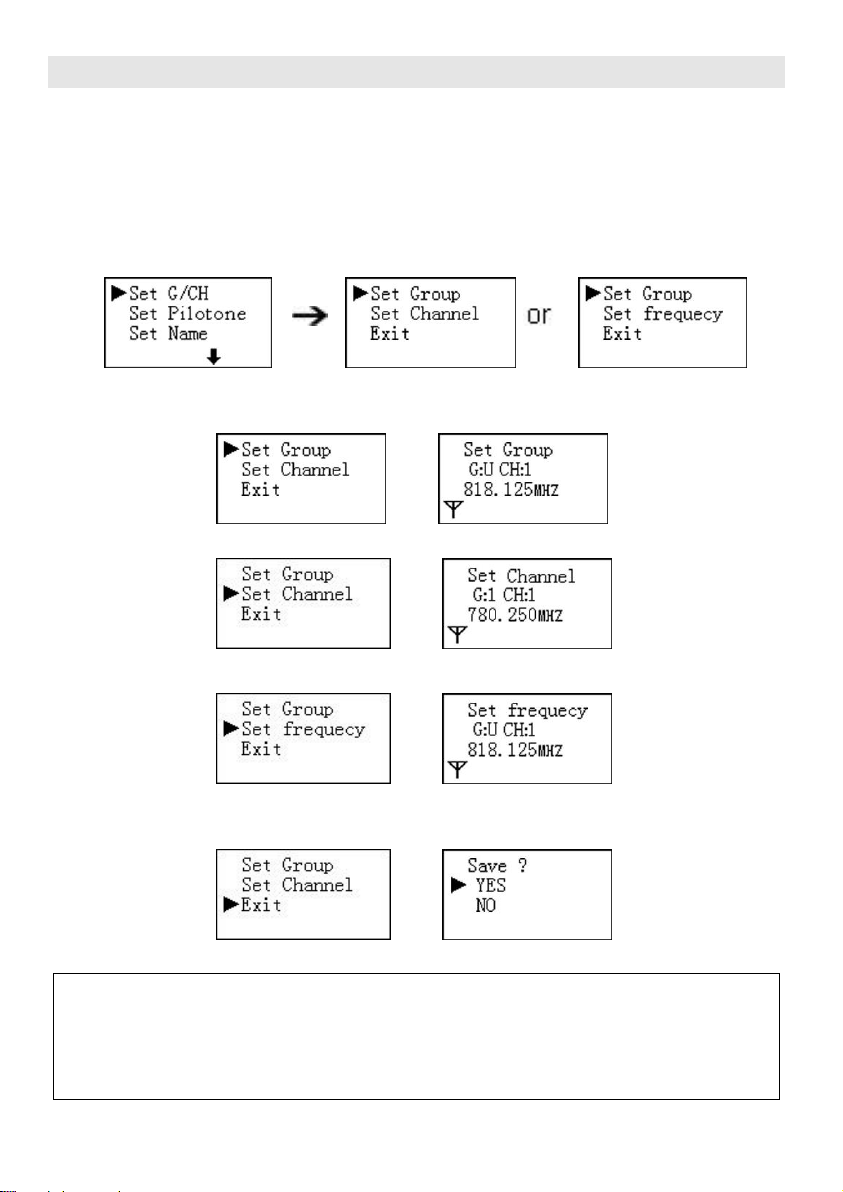
1. Set Channel Group / Channel / Frequency
There are 8 channel groups, Group "1 -7" are fixed, Group "U" is User group.
Group 1 –7: There are fixed frequency in each group, which cannot be changed.
Group U: 32 channels, User could define frequency in each channel.
1) Select『SET G/CH』item via "+" or "-" button, press "Set" button.
Group 1-7 Group U
2) Select『Set Group』, press "Set" button.
3) Select『Set Channel』, press "Set" button.(Group 1-7)
4) Select『Set frequency』, press "Set" button.(Group U)
5) Select『Exit』, press "Set" button. Select "YES" to save and exit, "No" means exit
without changes.
Remark: You could switch the language ( channel ) in Group"U", at most in 32
different languages. If you only need 2 languages, please set the other 30
channel frequencies to be zero. (FREQ=000.000MHZ)
10
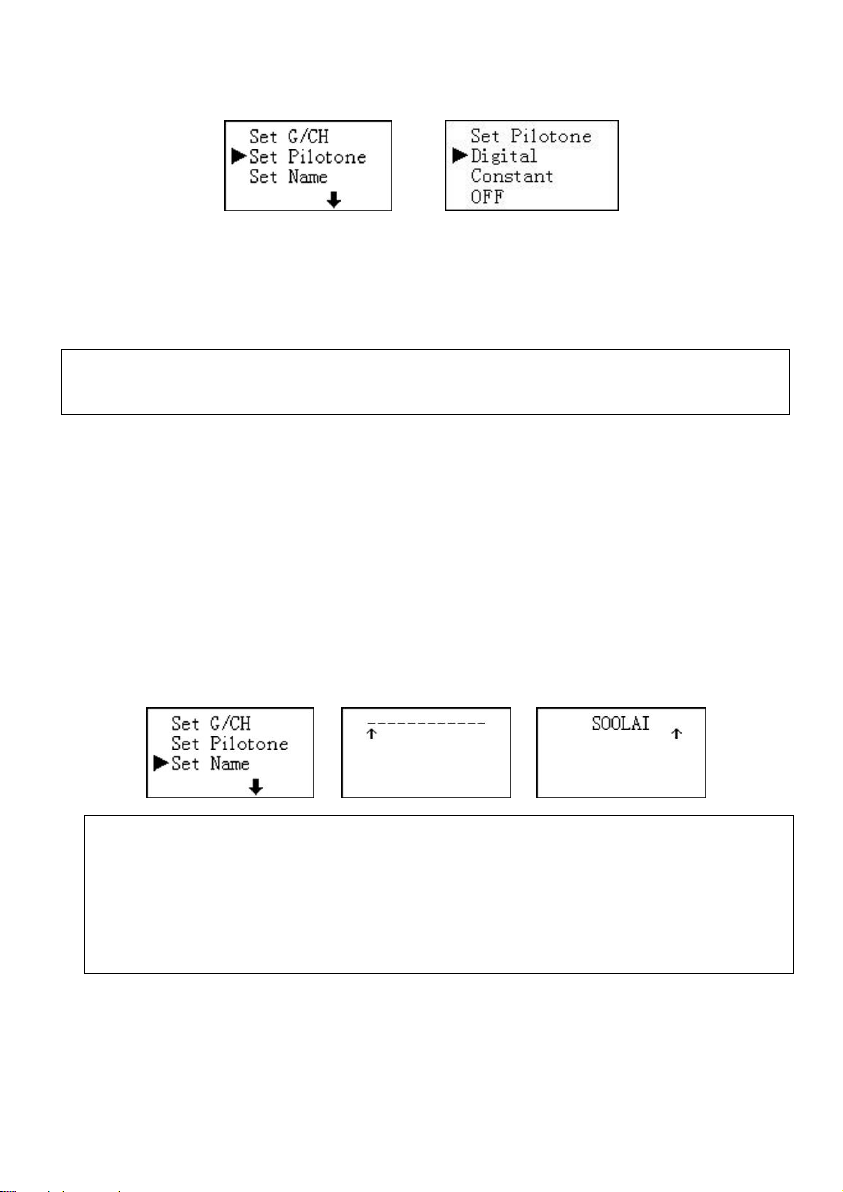
2. Set Pilotone
1). Select『Set Pilotone』item via "+"or "-"button, press "Set" button.
2). Select "Digital", it receives Digital Pilot signal from transmitter. (Recommended)
3). Select "Constant", it receives Constant Pilot signal from transmitter.
4). Select "OFF", it does not receive any Pilot signal from transmitter.
Remark: In normal use, please set Pilotone of transmitter and receivers be same.
3. Set Name
The name is compose of 12 characters, each character with 78 different choices: 0,
1, 2, 3, 4, 5, 6, 7, 8, 9, A, B, C, D, E, F, G, H, I, J, K, L, M, N, O, P, Q, R, S,T, Y, V,
W, X, Y, Z, a, b, c, d, e, f, g, h, i, j, k, l, m, n, o, p, q, r, s, t, u, v, w, x, y, z,
< , >, (, ), _, /, *, ., :, &, ?, @, #, +, "SPACE".
1). Select『Set Name』item via "+"or "-" button, press "Set" button.
2). At first, set the first character of the name, via "+"or "-" to select it and press
"Set" to confirm. Then set the second one until the last one. Save and exit.
Remark:
- In Group "1-7 ", this setting is available to all channels.
- In Group "U ", this setting is only available to current channel.
- The name of 32 channels in Group "U" can be set separately.
11
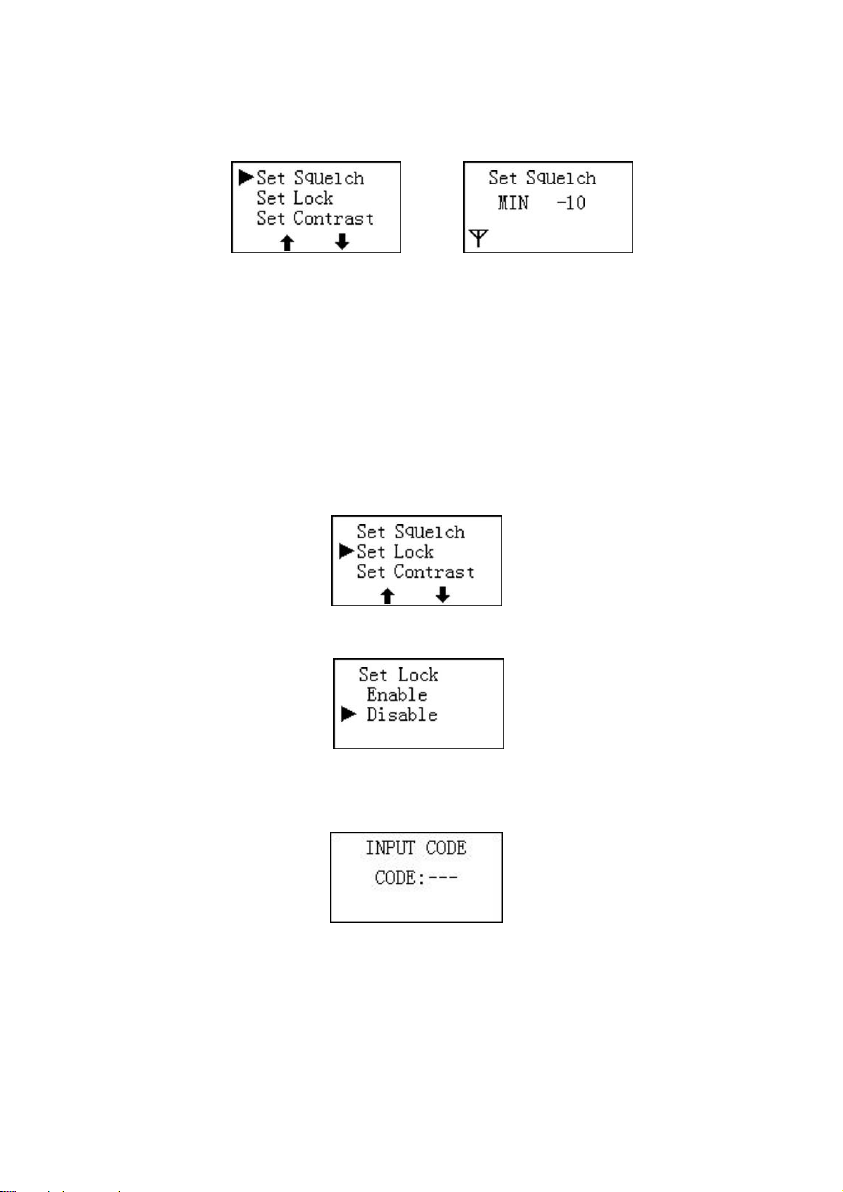
4. Set Noise Lock (SQ)
This item can be used to set Receiver Squelch level, there are 21 steps, -10~+10.
1). Select 『Set Squelch』item via "+"or "-" button, press "Set" button.
2). Select Squelch level via "+"or "-" button, press "Set" button.
"MIN -10", indicates receiver is with the farthest operating range before dropout
occurs, but with most noise. (Default)
"MAX +10", indicates receiver is with the nearest operating range before muting it,
but with least noise.
5. Set Locking / Unlocking
1). Select『Set Lock』item via "+"or "-" button, press "Set" button.
2). Select "Disable" and press "Set" button to unlock the panel operating.
3). Select "Enable" and press "Set" button to set the lock. Please enter three digits
code via "+"or "-" button, press "Set" button to set.
12
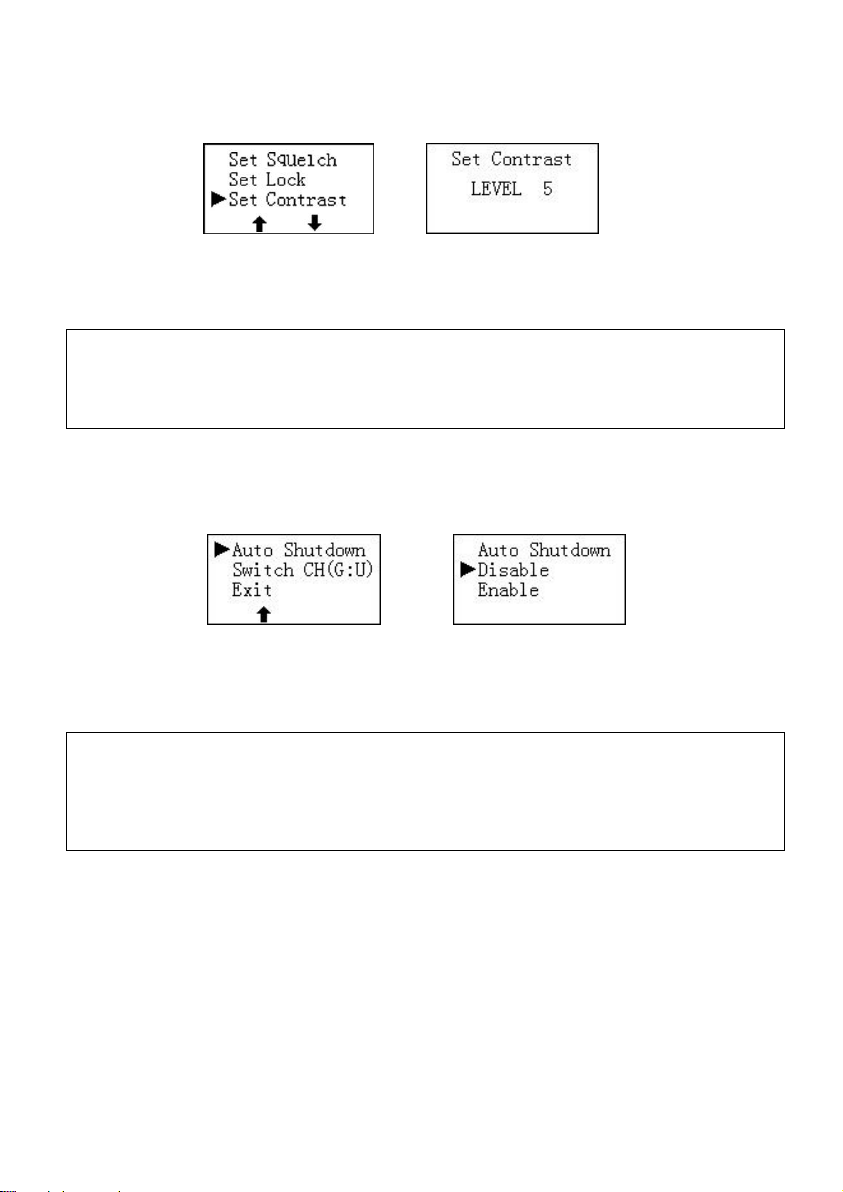
6. Set Contrast
1). Select『Set Contrast』item via "+"or "-" button, press "Set" button.
2). Select suitable contrast level via "+"or "-" button, press "Set" button.
3). There are totally 9 steps, the min is 1 and the max is 9.
Warning: In case of speeding up the aging of OLED display, please do not set the
contrast level too strong.
7. SetAuto Shutdown
1). Select『Auto Shutdown』item via "+"or "-" button, press "Set" button to enter.
2). Select "Disable" item, turn off auto shutdown function.
3). Select "Enable" item, turn on auto shutdown function.
Remark: Once Auto Shutdown function is turned on, receiver does not receive
any signal from transmitter, it will shutdown automatically.

13
8. Set Language channel switch
1). Select『Switch CH(G:U)』item via "+"or "-" button, press "Set" button.
2). Select "Enable" and then press "Set" button. In normal use, pressing "Set" shortly
could switch language channel.
3). Select "Disable" and then press "Set" button. In normal use, switching language
channels function is disable.
Remark:
It must meet two conditions as below to switch the language quickly:
- Channel group is set to "U" and at least two channels have been set to right
frequency.
- Setting the『Switch CH(G:U)』to "Enable".
9. Exit of operating menu
Select『Exit』via "+"or "-" button, press "Set" button.

14
Ⅵ.SPL-1600R Monitoring Mode
In power off state, keep pressing " -" and " " buttons simultaneously for 3 seconds to
turn on the unit and enter monitoring mode.
Remark: In this mode, the receiver would auto stop the function of SQ and
Pilotone, the receiver cannot be mute. This mode is only used for test
or receiving weak signal.
Ⅶ.SPL-1600R Updating Mode
In power off state, keep pressing “+" and " " buttons simultaneously for 3 seconds to
turn on and enter updating mode.
Remark: Updating the words at the display should according to software
S-WELCOME and writer SCW-02A.
15
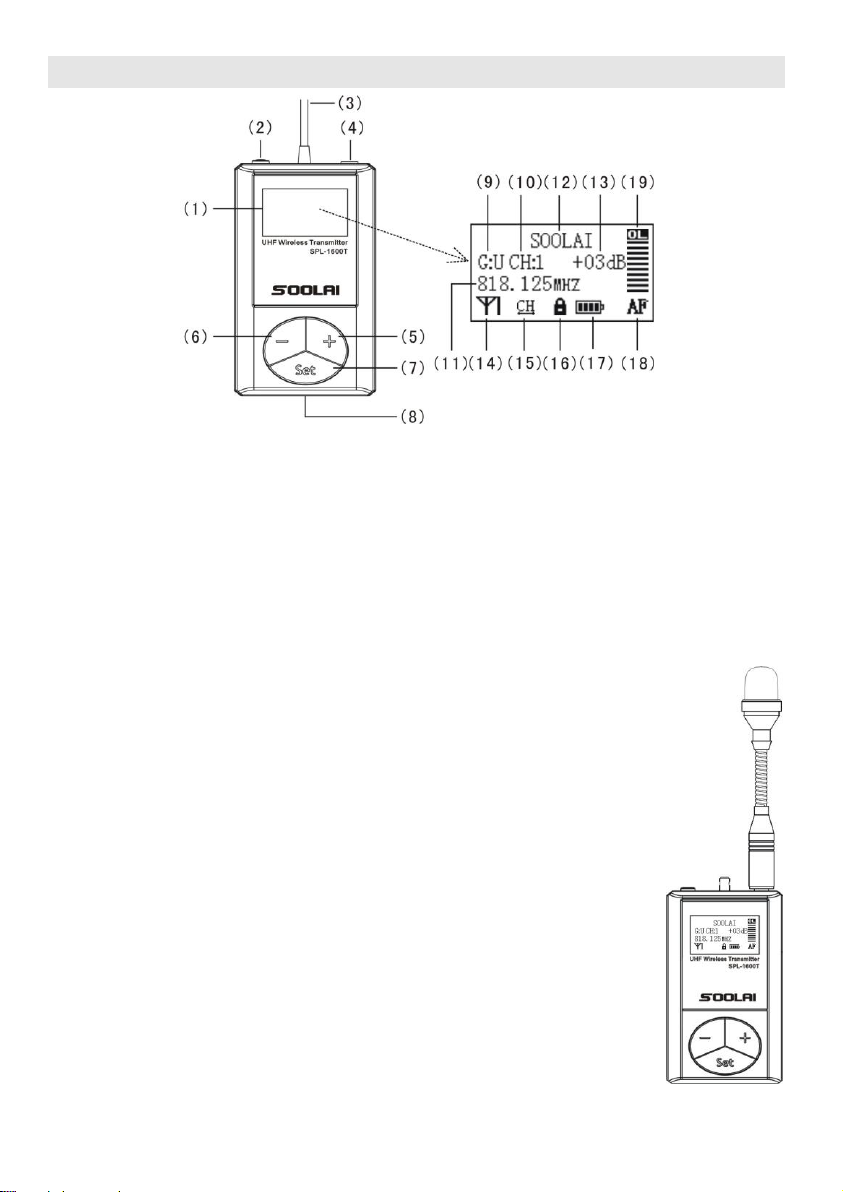
Ⅷ.SPL-1600T Parts Instruction
SPL-1600T OLED Display
(1). OLED display screen,128*64 dot matrix, double-color.
(2). Power On / Off button, Mute button
(3). 1/4 wavelength flexible antenna or Tie pillar.
(4). 3.5 mm stereo jack socket for microphones input (Tip) / line input (Ring).
(5). "+" button
(6). "-" button
(7). "SET" button.
(8). Charging & welcome display updating contacts.
(9). Channel group display. Channel group "1-7", User Group “U".
(10). Channel display.
(11). Name display. Frequency in User Group can be user-defined
(12). Name display, combined by 12 characters
(13). Microphone gain display
(14). RF power output display, LOW/NORMAL/HIGH.
(15). Changing channel display.
(16). Lock mode item (lock mode is activated).
(17). Battery status display.
(18).Audio level indication. MUTE/AF display.
(19). Audio overload display, ‘OL’means transmitter microphone
input volume is too high, please adjust transmitterAF gain.
16
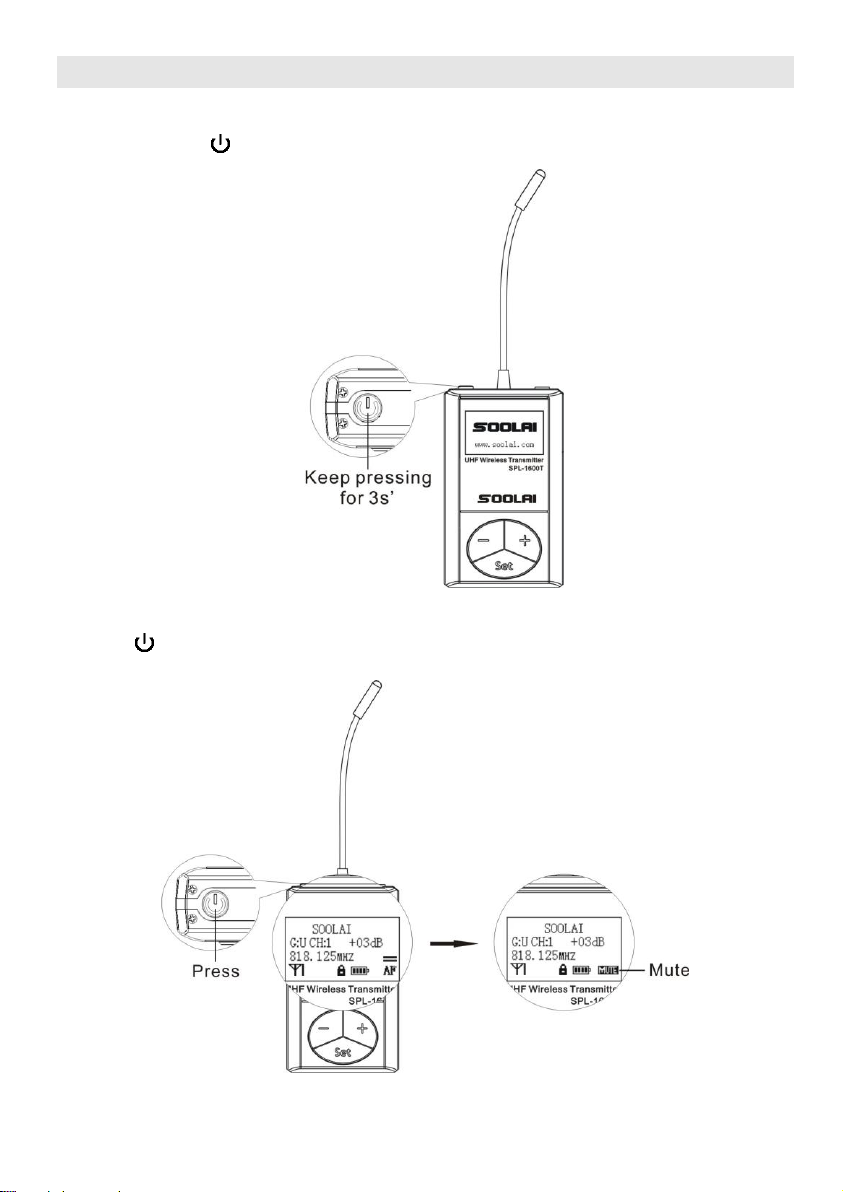
IX.SPL-1600T Operation Control
1. Turn On / Off the unit
Keep pressing " " button for 3seconds to turn on/off the unit.
2.Quick mute
Press " " button to mute the transmitter.
17
3. Fast switch of Language (channel)
Press via "+" or " -" button to switch from languages.
Remark:
- Channel group is set to "U" and at least two channels have been set to right
frequency.
- To realize this function, please set『Switch CH(G:U)』to "Enable".
18
X.SPL-1600T How to enter setting mode
1. In power off state, keep pressing " " and "Set" buttons simultaneously for 3
seconds to enter setting mode.
2. In setting mode, keep pressing "Set" button for 3 seconds to enter setting menu.
3. You have to enter correct code via "+" or "-"button, press "Set" button to enter
menu.
Remark: Initial code is "+++".
- Please try below code when you lost. There are sixteen code combinations you can
press buttons as below: "---","+++","-++", "+--", "--+","++-","-+-","+-+".

19
XI.SPL-1600T Parameter Setting
1. Set Channel Group / Channel / Frequency
There are 8 channel groups, Group " 1 -7"are fixed, Group "U"is User group.
Group 1 –7: There are fixed frequency in each group, which cannot be changed.
Group U: 32 channels, User could define frequency in each channel.
1). You can select『SET G/CH』via "+" or "-" button, then press "Set" button to enter.
Group 1-7 Group U
2). Select『Set Group』, then press "Set" button to enter.
3). Select『Set Channel』, then press "Set" button to enter.(Group 1-7)
4). Select『Set frequency』, then press "Set" button to enter.(Group U)
5). Select『Exit』, then press "Set" button to exit. Select " YES" to save it and exit, "
No" means exit without changes.
Remark: You could switch the language ( channel ) in Group "U", at most in
32 different languages. If you only need 2 languages, please set the
other 30 channels frequencies to be zero. (FREQ=000.000MHZ)
This manual suits for next models
2
Table of contents


