TopSpa XS User manual

1
TopSpaXS
User’sGuide
Installationofelectrics:TopSpaXSrequiresa230V,1x16Aconnectionwitha2.5mm
2
wirecrosssectionviaa
mainbreakerswitch.Aresidualcurrentdevicemustbeengaged.It’srecommendedthatatimer(clock)with
anon/offswitchbeinstalledtoensurethatthefiltrationsystemsrunsabout4‐6hoursperday.E.g.2x2
hours,or3x2hours,dependingonwhatismostappropriatefortheuser.Startforinstance,withthetime
youusuallybathe.Forexample3x2hours:
On18.00‐Off20.00 On02.00‐Off04.00 On10.00‐Off12.00
Meanwhile,theelectricalheateralsoturnsonifthetemperaturedropsbelowthesetvalue.NOTE!Timer
maynotbeinstalledontheincomingphaseaheadofthesafetyswitch.Seewiringdiagramforthecorrect
setup.It’simportantthataqualifiedprofessionalcheckthateverythingworksbeforethebathisused.Itis
thereforepracticaltofillthebathasshownonpage6,andthatthestartupisdoneaccordingtothe
instructionsonpage7sothateverythingcanbetestedwithanelectricianpresent.Ifthereareany
uncertaintiesduringtheinstallation,theelectriciancancontactusdirectlyforquickadvice.Wespeak
English,call+358500761115.Seepage11forsuitablefoundations.
WARNING!
A.
Makesurethattheproductisnotdamagedintransitduringunpacking.
B.
Theelectricalinstallationshouldonlybedonebyqualifiedpersons.
C.
Readinstructionscarefullybeforeinstallationbegins.
D.
Wearenotresponsibleforproductmalfunctionordamageiftheinstructionsarenotfollowedduring
installation.
E.
Donotconnectpowerbeforetheinstallationiscomplete.
F.
NOTE!Ifthehottubisbuiltintoaterraceorsimilar,theconstructionshallbebuiltinsuchawaythatallsides
arefreelyaccessibleforservicing.Outerpanelingandeventualinsulationmustbeeasilyremovable
G.
Readthetechnicalinstructionsbeforeinstallingthebath
H.
Readtheusersinstructionsbeforeusingthebath
I.
Donotleavechildreninthebathwithoutsupervision
J.
Donotsitwithyourbackorheadagainsttheskimmer
K.
Ifautomaticdispensers(floating,etc.)areused,carefuladjustmentshouldbemadetoavoidincorrectdosage.
Followtherecommendationsinourinstructions.
L.
Thecirculationpumpalsogeneratesheatandifitisrunningalongtimeitcanraisethetemperaturebyseveral
degreesinonedaywhenthetubiswellinsulated.
M.
Checkthequalityofthewater,aswellastemperatureandfunction,regularly,don'tleavethespaunmonitored
forlongtimeperiods.
N.
Ifthewater'sdrainedandthebathisn'tinuseduringcoldweather,thenallscrewconnectionsaretobeleft
opensothatanywatercandrainout.Drainthebubblesystemusingtheblower.
O.
Whenfillingwaterandthetemperatureisbelowfreezing,thepumpsandpipesarealsocold.Takethisinto
accountandfillwithwarmwaterfirst,orwarmupthespacewithanappropriatefanheaterbeforefillingwith
water.
P.
Afrostguardcanbeplacedinthetechnicalareatoprotectagainstdamagefromfreezingincoldweatherifthe
equipmentfails.
2020-04-23

2
HEATING
Expectaheatingrateof2degreesperhour.Ifthetemperatureofthewaterisaround6degreeswhen
starting,itwillbearound37degreesafter15hours.Afterthatthewatertemperatureiskeptaccordingto
thethermostat.Filtrationandwaterhygieneproductswillkeepthewaterclean.Alsoreadtheseparate
instructionsfortheheater.
Note!Evenifthethermostatissethigherthanthecurrentwatertemperature,itwillonlyturnonwhen
thewatercirculationisactive.Theheaterhasabuilt‐inflowsensorincl.microswitchthatrelyonacertain
flowofwatertobeactivatedandprovidepowertotheheater.Ifthereisnotenoughcirculation(e.g.filter
isnotcleaned,thewaterlevelistoolow),thentheheaterwon’tstart.Itcanalsoleadtotheoverheating
protection(coveredbyablackplasticnut)activatingandtheheaterstopsworking.Resettingisdoneby
looseningthenutanddepressingtheredpin.
CIRCULATIONPUMP
Werecommendthatthecirculationpumpbecontrolledviathetimerasdescribedonthefirstpage.Itis
alsopossibletocontrolitmanuallyviathebuttonsonthesidesofthe"controlbox".Thispresupposesthat
thetimer(ifused)isactivated.Ondeliveryhoseintendedforcirculationpumpislabeled"Pump".NOTE!If
youturnoffthepumpmanuallywiththebuttonitwillnotstartagainevenwiththetimerset!Thebutton
mustbeinthe"on"positionforthetimertofunctioncorrectly.
BLOWERFORBUBBLESYSTEM
Thisisalsocontrolledviaoneofthebuttonsonthesideofthe"controlbox"(locatedabovetheboxwith
pumps).Whichbuttoncontrolswhatfunctionisdeterminedbyhowthebuttonsareconnectedtothe
pumpandblower(viapneumatictubes).Ondeliverythehoseintendedforblowerislabeled"Blower".
Whenthewaterisdrained,thewaterinthehoseisremovedbystartingtheblowerforafewseconds.
NOTE!Whenairpassestheblowerthisandtheairwillbeheatedup.Inordernottoblowerandplastic
partswilloverheattherecommendedmaximumrunningtimeis20minutes/sessionwithatleasta30
minutebreakuntilthenextuse.Ifthetemperatureintheblowerrisestoohighitwillstopautomatically
whentheautomaticthermalfusesaretripped.
GOODTOKNOW!
Thebottomofthebathhasasmallbendupwards
whichwillbeflatandlieagainstthesupportplate
ontheframeinthebathwhenfilledwithwater.
Whendraingingthebottomrisesupagainandthat
makesallthewaterflowouttotheedgeandthen
outthroughthedrainvalve.
Readthewarningtextonthefirstpage.Itis
importanttoknowandfollowthe
informationtherein.
Notethatabathwhenfilledwithwaterand
beingusedby6people,weighsapprox1800kg.Takethisintoaccountwheninstallingthebathina
terraceorsimilarandmakesurethestructureisstrongenough.
The"push‐up"drainvalveisprimarilyusedtoflushoutthelastofthewater.Mostofthewateris
drainedinthewaydescribedonpage8underDraining/replacingwater.
Whenthecirculationpumpisrunning,thewaterisbeingfiltered.Ifthetemperatureofthewateris
lowerthanwhatissetonthethermostat,thewaterwillbeheatedaswell.Ifthepumpisrunning
allthetime(notcontrolledbyatimer)thatleadstothewatertemperatureisraisedregardlessof
whatthethermostatfortheelectricalheaterissetat.
3
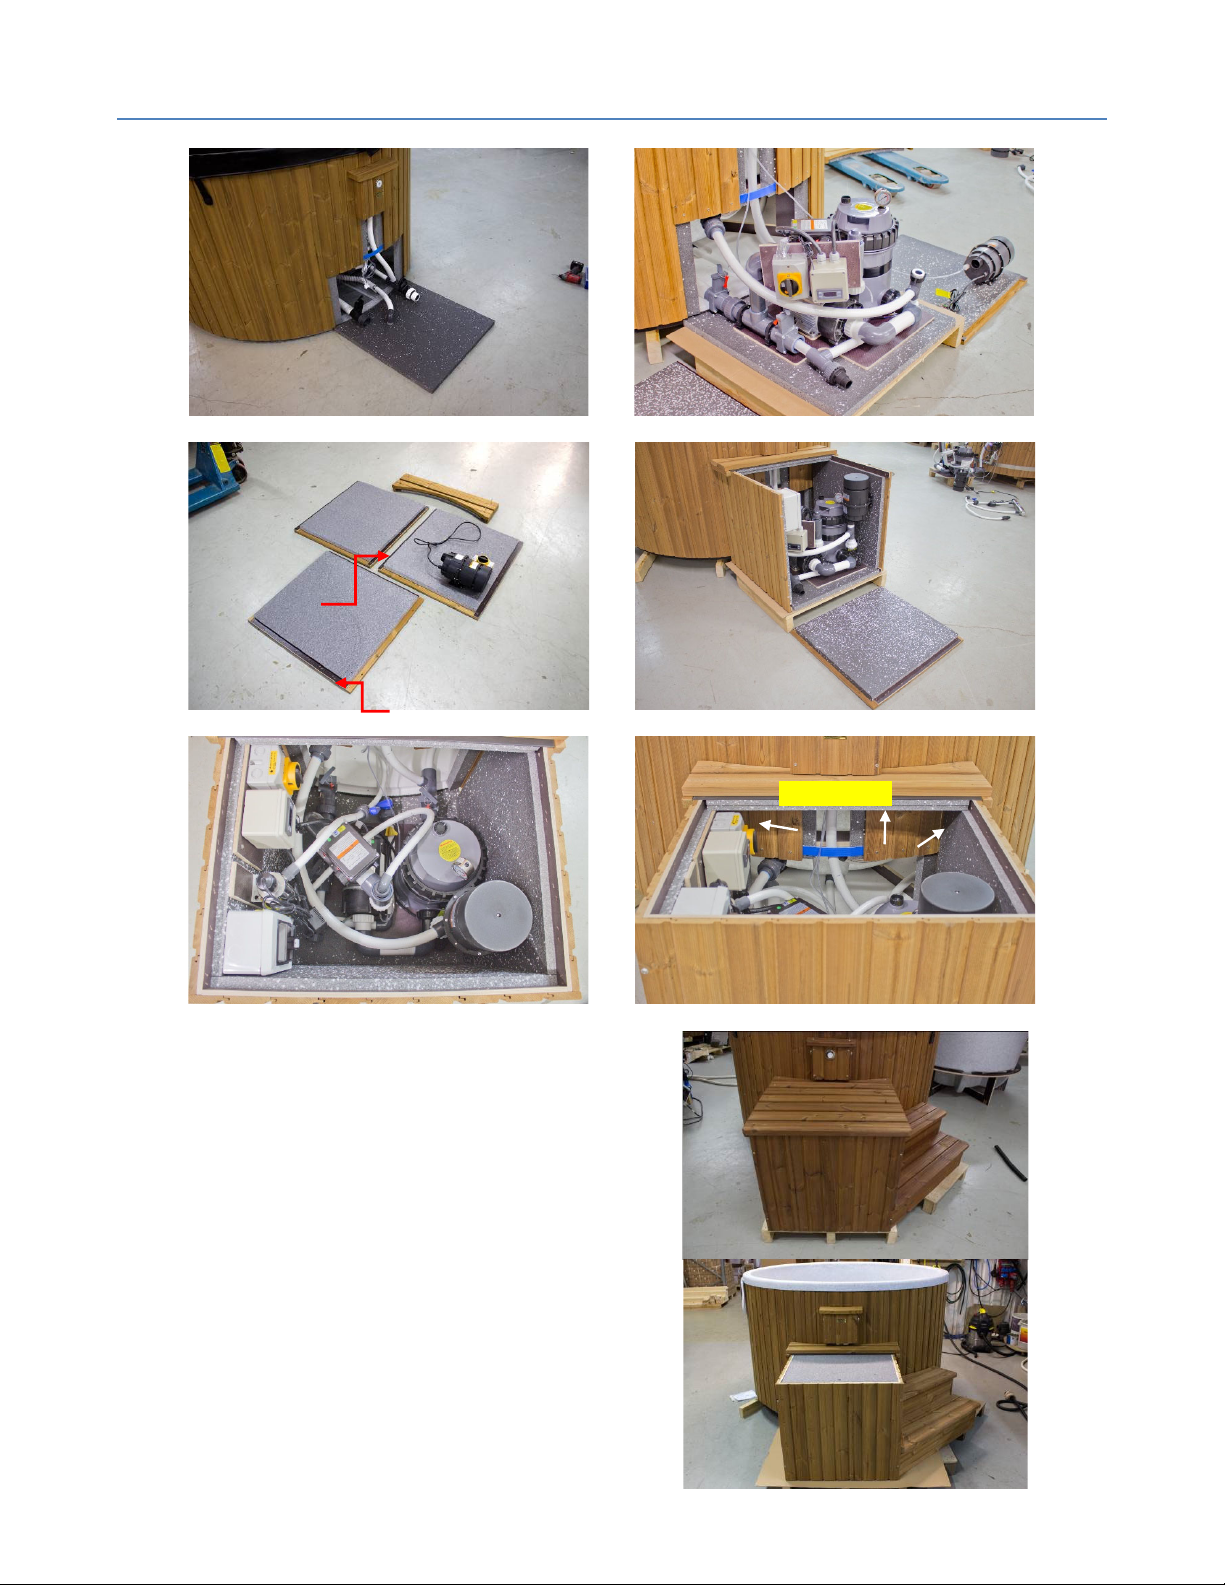
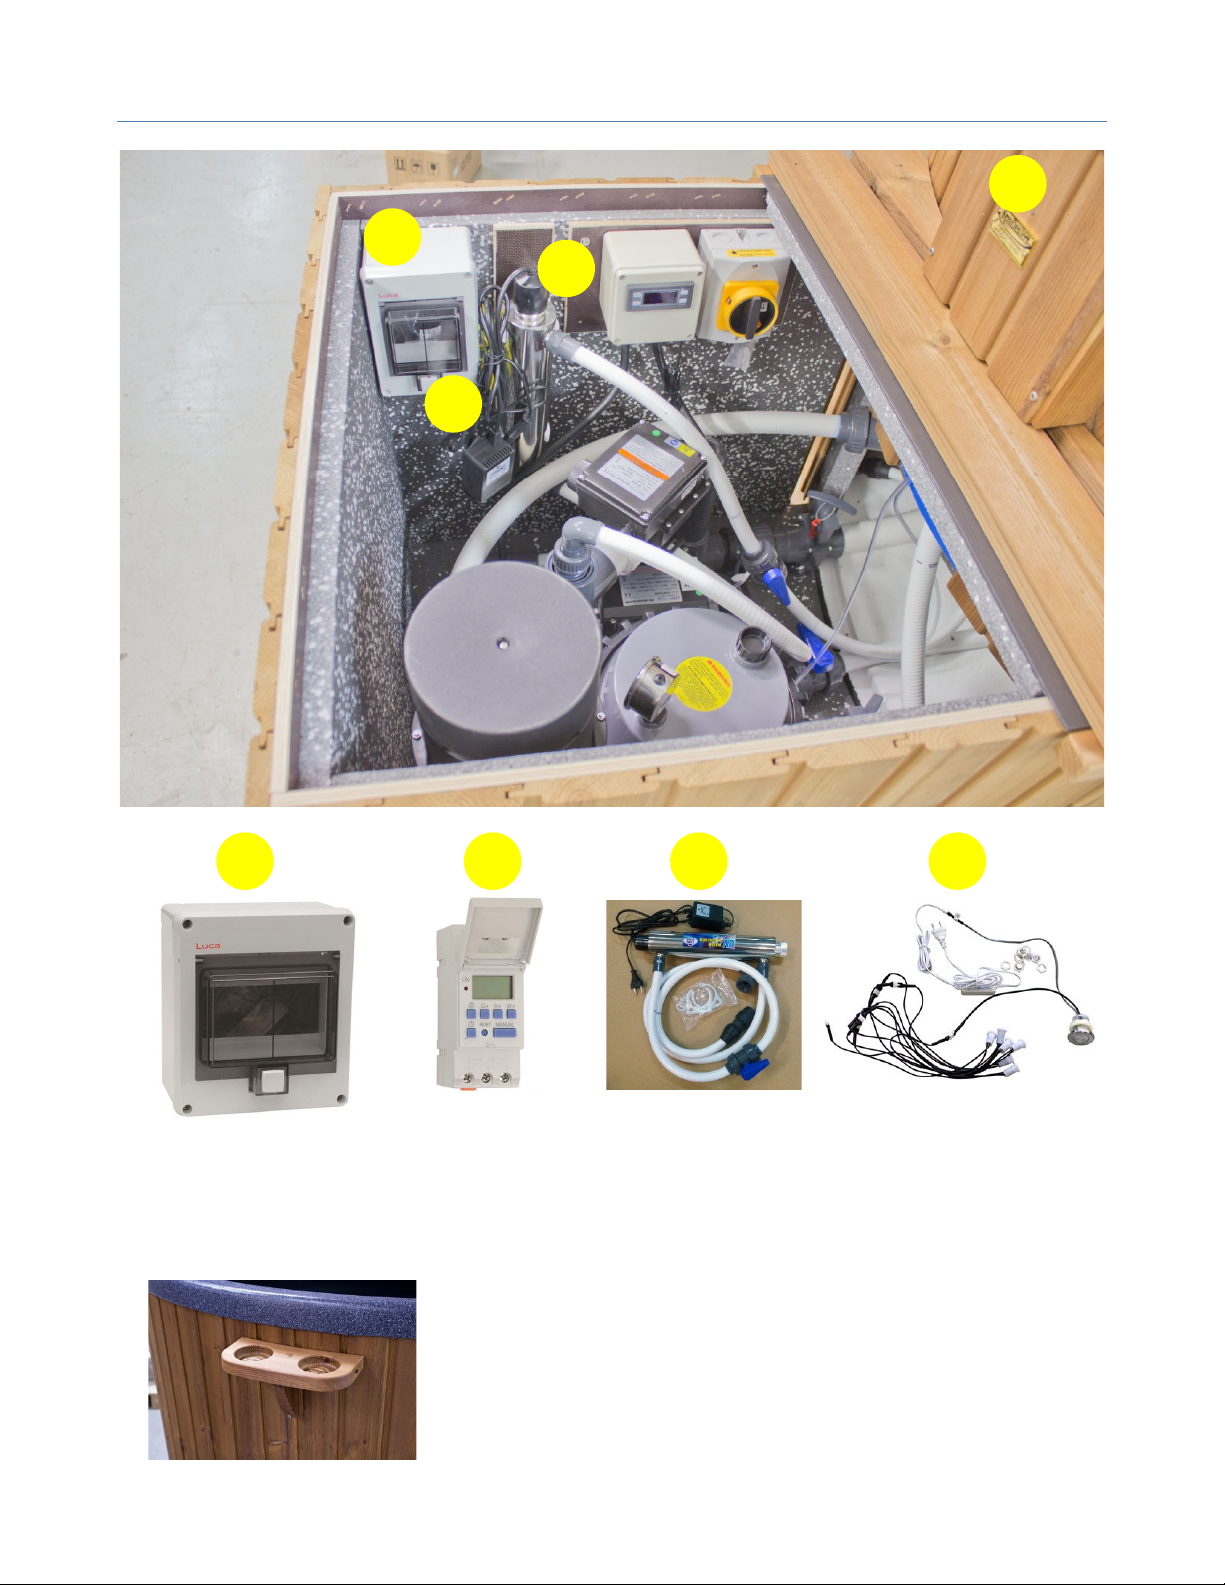
Installation of filtration- / heating unit
Applypolyurethanefoamontheinsideoftheboxwhereitmeetsthesidesofthehottub(sidesandabove)
Summeruse
Removetheinsulationunderthelidtothe
”technicalbox”whenoutsidetemperatures
exceed5degreesCelsius.
Winteruse
Duringcoldweather,below5degreesCelsius,the
insulationshouldbeinstalled.
Polyurethane
30mm
20mm

4
Schematic
230V/1x16A
1. Safetyswitch
2. Pressureswitch#1
3. Pressureswitch#2
4. Lighting(accessory)
5. Valve(pressureside)
6. Valve(suctionside)
7. Thermostat(settomax)
8. Indicatorlamp
9. Overheatingprotection
10. Checkvalve
11. Drainvalves
12. DigitalThermostat
Notethatthebubblehosehasbothcheck
valveanddrainvalve,inordertoprevent
waterfromenteringtheblower.
2
3
4
8
7
9
6
5
10
11
1
12
5
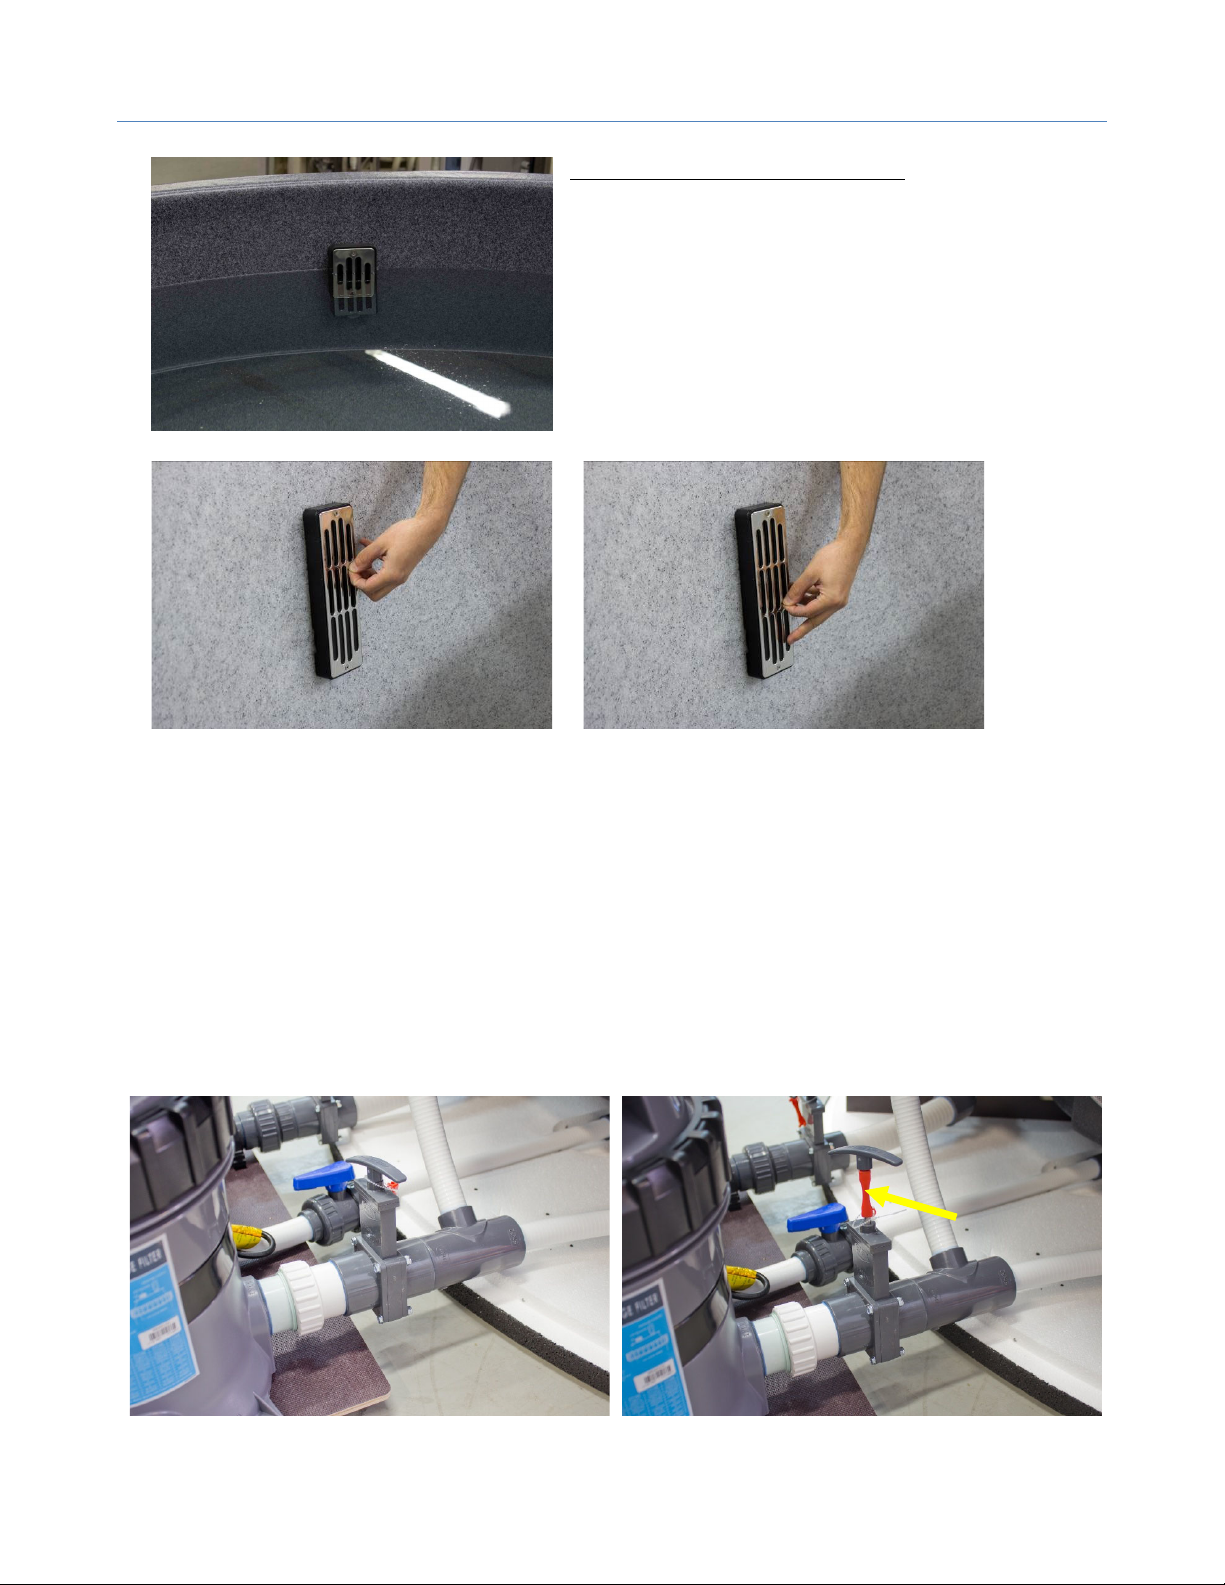
Fillingofwater
RECOMMENDEDWATERLEVEL
Duringfillingofwateragardenhoseorsimilarcanbe
used.Filltothelevelthatthepicturesshow.
NOTE!Duringthefilling,valves5&6havetobeclosed,
page5.
SUCTIONISADJUSTEDBYMOVINGTHEREGULATORUP
ORDOWN.MOVEDOWNWARDSTODECREASESUCTION.
Waterconsumptionandenergy!
Fillingisgenerallydonewithagardenhoseconnectedtothewatermains.Ifanotherwatersourceisused,
takespecialconsiderationregardingthepotentialforbacteria.Readtheinstructionsonwaterhygieneand
theuseofchemicals.
Rememberthatthewaterlevelwillrisebyapprox.5cmwhenanaverage‐sizedpersonsitsintheHotTub.
Thisisequivalentto80litersofwater.Thewaterlevelshouldbe20cmbelowtheedgewhenempty.The
totalamountofwatertoheatupissubsequentlyreducedbyca.320liters.Ifthespaiscompletelyfilled,
thisamountofwaterwillfloodovertheedgeswhentheuserssitdown.
PROPERHANDLINGOFTHEVALVE
Close:Pushdownthehandlealltheway.Open:Pullthehandleallthewayup.Youcanalso
usetheredcliptosecurethehandleinplace.

6
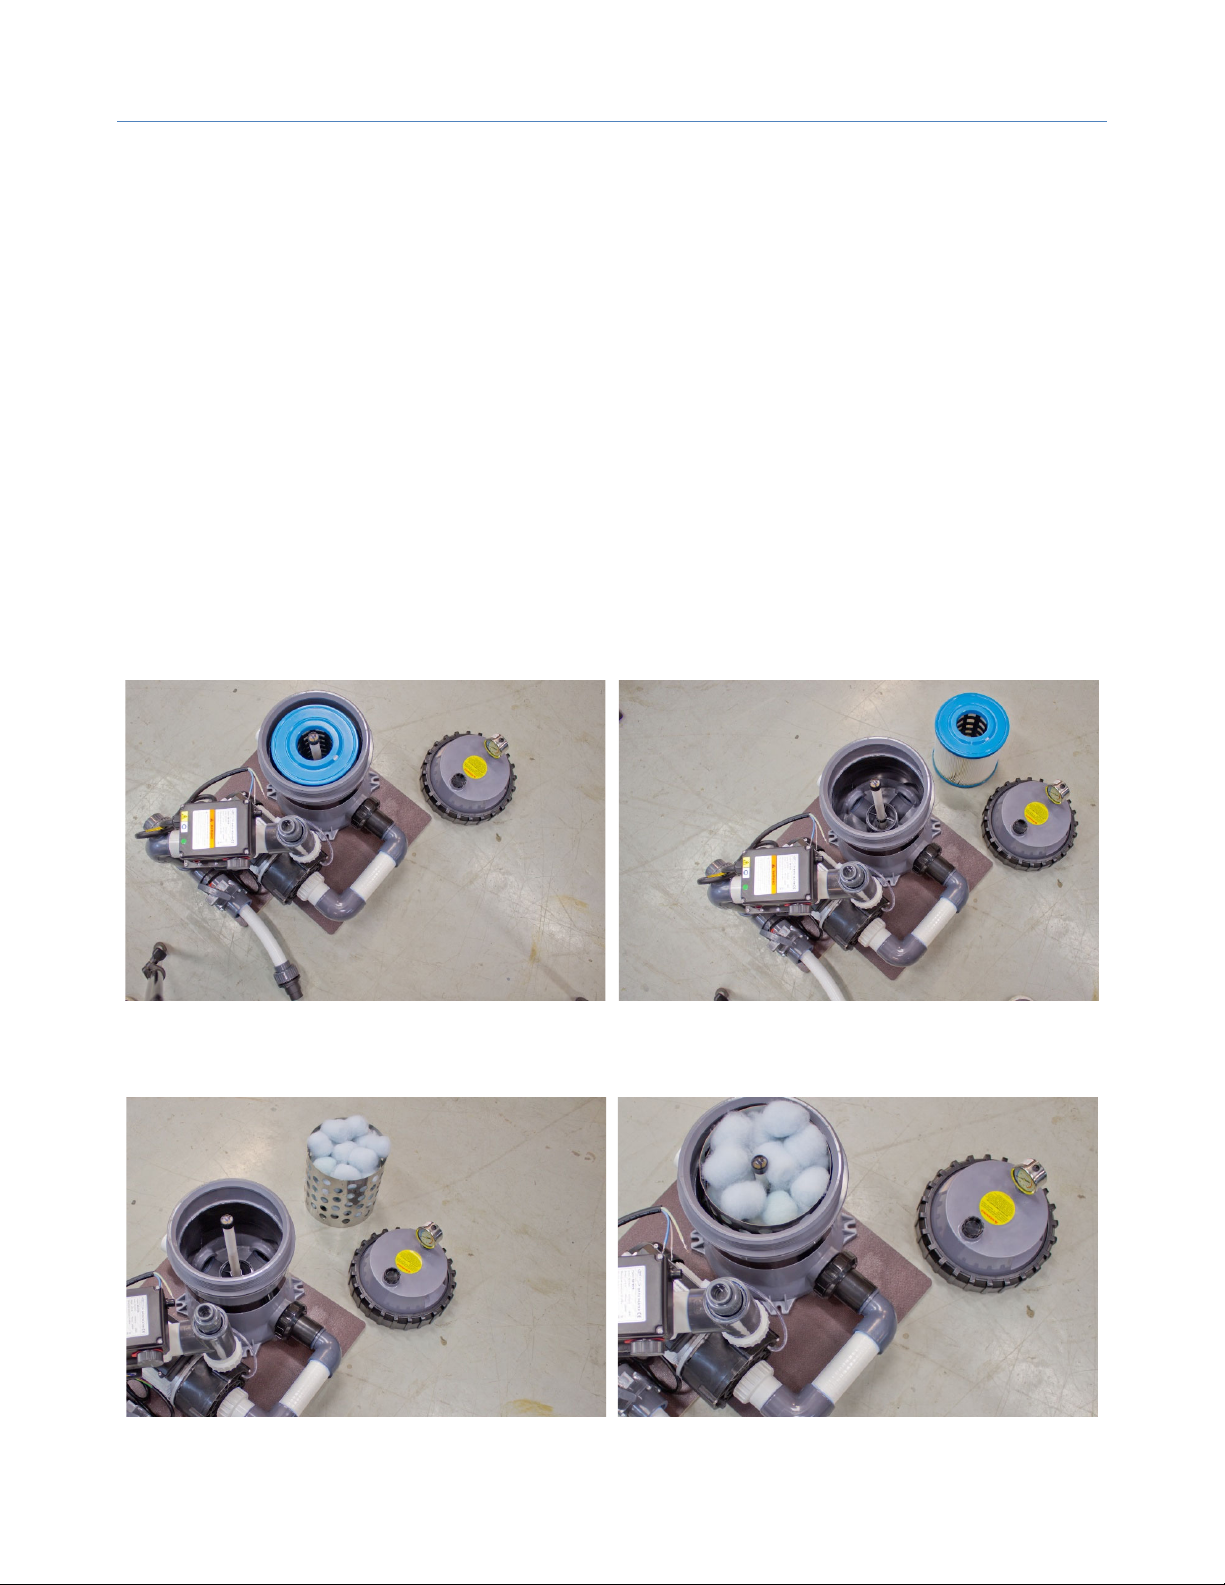
Startup/Filtration
YourTopSpaXScomeswithafiltrationsystemthatusescartridgefilters.It
shouldbecleanedasneeded,asdeterminedbycare,numberofbathersand
howoftenthebathisused.
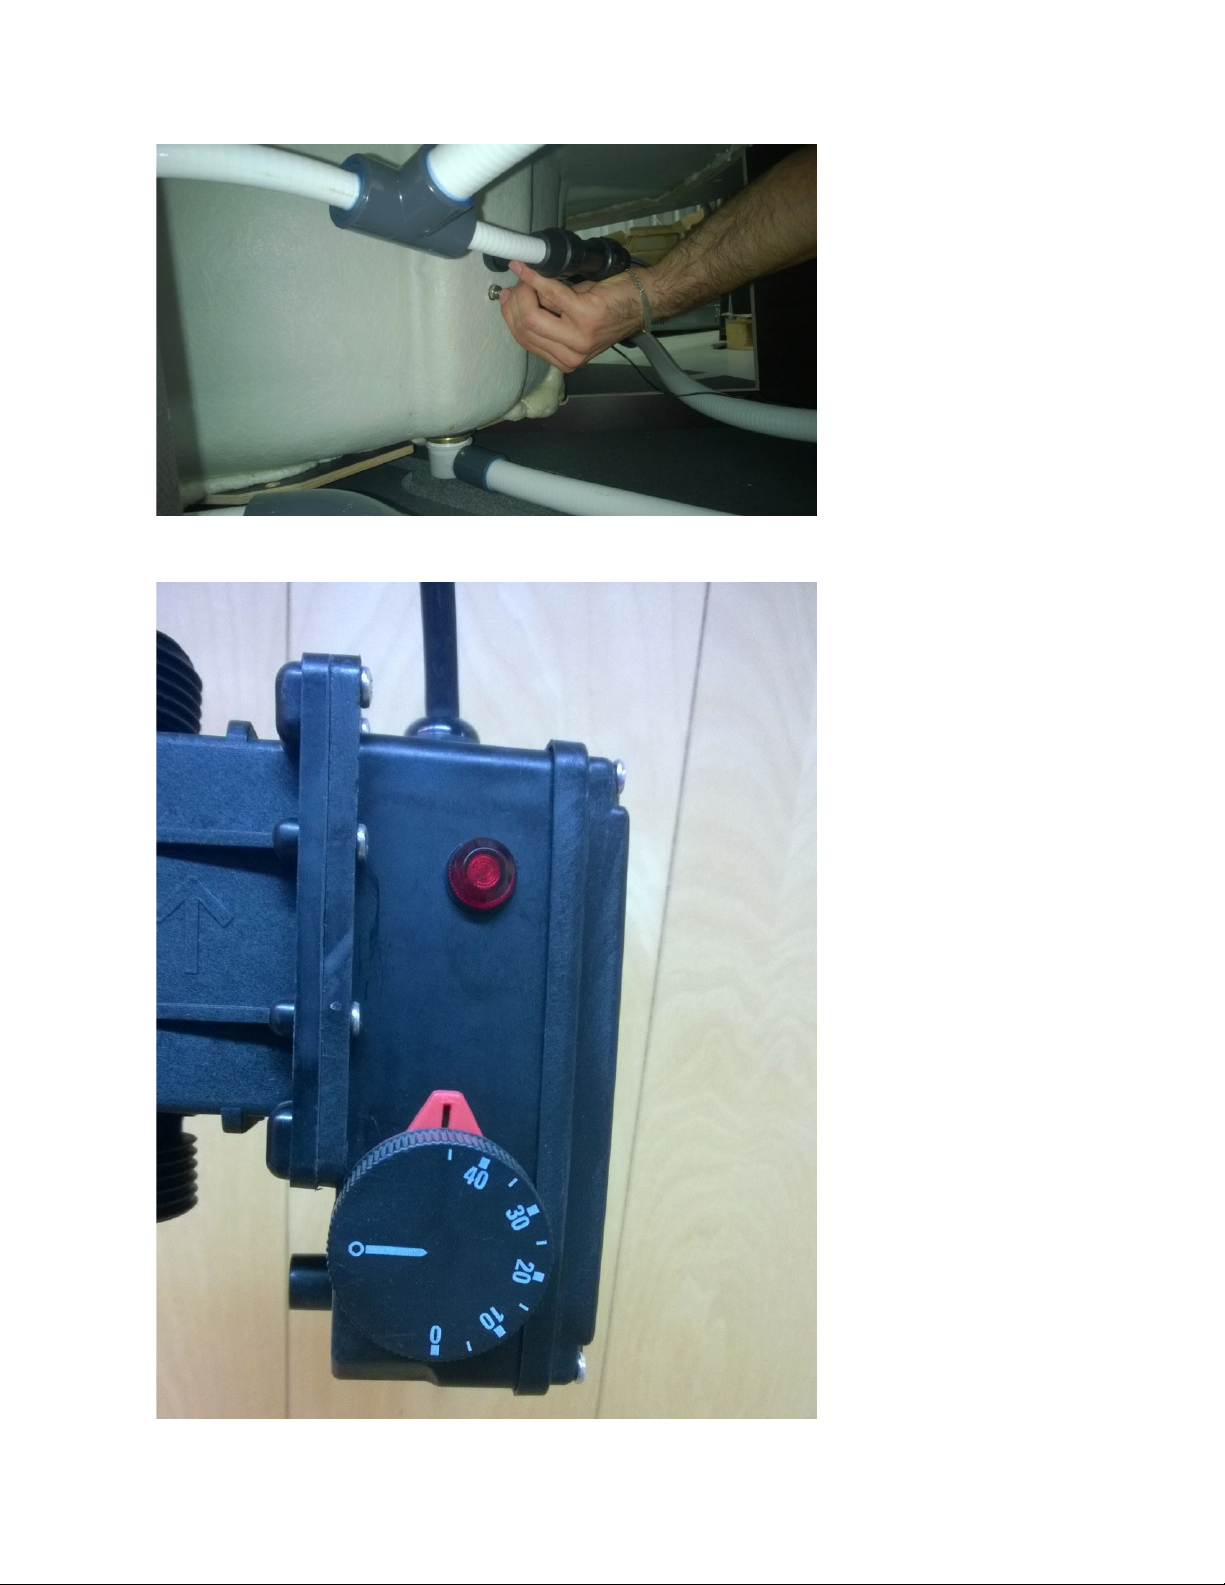
Startup
Opentheairscrew(14)ontopofthefiltertop.Openvalves5and6andlettheairout.Closewhenwater
startstoseepout.Nowthepumpcanbestarted.
NoteIftheheathasstoppedworking,itisasignofinsufficientwaterflowthatmaybeduetoimpure
filters.
Cleaning/changeoffilter
Foreffectivefiltrationandheatingitisveryimportantthatthefiltergetscleanedatleasteveryother
week,byrinsingitclean.Everyothermonth,orwheneveritisrequired,itneedstogetcleanedthoroughly
withacleaningsolution.
1. Openthehatchwherefilterandcirculationpumpareplaced.Startthepumpifit'snotalreadyrunning.
2. Openscrew14fortheairabovethefiltertoppiece.Closethevalve(6)nexttothefilterhousing.
3. Closevalve(3)andstopthepump.Thisisimportant,sowaterwillnotflowbackintothefiltercartridge
holder.NOTE!IfthesystemissuppliedwithoptionalUV‐Ccleaner,thenvalve(11)alsoneedtobeclosed.
4. Unscrewthenutandremovethefilter'stoppiece.Nowitispossibletocleanthefilter.Itwouldbegoodto
haveaspareone.Assembleitintheoppositeorder(tightenthenutonthecartridgeholder,leaveitslightly
loosesoitwillbeeasiertoreopenit).Openvalvesandletairescape.Closewhenwaterstartstricklingout.
Nowthepumpcanbestarted.
NOTE!Thepressuremeterwillread0becausethefilterisonthesuctionside.
14
6
5
11
7
Cleaningoffiltercartridge
Filtercartridges:
Thetaskofthefiltercartridgeistheremovalofsoil,sand,minerals,phosphatesanddirtfrompeople,from
thebathwater.
Cleaningofthecartridge: Thefiltershouldbecleanedandrinsedwithmoderatewaterpressuresuchasa
handshower,inadditionthecartridgealsoneedstobecleanedthoroughlyindepth.Evenifitdoesnot
lookdirty,itshouldstillbecleanedonaregularbasis.Mineralsandotherimpuritiescangetstuckdeepin
thefilterlamellaandthatcanleadtoproblemswiththeflow.Itisalwaysrecommendedtohavean
additionalfilter.Afilterneedstopassacleaning‐anddryingprocesswhiletheotheronegetsinstalled.The
lifespanandefficiencyofthefiltercanbedoubledthroughtheuseofthoroughandregularcleaning.
Thoroughcleaning:
1. PlacethedirtyfilterinabucketofwaterandaddFilterCleaneroratabletofdishwasherdetergent.
2. Leaveitinthesolutionforatleast12hours.
3. Removethefilterandrinsetherentwithawaterhoseormassageshower,bothfromtheoutsideandinside.
Letitdryproperly.Thefiltershouldbedryforatleasttwodaysbeforeinstallation.Note:Thisisimportant
thatyoufollowthis,regardlessofwhatyoumighthavebeenrecommendedelsewhere.
TopSpaXScanalsobeusedwithFilterBalls(accessory)
8
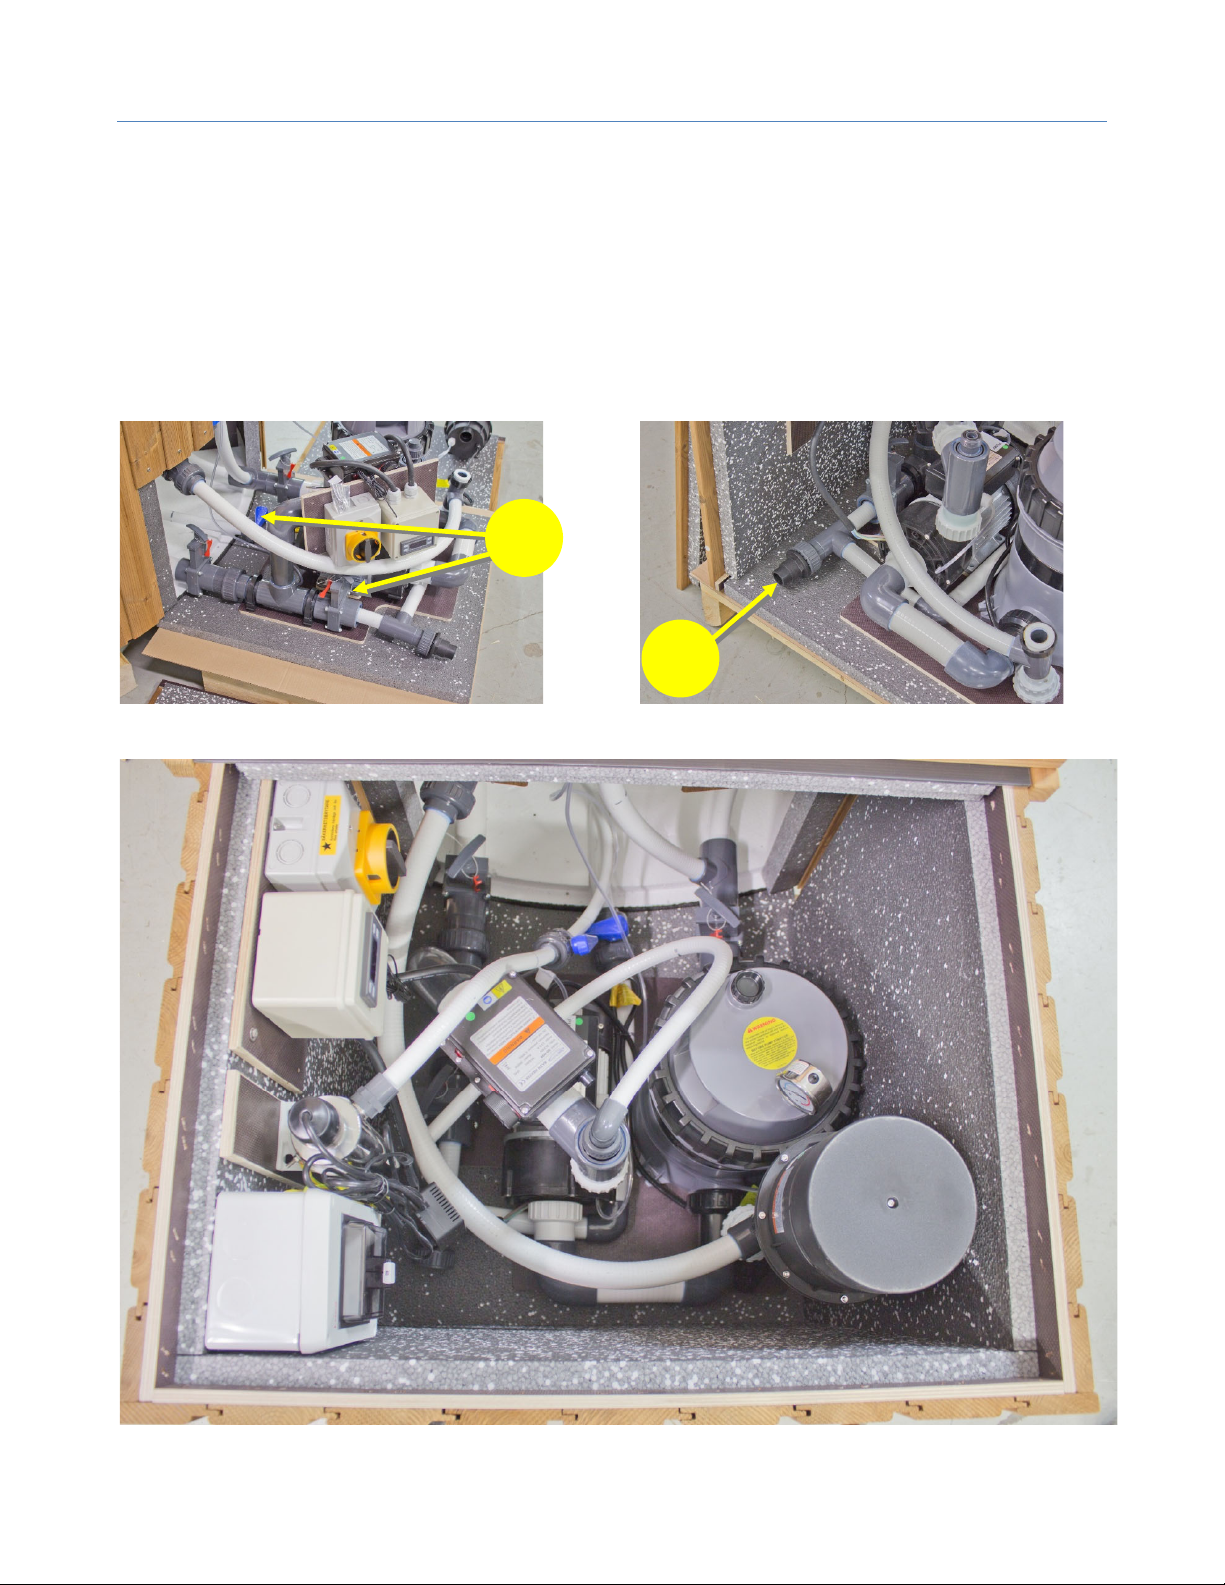
Draining/replacingwater
Openthecoverwherefilterandpump(s)are.Fordrainingthewater,avalveisinstallednearthefilter
container.Removethebackwalloftheboxandconnectcoupling(13)whoseouterdiameteris32mm.To
thisadrainhosecanbefitted.Openthevalves(11)anddrainthewater.Whenthewaterisdrainedthe
couplingpartandthebackwallisputback.
Whenthespaisdrainedfromwaterforalongerperiod,orifthereisariskoffreezing,shouldalsothe
circulatingpumpandmassagepump(ifincluded)bedrained.Theblowershouldalsobestartedupfora
fewseconds,todrainhosesandvalves.
11
13
9
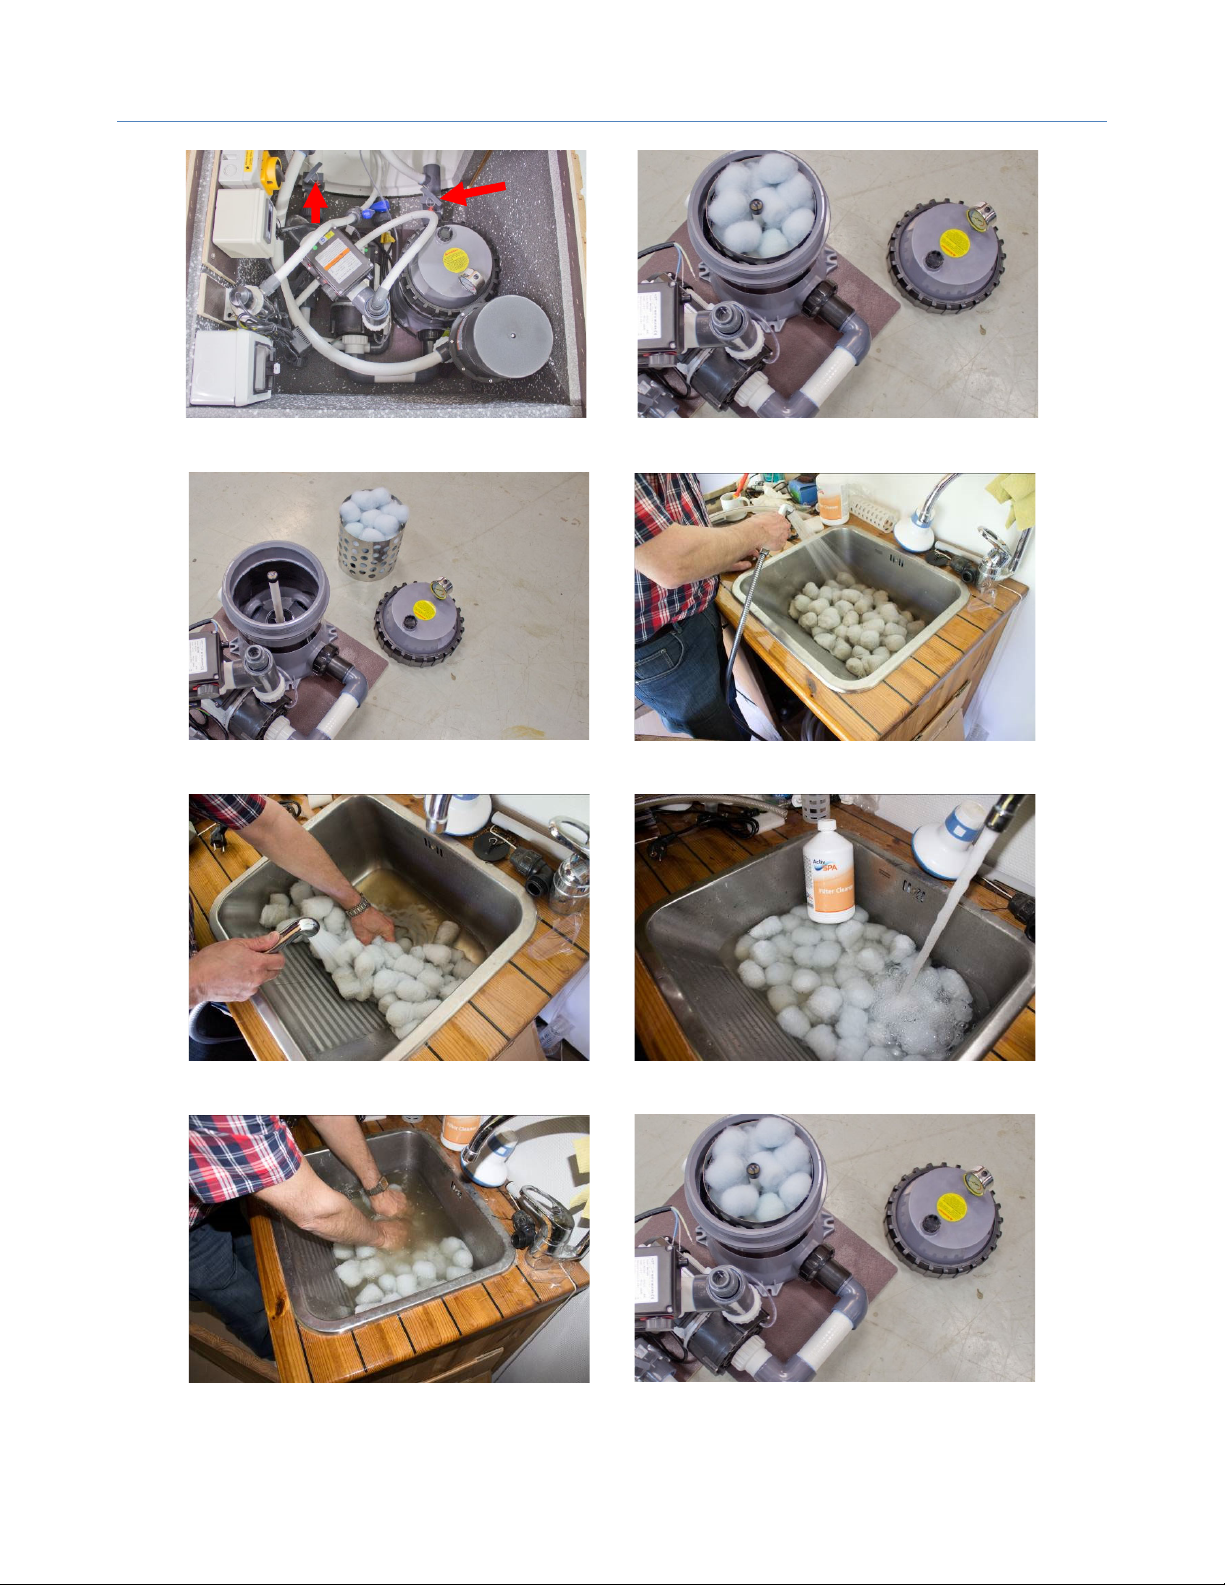
CleaningofFilterBalls(accessory)
Closethevalves(redarrows)andremovethefiltercanisteranddrainthewater.
Removethefilterballsandrinse.
Squeezethefilterballstogetoutthedirtywater.UseforexampleFilterCleanertodissolvethedirt.
Letthefilterballssoakforacoupleofhoursthensqueezeoutthedirtywater.Replacethewaterand
repeat.Returnthefilterballstothecontainer.
NOTE!Removethefilterballswhenthespaisdrainedforalongtime.Otherwise,itcanstartforming
mold.

10
Water hygiene is important!
Becarefulwiththewaterhygiene‐Abathingwaterwillneverbecleanerandsaferthanwhatonemakes
it.Personalhygieneandeffectivedisinfectionaretwothingsthatareimportantforcleanbathingwater.
Thewateryouuseshouldalsobetakenintoaccount.Bacteriathriveinwarmbathwaterandthesafestis
toaddbactericidalagentsbeforetakingabath.Iteffectivelypreventsthegrowthofbacteria.
Ifbacteriahadtimetodevelopitrequiresignificantlygreateramounttoincapacitatethem.Thereare
manydifferentbrands,butwhatisimportantistousebactericidalagentsforthe"right"temperature.
Agentsforswimmingpoolsarenotsuitableforwarmerwaterandviceversa.
Goodpersonalhygienebeforetakingabath‐Keepinmindthatapersonwhohasnotwashedhim/herself
beforewillpollutethewater200timesmorethansomebodywhohastakenashower.Sunlotion,skincare
products,soapshouldnotgetintothewaterandthat’swhywesuggesttotakeaquickshowerbefore
enjoyingabath.
Effectivedisinfection‐Filtrationhastheadvantagethatwatercanbeusedlonger.Stillitisimportantto
addsomebactericidalagents.Filtrationpreventstheaccumulationofimpuritiesbutnotthegrowingof
bacteria.Everyonewhoistakingabathisaddingmicroorganismstothewaterwhichareablendof
differentkindofbacteria.
Important!Whenbathing,largequantitiesofmicroorganisms,whichisamixtureofdifferentbacteria,is
addedtothewater.Bacteriacanhaveadversehealtheffectsandthereforeyouneedtoworkwithe.g.
chlorineaswell.IfthechlorinelevelsaretoohighthenthepH‐valuewillbeincreasedandthewaterwill
haveastrongsmell.Thechlorinelevelsshouldnotexceed1.5ppmandpH7.0‐7.6.Forbrominethelevel
shouldnotexceed2.0ppmandthepHshouldbe7,0‐7.8.Ifautomaticdispensers(floating,etc.)areused,
carefuladjustmentshouldbemadetoavoidincorrectdosage.Followtherecommendationsofthe
manufacturerofthespayouareusing.
5easyadviceformaintaininggoodwaterhygieneifyouhavegotatuboraspawithfiltrationsystem.
1. Takeashowerbeforeyougetintothehottub.
2. Addsomebactericidalagentsbeforeandaftertakingabath.
3. CheckthepH‐valueandbalanceitifnecessary.
4. Addactiveoxygen,about30ml,everyweek
5. Cleanthefiltermediafrequentlyandusesufficientfiltrationtime.About4‐6hoursperday.

11
Maintenanceinstructions
ThankyouforchoosingaproductfromSpaDealers.Wetrytodoourutmostto
ensurethatyouwillbesatisfiedwithourproducts.Ifyouhaveanyqueries,
pleasecontactusat+358‐(0)10‐2395600or[email protected]
Foundationandplacementoptions
Itisalsogoodtorememberthatabathfilledwithwaterand6usersweighsapprox1800kg.When
installedonaterraceorthelike,thismustbetakenintoaccountforthestrengthcalculation.
Maintenance
Thewoodontheoutsidemustbetreatedwithwoodoilatleastonceayeartomaintainthecolor.Theoil
mustbesuitableforhardwoodorheattreatedwood(hardwood)andwithUVprotection.Aslightnuance
(brown)alsoprovidesabetterUVprotection.
UntreatedOiled Untreated>3years
Managedcorrectly,youwillbatheinaSpaDealershottuborspaformanyyears.
Wewishyoumanywonderfulbathingdays.
Nurmi
Gräs
Grass
NichtaufRasen!
Pelouse
Puualusta
Trästom m e
Woodenfram e
AufHolzrahm en
Structure bois
Kivi-taivalulaatta
Sten-ellergjuten platta
Stone orconcrete plate
Stein-oderBetonfundam ent
Pierre ou ciment
Tiivistetty sorapeti
Stam patgrus
Gravelfoundation
DichterSchotter
Fondation en gravier
PlacetheHotTub
orspaonastable
baseandnot
directlyonthe
ground.
12
Accessories
15
17
16
18
15161718
Enclosure,IP55Timerswitch,
digital,weekly,
1‐channel
UV‐Cfilter16w
LUXstyle"pack"
LEDRGB0,02wx6,
17/22/30,controller/
transformer
CupHolder

13
Waterheaterforhottubs,jacuzzisandspas.
Packagecontains:
Theproductconsistsof1xheaterswiththermostat,flowswitchandoverheatingprotectionandthreaded
nutconnectionsuitableforgluefixingto50mmpipeorhose.
INSTRUCTIONS‐Thermostatcontrolledelectricalheaterwithflowswitch
Flowswitch
FS
MLL1T1T2
Fig. 1
Fig.1A
~ 19 Ω
Specifications:
Model:SD‐H20
Ratedpower:2000W
Voltage:AC220‐240V,50/60Hz
Amps:8.9A
MaxPressure:3,5Bar(0.035Mpa)
ProtectionclassIP45
Model:SD‐H30
Ratedpower:3000W
Voltage:AC220‐240V,50/60HZ
Amps:13.6A
Maxpressure:3,5Bar(0.035Mpa)
ProtectionclassIP45
NoteTheelectricheaterisdelivered
withoutplugonthecord.Installation
shalldonebyanauthorizedelectrician.
L1 230V
T1 Thermostat
T2Overheatingprotection
FS Flowswitch
MSMicroswitch
MLIndicatorlight
MS

14
SAFETYPRECAUTIONS
WARNING!
‐Checkthattheheateriswholeandundamagedonreceivingit.
‐Readthetechnicalspecificationsbeforeinstallingtheheater.
‐Readtheuserinstructionsbeforeinstallingandusingtheheater.
‐Theheaterisdesignedforheatingandmaintainingwatertemperatureinhottubs,jacuzzis,spasandsmaller
pools.
‐Allelectricalworkmustbecarriedoutbyaqualifiedelectrician.
‐Theheatermustbeconnectedtoagroundedpowersourcewithgroundfaultswitch.
‐Theheatermustnotbecoveredwhenitisinoperation.
‐Whencleaningtheheaterorotheractionthatrequiresopeningit,alwaysswitchoffthepowerbeforehand.
‐Neverusetheheaterifthepowercableisdamaged.Inthiscase,leavetheheatertoaqualifiedelectricianor
thedealerforinspectionandrepair.
‐Theheatercanbeusedindoorsandoutdoors.It’senclosureclassisratedIP45andisprotectedagainst
touchandpenetratingobjectswithatleast1mmdiameter.Itisalsosprayproofagainstwaterbutwe
recommendkeepingitinaprotectedareaoutofreachofchildrenorotherinexperiencedpersonswithout
thenecessaryproductunderstanding.
‐Inareaswithhardwater(highcalciumcontent)itisnecessarytodecalcifytheheaterperiodicallyaslime
coatingscanreducetheeffectandalsodestroytheheatingelement
FeatureDescription:
Theheater'sspecificationisshownonthelabelthatislocatedontopoftheheater.Theheaterhasabuilt‐
inflowswitchwithamicroswitch.Inorderforthemicrocontrollertosupplypowertothethermostat,a
circulationpumpwithsufficientwaterflow(atleast3600l/h)mustbeused.Ifthewatertemperatureis
lowerthanthatsetbythethermostat,itwillpassontotheelectricalheaterintheheaterwhentheflow
switchactivatesthemicrocontroller.Incasetheflowisinsufficientorthepumpstops,theheaterwillturn
off.Whenusingafiltersystem,itisimportanttocheckthatthefiltermediaiscleanasotherwiseitreduces
waterflowthatmayaffecttheflowmonitorfunctionsothatthepowerisnotswitchedonandthusdoes
notheatthewater.
Fig.2
Installedoninletside
Installedonoutletside
HeaterConnectionPump
HeaterConnectionPump

15
INSTALLATION
Thewaterheatermustbeconnectedtoacirculationsystemwithapumpthatgivesaflowrateofatleast
3600liters/hour.Ontheheatertherearearrowsthatshowinwhichdirectionitshouldbemounted.
Arrowsshouldalwaysturninthedirectionofthewaterflow.
1. Theheatershouldbemountedhorizontallyorvertically.
2. Theheatercanbeconnectedeithertothewateroutletoroutletofthe
installation(fig.2)
3. Forconnectiontotheheater'snutconnections,useaPVChoseorpipe
(fig.2,3).Bydefault,theconnectionhas50mminternaldiameter,butit
canalsobereducedto32mm.Thenareductionthatisnotincludedin
thestandardpackageisrequired.Askforyourseller.
4. GluethetubeorhosewithPVCglue.Cleanthesurfacestobeglued
properlybefore.
5. Beforegluing,tightenthenutsintheheaterfrombothsides.Applyglue
ontheinsideofthenutaswellastothehose/tubeandjointhem.This
willmakethedistancecorrect.
6. Theheatercovershouldfaceupwardsafterassembly.
7. Class1installations,asthisheateris,mustbeconnectedtoasolidpowersource.
8. Exampleofinstallationtosandfiltersystem(Fig.3)
POWERCONNECTION
Connecttheheatertoapowersourcewithgroundfaultswitch.Thecorrectpowersourcefortheheateris
indicatedontheheaterlabel.
Anyextensioncableshouldbeinaccordancewithnationalstandardsandhavethesamedimensionascable
forpowersource.For2kW,3x1.5mm²and3kW,thecableconnectionareamustbe3x2.5mm².
Itisveryimportanttoensurethatthecableisconnectedcorrectly.
Whentheinstallationiscomplete,thegroundfaultswitchmustbetestedbeforeusingtheheater.
SAFETYFEATURES
Thewaterheaterhasabuilt‐inflowswitchwithmicroswitchconnectedtothe230Vlinethatonlyworks
whenthepumpisrunningandthewatercirculatesthroughtheheater.Theminimumwaterflowforthe
pumpshouldbe3600liters/hour.
Thewaterheaterhasoverheatprotectionthatautomaticallyturnsofftheheaterifthewatertemperature
exceeds60°C.Iftheprotectionfails,unscrewthenut,whichcoversaredplasticstickandpushthepin.See
fig.1A,T2,page1.Ifitfeelsslowandaclickisheard,ithadreleased.Thiscanhappenif,forexamplethe
pumpistakingairandthereisn’tconstantorsufficientwaterflowthroughtheheater.Forexample.Ifthe
waterlevelistooloworthefilterisnotcleanedproperly.
BEFORESTARTINGTHEHEATER
Checkthatthearrowsymbolonthelowerpartoftheheaterpointsinthedirectionofthewaterflow.Ifthe
heaterisplacedonthesuctionsideofthepump,thearrowsymbolshouldpointtothepumpandifitis
positionedafterthepump,itshouldpointawayfromthepump.Powersourcefortheheaterisindicatedon
theheaterlabel.
Alsocheckthattherearenoleakfromcouplingsandhoses.
Fig.3

16
STARTTHEHEATER
Startthepumpandheateronlywhenyouaresurethatthepower,hosesandconnectionsareproperly
installed.Adjustthethermostattothedesiredtemperature.Notethatlabelsareforguidanceonly.
Temperaturedifferentialis+‐3°Catsetstoptemperatureandstart4°C+‐2°Cfromstoptemperature.
NOTE!Avoidresettingthethermostatwhenthedesiredheatisreachedasitmaycauselargetemperature
variationstooccur.Expectaheatingrateof2.5degreesperhourfor1000litersofwater.
MAINTENANCE
Theheaterdoesnotrequireanyspecialmaintenance.
Ifnotusedforalongtime,werecommendopening
connectionstoallowwatertodrainandnotcause
bacterialgrowth.Ifthereisanydamagetothecable,
replaceit.Contactaqualifiedprofessionalfor
inspection,repairoradjustment.
DISPOSAL
Thisproductmustnotbedisposedofasordinary
householdwaste.Itmustbesubmittedtoan
approvedwastedisposalsiteforelectricalproducts.
WARRANTY
Thewarrantyperiodfortheproductis2years,and
appliestomaterial,constructionand/orfabrication
defectsthatcausetheproducttonotfunction
properly.Incaseofcomplaint,thesellermustbe
contactedfirstandavalidpurchasereceiptmustbe
available.Defectivepartsarerepairedorreplaced.
Thewarrantydoesnotapplytotransportdamage,for
damagecausedbyimproperuse,subsequentfaults
causedbythis,defectsintheinstallationperformed
bythebuyer/useroranybodyhired,modificationsof
theproduct,weatherorelectricalphenomenons
beyondourcontrol.
Anyfreezingdamagethatoccurs
afterdeliveryisnotcoveredbythe
warranty.Itisalwaysthe
responsibilityoftheusertotake
measurestopreventfreezing
damage.Thisappliesbothbefore
andafterinstallation.
Thesellercannotbeheldliablefor
directorindirectdamage,
consequentialdamagesorlossesto
thebuyer.
Ifyouhavequestionsaboutthis
productorincaseofcomplaint,
contactSpaDealers,
info@spadealers.fi

17
DigitaltemperaturecontrolCoolHeat230V
Productinformation
TheproductusesthelatesttechnologywithaLEDdisplay.An
afforableproductthatiseasytooperate,solidperformance,smallsize
andintelligentcontrol,coolingandheatingfunctionsthatsuits
differenttypesofneeds.
Features:
LEDdisplay
Buttonsound
Silicone‐cladbuttons
Temperatureisdisplayedin℃
Cooling/heatingcontrol
Parameters:
Temperaturemeasurementandcontrolrange:‐40~99°C
Relaycapacity30A/250V
PowerOptions:230VAC
Input:1NTCsensor
Sensorwire:2m(default)
Accuracy:±1°C
Consumption:≤3W
Sensor:NTCsensor(1pc)
Recesssize:71×29(mm),productsize:77×34.5×62(mm)
Ambienttemperature:‐10~60°C;moisture:20~85%
Installationinstructions
Beforeuse,readtheseinstructionscarefully,understandthedifferencesbetweenthevariousfunctionsnas
positions.Theloadpowermustnotexceedthecapacityoftheterminal.Anternethavetobemadecarefully
andproperlytotheterminals.
Viscarefultoinstalltheunitinaprotectedplace.Itshallnotbeplacedunderthedrippingwaterandmust
bekeptawayfromelectronicallynonKingdomApparatertoavoidelectromagneticinterference.
Ifthedeviceisinterfering,turnoffthepowerandrestartit.
Donotopenordisassemblethedeviceunderanycircumstances.Ifanyerrorsoccurortherearequestions
abouttheusepleasecontactyoursupplier.
Loa d Sensor Power
1 2 3 4 5 6

18
CodeFunctionSettingrangeStandardUnit
HCTemperaturemode,options C:coolingH:heatingH/
DTemperaturedifferential1~152°C
LSLowesttemperaturesetting‐40~10°C
HSHighesttemperaturesetting~9940°C
CATemperaturecalibration‐5~50°C
PTCompressorDelay0~150Min.
Turnonandoff:
Ifthedeviceisturnedoff,pressthePOWERbuttontoturnon.Toturnoff,pressandholdthePOWER
buttonfor5seconds.
Userguide:
Buttons:SETUP DOWNPOWER
Settingthetemperature:
Innormalmode,presstheSETbutton,whichthendisplaysthecurrenttemperatureone,usetheUPor
DOWNbuttontoadjustthetemperature.Tip:PressandholddownthebuttonUPorDOWNforrapid
adjustment.Afteradjustment,pressSETfor3secondstosavethenewvalue.Thecontrollerthenreverts
tonormalmode,orleaveitfor15seconds,thenitreturnstonormalmodeandsavestheadjustments.
Settingtheparameters:
Innormalmode,pressSETfor3seconds,theindicatorlightsturnonandthecontrollerenters
maintenancemode.WhenthecodeHCappearsonscreen,usetheUPorDOWNbuttontosetthedesired
mode.HshouldbeselectedwhenthecontrolleristobeusedforheatingandCforcooling.After
adjustment,pressSETtoadvancetothenextparameter,usethesameproceduretosettherestof
parameters.Tip!holddownUPorDOWNforrapidadjustment.Whendone,pressSETfor3seconds.The
controllerthenreturnstonormalmode.Orleaveitfor15seconds,thenitreturnstonormalmodeand
savestheadjustments.
Settingthetemperaturedifferential(D):
Thisselectiondeterminesthetemperatureatwhichthethermostatshouldturnonagainafterstopping.
Example:IfthesetstoptemperaturesetviaSETis37°CandDisselectedto02thenthestarting
temperatureisthedifferencebetweenthesetwovaluesor37‐2=35°C.
Loweranduppertemperaturelimit(LSandHS)
LSandHSareusedtosetthevaluesfortheupperandlowerlimitsofthetemperaturerange.Example:if
LSis+10,HSis+40,thenthetemperaturecanonlybesetbetween+10and+40°C.Ifyouwanttoseta
valueoutsidetheseintervals,itmustbechangedinLSandHSfirst.

19
Temperaturecalibration(CA)
Ifitappearsthattheambienttemperatureandthemeasuredvaluedonotmatch,thetemperaturecontrol
canbecalibrated.Example:ifthemeasuredtemperatureshows37°Cbuttheactualis35°CthenCA
(calibration)issetto2andiftheactualis37°Candmeasured35°CthenCAissetto‐2.
Compressordelay(PE)(Onlyforusewithcooling/heatingunits)
Thecontrollerhasadelayfunction(PE)toprotectthecompressorfromrepeatedandfrequentstartsand
stops.PEcanbesetbetween0‐15minutesandifPEisselectedto2,thecompressorstartsuponly2
minutesafterthestartsignalfromthecontroller.Conditionsforstartupatcoolingmodearetremperature
selectedviaSET+selectedd(difference).
Conditionsforstart‐upincoolingmode(C):
Measurementtemperature≥settemperature(SET)+temperaturedifference(d)
Conditionsforstopforcoolingfunction:
Measurementtemperature≤settemperature(SET)
Conditionsforstopforheatingfunction(H):
Measurementtemperature=settemperature(SET)
Conditionsforstartforheatingfunction:
MeasurementTemperature=SetTemperatureTemperatureDifference(d)
Alarmanderrormodes
Ifanalarmoccurs,iconsappearonthedisplayandabeepsounds.Ifthereisnofaultonthesensorthe
errorcodealternatesbetweendisplayingthetemperatureandtheerrorcode.Ifthesensoris
malfunctioning,onlytheerrorcodeisdisplayed.
Alarmonsensorerror
Whenthedeviceisturnedon,ifthesensorcircuitisopen,theLEDdisplaywillblink"__",ifthereissensor
shortcircuit,"HH"willappearinthedisplay.Whenthesensorreportstheerrorstatus,thedevicewillwork
accordingtothefollowingcycle:Stop15minutes,15minutesinprogress.
Alarmatmaximumtemperatureorminimumtemperature
Whenthesensormeasuresatemperatureabove99°C,thedisplayshows"HH";
Whenthesensormeasuresatemperaturebelow‐40°C,LLisdisplayed.
CodeCauseTroubleshooting
HHShortcircuitinsensoror
themaximumtemperature
hasbeenexceeded
Checkthetemperaturewherethesensoris
locatedandifthefaultisduetoshortcircuit,
replacethesensor.
LLThesensorcircuitisopenor
thelowesttemperaturehas
beendropped
Checkthetemperaturewherethesensoris
locatedandifthefaultisduetoshortcircuit,
replacethesensor.
‐‐ ThesensorisnotpluggedinConnectthesensorwirestotheterminals.
20
InstallationprocedureforTopSpaXS:
1. Connectthesensorfromthedigitalthermostattothesensorsleevebeforethe
filtration‐/heatingunitisputinplace.
2. Iftheheaterhasitsownthermostat,adjustittothemaximumtemperature.
Table of contents
Popular Hot Tub manuals by other brands

Canadian Spa
Canadian Spa Yukon TP500 owner's manual

American Standard
American Standard Cadet 5' x 36" Specification sheet

Aquatic
Aquatic SYMPHONY SERIES Owners manual/install guide

Marquis
Marquis E-series owner's manual

Cyanna Valley
Cyanna Valley Balboa 100 owner's manual

SwimLife
SwimLife SwimFit Dual Stream Installation guide / instruction manual


