Toro 22615 User manual

FormNo.3404-446RevA
SGR-13StumpGrinder
ModelNo.22615—SerialNo.316000001andUp
ModelNo.22615G—SerialNo.316000001andUp
ModelNo.22615HD—SerialNo.316000001andUp
Registeratwww.Toro.com.
OriginalInstructions(EN)*3404-446*A

WARNING
CALIFORNIA
Proposition65Warning
Theengineexhaustfromthisproduct
containschemicalsknowntotheStateof
Californiatocausecancer,birthdefects,
orotherreproductiveharm.
DANGER
Theremaybeburiedpower,gas,and/ortelephone
linesintheworkarea.Shockorexplosionmay
occurifyoudigintothem.
Havethepropertyorworkareamarkedforburied
linesanddonotdiginmarkedareas.Contactyour
localmarkingserviceorutilitycompanytohavethe
propertymarked(forexample,intheUnitedStates,
call811forthenationwidemarkingservice).
ThissparkignitionsystemcomplieswithCanadianICES-002.
Becauseinsomeareastherearelocal,state,orfederal
regulationsrequiringthatasparkarresterbeusedonthe
engineofthismachine,asparkarresterisavailableas
anoption.Ifyourequireasparkarrester,contactyour
AuthorizedToroServiceDealer.
GenuineTorosparkarrestersareapprovedbytheUSDA
ForestryService.
ItisaviolationofCaliforniaPublicResourceCode
Section4442or4443touseoroperatetheengineonany
forest-covered,brush-covered,orgrass-coveredlandunless
theengineisequippedwithasparkarrester,asdenedin
Section4442,maintainedineffectiveworkingorderorthe
engineisconstructed,equipped,andmaintainedforthe
preventionofre.
Theenclosed
Engine Owner's Man ual
issuppliedfor
informationregardingtheUSEnvironmentalProtection
Agency(EPA)andtheCaliforniaEmissionControl
Regulationofemissionsystems,maintenance,and
warranty.Replacementsmaybeorderedthroughthe
enginemanufacturer.
Introduction
Thismachineisdesignedtogrindandremovetreestumps
andsurfaceroots.Itisnotintendedtocutrockoranyother
materialotherthanwoodandthesoilaroundastump.
Readthisinformationcarefullytolearnhowtooperateand
maintainyourproductproperlyandtoavoidinjuryand
productdamage.Youareresponsibleforoperatingthe
productproperlyandsafely.
YoumaycontactTorodirectlyatwww.Toro.comforproduct
andaccessoryinformation,helpndingadealer,ortoregister
yourproduct.
Wheneveryouneedservice,genuineToroparts,oradditional
information,contactanAuthorizedServiceDealerorToro
CustomerServiceandhavethemodelandserialnumbersof
yourproductready.Figure1illustratesthelocationofthe
modelandserialnumbersontheproduct.Writethenumbers
inthespaceprovided.
Figure1
1.Modelandserialnumberplate
ModelNo.
SerialNo.
Thismanualidentiespotentialhazardsandhassafety
messagesidentiedbythesafety-alertsymbol(Figure2),
whichsignalsahazardthatmaycauseseriousinjuryordeath
ifyoudonotfollowtherecommendedprecautions.
Figure2
1.Safety-alertsymbol
©2016—TheToro®Company
8111LyndaleAvenueSouth
Bloomington,MN554202
Contactusatwww.Toro.com.
PrintedintheUSA
AllRightsReserved

Thismanualuses2wordstohighlightinformation.
Importantcallsattentiontospecialmechanicalinformation
andNoteemphasizesgeneralinformationworthyofspecial
attention.
Contents
Safety...........................................................................3
SafeOperatingPractices...........................................3
SafetyandInstructionalDecals.................................5
ProductOverview..........................................................7
Controls................................................................7
Specications.........................................................8
Operation.....................................................................8
BeforeyouStart......................................................8
AddingFuel............................................................9
CheckingtheEngine-OilLevel.................................10
StartingandShuttingOfftheEngine.........................10
GrindingaStump...................................................11
Maintenance.................................................................13
RecommendedMaintenanceSchedule(s)......................13
Lubrication...............................................................13
GreasingtheMachine.............................................13
EngineMaintenance..................................................14
ServicingtheAirCleaner.........................................14
ServicingtheEngineOil..........................................15
ServicingtheSparkPlug..........................................15
BrakeMaintenance....................................................16
AdjustingtheParkingBrake.....................................16
BeltMaintenance......................................................17
AdjustingtheDrive-BeltTension..............................17
ReplacingtheDriveBelt..........................................17
GrinderMaintenance..................................................18
ReplacingtheTeeth................................................18
Cleaning...................................................................19
RemovingDebrisfromtheMachine..........................19
Storage........................................................................19
StoringtheMachine................................................19
Troubleshooting...........................................................20
Safety
Improperuseormaintenancebytheoperatororowner
canresultininjury.Toreducethepotentialforinjury,
complywiththesesafetyinstructionsandalways
payattentiontothesafetyalertsymbol,which
means:
Caution
,
W ar ning
,or
Danger
—personalsafety
instruction.Failuretocomplywiththeinstructionmay
resultinpersonalinjuryordeath.
SafeOperatingPractices
Thisproductiscapableofamputatinghandsandfeet.Always
followallsafetyinstructionstoavoidseriousinjuryordeath.
WARNING
Engineexhaustcontainscarbonmonoxide,an
odorless,deadlypoisonthatcankillyou.
Donotruntheengineindoorsorinanenclosed
area.
Training
•ReadtheOperator'sManualandothertrainingmaterial.If
theoperator(s)ormechanic(s)can’treadEnglish,itisthe
owner'sresponsibilitytoexplainthismaterialtothem.
•Becomefamiliarwiththesafeoperationoftheequipment,
operatorcontrols,andsafetysigns.
•Alloperatorsandmechanicsshouldbetrained.The
ownerisresponsiblefortrainingtheusers.
•Neverletchildrenoruntrainedpeopleoperateorservice
theequipment.Localregulationsmayrestricttheageof
theoperator.
•Theowner/usercanpreventandisresponsiblefor
accidentsorinjuriesoccurringtohimselforherself,other
peopleorproperty.
Preparation
•Wearappropriateclothingincludinggloves,eye
protection,longpants,substantialslip-resistantfootwear,
andhearingprotection.Tiebacklonghairanddonot
wearjewelry.
•Inspecttheareawheretheequipmentistobeusedand
removeallobjectssuchasrocks,toys,andwirewhichcan
bethrownbythemachine.
•Useextracarewhenhandlingfuels.Theyareammable
andvaporsareexplosive.
–Useonlyanapprovedcontainer
–Neverremovethefuelcaporaddfuelwiththeengine
running.Allowtheenginetocoolbeforerefueling.
Donotsmoke.
–Neverrefuelordrainthemachineindoors.
3

•Checkthattheoperatorpresencecontrols,safetyswitches,
andshieldsareattachedandfunctioningproperly.Donot
operateunlesstheyarefunctioningproperly.
•Checkthatthecuttingwheelhasstoppedrotatingwhen
youreducethethrottle.
Operation
•Neverrunanengineinanenclosedarea.
•Onlyoperateingoodlight,keepingawayfromholesand
hiddenhazards.
•Besurealldrivesareinneutralbeforestartingtheengine.
Onlystarttheenginefromtheoperator'sposition.
•Neveroperatewiththeguardsnotsecurelyinplace.Be
sureallinterlocksareattached,adjustedproperly,and
functioningproperly.
•Donotchangetheenginegovernorsettingoroverspeed
theengine.
•Stopthemachineonlevelground,lowerthegrinder,and
shutofftheenginebeforeleavingtheoperator'sposition
foranyreason.
•Keephandsandfeetawayfromthemovinggrinderwheel
andteeth.
•Keeppetsandbystandersaway.
•Donotoperatethemachinewhileill,tired,orunderthe
inuenceofalcoholordrugs.
•Usecarewhenloadingorunloadingthemachineintoa
trailerortruck.
•Ensurethattheareaisclearofotherpeoplebefore
operatingthemachine.Shutoffthemachineifanyone
entersthearea.
•Neverleavearunningmachineunattended.Alwaysshut
offtheengineandverifythecuttingwheelshasstopped
rotating.
•Neverjerkthecontrols;useasteadymotion.
•Watchfortrafcwhenoperatingnearorcrossing
roadways.
•Donottouchpartswhichmaybehotfromoperation.
Allowthemtocoolbeforeattemptingtomaintain,adjust,
orservice.
•Ensurethatyouoperatethemachineinareaswhere
therearenoobstaclesincloseproximitytotheoperator.
Failuretomaintainadequatedistancefromtrees,walls,
andotherbarriersmayresultininjuryasthemachine
backsupduringoperationiftheoperatorisnotattentive
tothesurroundings.Onlyoperatetheunitinareaswhere
thereissufcientclearancefortheoperatortosafely
maneuvertheproduct.
•Beforegrinding,havetheareamarkedforunderground
utilities,anddonotgrindinmarkedareas.
•Locatethepinchpointareasmarkedonthemachineand
keephandsandfeetawayfromtheseareas.
•Lightningcancausesevereinjuryordeath.Iflightning
isseenorthunderisheardinthearea,donotoperate
themachine;seekshelter.
MaintenanceandStorage
•Shutofftheengine.Waitforallmovementtostopbefore
adjusting,cleaning,orrepairing.
•Cleandebrisfromthegrinder,drives,mufers,andengine
tohelppreventres.Cleanupoilorfuelspillage.
•Lettheenginecoolbeforestoringanddonotstorenear
ame.
•Donotstorefuelnearamesordrainindoors.
•Parkthemachineonlevelground.Neverallowuntrained
personneltoservicethemachine.
•Carefullyreleasepressurefromcomponentswithstored
energy.
•Removethesparkplugwirebeforemakinganyrepairs.
•Keephandsandfeetawayfrommovingparts.Ifpossible,
donotmakeadjustmentswiththeenginerunning.
•Keepallpartsingoodworkingconditionandallhardware
tightened.Replaceallwornordamageddecals.
•Keepnutsandboltstight.Keepequipmentingood
condition.
•Nevertamperwithsafetydevices.
•Keepthemachinefreeofgrass,leaves,orotherdebris
build-up.Cleanupoilorfuelspillage.Allowthemachine
tocoolbeforestoring.
•Useextracarewhenhandlingfuels.Theyareammable
andvaporsareexplosive.
–Useonlyanapprovedcontainer.
–Neverremovethefuelcaporaddfuelwhenthe
engineisrunning.Allowtheenginetocoolbefore
refueling.Donotsmoke.
–Neverrefuelthemachineindoors.
–Neverstorethemachineorfuelcontainerinside
wherethereisanopename,suchasnearawater
heaterorfurnace.
–Neverllacontainerwhileitisinsideavehicle,trunk,
pick-upbed,oranysurfaceotherthantheground.
–Keepcontainernozzleincontactwiththetankduring
lling.
•Stopandinspecttheequipmentifyoustrikeanobject.
Makeanynecessaryrepairsbeforerestarting.
•UseonlygenuineTororeplacementpartstoensurethat
originalstandardsaremaintained.
4
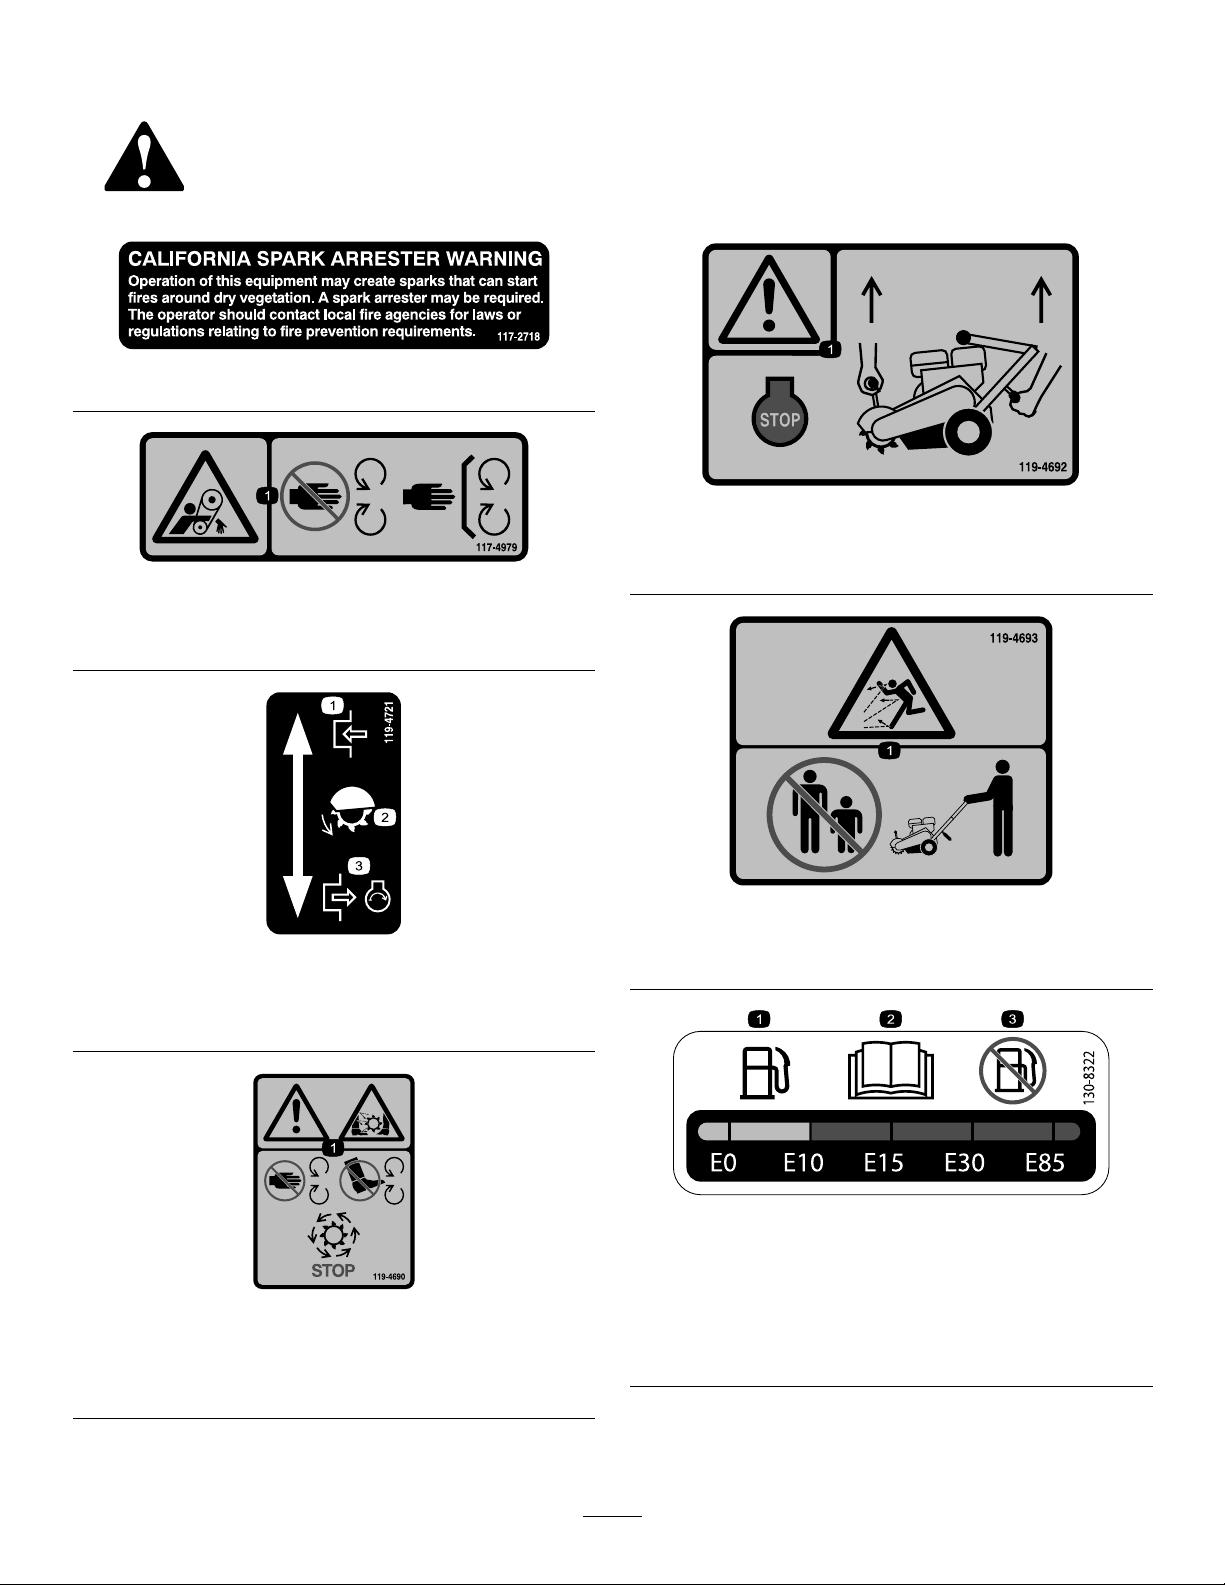
SafetyandInstructionalDecals
Safetydecalsandinstructionsareeasilyvisibletotheoperatorandarelocatednearanyareaofpotential
danger.Replaceanydecalthatisdamagedorlost.
117-2718
117-4979
1.Entanglementhazard,belt—stayawayfrommovingparts,
keepallguardsandshieldsinplace.
119-4721
1.Engage3.Disengage,engineruns
2.Grindingteeth
119-4690
1.Warning;cutting/dismembermenthazard,grinding
teeth—keephandsandfeetawayfromallmovingparts,
keepallshieldsinplace;waitforallmovingpartstostop.
119-4692
1.Warning—shutofftheengine;usebothhandholdstolift
thegrinder.
119-4693
1.Thrownobjecthazard—keepbystandersasafedistance
fromthemachine.
130-8322
1.Onlyusefuelwithan
alcoholcontentbyvolume
under10%.
3.Donotusefuelwithan
alcoholcontentbyvolume
greaterthan10%.
2.ReadtheOperator's
Manualformore
informationonfuel.
5

119-4701
1.Warning—readtheOperator'sManual.5.Crushinghazardofhand—stayawayfrommovingparts,keep
allguardsandshieldsinplace.
2.Warning—donotoperatethismachineunlessyouaretrained.6.Explosionhazard;electricalshockhazard—donotdiginareas
withburiedutilitylines;contactlocalpowerorganizations
beforedigging.
3.Thrownobjecthazard—keepbystandersasafedistancefrom
themachine.
7.Warning—removetheignitionkey(ifapplicable)andreadthe
instructionsbeforeservicingorperformingmaintenance.
4.Thrownobjecthazard—weareyeprotection,pickupdebris
beforeoperating.
132-4004
1.Warning,cuttingwheel—toadjustthecuttingwheelteethbetweenjobs1)Loosenthenut;2)Pushthetoothdownandrotateit1/3
ofaturn;3)Tightenthenutto50ft-lb;4)Proceedwithgrinding.
6
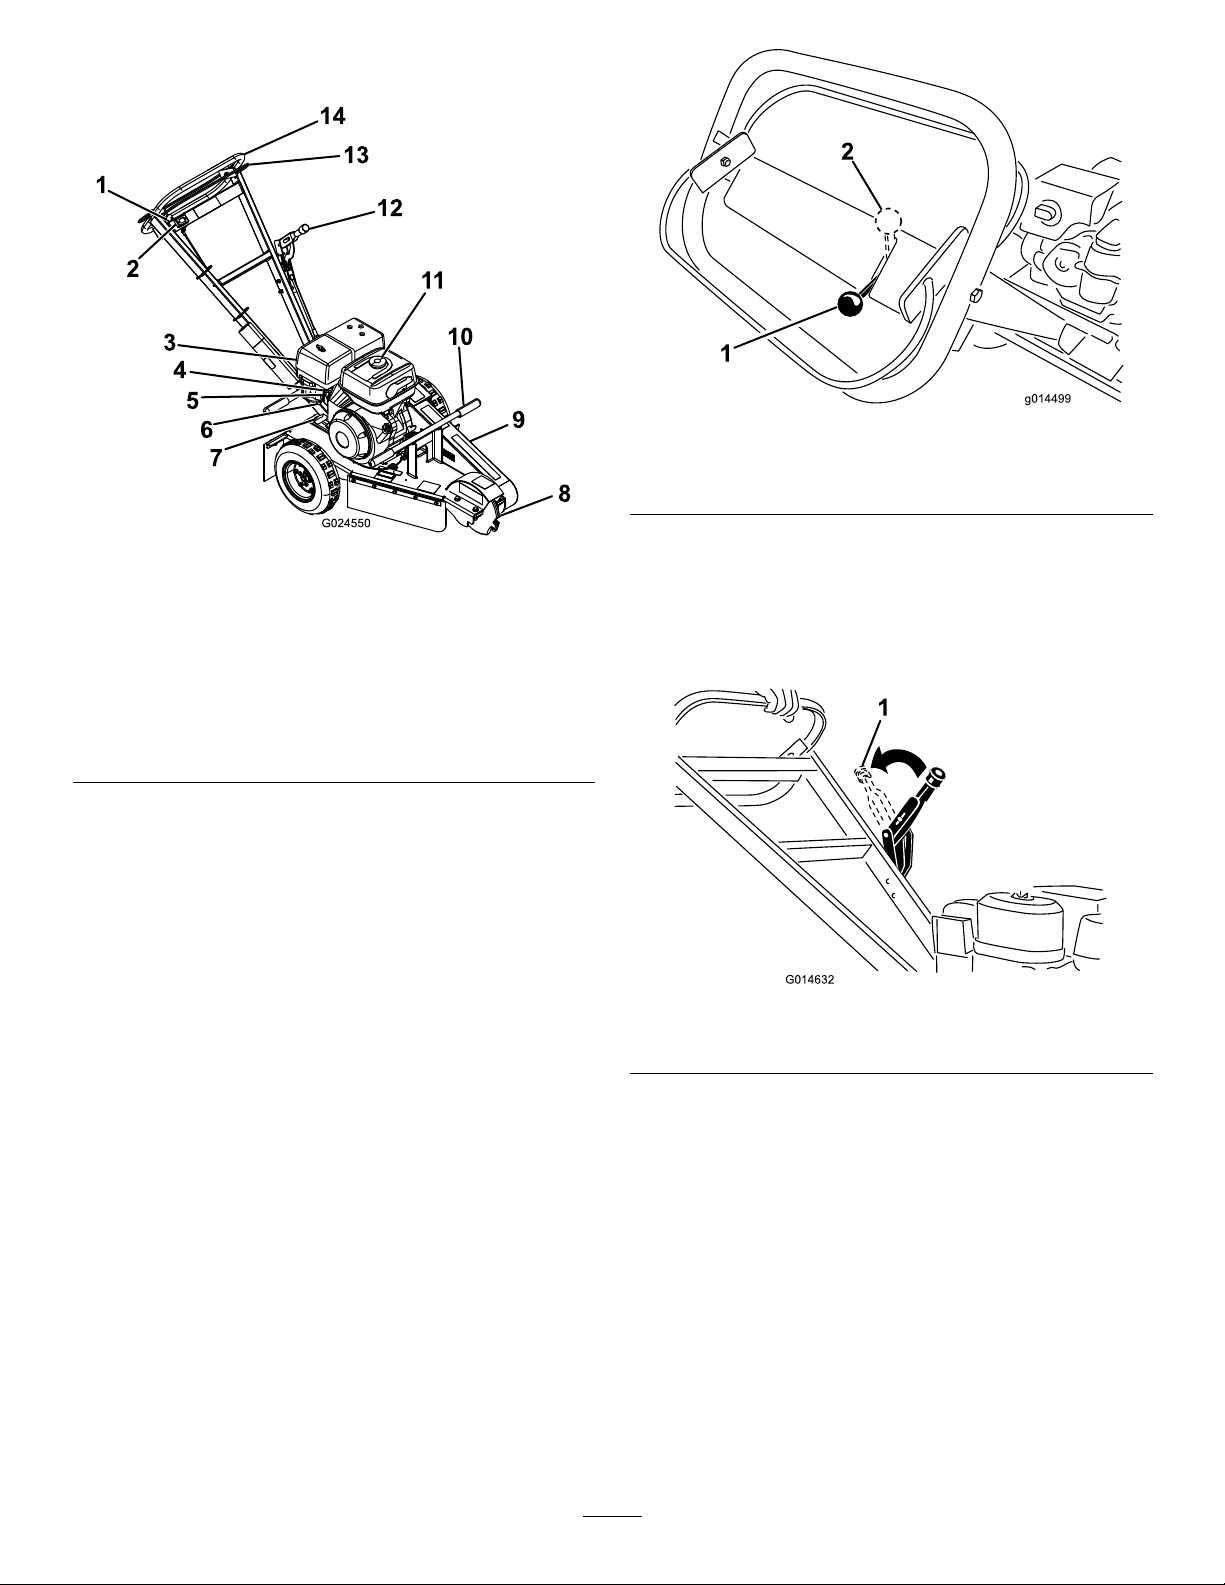
ProductOverview
Figure3
1.Throttlelever8.Cuttingwheel
2.Hourmeter9.Beltcover
3.Cycloneairlter10.Lift
4.Choke11.Fuelcap
5.Fuelvalve12.Parkingbrake
6.Sedimentcup13.Safetybail
7.Starter14.Handle
Controls
Becomefamiliarwithallthecontrols(Figure3andFigure4)
beforeyoustarttheengineandoperatethemachine.
ThrottleLever
Thethrottlelevercontrolsenginespeed.Withtheleverdown,
intheDISENGAGEposition,theenginerunsatidle.Thisis
alsothestartingposition.Whentheenginespeedincreases,
totheENGAGEDposition,thecentrifugalclutchengagesand
thecuttingwheelrotates.
Figure4
1.Throttle—Disengage
position
2.Throttle—Engaged
position
ParkingBrake
Theparkingbrakeholdstheleftwheelfromturningtosecure
themachineandforeasymovementofthemachinefromside
tosidewhengrindingthestump.
G014632
Figure5
1.Pullbacktoengagebrake
HourMeter
Whentheengineisoff,thehourmeterdisplaysthenumber
ofhoursofoperationthathavebeenloggedonthemachine.
7

Specications
Note:Specicationsanddesignaresubjecttochange
withoutnotice.
CuttingDepth30cm(12inches)
Length193cm(76inches)
Width75cm(29.5inches)
Height107cm(42inches)
Weight109Kg(240lb)
Operation
Note:Determinetheleftandrightsidesofthemachine
fromthenormaloperatingposition.
Important:Beforeoperating,checkthefuelandoil
level,andremovedebrisfromthemachine.Also,ensure
thattheareaisclearofpeopleanddebris.Youshould
alsoknowandhavemarkedthelocationsofallutility
lines.
BeforeyouStart
•Digawaytheearthandremoveanystonesnearthetree
stumpthatmayinterferewithyourwork.Checkthatthe
groundisfreeofforeignobjects,suchaselectricalcables,
barbedwire,etc.
•Cutortrimthestumpusingapowersaw .
•Reviewallthesafetydecalsonthemachine.
•Ensurethatyouarefamiliarwithsafetyregulationsand
shutdownproceduresdescribedinthismanual.
•Ensurethatallguardsareinplaceandingoodcondition.
•Ensurethatthebladesandcuttersareinplaceandin
goodcondition.
•Ensurethattheworkarea,cutter,andstumpinparticular
arefreefrommetallicobjectssuchaswire,nails,etc.that
couldbethrownoutandinjurepersonsinthevicinity
anddamagetheequipment.
8
AddingFuel
Useunleadedfuel(87pumpoctaneminimum).Leaded,
regularfuelmaybeusedifunleadedisnotavailable.
DANGER
Incertainconditions,fuelisextremelyammable
andhighlyexplosive.Areorexplosionfromfuel
canburnyouandothersandcandamageproperty.
•Fillthefueltankoutdoors,inanopenarea,when
theengineiscold.Wipeupanyfuelthatspills.
•Neverllthefueltankinsideanenclosedtrailer.
•Donotllthefueltankcompletelyfull.Add
fueltothefueltankuntilthelevelis6to13mm
(1/4to1/2inch)belowthebottomoftheller
neck.Thisemptyspaceinthetankallowsfuel
toexpand.
•Neversmokewhenhandlingfuel,andstayaway
fromanopenameorwherefuelfumesmaybe
ignitedbyaspark.
•Storefuelinanapprovedcontainerandkeepit
outofthereachofchildren.Neverbuymore
thana30-daysupplyoffuel.
•Donotoperatewithouttheentireexhaust
systeminplaceandinproperworkingcondition.
DANGER
Incertainconditionsduringfueling,static
electricitycanbereleasedcausingaspark,which
canignitethefuelvapors.Areorexplosionfrom
fuelcanburnyouandothersandcandamage
property.
•Alwaysplacefuelcontainersonthegroundaway
fromyourvehiclebeforelling.
•Donotllfuelcontainersinsideavehicleoron
atruckortrailerbedbecauseinteriorcarpets
orplastictruckbedlinersmayinsulatethe
containerandslowthelossofanystaticcharge.
•Whenpractical,removegas-poweredequipment
fromthetruckortrailerandrefueltheequipment
withitswheelsontheground.
•Ifthisisnotpossible,thenrefuelsuchequipment
onatruckortrailerfromaportablecontainer,
ratherthanfromafuel-dispensernozzle.
•Ifyoumustuseafuel-dispensernozzle,keepthe
nozzleincontactwiththerimofthefueltank
orcontaineropeningatalltimesuntilfuelingis
complete.
Important:Donotusemethanol,fuelcontaining
methanol,orgasoholcontainingmorethan10%ethanol
becausethefuelsystemcouldbedamaged.Donotmix
oilwithfuel.
UsingStabilizer/Conditioner
Useafuelstabilizer/conditionerinthemachinetoprovide
thefollowingbenets:
•Keepsfuelfreshduringstorageof90daysorless.For
longerstorageitisrecommendedthatthefueltankbe
drained.
•Cleanstheenginewhileitruns.
•Eliminatesgum-likevarnishbuildupinthefuelsystem,
whichcauseshardstarting.
Important:Donotusefueladditivescontaining
methanolorethanol.
Addthecorrectamountofgasstabilizer/conditionertothe
gas.
Note:Afuelstabilizer/conditionerismosteffectivewhen
mixedwithfreshfuel.Tominimizethechanceofvarnish
depositsinthefuelsystem,usefuelstabilizeratalltimes.
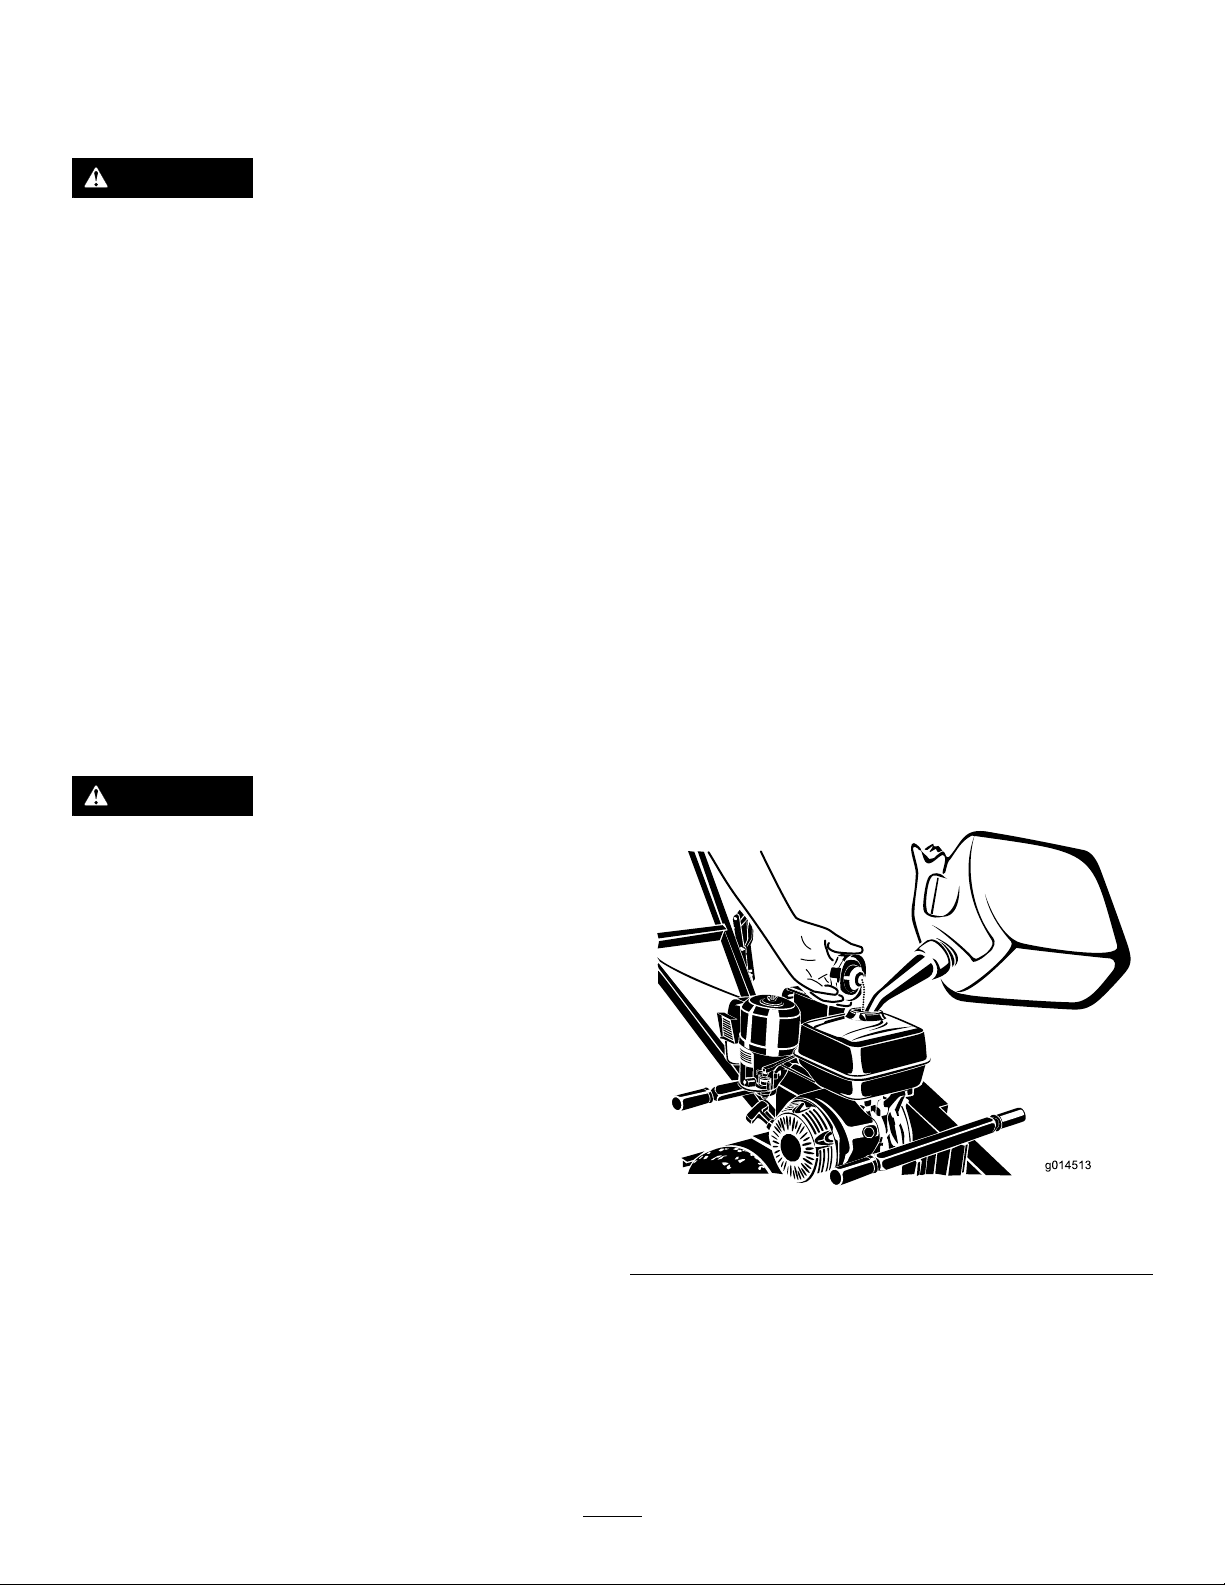
FillingtheFuelTank
1.Parkthemachineonalevelsurface,lowerthegrinder,
andshutofftheengine.
2.Allowtheenginetocool.
3.Cleanaroundthefuel-tankcapandremoveit(Figure
6).
Figure6
1.Fue-tankcap
4.Addfueltothefueltank,untilthelevelis6to13mm
(1/4to1/2inch)belowthebottomofthellerneck.
Important:Thisspaceinthetankallowsfuelto
expand.Donotllthefueltankcompletelyfull.
5.Installthefuel-tankcapsecurely.
6.Wipeupanyfuelthatmayhavespilled.
9

CheckingtheEngine-OilLevel
ServiceInterval:Beforeeachuseordaily
1.Tiltthemachinesotheengineislevel,andshutoff
theengine.
2.Allowtheenginetocool.
3.Cleanaroundtheoildipstick.
4.Removethedipstickandwipetheendclean.
5.Slidethedipstickfullyintothedipsticktubewithout
threadingitintothellerneck.
6.Pullthedipstickoutandlookattheend.
Note:Theoilshouldbetothetopoftheupperlimit
range(Figure7).
Figure7
1.Oildipstick
Important:Runningtheenginewithalowoil
levelcancauseenginedamage.Thistypeof
damageisnotcoveredbywarranty.
Theengineisequippedwithanoilalertsystem
thatautomaticallyshutsofftheenginebeforethe
oillevelfallsbelowthesafelimit.
7.Iftheoillevelislow,slowlypouronlyenoughoilinto
thecrankcasetoraisetheleveltotheupperlimit.
Important:Donotoverllthecrankcasewithoil
becausetheenginemaybedamaged.
8.Replacethedipstick.
StartingandShuttingOffthe
Engine
StartingtheEngine
1.MovethefuelvalvetotheOPENposition,alltheway
totheright.
Note:Ifyourmodelisequippedwithanenginewith
anOn/Offswitch,movetheswitchtotheONposition.
2.MovethechokeleverlefttotheONpositionifyou
arestartingacoldengine.
Note:Awarmorhotenginemaynotrequirechoking.
3.MovethethrottletotheDISENGAGEposition.
4.Holdthesafetybailagainstthehandleandpushthe
handledownenoughtoraisethecuttingwheeloffthe
ground.
5.Pullthestarterhandlelightlyuntilyoufeelresistance,
thenpullthehandlebriskly.Returnthestarterhandle
gently.
6.Aftertheenginestarts,graduallymovethechokelever
backtotheOFFposition.
Note:Iftheenginestallsorhesitates,movethechoke
backtotheONpositionagainuntiltheenginewarms
up.ThenmoveittotheOFFposition.
ShuttingOfftheEngine
1.MovethethrottletotheDISENGAGEposition.
Note:Iftheenginehasbeenworkinghardorishot,
letitrunforaminutebeforereleasingthesafetybail.
Thishelpstocooltheenginebeforeshuttingoff.Inan
emergency,theenginemaybeshutoffimmediately.
2.Releasethesafetybailtoshutofftheengine.
3.MovethefuelvalvetotheCLOSEDposition,allthe
waytotheleft.
Note:Ifyourmodelisequippedwithanengine
withanOn/Offswitch,movetheswitchtotheOFF
position.
10
GrindingaStump
DANGER
Themachinewillcutandamputatehandsandfeet.
•Stayintheoperator'spositionwhilethemachine
isrunningandkeepawayfromthecutting
wheel.
•Keepallbystandersasafedistancefromthe
machine.Shutoffthemachineimmediatelyif
anypeopleoranimalsentertheworkarea.
•Neverleavearunningmachineunattended.
Alwaysshutofftheengineandverifythecutting
wheelhasstoppedrotating.
WARNING
Grindingastumpthrowswoodchips,soil,and
otherdebrisintotheair,whichcouldinjureyouor
bystanders.
•Alwaysweareyeprotectionandahardhatwhen
usingthemachine.
•Ensurethateveryone,includingchildrenand
animals,maintainadistanceofatleast15m(50
feet)fromthemachine.
1.SetthrottletotheDISENGAGEposition,startthe
engine,andallowthemachinetowarmupfor2
minutes.
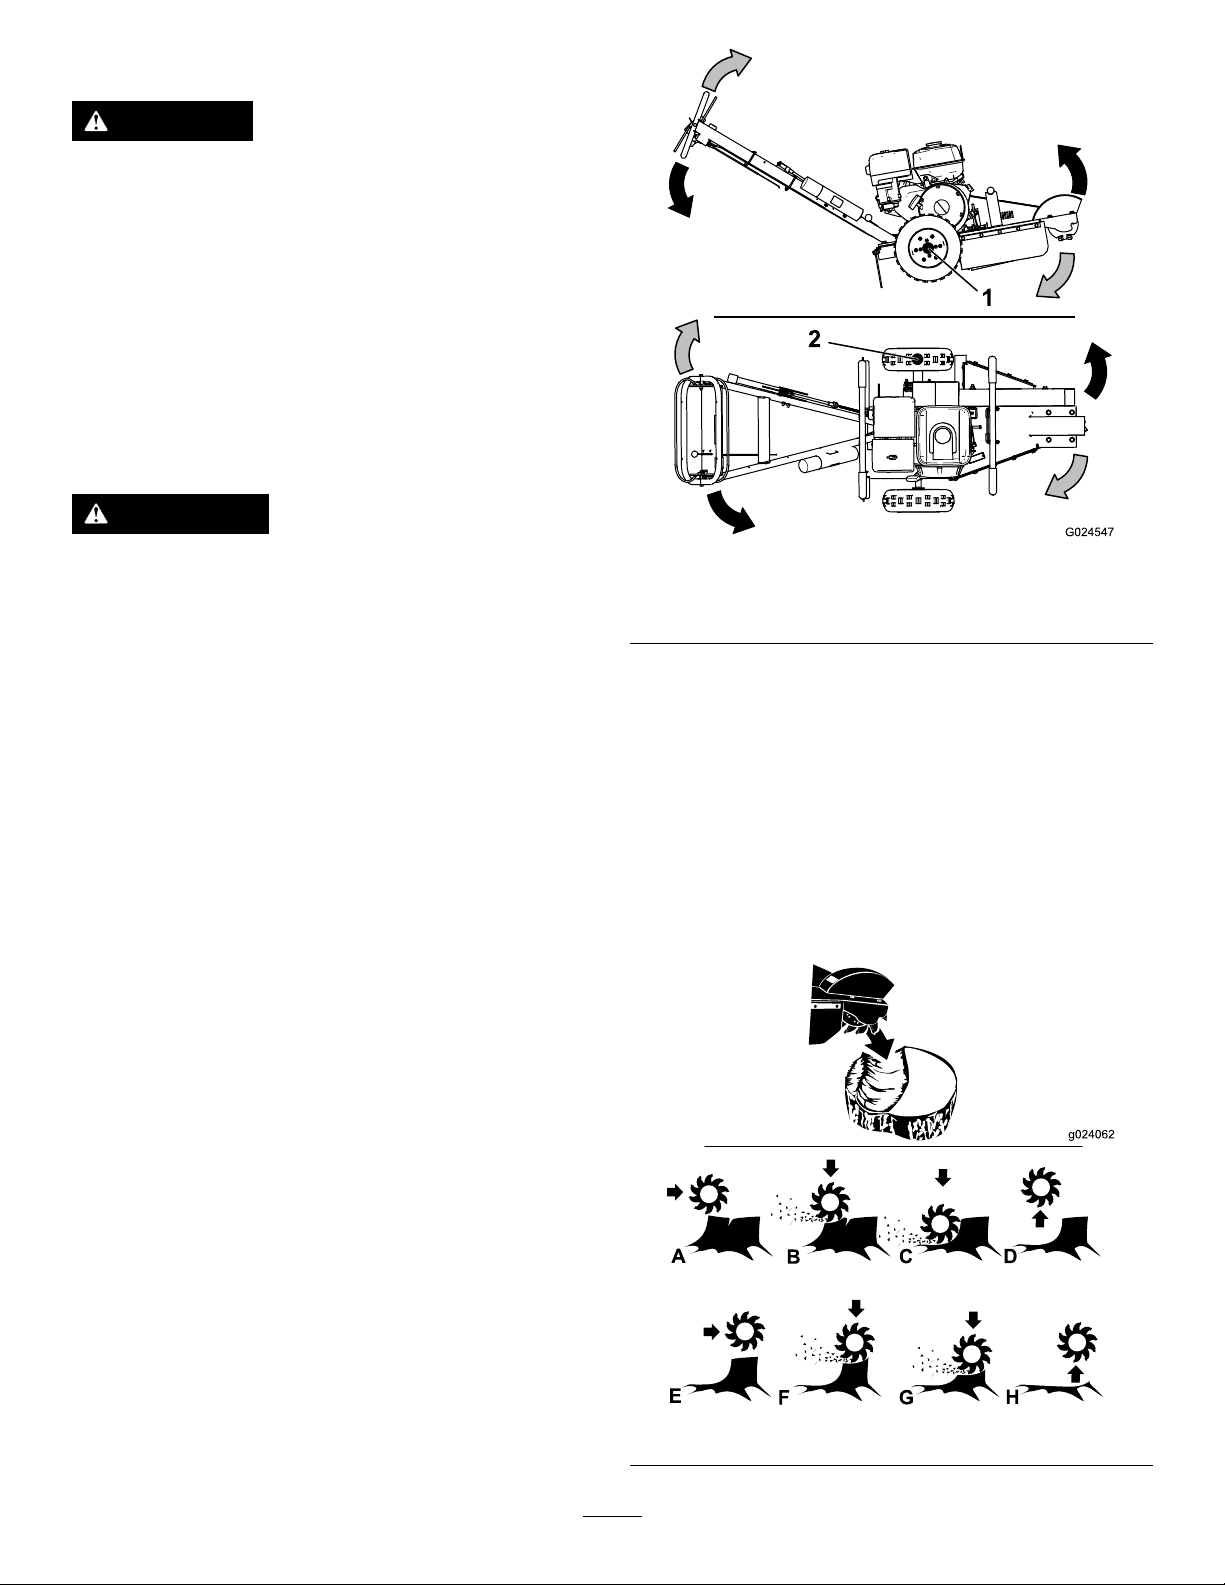
2.Pushthehandledownenoughtoraisethecutting
wheelofftheground(Figure8).
Figure8
1.Pivotpoint2.Pivotpointwhenthe
parkingbrakeisengaged
3.Movethemachinetothefrontofthestumpandset
theparkingbrake.
4.MovethrottleuptotheENGAGEposition.Thecutting
wheelwillbeginrotating.
5.Swingthecuttingwheelto1side(Figure8),then
loweritapproximately1to2.5cm(1/2to1inch)into
thefront-topcornerofthestump.Swingthecutting
wheelbackandforth,loweringthecuttingwheel
approximately1to2.5cm(1/2to1inch)beforeeach
sweep,untilyouhaveremovedthefrontportionofthe
stumptogroundlevel(AthroughDinFigure9).
Figure9
11

6.Raisethecuttingwheel,releasetheparkingbrake,and
movethemachineforwardafewcentimeters(inches).
Settheparkingbrake.
7.Repeatsteps5and6untilyouhavecompletely
removedthestump(EthroughHinFigure9).
8.MovethrottletotheDISENGAGEposition,pushthe
handledownenoughtoraisethecuttingwheeloffthe
ground.Waitforthecuttingwheeltostoprotating
thenreleasetheparkingbrakeandpullthemachine
awayfromthestump.
Note:Donotletthefrontoftheunittouchthe
grounduntilyouaresurethecuttingwheelhasstopped
turning.
9.Shutofftheengine;refertoShuttingOfftheEngine
(page10).
12

Maintenance
Note:Determinetheleftandrightsidesofthemachinefromthenormaloperatingposition.
Important:Youcantipthemachinebackwardoronitssidetocleanorserviceit,butnolongerthan2minutes.If
youholdthemachinethispositionfortoolong,fuelcandrainintothecrankcaseanddamagetheengine.Should
thishappen,performanextraoilchangeontheengine.Thenturntheengineoverafewrevolutionswiththestarter
handlebeforestartingtheengineagain.
RecommendedMaintenanceSchedule(s)
MaintenanceService
IntervalMaintenanceProcedure
Aftertherst25hours•Changetheoil.
Beforeeachuseordaily
•Checktheengine-oillevel.
•Greasethemachine.
•Checktheairlter.
•Checkthedrivebelttension.
•Checktheconditionoftheteeth;rotateorreplaceanythatarewornordamaged
andtorquethenutsforallteeth.
•Removedebrisfromthemachine.
Every50hours•Servicetheairlter.
Every100hours
•Changetheoil(morefrequentlywhenconditionsareextremelydustyorsandy).
•Cleanthesedimentcup.
•Checkthesparkplugs.
•Replacethedrivebelt.
Every200hours•Replacetheairlter.
Yearlyorbeforestorage•Changetheoil.
•Cleanthesedimentcup.
Important:Refertoyourengineowner’smanualforadditionalmaintenanceprocedures.
Lubrication
GreasingtheMachine
ServiceInterval:Beforeeachuseordaily
GreaseType:General-purposegrease.
1.Cleanthegreasettingswitharag.
2.Connectagreaseguntoeachtting.
3.Lubricate2ttings,1oneachcuttingwheelbearing.
4.Pumpgreaseintothettingsuntilgreasebeginsto
oozeoutofthebearings(approximately3pumps).
5.Wipeupanyexcessgrease.
Important:Pumpgreaseinslowlyandcarefully
topreventdamagetothebearingseals.
Figure10
13

EngineMaintenance
ServicingtheAirCleaner
ServiceInterval:Beforeeachuseordaily
Thecycloneairltercollectsthelargestcontaminantparticles,
whichcollectinthecontainer.Whenyoucanseealayerof
dirtatthebottomofthecontainer,cleanthecyclonehousing,
airchannels,andair-intakescreen.
ServicingtheCycloneAirFilter
ServiceInterval:Every50hours
1.Removethe3screwsholdingthecyclonehousing.
2.Removethehousingwiththeair-intakescreenand
removetheairchannels.
Figure11
1.Cyclonehousing3.Airchannels
2.Screw4.Cyclonehousingwith
air-intakescreen
Note:Theairchannelsmayremainintheupper
portionorfollowalongwiththehousingwhen
removed.
3.Cleanthecomponentswithwater,detergentanda
brush,thendrythecomponentscarefully.
4.Placetheairchannelsinthecyclonehousing.
5.Insertcyclonehousingintopositionandmakesureit
tsintheupperportion.Donotuseforce;alignitin
placebeforettingthescrews.
ReplacingtheAirFilter
ServiceInterval:Every200hours
Iftheengineislowonpower,producesblacksmoke,orruns
unevenly,theairltermaybeclogged.
1.Removethewingnutandliftoffthecyclonelterwith
theairltercowling(Figure12).
Figure12
1.Wingnut4.Airlter
2.Cycloneairlter5.Stud
3.Foampre-lter
2.Removethefoampre-lterandcleanitasfollows
A.Washthepre-lterusingamilddetergentand
water.
B.Squeezeitdrywithacleancloth.
C.Soakitwithnewengineoil.
D.Gentlywindthelterinanabsorbentclothand
squeezeoutexcessoil.
3.Removethewingnutontopoftheairlterand
removethepaperlter.
4.Tapthepaperlteragainstaxedsurfacetoremove
dust.Ifthepaperlterisstilldirtyordamaged,replace
it.
Important:Donotusecompressedairtoblow
outthepaperelement,thiscandamageit.
5.Mountthepaperlterintheairlterhousingand
secureitwiththewingnut.
6.Positionthefoampre-lteroverthepaperlter.
7.Installthecyclonelterwiththeairltercoverand
secureitwiththewingnut.
14

ServicingtheEngineOil
OilType:DetergentoilwithanAPIserviceofSJorhigher.
CrankcaseCapacity:2L(2.1qt)
Viscosity:SAE10W-30isrecommendedforgeneraluse.
ChangingtheEngineOil
ServiceInterval:Aftertherst25hours
Every100hours
Yearlyorbeforestorage
1.Starttheengineandletitrun5minutes.
Note:Thiswarmstheoilsoitdrainsbetter.
2.Parkthemachinesothatthedrainsideisslightlylower
thantheoppositesidetoensurethattheoildrains
completely.
3.Settheparkingbrakeandshutofftheengine.
4.Placeapanundertheoil-drainhole.
5.Removethedrainpluganddraintheoilthroughthe
holeslotintheframe(Figure13).
g014504
1
2
Figure13
1.Oil-drainhole2.Oil-llcap
6.Whentheoilhasdrainedcompletely,installtheplug
andwipeupanyspilledoil.
Note:Disposeoftheusedoilatacertiedrecycling
center.
7.Removetheoilllcapandslowlypourapproximately
80%ofthespeciedamountofoilintotheengine
(Figure13).
8.Slowlyaddadditionaloiltobringtheoilleveltothe
upperlimitmarkonthedipstick.RefertoCheckingthe
Engine-OilLevel(page10).
9.Installtheoil-llcap.
CleaningtheSedimentCup
ServiceInterval:Every100hours
Yearlyorbeforestorage
Underneaththefuelvalveisasedimentcuptocatchdirtin
thefuel.
1.MovethefuelvalvetotheOFFposition,alltheway
totheleft.
2.Unscrewthesedimentcup(Figure14).
Note:MakesurenottomisplacetheO-ring.
Figure14
1.Sedimentcup2.O-Ring
3.CleanthereservoirandtheO-ringusingacleaning
solventanddrycarefully.
Note:MakesurenottomisplacetheO-ring.
4.PuttheO-ringinplaceinthegrooveofthecupand
replacethesedimentcup.
5.TurnthefuelvalvetotheONposition,allthewayto
theright,andcheckforleaks.Ifitleaks,replacethe
o-ring.
ServicingtheSparkPlug
ServiceInterval:Every100hours—Checkthesparkplugs.
Ensurethattheairgapbetweenthecenterandsideelectrodes
iscorrectbeforeinstallingthesparkplug.Useasparkplug
wrenchforremovingandinstallingthesparkpluganda
gappingtool/feelergaugetocheckandadjusttheairgap.
Installanewsparkplugifnecessary.
Type:BPR6ES(NKG)orequivalent
AirGap:0.70to0.80mm(0.28to0.031inch)
15

RemovingtheSparkPlug
1.Lowerthegrinderandshutoffthemachine;Referto
ShuttingOfftheEngine(page10).
2.Pullthewireoffthesparkplug(Figure15).
Figure15
1.Sparkplug2.Wire
3.Cleanaroundthesparkplug.
4.Removethesparkplugandthemetalwasher.
CheckingtheSparkPlug
1.Lookatthecenterofthesparkplug(Figure16).Ifyou
seelightbrownorgrayontheinsulator,theengineis
operatingproperly.Ablackcoatingontheinsulator
usuallymeansthattheaircleanerisdirty.
Important:NeverCleanthesparkplug.Always
replacethesparkplugwhenithasablackcoating,
wornelectrodes,anoilylm,orcracks.
Figure16
1.Centerelectrodeinsulator3.Airgap(nottoscale)
2.Sideelectrode
2.Checkthegapbetweenthecenterandsideelectrodes
(Figure16).Bendthesideelectrode(Figure16)ifthe
gapisnotcorrect.
InstallingtheSparkPlug
1.Threadthesparkplugintothesparkplughole.
2.Tightenthesparkplugto27N∙m(20ft-lb).
3.Pushthewireontothesparkplug.
BrakeMaintenance
AdjustingtheParkingBrake
1.Loosenthesetscrewonsideofbrakeleverknob.
2.Turntheknobclockwisetotightenthebrake;adjust
counterclockwisetoloosenthebrake.
Note:Theleftwheelshouldlockcompletelywhen
thebrakeisset.
3.Tightenthesetscrew.
16
BeltMaintenance
AdjustingtheDrive-Belt
Tension
ServiceInterval:Beforeeachuseordaily
Note:Inspectthedrivebeltthroughtheslotontopofthe
beltcover.Adjustasrequired.
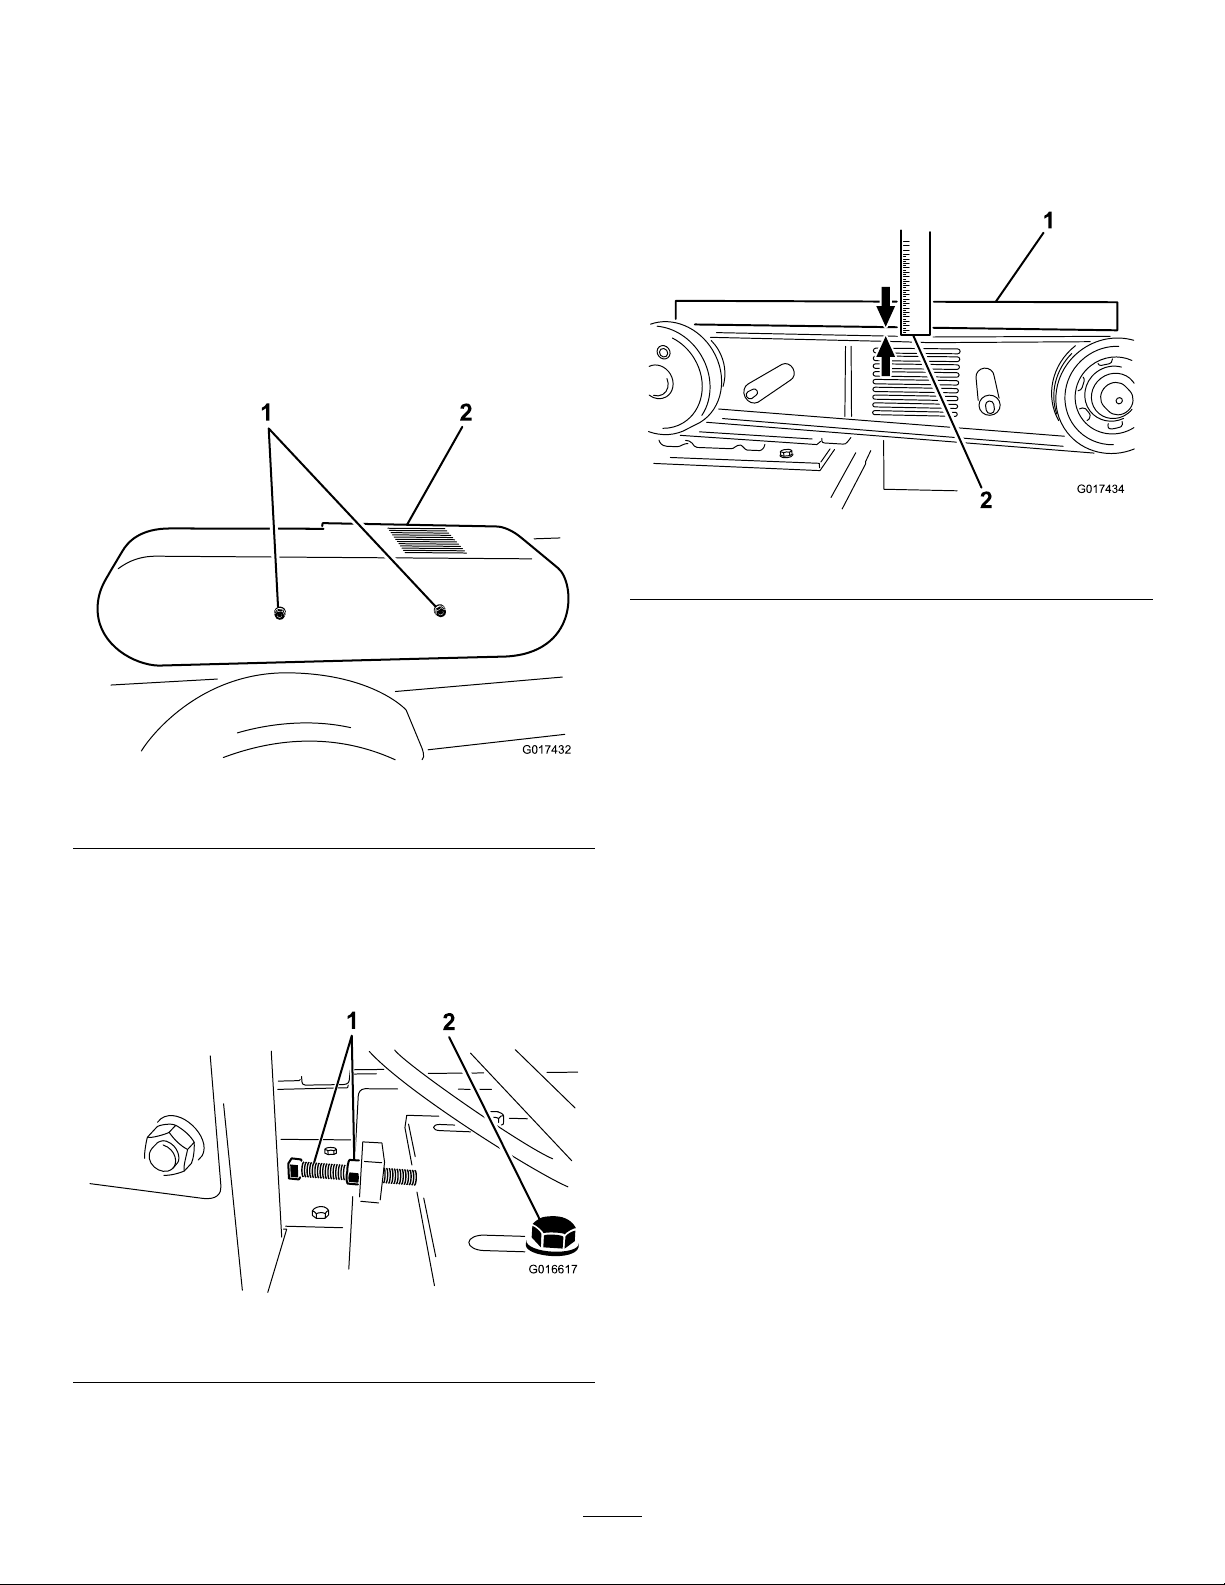
1.Removetheboltsandwasherssecuringthebeltguard
tomachine.
2.Removethebeltguard(Figure17).
G017432
Figure17
1.Boltsandwashers2.Beltguard
3.Loosenthe4engineplatemountingboltsandthe4
boltssecuringtherearofthebeltguardtotheengine.
4.Loosenthebelt-tensionboltandjamnut,slidethe
enginetowardtheywheelhousingtoloosenbelt
(Figure18).
G016617
Figure18
1.Tensionboltandjam2.Engineplatemountingbolt
5.Adjustthedrivebelttensionbytighteningtensionbolt
andjamnutagainsttheenginemountingplate,pushing
theenginerearward.
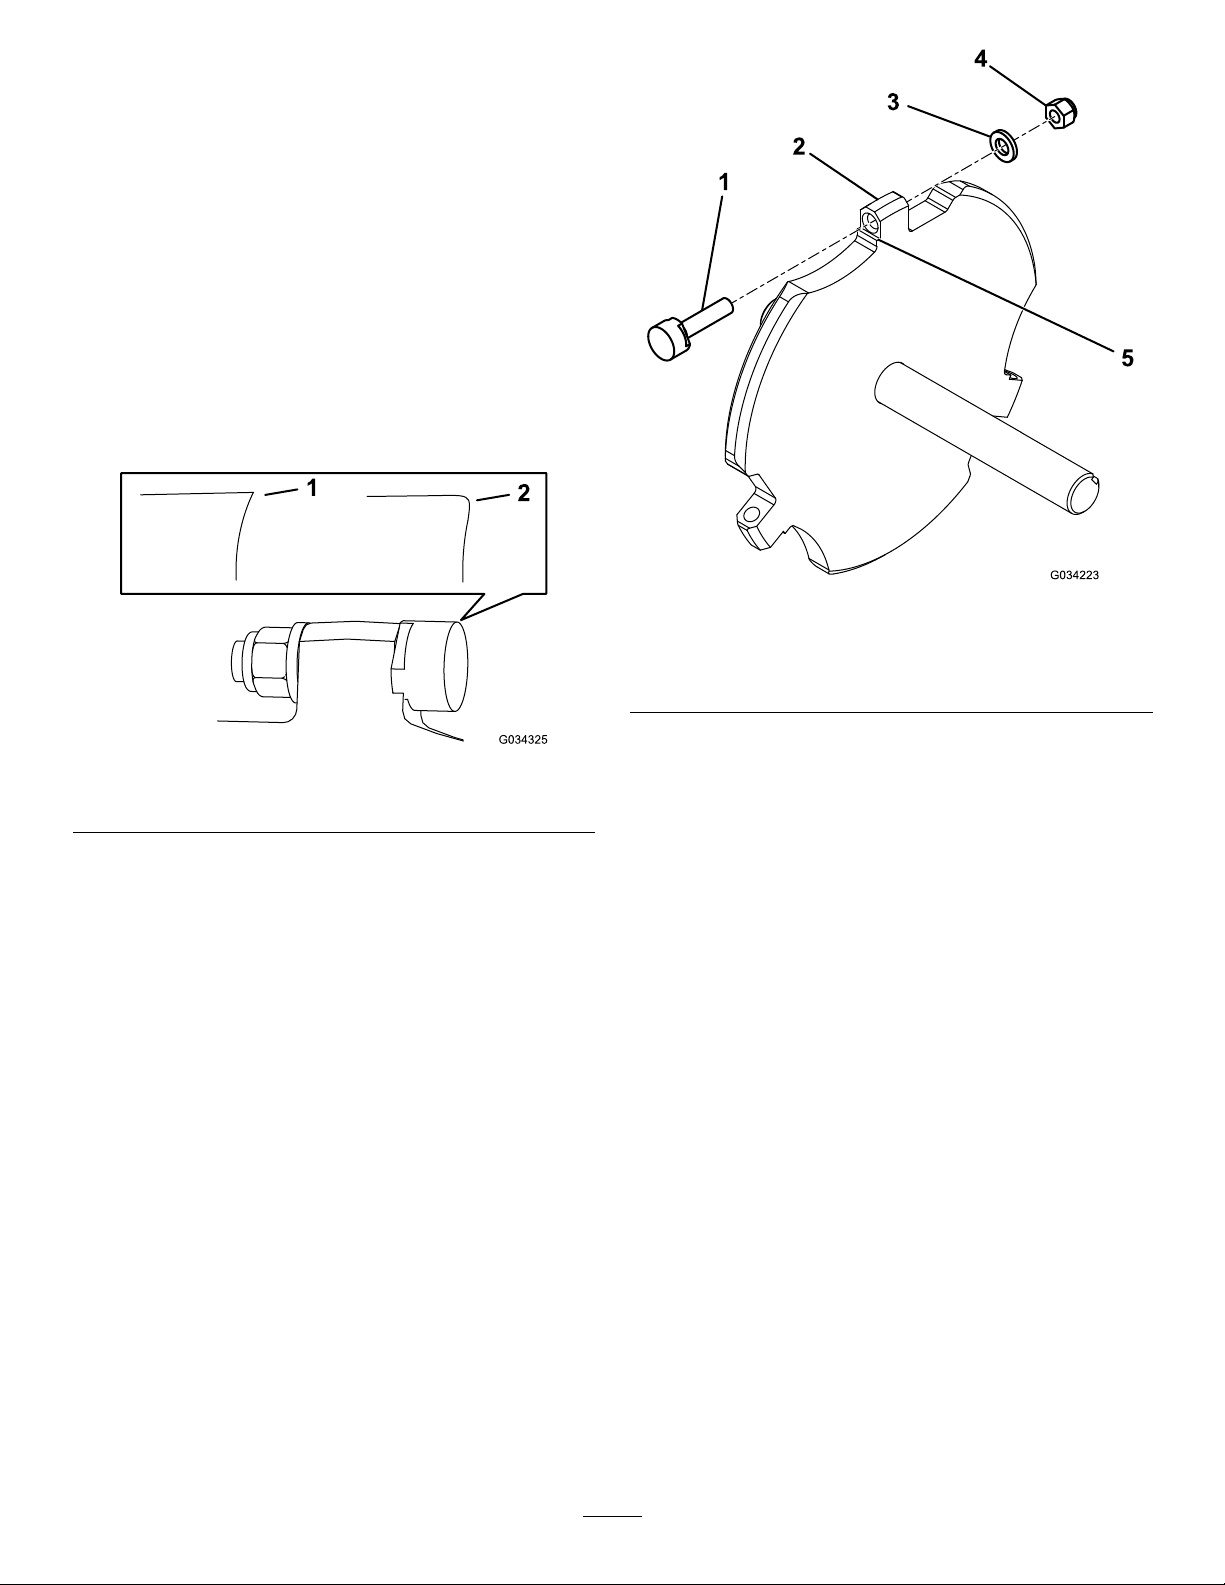
6.Layastraightedgeacrossclutchandywheelpulleys,
tightenbelt-tensionboltsothereis1cm(0.40inch)of
exinthebeltwhenpushingdownwith6.8kg(15lb)
force,atmid-span(whenre-tensioningabeltinuse)
orwith8kg(18lb)forcewheninstallinganewbelt
(Figure19).
G017434
Figure19
1.Straightedge2.Flexof1cm(0.40inch)
7.Ensurethatthepulleysarealignedandtheengineis
parallelwiththeframe(notangledtowardtheside),
thentightenthe4engineplatemountingboltsandthe
4boltssecuringtherearofthebeltguardtotheengine.
8.Installthebeltguardandsecureitwiththepreviously
removedwashersandbolts.
ReplacingtheDriveBelt
ServiceInterval:Every100hours
Note:Replacethebeltifitshowsanysignsofwear,cracks,
glazing,ordamage.
1.Removetheboltsandwasherssecuringthebeltguard
tomachine.
2.Removethebeltguard(Figure17).
3.Loosenthe4engineplatemountingboltsandthe4
boltssecuringtherearofthebeltguardtotheengine.
4.Loosenthebelt-tensionboltandjamnut,slidethe
enginetowardtheywheelhousingtoloosenbelt
(Figure18).
5.Replacedrivebelt.
6.Adjusttensionofnewbeltto7.6to8.4kg(17.1to
18.9lb)forceand10mm(0.40inch)beltdeection
atmid-span.
7.Tightenthe4engineplatemountingboltsandthe4
boltssecuringtherearofthebeltguardtotheengine.
8.Installthebeltguardandsecureitwiththepreviously
removedwashersandbolts.
17
GrinderMaintenance
ReplacingtheTeeth
ServiceInterval:Beforeeachuseordaily—Checkthe
conditionoftheteeth;rotateorreplace
anythatarewornordamagedandtorque
thenutsforallteeth.
Duetothehighamountofwearplacedontheteeth,youneed
torotateandreplacethemperiodically(Figure20).Before
yourotateorreplacethem,inspecteachtoothholderonthe
wheel,includingtheatlandsthatpreventtheteethfrom
rotating.Ifthetoothholderisdamaged,replacethewheel.
Torquethenuts68N∙m(50ft-lb)foranyteeththatyouare
notrotatingorreplacing.
Figure20
1.Sharptooth2.Worntooth
Eachtoothisindexedwith3positionssoyoucanrotate
ittwice,exposinganewsharpedgebeforereplacingthe
tooth.Torotateatooth,loosenthenutsecuringthetooth
(Figure21).Pushthetoothforwardandrotateit1/3ofa
turn,bringinganunusededgetotheoutside.Torquethenut
securingthetoothto68N∙m(50ft-lb).
Toreplaceatooth,removethenutsecuringthetooth,then
installanewtooth,washer,andnutinthesameposition
(Figure21).Torquethenutsecuringthetoothto68N∙m
(50ft-lb).
Figure21
1.Tooth4.Nut
2.Toothholder5.Flatland
3.Washer
18

Cleaning
RemovingDebrisfromthe
Machine
Regularcleaningandwashingincreasesthelifespanofthe
machine.Cleanthemachinedirectlyafteruse,beforethe
dirthardens.
Checkbeforecleaningthatthefueltankcapisproperlyin
placetoavoidgettingwaterinthetank.
Usecarewhenusingahigh-pressuresprayer,becauseitcan
damagewarningdecals,instructionsigns,andtheengine
Important:Lubricatethecuttingwheelbearingsafter
cleaning.
Storage
StoringtheMachine
Forstorageover30days,preparethemachineasfollows:
1.Removedirtandgrimefromtheexternalpartsof
theentireunit,especiallytheengine.Cleandirtand
sawdustchipsfromtheoutsideoftheenginecylinder
headnsandblowerhousing.
Important:Youcanwashtheunitwithmild
detergentandwater.
2.Addapetroleum-basedstabilizer/conditionertofuel
inthetank.Followmixinginstructionsfromstabilizer
manufacturer.(7.8mlperLor1ozperUSgallon).
Note:Fuelstabilizer/conditionerismosteffective
whenmixedwithfreshfuelandusedatalltimes.
Important:Donotuseanalcohol-based
stabilizer(ethanolormethanol).Donotstore
stabilizer/conditionedfuelover90days.
3.Runtheenginetodistributeconditionedfuelthrough
thefuelsystem(5minutes).
4.Shutofftheengine,allowittocool,anddrainthe
fueltankusingapumptypesiphon.Disposeoffuel
properly;recycleasperlocalcodes.
5.Starttheengineandrunituntilitshutsoff.
6.Choketheengine.
7.Startandruntheengineuntilitdoesnotstartagain.
8.Cleanthesedimentcup;refertoCleaningtheSediment
Cup(page15).
9.Servicetheaircleaner;refertoServicingtheAir
Cleaner(page14)andReplacingtheAirFilter(page
14).
10.Changetheenginecrankcaseoil;refertoChangingthe
EngineOil(page15).
11.Removethesparkplugandcheckthecondition;refer
toServicingtheSparkPlug(page15).
12.Withthesparkplugremovedfromtheengine,pour2
tablespoonsofengineoilintothesparkplughole.
13.Pullthestarterslowlytocranktheengineanddistribute
theoilinsidethecylinder.
14.Installthesparkplug,butdonotinstallthewireon
thesparkplug.
15.Greasethecutterwheelbearings;refertoGreasingthe
Machine(page13).
16.Checkandtightenallbolts,nuts,andscrews.Repairor
replaceanypartthatisdamaged.
17.Paintallscratchedorbaremetalsurfaces.Paintis
availablefromyourAuthorizedServiceDealer.
18.Storetheunitinaclean,drygarageorstoragearea.
19.Covertheunittoprotectitandkeepitclean.
19

Troubleshooting
ProblemPossibleCauseCorrectiveAction
1.ThesafetybaleisintheOFFposition.1.Holdthesafetybailagainstthehandle.
2.Ifyourmodelisequippedwithan
enginewithanOn/Offswitch,the
switchisintheOFFposition.
2.MovetheswitchtotheONposition.
3.Thefuelshutoffvalveisclosed.3.Openthefuelvalve.
4.Thechokeisopen.4.Closethechokewhenstartingacold
engine.
5.Thefueltankisempty.5.Filltankwithfreshfuel.
Theenginedoesnotstart.
6.Thesparkplugwireislooseor
disconnected.
6.Checktheelectrodegapandcleanor
replacethesparkplug.
1.Thechokeislefton.1.Openthechoke.
2.Theairlterisclogged.2.Cleanorreplacetheairlter.
3.Thefuellineisclogged.3.Cleanthesedimentcup.
4.Thereiswaterorcontaminantsinthe
fuel.
4.Drainandllthetankwithfreshfuel.
Theenginerunsrough.
5.Thesparkplugsarewornorhave
buildupontheelectrodes.
5.Checktheelectrodegapandcleanor
replacethesparkplug.
Thebeltslipsorcomesoffthepulleys.1.Thebelttensionisinsufcient.1.Adjustthebelttension.Reducethe
cuttingdepth.
1.Theenginespeedisinsufcientto
activatethecentrifugalclutch.
1.MovethethrottletotheENGAGED
position.
2.Thebelttensionisinsufcient.2.Adjustthebelttension.
Thecuttingwheeldoesnotrotate.
3.Theclutchshoesareworn.3.Replacetheclutch.
1.Theenginespeedisexcessive.1.MovethethrottletotheDISENGAGED
position.
2.Thebeltisoffofthepulleysorbroken.2.Replacethedrivebelt.
Thecuttingwheelcontinuestorotate.
3.Clutchspringsareweakorbroken.3.Replacetheclutch.
1.Theparkingbrakeisoutofadjustment.1.Adjusttheparkingbrake.
Theparkingbrakedoesnothold.
2.Thebrakepadsareworn.2.Replacethebrake.
20
Other manuals for 22615
1
This manual suits for next models
3
Table of contents
Other Toro Grinder manuals


Popular Grinder manuals by other brands

Bosch
Bosch GWS Professional 30-180 B Original instructions

EINHELL
EINHELL 44.308.85 Original operating instructions

Oregon
Oregon 720-120 Original instruction manual

DWT
DWT WS13-150 T Original instructions

Metabo
Metabo WEA 10-125 Quick Original instructions

Chicago Electric
Chicago Electric 91222 Assembly and operating instructions


Scheppach
Scheppach TIGER 3000VS Translation from the original instruction manual

Milwaukee
Milwaukee 2781-059 Operator's manual

Bosch
Bosch 1775E Operating/safety instructions

DeWalt
DeWalt D28065 Original instructions

Cleco
Cleco 1700 Series Operation & service manual

Trotec
Trotec PAGS 20-115 operating manual