Toro 22601 User manual

FormNo.3366-323RevA
6.5hpStumpGrinder
ModelNo.22601—SerialNo.310000001andUp
g014867
ToregisteryourproductordownloadanOperator'sManualorPartsCatalogatnocharge,gotowww.Toro.com.OriginalInstructions(EN)

WARNING
CALIFORNIA
Proposition65Warning
Theengineexhaustfromthisproduct
containschemicalsknowntotheStateof
Californiatocausecancer,birthdefects,
orotherreproductiveharm.
DANGER
Theremaybeburiedpower,gas,and/ortelephone
linesintheworkarea.Shockorexplosionmay
occurifyoudigintothem.
Havethepropertyorworkareamarkedforburied
linesanddonotdiginmarkedareas.Contactyour
localmarkingserviceorutilitycompanytohavethe
propertymarked(forexample,intheUnitedStates,
call811forthenationwidemarkingservice).
ThissparkignitionsystemcomplieswithCanadian
ICES-002.
Becauseinsomeareastherearelocal,state,orfederal
regulationsrequiringthatasparkarresterbeusedonthe
engineofthismachine,asparkarresterisavailableas
anoption.Ifyourequireasparkarrestor,contactyour
AuthorizedToroServiceDealer.
GenuineTorosparkarrestersareapprovedbytheUSDA
ForestryService.
Important:ItisaviolationofCaliforniaPublic
ResourceCodeSection4442touseoroperate
theengineonanyforest-covered,brush-covered,
orgrass-coveredlandwithoutasparkarrester
mufermaintainedinworkingorder,ortheengine
constricted,equipped,andmaintainedforthe
preventionofre.Otherstatesorfederalareasmay
havesimilarlaws.
Theenclosed
Engine Owner’ s Man ual
issupplied
forinformationregardingtheUSEnvironmental
ProtectionAgency(EPA)andtheCalifornia
EmissionControlRegulationofemissionsystems,
maintenance,andwarranty.Replacementsmaybe
orderedthroughtheenginemanufacturer.
Introduction
Thismachineisdesignedtogrindandremovetree
stumpsandsurfaceroots.Itisnotintendedtocutrock
oranyothermaterialotherthanwoodandthesoil
aroundastump.
Readthisinformationcarefullytolearnhowtooperate
andmaintainyourproductproperlyandtoavoidinjury
andproductdamage.Youareresponsibleforoperating
theproductproperlyandsafely.
YoumaycontactTorodirectlyatwww.Toro.comfor
productandaccessoryinformation,helpndinga
dealer,ortoregisteryourproduct.
Wheneveryouneedservice,genuineToroparts,or
additionalinformation,contactanAuthorizedService
DealerorToroCustomerServiceandhavethemodel
andserialnumbersofyourproductready.Figure1
illustratesthelocationofthemodelandserialnumbers
ontheproduct.Writethenumbersinthespace
provided.
g014868
1
Figure1
1.Modelandserialnumberplate
ModelNo.
SerialNo.
Thismanualidentiespotentialhazardsandhas
safetymessagesidentiedbythesafetyalertsymbol
(Figure2),whichsignalsahazardthatmaycauseserious
©2010—TheToro®Company
8111LyndaleAvenueSouth
Bloomington,MN554202
Contactusatwww.Toro.com.
PrintedintheUSA.
AllRightsReserved

injuryordeathifyoudonotfollowtherecommended
precautions.
Figure2
1.Safetyalertsymbol
Thismanualuses2otherwordstohighlightinformation.
Importantcallsattentiontospecialmechanical
informationandNoteemphasizesgeneralinformation
worthyofspecialattention.
Contents
Introduction.................................................................2
Safety...........................................................................3
SafeOperatingPractices.......................................3
SafetyandInstructionalDecals.............................5
ProductOverview........................................................6
Controls...............................................................6
Specications.......................................................8
Attachments/Accessories.....................................8
Operation.....................................................................9
BeforeyouStart...................................................9
AddingFuel.........................................................9
CheckingtheEngineOilLevel............................10
StartingandStoppingtheEngine........................11
GrindingaStump...............................................11
Maintenance...............................................................13
RecommendedMaintenanceSchedule(s)................13
Lubrication.............................................................13
GreasingtheMachine.........................................13
EngineMaintenance...............................................14
ServicingtheAirCleaner....................................14
ServicingtheEngineOil.....................................15
ServicingtheSparkPlug.....................................16
BeltMaintenance....................................................17
CheckingtheDriveBeltTension.........................17
AdjustingtheDriveBelt.....................................17
GrinderMaintenance..............................................18
CheckingtheCuttingWheelBlades.....................18
ReplacingtheCuttingWheelBlades....................18
Cleaning.................................................................19
RemovingDebrisfromtheMachine....................19
Storage.......................................................................20
..........................................................................20
Troubleshooting.........................................................21
Safety
Improperuseormaintenancebytheoperator
orownercanresultininjury.Toreducethe
potentialforinjury,complywiththesesafety
instructionsandalwayspayattentiontothesafety
alertsymbol,whichmeans:
Caution
,
W ar ning
,
or
Danger
—personalsafetyinstruction.Failureto
complywiththeinstructionmayresultinpersonal
injuryordeath.
SafeOperatingPractices
Thisproductiscapableofamputatinghandsandfeet.
Alwaysfollowallsafetyinstructionstoavoidserious
injuryordeath.
WARNING
Engineexhaustcontainscarbonmonoxide,an
odorless,deadlypoisonthatcankillyou.
Donotruntheengineindoorsorinanenclosed
area.
Training
•ReadtheOperator’sManualandothertraining
material.Iftheoperator(s)ormechanic(s)can
notreadEnglish,itistheowner’sresponsibilityto
explainthismaterialtothem.
•Becomefamiliarwiththesafeoperationofthe
equipment,operatorcontrols,andsafetysigns.
•Alloperatorsandmechanicsshouldbetrained.The
ownerisresponsiblefortrainingtheusers.
•Neverletchildrenoruntrainedpeopleoperateor
servicetheequipment.Localregulationsmayrestrict
theageoftheoperator.
•Theowner/usercanpreventandisresponsiblefor
accidentsorinjuriesoccurringtohimselforherself,
otherpeopleorproperty.
Preparation
•Evaluatetheterraintodeterminewhataccessories
andattachmentsareneededtoproperlyand
safelyperformthejob.Onlyuseaccessoriesand
attachmentsapprovedbythemanufacturer.
•Wearappropriateclothingincludinghardhat,face
shield,safetyglasses,longpants,safetyshoes,and
hearingprotection.Longhair,looseclothingor
jewelrymaygettangledinmovingparts.
•Inspecttheareawheretheequipmentistobeused
andremoveallobjectssuchasrocks,toys,andwire
whichcanbethrownbythemachine.
3

•Useextracarewhenhandlinggasolineandother
fuels.Theyareammableandvaporsareexplosive.
–Useonlyanapprovedcontainer
–Neverremovethegascaporaddfuelwiththe
enginerunning.Allowtheenginetocoolbefore
refueling.Donotsmoke.
–Neverrefuelordrainthemachineindoors.
•Checkthattheoperatorpresencecontrols,safety
switches,andshieldsareattachedandfunctioning
properly.Donotoperateunlesstheyarefunctioning
properly.
•Checkthatthecuttingwheelhasstoppedrotating
whenyoureducethethrottle.
Operation
•Neverrunanengineinanenclosedarea.
•Onlyoperateingoodlight,keepingawayfromholes
andhiddenhazards.
•Besurealldrivesareinneutralbeforestartingthe
engine.Onlystarttheenginefromtheoperator’s
position.
•Neveroperatewiththeguardsnotsecurelyinplace.
Besureallinterlocksareattached,adjustedproperly,
andfunctioningproperly.
•Donotchangetheenginegovernorsettingor
overspeedtheengine.
•Stoponlevelground,lowerthegrinder,andshut
offtheenginebeforeleavingtheoperator’sposition
foranyreason.
•Keephandsandfeetawayfromthemovinggrinder
wheelandteeth.
•Lookbehindanddownbeforebackinguptobesure
ofaclearpath.
•Keeppetsandbystandersaway.
•Donotoperatethemachineundertheinuenceof
alcoholordrugs.
•Usecarewhenloadingorunloadingthemachine
intoatrailerortruck.
•Ensurethattheareaisclearofotherpeoplebefore
operatingthemachine.Stopthemachineifanyone
entersthearea.
•Neverleavearunningmachineunattended.Always
stoptheengineandverifythecuttingwheelshas
stoppedrotating.
•Neverjerkthecontrols;useasteadymotion.
•Watchfortrafcwhenoperatingnearorcrossing
roadways.
•Donottouchpartswhichmaybehotfrom
operation.Allowthemtocoolbeforeattemptingto
maintain,adjust,orservice.
•Ensurethatyouoperatethemachineinareaswhere
therearenoobstaclesincloseproximitytothe
operator.Failuretomaintainadequatedistancefrom
trees,walls,andotherbarriersmayresultininjury
asthemachinebacksupduringoperationifthe
operatorisnotattentivetothesurroundings.Only
operatetheunitinareaswherethereissufcient
clearancefortheoperatortosafelymaneuverthe
product.
•Beforegrinding,havetheareamarkedfor
undergroundutilities,anddonotgrindinmarked
areas.
•Locatethepinchpointareasmarkedonthemachine
andkeephandsandfeetawayfromtheseareas.
•Lightningcancausesevereinjuryordeath.If
lightningisseenorthunderisheardinthearea,do
notoperatethemachine;seekshelter.
MaintenanceandStorage
•Stoptheengine.Waitforallmovementtostop
beforeadjusting,cleaning,orrepairing.
•Cleandebrisfromthegrinder,drives,mufers,and
enginetohelppreventres.Cleanupoilorfuel
spillage.
•Lettheenginecoolbeforestoringanddonotstore
nearame.
•Donotstorefuelnearamesordrainindoors.
•Parkthemachineonlevelground.Neverallow
untrainedpersonneltoservicethemachine.
•Carefullyreleasepressurefromcomponentswith
storedenergy.
•Removethesparkplugwirebeforemakingany
repairs.
•Keephandsandfeetawayfrommovingparts.If
possible,donotmakeadjustmentswiththeengine
running.
•Keepallpartsingoodworkingconditionandall
hardwaretightened.Replaceallwornordamaged
decals.
•Keepnutsandboltstight.Keepequipmentingood
condition.
•Nevertamperwithsafetydevices.
•Keepthemachinefreeofgrass,leaves,orother
debrisbuild-up.Cleanupoilorfuelspillage.Allow
themachinetocoolbeforestoring.
4
•Useextracarewhenhandlinggasolineandother
fuels.Theyareammableandvaporsareexplosive.
–Useonlyanapprovedcontainer.
–Neverremovethegascaporaddfuelwhen
theengineisrunning.Allowtheenginetocool
beforerefueling.Donotsmoke.
–Neverrefuelthemachineindoors.
–Neverstorethemachineorfuelcontainerinside
wherethereisanopename,suchasneara
waterheaterorfurnace.
–Neverllacontainerwhileitisinsideavehicle,
trunk,pick-upbed,oranysurfaceotherthanthe
ground.
–Keepcontainernozzleincontactwiththetank
duringlling.
•Stopandinspecttheequipmentifyoustrikean
object.Makeanynecessaryrepairsbeforerestarting.
•UseonlygenuineTororeplacementpartstoensure
thatoriginalstandardsaremaintained.
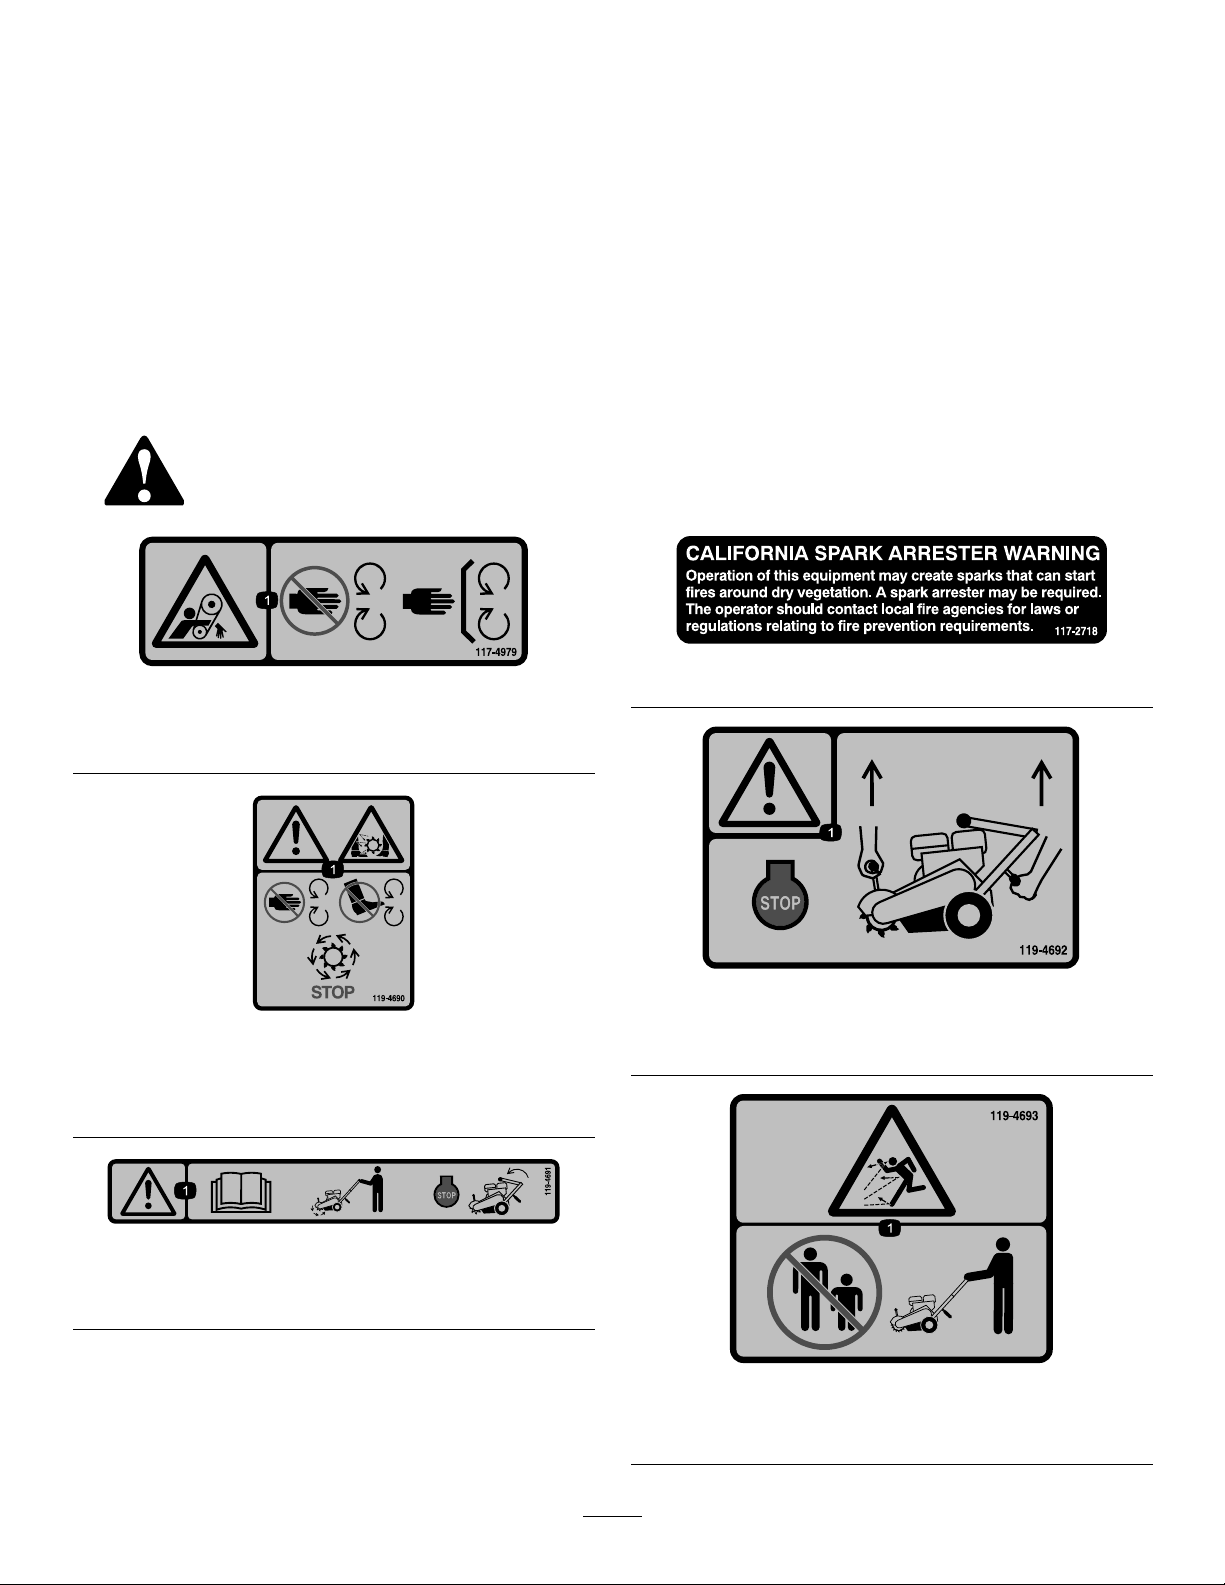
SafetyandInstructionalDecals
Safetydecalsandinstructionsareeasilyvisibletotheoperatorandarelocatednearanyareaof
potentialdanger.Replaceanydecalthatisdamagedorlost.
117–4979
1.Entanglementhazard,belt—stayawayfrommovingparts,
keepallguardsandshieldsinplace.
119-4690
1.Warning;cutting/dismembermenthazard,grinding
blade—keephandsandfeetawayfromallmovingparts,
keepallshieldsinplace;waitforallmovingpartstostop.
119-4691
1.Warning—readtheOperator’sManual;waitforgrinder
bladetostop,stoptheengineandfoldthehandle.
117–2718
119-4692
1.Warning—stoptheengine;usebothhandholdstoliftthe
grinder.
119-4693
1.Thrownobjecthazard—keepbystandersasafedistance
fromthemachine.
5

119-4722
1.Engine—run
2.Grinderblade—engage
ProductOverview
g014869
3
9
1
2
4
5
6
7
810
11
12
13
Figure3
1.Handle8.Starter
2.Throttlelever9.Cuttingwheel
3.Handlereleaseknob10.Lift
4.Airlter11.Beltcover
5.Sedimentcup12.Fuelcap
6.Fuelvalve13.Safetybail
7.Choke
Controls
Becomefamiliarwithallthecontrols(Figure3and
Figure6)beforeyoustarttheengineandoperatethe
machine.
HandleReleaseKnob
Thehandleonthismachinehasthecapabilitytobe
foldeddownforeasiertransport.Unscrewthehandle
releaseknobfromthemachine(Figure4).
6

g014871
1
Figure4
1.HandleReleaseKnob
Foldthehandledowntowardthemachineandscrewthe
handlebackontothemachine(Figure5).
g014870
Figure5
ThrottleLeverandSafetyBail
Thethrottlelevercontrolsenginespeed.Withthelever
down,inthedisengagedposition,theenginerunsat
idle.Thisisalsothestartingposition.Whenthethrottle
leverissqueezedtheenginespeedincreasesandthe
centrifugalclutchengagesandthecuttingwheelrotates.
Thesafetybailcontrolstheenginerunning.Holdthe
safetybailagainstthehandletodeactivatetheenginekill
switchsotheenginewillstart.Releasingthebailstops
theengine.
g014874
2
1
Figure6
1.Throttlelever2.Safetybail
ParkingBrake
Theparkingbrakeholdstheleftwheelfromturning
tosecurethemachineandforeasymovementofthe
machinefromsidetosidewhengrindingthestump.
g014872
Figure7
1.Engagedbrake
7

g014873
Figure8
1.DisengagedBrake
Specications
Note:Specicationsanddesignaresubjecttochange
withoutnotice.
CuttingDepthApprox12inches(30.48cm)
Length50inches(127cm)
Width22inches(56cm)
Height42inches(107cm)
Weight103lbs(47Kg)
Attachments/Accessories
AselectionofToroapprovedattachmentsand
accessoriesareavailableforusewiththemachineto
enhanceandexpanditscapabilities.Contactyour
AuthorizedServiceDealerorDistributororgoto
www.Toro.comforalistofallapprovedattachments
andaccessories.
8

Operation
Note:Determinetheleftandrightsidesofthe
machinefromthenormaloperatingposition.
Important:Beforeoperating,checkthefueland
oillevel,andremovedebrisfromthemachine.
Also,ensurethattheareaisclearofpeopleand
debris.Youshouldalsoknowandhavemarkedthe
locationsofallutilitylines.
BeforeyouStart
•Digawaytheearthandremoveanystonesnear
thetreestumpthatmayinterferewithyourwork.
Checkthatthegroundisfreeofforeignobjects,
suchaselectricalcables,barbedwire,etc.
•Cutortrimthestumpusingapowersaw.
•Reviewallthemachine’ssafetydecals.
•Useahard-hat,hearing,andeyeprotection.A
meshvisoralonedoesnotprovidesufcienteye
protection;supplementwithprotectiveglasses.
•Ensurethatyouarefamiliarwithsafetyregulations
andshutdownproceduresdescribedinthe
Operator’sManual.
•Ensurethatallguardsareinplaceandingood
condition.
•Ensurethatthebladesandcuttersareinplaceand
ingoodcondition.
•Ensurethattheworkarea,cutter,andstumpin
particulararefreefrommetallicobjectssuchas
wire,nails,etc.thatcouldbethrownoutandinjure
personsinthevicinityanddamagetheequipment.
•Ensurethateveryone,includingchildrenand
animals,maintainadistanceofatleast50feet(15
m)fromthemachine.Debriscanbethrownout
andinjurepeopleandanimals.
AddingFuel
Useunleadedgasoline(87pumpoctaneminimum).
Leaded,regulargasolinemaybeusedifunleadedisnot
available.
DANGER
Incertainconditions,gasolineisextremely
ammableandhighlyexplosive.Areorexplosion
fromgasolinecanburnyouandothersandcan
damageproperty.
•Fillthefueltankoutdoors,inanopenarea,
whentheengineiscold.Wipeupanygasoline
thatspills.
•Neverllthefueltankinsideanenclosedtrailer.
•Donotllthefueltankcompletelyfull.Add
gasolinetothefueltankuntilthelevelis1/4to
1/2inch(6to13mm)belowthebottomofthe
llerneck.Thisemptyspaceinthetankallows
gasolinetoexpand.
•Neversmokewhenhandlinggasoline,andstay
awayfromanopenameorwheregasoline
fumesmaybeignitedbyaspark.
•Storegasolineinanapprovedcontainerand
keepitoutofthereachofchildren.Neverbuy
morethana30-daysupplyofgasoline.
•Donotoperatewithoutentireexhaustsystem
inplaceandinproperworkingcondition.
DANGER
Incertainconditionsduringfueling,static
electricitycanbereleasedcausingasparkwhich
canignitethegasolinevapors.Areorexplosion
fromgasolinecanburnyouandothersandcan
damageproperty.
•Alwaysplacegasolinecontainersontheground
awayfromyourvehiclebeforelling.
•Donotllgasolinecontainersinsideavehicle
oronatruckortrailerbedbecauseinterior
carpetsorplastictruckbedlinersmayinsulate
thecontainerandslowthelossofanystatic
charge.
•Whenpractical,removegas-powered
equipmentfromthetruckortrailerandrefuel
theequipmentwithitswheelsontheground.
•Ifthisisnotpossible,thenrefuelsuch
equipmentonatruckortrailerfromaportable
container,ratherthanfromagasolinedispenser
nozzle.
•Ifagasolinedispensernozzlemustbeused,
keepthenozzleincontactwiththerimofthe
fueltankorcontaineropeningatalltimesuntil
fuelingiscomplete.
Important:Donotusemethanol,gasoline
containingmethanol,orgasoholcontainingmore
9

than10%ethanolbecausethefuelsystemcouldbe
damaged.Donotmixoilwithgasoline.
UsingStabilizer/Conditioner
Useafuelstabilizer/conditionerinthemachineto
providethefollowingbenets:
•Keepsgasolinefreshduringstorageof90daysor
less.Forlongerstorageitisrecommendedthatthe
fueltankbedrained.
•Cleanstheenginewhileitruns.
•Eliminatesgum-likevarnishbuildupinthefuel
system,whichcauseshardstarting.
Important:Donotusefueladditivescontaining
methanolorethanol.
Addthecorrectamountofgasstabilizer/conditioner
tothegas.
Note:Afuelstabilizer/conditionerismosteffective
whenmixedwithfreshgasoline.Tominimizethe
chanceofvarnishdepositsinthefuelsystem,usefuel
stabilizeratalltimes.
FillingtheFuelTank
1.Parkthemachineonalevelsurface,lowerthe
grinder,andstoptheengine.
2.Allowtheenginetocool.
3.Cleanaroundthefueltankcapandremoveit
(Figure9).
Figure9
viewmayvarydependingonmodel
1.Fueltankcap
4.Addunleadedgasolinetothefueltank,untilthe
levelis1/4to1/2inchbelowthebottomofthe
llerneck.
Important:Thisspaceinthetankallows
gasolinetoexpand.Donotllthefueltank
completelyfull.
5.Installthefueltankcapsecurely.
6.Wipeupanygasolinethatmayhavespilled.
CheckingtheEngineOilLevel
ServiceInterval:Beforeeachuseordaily
1.Tiltthemachinesotheengineislevel,andstop
theengine.
2.Allowtheenginetocool.
3.Cleanaroundtheoildipstick.
4.Removethedipstickandwipetheendclean.
5.Slidethedipstickfullyintothedipsticktubewithout
threadingitintothellerneck.
6.Pullthedipstickoutandlookattheend.The
oilshouldbetothetopoftheupperlimitrange
(Figure10).
Figure10
1.Oildipstick
Important:Runningtheenginewithlowoil
levelcancauseenginedamage.Thistypeof
damageisnotcoveredbywarranty.
Theengineisequippedwithanoilalertsystem
thatwillautomaticallystoptheenginebefore
theoillevelfallsbelowthesafelimit.
7.Iftheoillevelislow,slowlypouronlyenoughoil
intothecrankcasetoraisetheleveltotheupper
limit.
10

Important:Donotoverllthecrankcasewith
oilbecausetheenginemaybedamaged.
8.Replacethedipstick.
StartingandStoppingthe
Engine
StartingtheEngine
1.MovethefuelvalvetotheOpenposition,allthe
waytotheright.
2.MovethechokeleverlefttotheOnpositionifyou
arestartingacoldengine.
Note:Awarmorhotenginemaynotrequire
choking.
3.Holdthesafetybailagainstthehandleandpushthe
handledownenoughtoraisethecuttingwheeloff
theground.
4.Pullthestarterhandlelightlyuntilyoufeel
resistance,thenpullthehandlebriskly.Returnthe
starterhandlegently.
5.Aftertheenginestarts,graduallymovethechoke
leverbacktotheOffposition.Iftheenginestallsor
hesitates,movethechokebacktoOnagainuntilthe
enginewarmsup.ThenmoveittotheOffposition.
6.Holdthethrottleleveragainstthehandletorotate
thecuttingwheel.
StoppingtheEngine
1.Releaseyourhandfromthethrottlelever.
Note:Iftheenginehasbeenworkinghardoris
hot,letitrunforaminutebeforereleasingthe
safetybail.Thishelpstocooltheenginebefore
stopping.Inanemergency,theenginemaybe
stoppedimmediately.
2.Releasethesafetybailtostoptheengine.
3.MovethefuelvalvetotheClosedposition,allthe
waytotheleft.
GrindingaStump
Placethemachineintopositionwiththecuttingwheel
nearthefront-topedgeofthestump.
DANGER
Themachinewillcutandamputatehandsandfeet.
•Stayintheoperator’spositionwhilethe
machineisrunningandkeepawayfromthe
cuttingwheel.
•Keepallbystandersasafedistancefromthe
machine.
•Stopthemachineimmediatelyifanypeopleor
animalsentertheworkarea.
WARNING
Grindingastumpwillthrowwoodchips,soil,and
otherdebrisintotheairwhichcouldinjureyouor
bystanders.
•Alwaysweareyeprotectionwhenusingthe
machine.
•Keepallbystandersasafedistancefromthe
machine.
WARNING
Alwayswearhearingprotectionwhenusingthe
machine.
1.Releasethethrottlesothatitisindisengaged
position.
2.Starttheengine;referto
StartingtheEngine(page11).
3.Allowenginetowarmupatidlefortwominutes.
4.Pushthehandledownenoughtoraisethecutting
wheelofftheground.
5.Holdthethrottleagainstthehandlesothatitisin
engagedposition,thiswillengagethecentrifugal
clutchandthecuttingwheelrotates.
6.Movethemachinetothefrontofthestumpandset
theparkingbrake.
7.Swingthecuttingwheeltooneside,thenlowerit
approximately1/2inchto1inchintothefront-top
cornerofthestump.Swingthecuttingwheelback
andforth,loweringthecuttingwheelapproximately
1/2inchto1inchbeforeeachsweep,untilyouhave
removedthefrontportionofthestumptoground
level(Figure11).
11
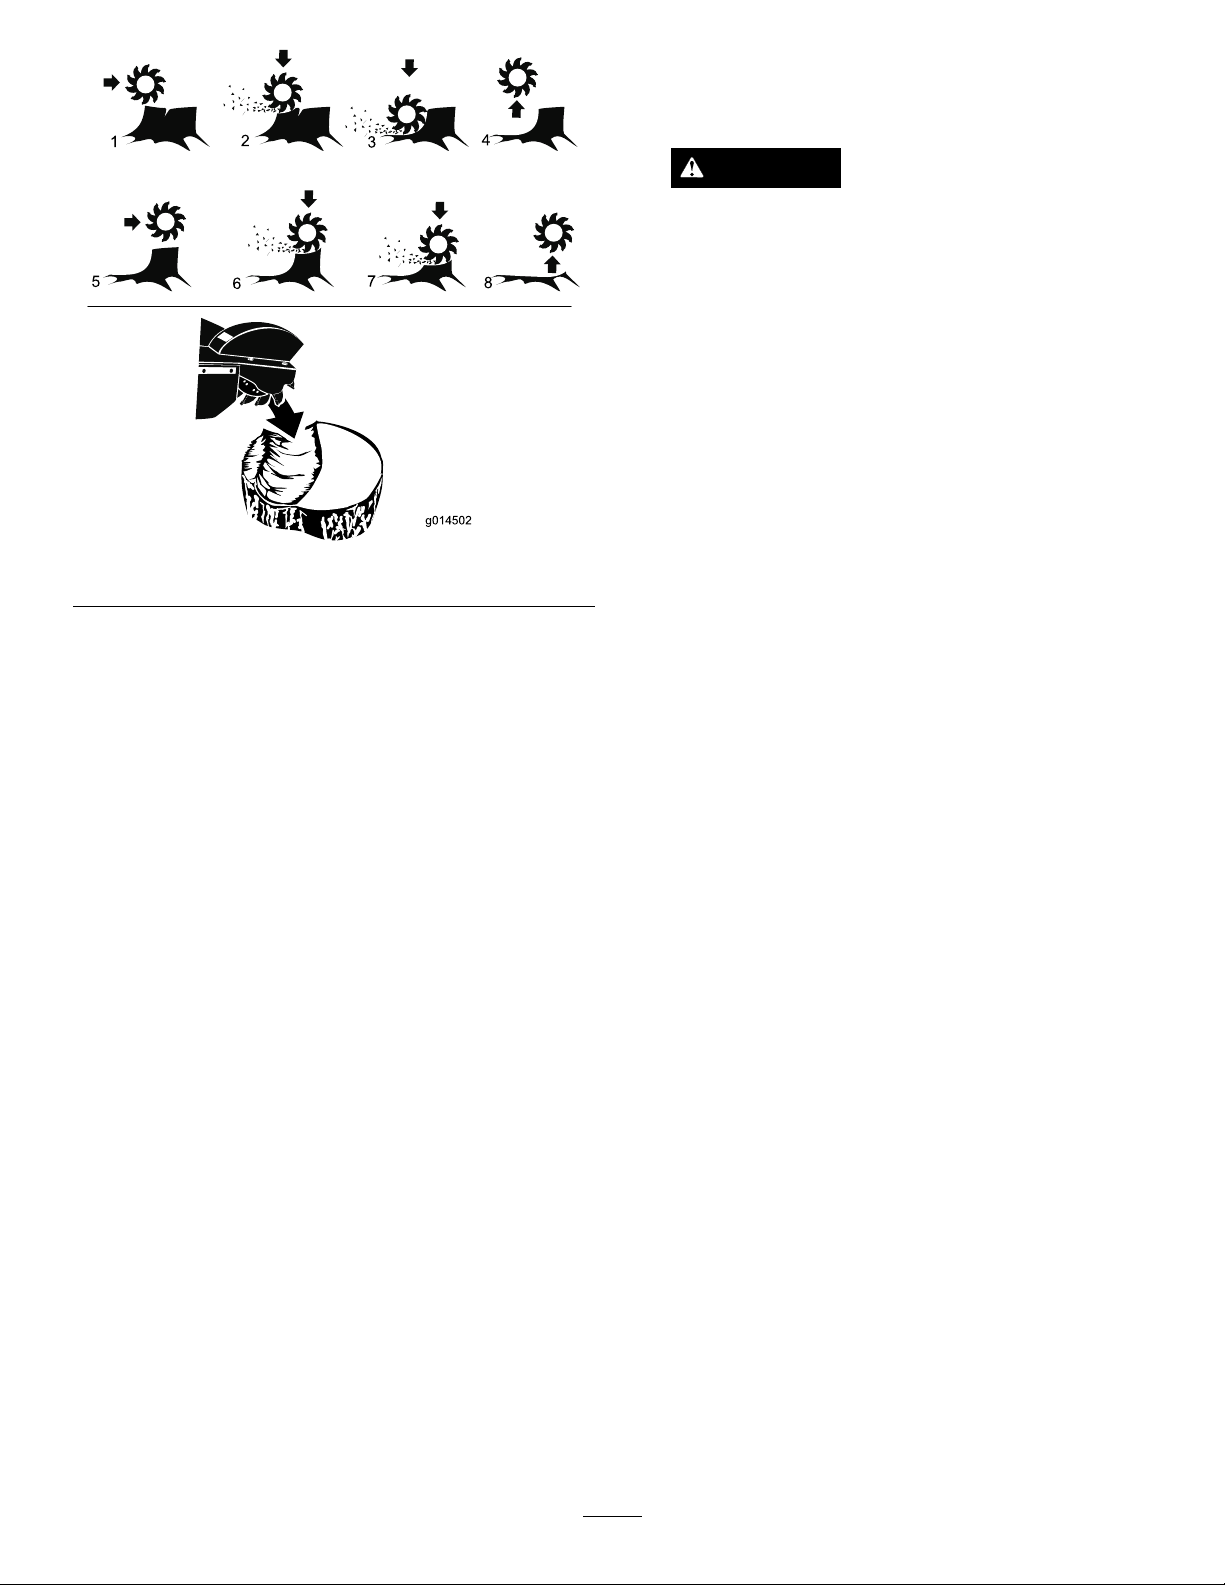
g014502
1234
568
7
Figure11
8.Raisethecuttingwheeluntilcenterofcuttingwheel
isjustabovetopofthestump.
9.Withthecuttingwheelofftooneside,releasethe
parkingbrakeandadvancethemachineforward,
resettheparkingbrake.
10.Continuesweepingandcuttingwheelleftandright
acrossstump,advancingthemachinebeforeeach
sweep,cutting1/2inchto1inchdepthofcutwith
eachsweep.
11.Continuecuttinguntilthetoplevelofstumpisall
removed,makingsurenottocutstumpdeeperthan
groundlevelduringthisrststage.
12.Releasethethrottlesothatitisindisengaged
position,pushthehandledownenoughtoraisethe
cuttingwheelofftheground.Waittensecondsfor
thecuttingwheeltostoprotatingthenreleasethe
brakeandpullthemachineawayfromthestump.
13.Pullthemachineawayfromthestumpandrakethe
chipsawayfromthestump.
14.Movethemachinetothefrontofthestumpandset
theparkingbrake.
15.Holdthethrottleagainstthehandlesothatitisin
engagedposition,thiswillengagethecentrifugal
clutchandthecuttingwheelrotates.
16.Continuecuttinguntilbyrepeatingstep10again
andagainuntilthelevelofstumpisdeeperthan
groundlevelasdesired.
17.Stopthemachine;referto
StoppingtheEngine(page11).
Note:DoNotletthefrontoftheunittouchthe
grounduntilyouaresurethecuttingwheelhas
stoppedturning.
DANGER
Arotatingcuttingwheelisverydangerousand
cancutandamputatehandsandfeet.
Stayattheoperatingpositionandbesurethat
thecuttingwheelhascometoacompletestop
beforedoinganythingelse.
12
Maintenance
Note:Determinetheleftandrightsidesofthemachinefromthenormaloperatingposition.
Important:Themachinemaybetippedbackward
oronitssidetofacilitateaccessforcleaningor
service,butnolongerthan2minutes.Ifthe
machineisheldinthispositionfortoolong,the
enginecanbedamagedbygasolinedraininginto
thecrankcase.Shouldthishappen,performan
extraoilchangeontheengine.Thenturnthe
engineoverafewrevolutionswiththestarterhandle
beforestartingtheengineagain.
RecommendedMaintenanceSchedule(s)
MaintenanceService
IntervalMaintenanceProcedure
Aftertherst25hours•Changetheoil.
Beforeeachuseordaily
•Checktheengineoillevel.
•Greasethemachine.
•Checktheairlter.
•Checkthecuttingwheelblades.
•Removedebrisfromthemachine.
Every25hours•Checkthedrivebelttension.
Every50hours•Servicetheairlter.
Every100hours
•Changetheoil.
•Cleanthesedimentcup.
•Checkthesparkplugs.
Every200hours•Replacetheairlter.
Yearlyorbeforestorage•Changetheoil.
•Cleanthesedimentcup.
Important:Refertoyour
Engine Operator’ s Man ual
foradditionalmaintenanceprocedures.
Lubrication
GreasingtheMachine
ServiceInterval:Beforeeachuseordaily
GreaseType:General-purposegrease.
1.Cleanthegreasettingswitharag.
2.Connectagreaseguntoeachtting.
3.Lubricatetwottings,oneoneachcuttingwheel
bearing.
Figure12
13

4.Pumpgreaseintothettingsuntilgreasebeginsto
oozeoutofthebearings(approximately3pumps).
5.Wipeupanyexcessgrease.
Important:Pumpgreaseinslowlyandcarefully
topreventdamagetothebearingseals.
EngineMaintenance
ServicingtheAirCleaner
ServiceInterval:Beforeeachuseordaily
Thecycloneairltercollectsthelargestcontaminant
particles,whichcollectinthecontainer.Whenyoucan
seealayerofdirtatthebottomofthecontainer,clean
thecyclonehousing,airchannels,andairintakescreen.
ServicingtheCycloneAirFilter
ServiceInterval:Every50hours
1.Removethe3screwsholdingthecyclonehousing.
2.Removethehousingwiththeairintakescreenand
removetheairchannels.
Figure13
1.Cyclonehousing3.Airchannels
2.Screw4.Cyclonehousingwithair
intakescreen
Note:Theairchannelsmayremainintheupper
portionorfollowalongwiththehousingwhen
removed.
3.Cleanthecomponents.Usewater,detergentanda
brush.Drycarefully.
4.Placetheairchannelsinthecyclonehousing.
5.Insertcyclonehousingintopositionandmakesure
ittsintheupperportion.Donotuseforce;alignit
inplacebeforettingthescrews.
ReplacingtheAirFilter
ServiceInterval:Every200hours
Iftheengineislowonpower,producesblacksmokeor
runsunevenly,theairltermaybeclogged.
1.Removethewingnutandliftoffthecyclonelter
withtheairltercowling(Figure14).
14
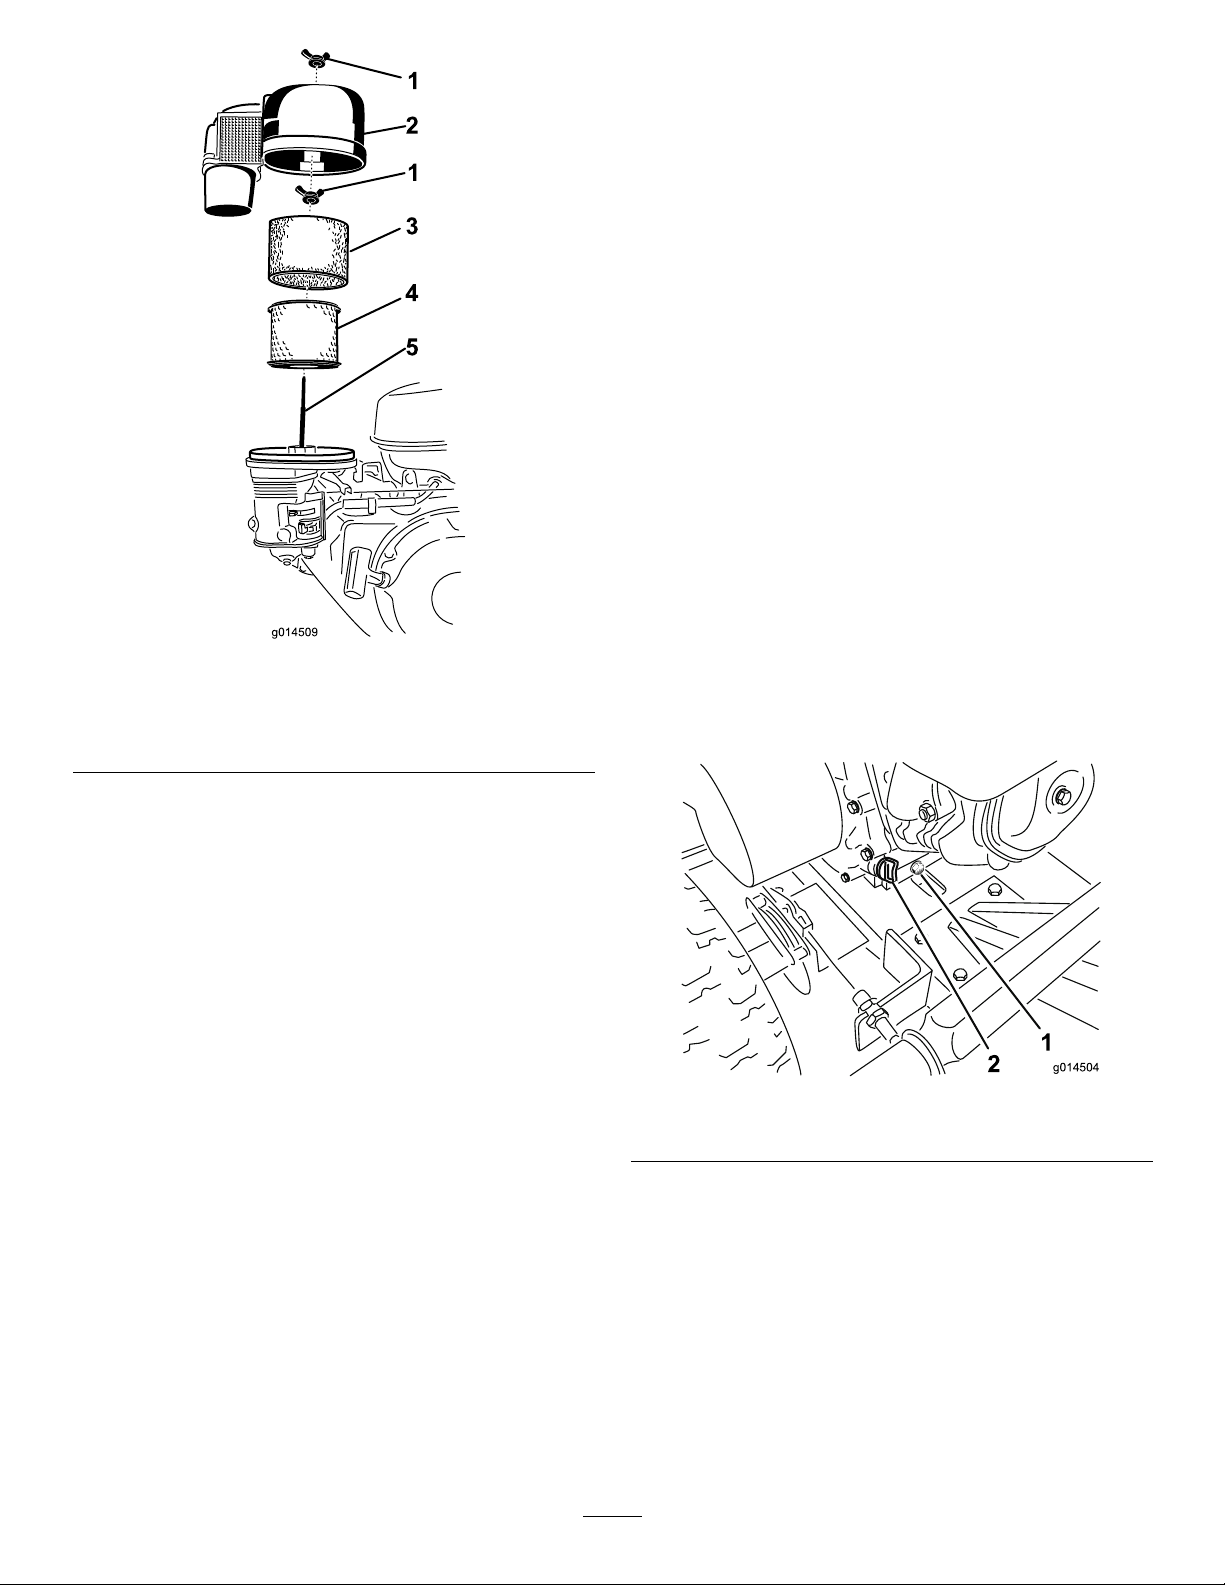
Figure14
1.Wingnut4.Airlter
2.Cycloneairlter5.Stud
3.Foampre-lter
2.Removethefoampre-lterandcleanitasfollows
A.Washthepre-lterusingamilddetergentand
water.
B.Squeezeitdrywithacleancloth.
C.Soakitwithnewengineoil.
D.Gentlywindthelterinanabsorbentclothand
squeezeoutexcessoil.
3.Removethewingnutontopoftheairlterand
removethepaperlter.
4.Tapthepaperlteragainstaxedsurfacetoremove
dust.Ifthepaperlterisstilldirtyordamaged,
replaceit.Thepaperltershouldbereplacedevery
200hours.
Important:Donotusecompressedairtoblow
outthepaperelement,thiscandamageit.
5.Mountthepaperlterintheairlterhousingand
secureitwiththewingnut.
6.Positionthefoampre-lteroverthepaperlter.
7.Installthecyclonelterwiththeairltercoverand
secureitwiththewingnut.
ServicingtheEngineOil
Note:Changetheoilmorefrequentlywhenthe
operatingconditionsareextremelydustyorsandy.
OilType:DetergentoilwithanAPIserviceofSJor
higher.
CrankcaseCapacity:.63qt(.6liters)
Viscosity:SAE10W-30isrecommendedforgeneral
use.
ChangingtheEngineOil
ServiceInterval:Aftertherst25hours
Every100hours
Yearlyorbeforestorage
1.Starttheengineandletitrunveminutes.This
warmstheoilsoitdrainsbetter.
2.Parkthemachinesothatthedrainsideisslightly
lowerthantheoppositesidetoensurethattheoil
drainscompletely.
3.Settheparkingbrakeandstoptheengine.
4.Placeapanundertheoildrainhole.
5.Removethedrainpluganddraintheoilthroughthe
holeslotintheframe(Figure15).
g014504
1
2
Figure15
1.Oildrainhole2.Oilllcap
6.Whentheoilhasdrainedcompletely,installtheplug
andwipeupanyspilledoil.
Note:Disposeoftheusedoilatacertiedrecycling
center.
7.Removetheoilllcapandslowlypourapproximately
80percentofthespeciedamountofoilintothe
engine(Figure15).
8.Slowlyaddadditionaloiltobringtheoilleveltothe
upperlimitmarkonthedipstick.Referto(page).
9.Installtheoilllcap.
15

CleaningtheSedimentCup
ServiceInterval:Every100hours
Yearlyorbeforestorage
Underneaththefuelvalveisasedimentcuptocatch
dirtinthefuel.
1.MovethefuelvalvetotheOffposition,alltheway
totheleft.
2.Unscrewthesedimentcup.Makesurenotto
misplacetheo-ring(Figure16).
Figure16
1.Sedimentcup2.O-Ring
3.Cleanthereservoirandtheo-ringusingacleaning
solventanddrycarefully.
Note:Makesurenottomisplacetheo-ring.
4.Puttheo-ringinplaceinthegrooveofthecupand
replacethesedimentcup.
5.TurnthefuelvalvetotheOnposition,alltheway
totheright,andcheckforleaks.Ifitleaks,replace
theo-ring.
ServicingtheSparkPlug
ServiceInterval:Every100hours—Checkthespark
plugs.
Ensurethattheairgapbetweenthecenterandside
electrodesiscorrectbeforeinstallingthesparkplug.
Useasparkplugwrenchforremovingandinstallingthe
sparkplugandagappingtool/feelergaugetocheckand
adjusttheairgap.Installanewsparkplugifnecessary.
Type:BPR6ES(NKG)orequivalent
AirGap:0.28–0.031inch(0.70-0.80mm)
RemovingtheSparkPlug
1.Lowerthegrinderandstopthemachine;Referto
StoppingtheEngine(page11).
2.Pullthewireoffofthesparkplug(Figure17).
Figure17
1.Sparkplug2.Wire
3.Cleanaroundthesparkplug.
4.Removethesparkplugandthemetalwasher.
16
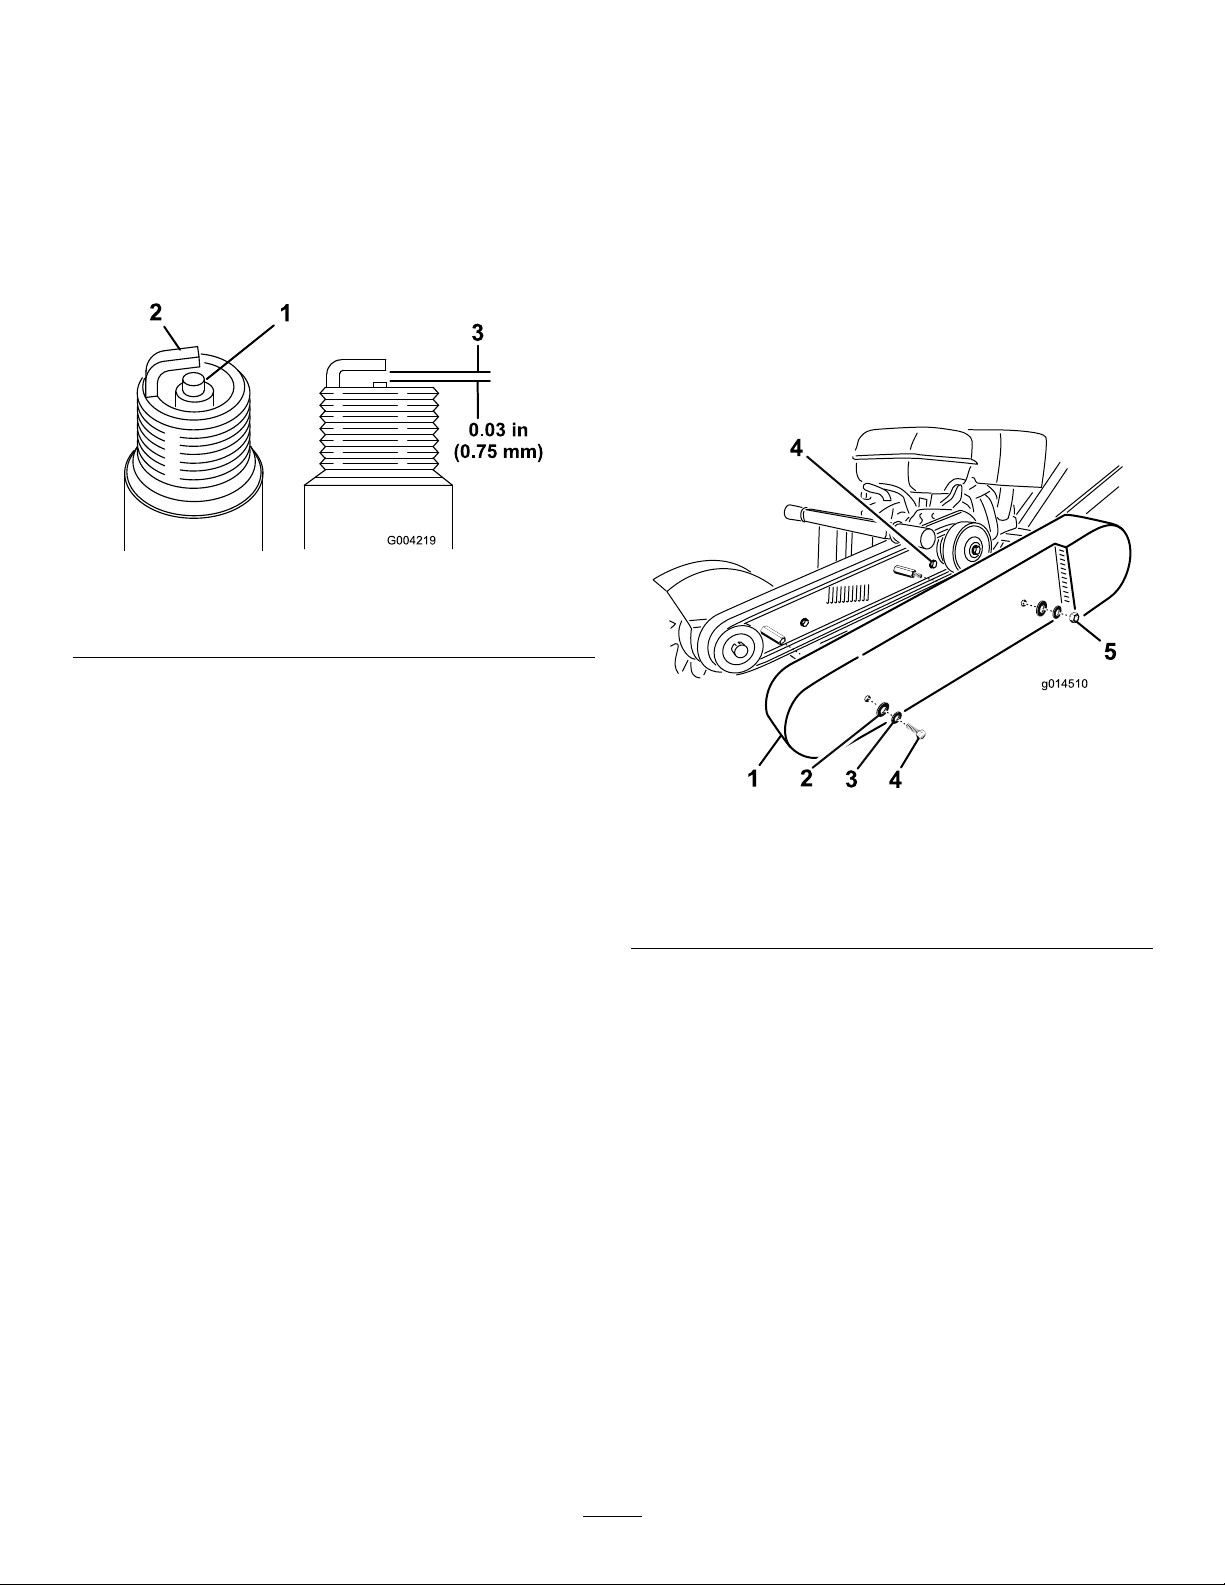
CheckingtheSparkPlug
1.Lookatthecenterofthesparkplug(Figure18).
Ifyouseelightbrownorgrayontheinsulator,the
engineisoperatingproperly.Ablackcoatingonthe
insulatorusuallymeansthattheaircleanerisdirty.
Important:NeverCleanthesparkplug.Always
replacethesparkplugwhenithasablack
coating,wornelectrodes,anoilylm,orcracks.
Figure18
1.Centerelectrodeinsulator3.Airgap(nottoscale)
2.Sideelectrode
2.Checkthegapbetweenthecenterandsideelectrodes
(Figure18).Bendthesideelectrode(Figure18)if
thegapisnotcorrect.
InstallingtheSparkPlug
1.Threadthesparkplugintothesparkplughole.
2.Tightenthesparkplugto20ft-lb(27N-m).
3.Pushthewireontothesparkplug.
BeltMaintenance
CheckingtheDriveBelt
Tension
ServiceInterval:Every25hours
Note:Replacethebeltifitshowsanysignsofwear,
cracks,ordamage.
1.Shutofftheengineandwaitforallrotatingparts
tostop.
2.Removebeltguardretainingscrews(Figure19).
g014510
1234
5
4
Figure19
viewmayvarydependingonmodel
1.Beltguard4.Bolt
2.Lockwasher5.Nut
3.Washer
3.Tocheckbelttension,gentlysqueezethebeltspans
together.Youshouldbeabletopushthebeltdown
about1/4–3/8inch(6–10mm)fromtheoriginal
position.
Important:Toextendthebeltlife,propertension
mustbemaintained.Aloosebeltwillcause
excessivecuttingwheelslippageandearlybelt
failure.Abeltthatistootightcancausebearing
andshaftfailure,andrapidbeltwear.
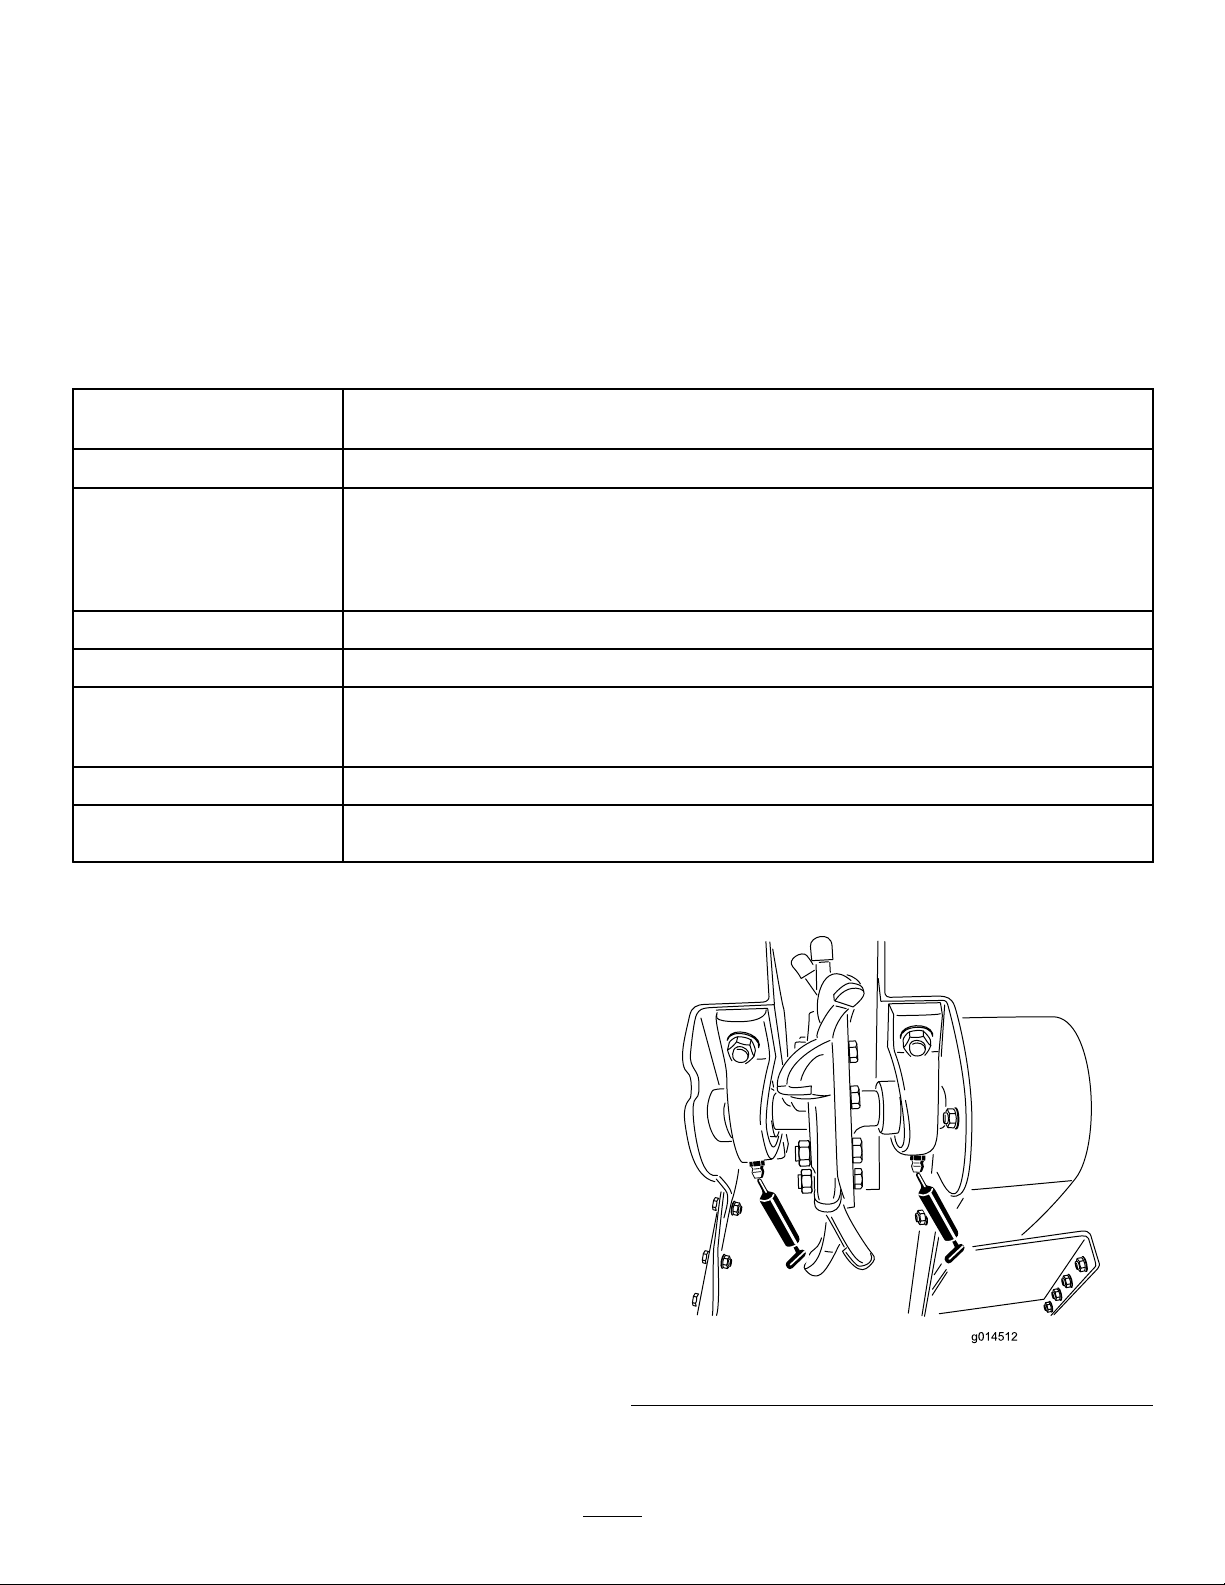
AdjustingtheDriveBelt
1.Removethebeltguard.
2.Loosenthe4enginemountingbolts,andjamnuts
holdingtheadjustmentbolt(Figure20).
17

Figure20
1.Bolt3.Enginemountbolt
2.JamNut
3.Turnsquareheadadjustingboltontheframe
clockwisetotightenthebelt,counterclockwiseto
loosenthebelt
Important:Important:Makesuretotighten
alltheengineboltsafterproperbeltadjustment
isachieved.
4.Installthebeltguardandsecurewithpreviously
removedhardware.
GrinderMaintenance
CheckingtheCuttingWheel
Blades
ServiceInterval:Beforeeachuseordaily
Amongthemostcriticalelementsofthemachineisthe
cuttingwheelblades.Theyarealsothemostsubjectto
damageandwear.Inthecourseofgrindingstumps
theynotonlymakecontactwiththewood,buttheyalso
encounternumerousabrasivesandobjects,suchasdirt,
stones,andoccasionallyalargerockorburiedscrap.
Thewearandlossofcuttingteethcansignicantly
impairtheefciencyandperformanceofthemachine.
Therefore,itisimportanttomakefrequentchecksof
theconditionofallofthecuttingteethandreplaceany
damagedorwornbladesections(Figure21).
Figure21
ReplacingtheCuttingWheel
Blades
1.Cleanalldirtfromthecuttingwheelandmounting
anges.
2.Removethetwoboltsthatholdeachcuttingblade
section.Usecarenottoletasectiondropandchip
whentheybecomeloose(Figure22).
18

Figure22
3.Checkeachsectionforcracks.Replaceablade
sectionifitiscrackedorhasmissingorwornteeth.
Note:Whenreplacingcuttingwheelbladesections,
makesurebladesectionisplacedincorrect
alignmentwithbladerotation.
4.Insertthebladesectionbetweentheblademounting
anges(Figure22),andsecurethemwith2bolts,
lockwashers,andnuts.
5.Torquethefastenersto27–33ft-lb(37–45N-m).
Cleaning
RemovingDebrisfromthe
Machine
Regularcleaningandwashingwillincreasethelifespan
ofthemachine.Cleanthemachinedirectlyafteruse,
beforethedirthardens.
Checkbeforecleaningthatthefueltankcapisproperly
inplacetoavoidgettingwaterinthetank.
Usecarewhenusingahigh-pressuresprayerbecauseit
candamagewarningdecals,instructionsigns,andthe
engine
Important:Lubricatethecuttingwheelblade
bearingsaftercleaning.
19

Storage
Forstorageover30days,preparetheunitasfollows:
1.Removedirtandgrimefromtheexternalpartsof
theentireunit,especiallytheengine.Cleandirt
andsawdustchipsfromtheoutsideoftheengine
cylinderheadnsandblowerhousing.
Important:Youcanwashtheunitwithmild
detergentandwater.
2.Addapetroleumbasedstabilizer/conditionerto
fuelinthetank.Followmixinginstructionsfrom
stabilizermanufacturer.(1oz.perUSgallon).Do
notuseanalcoholbasedstabilizer(ethanolor
methanol).
Note:Fuelstabilizer/conditionerismosteffective
whenmixedwithfreshgasolineandusedatalltimes.
Important:Donotstorestabilizer/conditioned
gasolineover90days.
3.Runtheenginetodistributeconditionedfuel
throughthefuelsystem(5minutes).
4.Stoptheengine,allowittocool,anddrainthefuel
tankusingapumptypesiphon.Disposeoffuel
properly;recycleasperlocalcodes.
5.Starttheengineandrunituntilitstops.
6.Choketheengine.
7.Startandruntheengineuntilitwillnotstartagain.
8.Cleanthesedimentcup;referto
CleaningtheSedimentCup(page16).
9.Servicetheaircleaner;referto
ServicingtheCycloneAirFilter(page14)
and,ReplacingtheAirFilter(page14).
10.Changetheenginecrankcaseoil;referto(page).
11.Removethesparkplugandcheckthecondition;
referto(page).
12.Withthesparkplugremovedfromtheengine,pour
twotablespoonsofengineoilintothesparkplug
hole.
13.Pullthestarterslowlytocranktheengineand
distributetheoilinsidethecylinder.
14.Installthesparkplug,butdonotinstallthewireon
thesparkplug.
15.Greasethecutterwheelbearings;referto
GreasingtheMachine(page13).
16.Checkandtightenallbolts,nuts,andscrews.Repair
orreplaceanypartthatisdamaged.
17.Paintallscratchedorbaremetalsurfaces.Paintis
availablefromyourAuthorizedServiceDealer.
18.Storetheunitinaclean,drygarageorstoragearea.
19.Covertheunittoprotectitandkeepitclean.
20
Table of contents
Languages:
Other Toro Grinder manuals


Popular Grinder manuals by other brands

Hitachi
Hitachi G 18SS Handling instructions

La San Marco
La San Marco SM 92 INSTANT Original instructions

Bosch
Bosch Professional GWS 670 Original instructions

Dynabrade
Dynabrade 48201 Safety, operation and maintenance manual

Narex
Narex EBU 18-25 Original operating manual

DeWalt
DeWalt DWE4011 instruction manual


