Toro 22615G User manual

FormNo.3421-245RevB
SGR-13StumpGrinder
ModelNo.22615—SerialNo.402000000andUp
ModelNo.22615G—SerialNo.402000000andUp
ModelNo.22615HD—SerialNo.402000000andUp
Registeratwww.Toro.com.
OriginalInstructions(EN)*3421-245*B
WARNING
CALIFORNIA
Proposition65Warning
Thisproductcontainsachemical
orchemicalsknowntotheStateof
Californiatocausecancer,birthdefects,
orreproductiveharm.
Theengineexhaustfromthisproduct
containschemicalsknowntotheStateof
Californiatocausecancer,birthdefects,
orotherreproductiveharm.
DANGER
Theremaybeburiedutilitylinesinthework
area.Diggingintothemmaycauseashock
oranexplosion.
Havethepropertyorworkareamarkedfor
buriedlinesanddonotdiginmarkedareas.
Contactyourlocalmarkingserviceorutility
companytohavethepropertymarked(for
example,intheUnitedStates,call811forthe
nationwidemarkingservice).
ItisaviolationofCaliforniaPublicResourceCode
Section4442or4443touseoroperatetheengineon
anyforest-covered,brush-covered,orgrass-covered
landunlesstheengineisequippedwithaspark
arrester,asdenedinSection4442,maintainedin
effectiveworkingorderortheengineisconstructed,
equipped,andmaintainedforthepreventionofre.
Theenclosedengineowner'smanualissupplied
forinformationregardingtheUSEnvironmental
ProtectionAgency(EPA)andtheCaliforniaEmission
ControlRegulationofemissionsystems,maintenance,
andwarranty.Replacementsmaybeorderedthrough
theenginemanufacturer.
Introduction
Thismachineisdesignedtogrindandremovetree
stumpsandsurfaceroots.Itisnotintendedtocut
rockoranyothermaterialotherthanwoodandthe
soilaroundastump.
Readthisinformationcarefullytolearnhowtooperate
andmaintainyourproductproperlyandtoavoid
injuryandproductdamage.Youareresponsiblefor
operatingtheproductproperlyandsafely.
YoumaycontactTorodirectlyatwww.Toro.com
forproductsafetyandoperationtrainingmaterials,
accessoryinformation,helpndingadealer,orto
registeryourproduct.
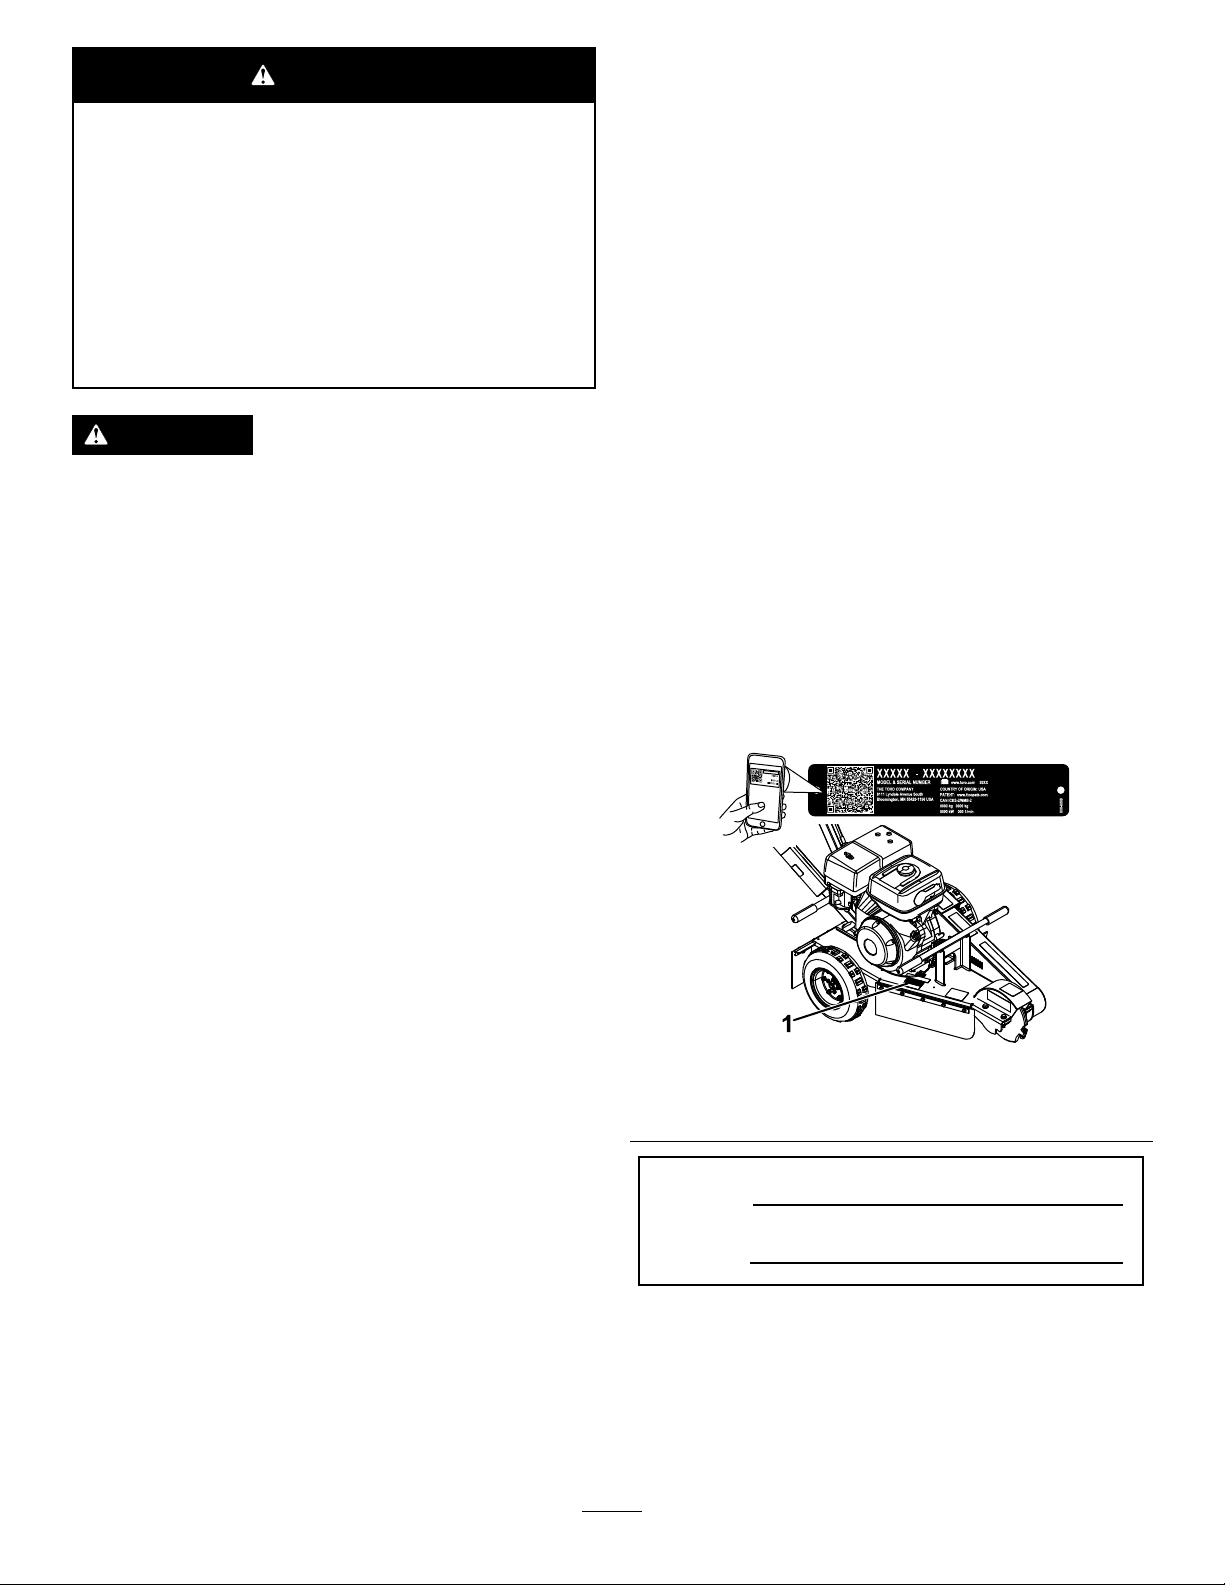
Wheneveryouneedservice,genuineToroparts,or
additionalinformation,contactanAuthorizedService
DealerorToroCustomerServiceandhavethemodel
andserialnumbersofyourproductready.Figure
1illustratesthelocationofthemodelandserial
numbersontheproduct.Writethenumbersinthe
spaceprovided.
Important:Withyourmobiledevice,youcan
scantheQRcodeontheserialnumberdecal(if
equipped)toaccesswarranty,parts,andother
productinformation.
g241653
Figure1
1.Modelandserialnumberplate
ModelNo.
SerialNo.
Thismanualidentiespotentialhazardsandhas
safetymessagesidentiedbythesafety-alertsymbol
(Figure2),whichsignalsahazardthatmaycause
seriousinjuryordeathifyoudonotfollowthe
recommendedprecautions.
©2018—TheToro®Company
8111LyndaleAvenueSouth
Bloomington,MN554202
Contactusatwww.Toro.com.
PrintedintheUSA
AllRightsReserved

g000502
Figure2
1.Safety-alertsymbol
Thismanualuses2wordstohighlightinformation.
Importantcallsattentiontospecialmechanical
informationandNoteemphasizesgeneralinformation
worthyofspecialattention.
Contents
Safety.......................................................................3
SafeOperatingPractices....................................3
SafetyandInstructionalDecals..........................5
ProductOverview.....................................................7
Controls.............................................................7
Specications....................................................8
Operation..................................................................8
BeforeyouStart..................................................8
ThinkSafetyFirst................................................8
AddingFuel........................................................9
PerformingDailyMaintenance..........................10
StartingtheEngine...........................................10
ShuttingOfftheEngine.....................................10
GrindingaStump...............................................11
LiftingtheMachine...........................................12
Maintenance...........................................................13
RecommendedMaintenanceSchedule(s)...........13
Lubrication..........................................................13
GreasingtheMachine.......................................13
EngineMaintenance...........................................14
ServicingtheAirCleaner..................................14
ServicingtheEngineOil....................................15
ServicingtheSparkPlug...................................17
FuelSystemMaintenance...................................18
CleaningtheSedimentCup..............................18
CoolingSystemMaintenance..............................19
CleaningtheEngineScreen.............................19
BrakeMaintenance.............................................19
AdjustingtheParkingBrake..............................19
BeltMaintenance................................................20
AdjustingtheDrive-BeltTension.......................20
ReplacingtheDriveBelt...................................21
GrinderMaintenance............................................22
ReplacingtheTeeth..........................................22
Cleaning..............................................................23
RemovingDebrisfromtheMachine..................23
Storage...................................................................24
Troubleshooting......................................................25
Safety
Improperuseormaintenancebytheoperatoror
ownercanresultininjury.Toreducethepotential
forinjury,complywiththesesafetyinstructions
andalwayspayattentiontothesafetyalert
symbol,whichmeans:Caution,Warning,or
Danger—personalsafetyinstruction.Failureto
complywiththeinstructionmayresultinpersonal
injuryordeath.
SafeOperatingPractices
Thisproductiscapableofamputatinghandsandfeet.
Alwaysfollowallsafetyinstructionstoavoidserious
injuryordeath.
WARNING
Engineexhaustcontainscarbonmonoxide,
anodorlesspoisonthatisfatalifinhaled.
Donotruntheengineindoorsorinan
enclosedarea.
Training
•ReadtheOperator'sManualandothertraining
material.Iftheoperator(s)ormechanic(s)cannot
readEnglish,itistheowner'sresponsibilityto
explainthismaterialtothem.
•Becomefamiliarwiththesafeoperationofthe
equipment,operatorcontrols,andsafetysigns.
•Alloperatorsandmechanicsshouldbetrained.
Theownerisresponsiblefortrainingtheusers.
•Neverletchildrenoruntrainedpeopleoperateor
servicetheequipment.Localregulationsmay
restricttheageoftheoperator.
•Theowner/usercanpreventandisresponsible
foraccidentsorinjuriesoccurringtohimselfor
herself,otherpeopleorproperty.
3

Preparation
•Wearappropriateclothingincludinggloves,eye
protection,longpants,substantialslip-resistant
footwear,andhearingprotection.Tiebacklong
hairanddonotwearlooseclothingorloose
jewelry.
•Inspecttheareawhereyouwillusetheequipment
andremoveallobjects,suchasrocks,toys,and
wire,thatthemachinecouldthrow.
•Checkthattheoperator'spresencecontrols,safety
switches,andshieldsareattachedandfunctioning
properly.Donotoperatethemachineunlessthey
arefunctioningproperly.
FuelSafety
•Useextracarewhenhandlingfuel.Itisammable
anditsvaporsareexplosive.
•Extinguishallcigarettes,cigars,pipes,andother
sourcesofignition.
•Useonlyanapprovedfuelcontainer.
•Donotremovethefuelcaporllthefueltank
whiletheengineisrunningorhot.
•Donotaddordrainfuelinanenclosedspace.
•Donotstorethemachineorfuelcontainerwhere
thereisanopename,spark,orpilotlight,such
asonawaterheaterorotherappliance.
•Ifyouspillfuel,donotattempttostarttheengine;
avoidcreatinganysourceofignitionuntilthefuel
vaporshavedissipated.
Operation
•Useyourfullattentionwhileoperatingthe
machine.Donotengageinanyactivitythat
causesdistractions;otherwise,injuryorproperty
damagemayoccur.
•Neverrunanengineinanenclosedarea.
•Operatethemachineonlyingoodlight,keeping
awayfromholesandhiddenhazards.
•Ensurethatallthedrivesareinneutralandthe
parkingbrakeisengagedbeforestartingthe
engine.Starttheengineonlyfromtheoperator's
position.
•Neveroperatethemachinewithouttheguards
securelyinplace.Ensurethatalltheinterlocksare
attached,adjusted,andfunctioningproperly.
•Donotchangetheengine-governorsettingor
overspeedtheengine.
•Parkthemachineonalevelsurface,engagethe
parkingbrake,andshutofftheenginebefore
leavingtheoperator'spositionforanyreason.
•Keepyourhandsandfeetawayfrommovingparts.
•Lookbehindanddownbeforebackingupto
ensurethatthepathisclear.
•Donotoperatethemachinewhenyouaretired,ill,
orundertheinuenceofalcoholordrugs.
•Usecarewhenloadingorunloadingthemachine
intoatrailerortruck.
•Ensurethattheareaisclearofpeoplebefore
operatingthemachine.Stopthemachineif
anyoneentersthearea.
•Neverleavearunningmachineunattended.
Alwaysshutofftheengine,engagetheparking
brake,andverifythatmovingpartshavestopped
beforeleavingthemachine.
•Neverjerkthecontrols;useasteadymotion.
•Watchfortrafcwhenoperatingnearorcrossing
roadways.
•Donottouchpartsthatmaybehotfromoperation.
Allowthemtocoolbeforeattemptingtomaintain,
adjust,orservicethemachine.
•Beforegrinding,havetheareamarkedfor
undergroundutilitiesanddonotgrindinmarked
areas.
•Lightningcancausesevereinjuryordeath.If
lightningisseenorthunderisheardinthearea,do
notoperatethemachine;seekshelter.
MaintenanceandStorage
•Parkthemachineonalevelsurface,engagethe
parkingbrake,andshutofftheengine.Waitforall
movementtostopbeforeadjusting,cleaning,or
repairingthemachine.
•Cleandebrisfromthegrinder,drives,mufers,and
enginetohelppreventres.Wipeupanyspilled
oilorfuel.
•Allowtheenginetocoolbeforestoringanddonot
storenearames.
•Neverallowuntrainedpersonneltoservicethe
machine.
•Carefullyreleasepressurefromcomponentswith
storedenergy.
•Keepyourhandsandfeetawayfromthemoving
parts.Ifpossible,donotmakeadjustmentswith
theenginerunning.
•Removethespark-plugwiresbeforemakingany
repairs.
•Keepallpartsingoodworkingconditionandall
hardwaretightened.Replaceallwornordamaged
decals.
•Keepallnutsandboltstight.Keeptheequipment
ingoodcondition.
•Nevertamperwiththesafetydevices.
•Keepthemachinefreeofgrass,leaves,orother
debrisbuildup.Wipeupanyspilledoilorfuel.
Allowthemachinetocoolbeforestoring.
4
•Engagetheparkingbrake,shutofftheengine,
waitforallmovingpartstostop,andinspect
themachineifyoustrikeanobject.Makeany
necessaryrepairsbeforestartingthemachine.
•UseonlygenuineTororeplacementparts.
SafetyandInstructionalDecals
Safetydecalsandinstructionsareeasilyvisibletotheoperatorandarelocatednearanyarea
ofpotentialdanger.Replaceanydecalthatisdamagedormissing.
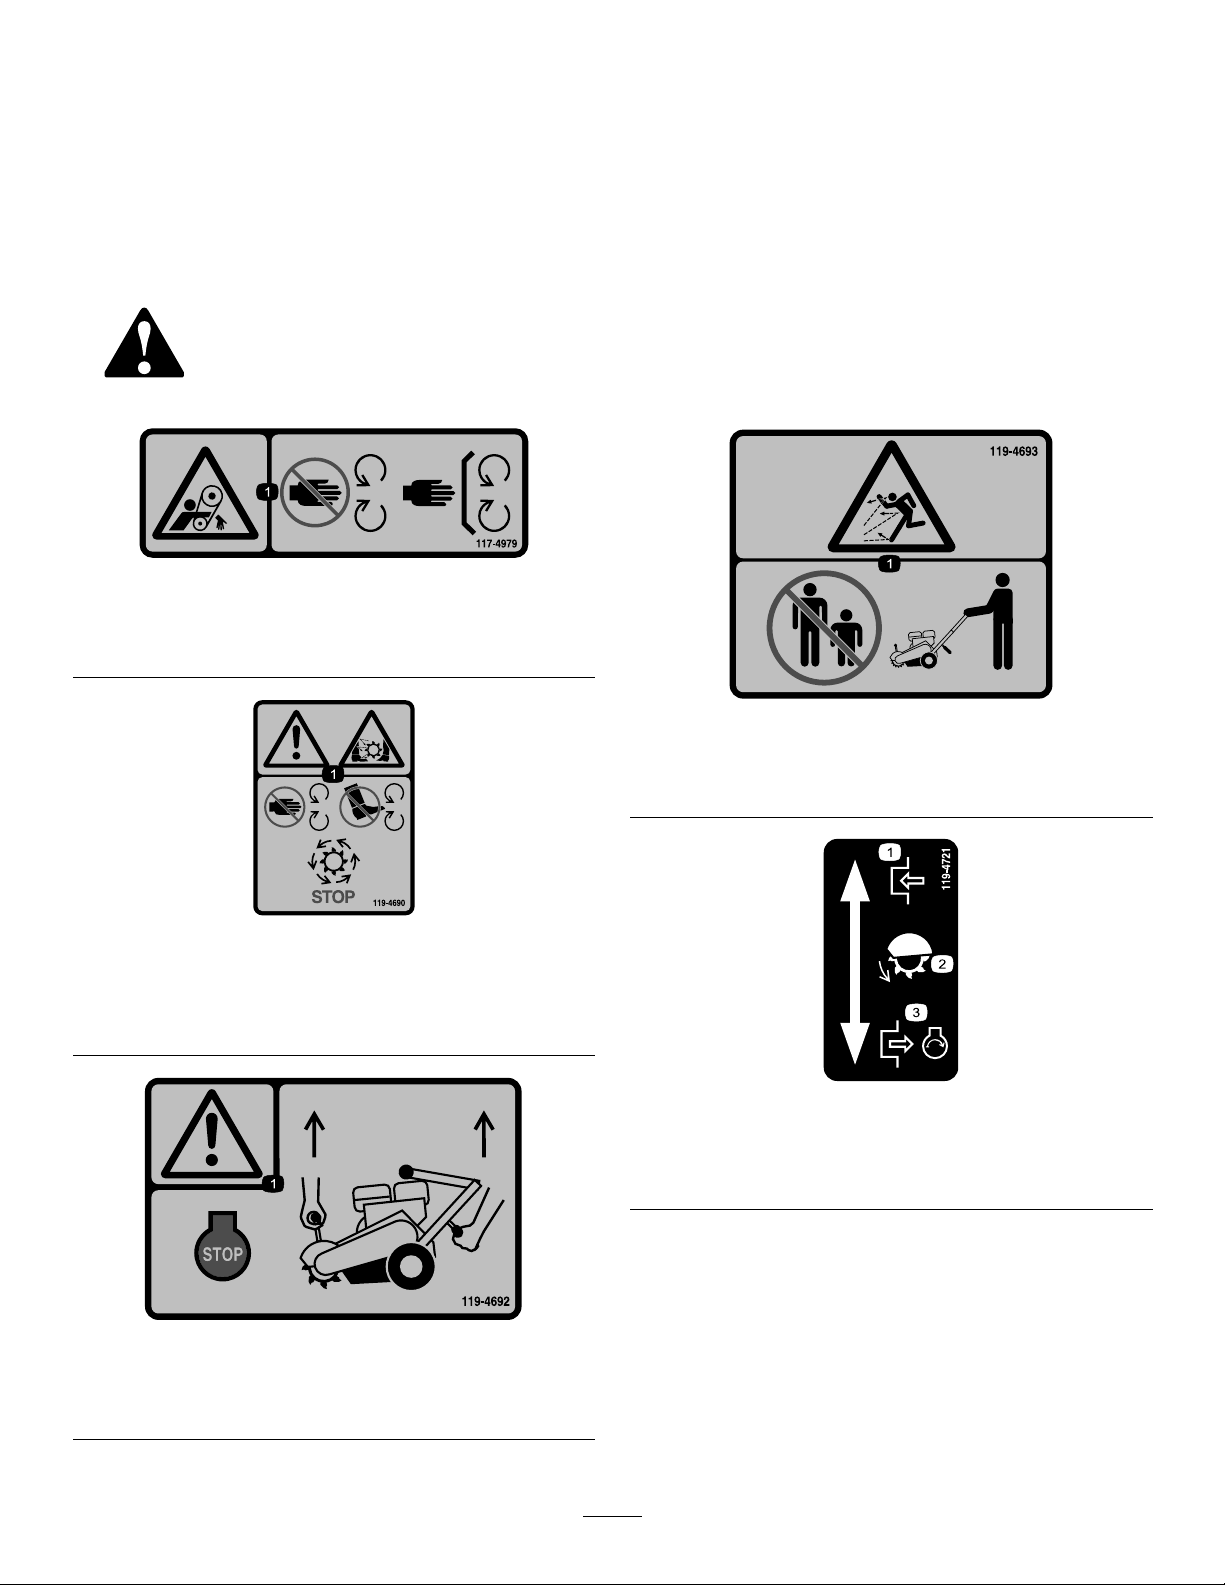
decal117-4979
117-4979
1.Entanglementhazard,belt—stayawayfrommovingparts;
keepallguardsandshieldsinplace.
decal119-4690
119-4690
1.Warning;cutting/dismembermenthazard,grinding
teeth—keephandsandfeetawayfromallmovingparts,
keepallshieldsinplace;waitforallmovingpartstostop.
decal119-4692
119-4692
1.Warning—shutofftheengine;usebothhandholdstolift
thegrinder.
decal119-4693
119-4693
1.Thrownobjecthazard—keepbystandersasafedistance
awayfromthemachine.
decal119-4721
119-4721
1.Engage3.Disengage,engineruns
2.Grindingteeth
5
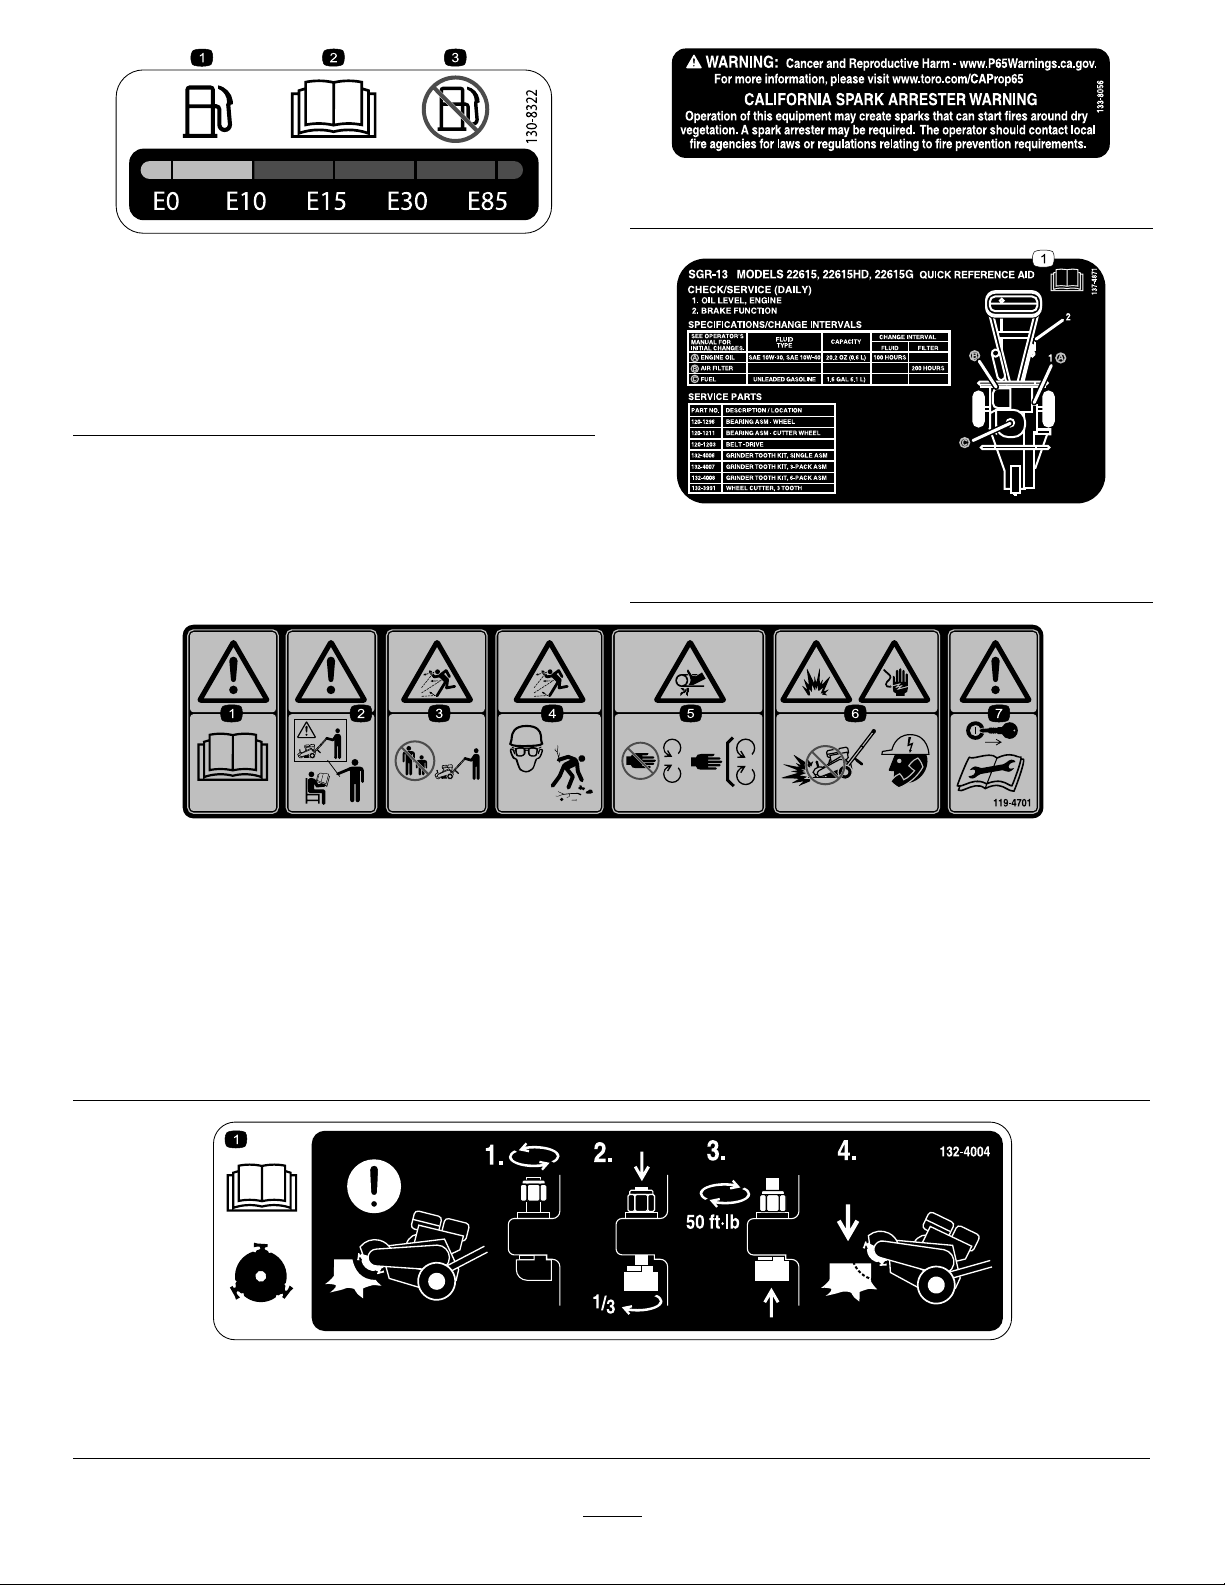
decal130-8322
130-8322
1.Useonlyfuelwithan
alcoholcontentbyvolume
under10%.
3.Donotusefuelwithan
alcoholcontentbyvolume
greaterthan10%.
2.ReadtheOperator's
Manualformore
informationonfuel.
decal133-8056
133-8056
decal137-4871
137-4871
1.ReadtheOperator’sManual.
decal119-4701
119-4701
1.Warning—readtheOperator'sManual.5.Crushinghazardofhand—stayawayfrommovingparts;keep
allguardsandshieldsinplace.
2.Warning—donotoperatethismachineunlessyouaretrained.6.Explosionhazard;electricalshockhazard—donotdiginareas
withburiedutilitylines;contactlocalpowerorganizations
beforedigging.
3.Thrownobjecthazard—keepbystandersasafedistance
awayfromthemachine.
7.Warning—removethekey(ifapplicable)andreadthe
instructionsbeforeservicingorperformingmaintenance.
4.Thrownobjecthazard—weareyeprotection;pickupdebris
beforeoperatingthemachine.
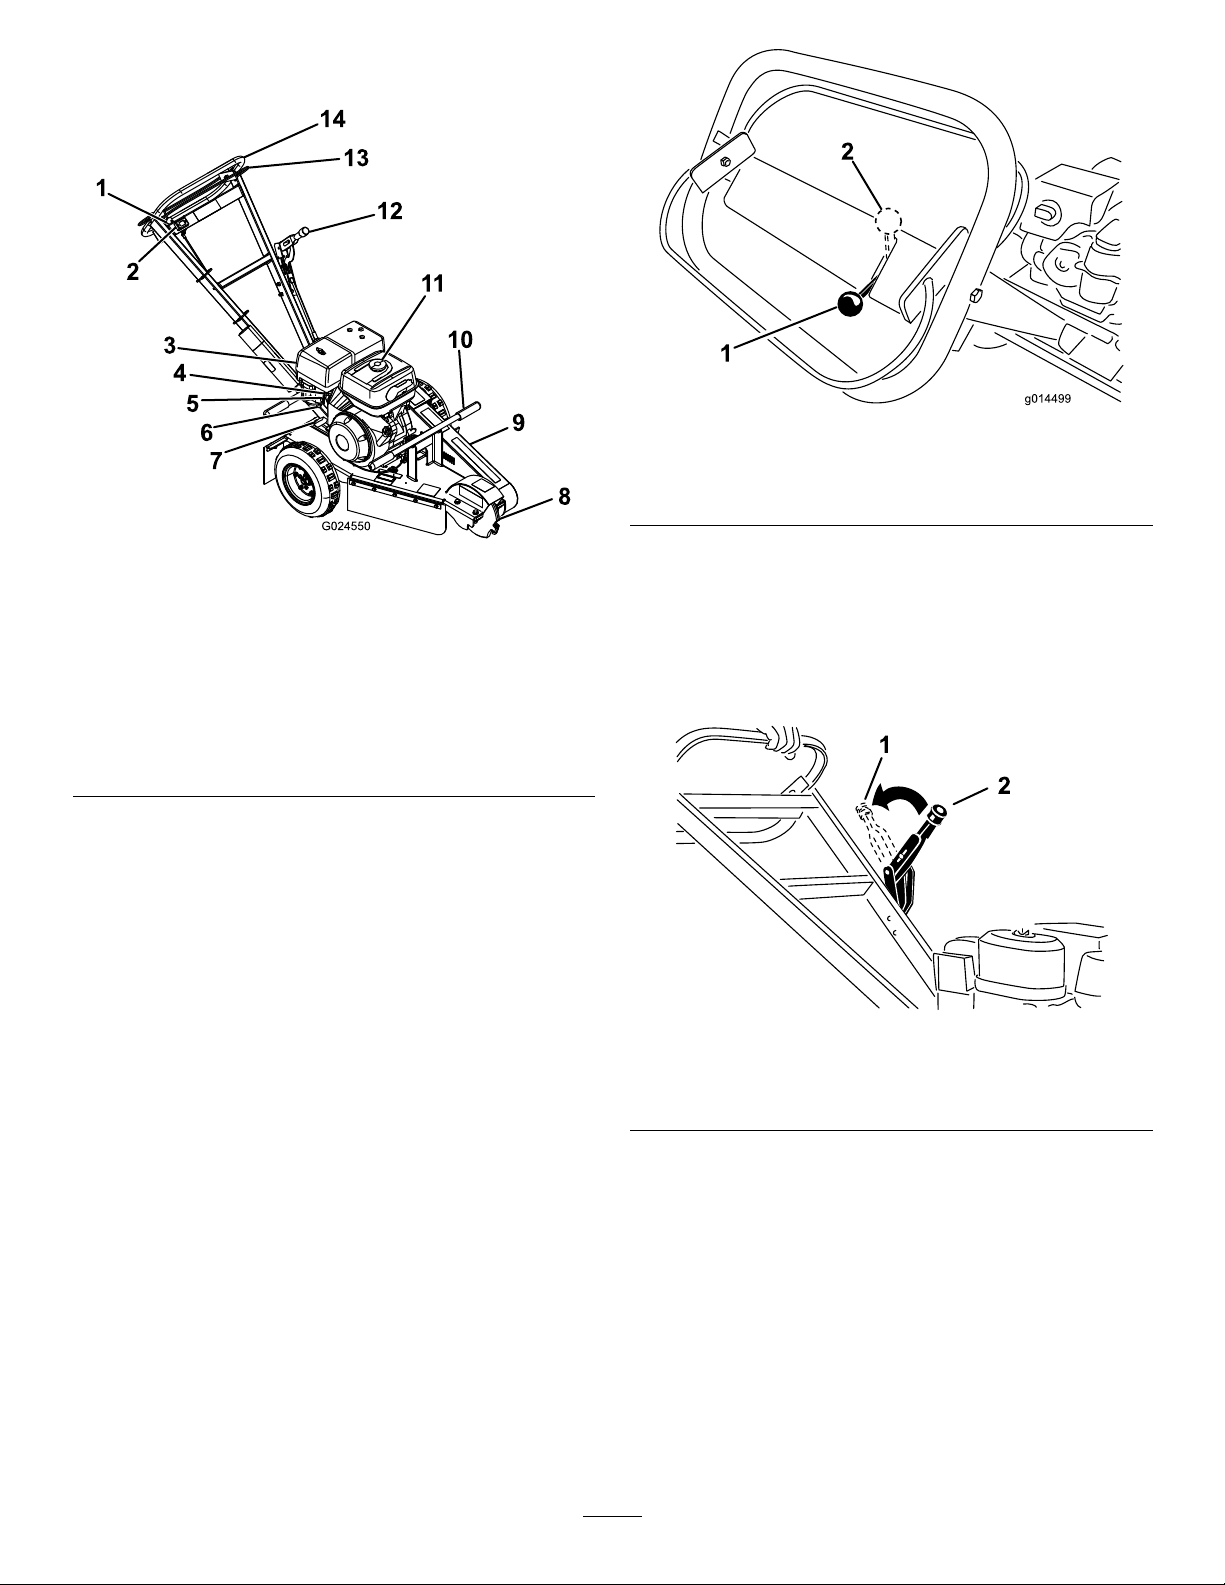
decal132-4004
132-4004
1.Warning,cuttingwheel—toadjustthecuttingwheelteethbetweenjobs1)Loosenthenut;2)Pushthetoothdownandrotateit1/3
ofaturn;3)Tightenthenutto50ft-lb;4)Proceedwithgrinding.
6
ProductOverview
g024550
Figure3
1.Throttlelever8.Cuttingwheel
2.Hourmeter9.Beltcover
3.Cycloneairlter10.Lifthandle
4.Choke11.Fuelcap
5.Fuelvalve12.Parkingbrake
6.Sedimentcup13.Safetybail
7.Starter14.Handle
Controls
Becomefamiliarwithallthecontrols(Figure3and
Figure4)beforeyoustarttheengineandoperatethe
machine.
SafetyBail
Thesafetybailcontrolstheengine.Holdthesafety
bailagainstthehandlewhenyoustarttheengineand
usethemachine.Releasethesafetybailtoshutoff
theengine(Figure3).
ThrottleLever
Thethrottlelevercontrolsenginespeed.Withthe
leverdown,intheDISENGAGEposition,theengine
runsatidle.Thisisalsothestartingposition.When
theenginespeedincreases,totheENGAGEDposition,
thecentrifugalclutchengagesandthecuttingwheel
rotates.
g014499
Figure4
1.Throttle—Disengage
position
2.Throttle—Engaged
position
ParkingBrake
Theparkingbrakeholdstheleftwheelfromturningto
securethemachineandforeasymovementofthe
machinefromsidetosidewhengrindingastump
(Figure5).
g241736
Figure5
1.Parkingbrake(engaged)2.Parkingbrake
(disengaged)
HourMeter
Whentheengineisoff,thehourmeterdisplaysthe
numberofhoursofoperationthathavebeenlogged
onthemachine.
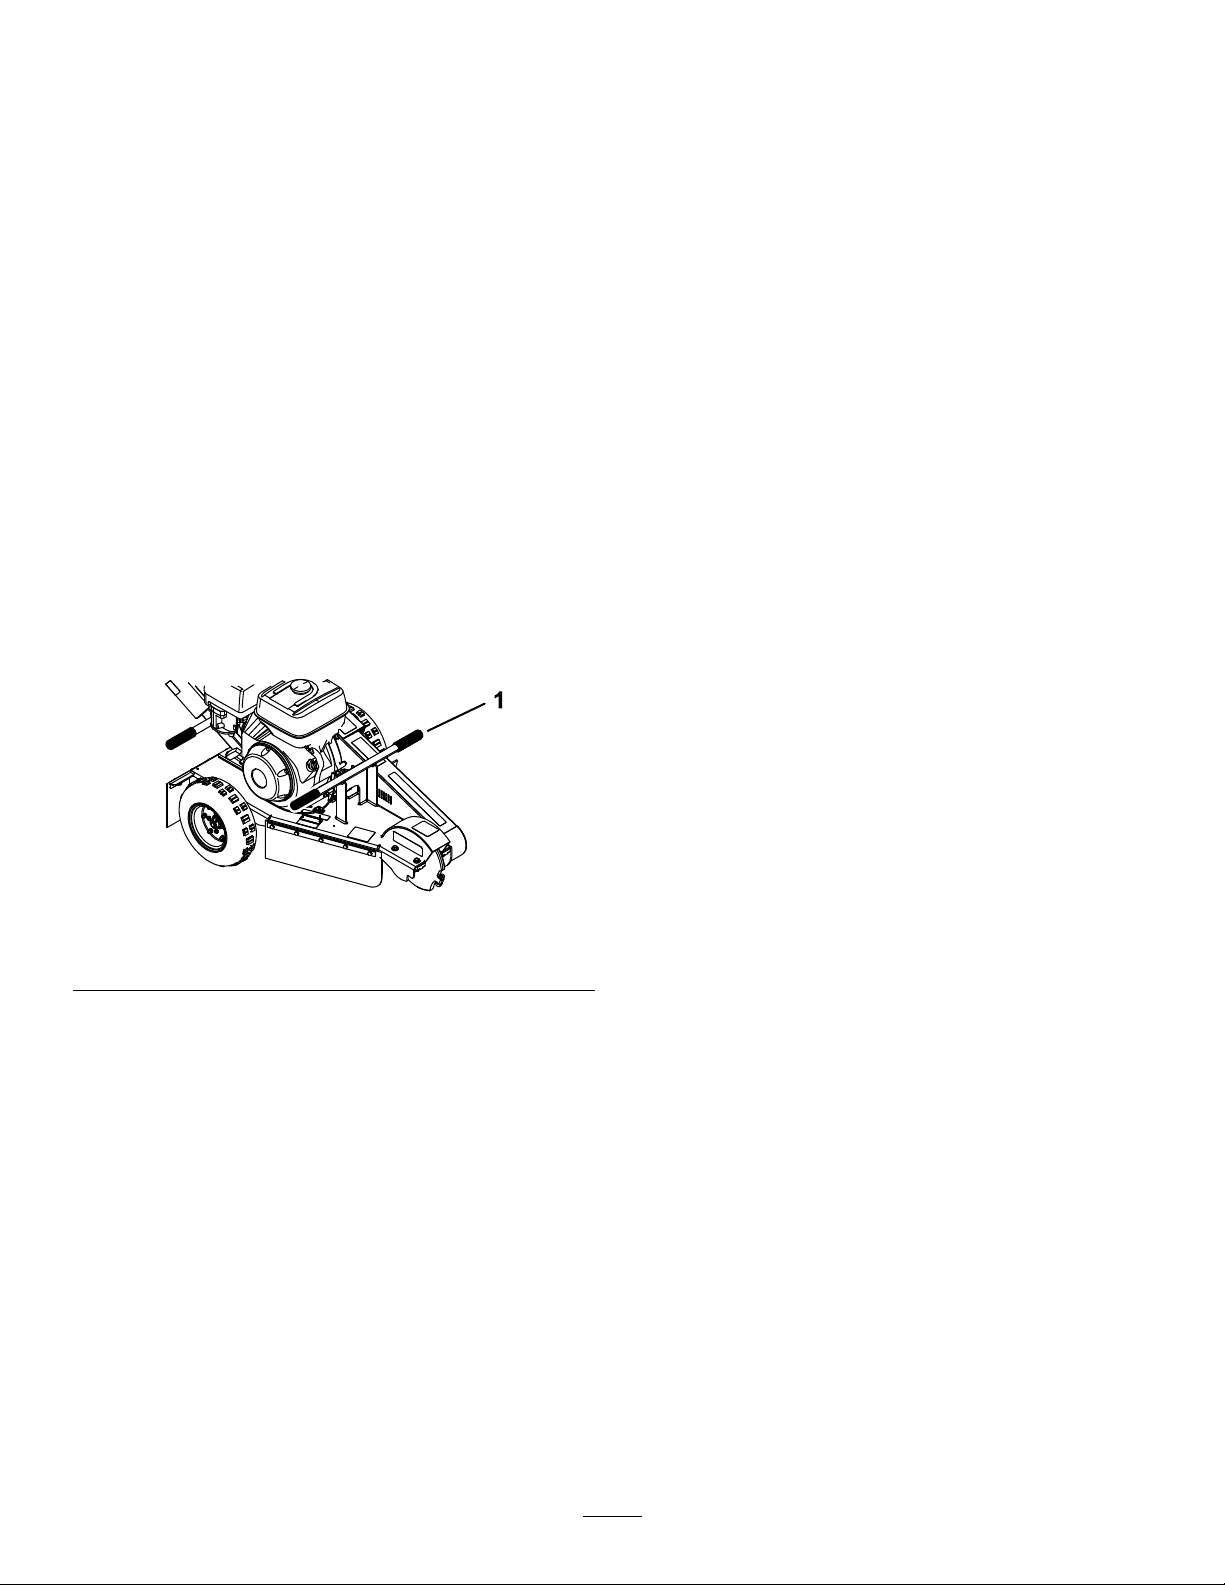
FuelValve
Thefuelvalve(Figure6)islocatedunderneaththe
chokelever.Movetheleverforthefuelvalvetothe
ONpositionbeforeattemptingtostarttheengine.
7

g015174
Figure6
1.Choke3.Recoil-starthandle
2.Fuelvalve
ChokeLever
Usethechokelever(Figure6)tostartacoldengine.
Beforepullingtherecoil-starthandle,movethechoke
levertotheCLOSEDposition.Oncetheengineis
running,movethechokelevertotheOPENposition.
Donotusethechokeiftheengineisalreadywarmed
uporiftheairtemperatureishigh.
Recoil-StartHandle
Tostarttheengine,pulltherecoil-starthandle(Figure
6)quicklytoturntheengineover.RefertoStartingthe
Engine(page10)forthecorrectstartingprocedure.
Specications
Note:Specicationsanddesignaresubjectto
changewithoutnotice.
CuttingDepth30cm(12inches)
Length193cm(76inches)
Width75cm(29.5inches)
Height107cm(42inches)
Weight109kg(240lb)
Operation
Note:Determinetheleftandrightsidesofthe
machinefromthenormaloperatingposition.
Important:Beforeoperating,checkthefueland
oillevel,andremovedebrisfromthemachine.
Also,ensurethattheareaisclearofpeopleand
debris.Youshouldalsoknowandhavemarked
thelocationsofallutilitylines.
BeforeyouStart
•Digawaytheearthandremoveanystonesnear
thetreestumpthatmayinterferewithyourwork.
Checkthatthegroundisfreeofforeignobjects,
suchaselectricalcables,barbedwire,etc.
•Cutortrimthestumpusingapowersaw.
•Reviewallthesafetydecalsonthemachine.
•Ensurethatyouarefamiliarwithsafetyregulations
andshutdownproceduresdescribedinthis
manual.
•Ensurethatallguardsareinplaceandingood
condition.
•Ensurethatthebladesandcuttersareinplace
andingoodcondition.
•Ensurethattheworkarea,cutter,andstumpin
particulararefreefrommetallicobjectssuchas
wire,nails,etc.thatcouldbethrownoutandinjure
personsinthevicinityanddamagetheequipment.
ThinkSafetyFirst
Carefullyreadallsafetyinstructionsandsymbolsin
thesafetysection.Knowingthisinformationcould
helpyouorbystandersavoidinjury.
CAUTION
Thismachineproducessoundlevelsthatcan
causehearinglossthroughextendedperiods
ofexposure.
Wearhearingprotectionwhenoperatingthis
machine.
g229846
Figure7
1.Wearhearingprotection.
8

AddingFuel
DANGER
Incertainconditions,fuelisextremely
ammableandhighlyexplosive.Areor
explosionfromfuelcanburnyouandothers
andcandamageproperty.
•Fillthefueltanksoutdoors,inanopen
area,whentheengineiscold.Wipeupany
fuelthatspills.
•Neverllthefueltanksinsideanenclosed
trailer.
•Neversmokewhenhandlingfuelandstay
awayfromanopenameorwherefuel
fumesmaybeignitedbyaspark.
•Storefuelinanapprovedcontainerand
keepitoutofthereachofchildren.Never
buymorethana30-daysupplyoffuel.
•Donotoperatewithoutentireexhaust
systeminplaceandinproperworking
condition.
DANGER
Incertainconditionsduringfueling,static
electricitycanbereleased,causingaspark
thatcanignitethefuelvapors.Areor
explosionfromfuelcanburnyouandothers
andcandamageproperty.
•Alwaysplacefuelcontainersontheground
awayfromyourvehiclebeforelling.
•Donotllfuelcontainersinsideavehicle
oronatruckortrailerbed,becauseinterior
carpetsorplastictruckbedlinersmay
insulatethecontainerandslowthelossof
anystaticcharge.
•Whenpractical,removeequipmentfrom
thetruckortrailerandrefueltheequipment
withitswheelsontheground.
•Ifthisisnotpossible,thenrefuelsuch
equipmentonatruckortrailerfroma
portablecontainerratherthanfroma
fuel-dispensernozzle.
•Ifyoumustuseafuel-dispensernozzle,
keepthenozzleincontactwiththerimof
thefueltankorcontaineropeningatall
timesuntilfuelingiscomplete.
WARNING
Fuelisharmfulorfatalifswallowed.
Long-termexposuretovaporscancause
seriousinjuryandillness.
•Avoidprolongedbreathingofvapors.
•Keepyourfaceawayfromthenozzleand
fueltankopening.
•Keepfuelawayfromyoureyesandskin.
FuelRecommendations
•Forbestresults,useonlyclean,fresh(lessthan
30daysold),unleadedgasolinewithanoctane
ratingof87orhigher((R+M)/2ratingmethod).
•Ethanol:Gasolinewithupto10%ethanol
(gasohol)or15%MTBE(methyltertiarybutyl
ether)byvolumeisacceptable.Ethanoland
MTBEarenotthesame.Gasolinewith15%
ethanol(E15)byvolumeisnotapprovedforuse.
Neverusegasolinethatcontainsmorethan
10%ethanolbyvolume,suchasE15(contains
15%ethanol),E20(contains20%ethanol),orE85
(containsupto85%ethanol).Usingunapproved
gasolinemaycauseperformanceproblemsand/or
enginedamagewhichmaynotbecoveredunder
warranty.
•Donotusegasolinecontainingmethanol.
•Donotstorefueleitherinthefueltankorinfuel
containersoverthewinterunlessyouuseafuel
stabilizer.
•Donotaddoiltogasoline.
UsingStabilizer/Conditioner
Useafuelstabilizer/conditionerinthemachineto
providethefollowingbenets:
•Keepsfuelfreshduringstorageof90daysorless
(drainthefueltankwhenstoringthemachinefor
morethan90days)
•Cleanstheenginewhileitruns
•Eliminatesgum-likevarnishbuildupinthefuel
system,whichcauseshardstarting
Important:Donotusefueladditives
containingmethanolorethanol.
Addthecorrectamountoffuelstabilizer/conditioner
tothefuel.
Note:Afuelstabilizer/conditionerismost
effectivewhenmixedwithfreshfuel.T ominimize
thechanceofvarnishdepositsinthefuelsystem,
usefuelstabilizeratalltimes.
9
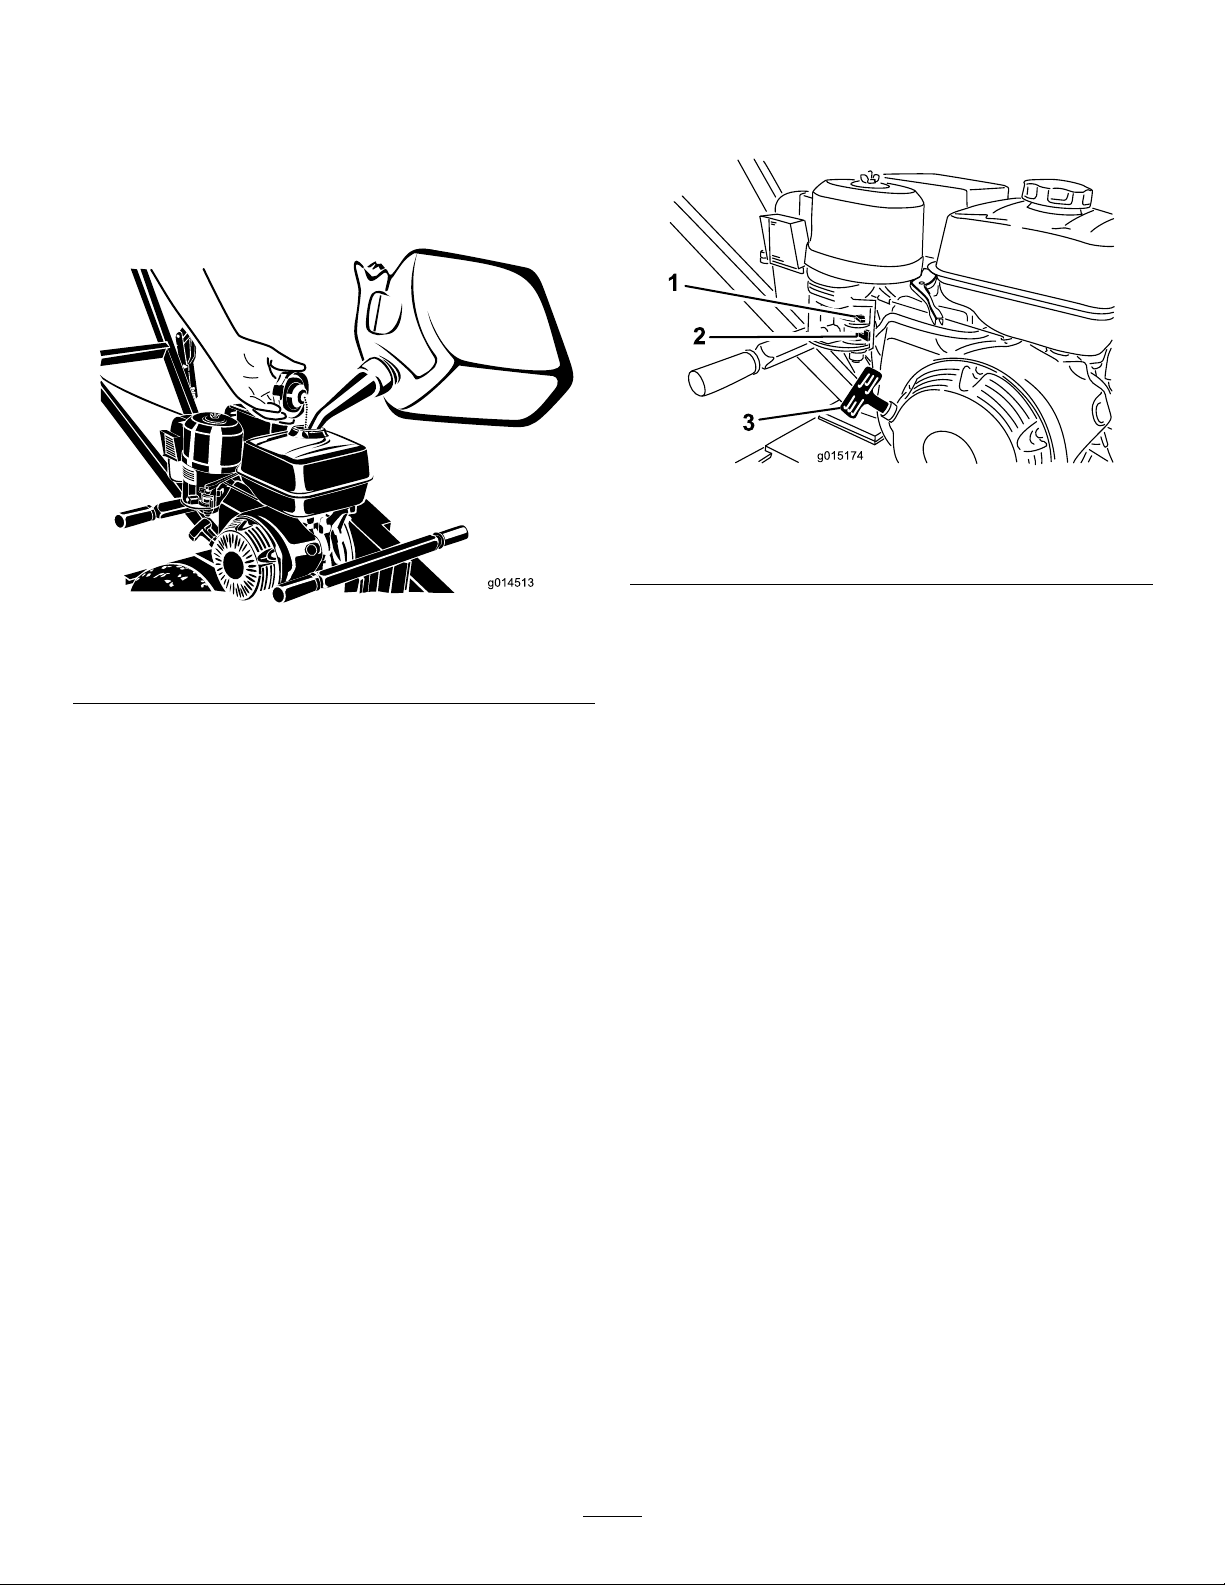
FillingtheFuelTank
1.Parkthemachineonalevelsurfaceandengage
theparkingbrake.
2.Shutofftheengineandallowtheenginetocool.
3.Cleanaroundthefuel-tankcapandremoveit
(Figure8).
g014513
Figure8
1.Fuel-tankcap
4.Fillthetankwithfueltoabout6to13mm(1/4to
1/2inch)belowthebottomofthellerneck.
Important:Thisspaceinthetankallows
fueltoexpand.Donotllthefueltank
completelyfull.
5.Installthefuel-tankcapsecurely.
6.Wipeupanyspilledfuel.
PerformingDaily
Maintenance
Beforestartingthemachineeachday,performthe
EachUse/DailyprocedureslistedinMaintenance
(page13).
StartingtheEngine
1.MovethefuelvalvetotheOPENposition,allthe
waytotheright(Figure9).
g015174
Figure9
1.Chokelever3.Recoil-starthandle
2.Fuelvalve
2.MovethechokelevertotheONposition(Figure
9).
Note:Awarmorhotenginemaynotrequire
choking.
3.MovethethrottlelevertotheDISENGAGE
position.
4.Holdthesafetybailagainstthehandleandpush
thehandledownenoughtoraisethecutting
wheelofftheground.
5.Pulltherecoil-starthandlelightlyuntilyoufeel
resistance,thenpullthehandlebriskly(Figure
9).Returntherecoil-starthandlegently.
6.Aftertheenginestarts,graduallymovethe
chokeleverbacktotheOFFposition.Ifthe
enginestallsorhesitates,movethechokeback
totheONpositionagainuntiltheenginewarms
up.ThenmoveittotheOFFposition.
ShuttingOfftheEngine
1.MovethethrottletotheDISENGAGEposition.
Note:Iftheenginehasbeenworkinghardor
ishot,letitrunforaminutebeforereleasingthe
safetybail.Thishelpstocooltheenginebefore
shuttingitoff.Inanemergency,theenginemay
beshutoffimmediately.
2.Releasethesafetybailtoshutofftheengine.
3.MovethefuelvalvetotheCLOSEDposition,all
thewaytotheleft.
10

GrindingaStump
DANGER
Thismachineiscapableofamputatinghands
andfeet.
•Alwayswearsubstantial,slip-resistant
footwear.
•Stayintheoperatingpositionwhilethe
machineisrunning,andkeepawayfrom
movingparts.
•Keepallbystandersasafedistanceaway
fromthemachine.
•Stopthemachineimmediatelyifany
peopleoranimalsentertheworkarea.
WARNING
Grindingastumpthrowswoodchips,soil,
andotherdebrisintotheair,whichcould
injureyouorbystanders.
•Alwaysweareyeprotectionandlongpants
whenusingthegrinder.
•Keepallbystandersasafedistanceaway
fromthegrinder.
WARNING
Thegrinderisveryloudwhencuttingastump
andcandamageyourears.
Alwayswearhearingprotectionwhenusing
thegrinder.
1.SetthrottletotheDISENGAGEposition,startthe
engine,andallowthemachinetowarmupfor
2minutes.
2.Pushthehandledownenoughtoraisethe
cuttingwheelofftheground(Figure10).
g024063
Figure10
1.Pivotpoint2.Pivotpointwhenthe
parkingbrakeisengaged
3.Movethemachinetothefrontofthestumpand
engagetheparkingbrake.
4.MovethrottleuptotheENGAGEposition.The
cuttingwheelwillbeginrotating.
5.Swingthecuttingwheeltooneside(Figure10),
thenloweritapproximately1to2.5cm(1/2to1
inch)intothefront-topcornerofthestump.
g024062
Figure11
6.Usingasweepingmotion,swingthecutting
wheelbackandforth,loweringthecuttingwheel
approximately1to2.5cm(1/2to1inch)before
11
eachsweep,untilyouhaveremovedthefront
portionofthestumptogroundlevel(Athrough
DinFigure11).
7.Raisethecuttingwheel,releasetheparking
brake,andmovethemachineforwardafew
centimeters(inches).Engagetheparkingbrake.
8.Repeatsteps5and7untilyouhavecompletely
removedthestump(EthroughHinFigure11).
9.MovethrottletotheDISENGAGEposition,push
thehandledownenoughtoraisethecutting
wheelofftheground.Waitforthecuttingwheel
tostoprotatingthenreleasetheparkingbrake
andpullthemachineawayfromthestump.
Note:Donotletthefrontofthemachinetouch
thegrounduntilthecuttingwheelhasstopped
turning.
10.Shutofftheengine;refertoShuttingOffthe
Engine(page10).
LiftingtheMachine
UsethehandlesshowninFigure12asliftpoints.
g205090
Figure12
1.Lifthandle(4)
12
Maintenance
Note:Determinetheleftandrightsidesofthemachinefromthenormaloperatingposition.
Important:Youcantipthemachinebackwardoronitssidetocleanorserviceit,butnolongerthan
2minutes.Ifyouholdthemachinethispositionfortoolong,fuelcandrainintothecrankcaseand
damagetheengine.Shouldthishappen,performanextraoilchangeontheengine.Thenturnthe
engineoverafewrevolutionswiththestarterhandlebeforestartingtheengineagain.
RecommendedMaintenanceSchedule(s)
MaintenanceService
IntervalMaintenanceProcedure
Aftertherst20hours•Changetheengineoil.
Beforeeachuseordaily
•Greasethemachine.
•Checktheairlter
•Checktheengine-oillevel.
•Cleantheenginescreen.
•Checkthedrive-belttension.
•Checktheconditionoftheteeth;rotateorreplaceanythatarewornordamaged
andtorquethenutsforallteeth.
•Removedebrisfromthemachine.
Every50hours•Servicetheairlter
Every100hours
•Changetheengineoil.
•Checkthesparkplug.
•Cleanthesedimentcup.
•Replacethedrivebelt.
Every300hours•Replacethesparkplug.
Every600hours•Replacetheairlter.
Yearlyorbeforestorage•Changetheengineoil.
•Cleanthesedimentcup.
Important:Refertoyourengineowner’smanualforadditionalmaintenanceprocedures.
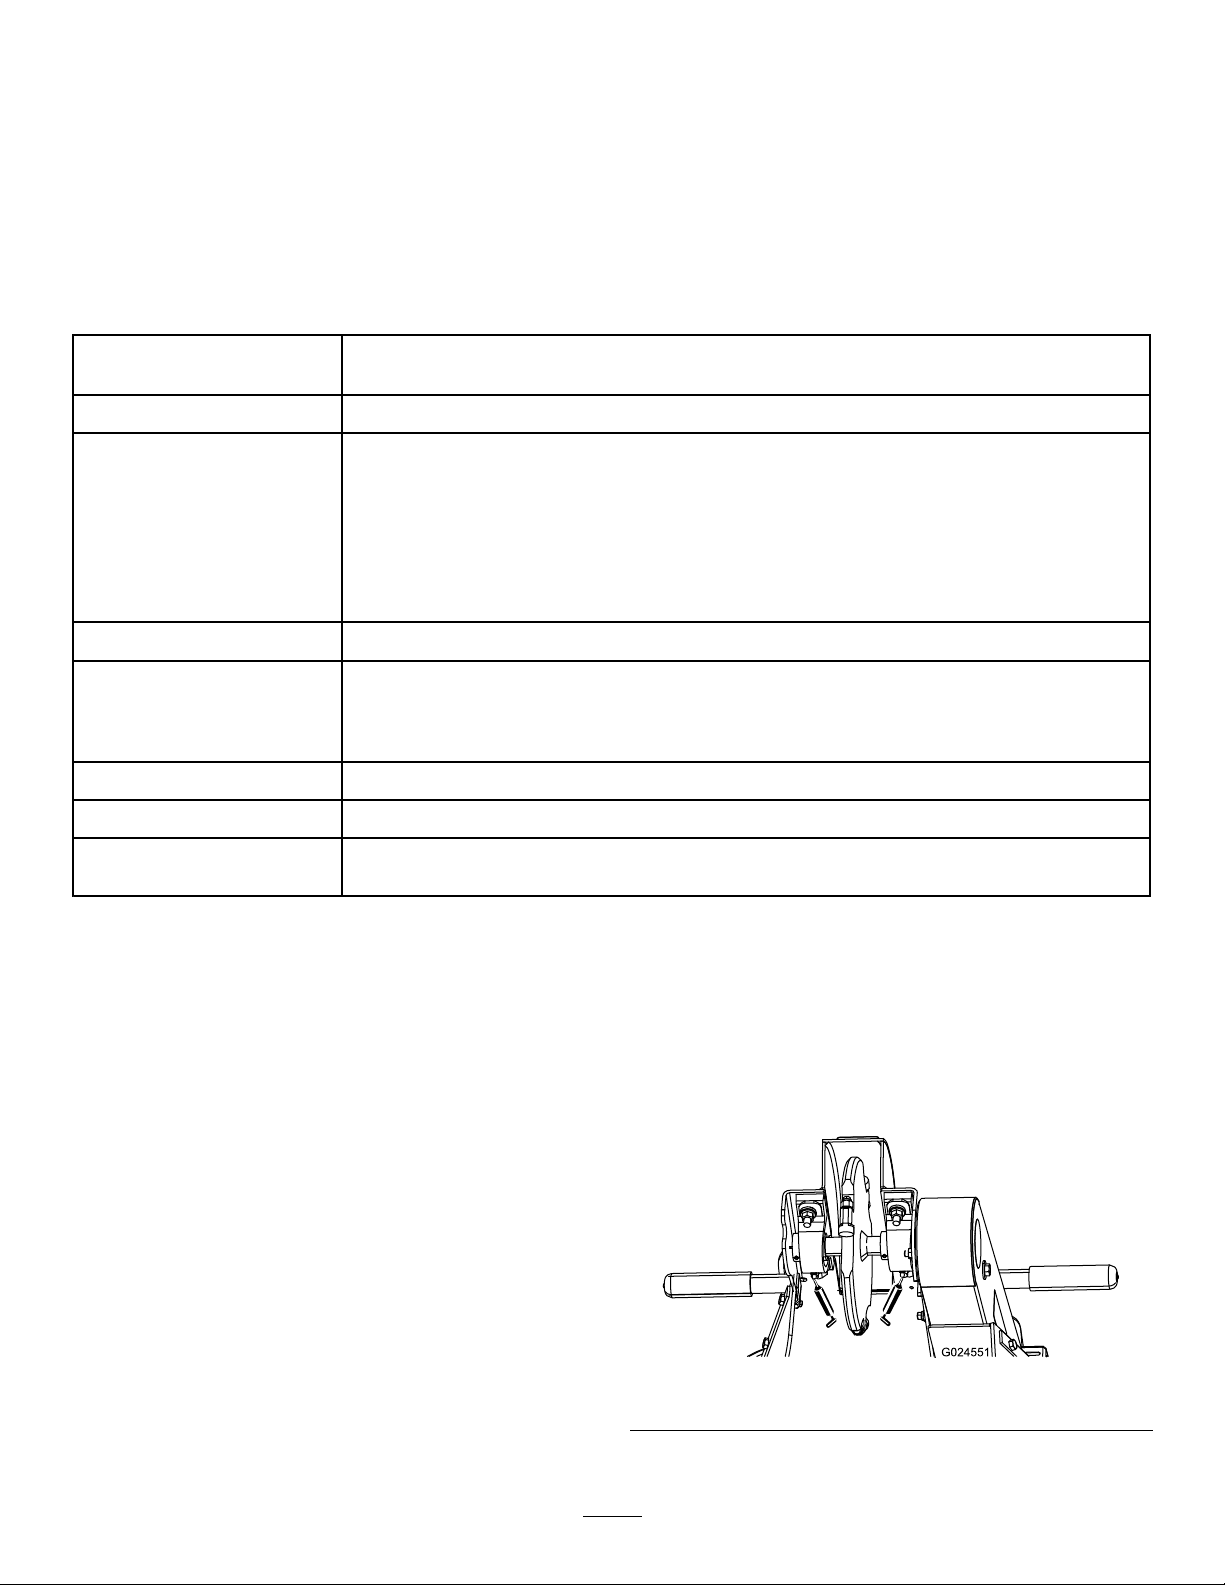
Lubrication
GreasingtheMachine
ServiceInterval:Beforeeachuseordaily
GreaseType:General-purposegrease.
1.Parkthemachineonalevelsurfaceandengage
theparkingbrake.
2.Shutofftheengineandwaitforallmovingparts
tostop.
3.Cleanthegreasettingswitharag.
4.Connectagreaseguntoeachtting.
5.Lubricatethe2ttings,1oneachcutting-wheel
bearing.
6.Pumpgreaseintothettingsuntilgreasebegins
tooozeoutofthebearings(approximately3
pumps).
Important:Pumpgreaseinslowlyand
carefullytopreventdamagetothebearing
seals.
7.Wipeupanyexcessgreasefromthettingand
bearingarea.
g024551
Figure13
13

EngineMaintenance
ServicingtheAirCleaner
ServiceInterval:Beforeeachuseordaily—Check
theairlter
Every50hours—Servicetheairlter
Every600hours/Every2years(whichever
comesrst)—Replacetheairlter.
Thecycloneairltercollectsthelargestcontaminant
particles,whichcollectinthecontainer.Whenyou
canseealayerofdirtatthebottomofthecontainer,
cleanthecyclonehousing,airchannels,andair-intake
screen.
ServicingtheCycloneHousing
1.Parkthemachineonalevelsurfaceandengage
theparkingbrake.
2.Shutofftheengineandwaitforallmovingparts
tostop.
3.Removethe3screwsholdingthecyclone
housingtotheair-cleanercover.
4.Removethehousingwiththeair-intakescreen
andremovetheairchannels.
g014508
Figure14
1.Air-cleanercover3.Airchannels
2.Screw4.Cyclonehousingwith
air-intakescreen
5.Cleanthecomponentswithwater,detergent,
andabrushthendrythecomponentscarefully.
6.Placetheairchannelsinthecyclonehousing.
7.Insertcyclonehousingintopositionandmake
surethatittsintheupperportion.
Important:Donotuseforce;alignitinplace
beforettingthescrews.
8.Securethecyclonehousingusingthe3screws.
ServicingtheAir-CleanerElements
RemovingtheFoamandPaperElements
1.Parkthemachineonalevelsurfaceandengage
theparkingbrake.
2.Shutofftheengineandwaitforallmovingparts
tostop.
3.Removethewingnutandliftofftheair-cleaner
coverwiththeair-ltercowling(Figure15).
g014509
Figure15
1.Wingnut4.Paperelement
2.Air-cleanercover5.Stud
3.Foamelement
4.Removethefoamelement(Figure15).
5.Removethewingnutontopofthepaper
elementandremovethepaperelement(Figure
15).
14

ServicingtheFoamAir-CleanerElement
1.Washthefoamelementusingamilddetergent
andwater.
2.Squeezeitdrywithacleancloth.
3.Soakitwithnewengineoil.
4.Gentlysqueezeoutexcessoilfromtheelement
inanabsorbentcloth.
ServicingthePaperAir-CleanerElement
1.Cleanthepaperelementbytappingitgentlyto
removedust.Ifitisverydirty,replacethepaper
element(Figure15).
2.Inspecttheelementfortears,anoilylm,or
damagetotherubberseal.
3.Replacethepaperelementifitisdamaged.
Important:Donotcleanthepaperlter.
InstallingtheFoamandPaperElements
1.Mountthepaperelementintheair-cleaner
housingandsecureitwiththewingnut.
2.Positionthefoamelementoverthepaper
element.
3.Installtheair-cleanercoverandsecureitwith
thewingnut.
ServicingtheEngineOil
ServiceInterval:Beforeeachuseordaily—Check
theengine-oillevel.
Aftertherst20hours—Changetheengineoil.
Every100hours—Changetheengineoil.
Yearlyorbeforestorage—Changetheengine
oil.
Engine-OilSpecications
Note:Changetheoilmorefrequentlywhenthe
operatingconditionsareextremelydustyorsandy.
OilType:DetergentoilwithanAPIserviceofSJor
higher.
CrankcaseCapacity:1.1L(1.2USqt)
Viscosity:Refertothegurebelow.
g241832
Figure16
CheckingtheEngine-OilLevel
1.Parkthemachineonalevelsurfaceandengage
theparkingbrake.
2.Shutofftheengineandwaitforallmovingparts
tostop.
3.Checktheengine-oillevelasshowninFigure
17.
15

g205123
g035136
Figure17
ChangingtheEngineOil
1.Starttheengineandletitrunfor5minutes.
Note:Thiswarmstheoilsothatitdrainsbetter.
2.Parkthemachineonalevelsurfaceandengage
theparkingbrake.
3.Shutofftheengineandwaitforallmovingparts
tostop.
4.Changetheoilasshownin(Figure18).
g206641
g031623
Figure18
5.Slowlypourapproximately80%ofthespecied
oilintothellertubeandslowlyaddthe
additionaloiltobringittotheFullmark(Figure
19).
16

g206640
Figure19
6.Disposeoftheusedoilatarecyclingcenter.
ServicingtheSparkPlug
ServiceInterval:Every100hours—Checkthespark
plug.
Every300hours—Replacethesparkplug.
Ensurethattheairgapbetweenthecenterandside
electrodesiscorrectbeforeinstallingthesparkplug.
Useasparkplugwrenchforremovingandinstalling
thesparkplugandagappingtool/feelergaugeto
checkandadjusttheairgap.Installanewsparkplug
ifnecessary.
Type:BPR6ES(NKG)orequivalent
AirGap:0.70to0.80mm(0.28to0.031inch)
RemovingtheSparkPlug
1.Parkthemachineonalevelsurfaceandengage
theparkingbrake.
2.Shutofftheengine,waitforallmovingpartsto
stop,andallowtheenginetocool.
3.Locateandremovethesparkplug(Figure20).
g205129
g027478
Figure20
CheckingtheSparkPlug
Important:Donotcleanthesparkplug(s).
Alwaysreplacethesparkplug(s)whenithas:a
blackcoating,wornelectrodes,anoilylm,or
cracks.
Ifyouseelightbrownorgrayontheinsulator,the
engineisoperatingproperly.Ablackcoatingonthe
insulatorusuallymeanstheaircleanerisdirty.
Setthegapto0.70to0.80mm(0.28to0.031inch).
g206628
Figure21
17
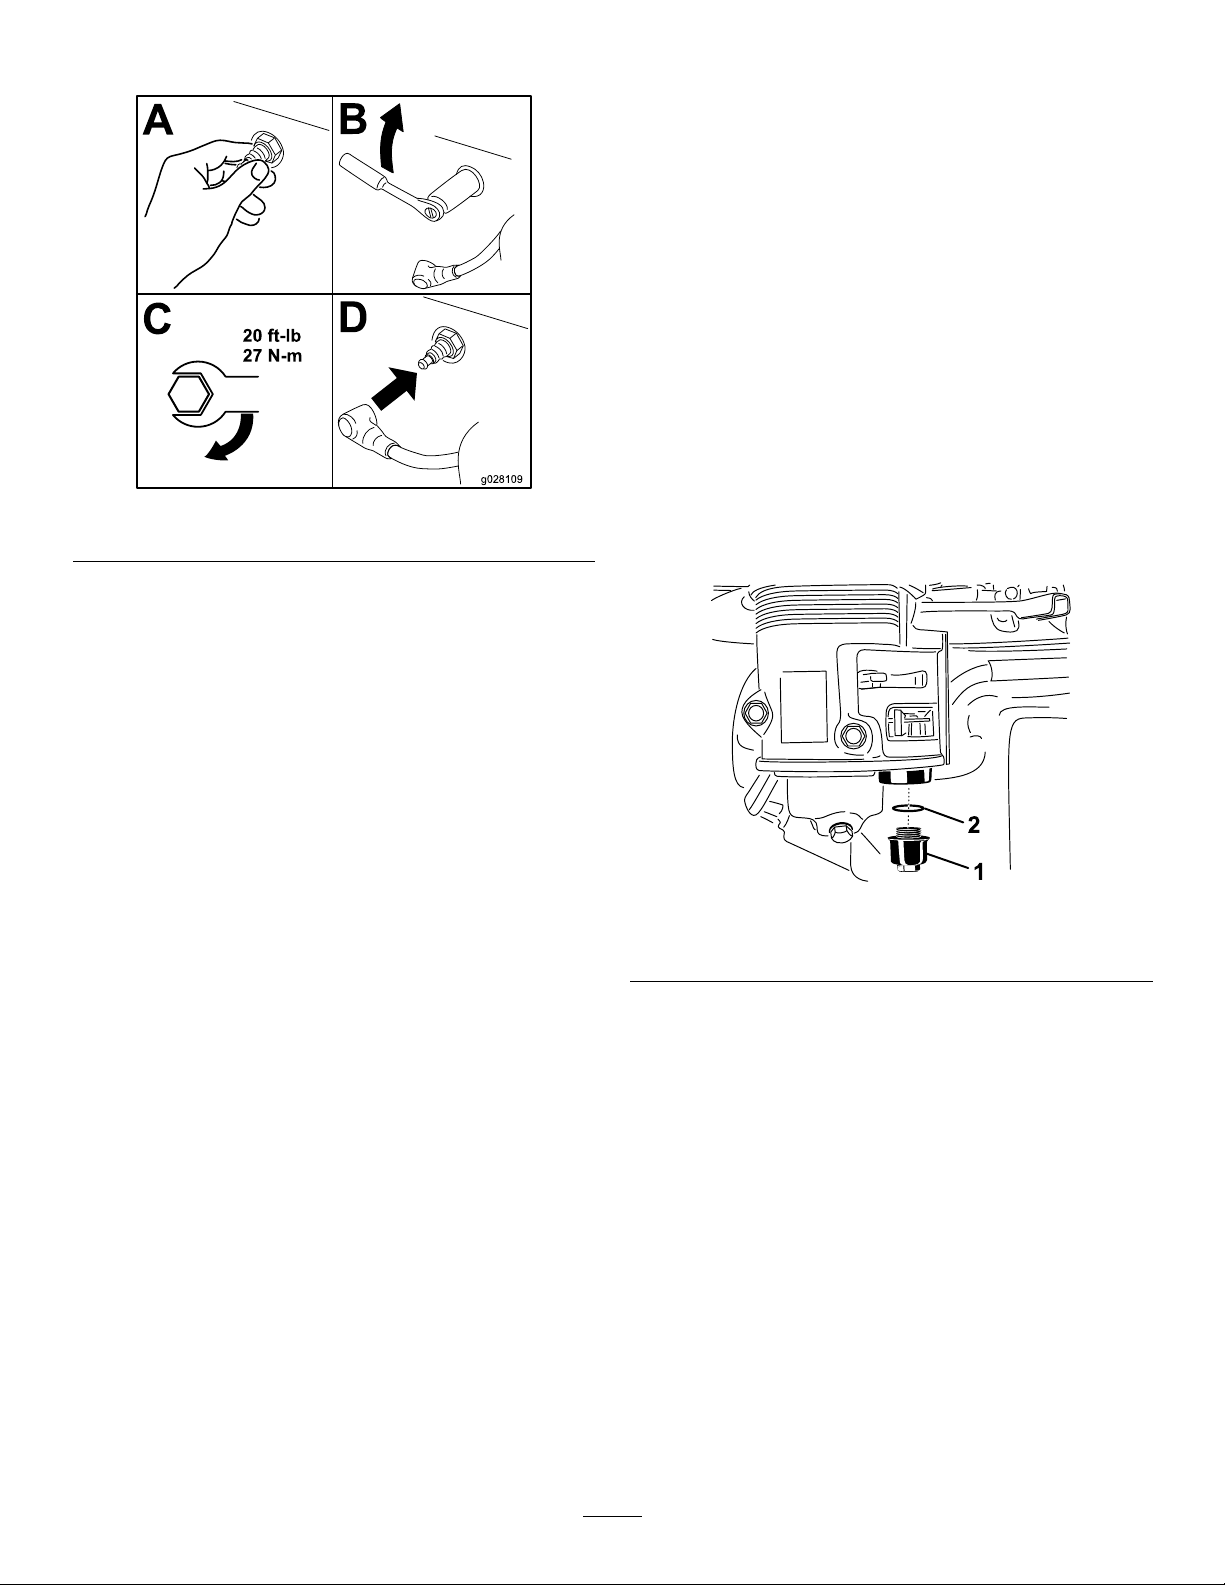
InstallingtheSparkPlug
g028109
Figure22
FuelSystem
Maintenance
CleaningtheSedimentCup
ServiceInterval:Every100hours
Yearlyorbeforestorage
Underneaththefuelvalveisasedimentcuptocatch
dirtinthefuel.
1.Parkthemachineonalevelsurfaceandengage
theparkingbrake.
2.Shutofftheengineandwaitforallmovingparts
tostop.
3.MovethefuelvalvetotheOFFposition,allthe
waytotheleft.
4.Unscrewthesedimentcup(Figure23).
g241891
Figure23
1.Sedimentcup2.O-ring
5.CleanthereservoirandtheO-ringusinga
cleaningsolventanddrycarefully.
Note:MakesurenottomisplacetheO-ring.
6.PlacetheO-ringinthegrooveofthecupand
replacethesedimentcup.
7.TurnthefuelvalvetotheONposition,alltheway
totheright,andcheckforleaks.
Note:Ifitleaks,replacetheO-ring.
18

CoolingSystem
Maintenance
CleaningtheEngineScreen
ServiceInterval:Beforeeachuseordaily
Beforeeachuse,removeanybuildupofgrass,
dirt,orotherdebrisfromtheenginescreen.This
helpsensureadequatecoolingandcorrectengine
speedandreducesthepossibilityofoverheatingand
mechanicaldamagetotheengine.
g242388
Figure24
BrakeMaintenance
AdjustingtheParking
Brake
1.Parkthemachineonalevelsurfaceandengage
theparkingbrake.
2.Shutofftheengineandwaitforallmovingparts
tostop.
3.Loosenthesetscrewonthesideofthe
brake-leverknob.Turntheknobclockwiseto
tightenthebrake;turntheknobcounterclockwise
toloosenthebrake.
Note:Theleftwheelshouldlockcompletely
whenyouengagethebrake.
4.Tightenthesetscrew.
19

BeltMaintenance
AdjustingtheDrive-Belt
Tension
ServiceInterval:Beforeeachuseordaily
Note:Inspectthedrivebeltthroughtheslotontopof
thebeltcover.Adjustasrequired.
1.Parkthemachineonalevelsurfaceandengage
theparkingbrake.
2.Shutofftheengineandwaitforallmovingparts
tostop.
3.Loosenthe2boltssecuringthebeltguardto
machineuntilyoucanremovethebeltguard
(Figure25).
Note:Theboltsandwasherswillremain
attachedtothebeltguard.
g205161
Figure25
1.Beltguard2.Boltandwasher(2)
4.Removethebeltguard(Figure25).
5.Loosenthe4engine-platemountingboltsand
the2boltssecuringtherearofthebeltguardto
theengine(Figure26andFigure27).
g242386
Figure26
1.Bolt
6.Loosenthebelt-tensionboltandjamnut.Slide
theenginetowardtheywheelhousingtoloosen
thebelt(Figure27).
g016617
Figure27
1.Tensionboltandjam2.Engineplatemountingbolt
7.Adjustthedrive-belttensionbytightening
tensionboltandjamnutagainsttheengine
mountingplate,pushingtheenginerearward.
8.Layastraightedgeacrosstheclutchand
ywheelpulleys.Tightenthebelt-tensionbolt
sothereis10mm(0.40inch)ofexinthebelt
whenpushingdownwith6.8kg(15lb)forceat
mid-span(whenre-tensioningabeltinuse),or
with8kg(18lb)forcewheninstallinganewbelt
(Figure28).
20
This manual suits for next models
3
Table of contents
Other Toro Grinder manuals


Popular Grinder manuals by other brands

Metabo
Metabo BFE 9-20 Original instructions

DuraTech Industries
DuraTech Industries 6010 operating instructions

BRODBECK IRONWORKS
BRODBECK IRONWORKS 2X72 GRINDER Assembly instructions

Scheppach
Scheppach SM200L Translation of original instruction manual

Ozito
Ozito BGRT-121 instruction manual

EINHELL
EINHELL TE-AG 125 CE Original operating instructions

Parkside
Parkside PWSAM 20-Li A1 Translation of the original instructions

Hitachi
Hitachi G 13SQ Handling instructions

Parkside
Parkside 102876 translation of original operation manual

Makita
Makita GA4040C instruction manual

Clarke
Clarke CAT133 Operating & maintenance instructions

Baratza
Baratza Sette 270Wi manual


