Toro STX-38 User manual
FormNo.3394-651RevA
STX-38EFIStumpGrinderwith
Intelli-Sweep
ModelNo.23214—SerialNo.315000001andUp
G024905
Registeratwww.Toro.com.
OriginalInstructions(EN)*3394-651*A

WARNING
CALIFORNIA
Proposition65Warning
Thisproductcontainsachemicalorchemicals
knowntotheStateofCaliforniatocausecancer,
birthdefects,orreproductiveharm.
Theengineexhaustfromthisproduct
containschemicalsknowntotheStateof
Californiatocausecancer,birthdefects,
orotherreproductiveharm.
DANGER
Theremaybeburiedutilitylinesintheworkarea.
Ifyoudigintothem,youmaycauseashockor
explosion.
Havethepropertyorworkareamarkedforburied
linesanddonotdiginmarkedareas.Contactyour
localmarkingserviceorutilitycompanytohavethe
propertymarked(forexample,intheUnitedStates,
call811forthenationwidemarkingservice).
ThissparkignitionsystemcomplieswithCanadianICES-002.
Becauseinsomeareastherearelocal,state,orfederal
regulationsrequiringthatasparkarresterbeusedonthe
engineofthismachine,asparkarresterisavailableas
anoption.Ifyourequireasparkarrester,contactyour
AuthorizedToroServiceDealer.
GenuineTorosparkarrestersareapprovedbytheUSDA
ForestryService.
Important:ItisaviolationofCaliforniaPublic
ResourceCodeSection4442touseoroperatetheengine
onanyforest-covered,brush-covered,orgrass-covered
landwithoutasparkarrestermufermaintainedin
workingorder,ortheengineconstricted,equipped,and
maintainedforthepreventionofre.Otherstatesor
federalareasmayhavesimilarlaws.
Theenclosed
Engine Owner's Man ual
issuppliedfor
informationregardingtheUSEnvironmentalProtection
Agency(EPA)andtheCaliforniaEmissionControl
Regulationofemissionsystems,maintenance,and
warranty.Replacementsmaybeorderedthroughthe
enginemanufacturer.
ThisproductcomplieswithallrelevantEuropeandirectives.
Fordetails,pleaseseetheseparateproductspecic
DeclarationofConformity(DOC)sheet.
Introduction
Thismachineisdesignedtogrindandremovetreestumps
andsurfaceroots.Itisnotintendedtocutrockoranyother
materialotherthanwoodandthesoilaroundastump.
Readthisinformationcarefullytolearnhowtooperateand
maintainyourproductproperlyandtoavoidinjuryand
productdamage.Youareresponsibleforoperatingthe
productproperlyandsafely.
YoumaycontactTorodirectlyatwww .Toro.comforproduct
andaccessoryinformation,helpndingadealer,ortoregister
yourproduct.
Wheneveryouneedservice,genuineToroparts,oradditional
information,contactanAuthorizedServiceDealerorToro
CustomerServiceandhavethemodelandserialnumbersof
yourproductready.Figure1illustratesthelocationofthe
modelandserialnumbersontheproduct.Writethenumbers
inthespaceprovided.
1
G024914
Figure1
1.Modelandserialnumberplate
ModelNo.
SerialNo.
Thismanualidentiespotentialhazardsandhassafety
messagesidentiedbythesafetyalertsymbol(Figure2),
whichsignalsahazardthatmaycauseseriousinjuryordeath
ifyoudonotfollowtherecommendedprecautions.
©2015—TheToro®Company
8111LyndaleAvenueSouth
Bloomington,MN554202
Contactusatwww.Toro.com.
PrintedintheUSA
AllRightsReserved

Figure2
1.Safetyalertsymbol
Thismanualuses2wordstohighlightinformation.
Importantcallsattentiontospecialmechanicalinformation
andNoteemphasizesgeneralinformationworthyofspecial
attention.
Contents
Safety...........................................................................4
SafeOperatingPractices...........................................4
SoundPressure.......................................................6
SoundPower..........................................................6
Hand-ArmVibrationLevel.......................................6
SlopeIndicator.......................................................7
SafetyandInstructionalDecals.................................8
Setup...........................................................................11
CheckingFluidLevels.............................................11
ChargingtheBattery...............................................11
OpeningtheLiftValve............................................11
ProductOverview.........................................................11
Controls...............................................................11
Specications........................................................14
Attachments/Accessories........................................14
Operation....................................................................15
AddingFuel...........................................................15
CheckingtheEngine-oilLevel..................................16
StartingandStoppingtheEngine..............................16
StoppingtheMachine.............................................17
MovingaNon-functioningMachine.........................17
GrindingaStump...................................................17
SecuringtheMachineforTransport..........................18
LiftingtheMachine................................................18
OperatingTips......................................................19
Maintenance.................................................................20
RecommendedMaintenanceSchedule(s)......................20
PremaintenanceProcedures........................................20
RemovingtheFrontCover......................................20
InstallingtheFrontCover........................................21
RemovingtheBottomShield...................................21
InstallingtheBottomShield.....................................21
Lubrication...............................................................22
GreasingtheMachine.............................................22
EngineMaintenance..................................................23
ServicingtheAirCleaner.........................................23
ServicingtheEngineOil..........................................23
ServicingtheSparkPlugs.........................................26
FuelSystemMaintenance...........................................27
DrainingtheFuelTank...........................................27
ReplacingtheLow-pressureFuelFilter......................27
ServicingtheHigh-pressureFuelFilter......................28
ElectricalSystemMaintenance....................................28
ServicingtheBattery...............................................28
ReplacingtheFuses................................................30
DriveSystemMaintenance.........................................31
ServicingtheTracks................................................31
CoolingSystemMaintenance......................................33
CleaningtheEngineScreen......................................33
BeltMaintenance......................................................34
ReplacingthePumpDriveBelt.................................34
ControlsSystemMaintenance.....................................34
AdjustingtheTractionControlAlignment.................34
AdjustingtheTractionControlNeutral
Position.............................................................35
AdjustingtheTrackingoftheTractionControl,
FullForwardPosition..........................................35
HydraulicSystemMaintenance....................................36
CheckingtheHydraulic-uidLevel...........................36
ReplacingtheHydraulicFilter..................................37
ChangingtheHydraulicFluid...................................38
CheckingtheHydraulicLines...................................38
GrinderMaintenance..................................................39
ReplacingtheTeeth................................................39
Cleaning...................................................................39
RemovingDebrisfromtheMachine..........................39
Storage........................................................................40
Troubleshooting...........................................................41
Schematics...................................................................42
3

Safety
Improperuseormaintenancecanresultininjury.To
reducethepotentialforinjury,complywiththesesafety
instructionsandalwayspayattentiontothesafety
alertsymbol,whichmeans:
Caution
,
W ar ning
,or
Danger
—personalsafetyinstruction.Failuretocomply
withtheinstructionmayresultinpersonalinjuryor
death.
SafeOperatingPractices
Thisproductiscapableofamputatinghandsandfeet.Always
followallsafetyinstructionstoavoidseriousinjuryordeath.
WARNING
Engineexhaustcontainscarbonmonoxide,an
odorless,deadlypoisonthatcankillyou.
Donotruntheengineindoorsorinanenclosed
area.
Training
•ReadtheOperator'sManualandothertrainingmaterial.If
theoperator(s)ormechanic(s)cannotreadorunderstand
theinformation,itistheowner'sresponsibilitytoexplain
thismaterialtothem.
•Becomefamiliarwiththesafeoperationoftheequipment,
operatorcontrols,andsafetysigns.
•Alloperatorsandmechanicsshouldbetrained.The
ownerisresponsiblefortrainingtheusers.
•Neverletchildrenoruntrainedpeopleoperateorservice
theequipment.Localregulationsmayrestricttheageof
theoperator.
•Theowner/usercanpreventandisresponsiblefor
accidentsorinjuriesoccurringtopeopleordamageto
property.
Preparation
•Evaluatetheterraintodeterminewhataccessoriesand
attachmentsareneededtoproperlyandsafelyperform
thejob.Onlyuseaccessoriesandattachmentsapproved
bythemanufacturer.
•Wearappropriateclothingincludinghardhat,afullface
shield,safetyglasses,longpants,substantialsafetyshoes,
andhearingprotection.Longhair,looseclothingor
jewelrymaygettangledinmovingparts.
•Inspecttheareawheretheequipmentistobeusedand
removeallobjectssuchasrocks,toys,andwirewhichcan
bethrownbythemachine.
•Checkthattheoperatorpresencecontrols,safetyswitches,
andshieldsareattachedandfunctioningproperly.Donot
operateunlesstheyarefunctioningproperly.
Operation
•Neverrunanengineinanenclosedarea.
•Onlyoperateingoodlight,keepingawayfromholesand
hiddenhazards.
•Besurealldrivesareinneutralbeforestartingtheengine.
Onlystarttheenginefromtheoperator'sposition.
•Slowdownanduseextracareonhillsides.Besureto
travelintherecommendeddirectiononhillsides.Turf
conditionscanaffectthemachine'sstability.
•Neveroperatewiththeguardsnotsecurelyinplace.Be
sureallinterlocksareattached,adjustedproperly,and
functioningproperly.
•Donotchangetheenginegovernorsettingoroverspeed
theengine.
•Stoponlevelground,lowerthegrinder,disengagethe
hydraulics,andshutofftheenginebeforeleavingthe
operator'spositionforanyreason.
•Keephandsandfeetawayfromthemovinggrinderwheel
andteeth.
•Lookbehindanddownbeforebackinguptobesureof
aclearpath.
•Keeppetsandbystandersaway.
•Donotoperatethemachineundertheinuenceof
alcoholordrugs.
•Usecarewhenloadingorunloadingthemachineinto
oroutofatrailerortruck.
•Ensurethattheareaisclearofotherpeoplebefore
operatingthemachine.Stopthemachineifanyoneenters
thearea.
•Neverleavearunningmachineunattended.Alwayslower
thegrinder,stoptheengine,andremovethekeybefore
leaving.
•Neverjerkthecontrols;useasteadymotion.
•Watchfortrafcwhenoperatingnearroadways.
•Donottouchpartswhichmaybehotfromoperation.
Allowthemtocoolbeforeattemptingtomaintain,adjust,
orservice.
•Ensurethatyouoperatethemachineinareaswhere
therearenoobstaclesincloseproximitytotheoperator.
Failuretomaintainadequatedistancefromtrees,walls,
andotherbarriersmayresultininjuryasthemachine
backsupduringoperationiftheoperatorisnotattentive
tothesurroundings.Onlyoperatetheunitinareaswhere
thereissufcientclearancefortheoperatortosafely
maneuvertheproduct.
•Beforegrinding,havetheareamarkedforunderground
utilities,anddonotgrindintothegroundinmarkedareas.
•Locatethepinchpointareasmarkedonthemachineand
keephandsandfeetawayfromtheseareas.
•Lightningcancausesevereinjuryordeath.Iflightning
isseenorthunderisheardinthearea,donotoperate
themachine;seekshelter.
4

SafeHandlingofFuels
•Toavoidpersonalinjuryorpropertydamage,use
extremecareinhandlinggasoline.Gasolineisextremely
ammableandthevaporsareexplosive.
•Extinguishallcigarettes,cigars,pipes,andothersources
ofignition.
•Useonlyanapprovedfuelcontainer.
•Neverremovefuelcaporaddfuelwiththeengine
running.
•Allowenginetocoolbeforerefueling.
•Neverrefuelthemachineindoors.
•Neverstorethemachineorfuelcontainerwherethereis
anopename,spark,orpilotlightsuchasonawater
heateroronotherappliances.
•Neverllcontainersinsideavehicleoronatruckor
trailerbedwithaplasticliner.Alwaysplacecontainerson
thegroundawayfromyourvehiclebeforelling.
•Removeequipmentfromthetruckortrailerandrefuelit
ontheground.Ifthisisnotpossible,thenrefuelsuch
equipmentwithaportablecontainer,ratherthanfroma
fueldispensernozzle.
•Keepthenozzleincontactwiththerimofthefueltank
orcontaineropeningatalltimesuntilfuelingiscomplete.
•Donotuseanozzlelockopendevice.
•Iffuelisspilledonclothing,changeclothingimmediately.
•Neveroverllfueltank.Replacefuelcapandtighten
securely.
SlopeOperation
Slopesareamajorfactorrelatedtoloss-of-controland
tip-overaccidents,whichcanresultinsevereinjuryordeath.
Allslopesrequireextracaution.
•Donotoperatethemachineonhillsidesorslopes
exceedingtheanglesrecommendedinthefollowingtable.
FrontFacing
Uphill
RearFacing
Uphill
SideFacingUphill
16°16°16°
Note:SeealsotheSlopeIndicator(page7).
•Operateupanddownslopeswiththefrontendof
themachineuphill.
•Removeobstaclessuchasrocks,treelimbs,etc.fromthe
workarea.Watchforholes,ruts,orbumps,asuneven
terraincouldoverturnthemachine.Tallgrasscanhide
obstacles.
•UseonlyToro-approvedaccessories.Accessoriescan
changethestabilityandtheoperatingcharacteristics
ofthemachine.Warrantymaybevoidedifusedwith
unapprovedaccessories.
•Keepallmovementsonslopesslowandgradual.Donot
makesuddenchangesinspeedordirection.
•Avoidstartingorstoppingonaslope.Ifthemachine
losestraction,proceedslowly,straightdowntheslope.
•Avoidturningonslopes.Ifyoumustturn,turnslowly
andkeeptheheavyendofthemachineuphill.
•Donotoperateneardrop-offs,ditches,orembankments.
Themachinecouldsuddenlyturnoverifatrackgoes
overtheedgeofaclifforditch,orifanedgecavesin.
•Donotoperateonwetgrass.Reducedtractioncould
causesliding.
•Donotparkthemachineonahillsideorslopewithout
loweringthegrindertothegroundandchockingthe
tracks.
MaintenanceandStorage
•Disengagethehydraulics,lowerthegrinder,stopthe
engine,andremovethekey.Waitforallmovementto
stopbeforeadjusting,cleaning,orrepairing.
•Cleandebrisfromthegrinder,drives,mufers,andengine
tohelppreventres.Cleanupoilorfuelspillage.
•Lettheenginecoolbeforestoringanddonotstorenear
ame.
•Donotstorefuelnearamesordrainindoors.
•Parkthemachineonlevelground.Neverallowuntrained
personneltoservicethemachine.
•Usejackstandstosupportcomponentswhenrequired.
•Carefullyreleasepressurefromcomponentswithstored
energy.
•Disconnectthebatteryorremovethesparkplugwires
beforemakinganyrepairs.Disconnectthenegative
terminalrstandthepositivelast.Reconnectpositive
rstandnegativelast.
•Keephandsandfeetawayfrommovingparts.Ifpossible,
donotmakeadjustmentswiththeenginerunning.
•Keepallpartsingoodworkingconditionandallhardware
tightened.Replaceallwornordamageddecals.
•Keepnutsandboltstight.Keepequipmentingood
condition.
•Nevertamperwithsafetydevices.
•Keepthemachinefreeofgrass,leaves,orotherdebris
build-up.Cleanupoilorfuelspillage.Allowthemachine
tocoolbeforestoring.
•Stopandinspecttheequipmentifyoustrikeaforeign
objectoutsideofthestumpwood.Makeanynecessary
repairsbeforerestarting.
•UseonlygenuineTororeplacementpartstoensurethat
originalstandardsaremaintained.
•Batterysafety:
–Chargebatteriesinanopen,wellventilatedarea,away
fromsparkandames.Unplugthechargerbefore
connectingordisconnectingitfromthebattery.Wear
protectiveclothinganduseinsulatedtools.
5

–Batteryacidispoisonousandcancauseburns.Avoid
contactwithskin,eyes,andclothing.Protectyour
face,eyes,andclothingwhenworkingwithabattery.
–Batterygasescanexplode.Keepcigarettes,sparks
andamesawayfromthebattery.
•Keepyourbodyandhandsawayfrompinholeleaks
ornozzlesthatejecthighpressurehydraulicuid.Use
cardboardorpapertondhydraulicleaks;neveruse
yourhands.Hydraulicuidescapingunderpressurecan
penetrateskinandcauseinjuryrequiringsurgerywithina
fewhoursbyaqualiedsurgeonorgangrenemayresult.
Hauling
•Usecarewhenloadingorunloadingthemachineintoa
trailerortruck.
•Usefullwidthrampsforloadingmachineintotraileror
truck.
•Tiethemachinedownsecurelyusingstraps,chains,cable,
orropes.Bothfrontandrearstrapsshouldbedirected
downandoutwardfromthemachine.
SoundPressure
Thisunithasasoundpressurelevelattheoperator’searof92
dBA,whichincludesanUncertaintyValue(K)of1dBA.
Soundpressurelevelwasdeterminedaccordingtothe
proceduresoutlinedinENISO11201.
Thesoundpressurelevelwillvarydependingonconditions.
SoundPower
Thisunithasasoundpowerlevelof109dBA,whichincludes
anUncertaintyValue(K)of3.75dBA.
Thesoundpowerlevelwasdeterminedwithnoload
accordingtotheproceduresoutlinedinISO3744.
Hand-ArmVibrationLevel
DeclaredinaccordancewithEN12096
Measuredvibrationlevelforrighthand=2.2m/s2
Measuredvibrationlevelforlefthand=2.3m/s2
UncertaintyValue(K)=1.2m/s2
Measuredvaluesweredeterminedaccordingtotheprocedures
outlinedinENISO20643.
6
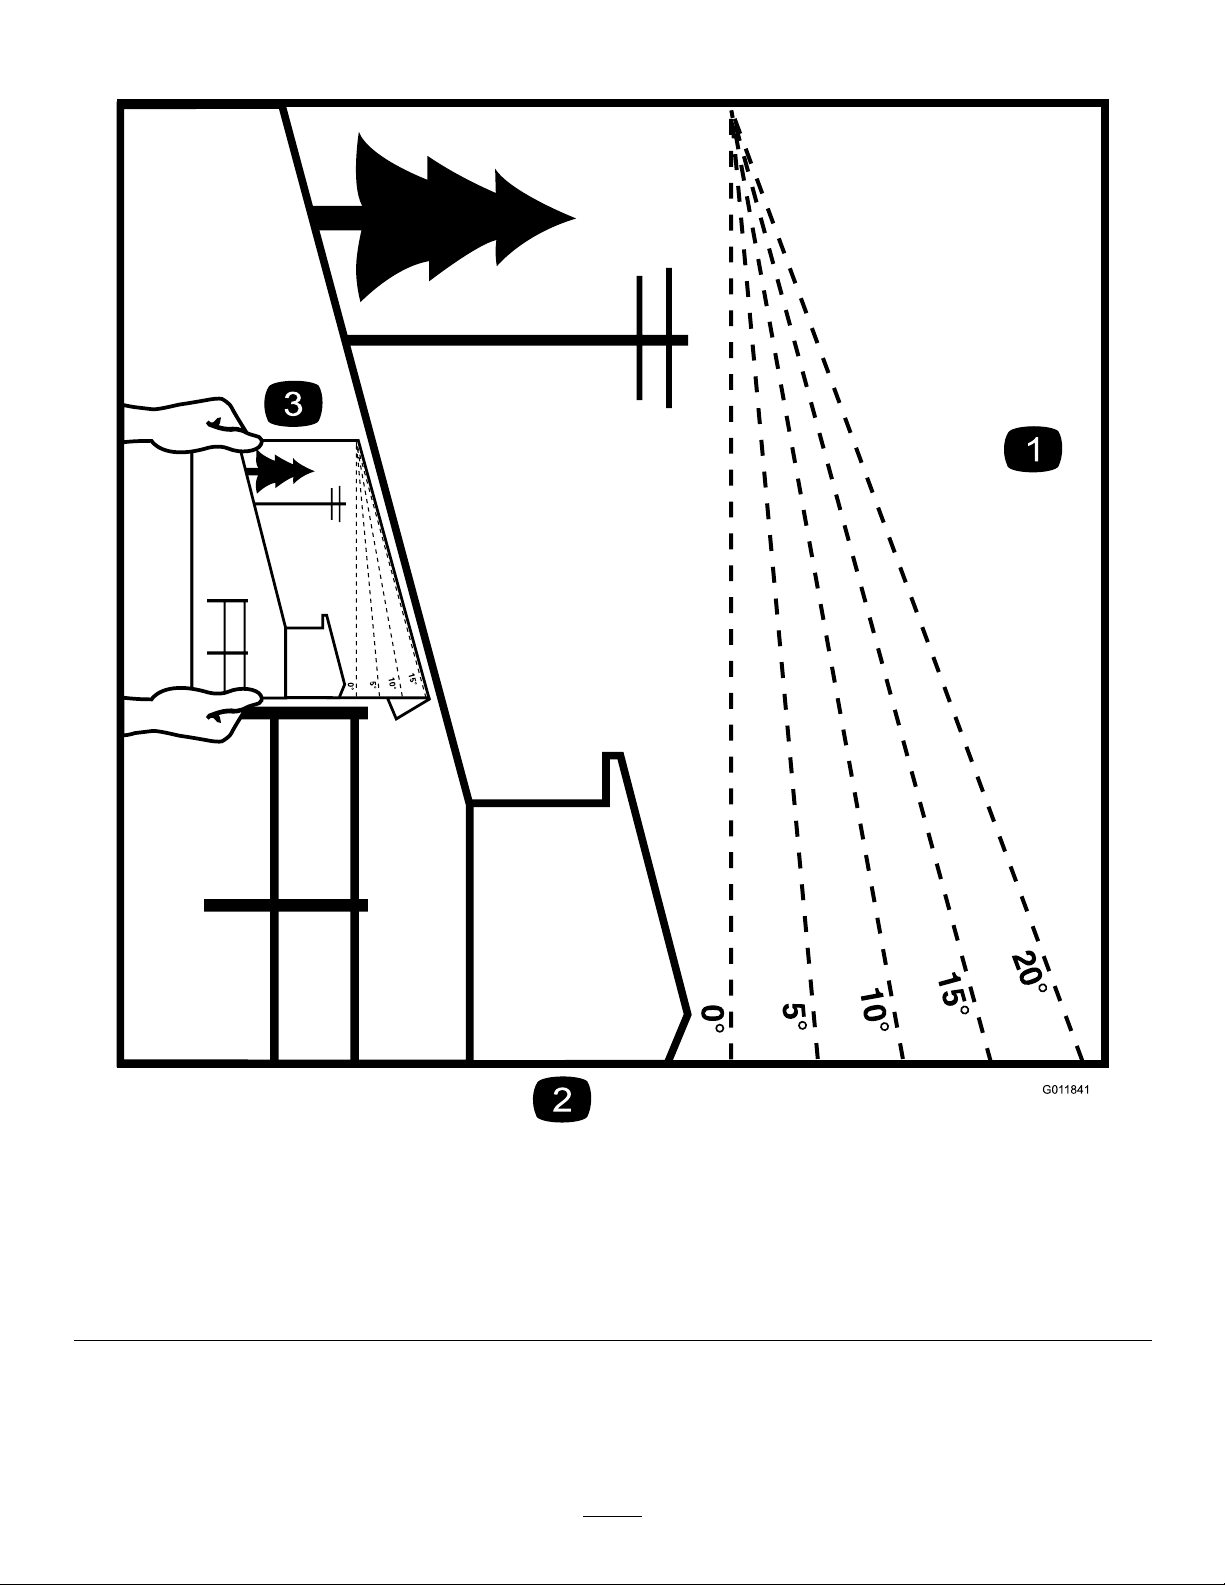
SlopeIndicator
G01 1841
Figure3
Thispagemaybecopiedforpersonaluse.
1.Themaximumslopeyoucansafelyoperatethemachineonis16degrees.Usetheslopecharttodeterminethedegreeofslope
ofhillsbeforeoperating.Donotoperatethismachineonaslopegreaterthan16degrees.Foldalongtheappropriateline
tomatchtherecommendedslope.
2.Alignthisedgewithaverticalsurface,atree,building,fencepole,etc.
3.Exampleofhowtocompareslopewithfoldededge.
7
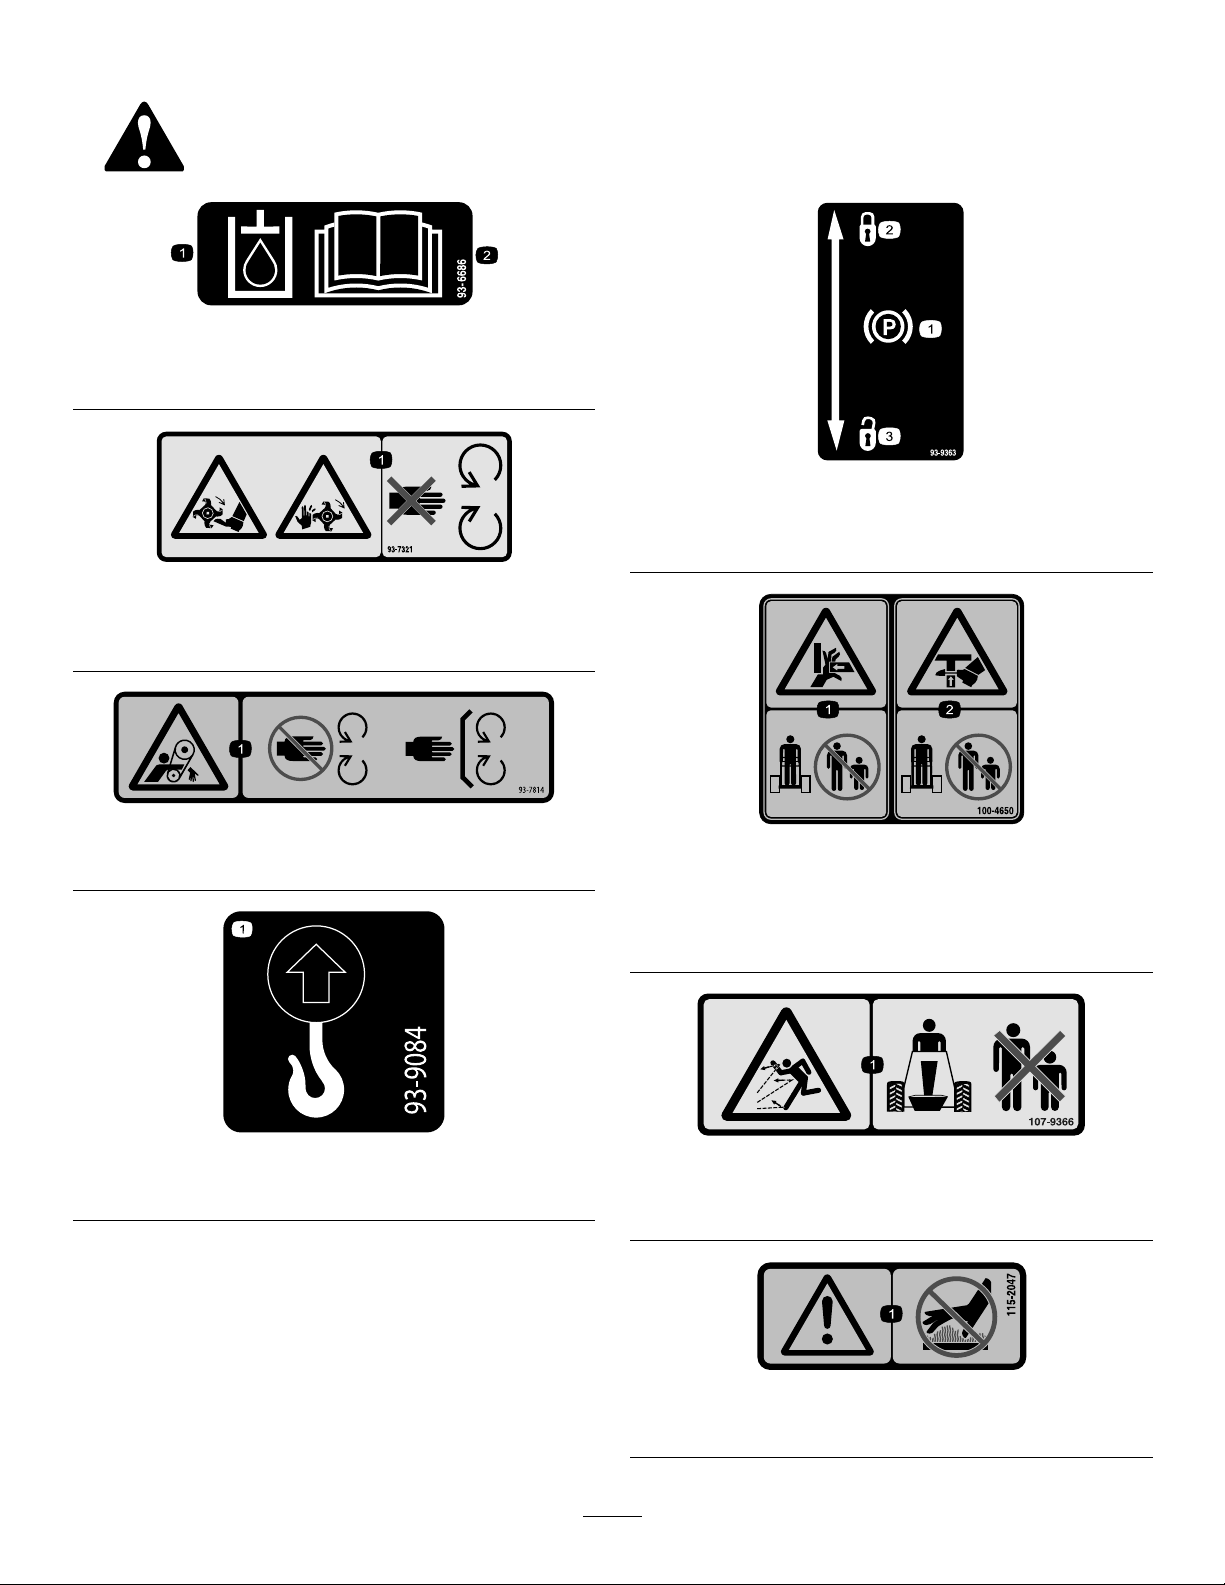
SafetyandInstructionalDecals
Safetydecalsandinstructionsareeasilyvisibletotheoperatorandarelocatednearanyareaofpotential
danger.Replaceanydecalthatisdamagedorlost.
93–6686
1.Hydraulicoil2.ReadtheOperator's
Manual.
93-7321
1.Cutting/dismembermenthazardofhandsandfeet,rotating
knives/blades—stayawayfrommovingparts.
93-7814
1.Entanglementhazard,belt—stayawayfrommovingparts.
93-9084
1.Liftpoint2.Tie-downpoint
93-9363
1.Parkingbrake3.Unlocked
2.Locked
100-4650
1.Crushinghazardofhand—keepbystandersasafedistance
fromthemachine.
2.Crushinghazardoffoot—keepbystandersasafedistance
fromthemachine.
107-9366
1.Thrownobjecthazard—keepbystandersasafedistance
fromthemachine.
115-2047
1.Warning—donottouchthehotsurface.
8
115-4020
1.Turnright3.Reverse
2.Forward4.Turnleft
117–2718
BatterySymbols
Someorallofthesesymbolsareonyourbattery
1.Explosionhazard6.Keepbystandersasafe
distancefromthebattery.
2.Nore,opename,or
smoking.
7.Weareyeprotection;
explosivegasescan
causeblindnessandother
injuries
3.Causticliquid/chemical
burnhazard
8.Batteryacidcancause
blindnessorsevereburns.
4.Weareyeprotection9.Flusheyesimmediately
withwaterandgetmedical
helpfast.
5.ReadtheOperator's
Manual.
10.Containslead;donot
discard.
121–4402
1.Pushforwardtolowerthe
stumpgrinder
3.Pullbacktoraisethe
stumpgrinder
2.Moverighttomovethe
stumpgrindertotheright
4.Movelefttomovethe
stumpgrindertotheleft
130-7580
1.Engine—start5.Enginespeed—slow
2.Engine—run6.Engineindicatorlight
3.Engine—stop7.ReadtheOperator's
Manualbeforestartingthe
engine—1)Ensurethat
thetractioncontrolisin
theneutralposition;2)
Movethethrottleleverto
theFastposition,close
thechoke(ifapplicable),
anddonotoperatethe
joystick;3)Turnthekeyto
starttheengine.
4.Enginespeed—fast
9

119-4606
1.Warning—readtheOperator'sManual.5.Explosionandelectricshockhazard—donotdiginareaswith
buriedutilitylines;contactlocalpowerorganizationsbefore
digging.
2.Cutting/dismembermenthazard;grinder—keepbystandersa
safedistancefromthemachine;donotoperatethegrinder
headwhiletransportingthemachine.
6.Tipping/crushinghazard—lowerthecutterheadwhen
operatingonslopes.
3.Warning—stayawayfrommovingparts;waitforallmoving
partstostop.
7.Explosionhazard,fueling—stoptheengineandextinguish
allameswhenfueling.
4.Warning—donotoperatethismachineunlessyouaretrained.8.Warning—lowerthegrinderhead,settheparkingbrake(if
applicable),stoptheengine,removetheignitionkeybefore
leavingthemachine.
121–4382
1.ReadtheOperator’sManualforinformationonoperatingthe
grinder—1)Grindhorizontallyalongtheedgeofthestump;2)
Lowerthegrinderslightlyintothestump;3)Grindhorizontally
downtogroundlevel;4)Movethegrinderforward.
3.1)Topowerthegrinder,pressthesafetylockandthetrigger
together;2)T okeepthegrinderrunning,holdthetrigger.
2.Donotstartgrindinginthemiddleofthestump;startgrinding
attheedgeofthestump.
10
Setup
CheckingFluidLevels
Beforestartingtheengineforthersttime,checktheengine
oilandhydraulicuidlevels;refertoCheckingtheEngine-oil
Level(page24)andCheckingtheHydraulic-uidLevel(page
36)formoreinformation.
ChargingtheBattery
Chargethebattery;refertoChargingtheBattery(page30)
formoreinformation.
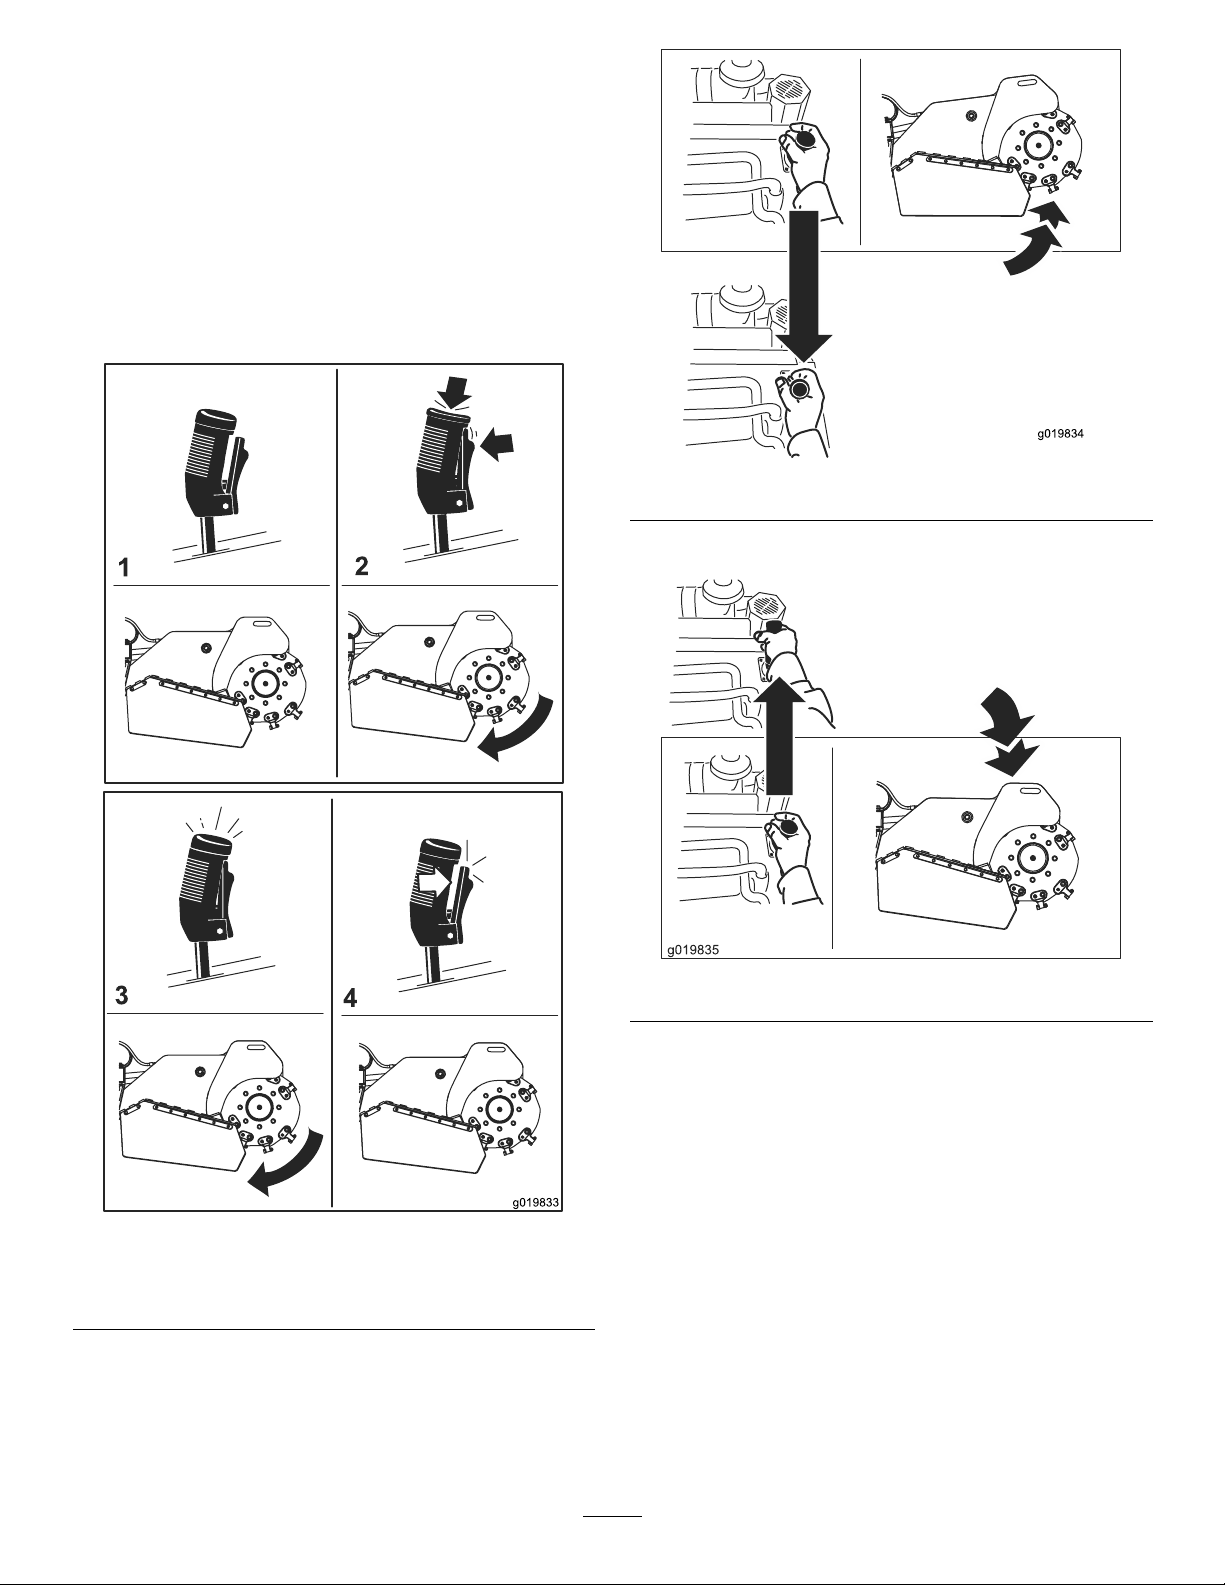
OpeningtheLiftValve
Beforeyoucanraisethegrinderandmovethemachine,
youmustopentheliftvalvelocatedunderthecontrolpanel
(Figure4).Turntheknobcounterclockwisetoallowyouto
liftthegrinder.Thefurtheryouturntheknob,thefasterthe
headwillraiseandlowerwhenactivated.
Figure4
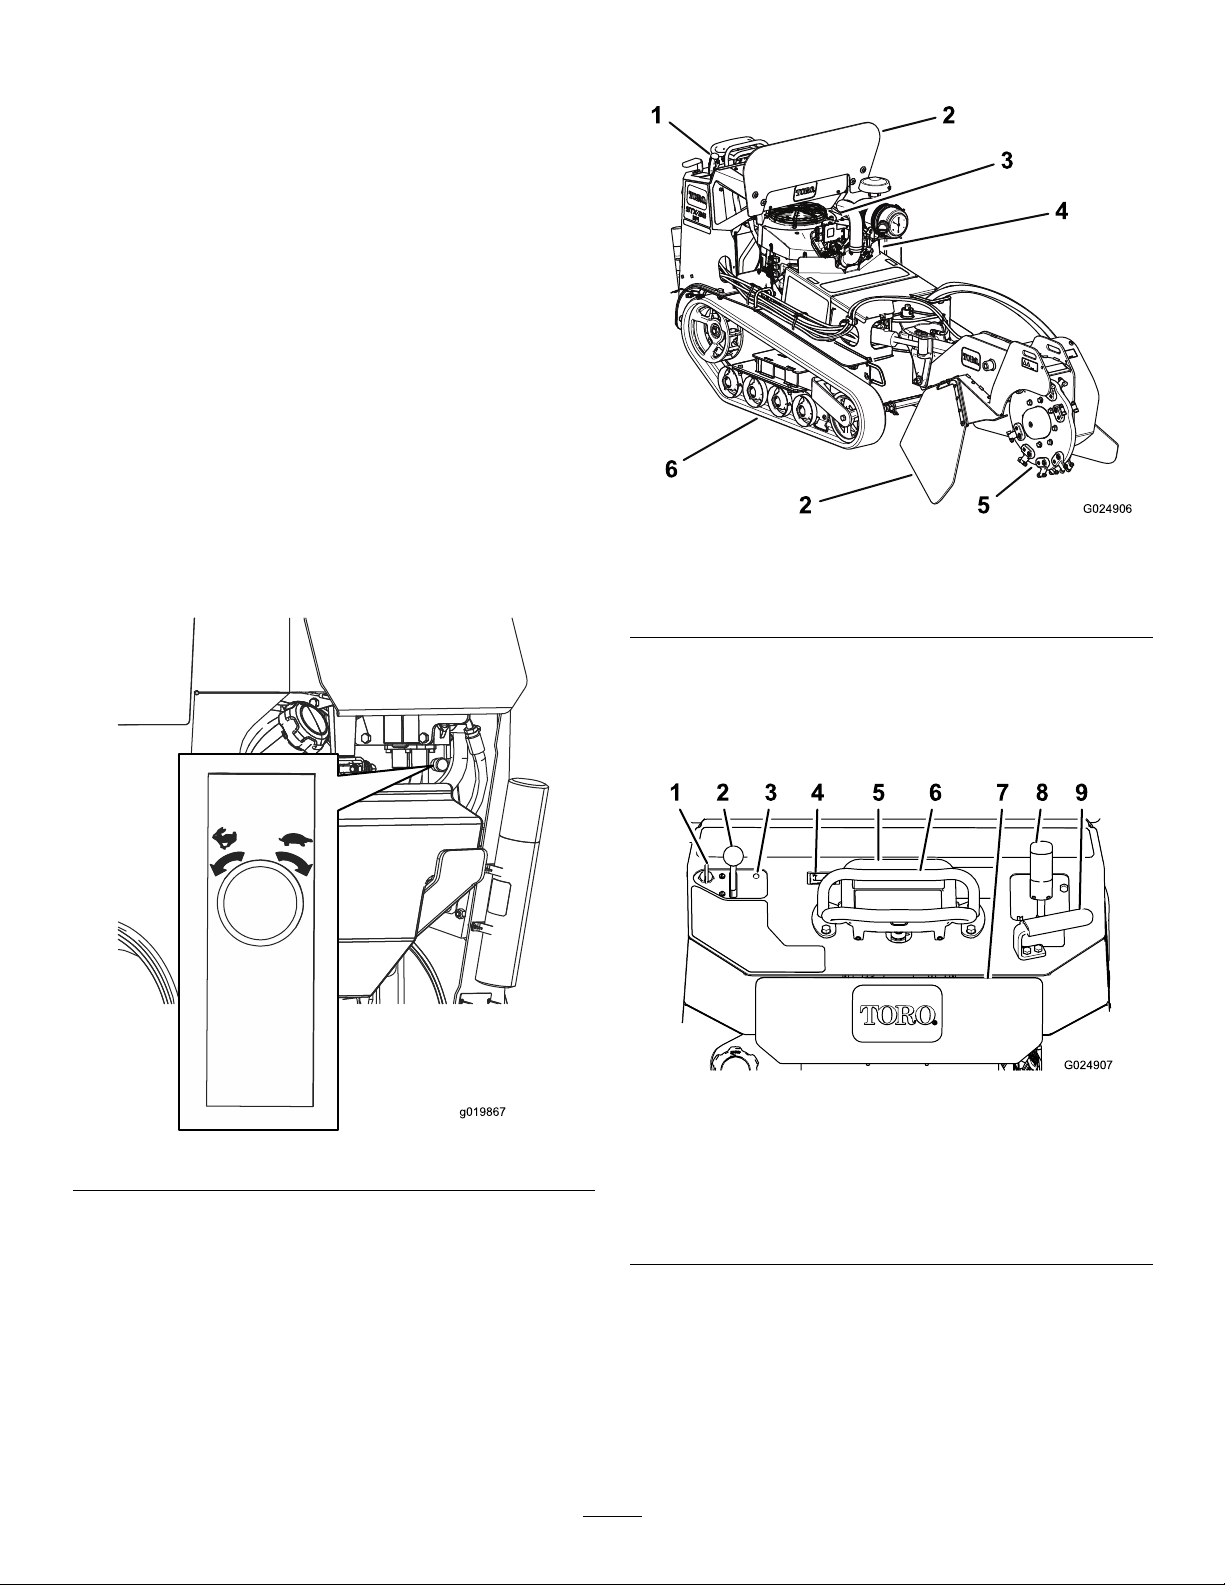
ProductOverview
1
G024906
2
4
3
25
6
Figure5
1.Controlpanel3.Engine5.Grinder
2.Chipshield4.Battery6.Track
Controls
Becomefamiliarwithallthecontrols(Figure6)beforeyou
starttheengineandoperatethemachine.
1 2 4 5 6 7 8 9
G024907
3
Figure6
1.Keyswitch6.Referencebar
2.Throttlelever7.Reversesafetyplate
3.Engineindicatorlight8.Grindercontrollever
4.Hourmeter9.Handle
5.Tractioncontrol
KeySwitch
Thekeyswitchhasthreepositions:Off,Run,andStart.
•Tostarttheengine,rotatethekeytotheStartposition.
Releasethekeywhenenginestartsanditwillmove
automaticallytotheRunposition.
•Tostoptheengine,rotatethekeytotheOffposition.
11

ThrottleLever
Movethecontrolforwardtoincreasetheenginespeedand
rearwardtodecreasespeed.
HourMeter
Whentheengineisoff,thehourmeterdisplaysthenumber
ofhoursofoperationthathavebeenloggedonthemachine.
ReferenceBar
Whendrivingthemachine,usethereferencebarasahandle
andaleveragepointforcontrollingthetractioncontrol.To
ensuresmooth,controlledoperation,donottakebothhands
offthereferencebarwhileoperatingthemachine.
ParkingBrake
Toengagetheparkingbrake,lifttheleverupward.To
disengagetheparkingbrake,pushtheleverdownward.
Figure7
1.Parking-brakelever
TractionControl
Figure8
1.Referencebar(doesnotmovetogiveyouareferencepoint
andaxedhandletoholdwhileoperatingthetractionunit)
2.Tractioncontrol(movestocontrolthemachine)
•Tomoveforward,movethetractioncontrolforward
(Figure9).
Figure9
•Tomoverearward,movethetractioncontrolrearward
(Figure10).Whenreversing,lookbehindfor
obstructionsandkeepyourhandsonthereference
bar(Figure8).
Figure10
•Toturnright,rotatethetractioncontrolclockwise(Figure
11).
G008131
Figure11
•Toturnleft,rotatethetractioncontrolcounterclockwise
(Figure12).
G008132
Figure12
•Tostop,releasethetractioncontrol(Figure8).
Note:Thefartheryoumovethetractioncontrolinany
direction,thefasterthemachinewillmoveinthatdirection.
12
GrinderControlLever
Operatethegrinderusingthegrindercontrolleverasfollows:
•Tostartthegrinder(Figure13),presstheredbuttonon
thetopofthelever,thensqueezethetrigger.Oncethe
grinderhasstarted,youcanreleasetheredbutton.
•Tostopthegrinder(Figure13),releasethetriggerfor
morethanahalfsecond.
Note:Ifyouareoperatingthegrinderandmomentarily
releasethetrigger(forlessthanahalfsecond)thegrinder
willcontinueoperation.
Figure13
1.Neutral3.Runthegrinder
2.Startthegrinder4.Stopthegrinder
•Toraisethegrinder,pulltheleverrearward(Figure14).
Figure14
•Tolowerthegrinder,pushtheleverforward(Figure15).
Figure15
•Torotatethegrindertotherightorleft,movetheleverin
thedesireddirection.
13
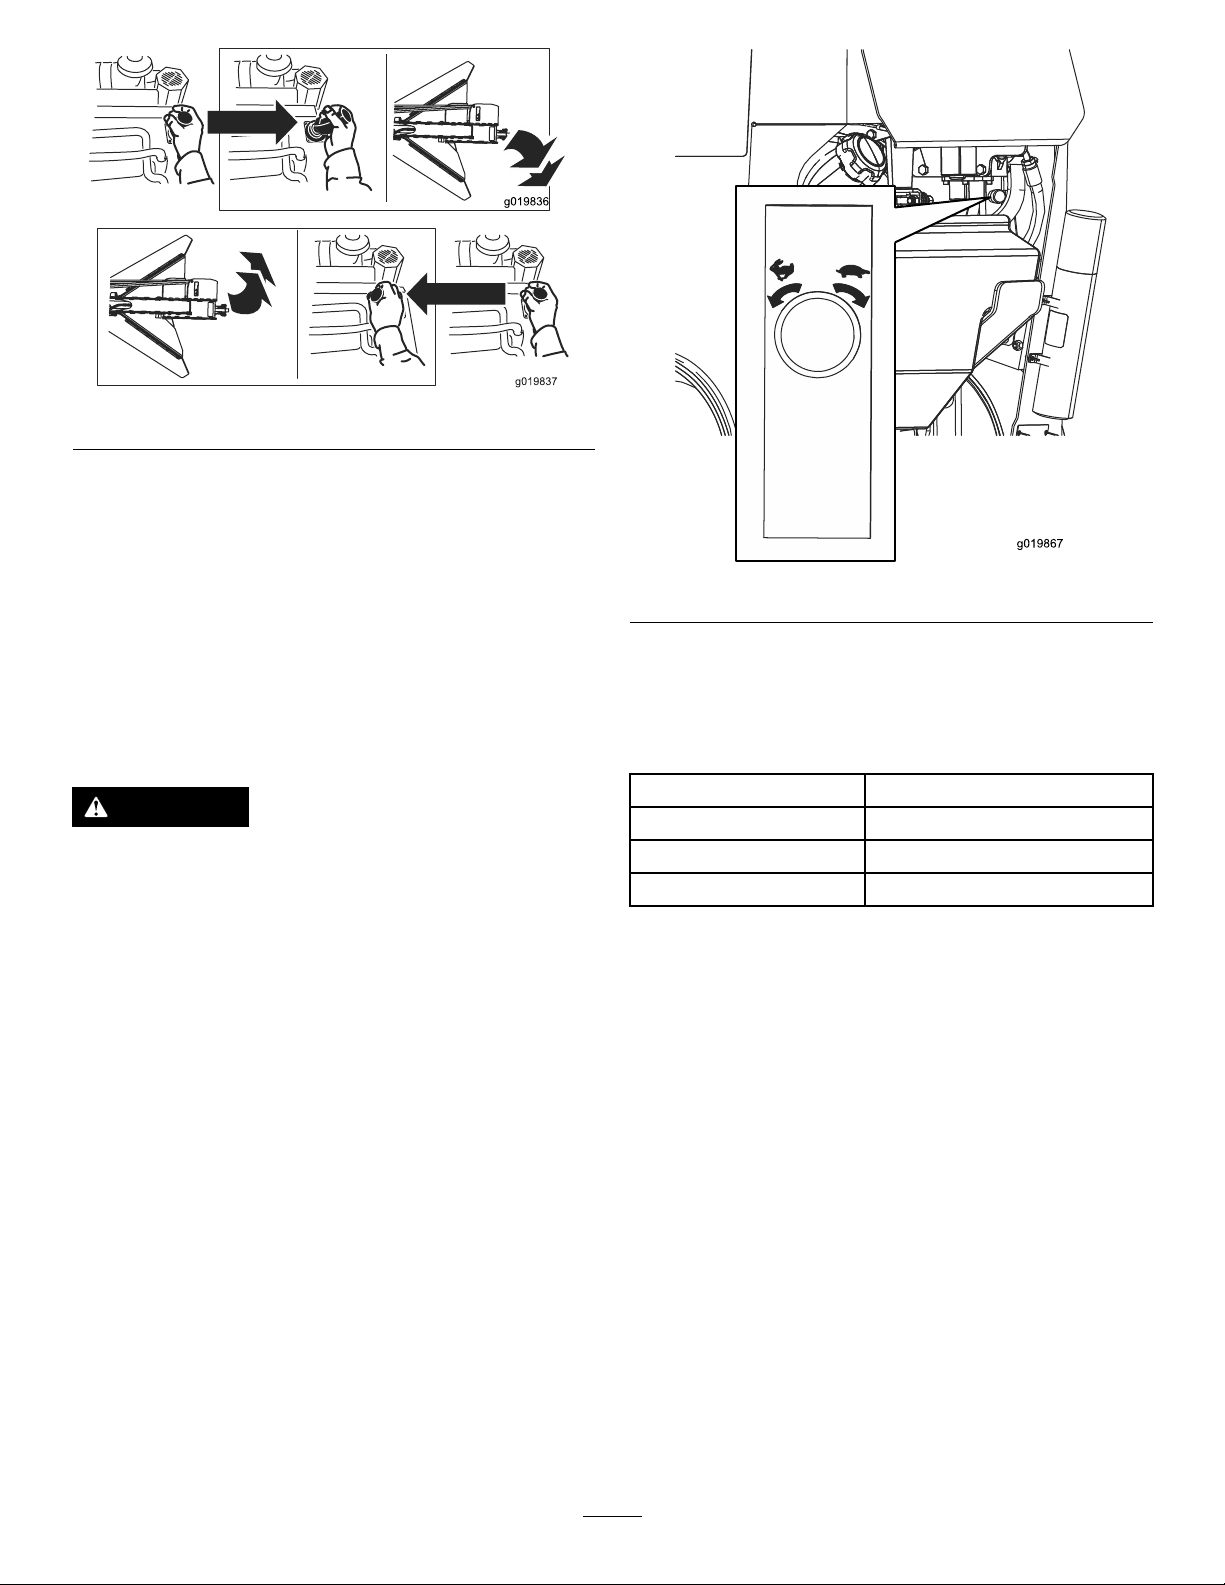
Figure16
Lift/LowerSpeedControl
Youcanchangehowquicklythegrinderheadraisesand
lowersusingthelift/lowerspeedcontrol,locatedunder
therightsideofthecontrolpanel(Figure17).Rotatethe
dialcounterclockwisetoincreasethespeedorclockwiseto
reducethespeed.
Ifyoueverneedtostopthemachinewiththegrinderhead
raised,turnthecontroldialallthewayclockwisetolockthe
grinderheadbeforeleavingthemachineorperformingany
maintenance
CAUTION
IfyouleavethegrinderheadintheUpposition
withoutturningthelift/lowerspeedcontroldialall
thewayclockwise,thegrindercouldlowercrushing
youorbystanders.
Wheneverpossible,lowerthegrindertotheground
beforestoppingtheengine.Ifyoumustkeep
thegrinderheadraised,turnthelift/lowerspeed
controldialallthewayclockwisetolockthegrinder.
Figure17
Specications
Note:Specicationsanddesignaresubjecttochange
withoutnotice.
Width86cm(34inches)
Length241cm(95inches)
Height130cm(51inches)
Weight794kg(1750lb)
Attachments/Accessories
AselectionofToroapprovedattachmentsandaccessoriesis
availableforusewiththemachinetoenhanceandexpand
itscapabilities.ContactyourAuthorizedServiceDealeror
Distributororgotowww .Toro.comforalistofallapproved
attachmentsandaccessories.
14

Operation
Note:Determinetheleftandrightsidesofthemachine
fromthenormaloperatingposition.
Important:Beforeoperating,checkthefuelandoil
level,andremovedebrisfromthemachine.Also,ensure
thattheareaisclearofpeopleanddebris.Youshould
alsoknowandhavemarkedthelocationsofallutility
lines.
AddingFuel
RecommendedFuel:
•Forbestresults,useonlyclean,fresh(lessthan30days
old),unleadedgasolinewithanoctaneratingof87or
higher((R+M)/2ratingmethod).
•Ethanol:Gasolinewithupto10%ethanol(gasohol)
or15%MTBE(methyltertiarybutylether)byvolume
isacceptable.EthanolandMTBEarenotthesame.
Gasolinewith15%ethanol(E15)byvolumeisnot
approvedforuse.Neverusegasolinethatcontainsmore
than10%ethanolbyvolume,suchasE15(contains15%
ethanol),E20(contains20%ethanol),orE85(contains
85%ethanol).Usingunapprovedgasolinemaycause
performanceproblemsand/orenginedamagewhichmay
notbecoveredunderwarranty.
•Donotusegasolinecontainingmethanol.
•Donotstorefueleitherinthefueltankorfuelcontainers
overthewinterunlessafuelstabilizerisused
•Donotaddoiltogasoline.
DANGER
Incertainconditions,gasolineisextremely
ammableandhighlyexplosive.Areorexplosion
fromgasolinecanburnyouandothersandcan
damageproperty.
•Fillthefueltankoutdoors,inanopenarea,
whentheengineiscold.Wipeupanygasoline
thatspills.
•Neverllthefueltankinsideanenclosedtrailer.
•Donotllthefueltankcompletelyfull.Add
gasolinetothefueltankuntilthelevelis6to13
mm(1/4to1/2inch)belowthebottomofthe
llerneck.Thisemptyspaceinthetankallows
gasolinetoexpand.
•Neversmokewhenhandlinggasoline,andstay
awayfromanopenameorwheregasoline
fumesmaybeignitedbyaspark.
•Storegasolineinanapprovedcontainerand
keepitoutofthereachofchildren.Neverbuy
morethana30-daysupplyofgasoline.
•Donotoperatewithoutentireexhaustsystemin
placeandinproperworkingcondition.
DANGER
Incertainconditionsduringfueling,static
electricitycanbereleasedcausingasparkwhich
canignitethegasolinevapors.Areorexplosion
fromgasolinecanburnyouandothersandcan
damageproperty.
•Alwaysplacegasolinecontainersontheground
awayfromyourvehiclebeforelling.
•Donotllgasolinecontainersinsideavehicleor
onatruckortrailerbedbecauseinteriorcarpets
orplastictruck-bedlinersmayinsulatethe
containerandslowthelossofanystaticcharge.
•Whenpractical,removegas-poweredequipment
fromthetruckortrailerandfueltheequipment
withthewheelsontheground.
•Ifthisisnotpossible,thenfuelsuchequipment
onatruckortrailerfromaportablecontainer,
ratherthanfromagasoline-dispensernozzle.
•Ifagasoline-dispensernozzlemustbeused,
keepthenozzleincontactwiththerimofthe
fueltankorcontaineropeningatalltimesuntil
fuelingiscomplete.
Important:Donotusemethanol,gasolinecontaining
methanol,orgasoholcontainingmorethan10%ethanol
becausethefuelsystemcouldbedamaged.Donotmix
oilwithgasoline.
15

UsingStabilizer/Conditioner
Useafuelstabilizer/conditionerinthemachinetokeep
gasolinefreshduringstorageof90daysorless.Forlonger
storageitisrecommendedthatthefueltankbedrained.
Important:Donotusefueladditivescontaining
methanolorethanol.
Addthecorrectamountofgasstabilizer/conditionertothe
gas.
Note:Afuelstabilizer/conditionerismosteffectivewhen
mixedwithfreshgasoline.Tominimizethechanceofvarnish
depositsinthefuelsystem,usefuelstabilizeratalltimes.
FillingtheFuelTank
1.Parkthemachineonalevelsurface,lowerthegrinder,
andstoptheengine.
2.Removethekeyandallowtheenginetocool.
3.Cleanaroundthefueltankcapandremoveit(Figure
18).
Figure18
1.Fuel-tankcap2.Fuelgauge
4.Addunleadedgasolinetothefueltankuntilthelevel
is6to13mm(1/4to1/2inch)belowthebottomof
thellerneck.
Important:Thisspaceinthetankallowsgasoline
toexpand.Donotllthefueltankcompletelyfull.
5.Installthefuel-tankcapsecurely.
6.Wipeupanygasolinethatmayhavespilled.
CheckingtheEngine-oilLevel
Beforeyoustarttheengineandusethemachine,checktheoil
levelintheenginecrankcase;refertoCheckingtheEngine-oil
Level(page24).
StartingandStoppingthe
Engine
StartingtheEngine
1.MovethethrottlelevermidwaybetweentheSlowand
Fastpositions(Figure19).
1 2
G024908
Figure19
1.Key2.Throttlelever
2.TurnthekeytotheOnposition(Figure19).Whenthe
enginestarts,releasethekey.
Important:Donotengagethestarterformore
than10secondsatatime.Iftheenginefailsto
start,allowa30secondcool-downperiodbetween
attempts.Failuretofollowtheseinstructionscan
burnoutthestartermotor.
3.Movethethrottlelevertothedesiredsetting(Figure
19).
Important:Iftheengineisrunathighspeeds
whenthehydraulicsystemiscold(i.e.,whenthe
ambientairtemperatureisnearfreezingorlower),
hydraulicsystemdamagecouldoccur.When
startingtheengineincoldconditions,allowthe
enginetoruninthemiddlethrottlepositionfor
2to5minutesbeforemovingthethrottletofast
(rabbit).Atnormaltohighambienttemperatures,
runthemachineatfullthrottleforthebest
performanceandcooling.
Note:Iftheoutdoortemperatureisbelowfreezing,
storethemachineinagaragetokeepitwarmerand
aidinstarting.
StoppingtheEngine
1.Stopthegrinderandlowerittotheground.
2.MovethethrottlelevertotheSlowposition(Figure19).
3.TurnthekeytotheOffposition(Figure19).
Note:Iftheenginehasbeenworkinghardorishot,
letitidleforaminutebeforeturningtheignitionkey
16
off.Thishelpscooltheenginebeforeitisstopped.In
anemergency,theenginemaybestoppedimmediately.
4.Removethekey.
StoppingtheMachine
Tostopthemachine,releasethetractioncontrol,movethe
throttlelevertoslow(turtle),lowerthegrindertotheground,
stoptheengine,andremovethekey.
CAUTION
Achildoruntrainedbystandercouldattemptto
operatethemachineandbeinjured.
Removethekeyfromtheswitchwhenleavingthe
machine,evenifjustforafewseconds.
MovingaNon-functioning
Machine
Important:Donottoworpullthemachinewithoutrst
openingthetowvalves,orthehydraulicsystemwillbe
damaged.
1.Stoptheengine.
2.Removethebottomshield.
3.Usingawrench,turnthetowvalvesonthehydraulic
motorstwicecounter-clockwise(Figure20).
Figure20
1.Towvalves
4.Installthebottomshieldandtowthemachineas
required.
5.Whenthemachinehasbeenrepaired,closethetow
valvesbeforeoperatingit.
GrindingaStump
DANGER
Thisproductiscapableofamputatinghandsand
feet.
•Stayintheoperatingpositionwhilethegrinder
isrunning,andkeepawayfromthegrinder.
•Keepallbystandersasafedistancefromthe
grinder.
•Stopthegrinderimmediatelyifanypeopleor
animalsentertheworkarea.
WARNING
Grindingastumpwillthrowwoodchips,soil,and
otherdebrisintotheairwhichcouldinjureyouor
bystanders.
•Alwayswearahardhatandafullfaceshield
whenusingthegrinder.
•Keepallbystandersasafedistancefromthe
grinder.
WARNING
Thegrinderisveryloudwhencuttingastumpand
candamageyourears.
Alwayswearhearingprotectionwhenusingthe
grinder.
1.Starttheengine,raisethegrinder,setthethrottlelever
totheFastposition,andmovethemachinetothe
stumptobeground.
2.Usethegrindercontrolleverandthetractioncontrol
topositionthegrindertoonesideofthefrontof
thestump,aboutaninchbelowthetopofthestump
surface.
3.Startthegrinderandwaitforittogetuptofullspeed.
4.Usingthegrindercontrollever,swingthegrinder
slowlyacrossthefaceofthestump,cuttingawaya
swathofchips(Figure21).
Important:Thegrinderwillautomaticallyslow
downthespeedatwhichitswingsintothestump
tomaintaintheoptimumywheelspeedandnot
bogdowninthewood.
17
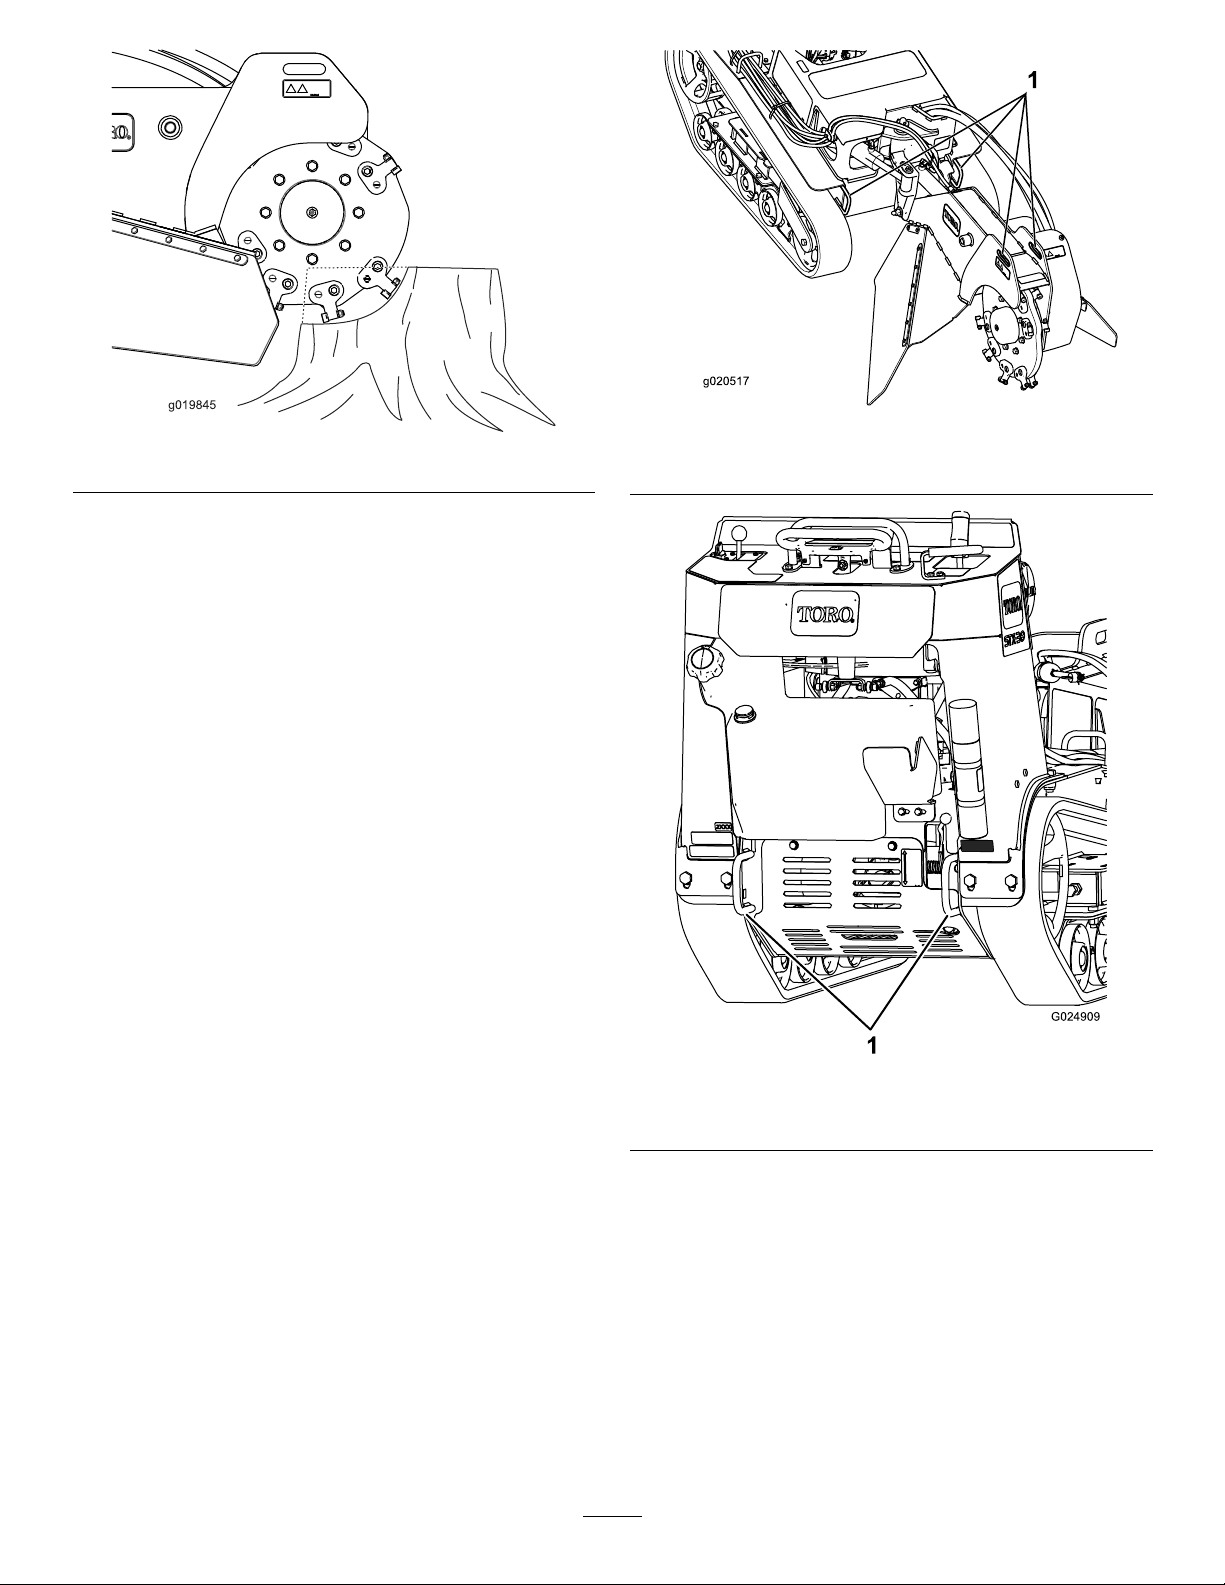
Figure21
5.Lowerthegrinderaboutaninchandswingitback
overthestump.
6.Repeatstep5untilyouhavereachedgroundlevel.
7.Raisethegrindersothatitisaboutaninchbelowthe
topoftheremainingstump,movethemachineforward
afewinches,andrepeatsteps4through6untilyou
havegroundawaytheentirestump..
8.Ifthereareanylargerootstobeground,positionthe
grinderovereachrootandusethetractioncontroland
grindercontroltomovethegrinderalongtheroot,
grindingitaway.
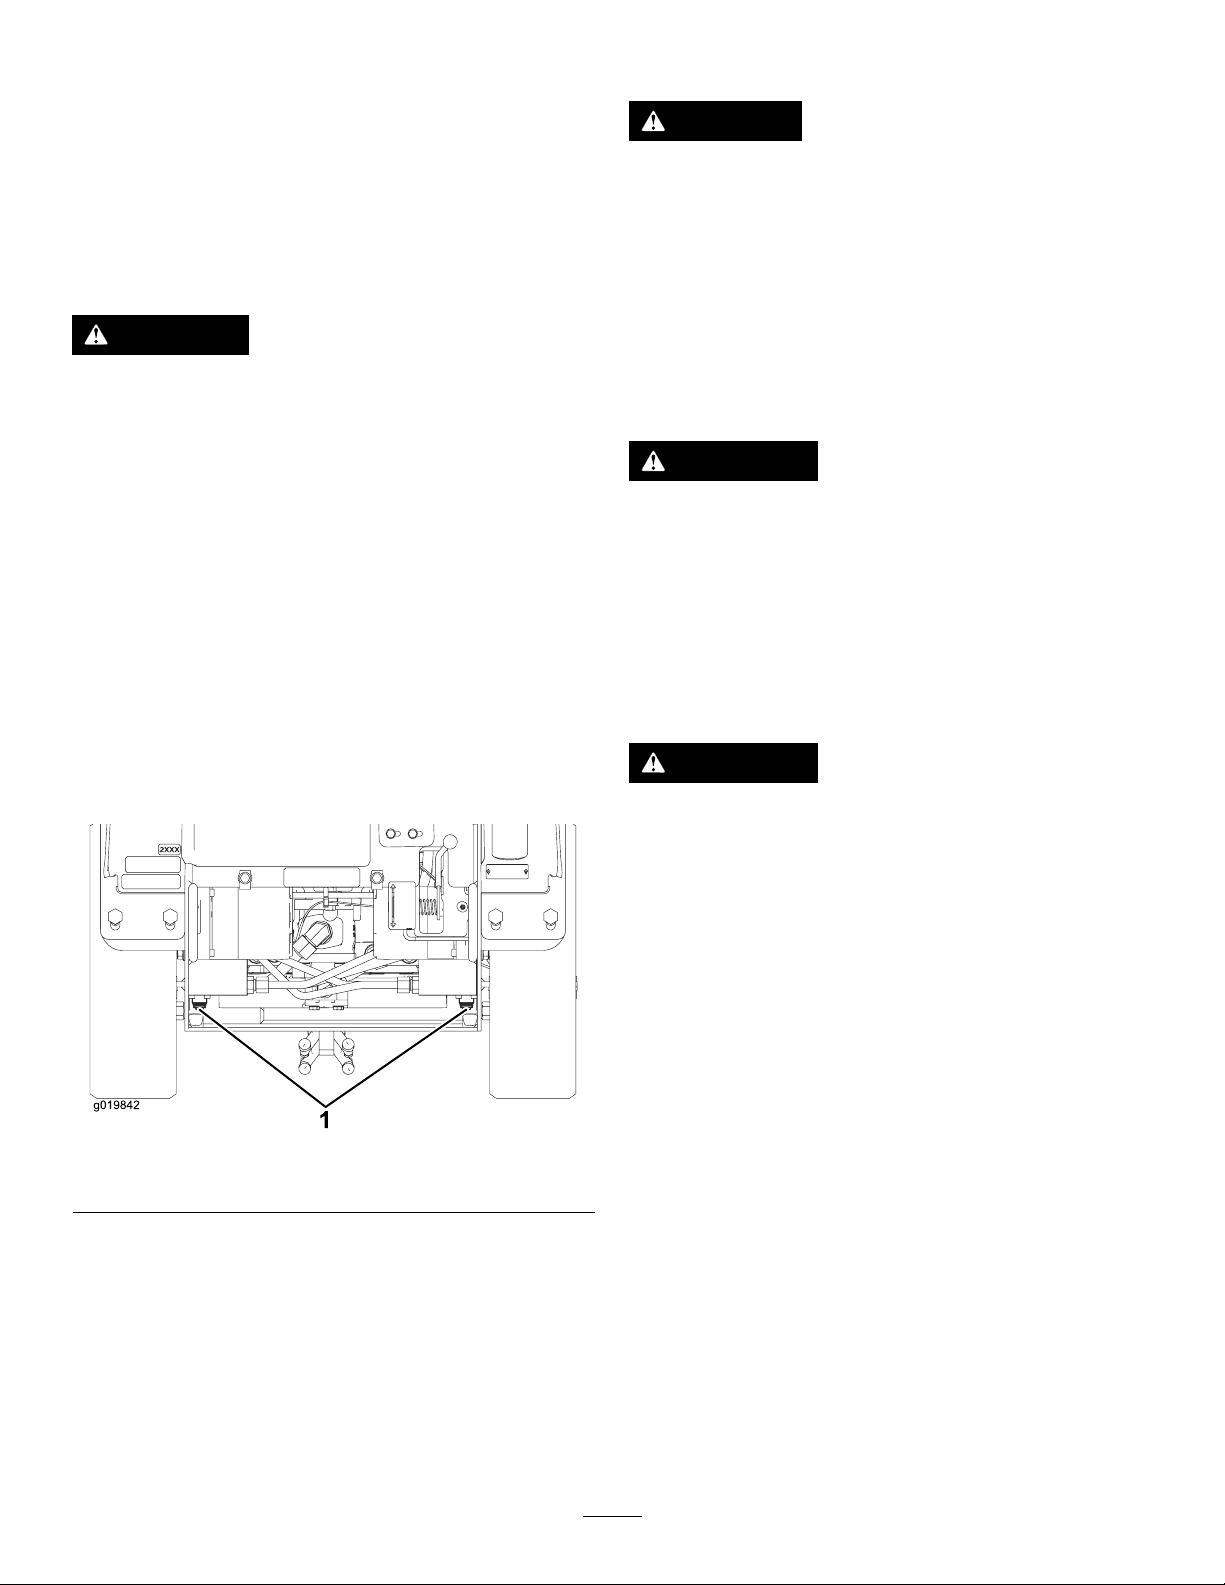
SecuringtheMachinefor
Transport
Whentransportingthemachineonatrailer,alwaysusethe
followingprocedure:
Important:Donotoperateordrivethemachineon
roadways.
1.Stoptheengine.
2.Lowerthegrinder.
3.Securethemachinetothetrailerwithchainsorstraps
usingthetie-down/liftloopsatthefrontandrearof
themachine(Figure22andFigure23).
Note:Refertoyourlocalordinancesfortrailerand
tie-downrequirements.
Figure22
1.Fronttie-downloop
1
G024909
Figure23
1.Reartie-downloops
LiftingtheMachine
Youcanliftthemachineusingthetie-down/liftloopsaslift
points(Figure22andFigure23).
18

OperatingTips
•Cleantheareaoftrash,branchesandrocksbefore
operatingtopreventequipmentdamage.
•Alwaysusefullthrottle(maximumenginespeed)when
grinding.
•Cuttheedgesofthestumpformoreefcientgrinding.
Onceyourcuttingswathiscloseto1/4ofthewheel
diameter(Figure21),liftthegrinder,moveforwardand
begincuttingontheedgeagain.
19

Maintenance
Note:Determinetheleftandrightsidesofthemachinefromthenormaloperatingposition.
RecommendedMaintenanceSchedule(s)
MaintenanceService
IntervalMaintenanceProcedure
Aftertherst50hours•Checkandadjustthetracktension.
Beforeeachuseordaily
•Greasethemachine(greaseitimmediatelyaftereverywashing.)
•Checktheengine-oillevel.
•Cleantheenginescreen.
•Checktheconditionoftheteethandrotateorreplaceanythatarewornordamaged.
•Removedebrisfromthemachine.
•Checkforloosefasteners.
Aftereachuse•Checktheconditionofandcleanthetracks.
Every25hours•Checkthebatteryelectrolytelevel.
•Checkthehydraulic-uidlevel.
Every100hours
•Changetheengineoil(theoillterisrecommended)(moreoftenindirtyordusty
conditions).
•Checkandadjustthetracktension.
•Checkthehydrauliclinesforleaks,loosettings,kinkedlines,loosemounting
supports,wear,weather,andchemicaldeteriorationandrepairifnecessary.
Every150hours•Inspecttheprimarylter.
•Replacethelow-pressurefuellter(moreoftenindirtyordustyconditions).
Every200hours•Changetheengineoillter.
•Replacethehydrauliclter.
Every250hours•Checkandgreasetheroadwheels.
Every300hours•Replacetheprimaryairlter(moreoftenindustyorsandyconditions).
•Checktheinnerairlter.
Every400hours•Changethehydraulicuid.
Every600hours•Replacetheinnerairlter.
•Replaceandgapthesparkplugs.
Every1,500hours•Replaceallmovinghydraulichoses.
Yearlyorbeforestorage•Checkandadjustthetracktension.
•Touchupchippedpaint
Important:Refertoyourengineoperator'smanualforadditionalmaintenanceprocedures.
CAUTION
Ifyouleavethekeyintheignitionswitch,someonecouldaccidentlystarttheengineandseriouslyinjure
youorotherbystanders.
Removethekeyfromtheignitionanddisconnectthewirefromthesparkplugbeforeyoudoany
maintenance.Setthewireasidesothatitdoesnotaccidentallycontactthesparkplug.
Premaintenance
Procedures
Beforeopeninganyofthecovers,stoptheengine,removethe
key,andallowtheenginetocool.
RemovingtheFrontCover
1.Lowerthegrinder,stoptheengine,removethekey,and
allowthemachinetocool.
20
Other manuals for STX-38
3
This manual suits for next models
1
Table of contents
Other Toro Grinder manuals


Popular Grinder manuals by other brands

Cornwell Tools
Cornwell Tools CAT555 Operating instructions, warning information, parts breakdown

Malmbergs
Malmbergs AN846B instruction manual

BURR KING
BURR KING 720 manual

Tecomec
Tecomec Midi Jolly-N owner's manual

Makita
Makita MGD100 instruction manual

WOLFF
WOLFF MAMBO Evo Translation of the original operating instructions


Parkside
Parkside PWS 125 A1 Operation and safety notes

Kogan
Kogan Pawever Pets PP2PTNLGRDA user guide

Atlas Copco
Atlas Copco G2515 Original product instructions

Universal Tool
Universal Tool UT8750 Operator instructions

Fieldmann
Fieldmann FDB 200651-E instruction manual

Black & Decker
Black & Decker Linea Pro G720 instruction manual