Toro STX-38 User manual

FormNo.3429-736RevA
STX-38EFIStumpGrinderwith
Intelli-Sweep
ModelNo.23214—SerialNo.404320000andUp
Registeratwww.Toro.com.
OriginalInstructions(EN)*3429-736*A
ThisproductcomplieswithallrelevantEuropean
directives;fordetails,pleaseseetheseparateproduct
specicDeclarationofConformity(DOC)sheet.
ItisaviolationofCaliforniaPublicResourceCode
Section4442or4443touseoroperatetheengineon
anyforest-covered,brush-covered,orgrass-covered
landunlesstheengineisequippedwithaspark
arrester,asdenedinSection4442,maintainedin
effectiveworkingorderortheengineisconstructed,
equipped,andmaintainedforthepreventionofre.
Theenclosedengineowner'smanualissupplied
forinformationregardingtheUSEnvironmental
ProtectionAgency(EPA)andtheCaliforniaEmission
ControlRegulationofemissionsystems,maintenance,
andwarranty.Replacementsmaybeorderedthrough
theenginemanufacturer.
WARNING
CALIFORNIA
Proposition65Warning
Theengineexhaustfromthisproduct
containschemicalsknowntotheStateof
Californiatocausecancer,birthdefects,
orotherreproductiveharm.
Batteryposts,terminals,andrelated
accessoriescontainleadandlead
compounds,chemicalsknownto
theStateofCaliforniatocause
cancerandreproductiveharm.Wash
handsafterhandling.
Useofthisproductmaycauseexposure
tochemicalsknowntotheStateof
Californiatocausecancer,birthdefects,
orotherreproductiveharm.
Introduction
Thismachineisdesignedtogrindandremovetree
stumpsandsurfaceroots.Itisnotintendedtocut
rockoranyothermaterialotherthanwoodandthe
soilaroundastump.
Readthisinformationcarefullytolearnhowtooperate
andmaintainyourproductproperlyandtoavoid
injuryandproductdamage.Youareresponsiblefor
operatingtheproductproperlyandsafely.
YoumaycontactT orodirectlyatwww.Toro.com
forproductsafetyandoperationtrainingmaterials,
accessoryinformation,helpndingadealer,orto
registeryourproduct.
Wheneveryouneedservice,genuineToroparts,or
additionalinformation,contactanAuthorizedService
DealerorToroCustomerServiceandhavethemodel
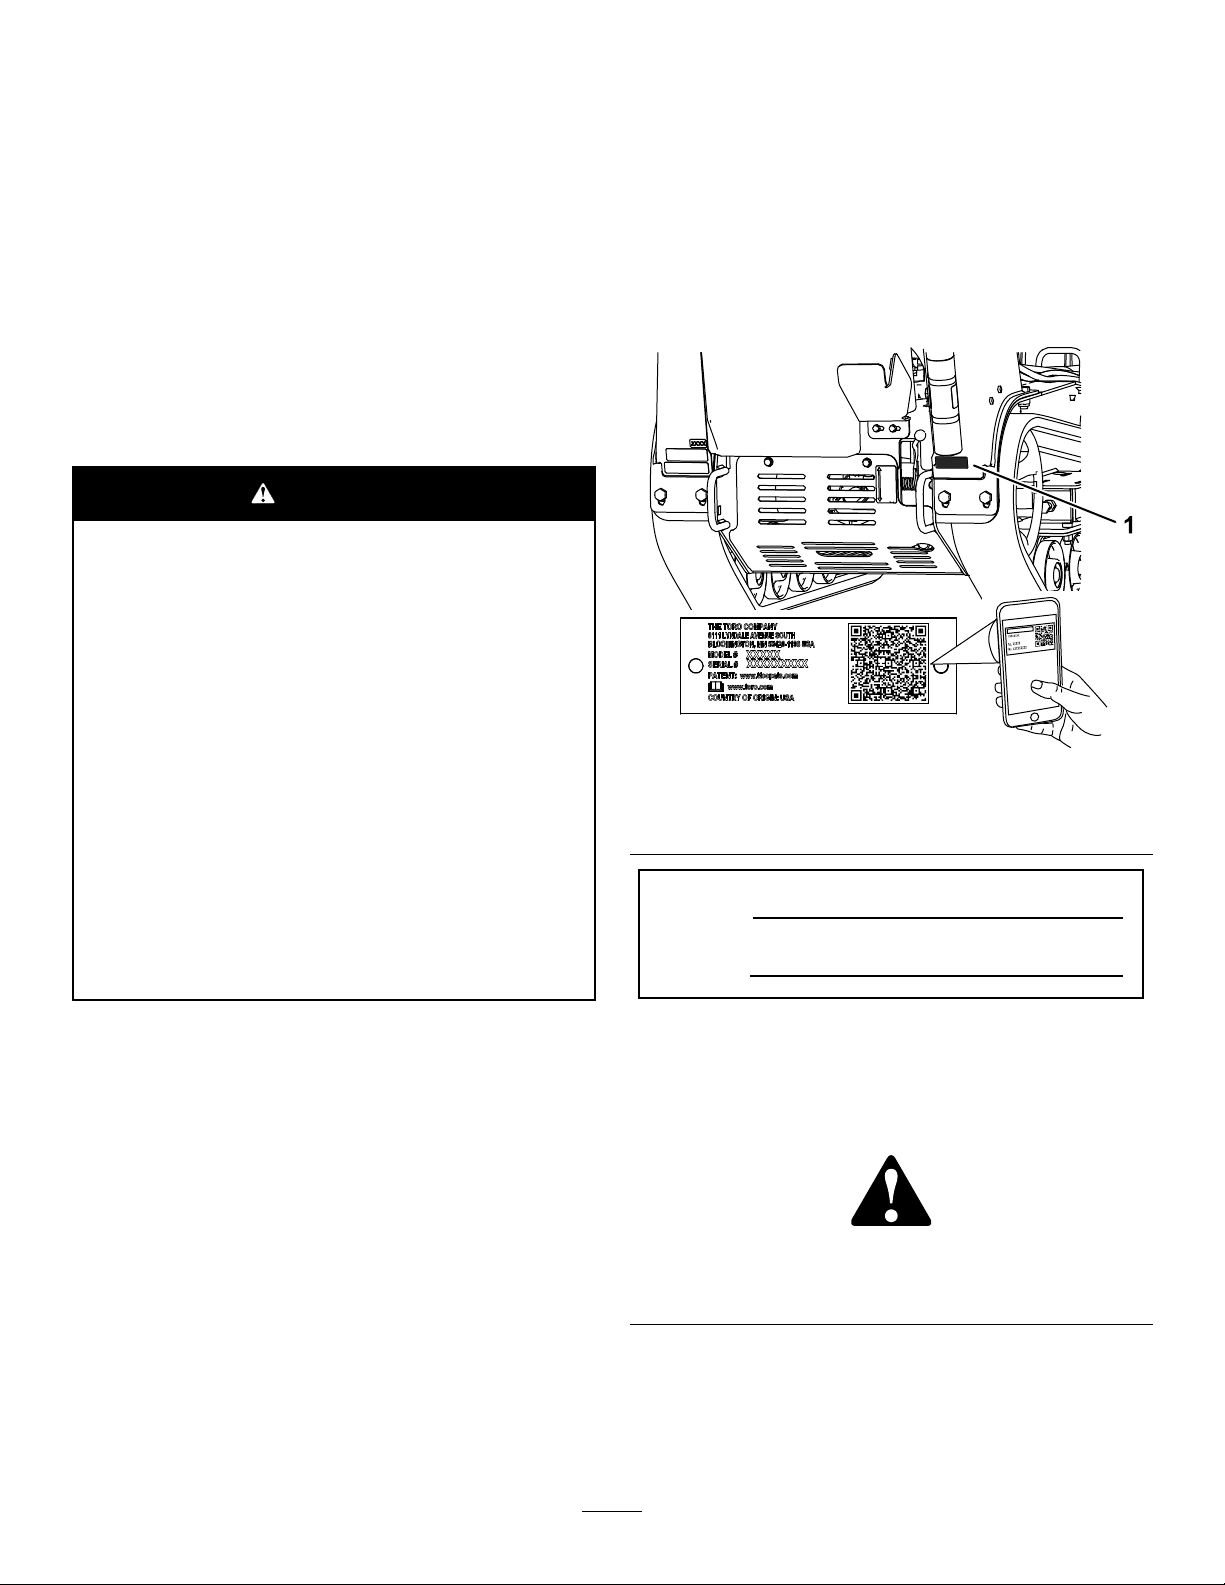
andserialnumbersofyourproductready.Figure
1illustratesthelocationofthemodelandserial
numbersontheproduct.Writethenumbersinthe
spaceprovided.
Important:Withyourmobiledevice,youcan
scantheQRcodeontheserialnumberdecal(if
equipped)toaccesswarranty,parts,andother
productinformation.
g247193
Figure1
1.Modelandserialnumberplate
ModelNo.
SerialNo.
Thismanualidentiespotentialhazardsandhas
safetymessagesidentiedbythesafety-alertsymbol
(Figure2),whichsignalsahazardthatmaycause
seriousinjuryordeathifyoudonotfollowthe
recommendedprecautions.
g000502
Figure2
1.Safety-alertsymbol
Thismanualuses2wordstohighlightinformation.
Importantcallsattentiontospecialmechanical
informationandNoteemphasizesgeneralinformation
worthyofspecialattention.
©2018—TheToro®Company
8111LyndaleAvenueSouth
Bloomington,MN554202
Contactusatwww.Toro.com.
PrintedintheUSA
AllRightsReserved

Contents
Safety.......................................................................4
SafeOperatingPractices....................................4
SafetyandInstructionalDecals..........................6
Setup......................................................................10
CheckingtheFluidLevels.................................10
ChargingtheBattery.........................................10
OpeningtheLiftValve.......................................10
ProductOverview...................................................10
Controls...........................................................10
Specications..................................................14
Attachments/Accessories.................................14
Operation................................................................14
AddingFuel......................................................14
PerformingDailyMaintenance..........................16
StartingtheEngine...........................................16
DrivingtheMachine..........................................17
ShuttingofftheEngine......................................17
MovingaNon-FunctioningMachine..................17
GrindingaStump..............................................18
SecuringtheMachineforTransport..................19
LiftingtheMachine...........................................19
OperatingTips.................................................19
Maintenance...........................................................20
RecommendedMaintenanceSchedule(s)...........20
Pre-MaintenanceProcedures..............................21
RemovingtheFrontCover................................21
RemovingtheMuferCover.............................21
RemovingtheBottomShield............................22
Lubrication..........................................................22
GreasingtheMachine.......................................22
EngineMaintenance...........................................23
ServicingtheAirCleaner..................................23
ServicingtheEngineOil....................................24
ServicingtheSparkPlug(s)..............................27
FuelSystemMaintenance...................................28
DrainingtheFuelT ank......................................28
ReplacingtheLow-pressureFuelFilter.............28
ServicingtheHigh-PressureFuelFilter.............29
ElectricalSystemMaintenance...........................29
ServicingtheBattery.........................................29
ReplacingtheFuses.........................................31
DriveSystemMaintenance..................................32
ServicingtheTracks.........................................32
CoolingSystemMaintenance..............................34
CleaningtheEngineScreen.............................34
BeltMaintenance................................................35
ReplacingthePump-DriveBelt.........................35
ControlsSystemMaintenance.............................35
AdjustingtheTraction-Control
Alignment......................................................35
HydraulicSystemMaintenance...........................37
HydraulicFluidSpecications...........................37
CheckingtheHydraulic-FluidLevel...................38
ReplacingtheHydraulicFilter...........................38
ChangingtheHydraulicFluid............................38
GrinderMaintenance............................................39
ReplacingtheTeeth..........................................39
Cleaning..............................................................40
RemovingDebrisfromtheMachine..................40
Storage...................................................................41
Troubleshooting......................................................42
Schematics.............................................................44
3

Safety
Improperuseormaintenancebytheoperatororowner
canresultininjury.Toreducethepotentialforinjury,
complywiththesesafetyinstructionsandalwayspay
attentiontothesafety-alertsymbol(Figure2),which
meansCaution,Warning,orDanger—personal
safetyinstruction.Failuretocomplywiththe
instructionmayresultinpersonalinjuryordeath.
DANGER
Theremaybeburiedutilitylinesinthework
area.Diggingintothemmaycauseashock
oranexplosion.
Havethepropertyorworkareamarkedfor
buriedlinesanddonotdiginmarkedareas.
Contactyourlocalmarkingserviceorutility
companytohavethepropertymarked(for
example,intheUnitedStates,call811forthe
nationwidemarkingservice).
SafeOperatingPractices
Thisproductiscapableofamputatinghandsandfeet.
Alwaysfollowallsafetyinstructionstoavoidserious
injuryordeath.
WARNING
Engineexhaustcontainscarbonmonoxide,
anodorlesspoisonthatisfatalifinhaled.
Donotruntheengineindoorsorinan
enclosedarea.
Training
•ReadtheOperator'sManualandothertraining
material.Iftheoperator(s)ormechanic(s)cannot
readthisinformation,itistheowner'sresponsibility
toexplainthismaterialtothem.
•Becomefamiliarwiththesafeoperationofthe
equipment,operatorcontrols,andsafetysigns.
•Alloperatorsandmechanicsshouldbetrained.
Theownerisresponsiblefortrainingtheusers.
•Neverletchildrenoruntrainedpeopleoperateor
servicetheequipment.Localregulationsmay
restricttheageoftheoperator.
•Theowner/usercanpreventandisresponsible
foraccidentsorinjuriesoccurringtohimselfor
herself,otherpeopleorproperty.
Preparation
•Beforeusingthemachine,havetheareamarked
forundergroundutilitiesanddonotusethe
machineinmarkedareas.
•Evaluatetheterraintodeterminewhataccessories
andattachmentsyouneedtoproperlyand
safelyperformthejob.Useonlytheaccessories
andattachmentsthatareapprovedbythe
manufacturer.
•Wearappropriateclothingincludinggloves,eye
protection,longpants,substantialslip-resistant
footwear,andhearingprotection.Tiebacklong
hairanddonotwearlooseclothingorloose
jewelry.
•Inspecttheareawhereyouwillusetheequipment
andremoveallobjects,suchasrocks,toys,and
wire,thatthemachinecouldthrow.
•Checkthattheoperator'spresencecontrols,safety
switches,andshieldsareattachedandfunctioning
properly.Donotoperatethemachineunlessthey
arefunctioningproperly.
FuelSafety
•Useextracarewhenhandlingfuel.Itisammable
anditsvaporsareexplosive.
•Extinguishallcigarettes,cigars,pipes,andother
sourcesofignition.
•Useonlyanapprovedfuelcontainer.
•Donotremovethefuelcaporllthefueltank
whiletheengineisrunningorhot.
•Donotaddordrainfuelinanenclosedspace.
•Donotstorethemachineorfuelcontainerwhere
thereisanopename,spark,orpilotlight,such
asonawaterheaterorotherappliance.
•Ifyouspillfuel,donotattempttostarttheengine;
avoidcreatinganysourceofignitionuntilthefuel
vaporshavedissipated.
Operation
•Useyourfullattentionwhileoperatingthe
machine.Donotengageinanyactivitythat
causesdistractions;otherwise,injuryorproperty
damagemayoccur.
•Cleandebrisfromthehydrauliclift,drives,
mufers,andengineaftereachusetohelp
preventres.
•Parkthemachineonalevelsurface,lowerthe
hydrauliclift,disengagethehydraulics,engagethe
parkingbrake(ifapplicable),shutofftheengine,
andremovethekeybeforeleavingtheoperator's
positionforanyreason.
•Donottouchpartsthatmaybehotfromoperation.
Allowthemtocoolbeforeattemptingtomaintain,
adjust,orservicethemachine.
•Neverrunanengineinanenclosedarea.
•Operatethemachineonlyingoodlight,keeping
awayfromholesandhiddenhazards.
4

•Ensurethatallthedrivesareinneutralandthe
parkingbrakeisengaged(ifapplicable)before
startingtheengine.Starttheengineonlyfromthe
operator'sposition.
•Slowdownanduseextracareonhillsides.
Ensuretotravelintherecommendeddirectionon
hillsides.Turfconditionscanaffectthestabilityof
themachine.
•Slowdownandusecautionwhenmakingturns,
crossingroadsandsidewalks,andwhenchanging
directionsonslopes.
•Donotchangetheengine-governorsettingor
overspeedtheengine.
•Keepyourhandsandfeetawayfrommovingparts.
•Lookbehindanddownbeforebackingupto
ensurethatthepathisclear.
•Nevercarrypassengersandkeeppetsand
bystandersaway.
•Donotoperatethemachinewhenyouaretired,ill,
orundertheinuenceofalcoholordrugs.
•Usecarewhenloadingorunloadingthemachine
intoatrailerortruck.
•Usecarewhenapproachingblindcorners.
•Ensurethattheareaisclearofpeoplebefore
operatingthemachine.Stopthemachineif
anyoneentersthearea.
•Neverjerkthecontrols;useasteadymotion.
•Operatethemachineinareaswherethereare
noobstaclesincloseproximitytoyou.Failureto
maintainadequatedistancefromtrees,walls,and
otherbarriersmayresultininjuryasthemachine
backsupduringoperationifyouarenotattentive
tothesurroundings.Operatethemachineonlyin
areaswherethereissufcientclearanceforyou
tosafelymaneuver.
•Locatethepinchpointareasmarkedonthe
machineandkeepyourhandsandfeetawayfrom
theseareas.
•Lightningcancausesevereinjuryordeath.If
lightningisseenorthunderisheardinthearea,do
notoperatethemachine;seekshelter.
SlopeOperation
•Slopesareamajorfactorrelatedtoloss-of-control
andtip-overaccidents,whichcanresultinsevere
injuryordeath.Theoperatorisresponsiblefor
safeslopeoperation.operatingthemachineon
anysloperequiresextracaution.Beforeusingthe
machineonaslope,youmust:
–Reviewandunderstandtheslopeinstructions
inthemanualandonthemachine.
–Evaluatethesiteconditionsofthedayto
determineiftheslopeissafeformachine
operation.Alwaysusecommonsense
andgoodjudgmentwhenperformingthis
evaluation.Changesintheterrain,suchas
moisture,canquicklyaffecttheoperationof
themachineonaslope.
•Operateupanddownslopeswiththefrontof
themachineuphill.
•Identifyhazardsatthebaseoftheslope.Do
notoperatethemachineneardrop-offs,ditches,
embankments,waterorotherhazards.The
machinecouldsuddenlyrolloverifawheelortrack
goesovertheedgeortheedgecollapses.Keep
asafedistance(twicethewidthofthemachine)
betweenthemachineandanyhazard.
•Avoidstarting,stopping,orturningthemachineon
aslope.Avoidmakingsuddenchangesinspeed
ordirection;turnslowlyandgradually.
•Keepallmovementsonslopesslowandgradual.
Donotmakesuddenchangesinspeedor
direction.
•Donotoperatethemachineunderanyconditions
wheretraction,steering,orstabilityisinquestion.
Beawarethatoperatingthemachineonwetgrass,
acrossslopesordownhillmaycausethemachine
tolosetraction.Lossoftractiontothewheelsor
tracksmayresultinslidingandalossofbraking
andsteering.Themachinecanslideevenifthe
wheelsortracksarestopped.
•Identifyhazardsatthebaseoftheslope.Do
notoperatethemachineneardrop-offs,ditches,
embankments,waterorotherhazards.The
machinecouldsuddenlyrolloverifawheelortrack
goesovertheedgeortheedgecollapses.Keep
asafedistance(twicethewidthofthemachine)
betweenthemachineandanyhazard.
•Removeormarkobstaclessuchasditches,holes,
ruts,bumps,rocksorotherhiddenhazards.T all
grasscanhideobstacles.Uneventerraincould
overturnthemachine.
•Donotparkthemachineonahillsideorslope
withoutloweringthehydrauliclifttotheground.
MaintenanceandStorage
•Parkthemachineonalevelsurface,lowerthe
hydrauliclift,disengagethehydraulics,engagethe
parkingbrake(ifapplicable),shutofftheengine,
andremovethekey.Waitforallmovingpartsto
stopbeforeadjusting,cleaning,orrepairingthe
machine.
•Cleandebrisfromthehydrauliclift,drives,
mufers,andenginetohelppreventres.Wipe
upanyspilledoilorfuel.
•Allowtheenginetocoolbeforestoringanddonot
storethemachinenearames.
•Neverallowuntrainedpersonneltoservicethe
machine.
5

•Usejackstandstosupportthecomponentswhen
required.
•Carefullyreleasepressurefromcomponentswith
storedenergy.
•Keepyourhandsandfeetawayfromthemoving
parts.Ifpossible,donotmakeadjustmentswith
theenginerunning.
•Disconnectthebatteryorremovethespark-plug
wiresbeforemakinganyrepairs.Disconnect
thenegativeterminalrstandthepositivelast;
connectthepositiverstandthenegativelast.
•Chargethebatteryinanopen,well-ventilated
area,awayfromsparkandames.Unplugthe
chargerbeforeconnectingordisconnectingitfrom
thebattery.Wearprotectiveclothinganduse
insulatedtools.
•Batteryacidispoisonousandcancauseburns.
Avoidcontactwithskin,eyes,andclothing.Protect
yourface,eyes,andclothingwhenworkingwitha
battery.
•Batterygassescanexplode.Keepcigarettes,
sparks,andamesawayfromthebattery.
•Keepallpartsingoodworkingconditionandall
hardwaretightened.Replaceallwornordamaged
decals.
•Keepallnutsandboltstight.Keeptheequipment
ingoodcondition.
•Nevertamperwiththesafetydevices.
•Keepthemachinefreeofdebrisbuildup.Wipeup
anyspilledoilorfuel.
•Shutofftheengine,removethekey,andinspect
themachineifyoustrikeanobject.Makeany
necessaryrepairsbeforestarting.
•UseonlygenuineTororeplacementparts.
•Keepyourbodyandhandsawayfrompinhole
leaksornozzlesthatejecthigh-pressurehydraulic
uid.Usecardboardorpapertondhydraulic
leaks;neveruseyourhands.Hydraulicuid
escapingunderpressurecanpenetrateskinand
causeinjuryrequiringsurgerywithinafewhours
byaqualiedsurgeon;otherwise,gangrenemay
result.
SafetyandInstructionalDecals
Safetydecalsandinstructionsareeasilyvisibletotheoperatorandarelocatednearanyarea
ofpotentialdanger.Replaceanydecalthatisdamagedormissing.
decalbatterysymbols
BatterySymbols
Someorallofthesesymbolsareonyourbattery.
1.Explosionhazard6.Keepbystandersasafe
distancefromthebattery.
2.Nore,opename,or
smoking
7.Weareyeprotection;
explosivegasescan
causeblindnessandother
injuries.
3.Causticliquid/chemical
burnhazard
8.Batteryacidcancause
blindnessorsevereburns.
4.Weareyeprotection.9.Flusheyesimmediately
withwaterandgetmedical
helpfast.
5.ReadtheOperator's
Manual.
10.Containslead;donot
discard
decal93-6686
93-6686
1.Hydraulicuid
2.ReadtheOperator'sManual.
decal93-7321
93-7321
1.Cutting/dismembermenthazardofhandsandfeet,rotating
knives/blades—stayawayfrommovingparts.
6

decal93-7814
93-7814
1.Entanglementhazard,belt—stayawayfrommovingparts;
keepallguardsandshieldsinplace.
decal93-9084
93-9084
1.Liftpoint/Tie-downpoint
decal93-9363
93-9363
1.Parkingbrake3.Unlocked
2.Locked
decal100-4650
100-4650
1.Crushinghazardofhand—keepbystandersasafedistance
awayfromthemachine.
2.Crushinghazardoffoot—keepbystandersasafedistance
awayfromthemachine.
decal107-9366
107-9366
1.Thrownobjecthazard—keepbystandersasafedistance
awayfromthemachine.
decal115-2047
115-2047
1.Warning—donottouchthehotsurface.
decal121-4402
121-4402
1.Pushforwardtolowerthe
stumpgrinder.
3.Pullbacktoraisethe
stumpgrinder.
2.Moverighttomovethe
stumpgrindertotheright.
4.Movelefttomovethe
stumpgrindertotheleft.
7
decal130-7580
130-7580
1.Engine—start5.Enginespeed—slow
2.Engine—run6.Engineindicatorlight
3.Engine—stop7.ReadtheOperator's
Manualbeforestartingthe
engine—1)Ensurethat
thetractioncontrolisin
theneutralposition;2)
Movethethrottleleverto
theFastposition,close
thechoke(ifapplicable),
anddonotoperatethe
joystick;3)Turnthekeyto
starttheengine.
4.Enginespeed—fast
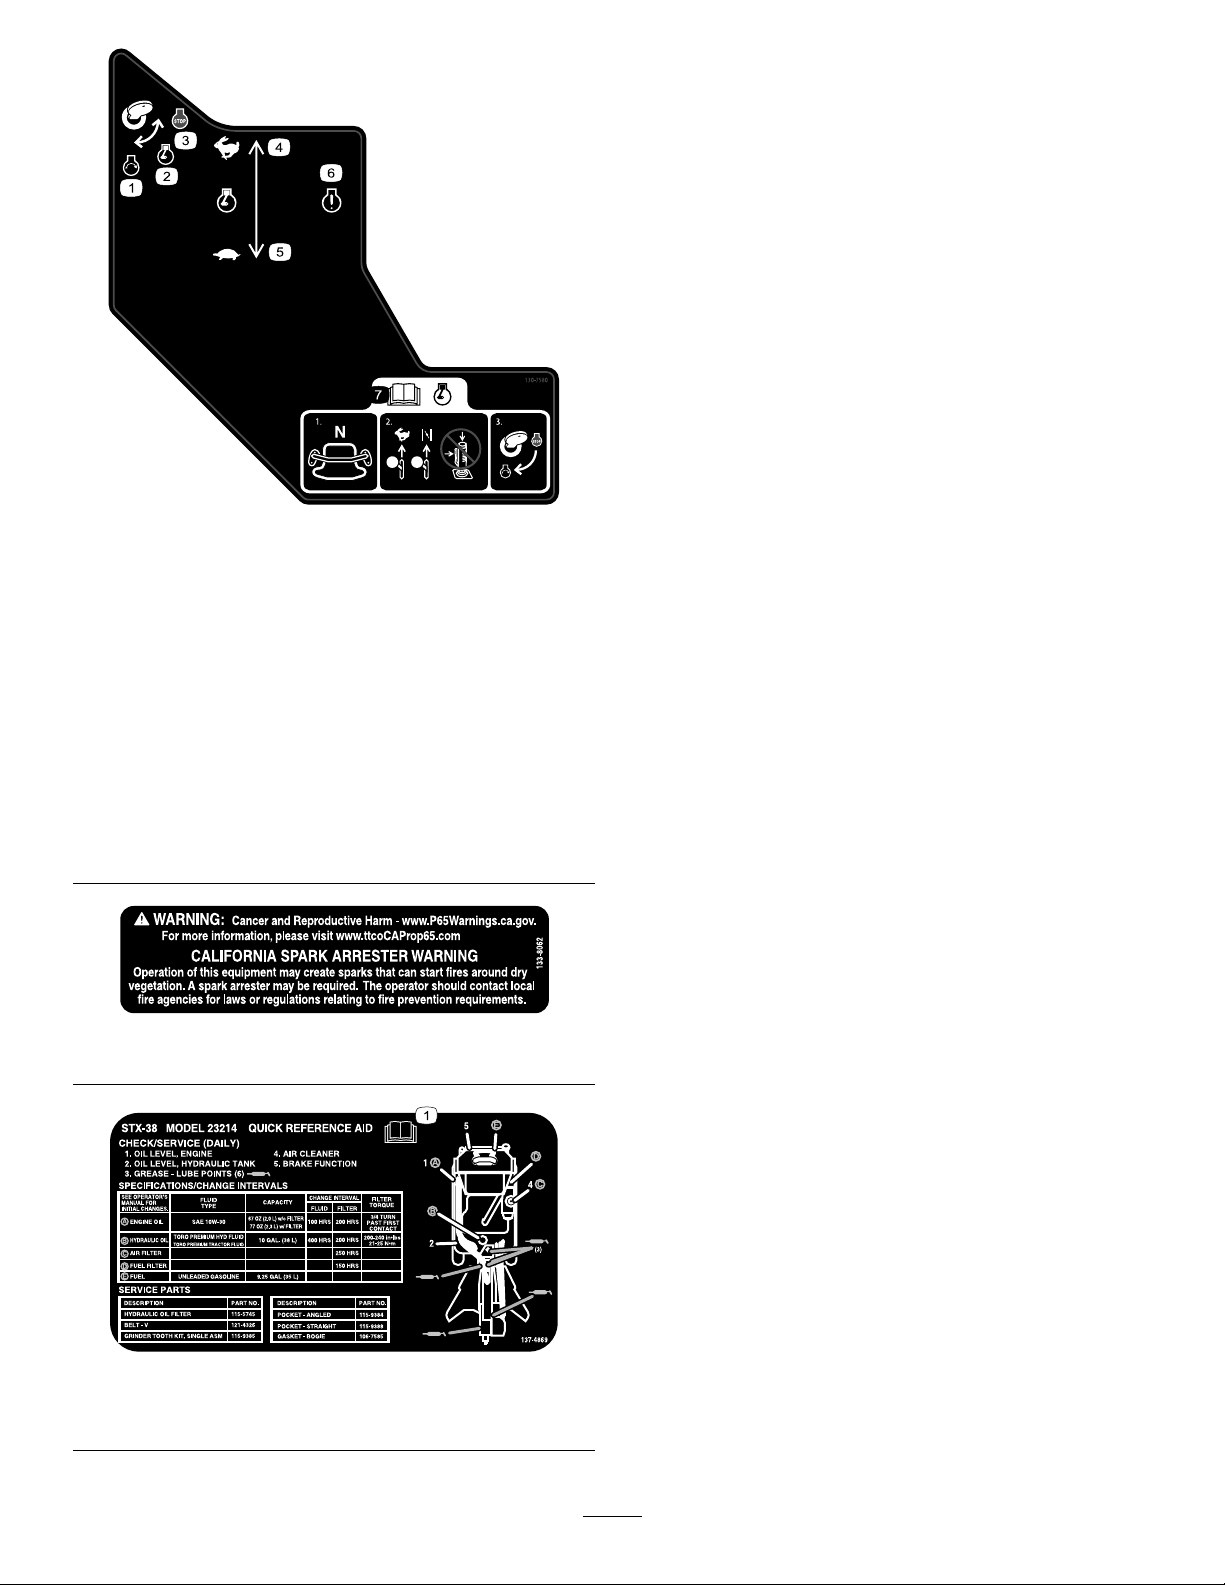
decal133-8062
133-8062
decal137-4869
137-4869
1.ReadtheOperator’sManual.
8

decal115-4020
115-4020
1.Turnright3.Reverse
2.Forward4.Turnleft
decal119-4606
119-4606
1.Warning—readtheOperator'sManual.5.Explosionandelectricshockhazard—donotdiginareaswith
buriedutilitylines;contactlocalpowerorganizationsbefore
digging.
2.Cutting/dismembermenthazard;grinder—keepbystanders
asafedistanceawayfromthemachine;donotoperatethe
grinderheadwhiletransportingthemachine.
6.Tipping/crushinghazard—lowerthecutterheadwhen
operatingonslopes.
3.Warning—stayawayfrommovingparts;waitforallmoving
partstostop.
7.Explosionhazard,fueling—shutofftheengineandextinguish
allameswhenfueling.
4.Warning—donotoperatethismachineunlessyouaretrained.8.Warning—lowerthegrinderhead,engagetheparkingbrake
(ifapplicable),shutofftheengine,andremovethekeybefore
leavingthemachine.
decal121-4382
121-4382
1.ReadtheOperator’sManualforinformationonoperatingthe
grinder—1)Grindhorizontallyalongtheedgeofthestump;2)
Lowerthegrinderslightlyintothestump;3)Grindhorizontally
downtogroundlevel;4)Movethegrinderforward.
3.1)Topowerthegrinder,pressthesafetylockandthetrigger
together;2)Tokeepthegrinderrunning,holdthetrigger.
2.Donotstartgrindinginthemiddleofthestump;startgrinding
attheedgeofthestump.
9

Setup
CheckingtheFluidLevels
Beforestartingtheengineforthersttime,check
theengine-oilandhydraulic-uidlevels.Refertothe
followingsectionsformoreinformation:
•CheckingtheEngine-OilLevel(page24)
•CheckingtheHydraulic-FluidLevel(page38)
ChargingtheBattery
Chargethebattery;refertoChargingtheBattery
(page30)formoreinformation.
OpeningtheLiftValve
Beforeyoucanraisethegrinderandmovethe
machine,youmustopentheliftvalvelocatedunder
thecontrolpanel(Figure3).Turntheknobcounter
clockwisetoallowyoutoliftthegrinder.Thefarther
youturntheknob,thefastertheheadraisesand
lowerswhenactivated.
g019867
Figure3
ProductOverview
g024906
Figure4
1.Controlpanel3.Engine5.Grinder
2.Chipshield4.Battery6.Track
Controls
Becomefamiliarwithallthecontrols(Figure5)before
youstarttheengineandoperatethemachine.
ControlPanel
g024907
Figure5
1.Keyswitch6.Referencebar
2.Throttlelever7.Reversesafetyplate
3.Engineindicatorlight8.Grindercontrollever
4.Hourmeter9.Handle
5.Tractioncontrol
10

KeySwitch
Thekeyswitch,usedtostartandshutofftheengine,
has3positions:OFF,RUN,andSTART.Referto
StartingtheEngine(page16).
ThrottleLever
Movethecontrolforwardtoincreasetheenginespeed
andrearwardtodecreasetheenginespeed.
HourMeter
Thehourmeterdisplaysthenumberofhoursof
operationthathavebeenloggedonthemachine.
ReferenceBar
Whendrivingthemachine,usethereferencebar
asahandleandaleveragepointforcontrollingthe
machine.T oensuresmooth,controlledoperation,
donottakebothhandsoffthereferencebarwhile
operatingthemachine.
Parking-BrakeLever
Toengagetheparkingbrake,lifttheleverupward.
Todisengagetheparkingbrake,pushthelever
downward.
g019832
Figure6
1.Parking-brakelever
TractionControl
g008128
Figure7
1.Referencebar
2.Tractioncontrol
•Tomoveforward,movethetractioncontrolforward
(Figure8).
g008129
Figure8
•Tomoverearward,movethetractioncontrol
rearward(Figure9).
Important:Whenreversing,lookbehindyou
forobstructionsandkeepyourhandsonthe
referencebar.
g008130
Figure9
11
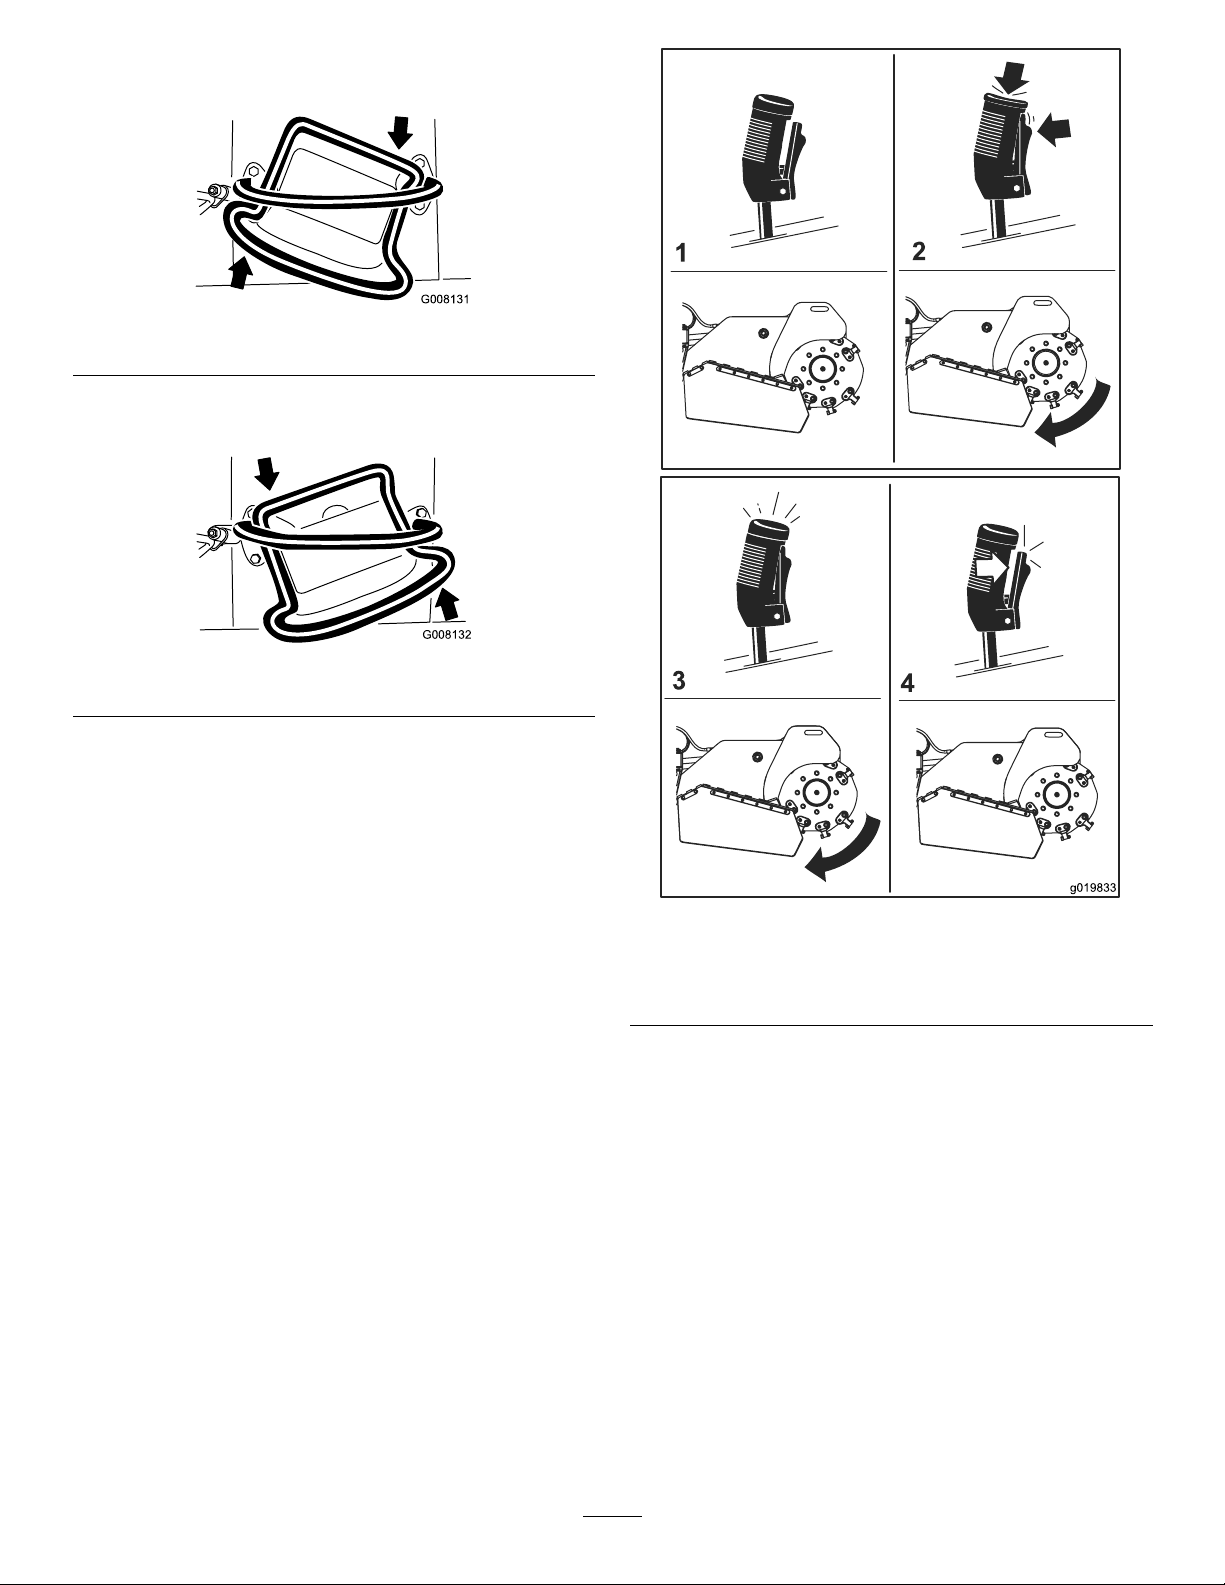
•Toturnright,rotatethetractioncontrolclockwise
(Figure10).
g008131
Figure10
•Toturnleft,rotatethetractioncontrol
counterclockwise(Figure11).
g008132
Figure11
•Tostopthemachine,releasethetractioncontrol
(Figure7).
Note:Thefartheryoumovethetractioncontrolin
anydirection,thefasterthemachinemovesinthat
direction.
GrinderControl/Hydraulic-Lift
Lever
Operatethegrinderusingthegrindercontrollever
asfollows:
•Tostartthegrinder(Figure12),squeezethe
triggerandthenpresstheredbuttononthetopof
thelever.Oncethegrinderhasstarted,youcan
releasetheredbutton.
•Tostopthegrinder(Figure12),releasethetrigger
formorethanahalfsecond.
Note:Ifyouareoperatingthegrinderand
momentarilyreleasethetrigger(i.e.,lessthana
halfsecond),thegrindercontinuestooperate.
g019833
Figure12
1.Neutral3.Runthegrinder
2.Startthegrinder4.Stopthegrinder
12
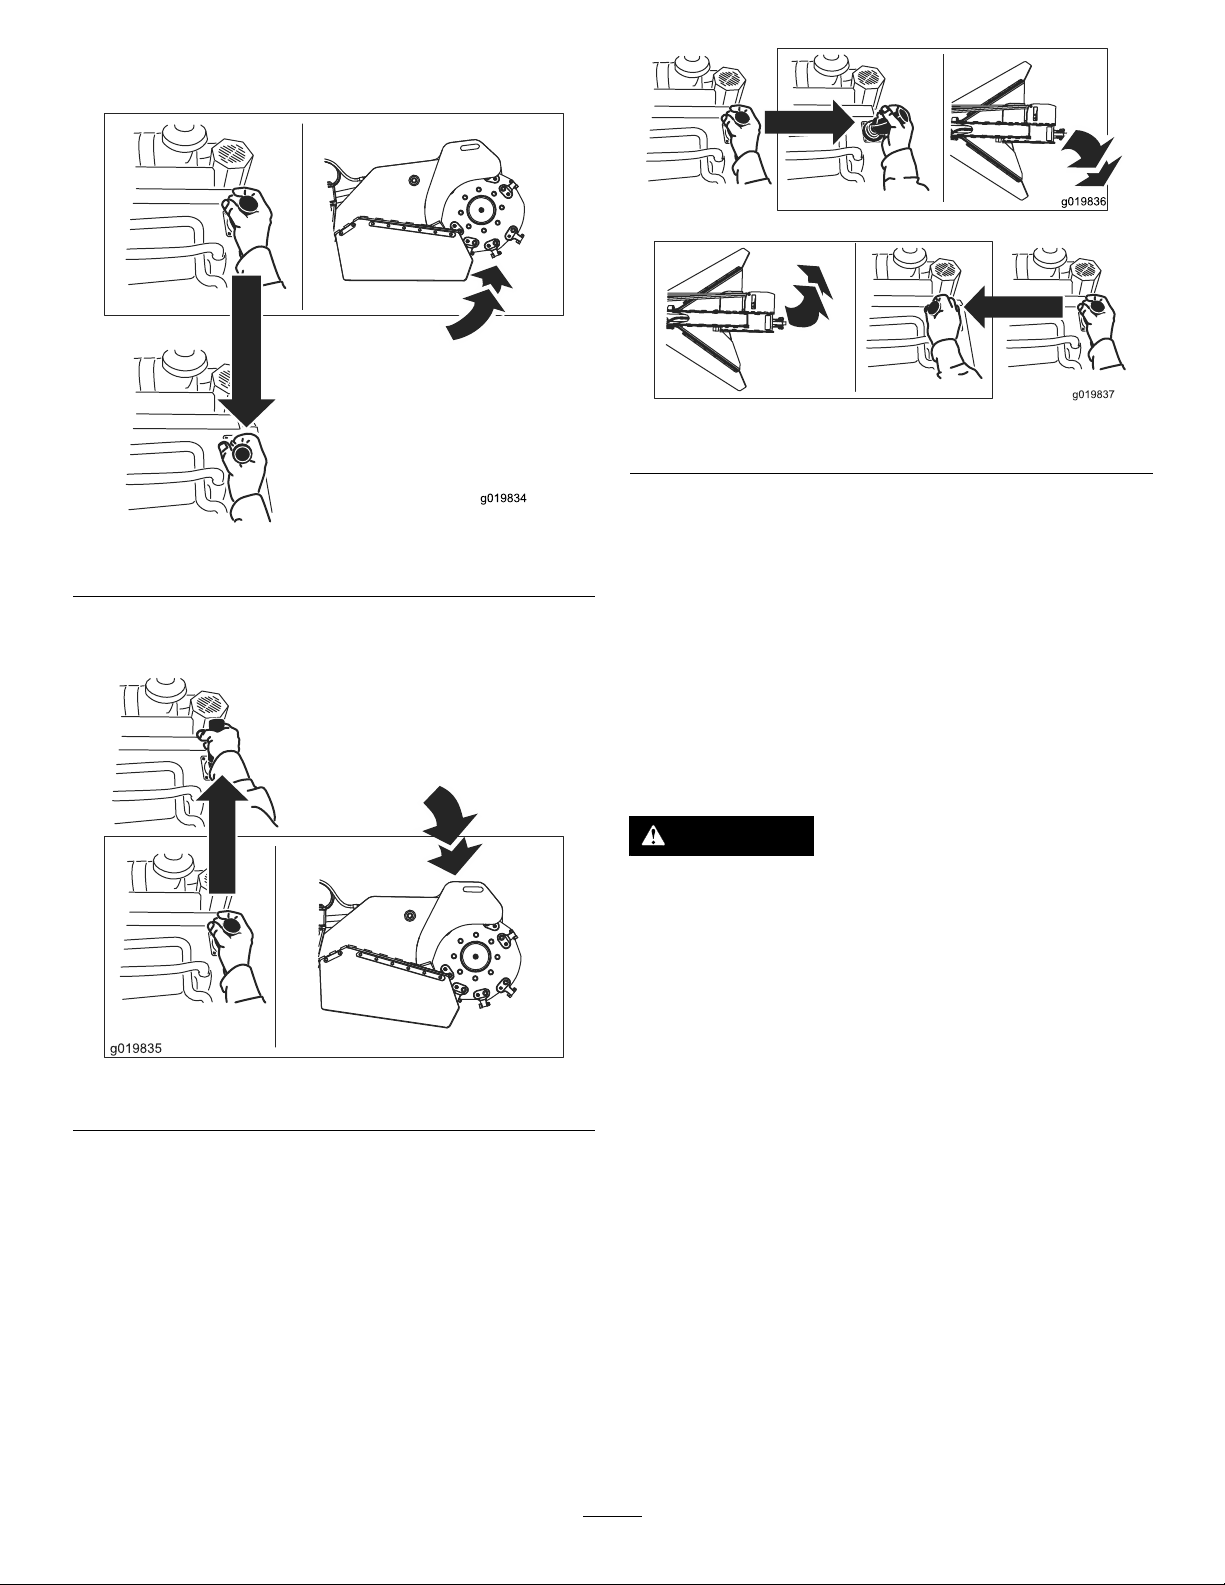
•Toraisethegrinder,pulltheleverrearward(Figure
13).
g019834
Figure13
•Tolowerthegrinder,pushtheleverforward(Figure
14).
g019835
Figure14
•Torotatethegrindertotherightorleft,movethe
leverinthedesireddirection(Figure15).
g019836
g019837
Figure15
Lift/LowerSpeedControl
Youcanchangehowquicklythegrinderheadraises
andlowersusingthelift/lowerspeedcontrol,located
undertherightsideofthecontrolpanel(Figure16).
Rotatethedialcounterclockwisetoincreasethe
speedorrotateitclockwisetoreducethespeed.
Ifyoumuststopthemachinewiththegrinderhead
raised,turnthecontroldialallthewayclockwiseto
lockthegrinderheadbeforeleavingthemachineor
performinganymaintenance
CAUTION
Ifyouleavethegrinderheadintheraised
positionwithoutturningthelift/lowerspeed
controldialallthewayclockwise,thegrinder
couldlower,crushingyouorbystanders.
Wheneverpossible,lowerthegrindertothe
groundbeforeshuttingofftheengine.If
youmustkeepthegrinderheadraised,turn
thelift/lowerspeedcontroldialalltheway
clockwisetolockthegrinder.
13
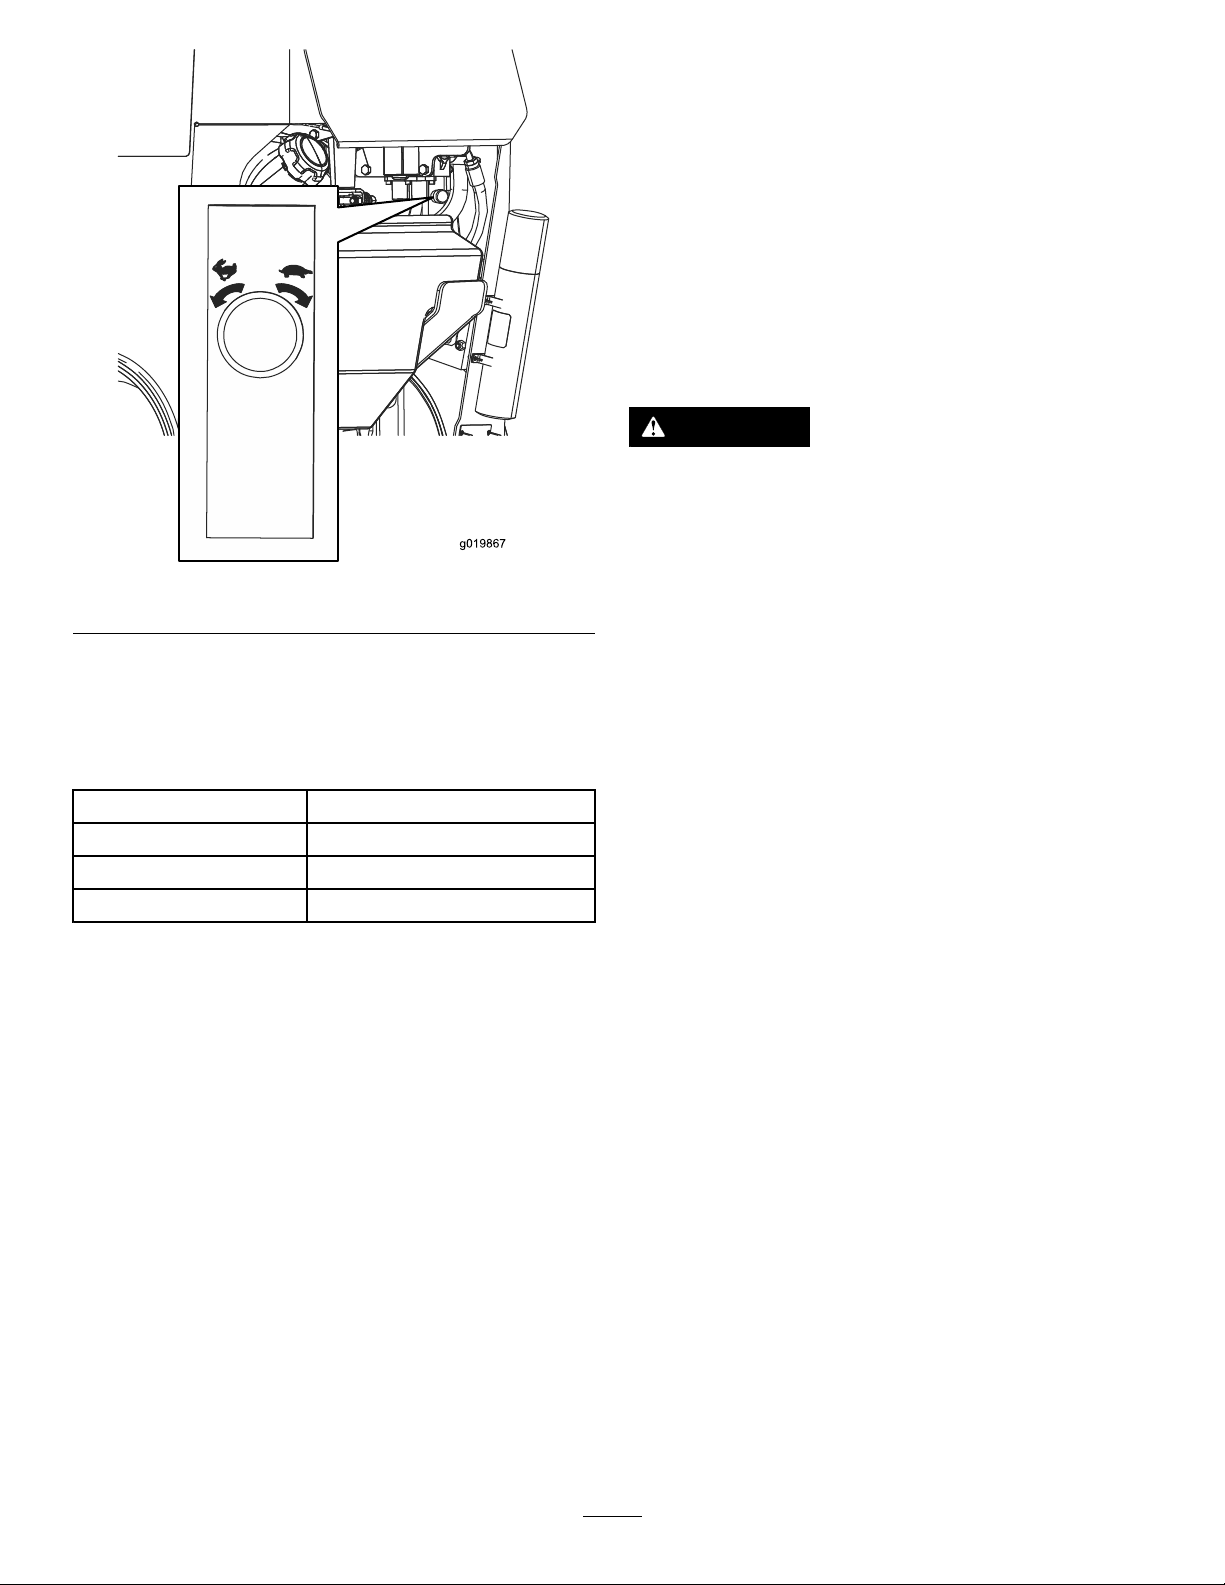
g019867
Figure16
Specications
Note:Specicationsanddesignaresubjectto
changewithoutnotice.
Width86cm(34inches)
Length241cm(95inches)
Height130cm(51inches)
Weight794kg(1,750lb)
Attachments/Accessories
AselectionofT oroapprovedattachmentsand
accessoriesisavailableforusewiththemachine
toenhanceandexpanditscapabilities.Contact
yourAuthorizedServiceDealerorauthorizedT oro
distributororgotowww.T oro.comforalistofall
approvedattachmentsandaccessories.
Toensureoptimumperformanceandcontinuedsafety
certicationofthemachine,useonlygenuineToro
replacementpartsandaccessories.Replacement
partsandaccessoriesmadebyothermanufacturers
couldbedangerous,andsuchusecouldvoidthe
productwarranty.
Operation
Note:Determinetheleftandrightsidesofthe
machinefromthenormaloperatingposition.
Important:Beforeoperatingthemachine,check
theuidlevels,andremovedebrisfromthe
machine.Ensurethattheareaisclearofpeople
anddebris.Youshouldalsoknowandhave
markedthelocationsofallutilitylines.
AddingFuel
DANGER
Incertainconditions,fuelisextremely
ammableandhighlyexplosive.Areor
explosionfromfuelcanburnyouandothers
andcandamageproperty.
•Fillthefueltanksoutdoors,inanopen
area,whentheengineiscold.Wipeupany
fuelthatspills.
•Neverllthefueltanksinsideanenclosed
trailer.
•Neversmokewhenhandlingfuelandstay
awayfromanopenameorwherefuel
fumesmaybeignitedbyaspark.
•Storefuelinanapprovedcontainerand
keepitoutofthereachofchildren.Never
buymorethana30-daysupplyoffuel.
•Donotoperatewithoutentireexhaust
systeminplaceandinproperworking
condition.
14

DANGER
Incertainconditionsduringfueling,static
electricitycanbereleased,causingaspark
thatcanignitethefuelvapors.Areor
explosionfromfuelcanburnyouandothers
andcandamageproperty.
•Alwaysplacefuelcontainersontheground
awayfromyourvehiclebeforelling.
•Donotllfuelcontainersinsideavehicle
oronatruckortrailerbed,becauseinterior
carpetsorplastictruckbedlinersmay
insulatethecontainerandslowthelossof
anystaticcharge.
•Whenpractical,removeequipmentfrom
thetruckortrailerandrefueltheequipment
withitswheelsontheground.
•Ifthisisnotpossible,thenrefuelsuch
equipmentonatruckortrailerfroma
portablecontainerratherthanfroma
fuel-dispensernozzle.
•Ifyoumustuseafuel-dispensernozzle,
keepthenozzleincontactwiththerimof
thefueltankorcontaineropeningatall
timesuntilfuelingiscomplete.
WARNING
Fuelisharmfulorfatalifswallowed.
Long-termexposuretovaporscancause
seriousinjuryandillness.
•Avoidprolongedbreathingofvapors.
•Keepyourfaceawayfromthenozzleand
fueltankopening.
•Keepfuelawayfromyoureyesandskin.
RecommendedFuel
•Forbestresults,useonlyclean,fresh(lessthan
30daysold),unleadedgasolinewithanoctane
ratingof87orhigher((R+M)/2ratingmethod).
•Ethanol:Gasolinewithupto10%ethanol
(gasohol)or15%MTBE(methyltertiarybutyl
ether)byvolumeisacceptable.Ethanoland
MTBEarenotthesame.Gasolinewith15%
ethanol(E15)byvolumeisnotapprovedforuse.
Neverusegasolinethatcontainsmorethan
10%ethanolbyvolume,suchasE15(contains
15%ethanol),E20(contains20%ethanol),orE85
(containsupto85%ethanol).Usingunapproved
gasolinemaycauseperformanceproblemsand/or
enginedamagewhichmaynotbecoveredunder
warranty.
•Donotusegasolinecontainingmethanol.
•Donotstorefueleitherinthefueltankorfuel
containersoverthewinterunlessyouuseafuel
stabilizer.
•Donotaddoiltogasoline.
UsingStabilizer/Conditioner
Useafuelstabilizer/conditionerinthemachineto
providethefollowingbenets:
•Keepsfuelfreshlongerwhenusedasdirectedby
thefuel-stabilizermanufacturer
•Cleanstheenginewhileitruns
•Eliminatesgum-likevarnishbuildupinthefuel
system,whichcauseshardstarting
Important:Donotusefueladditives
containingmethanolorethanol.
Addthecorrectamountoffuelstabilizer/conditioner
tothefuel.
Note:Afuelstabilizer/conditionerismost
effectivewhenmixedwithfreshfuel.T ominimize
thechanceofvarnishdepositsinthefuelsystem,
usefuelstabilizeratalltimes.
15

FillingtheFuelTank
1.Parkthemachineonalevelsurface,engage
theparkingbrake(ifapplicable),andlowerthe
hydrauliclift.
2.Shutofftheengine,removethekey,andallow
theenginetocool.
3.Cleanaroundthefuel-tankcapandremoveit
(Figure17).
g020516
Figure17
1.Fuel-tankcap
2.Fuelgauge
4.Fillthetankwithfueltoabout6to13mm(1/4to
1/2inch)belowthebottomofthellerneck.
Important:Thisspaceinthetankallows
fueltoexpand.Donotllthefueltank
completelyfull.
5.Installthefuel-tankcapsecurely.
6.Wipeupanyspilledfuel.
PerformingDaily
Maintenance
Beforestartingthemachineeachday,performthe
EachUse/DailyprocedureslistedinMaintenance
(page20).
StartingtheEngine
1.Movethethrottlelevermidwaybetweenthe
SLOWandFASTpositions(Figure18).
g024908
Figure18
1.Key2.Throttlelever
2.TurnthekeytotheONposition(Figure18).
Whentheenginestarts,releasethekey.
Important:Donotengagethestarterfor
morethan10secondsatatime.Iftheengine
failstostart,allowa30-secondcooldown
periodbetweenattempts.Failuretofollow
theseinstructionscanburnoutthestarter
motor.
3.Movethethrottlelevertothedesiredsetting
(Figure18).
Important:Iftheengineisrunathigh
speedswhenthehydraulicsystemiscold
(i.e.,whentheambientairtemperatureis
nearfreezingorlower),hydraulicsystem
damagecouldoccur.Whenstartingthe
engineincoldconditions,allowtheengine
toruninthemiddlethrottlepositionfor
2to5minutesbeforemovingthethrottle
tofast(rabbit).Atnormaltohighambient
temperatures,runthemachineatfullthrottle
forthebestperformanceandcooling.
Note:Iftheoutdoortemperatureisbelow
freezing,storethemachineinagaragetokeep
itwarmerandaidinstarting.
16

DrivingtheMachine
Usethetractioncontrolstomovethemachine.The
fartheryoumovethetractioncontrolsinanydirection,
thefasterthemachinemovesinthatdirection.
Releasethetractioncontrolstostopthemachine.
CAUTION
Whenreversing,youmaybackintostationary
objectsoroverbystandersandcauseserious
personalinjuryordeath.
Lookbehindyouforobstructionsor
bystandersandkeepyourhandsonthe
referencebar.
Thethrottlecontrolregulatestheenginespeedas
measuredinrpm(revolutionsperminute).Placethe
throttleleverintheFASTpositionforbestperformance.
Youcan,however,usethethrottlepositiontooperate
atslowerspeeds.
ShuttingofftheEngine
1.Parkthemachineonalevelsurface,engage
theparkingbrake(ifapplicable),andlowerthe
hydrauliclift.
2.MovethethrottlelevertotheSLOWposition
(Figure18).
3.Iftheenginehasbeenworkinghardorishot,let
itidleforaminutebeforeturningthekeyswitch
totheOFFposition.
Note:Thishelpstocooltheenginebeforeyou
shutitoff.Inanemergency,youcanshutoff
theengineimmediately.
4.TurnthekeyswitchtotheOFFpositionand
removethekey.
CAUTION
Achildoruntrainedbystandercould
attempttooperatethemachineandbe
injured.
Removethekeyfromtheswitchwhen
leavingthemachine,evenifjustforafew
seconds.
MovingaNon-Functioning
Machine
Important:Donottoworpullthemachine
withoutrstopeningthetowvalves,oryouwill
damagethehydraulicsystem.
1.Engagetheparkingbrakeandlowerthe
hydrauliclift.
2.Shutofftheengineandremovethekey.
3.Removethebottomshield.
4.Usingawrench,turnthetowvalvesonthe
hydraulicpumpstwicecounter-clockwise(Figure
19).
g019842
Figure19
1.Towvalves
5.Installthebottomshieldandtowthemachine
asrequired.
6.Afterrepairingthemachine,closethetowvalves
beforeoperatingit.
17

GrindingaStump
DANGER
Thismachineiscapableofamputatinghands
andfeet.
•Stayintheoperatingpositionwhilethe
machineisrunning,andkeepawayfrom
movingparts.
•Keepallbystandersasafedistanceaway
fromthemachine.
•Stopthemachineimmediatelyifany
peopleoranimalsentertheworkarea.
WARNING
Grindingastumpthrowswoodchips,soil
andotherdebrisintotheair,whichcould
injureyouorbystandersandcoulddamage
property.
•Alwaysweareyeprotectionwhenusing
thegrinder.
•Keepallbystandersasafedistanceaway
fromthegrinder.
WARNING
Thegrinderisveryloudwhencuttingastump
andcandamageyourears.
Alwayswearhearingprotectionwhenusing
thegrinder.
1.Starttheengine,raisethegrinder,setthe
throttlelevertotheFASTposition,andmovethe
machinetothestumptobeground.
2.Usethegrindercontrolleverandthetraction
controltopositionthegrindertothesideofthe
frontofthestump,about2cm(1inch)below
thesurface(Figure20).
3.Startthegrinderandwaitforittogetuptofull
speed.
4.Usethegrindercontrollevertoswingthegrinder
slowlyacrossthefaceofthestump,cutting
awayaswathofchips(Figure20).
Important:Thegrinderautomaticallyslows
downthespeedatwhichitswingsintothe
stumptomaintaintheoptimumywheel
speedandnotbogdowninthewood.
g019845
Figure20
5.Lowerthegrinderaboutaninchandswingit
backoverthestump.
6.Repeatsteps4and5untilyouhavereached
groundlevel.
7.Raisethegrindersothatitisaboutaninch
belowthetopoftheremainingstump,movethe
machineforwardafewcentimeters(inches),
andrepeatsteps4through6untilyouhave
groundawaytheentirestump.
8.Ifthereareanylargerootstobeground,position
thegrinderovereachrootandusethetraction
controlandgrindercontroltomovethegrinder
alongtheroot,grindingitaway.
9.Cleandebrisfromthehydrauliclift,drives,
mufers,andengineaftereachuse.
Note:RefertoRemovingtheMuferCover
(page21)toaccessthemufer.
18

SecuringtheMachinefor
Transport
Important:Donotoperateordrivethemachine
onroadways.
1.Parkthemachineonalevelsurface,engage
theparkingbrake(ifapplicable),andlowerthe
hydrauliclift.
2.Shutofftheengineandremovethekey.
3.Securethemachinetoatrailerwithchainsor
strapsusingthetie-down/liftloopsatthefront
andrearofthemachine(Figure21andFigure
22).Refertoyourlocalordinancesfortrailerand
tie-downrequirements.
g020517
Figure21
1.Fronttie-down/liftloops
g007818
Figure22
1.Reartie-down/liftloops
LiftingtheMachine
Youcanliftthemachineusingthetie-down/liftloops
asliftpoints(Figure21andFigure22).
OperatingTips
•Cleantheareaoftrash,branches,androcks
beforeoperatingtopreventequipmentdamage.
•Alwaysusefullthrottle(maximumenginespeed)
whengrinding.
•Cuttheedgesofthestumpformoreefcient
grinding.Onceyourcuttingswathiscloseto1/4
ofthewheeldiameter,lowerthegrinderandbegin
cuttingontheedgeagain.
g019845
Figure23
•Listentotheengineandwatchthegrinderwheel
speedtomaintainthespeedofthewheel.Slow
downtheheadsweepbyfeatheringthejoystickas
cuttingbecomesdifcult.
•Asyougrindfromlefttoright,mostofthedebris
goestotheleftofthegrinderwheel.Whenyou
grindfromtherighttoleft,thedebrisgoestothe
right.
•Youmayalsogrindastumpfromthesidetolessen
turfdamage.
19

Maintenance
Note:Determinetheleftandrightsidesofthemachinefromthenormaloperatingposition.
RecommendedMaintenanceSchedule(s)
MaintenanceService
IntervalMaintenanceProcedure
Aftertherst50hours•Checkandadjustthetracktension.
Beforeeachuseordaily
•Greasethemachine.(Greaseitimmediatelyaftereverywashing.)
•Checktheengine-oillevel.
•Checktheconditionofandcleanthetracks.
•Cleantheenginescreen.
•Checktheconditionoftheteeth;rotateorreplaceanythatarewornordamaged
andtorquethenutsforallteeth.
•Checkforloosefasteners.
Aftereachuse•Removedebrisfromthemachine.
Every25hours•Checkthebatteryelectrolytelevel.
•Checkthehydraulic-uidlevel.
Every100hours
•Changetheengineoilandoillter(moreoftenindirtyordustyconditions).
•Checkandadjustthetracktension.
•Checkthehydrauliclinesforleaks,loosettings,kinkedlines,loosemounting
supports,wear,weather,andchemicaldeteriorationandrepairifnecessary.
Every150hours•Inspecttheprimarylter.
•Replacethelow-pressurefuellter(moreoftenindirtyordustyconditions).
Every200hours•Changetheengine-oillter.
•Replacethehydrauliclter.
Every250hours•Checkandgreasetheroadwheels.
Every300hours•Replacetheprimaryairlter(moreoftenindustyorsandyconditions).
•Checktheinnerairlter.
Every400hours•Changethehydraulicuid.
Every500hours•Replaceandgapthesparkplug(s).
Every600hours•Replacetheinnerairlter.
Every1,500hours•Replaceallmovinghydraulichoses.
Yearlyorbeforestorage•Checkandadjustthetracktension.
•Touchupchippedpaint.
Important:Refertoyourengineowner'smanualforadditionalmaintenanceprocedures.
CAUTION
Ifyouleavethekeyinthekeyswitch,someonecouldaccidentlystarttheengineandseriously
injureyouorotherbystanders.
Removethekeyfromthekeyswitchanddisconnectthewiresfromthesparkplugsbefore
youdoanymaintenance.Setthewiresasidesothattheydonotaccidentallycontactthe
sparkplugs.
20
Other manuals for STX-38
3
This manual suits for next models
1
Table of contents
Other Toro Grinder manuals


