Torpedo7 Estate User manual

Select a dry, level area and clear the ground of any
sharp or dangerous objects.
Where possible select a sheltered camp site protected
from the wind, and one that will not allow water to
pond under the tent oor in the event of rain.
Lay out the tent with doors facing in the desired
direction. Open all doors and windows in the tent to
allow air inside when erecting the tent.
WARNING - Failing to open doors and windows will
put excessive stress on the fabric and seams as the
tent is raised and may cause damage.
• Peg out the four corners of the tent, ensuring that
the tent is pulled out rm and square (be careful
not to make it too taut). Peg out the remaining peg
points inserting pegs on a 45 degree angle.
• Remove all of the frame parts from the bag and lay
out as per the frame part diagram. Join appropriate
tent pole sections together ensuring each section is
rmly secured into the next.
• Install the centre ridge pole. Select the frame
(parts #42, #43 and #44) for the centre ridge pole
and insert through the centre ridge pole sleeve on
the tent ensuring the front pole #44 is correctly tted
through the webbing loop and pole sock, and the
the rear pole #42 is tted through the webbing strap
attached to the tent.
• Install the outside curved ridge poles, x2. Select
the frame (parts #32, #33 and #34) for the outside
curved ridge poles and insert through
the outside ridge pole sleeves on the
roof of the tent, ensuring the end poles
are correctly tted through the webbing
loops attached to the tent.
WARNING - Do not force poles through the sleeves
as this may damage the sleeve. Check to ensure
the pole does not snag when sliding it through the
sleeve.
• Install the inside curved ridge poles, x2. Select the
frame (parts #35, #36 and #37) for the inside curved
ridge poles and insert through the inside ridge pole
sleeves on the roof of the tent, ensuring the front
pole #37 is correctly tted through the webbing loop
and pole sock and the rear pole #35 is tted through
the webbing strap attached to the tent.
• WARNING - Do not force poles through the
sleeves as this may damage the sleeve. Check
to ensure the pole does not snag when sliding it
through the sleeve.
• Install the outside support legs. Select the 4
assembled outside support legs, (4 x part #30 and
4 x part #31) and insert these into the outside ridge
poles already tted to the tent.
Estate Tent Instructions
Peg points Webbing loops
Outside ridge pole sleeve Inside ridge pole sleeve Centre ridge pole sleeve
GUSSET
SOCK
PART
63C
Webbing Loop
Pole Sock
Part #44
CENTRE RIDGE POLE FRONT
Part #43
ROOF SPREADER POLE
Part #42
ROOF END POLE
Webbing Loop
Pole Sock
Part #37
ROOF END
POLE INSIDE
Part #36
ROOF SPREADER
POLE INSIDE
Part #35
ROOF END
POLE INSIDE
Webbing Loop
Part #34
ROOF END
POLE OUTSIDE
Part #33
ROOF SPREADER
POLE OUTSIDE
Part #32
ROOF END
POLE OUTSIDE
Part #30
OUTSIDE SUPPORT LEG TOP
Part #31
OUTSIDE SUPPORT LEG BOTTOM

• Install the inside support legs. Select the 4
assembled inside support legs, (4 x part #38 and 4 x
part #39) and insert these into the inside ridge poles
already tted to the tent. The pole socks are then
clipped to the already tted ridge poles.
• With the help of another person, start by lifting one
of the outside sets of support legs until the end
wall is upright and push the bottom of the support
leg against the ground to hold in place. Repeat this
process with the closest set of inside support legs.
Move to the opposite end of the tent and repeat,
lifting the outside support legs rst, followed by
the inside support legs. The tent should now be
supported by the eight upright support legs.
• Fold the front porch back over the cabin of the tent
and t the front porch spreader bar #7 to the already
tted ridge pole #44.
• Attach the front and rear centre upright poles (parts
#40 and #41) to the already tted centre ridge pole.
Clip the pole sock to the centre ridge pole, and
again with the help of another person, lift both the
front and rear centre poles into position and adjust
accordingly.
WARNING - Do not push the poles up too high as
this may cause undue stress and damage to the
fabric.
• Setting the front porch. Insert the remaining porch
spreader bars (parts #8 & #9) to the already tted
part #7. Please note that this join is not xed and
is designed to slide for adjustment.
• Carefully pull the folded porch over from the cabin
of the tent and insert completed centre porch pole
(parts #14 and #14a) by inserting the spike on the
top of the pole through the center porch ridge pole
and then the eyelet located in the centre front of the
porch canvas. Attach a guy rope to the pole spike
and peg the rope to the ground approximately 1.5
meters from the base of the pole. Note that part #14
has a metal clip attached to the porch pole to t a
corresponding hook from the canvas porch.
• Repeat this process for the remaining porch poles
making sure to place the poles in the correct
positions. Place corner poles (parts #10 and #11)
to the outside corners and outside poles (parts #10
and #12) to the sides of the porch. Note that part
#12 has a metal clip attached to the porch pole to t
a corresponding hook from the canvas porch.
• Once all porch poles are in place, adjust the tension
on the guy ropes to set the porch evenly and taut.
WARNING - If the porch is not tensioned correctly,
water will pond and may cause damage to the
fabric and poles.
REVERSE THESE PROCEDURES
TO LOWER THE TENT
Part #38
INSIDE SUPPORT LEG TOP
Part #39
INSIDE SUPPORT LEG BOTTOM
Part #44
CENTRE RIDGE POLE FRONT
Part #40
CENTRE UPRIGHT TOP
Part #7
PORCH SPREADER BAR
Part #41
CENTRE UPRIGHT BOTTOM
Part #8
PORCH SPREADER BAR
Part #14A
PORCH CENTRE POLE BOTTOM
Part #10
PORCH POLE BOTTOM
Part #10
PORCH POLE BOTTOM
Part #9
PORCH END BAR
Part #14
PORCH CENTRE POLE TOP
Part #12
OUTSIDE PORCH POLE TOP
Part #11
CORNER PORCH POLE TOP

PACKING INSTRUCTIONS
• Make sure that the tent is COMPLETELY DRY and
CLEAN before packing away (a damp tent can
develop mildew very quickly). Leave front doors and
windows open.
• Clean, dry and pack the poles and pegs into their
separate bags.
• Once the tent has been lowered, ensure that the
walls are folded neatly and the roof is spread out
at. Fold the porch roof back over the main part of
the tent and lay at on top of the middle room.
• Fold the tent in thirds by rst folding one of the
side rooms inward completely over the top of the
centre room (we recommend that you brush or wipe
the underside of the oor at this point to remove
any grass or dirt and then allow to dry before
proceeding), then repeat the process with the other
side room (including brushing/wiping). The tent is
now square.
• Again fold the tent in thirds by rst folding one of the
outside edges inward to two thirds across the width.
Repeat with the other outside edge, folding this
edge completely over to meet the fold on the other
side. Brush/wipe the underside of the oor after
every fold. The tent is now a long narrow rectangle.
• Tightly roll the tent, from the back towards the front
door, brushing/wiping the underside of the oor as
you go (rolling towards the door helps to push the air
out).
• Secure the rolled up tent with the supplied ties.
• Place in the carry bag.
CARE INSTRUCTIONS FOR YOUR TENT
• We recommend that you season your tent prior
to the rst use, to ensure that the seams are
fully watertight. Erect your tent at home, and wet
thoroughly with the garden hose – especially on the
seams (but not on the zips). Allow to dry fully, and
then repeat 1-2 times.
• KEEP ALL HEAT AND FLAME SOURCES AWAY
FROM TENT, ***NEVER*** use any gas, ame or
heat appliances inside your tent.
• The supplied guy ropes must be used at all times to
help stabilise and help prevent any damage to your
tent (your tent is not covered under warranty from
wind and/or storm damage).
• Your tent must be stored away DRY and CLEAN;
it also must be kept in a dry area off the ground to
help prevent any moisture build-up and/or mildew
developing.
• At the rst sign of bird droppings or sap from a tree,
clean off straight away using water and a soft cloth
only; if left, this may damage the fabric of your tent.
• DO NOT use cleaning agents, bleaches or sharp
instruments to clean your tent; this may not only
affect any waterproong treatment of the fabric, but
may also accidentally damage the tent which would
NOT be covered under the warranty.
• When dismantling the tent, take the extra time to
wipe down the poles along with your pegs. This will
help keep them all free of dirt and debris and help
extend their usage.
• If not regularly used, erect the tent periodically, this
will help in the detection of any mould or mildew that
may have been previously undetected (if accidentally
put away damp, or has had moisture build-up
whilst stored), or any damage that may have been
unsighted when last used.
• If the tent has been used near the sea, hose
down the entire tent to remove salt spray residue
(particularly zip slides and any metal parts) and dry
thoroughly before storing. Zip sliders can be sprayed
with a silicone spray to prevent corrosion (avoid oil-
based sprays as they will stain the fabric).
Warranty
Torpedo7’s Warranty Policy covers our products for 12
months from the purchase date. Warranty claims cover
any fault, defect or failure occurring as a result of the
manufacturing process. Damage or faults occurring as
a result of misuse, accident, or wear and tear are not
covered by our warranty policy. If the product is out of
warranty, then we can still have the product repaired,
however, the cost of the repair will be charged to the
customer.
Please Note:
The warranty for Torpedo7 tents does not cover wind
damage. This is standard practice for all tents sold
within New Zealand and Australia.
Porch Pole Assembly Before lifting the front centre upright pole into place insert part #7 into part #44. When centre
upright pole is ifted insert parts 8 & 9 into place to complete centre ridge porch pole assembly.
Part #44
Centre Ridge Pole Front
Part #7
Porch Spreader Bar
Part #14A
Porch Centre Pole Bottom
Part #10
Porch Pole Bottom
Part #10
Porch Pole Bottom
Part #11
Corner Porch Pole Top
Part #12
Outside Porch Pole Top
Part #14
Porch Centre Pole Top
Part #8
Porch Spreader Bar
Part #9
Porch End Bar
Part #32
Roof end pole outside
Part #33
Roof spreader pole outside
Part #34
Roof end pole outside
Outside Ridge Poles Insert poles through the webbing loop and through outside ridge pole sleeves on the roof.
Outside Support Legs Place the outside support legs into the roof end poles on the outside ridge poles
ready to lift the side walls into position.
Part #30
Outside Support Leg Top
Part #31
Outside Support Leg Bottom
Part #30
Outside Support Leg Top
Part #31
Outside Support Leg Bottom
Inside Ridge Poles Insert poles through the webbing loop and pole sock and through inside ridge pole
sleeves on roof.
Part #35
Roof end pole inside
Part #36
Roof spreader pole inside
Part #37
Roof end pole inside
Inside Support Legs Place the inside support legs into the roof end poles on the inside ridge poles
ready to lift the internal walls into position.
Part #38
Inside Support Leg Top
Part #39
Inside Support Leg Bottom
Part #38
Inside Support Leg Top
Part #39
Inside Support Leg Bottom
Centre Ridge Pole Insert centre ridge pole assembly through the webbing loop and pole sock from
the porch end.
Part #44
Centre Ridge Pole Front
Part #43
Roof Spreader Pole
Part #42
Roof End Pole
Centre Upright Poles Place the centre support legs into the centre pole ready to lift into position.
Part #40
Centre Upright Top
Part #40
Centre Upright Top
Part #41
Centre Upright Bottom
Part #41
Centre Upright Bottom
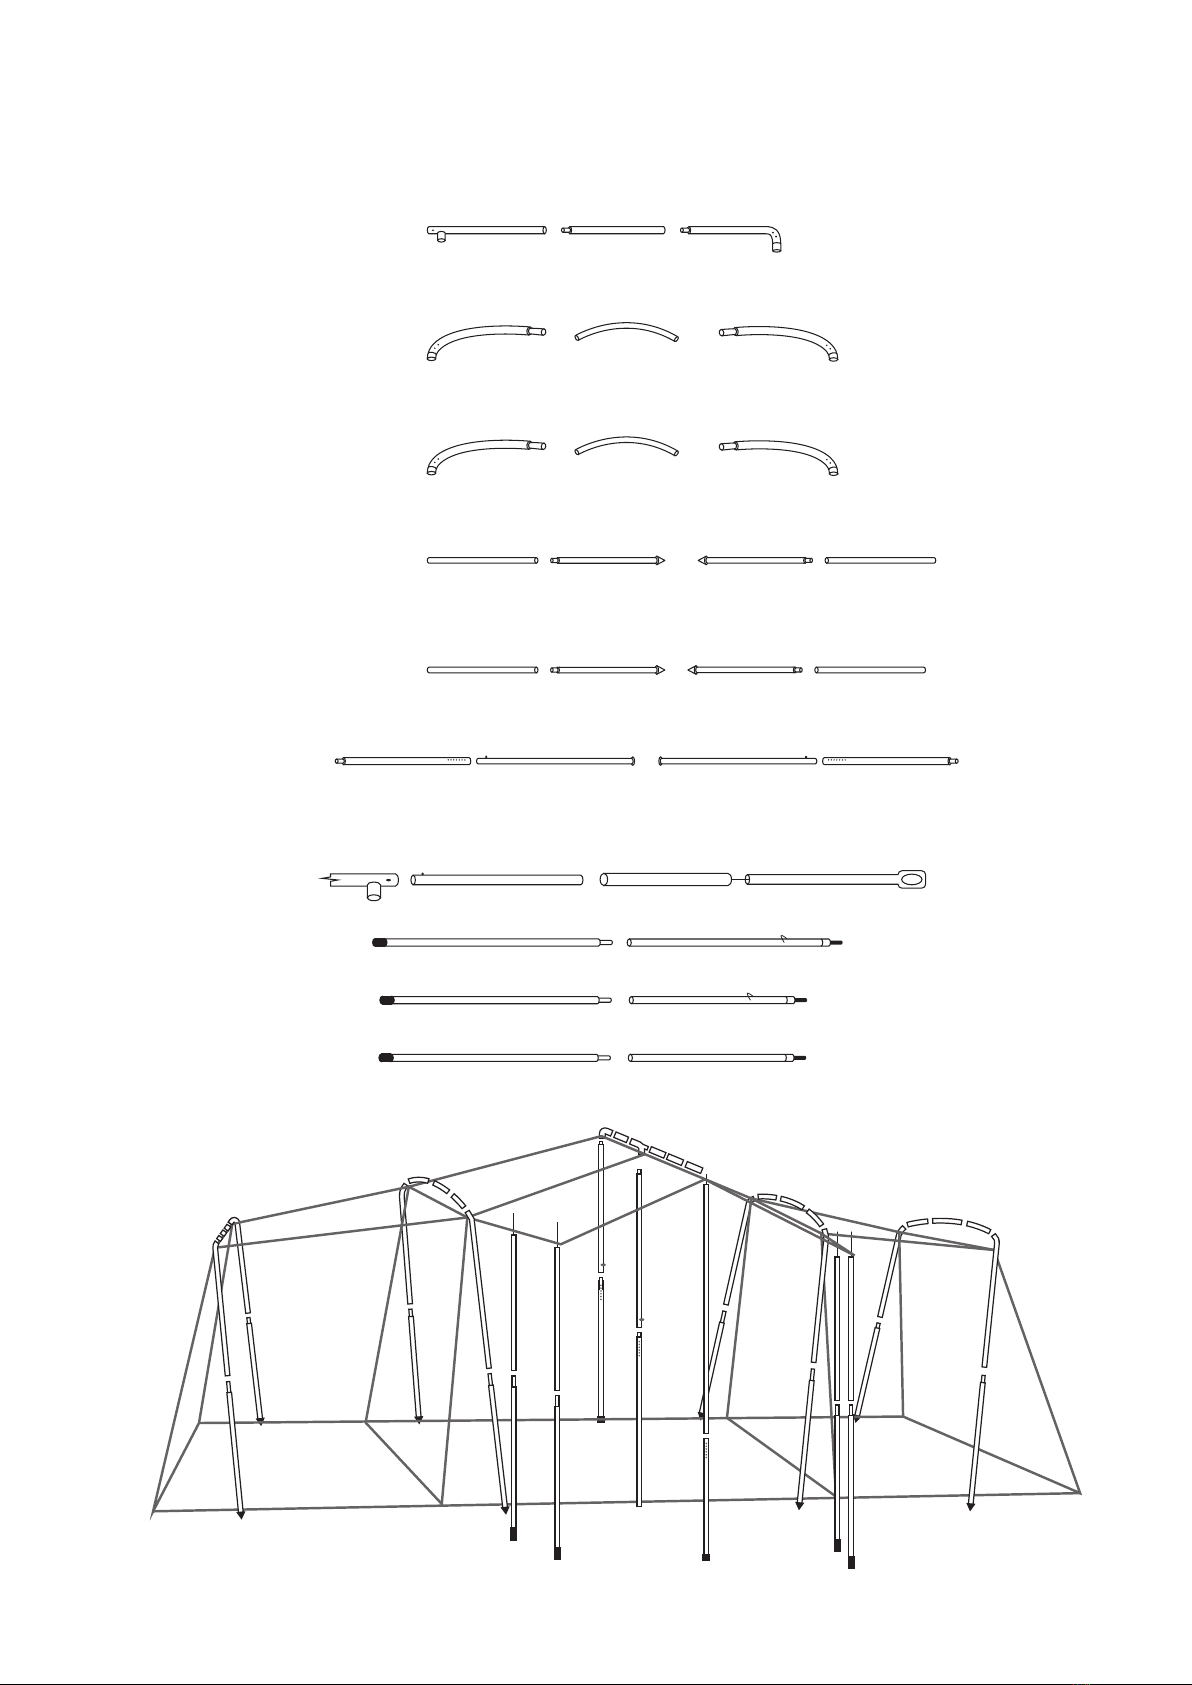
Frame Parts
Lay out pole segments as shown below in order to make assemble quick and easy.
GUSSET
SOCK
PART
63C
31
30
38
38
12
10
11
10
40
41
40
41
14
14A
37
36
35
39
39
38
39
38
12
11
31
30
30
32
42
43 44 789
33 34
31
10 10
35 36
37
39
32
33
34
30
31
Other Torpedo7 Tent manuals


