Torpedo7 Large 6 Tent User manual
Large 6 Tent Instructions
28 61
1
Assembly
•
Find a clear area of even ground and ensure it is free of sharp objects before the
tent is pitched –these tents require a minimum of two people to assemble and pitch
correctly.
•
Avoid pitching under trees –falling tree branches and bird poo won’t keep your tent
looking new. Also orient the back of the tent to keep it more streamlined to the
prevailing wind and allow the rear vent to circulate more air.
•
Once all air tubes are inflated, peg out the remaining peg points and guy
ropes.
Make sure the floor of the tent is sitting flat and even. All entrances should
be closed for this next step and the pegs closest to the zippers of the entrances be
pegged cross wise –this takes all the tension out of the zippers. Now that the
overall tent structure is secure, adjust the tensioning buckles/straps at each peg
points to ensure
they are pulling evenly
.
•
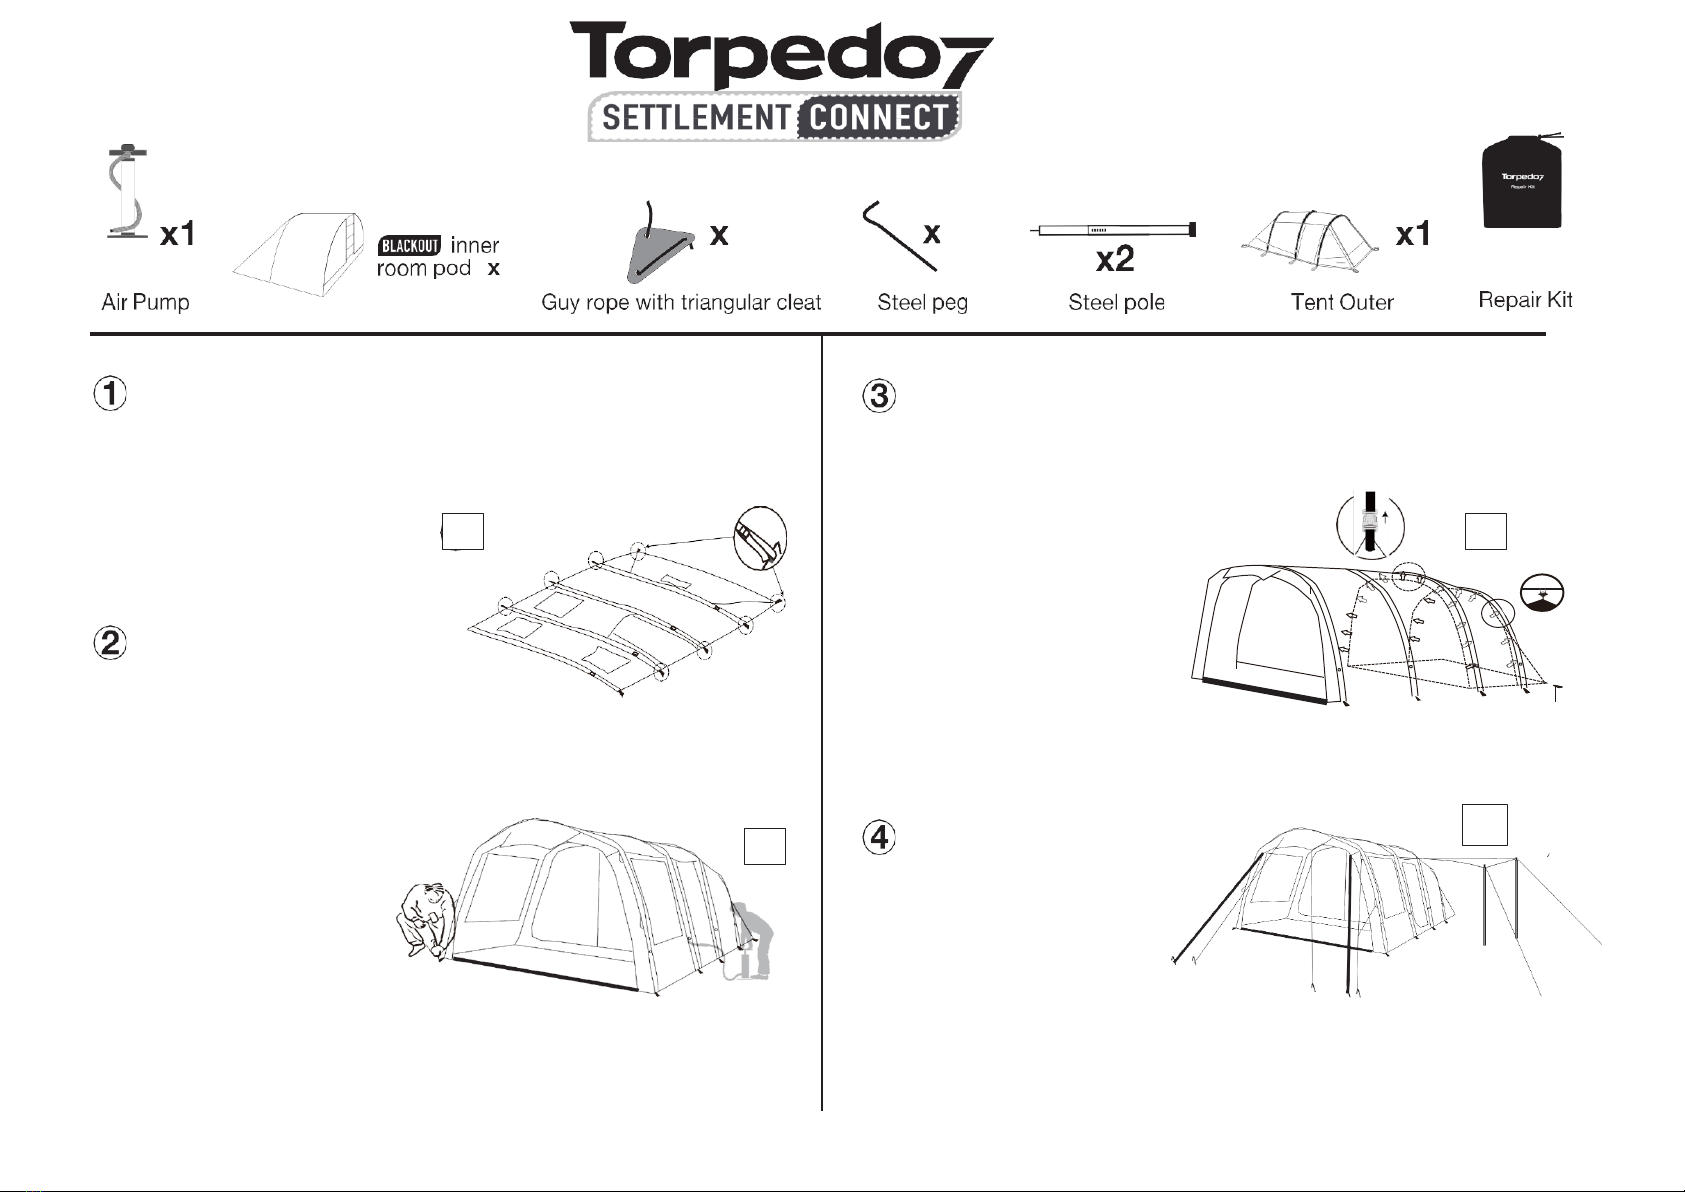
Spread out the tent and peg out the
corners.
[Figure 1]
•
Angle the tent pegs at 45 degrees and
use a rubber mallet to hammer the pegs
into the ground (to avoid damage to the
pegs).
•
Once pegged, start inflating the air
beams, starting with the air beams in
the center.
•
Remove caps and attach the hose of
the air pump, ensuring the purge valve is
attached to the pump.
•
As the tubes take shape get the second
person to raise the tubes and prevent them
from buckling from inside
the tent to enable
the air to set the central
lounge area.
•
Secure
the central dome of
the lounge with guy ropes
and repeat the inflation
process at the end room air
tubes and then the front
entrance air tube.
•
Do not try to over inflate
the air tubes.
When the
purge valve starts to purge excess air –
your air tube is at maximum pressure.
Trying to force more air in the bladder at
this point can cause damage.
•
Ensure all entrances are open when you
inflate the tent to allow airflow and ease the
process.
•
Securely attach the valve caps for
all the bedroom and entrance air
beams or they can leak air.
•
Complete the assembly by
attaching the inner room of the tent
by aligning the toggles on the inner
room with the sewn in O-
rings/tabs inside the tent.
[Figure 3]
•
The zippered door of the inner
room should face towards the
tent entrance.
•
Ensure the doors of the inner
rooms are zipped up
during
assembly (note some air tents the
rooms may be pre-assembled).
•
Double check that you have
pegged out all the remaining
guy ropes
and fine tune the
tent –DO NOT OVER
TENSION THE FLY as you will
need to allow for changes in
weather and wind strength.
•
Peg out the front and rear draft
vents at each end of the tent –
these will keep the air
circulating in the tent and maintain a more comfortable interior temperature –you can
adjust the amount of venting by relocating the tension/location of the pegs of the draft
vent.
•
Reduce vent size in cold weather- but still allow some air flow to reduce internal
condensation, which will occur on all single layer tents to various degrees.
•
REVERSE THESE PROCEDURES TO LOWER THE TENT
2
4
3
1

General Maintenance and Handy Pointers
Care Instructions
Setting Up Your Tent For The First Time
WARNING- do not open the air tube zips- these are
only to be opened when the inner bladder needs
replacing. For details on tube replacement please
refer to www.torpedo7.com and search for the tent
model assembly/ dissemble details
Deflation and Disassembly
Practice pitching your tent to become familiar with the pitching process
and make sure you follow instructions. Air inside the tubes of the Air
Series tents naturally expands and contracts with air temperature so for
extended camping you will need to top up to maintain a 7 PSI pressure.
The tent will rise and fall during the day with the heat of the sun. Don’t
over-inate a cool tent in the morning as the air WILL expand. Avoid
setting up or disassembling your Torpedo7 Air Series Tent in strong
winds as any damage will not be covered by our standard 12 month
warranty
We recommend that you erect your tent for a period of time before use
- enabling it to go through the weathering process. Weathering is the
process of allowing your tent to become soaked and then completely
dry two to three times in order to reinforce the waterproong of the
seams and y sheet stitching.
Guy Ropes Tips and Tricks
Packing Away and Storing Your Tent
Using Your Tent
The pre-tied guy ropes must be used at ALL times to help stabilize and
help prevent any damage to your tent (your tent is not covered under
warranty from wind and/ or storm damage) . Guy ropes need to go into
the ground and be at a 45 degree angle to be most eective.
• DO NOT use cleaning agents, bleaches or sharp instruments to
clean your tent; this may not only aect the waterproong treatment
of the fabric, but may accidentally cause damage to the tent which
would NOT be covered under the warranty
• Your tent must be stores away DRY and CLEAN; it must also be
kept in a dry area o the ground to help prevent any moisture build-
up and/ or mildew developing
• When dismantling the tent, take the extra time to wipe down the
poles along with your pegs. This will help keep them all free of dirt
and debris and help extend their lifespan
• If you need to pack away your tent damp, please ensure you dry the
tent fully as soon as possible to avoid mildew.
• If not regularly used, erect the tent every 3 months, this will help in
the detection of any mold or mildew that may have been unsighted
when last used.
• If the tent has been used near the sea, hose down the entire tent
to remove salt spray residue (particularly zip slides and any metal
parts) and dry thoroughly before storing. Zip sliders can be sprayed
with a silicone spray to prevent corrosion (avoid oil- based sprays
as they will stain the fabric)
• For best results set your tent up on level ground with no sharp
objects
• At the rst sign of bird droppings or sap from a tree, clean o
straight away using water and a soft cloth only; if left this way
damage the fabric
• If using a groundsheet ensure that it has a smaller footprint than the
tent. This helps to stop water from pooling under the tent.
KEEP ALL HEAT AND FLAME SOURCES AWAY FROM
SHELTER ***NEVER*** use any gas, ame or heat appliances
inside your shelter
1. When you are ready to move from your campsite- unscrew the valves
counter clockwise a few gentle turns- let the air release gradually
from the air tubes- don’t release too suddenly as it is likely to give
your neighbours a fright as there is a fair bit of pressure.
2. Air tubes may still have residue air- this can be massaged out
towards the valve direction while the tent is being folded. Always dry
the tent before you pack away to prevent any moisture build up and/
or mildew developing. The inner room can be left inside the tent on
deating and removed and folded later
3. DO NOT pull out pegs with the peg webbing as it will weaken the
peg straps or break them- use another peg and its hook end to lever
out other pegs or a peg extractor tool.
4. When you return home, dry the tent out and repack- add some
silicone sachets and store in dry place.

Ventilation and Avoiding Condensation
Inflating The Air Tubes
Guide For Pumping Up Air Tents
Guide For Pumping Up Air Tents Continued
Puncture? You can easily repair it
• Condensation happens in cold weather and in humid conditions. It
is formed by breath, cooking nearby, drying clothes in your tent and
human perspiration.
• The most ecient way to prevent condensation is ventilation. Man
made fabrics are prone to condensation as warm air from within the
tent and colder outer air create condensation on the outer material.
This is a natural occurrence and vents must be open at all times
• The tent is designed to have a good air circulation which only works
when vents remain open. Whenever possible keep the waterproof
doors open with the mesh screens closed to allow for a through
ow of air and fully peg your lower vents out, keeping them clear of
obstructions such as mattress and gear bags.
• Please note: the average person will expel up to 1 litre
of moisture from their breath per night – this will amplify any
condensation events and can be mistaken for leaks.
• Ensure your air tubes are inated to the correct pressure by using
the gauge on the pump and using the pressure release valve.
Please inate tubes slowly and children should be supervised when
inating the tent.
• Inate the air tubes to 7 psi maximum- DO NOT OVER
INFLATE THE AIR TUBES- when the purge valve starts to
purge excess air- your air tube is at maximum pressure. Secure the
valve caps securely in a clockwise direction- DO NOT
OVER-TIGHTEN.
• The purge valves supplied with these Air Series tents, and attached
to the pump, are slow acting purge valves. This allows for maximum
pressure, and therefore Air Beam rigidity, to be achieved.
• There is some risk that the Air Beams can be momentarily over
inated if the pump action used is too rigorous, leading to the
internal bladders of the Air Beams popping the zips open
• Please ensure that you inate the Air Beams slowly, and carefully,
paying attention to the noise of the purge valve exhausting – this
sound is very similar to the sound of the air entering the Air Beam
bladder.
• If you locate a small puncture you can easily repair it with your kit
which came with your tent.
• To remove the air frame tube- deate the tube and unzip the
protective covers and pull the tube out. Please do not unzip while
the tube is inated.
• Establish the positioning of the puncture and repair with your kit.
Place the air tube back into its sleeve, in the correct position, with
the valves in their correct sockets and ensure that the bladder has
not got twisted.
• Zip both sleeves up again.
• Begin to inate the tube slowly again, checking that the puncture
repair has been successful.
• If the process does not work a replacement bladder can be
purchased from your nearest Torpedo7 store.
• *Tents will not be replaced due to damaged bladders- within
warranty time-frames bladders will be replaced*
Ensure your air tubes are inated
to the correct pressure by using the
pressure release valve and gauge
on the pump.
PSI

Trouble Shooting
Problem Reason Solution
The Air Tube is deating after the pump is
removed
The “Speed Valve” Button hasn’t pressed
back out
Press the quick release button back out and
the valve will close
Your tent is leaking water
Tents need to be “weathered” before
they fully seal, you may experience some
weeping before your tent weathers
Allow the tent to get completely soaked and
then fully dry two to three times
Pools of condensation are forming
Condensation is an inevitable occurrence
in tents caused by a warmer inside
temperature from people and a cooler
exterior
Open any ventilation points. Always keep
your lower ventilation points open to
optimise the tents air ow (this reduces
condensation)
Bowing or twisting of tubes
There is a chance that the air tubes can
twist within the seams especially when
packing away
Unzip the sleeve when the tube is deated.
Adjust and reposition the tube as required
Warranty Not covered under warranty:
Please Note:
Torpedo7’s Warranty Policy covers our product for 12 months from
the purchase date. Warranty claims cover any fault, defect or failure
occurring as a result from the manufacturing process. Damage or faults
occurring as a result of misusem accident, or wear and tear are not
covered by our warranty policy.
The warranty for Torpedo7 tents does not cover wind damage. This is
standard practice for all tents sold in New Zealand and Australia. It is
recommended to take down your shelter in the event of high winds.
• Failure to deploy all guy ropes in accordance with the instructions.
• Damage caused by incorrect maintenance of the product.
• Flaws in the fabric caused by excessive use
• Imperfections or pulls in mesh doors due to wear and tear.
• Water ingress through fabric because of accelerated UV
degradation due to long term pitch.
• Water ingress through seams caused by excessive abrasion of
seams or taped seam.
• Broken zips caused by over tensioning, forcing or snagging.
• Over tensioned/stretched seams coming apart
• Buckles subjected to undue force or abrasion.
Other Torpedo7 Tent manuals


