Kannad Marine SafeLink EPIRB User manual

SAFELINK
EPIRB
User Manual

SafeLink Category 1

SafeLink Category 2

Disclaim
e
Kannad M
a
publication
right to ch
a
as part o
f
publication
otherwise
w
inaccuraci
e
complete a
End of Lif
e
A
t the end
False alert
s
a consequ
e
Safe disp
A
lways dis
discard th
e
McMurdo
L
RECOM
M
Thi
s
Fal
s
acti
v
Re
a
En
s
En
s
Th
e
bat
t
Thi
s
Ta
k
Thi
s
har
m
e
r
a
rine is a
are to the
a
nge speci
f
f
our polic
y
may be re
p
w
ithout per
m
e
s or omis
s
nd accurat
e
e
Stateme
n
of the pro
d
s
cause ex
p
e
nce
.
osal
Con
reta
r
DO
pose of thi
s
e
product i
n
L
td for furth
e
M
ENDATI
O
s
EPIRB is
s
e alerts e
v
ate your e
a
d the com
p
s
ure you te
s
s
ure the EP
e
EPIRB c
o
t
ery replac
e
s
device c
o
k
e care if y
o
s
device e
m
m
ful; howe
v
brand of
M
best of ou
f
ications, e
q
y
of conti
n
p
roduced,
s
m
ission in
w
s
ions in th
e
e
as possib
n
t
d
ucts usef
u
p
ensive dis
tains trace
r
dants (BF
R
NOT INCI
N
s
p
r
oduct i
n
n
the dom
e
e
r advice.
O
NS AND
S
an emerge
n
ndanger li
v
quipment. I
p
lete manu
a
s
t the EPIR
B
IRB is regi
s
o
ntains no
e
ment or ot
h
o
ntains Lith
o
u need to
d
m
its radio f
r
v
er, it is ad
v
M
cMurdo L
r knowled
g
q
uipment, i
n
uous pro
d
s
tored in a
r
w
riting fro
m
e
publicati
o
le.
u
l life, it is
v
ruption to
S
s of lithiu
m
R
s), both in
N
ERATE
n
a sensibl
e
e
stic waste
.
S
AFETY N
n
cy device
f
v
es. Help
t
ntentional
f
a
l before in
s
B
monthly
s
tered with
y
user servi
c
h
er service.
ium batteri
e
d
ispose of t
h
r
equency r
a
v
isable not
t
td. The in
f
g
e correct
a
nstallation
d
uct devel
o
r
etrieval sy
s
m
McMurdo
o
n, althoug
h
v
ital that th
S
earch and
m
, may co
n
the housin
g
e
and con
s
.
Instead,
t
OTICES
f
or use onl
y
t
o prevent
f
alse alerts
s
talling, tes
y
our local
a
c
eable par
t
e
s; do not
h
ese batte
r
a
diation wh
e
t
o handle t
h
f
ormation
a
a
t the time
and maint
e
o
pment an
d
s
tem or tra
n
Limited. N
o
h
every ca
r
e battery i
s
Rescue se
n
tain trace
s
g
material
a
s
iderate ma
t
ake it to a
y
in grave a
them; und
e
may involv
e
ting or usin
a
uthorities (
t
s. Do not
incinerate,
r
ies or the c
e
n activate
d
h
e antenna
a
nd illustra
t
of going t
o
e
nance inst
d
improve
m
n
smitted in
o
liability c
a
r
e has bee
s
removed
t
rvices and
s
of lead
a
a
nd circuit
b
nner. For
e
civil recy
c
nd immine
n
e
rstand ho
w
e
penalties
.
g the EPIR
Flag State
n
open. Ret
u
puncture,
d
omplete E
P
d
. This radi
while the u
t
ions conta
o
print. We
ructions wi
t
m
ent. No
p
any form,
e
a
n be acce
p
n taken to
t
o prevent
may enda
n
a
nd bromin
b
oards.
e
xample, d
o
c
ling facility
n
t danger.
w
to activ
a
.
B.
n
ation)
u
rn to you
d
eform or
s
P
IRB.
ation is no
t
nit is activ
a
ined in thi
s
reserve th
e
t
hout notic
e
p
art of thi
s
e
lectronic o
p
ted for an
y
make it a
s
false alert
s
n
ger lives a
s
ated flame
o
not simpl
y
, or conta
c
a
te and de
r
dealer fo
s
hort-circui
t
t
classed a
s
a
ted
.
s
e
e
s
r
y
s
s
.
s
-
y
c
t
-
r
t
.
s

CONTENTS
1.INTRODUCTION........................................................................................................... 1
1.1.COSPAS-SARSAT system description................................................................ 1
1.2.Immediate alerting and location calculation....................................................... 1
2.APPLICATION.............................................................................................................. 1
3.REGISTRATION ........................................................................................................... 2
4.DESCRIPTION.............................................................................................................. 2
4.1.Container and mounting bracket description..................................................... 2
4.2.Beacon Description............................................................................................... 3
5.TEST INSTRUCTIONS ................................................................................................. 5
6.INSTRUCTIONS FOR USE........................................................................................... 5
6.1.Automatic activation ............................................................................................. 5
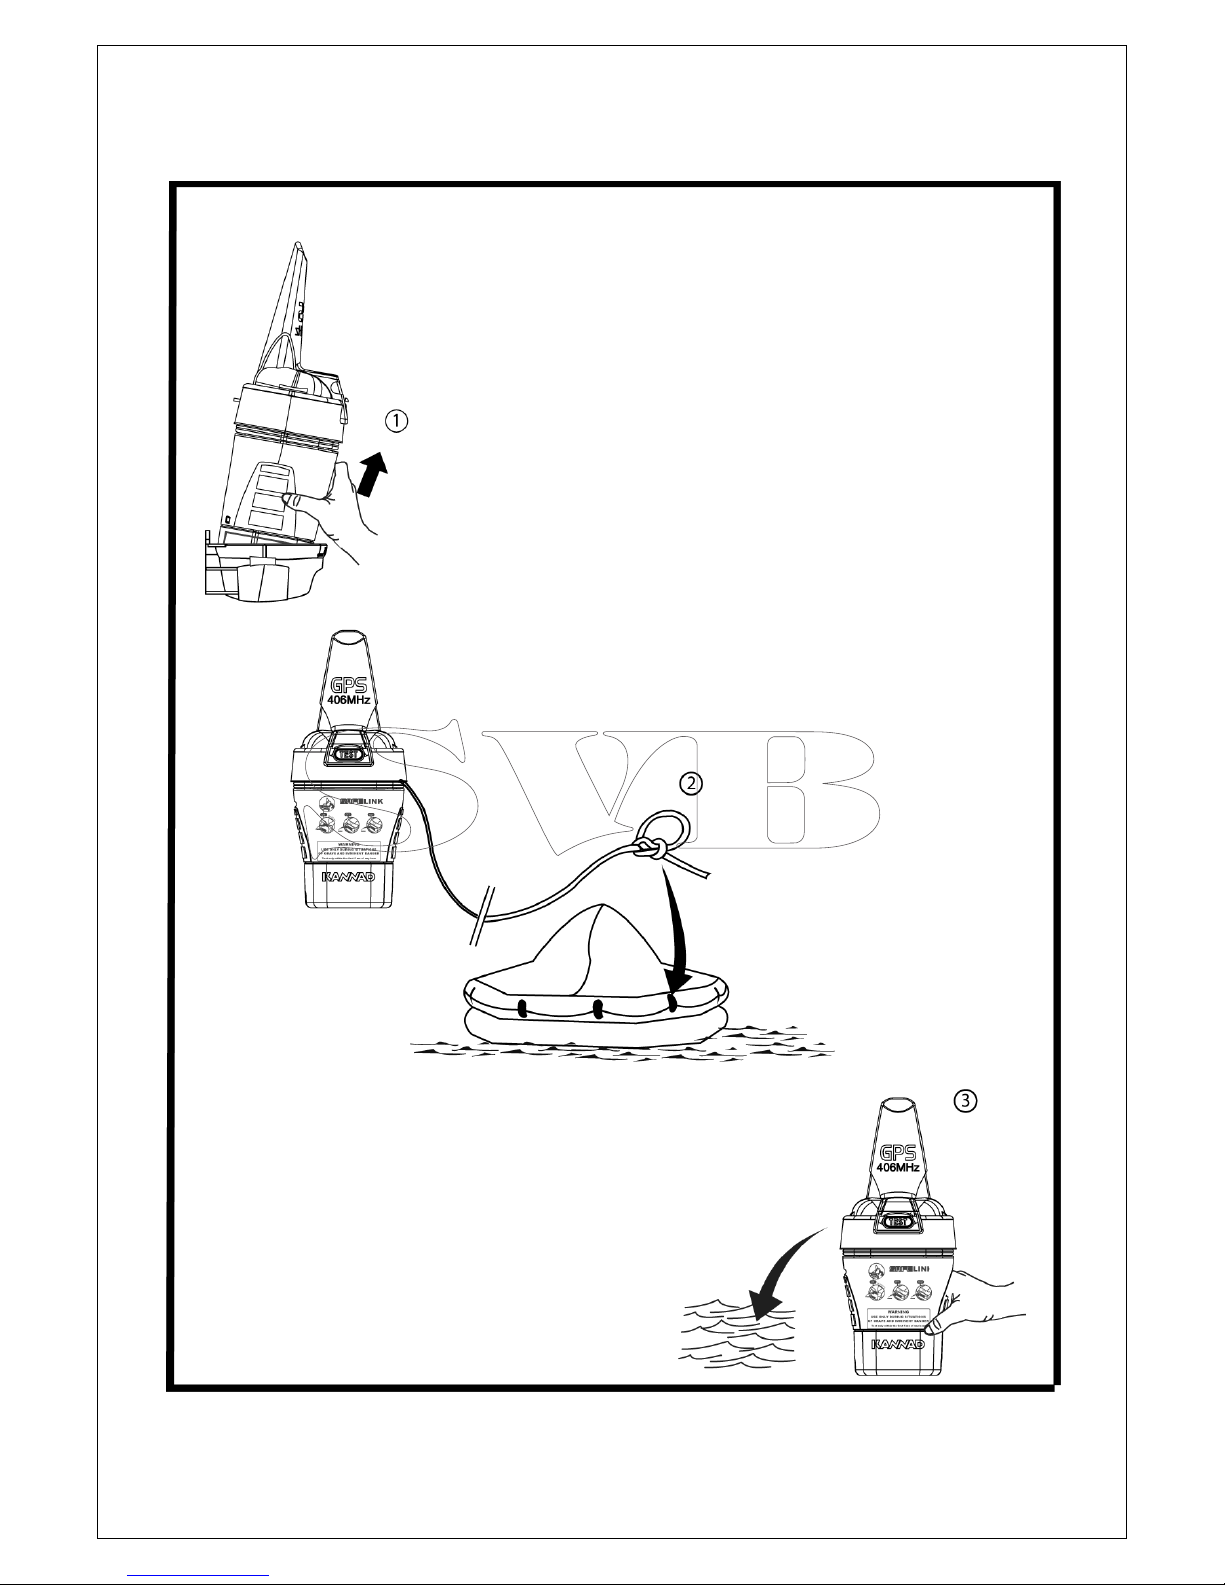
6.2.Manual activation .................................................................................................. 5
6.2.1.Beacon removal................................................................................................ 5
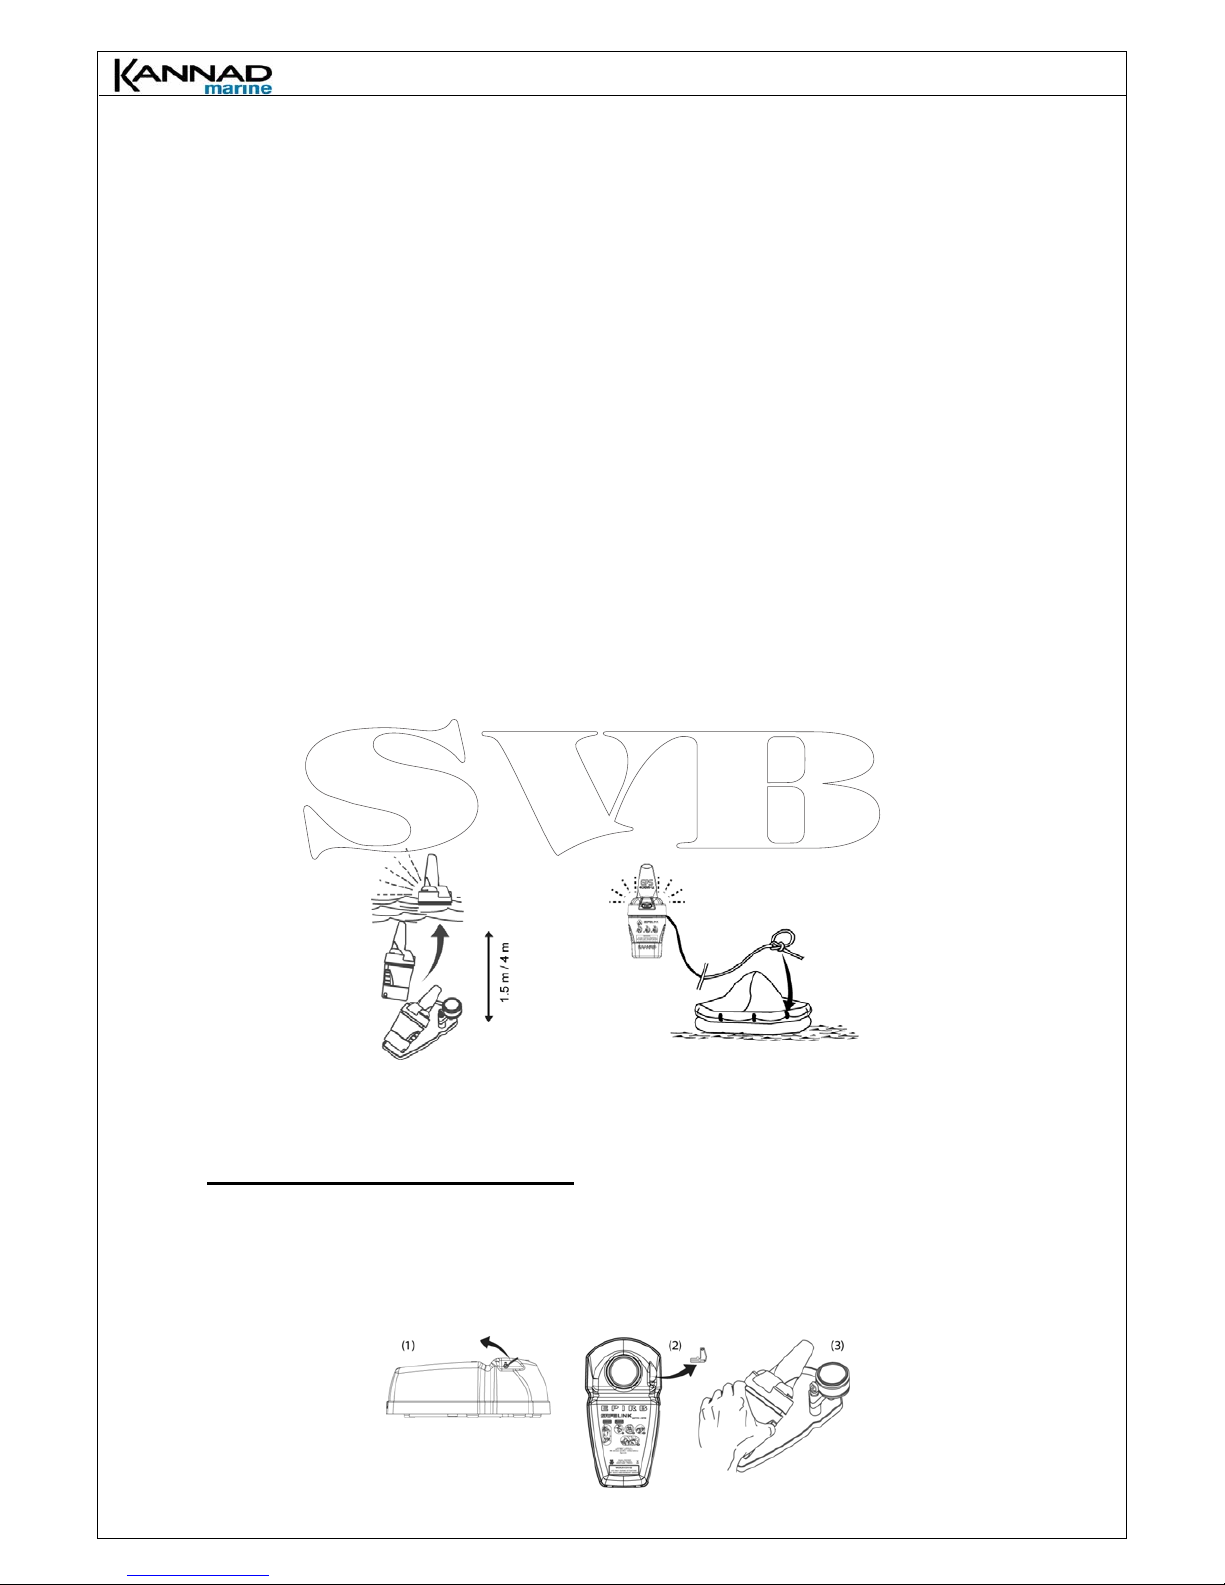
6.2.2.Activation by water switch sensor..................................................................... 6
6.2.3.Manual Activation by ON pushbutton................................................................ 6
7.FALSE ALARMS .......................................................................................................... 7
7.1.False alarms prevention ....................................................................................... 7
7.2.Beacon de-activation ............................................................................................ 7
7.2.1.Beacon overboard............................................................................................. 7
7.2.2.Beacon manually activated............................................................................... 7
7.2.3.Fully disabling the beacon................................................................................. 7
8.BEACON INSTALLATION............................................................................................ 8
8.1.Mounting instructions plate.................................................................................. 8
8.2.SafeLink Auto Category 1 (Float Free) ................................................................ 9
8.2.1.Installation of container..................................................................................... 9
8.2.2.Installation of beacon into container................................................................ 10
8.3.SafeLink Manual+ Category 2............................................................................. 11
8.3.1.Mounting bracket installation........................................................................... 11
8.3.2.Installation of beacon into its mounting bracket .............................................. 12
9.TECHNICAL SPECIFICATIONS................................................................................. 13
10.MANDATORY REGISTRATION .............................................................................. 13
10.1.Overview........................................................................................................... 13
10.2.How to register................................................................................................. 14
10.3.Radio licence.................................................................................................... 15
10.4.Sale or transfer................................................................................................. 15
10.5.Mandatory information for Australia and New Zealand................................ 15
10.6.USA Advice to owners of Emergency Position Indicating Radio Beacons. 15
10.7.Emergency Contact.......................................................................................... 15
11.MAINTENANCE ....................................................................................................... 16
11.1.Battery replacement......................................................................................... 16
11.2.Servicing........................................................................................................... 16
11.3.GMDSS inspections......................................................................................... 16
12.TRANSPORTATION ................................................................................................ 16
13.BATTERY REPLACEMENT PROCEDURE............................................................. 17
13.1.Battery pack removal....................................................................................... 17
13.2.Battery pack reassembly................................................................................. 18
14.AUTOMATIC RELEASE SYSTEM REPLACEMENT .............................................. 19
14.1.Description ....................................................................................................... 19
14.2.Replacement..................................................................................................... 19

Page 1 of 25
1.INTRODUCTION
1.1. COSPAS-SARSAT system description
COSPAS-SARSAT is a global distress warning system operating in the 406.0 - 406.1 MHz
frequency band. The 406 MHz frequency coded with the beacon ID, is used to determine the
position of the beacon to alert the nearest Search and Rescue Services (S.A.R.).
The system consists of:
1. Distress beacons;
2. Satellites on polar orbits (LEOSAR) and geostationary satellites (GEOSAR);
3. Local User Terminals (LUTs);
4. Mission and Rescue Control Centers (MRCC's).
5. MCCs receive alerts produced by LUTs and forward them to Rescue Coordination
Centers (RCCs) or Search
6. and Rescue (S.A.R.) Points Of Contacts
Figure 1: Cospas-Sarsat System
1.2. Immediate alerting and location calculation
When activated, the SafeLink beacons transmit, in the 406 MHz frequency, a coded message with
a unique number to identify the distress and the beacon’s owner, and the GPS position. This
message is picked up by the COSPASSARSAT satellites which store it and continuously
retransmit it to the Local User Terminals (L.U.T) Thanks to the geostationary satellites (GEOSAR),
the distress is received within minutes and transmitted anywhere in the world.
Thanks to the orbital satellites (LEOSAR), the position of the distress is calculated within one
nautical mile anywhere in the world using Doppler techniques. The typical waiting time for
calculating a position in average latitudes is less than one hour.
Thanks to the built-in GPS receiver, its position (accuracy typically about 120 meters) will be
transmitted by the beacon within minutes following the distress.
The data are processed and retransmitted to Mission and Rescue Control Centers (MRCC's) and
to the Search And Rescue Center (RCC or S.A.R.) nearest to the distress to organize the rescue
operations.
The 121.5 MHz frequency is also transmitted by the beacon and is used as a homing frequency in
the final stages of rescue.
2.APPLICATION
This EPIRB (Emergency Position Indicating Radio Beacon) is designed for use in maritime
emergencies, and is approved for these contingencies.
It is not designed or recommended for use on land or in the air.
Use the EPIRB only in situations of grave and imminent danger. Intentional false alerts may result in
penalties.

Page 2 of 25
3.REGISTRATION
This EPIRB must be registered with the appropriate national authority.
Refer to Section 10. MANDATORY REGISTRATION page 12.
The function of the EPIRB is to send an alert to the COSPAS-SARSAT satellites. How soon an alert
is received depends on the positions of the satellites at the time, and can be influenced by overhead
obstructions aboard the vessel. Rescue time following an alert depends on the overall performance
of the Search and Rescue organisations.
4.DESCRIPTION
SafeLink beacons are Emergency Position Indicating Radio Beacons (EPIRB) Float Free version
category 1 (SafeLink Auto) or non Float Free version category 2 (SafeLink Manual+). Both versions
are fitted with a built-in GPS.
4.1. Container and mounting bracket description
The beacon is supplied either in an automatic container (A) for the Float Free version category 1,
or with a wall mounting bracket for the Non Float Free version category.
The container (A) is designed to protect the beacon and to ensure its automatic release in the
event of a ship wreck thanks to the HAMMAR H20 release system (1A). This container is also
fitted with a locking pin (2A). It is mounted either in horizontal position on the wheel house or deck
of the vessel, or in vertical position against a bulkhead or any vertical and flat surface (§ 8.2.1.
Installation of container).
When installed in its container, a magnet avoids beacon activation (water, moisture).
The wall mounting bracket (B) is designed to be mounted vertically against a bulkhead or any
vertical flat surface. The mounting bracket is fitted with a locking pin (1B). When installed in its
mounting bracket, a magnet avoids beacon activation (water, moisture).

Page 3 of 25
4.2. Beacon Description
1. Tamper proof seal
to prove the beacon has been intentionally activated.
2. Locking system
to avoid unintentional activation of the beacon.
3. TEST pushbutton:
to perform a self-test;
to stop the beacon transmission if manually activated by ON button if required by
authorities.
4. ON button:
to activate manually the beacon.
5. Strobe lights:
to improve or help visual localization of the beacon by the SAR operations.
6. Beacon control lamps (red and green):
to check good operation when activating the beacon;
to check good operation when performing a self-test;
7. Programming led:
to program the beacon (by manufacturer or authorized programming stations).
8. Water switch contact:
to activate automatically the beacon when submerged in water.
9. Retroreflective tape
10. Tether line:
to secure the beacon to a liferaft, life jacket, boat, etc.
Important: The tether line is used to moor the EPIRB when floating in the water. Do not
tie lanyard.
to ship when installing beacon inside bracket.
11. 406 / 121.5 MHz antenna.

Page 4 of 25

Page 5 of 25
5.TEST INSTRUCTIONS
Test of 406 / 121.5 MHz frequencies.
It is recommended to perform a self-test once a month. The self-test may be performed with the
beacon inside its bracket or container.
NOTE: This check shall only be conducted during the first five minutes of any UTC hour.
1. Press TEST / READY push button (3) for 2 seconds.
2. During the test, the strobe lights (5) blink, the buzzer transmits an audible signal, and the red
programming led (7) flashes once.
3. At the end of the test, the result is displayed by green (6a) or red (6b) leds:
- Green led (6a), 1 flash indicates the system is operational;
- Red led (6b), 1 flash indicates the test has failed.
Repeat 3 times to confirm failure before contacting agent.
NOTE: Do not confuse the red programming led (7) and the «default» red led (6b).
6.INSTRUCTIONS FOR USE
WARNING: It is unlawful to transmit a distress signal unless an emergency exists. Do not
operate inside life raft or under any similar cover of canopy. Do not obstruct GPS antenna's
view of sky to maximize self-locating performance (do not place the hands over the
transparent dome of the beacon).
6.1. Automatic activation
IMPORTANT: Only for SafeLink Auto Float Free version, category 1.
If the vessel sinks, the release system ejects the cover to enable the beacon to rise to the surface.
The beacon is automatically activated when submerged in water and out of its container.
The beacon should be recovered and tied to a life raft to locate the survivors and not the wreck
location.
6.2. Manual activation
6.2.1. Beacon removal
SafeLink Auto category 1 (Float Free)
Remove the beacon from its container:
(1) Lift up the red locking pin of the container;
(2) Remove the locking pin;
(3) Remove the cover of the container and extract the beacon.

Page 6 of 25
SafeLink Manual+ category 2 (Non Float Free)
Remove the beacon from its mounting bracket:
(1) Lift up the red locking pin;
(2) Pull and remove the red locking pin to unlock the bracket;
(3) Extract the beacon from the mounting bracket.
6.2.2. Activation by water switch sensor
Tie the beacon with lanyard before throwing overboard.
The beacon will start to transmit as soon as submerged (water switch sensor activation).
TO STOP BEACON: remove the beacon from water. Transmission will stop 10 seconds after.
6.2.3. Manual Activation by ON pushbutton
(1) Break the seal by pushing the locking system up.
(2) Press ON pushbutton for 1 at least second.
(3) The buzzer transmits an audible signal every second.
(4) The beacon performs a self-test.
(5) After the self-test, only the white strobe lights blink 3 seconds. The buzzer continues to
transmit every second.
(6) Tie the beacon with the lanyard to the boat or a life raft and throw it overboard.
TO STOP THE BEACON: press TEST pushbutton.

Page 7 of 25
7.FALSE ALARMS
7.1. False alarms prevention
Important: before extracting the beacon, check there is neither salt nor moisture on the
water switch sensor. Clean if necessary (risk of activation).
False alarms caused by accidental activation of beacons result in unnecessary search and rescue
services.
Therefore, if the beacon has been activated by mistake, it is mandatory to:
(1) Immediately contact the nearest search and rescue authorities (coast guards, etc.) to tell them
it is a false alarm to stop SAR operations. Report:
- - beacon unique ID (15 hexadecimal code on label);
- - time and duration of alarm;
- - location when activated.
(2) According to instructions of authorities, manually de-activate the beacon (see § 7.2.)
7.2. Beacon de-activation
If the beacon has been activated by mistake, de-activate as indicated below (according to
instructions of authorities):
7.2.1. Beacon overboard
- Remove the beacon from water;
- wait a few seconds for the water switch sensor to de-activate;
- if the beacon still transmits (flash operating), de-activate it manually (see § 7.2.2.).
7.2.2. Beacon manually activated
- Press and release the TEST button for at least 2 seconds;
- if the beacon still transmits (strobe lights operating), stop the transmission by fully disabling
the beacon (see § 7.2.3.).
7.2.3. Fully disabling the beacon
In the event that the beacon does not switch off despite the above actions, it is necessary to
stop the transmission by fully disabling the beacon (see § 13.1. Battery pack removal).

Page 8 of 25
8.BEACON INSTALLATION
8.1. Mounting instructions plate
The SafeLink beacons are supplied with an instructions plate. This is a rigid plate with basic visual
instructions for how to operate the beacon in an emergency.
The instruction plate should be mounted next to the beacon so that it is easily visible in an
emergency. Use four screws (not supplied) to mount the plate.
Important: do not paint the plate; do not use strong degreasing solvent to clean it.

Page 9 of 25
8.2. SafeLink Auto Category 1 (Float Free)
8.2.1. Installation of container
The container should be installed outside on deck or wheelhouse, or against a bulkhead or any
vertical and flat surface and comply with the following instructions:
- horizontal or vertical position;
- clear area to allow the beacon to rise the surface, should the vessel sink;
Caution: watch rigging, antenna or shroud that could build obstacles;
- easy access to the crew for manual operation;
- strongly fix to the vessel with 4 screws according to drilling mask hereunder.
Note: dimensions are in millimeters (inches in bracket).
Reminder: The instructions plate must be fixed close to the container.

Page 10 of 25
8.2.2. Installation of beacon into container
Caution: If a mounting bracket is installed on the beacon, remove it before installing the beacon
into its container.
(1) To remove the cover, lift the locking pin then extract it from the cover.
(2) Put the beacon into the container by sliding the antenna below the HAMMAR release
system.
(3) Fold the cover onto the support making sure the slots (a) of the cover are inserted into the
lugs (b) of the support.
(4) Slide the locking pin into the hole of the cover and the hole of the fastening screw of
HAMMAR release system.
(5) Lock the pin by turning it down making sure it is locked by the lug of cover.
(a)
(a)
(b)
(b)

Page 11 of 25
8.3. SafeLink Manual+ Category 2
Note: the mounting bracket is fitted with a magnet to avoid beacon activation (water, moisture)
when installed in its mounting bracket.
8.3.1. Mounting bracket installation
The mounting bracket should be installed in a clear area, well known and identified so that it
can be reached easily for emergency used. It should be strongly fixed onto a vertical surface
with 3 screws according to drilling mask hereunder.
Note: dimensions are in millimeters (inches in bracket).
Reminder: The instructions plate must be fixed close to the mounting bracket.

Page 12 of 25
8.3.2. Installation of beacon into its mounting bracket
(1) Insert the beacon into its mounting bracket.
(2) Insert the locking pin in the locking sleeve of the mounting bracket.
(3) Turn downwards the locking pin up to hear a click that proves the bracket is locked.

Page 13 of 25
9.TECHNICAL SPECIFICATIONS
Operating temperature range : -20°C to +55°C.
Storage temperature : -30°C to +70°C.
Lithium manganese batteries
Battery life
: High energy LiMnO2.
: 6 years storage life.
Operating life : 48 hours mini. at -20°C.
Watertight at 1 bar.
Dimensions Beacon Beacon + bracket Beacon + container
250 x 106 x 83 mm 250 x 111 x 91 mm 287.6 x 147.5 x 96.7 mm
Weight 627 g. 679 g. 1280 g.
406 MHz SATELLITE TRANSMISSION
Frequency : 406.037 MHz ± 0.001 MHz
UHF output power : 5W nominal (37dBm ± 2 dB)
Phase modulation : 16K0G1D, Biphase L ± 1.1 ± 0.1 radians
Repetition period : 50 sec. ± 5%
Transmission time : 520 msec. ± 1%
121.5 MHz HOMING TRANSMITTER
Frequency : 121.5 MHz ± 0.006 MHz
Power : 50 mW (17dBm ± 3 dB)
Modulation : AM audio sweep
Modulation format : 3K20A3X
Transmission : Continuous
STROBE LIGHTS : Super LEDs - 0.75 Candela - 23 flashes / mn
GPS : FASTRAX UC322
10. MANDATORY REGISTRATION
You must register your EPIRB with the appropriate authorities.
Failure to register may slow the rescue and lead to loss of life.
You are legally required to register your EPIRB.
10.1.Overview
The EPIRB is pre-programmed with a unique identity before it reaches the end customer. This is
done by the manufacturer or, in some cases, the distributor. The identity includes a 3-digit country
code. This is the country that takes responsibility for storing that particular EPIRB's registration
details. In most cases this is the country to which the vessel is flagged. The country ID
programmed into your EPIRB can be found from its rear identity label. You must register your
EPIRB ownership detail with this authorities in this country.
When you activate your EPIRB in an emergency, the nearest maritime search and rescue
coordination centre (MRCC) will receive the message and decode the country code. They will
then access the registration database for that country and expect to find details of your vessel, its
radio equipment and who to contact. If they fail to find this information, this may slow down any
rescue.

Page 14 of 25
10.2.How to register
Register on-line (were available) or complete the appropriate
registration form with your EPIRB's identity; vessels details and
emergency 24 hour contact numbers. Wherever possible the forms
are also pre-printed with the correct mailing address and a faxback
number. If your form does not have a mailing address, contact your
supplier. When you have completed the form, you can choose to fax it
or mail it.
It is usual to receive confirmation when you register. USA and UK
owners will also receive a "Decal" sticker which you must fit to the
EPIRB itself. The Decal is proof of registration. Not having a Decal
may be an offence in some countries.
Useful registration contacts are:
USA Sarsat Beacon Registration
Mail or Fax to:
NOAA/SARSAT
NSOF, E/SP
34231 Suitland Road
Suitland, MD 20746
Fax No. 301-817-4565
Tel; 1-888-212-SAVE (7283) or 301-817-4515
On-line registration
www.beaconregistration.noaa.gov
Canada Beacon Registration
Canadian Beacon Registry
CFB Trenton
PO Box 1000 Stn Forces
Astra, ON K0K 3W0
Tel. 1-877-406-SOS1 (7671)
Fax: 1-877-406-FAX8 (3298)
Email: [email protected]
On-line registration
www.canadianbeaconregistry.forces.gc.ca
UK EPIRB Registry
The Epirb Registry,
Falmouth MRCC
Pendennis Point, Castle Drive, Falmouth,
Cornwall, TR11 4WZ
Tel: + 44 (0)1326 211569
Fax: + 44 (0)1326 319264
Email: [email protected]
On-line registration
www.mcga.gov.uk/c4mca/epirb
Australian coded beacons
Beacon Registration Section,
Australian Maritime Safety Authority
GPO Box 2181 Canberra City ACT 2601
Tel. +61 2 6279 5766Fax.+61 2 9332 6323
On-line registration
www.beacons.amsa.gov.au
New Zealand coded beacons
Rescue Co-ordination Centre
New Zealand PO Box 30050,
Lower Hutt 5040
Tel: +64 4 577 8033
Fax +64 4 577 8041
Email: [email protected]
COSPAS-SARSAT provide registration details for many countries; use the web address
www.cospas-sarsat.org and follow the links to 406 MHz Beacons and Registration; alternatively.
There is direct access to the database on line at: www.406registration.com.

Page 15 of 25
10.3.Radio licence
An EPIRB is a radio transmitter, if you vessel has already been allocated a radio callsign then you
will already have a radio licence. It is recommended that you should update your licence to
include details of your EPIRB.
10.4.Sale or transfer
EPIRBs registered in the USA, Canada, UK, Australia and New Zealand do not normally need to
be re-programmed when transferred to a new vessel. Simply go on line (detail above) and
complete another registration. For most other countries, the EPIRB must be re-programmed with
either the new vessel's Maritime Mobile Station Identity (MMSI) or its radio callsign, whichever is
required by the country controlling the new vessel. Since the EPIRB identity contains a country
code, it follows that changing the flag state of the vessel also means the EPIRB must be re-
programmed. For details of your nearest agent, either contact Kannad Marine using the details in
the warranty section, or visit the service section of the web site: www.kannadmarine.com.
10.5.Mandatory information for Australia and New Zealand
Advice to owners of Emergency Position Indicating Radio Beacons:
Registration of 406 MHz satellite Emergency Position Indicating Radio Beacons (EPIRB) with the
EPIRB Registration Section of the appropriate Maritime Safety Authority (MSA - see below) is
mandatory because of the global alerting nature of the system. The information provided in the
registration card is used only for rescue purposes. Fill in the owner registration card immediately
on completion of the sales transaction. Mail the registration card immediately. If the beacon is to
enter service immediately, complete the registration card and fax the information to the MSA. The
original card must still be mailed to the MSA for hard-copy reference and filing. If the current
owner is transferring the beacon to a new owner, the current owner is required to inform the MSA
by letter, fax or telephone of the name and address of the new owner. The subsequent owner of
the beacon is required to provide the MSA with the information shown on the owner registration
card. This obligation transfers to all subsequent owners.*The MSA is the Australian Maritime
Safety Authority or the Maritime Safety Authority of New Zealand, as appropriate, whose
respective fax numbers are .+61 2 9332 6323 (Australia) and +64 4 577 8041 (NZ).
10.6.USA Advice to owners of Emergency Position Indicating Radio Beacons
Failure to register the EPIRB may result in a fine
Beacon registration is now available on-line. This is the preferred method of registration; point
your browser to http://www.beaconregistration.noaa.gov and follow the instructions on-screen.
Use the EPIRB form.
Other Information
At present, NOAA still accepts registration by mail or fax. The registration forms are pre-printed
with the correct mailing address and fax number. A registration form may be downloaded from the
website given above. However, after you register the beacon, you will be sent a decal which must
be attached to the beacon.
10.7.Emergency Contact
It is VITAL that the Emergency Contact information is accurate, particularly regarding the
telephone number, as this will be used to validate an alert. Only if the beacon registration and
approximate location details can be confirmed will USCG (United States Coast Guard) launch an
immediate rescue, otherwise there will be a delay whilst further alerts from the same source are
received and verified.
Table of contents
Popular Marine Equipment manuals by other brands

Ocean Signal
Ocean Signal PLB1 user manual

System Sensor
System Sensor SpectrAlert Advance Installation and maintenance instructions

JRC
JRC JAN-7201S instruction manual

Vetus
Vetus BOW2204DE Operation manual and installation instructions

Furuno
Furuno FI-304 Operator's manual

NETmc Marine
NETmc Marine videoPWR user guide