manuals.online logo
Brands
  1. Home
  2. •
  3. Brands
  4. •
  5. Toto
  6. •
  7. Toilet
  8. •
  9. Toto C887 Series User manual

Toto C887 Series User manual

Wall Wall
2018.050IM80503 Installation manual
Precaution before installation
Install the product properly according to this installation manual for best performance. When the installation
work is complete, give a detailed explanation of how to use this product to the customer.
Included parts
Read these “Safety Cautions” carefully before starting installation work. Install the product properly.
This manual uses various indications to ensure a proper, safe installation and to prevent injury to the customer,
injury to other people and damage to property.
The symbols should be interpreted as follows.
Items to be observed are classified by type and explained with the following pictograms.
Caution
Improper use or installation of this product may result in injury or
property damage.
Symbol example
Meaning
Safety Cautions(Observe these cautions for safety’s sake.)
This symbol is used to
indicate no tampering with
this product.
This symbol is used to
indicate a required step in
the use of this product.
Do not excessively bend or twist the water supply hose.
Otherwise, the flexible water supply hose may break causing leaks
that may damage property.
Caution
Do not subject the toilet bowl to strong forces or impacts.
Otherwise, the toilet bowl may break causing injury or leaks that
may damage property.
Be sure to use the included or specified parts for installation work.
Otherwise, the product may not be installed properly.
Do not remove the water supply filter with the water supply
valve being open.
If the water supply valve is not closed, water may gush out causing
leaks that may damage property.
Carry out the installation work according to this installation manual.
Otherwise, damage caused by water leaks may occur.
Required
Prohibited
•
•
•
•
•
•
•
A-1
B-1 B-3
B-2 (300)
D-2
(mm)
C889***
Product Diagram
(mm)
(mm)(mm)
C887***
Product Diagram
380
395
657
699
277
304
428
387
727 701
20 19
<When distance from wall to
drainage center is 305 mm (12-3/8'')>
<When distance from wall to
drainage center is 400 mm (15-3/4'')>
C-1(305) C-1(400)
C-2
E-6
C-3 C-4
C-5
E-4
E-2 E-3
E-1
C-6
E-5
E-1 E-1
100 100 115 115
202
239
202
239
D-1
*The product may be slightly different in shape than the product shown in the figure depending on the model.
Secure the space required for toilet installation and at the same
time, check door opening/closing for possible interference.
Turn on electricity and water supply to the product after
completing all installation work.
Use care not to damage the end of the connection hose.
The minimum required water pressure (flowing) is 7PSI at
2.64 Gal/min (0.05MPa at 10 L/min) while the maximum
water pressure (static) is 108PSI(0.75MPa).
Make sure before installation that the water supply source
and water drain pipe are in the specified positions
according to the diagram.
If it is not positioned properly, the product may not be
able to be installed correctly.
Please wash away the dust or sand in the water supply
pipe completely before installing the water supply valve.
If there is a gap between the discharge pipe and floor,
fill it with mold-resistant silicone-based seal material
(Mediseal).
Doing otherwise may cause water to leak downstairs.
(mm)
For setting water supply Rc 1/2
150±10
200±10
PVC water drain pipe
305±10
400±10
<When distance from
wall to drainage center is
305 mm (12-3/8'')>
<When distance from
wall to drainage center is
400 mm (15-3/4'')>
PVC water drain pipe PVC water drain pipe
C887*** C889*** Integrated Toilet
<There parts are not included in some cases>
F-1
F-2
F-3
F-4
F-5
F-6
<When distance from wall to
drainage center is 400 mm (15-3/4'')>
F-1
F-2
F-3
F-4
F-5
F-6
C-1 (400)
< When using the floor flange >
C-2/C-3/C-5 are not used in this case.
Part diagram
C-1(400)
C-4
C-5
C-4
E-5 C-3
*The product may be slightly different in shape than
the product shown in the figure depending on the model.
*If there is a gap between the straight pipe and the floor, fill
it with mold-resistant silicone-based seal material (Mediseal),
and then attach a cover(B-2).
D-1
Place the positioning sheet aligned
with the discharge center
C-1(305)
E-4
E-5
E-5
E-1
C-6
E-6
E-6
E-1 C-6
E-3
E-2
E-2
E-3
B-3
B-1
B-2
(300)
E-4
E-6
C-2
C-2
D-1
D-1
C-6
C-2 C-2
55
ø8
ø8
55
ø8
55
ø8
55
ø8
ø8 ø8
55
5555
(mm)
C-6
ø8
55
A-1
E-6
E-6 E-6
*The floor flange, T-bolt and sealant
are not included.
They must be arranged separately.
Sealant
B-3
B-1
Sealing tape
Installation procedure
Watch the template for detail.
<When distance from wall to
drainage center is 400 mm (15-3/4'')>
For setting standard toilet seat
For setting washlet
Toilet bowl inner surface Toilet bowl outer surface
Silicon sealant
Make sure that the seallant size/installing procedure is different,
depending on the existing floor flange type.
Misinstallation of sealant may cause inadequate flushing or clogging
of the bowl unit, resulting in water leakage and damage to the assets.
Plastic flange
Sealant for plastic flange
(For plastic flange)
Sealant
Sealant
Attach the sealant to the depression properly
(For metal flange)
When installing the washlet main unit or standard toilet seat main unit, follow the
instructions in the included Installation Guide.
E-4
E-5
E-5
E-1
C-4
C-1(400)
C-5
C-4
C-1(305)
C-3
C-1(305)
E-3 E-2
E-3
E-2
A-1
After conducting a test run, confirm that no connections are leaking water.
Not installing the product properly may cause water leaks that could result in flooding
damage to property, such as household belongings.
A-1
< When using the floor flange >
Caution in handling of the Sealant
Required
Caution
1.
Do not pour detergent into the tank. Doing so could cause damage to the household
or product. Detergent that contains fluorine components (calcium hypochlorite)
could damage devices inside the tank. Resulting malfunctions such as water shutoff
problems could cause water leaks that could result in flooding damage to property,
such as household belongings.
2.
All materials are written based on the latest product conditions at the time of
printing. However, TOTO China reserves the right to change product specifications,
packaging, or supply conditions at any time.
We may change this without prior notification.
3.
Installing this product with cement is prohibited. TOTO shall not be held responsible
for any damage to toilets caused by cement installation.
4.
Use only the included discharge connection parts. If the building's plumbing uses a
trap structure, it could impact the flushing performance of the product.
Caution: If any other issue occurs during use, contact the TOTO After
Sales Service Department.
Malfunction 5: Water leaks from the tank.
1.
If the water in your region is of a hard quality, clean the toilet with toilet cleaner at
least once per week. This will keep the water discharge outlet clean and the toilet
flushing properly. Use a long brush to clean inside the water discharge outlet and
water passage. This can prevent mineral matter from accumulating. Although most
detergents will not damage the surface of the toilet, be sure to follow the detergent
manufacturer's instructions when cleaning. Do not use corrosive chemicals or liquids.
2.
Do not flush newspaper, diapers, sanitary products, or other foreign matter down
the toilet. Doing so could clog the toilet pipeline.
3.
Do not subject the toilet to strong forces or impacts. Otherwise, the toilet may break,
causing injury or leaks that may damage property.
4.
Do not use this product in environments subject to temperatures of 0° or below.
5.
When you first use the product, slowly open the shutoff valve and confirm that there
are no water leaks between the water supply hose and tank unit, and between the
water supply hose and shutoff valve connection area.
6.
Adjust the water level if the water level inside the tank is lower than the standard
water line (WL). Otherwise, flushing performance will be affected (refer to Figure 2).
7.
If the water pressure is high, tighten the shutoff valve appropriately to prevent the
shutoff valve and hose from disconnecting.
Customer Usage Precautions
WARNING
Possible cause
The water supply valve nut
is loose.
1Retighten the water supply valve nut.
The clamping of the shutoff
valve is loose.
2Retighten the shutoff valve.
The water supply hose or
flexible hose is loose.
3Retighten the water supply hose or
flexible hose.
Solution
Malfunction 4: Water is not stored in the tank.
Possible cause
The shutoff valve is closed. Open the shutoff valve.
The float ball is caught on
the side of the tank.
Adjust the position of the water supply valve.
The filter is clogged.
Contact TOTO After Sales Service to have
the filter cleaned.
Malfunction 1: Cannot flush
Malfunction 2: The toilet is clogged or does not flush smoothly
Malfunction 3: Water does not stop
Malfunction Troubleshooting
Possible cause
The shutoff valve is closed. Open the shutoff valve.
The discharge valve's ball chain is loose
and unable to lift the float valve.
Adjust the length of the discharge valve's
ball chain.
Possible cause
The seal surface on the
discharge valve unit is dirty. Clean the discharge valve seal surface.
The seal surface on the
water supply valve is dirty.
Contact TOTO After Sales Service to
have the filter cleaned.
The float ball was caught
on the tank wall.
Adjust the position of the water supply valve.
The discharge valve does
not shut tightly.
Follow the discharge valve installation
procedure and reinstall the discharge valve.
The discharge valve's ball
chain is not the proper length.
Adjust the length of the discharge valve's
ball chain.
Possible cause
The toilet is clogged.
Clean any foreign matter from within the discharge pipe.
The water supply hose is
installed incorrectly.
Install the water supply hose
(refer to Figure 1).
Water supply is slow. The water supply pressure must be 0.05
Mpa (dynamic) or higher.
The water passage pipe is
clogged.
Clean any foreign matter from within the
water passage pipe.
Figure1
Figure2
Water supply valve Water supply hose
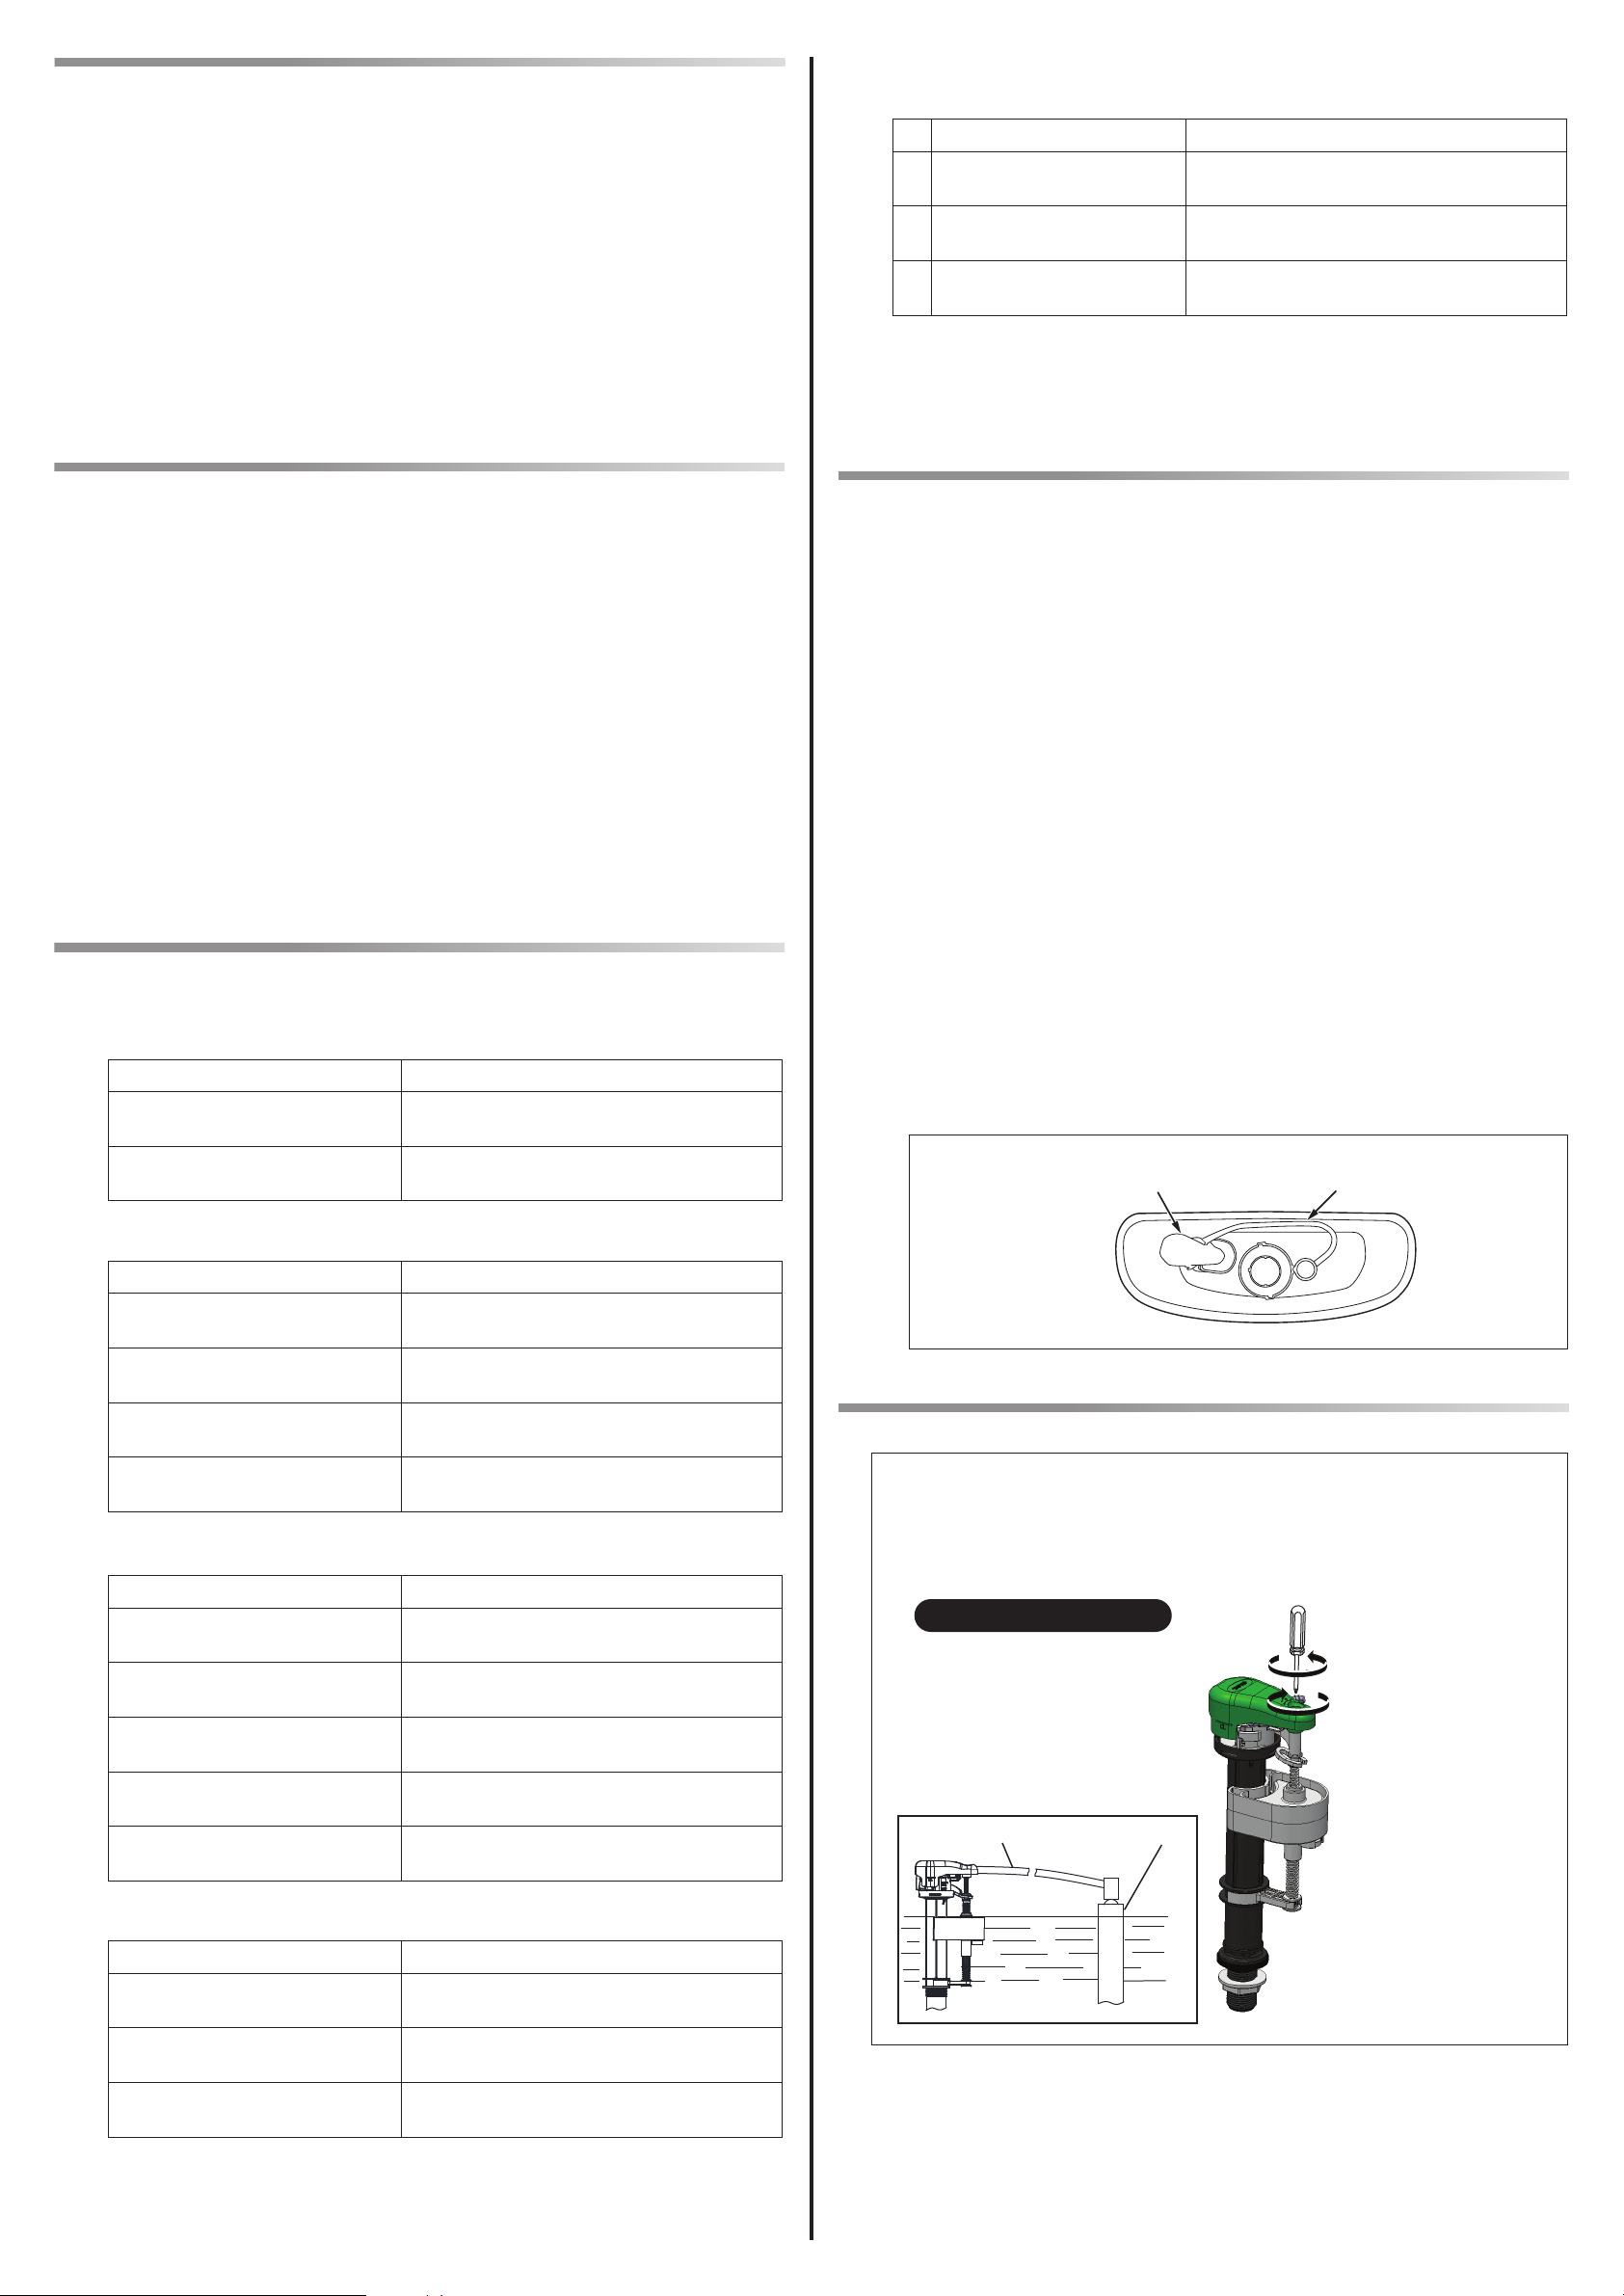
Be sure to confirm water supply after installing the toilet.
Confirm that the water shutoff position matches the WL on the
inner wall of the tank. If they do not match, adjust the height of the
shutoff valve (refer to the following figure).
Adjust using a
flat-head screwdriver
Clockwise: Raise water level
Counterclockwise: Lower water level
• After installation, unseen dirt (oil or adhesive for piping) may remain in the
toilet bowl.
Be sure to wipe it off using a non-abrasive neutral detergent for toilets.
Otherwise, the toilet bowl surface may not flush completely clean.
• Make sure that there are no scratches or other damage on the ceramic
surface.If the ceramic surface is tightly pressed or rubbed against metals
(watchbands, belt buckles, etc.), black or silver streak marks may be left
on the surface.
• Be sure to close the water supply valve and clean the water supply filter
after a trial-run.
* After cleaning the filter, open the water supply valve.
•After the trial-run (flush) of the toilet bowl, check the toilet bowl inside for
foreign matter such as chips of cut pipe, etc. Foreign matters such as
transmitted rust can stick to the sides.
Adjusting the water level
Water supply hose
Overflow pipe
WL
Solution
Solution
Solution
Solution

This manual suits for next models

2

Other Toto Toilet manuals

Toto Aquia CST412MF User manual

Toto

Toto Aquia CST412MF User manual

Toto MS604114CEF User manual

Toto

Toto MS604114CEF User manual

Toto MS614114CEFG User manual

Toto

Toto MS614114CEFG User manual

Toto CS320D Series User manual

Toto

Toto CS320D Series User manual

Toto NEOREST 750H User manual

Toto

Toto NEOREST 750H User manual

Toto MS604114CEFG User manual

Toto

Toto MS604114CEFG User manual

Toto WASHLET+ RX CWT4474047CMFGA MS Series User manual

Toto

Toto WASHLET+ RX CWT4474047CMFGA MS Series User manual

Toto WASHLET SW3074T40 User manual

Toto

Toto WASHLET SW3074T40 User manual

Toto MS636CDR Series User manual

Toto

Toto MS636CDR Series User manual

Toto AP WASHLET CWT4263046CMFG User manual

Toto

Toto AP WASHLET CWT4263046CMFG User manual

Toto UWN926EBS User manual

Toto

Toto UWN926EBS User manual

Toto CT447CFG01 User manual

Toto

Toto CT447CFG01 User manual

Toto NEOREST AS User manual

Toto

Toto NEOREST AS User manual

Toto MS980CMG User manual

Toto

Toto MS980CMG User manual

Toto NEOREST A User manual

Toto

Toto NEOREST A User manual

Toto USWN900 Series Guide

Toto

Toto USWN900 Series Guide

Toto NEOREST DH TCF9575 Series User manual

Toto

Toto NEOREST DH TCF9575 Series User manual

Toto CST424SF User manual

Toto

Toto CST424SF User manual

Toto WASHLET SW2043R User manual

Toto

Toto WASHLET SW2043R User manual

Toto MS604 Series User manual

Toto

Toto MS604 Series User manual

Toto NEOREST 500H User manual

Toto

Toto NEOREST 500H User manual

Toto washlet User manual

Toto

Toto washlet User manual

Toto CST243EF User manual

Toto

Toto CST243EF User manual

Toto Washlet SG User manual

Toto

Toto Washlet SG User manual

Popular Toilet manuals by other brands

Roca IN-WASH INSIGNIA A803104001 manual

Roca

Roca IN-WASH INSIGNIA A803104001 manual

Blooming NB-1360E manual

Blooming

Blooming NB-1360E manual

AQUARIUS Intelligent Bidet instruction manual

AQUARIUS

AQUARIUS Intelligent Bidet instruction manual

Lacava Navi N5051WC owner's manual

Lacava

Lacava Navi N5051WC owner's manual

Thetford Aqua-Magic IV Foot Pedal Flush owner's manual

Thetford

Thetford Aqua-Magic IV Foot Pedal Flush owner's manual

Silent Venus SVP600A quick start guide

Silent Venus

Silent Venus SVP600A quick start guide

MullToa 65ai user manual

MullToa

MullToa 65ai user manual

SFA SANIBROYEUR installation instructions

SFA

SFA SANIBROYEUR installation instructions

Fluidmaster 580AU installation instructions

Fluidmaster

Fluidmaster 580AU installation instructions

YitaHome BFTLPT-1003 Assembly instructions

YitaHome

YitaHome BFTLPT-1003 Assembly instructions

Geberit AquaClean 4000 installation manual

Geberit

Geberit AquaClean 4000 installation manual

SFA SANIMARIN 31 installation instructions

SFA

SFA SANIMARIN 31 installation instructions

Cinderella Comfort installation manual

Cinderella

Cinderella Comfort installation manual

Sanela SLPN 07 Mounting instructions

Sanela

Sanela SLPN 07 Mounting instructions

Grohe EUROCUBE 39663000 owner's manual

Grohe

Grohe EUROCUBE 39663000 owner's manual

LUXE BIDET Neo 110 Assembly instruction

LUXE BIDET

LUXE BIDET Neo 110 Assembly instruction

Sanela SLWN 04 Mounting instructions

Sanela

Sanela SLWN 04 Mounting instructions

Sanela SLPN 09CB Mounting instructions

Sanela

Sanela SLPN 09CB Mounting instructions

manuals.online logo
manuals.online logoBrands
  • About & Mission
  • Contact us
  • Privacy Policy
  • Terms and Conditions

Copyright 2025 Manuals.Online. All Rights Reserved.