Touchstone VALUELINE 30003 User manual
VALUELINE TV LIFT
Model # :
30003 –28” Valueline TV Lift
30004 –39” Valueline TV Lift
OWNER’S MANUAL

Valueline TV Lift
www.touchstonehomeproducts.com 800.215.1990
rev. 20200618
2

Valueline TV Lift
www.touchstonehomeproducts.com 800.215.1990
rev. 20200618
3
Table of Contents
About Your Touchstone Valueline TV Lift.............................................................................................................. 4
Lift Features.............................................................................................................................................................. 4
Safety Information...................................................................................................................................................... 5
IMPORTANT SAFETY and PRE-INSTALLATION INSTRUCTIONS................................................................ 5
Lift Components & TV Installation Hardware........................................................................................................ 6
Components .............................................................................................................................................................. 6
Hardware................................................................................................................................................................... 6
Tools ......................................................................................................................................................................... 6
Dimensional Drawings................................................................................................................................................ 7
30003 –Valueline 29” TV Lift.................................................................................................................................. 7
30004 –Valueline 39” TV Lift.................................................................................................................................. 8
Assembling and Installing Your Valueline TV Lift................................................................................................. 9
Fasten Lift To Cabinet.............................................................................................................................................. 9
Hooking Up Lift Components and Operating Lift ................................................................................................ 11
Hooking Up Control Box........................................................................................................................................ 12
Hooking Up Wired Handset Control ...................................................................................................................... 13
Hooking Up Power Supply..................................................................................................................................... 13
Operating the Lift.................................................................................................................................................... 14
Wired Handset Control....................................................................................................................................... 14
Wireless RF Control ........................................................................................................................................... 15
Pairing RF Remote Control to Control Box ....................................................................................................... 15
Mounting and Installing the TV.............................................................................................................................. 16
Attaching TV Mounting Brackets To Flat Panel TV.............................................................................................. 16
Assembling The Flat Panel TV Mount................................................................................................................... 18
Mounting Flat Panel TV Mount To The Lift.......................................................................................................... 19
Installing TV on Lift............................................................................................................................................... 21
Locking TV to Flat Panel TV Mount...................................................................................................................... 22
Installing C Bracket and Flat Top Lid Mount......................................................................................................... 23
Warranty ................................................................................................................................................................... 25

Valueline TV Lift
www.touchstonehomeproducts.com 800.215.1990
rev. 20200618
4
About Your Touchstone Valueline TV Lift
Congratulations on the purchase of your Touchstone Valueline TV lift. Touchstone Home Products takes pride in
the quality craftsmanship and smooth functionality of our TV lift mechanisms. Please take a few minutes to learn
about the features of your TV lift to ensure you get the optimum use and performance from your new purchase.
Lift Features
- Durable steel construction with 24v motor for smooth, quiet and reliable operation
- Lift cycle fully raises or lowers in approximately 30 seconds.
- Universal quick connect installation takes just minutes. Includes hardware kit with the most common bolts for
mounting TV.
- 3-way adjustable mounting system to ensure that the Valueline is compatible with almost all flat panel TVs in
the market today.
- Modular design –all components can be easily replaced in just minutes
- Three (3) year worry-free warranty
30003 Valueline TV Lift
30003 Valueline TV Lift
With Flat Top Lid Mount

Valueline TV Lift
www.touchstonehomeproducts.com 800.215.1990
rev. 20200618
5
Safety Information
Mounting your flat screen TV to the Touchstone Valueline TV Lift is fast and easy. Operating your lift is very
straightforward. However, to avoid the risk of personal injury and to ensure optimum performance of your TV lift
mechanism, please pay particular attention to the warnings and safety notices throughout this manual.
IMPORTANT SAFETY and PRE-INSTALLATION INSTRUCTIONS
1. Please adhere to the proper installation procedure as detailed in the installation instructions.
2. Safety precaution measures must be practiced at all times during installation of this product.
3. The entire installation instructions should be fully read and understood before beginning installation.
4. At least two people should be available to lift the TV onto the lift mechanism. Please take care when
handling your flat screen TV, as injury and damage can result from dropping or mishandling of the TV.
5. The stand on your flat screen TV is removable! Please remove the stand prior to installing the TV on the
lift mechanism. Consult your TV’s owner’s manual for instructions for removing the stand.
6. Carefully measure all dimensions of your LCD, PLASMA, or LED TV before proceeding. Then consult the
Mounting and Installing the TV section of this manual for maximum TV size.
IMPORTANT!: After installing your TV, you may find there is room in the bottom of the cabinet to install
a small cable/satellite TV box. Carefully inspect the space between the bottom of the TV and the bottom of
the cabinet to see if your component will fit in the bottom of the cabinet. Consult the Mounting and
Installing the TV section of this manual for more information.
7. All cords connecting components to the TV should be a minimum of 72” (6 feet) in length when installing
components inside of a cabinet or a minimum of 144” (12 feet) in length when installing components
outside of cabinet (length of cable will depend on placement of your component).
8. WARNING!: TV lift mechanism contains moving parts. Please keep hands, arms, and fingers away from
the lift and cabinet lid opening when the lift is in motion. Cables should be wire-tied or secured neatly so
lift does not contact them during operation. Also, keep all components away from the lift mechanism.
Contact Touchstone Customer Service at 1-800-215-1990 with any questions regarding the operation of your Valueline
TV Lift. We are also available on the web at www.touchstonehomeproducts.com

Valueline TV Lift
www.touchstonehomeproducts.com 800.215.1990
rev. 20200618
6
Lift Components & TV Installation Hardware
Components
Lift Parts
Number
Part Number
Part Name
1
30003, 30004
Lift Column
2
32809
Lift Base
3
n/a
TV Mounting Plate
4
32810a
TV Mounting Brackets
5
32810b
Horizontal Flat Panel Brackets
6
n/a
Flat Top Lift Mount
7
32810c
Vertical Flat Panel Bracket Rods
8
32802
Wired Handset Control
9
32803
Wireless RF Remote
10
32801, 33901
Control Box
11
32806
Power Supply
12
n/a
Control Box-Lift Transit Line
13
n/a
Power Supply Transit Line
14
32807
Power Cable
Accessory Package
Part
Quantity
M8 Bolts and Nuts –For TV Bracket
4
M6x16 Bolts –Adjustable C Bracket
8
M6x8 Bolts –Flat Top Lid Mount
5
ST6x16 Screws –For Fastening Back of Lift
4
ST5x16 Screws –For Fastening Lift to Floor
4
TV Mounting Screws –Assorted Sizes
4 per size
Washers –Assorted Sizes
4 per size
**Note: The TV Mounting Screws provides fit most TVs on the market. If they
do not fit your TV, you can purchase them an any hardware store.
Hardware
- TV Mounting Screws
-> Please consult your TV manufacturer for the size and length of the mounting screw for your TV.
Included is a basic set of mounting screws that accommodates most LCD/Plasma TVs. Depending on your
television, the screws included in the kit may not fit your television. If that is the case, these screws can be
purchased at most hardware/home improvement stores.
Tools
In order to assemble the Valueline TV Lift, you will need the following tools:
- Philips-head screwdriver - size 5 metric hex wrench (included)
- size 4 metric hex wrench (included) - adjustable wrench or size 4 and size 5 metric socket wrench

Valueline TV Lift
www.touchstonehomeproducts.com 800.215.1990
rev. 20200618
7
Dimensional Drawings
30003 –Valueline 29” TV Lift
Valueline TV Lift
www.touchstonehomeproducts.com 800.215.1990
rev. 20200618
8
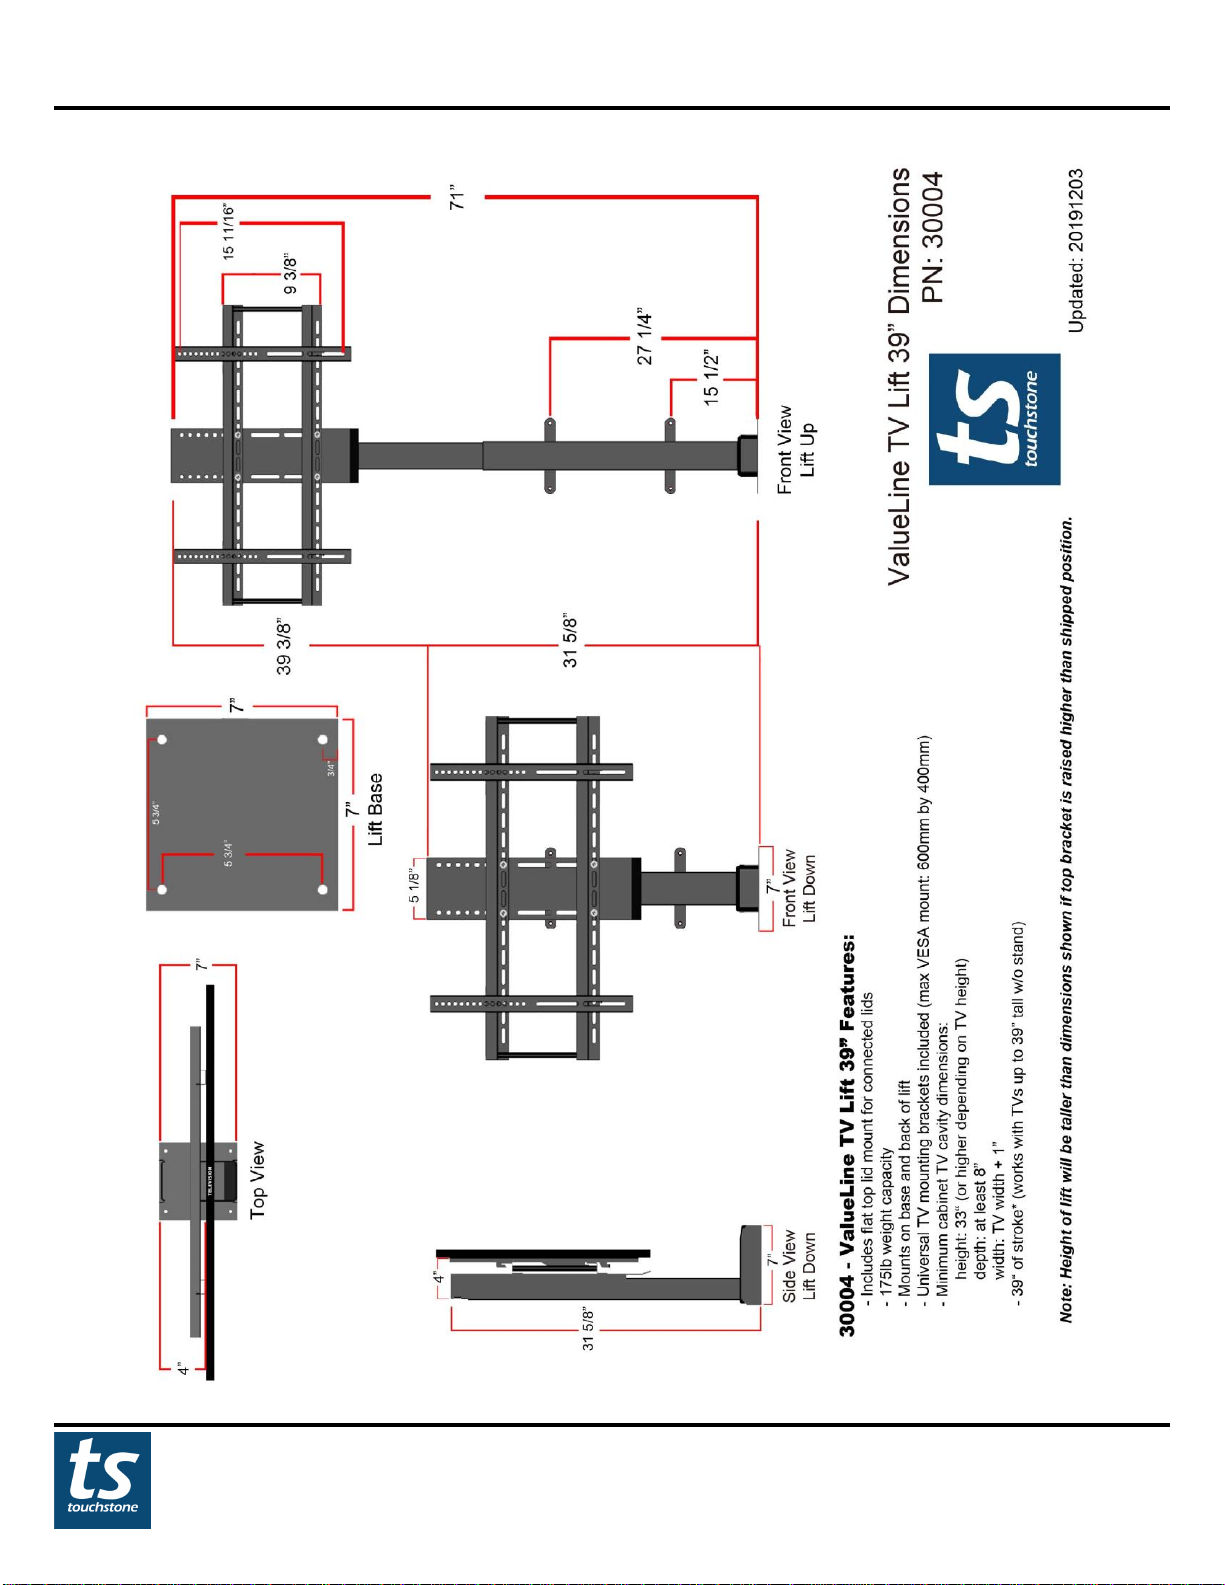
30004 –Valueline 39” TV Lift
Valueline TV Lift
www.touchstonehomeproducts.com 800.215.1990
rev. 20200618
9
Assembling and Installing Your Valueline TV Lift
Fasten Lift To Cabinet
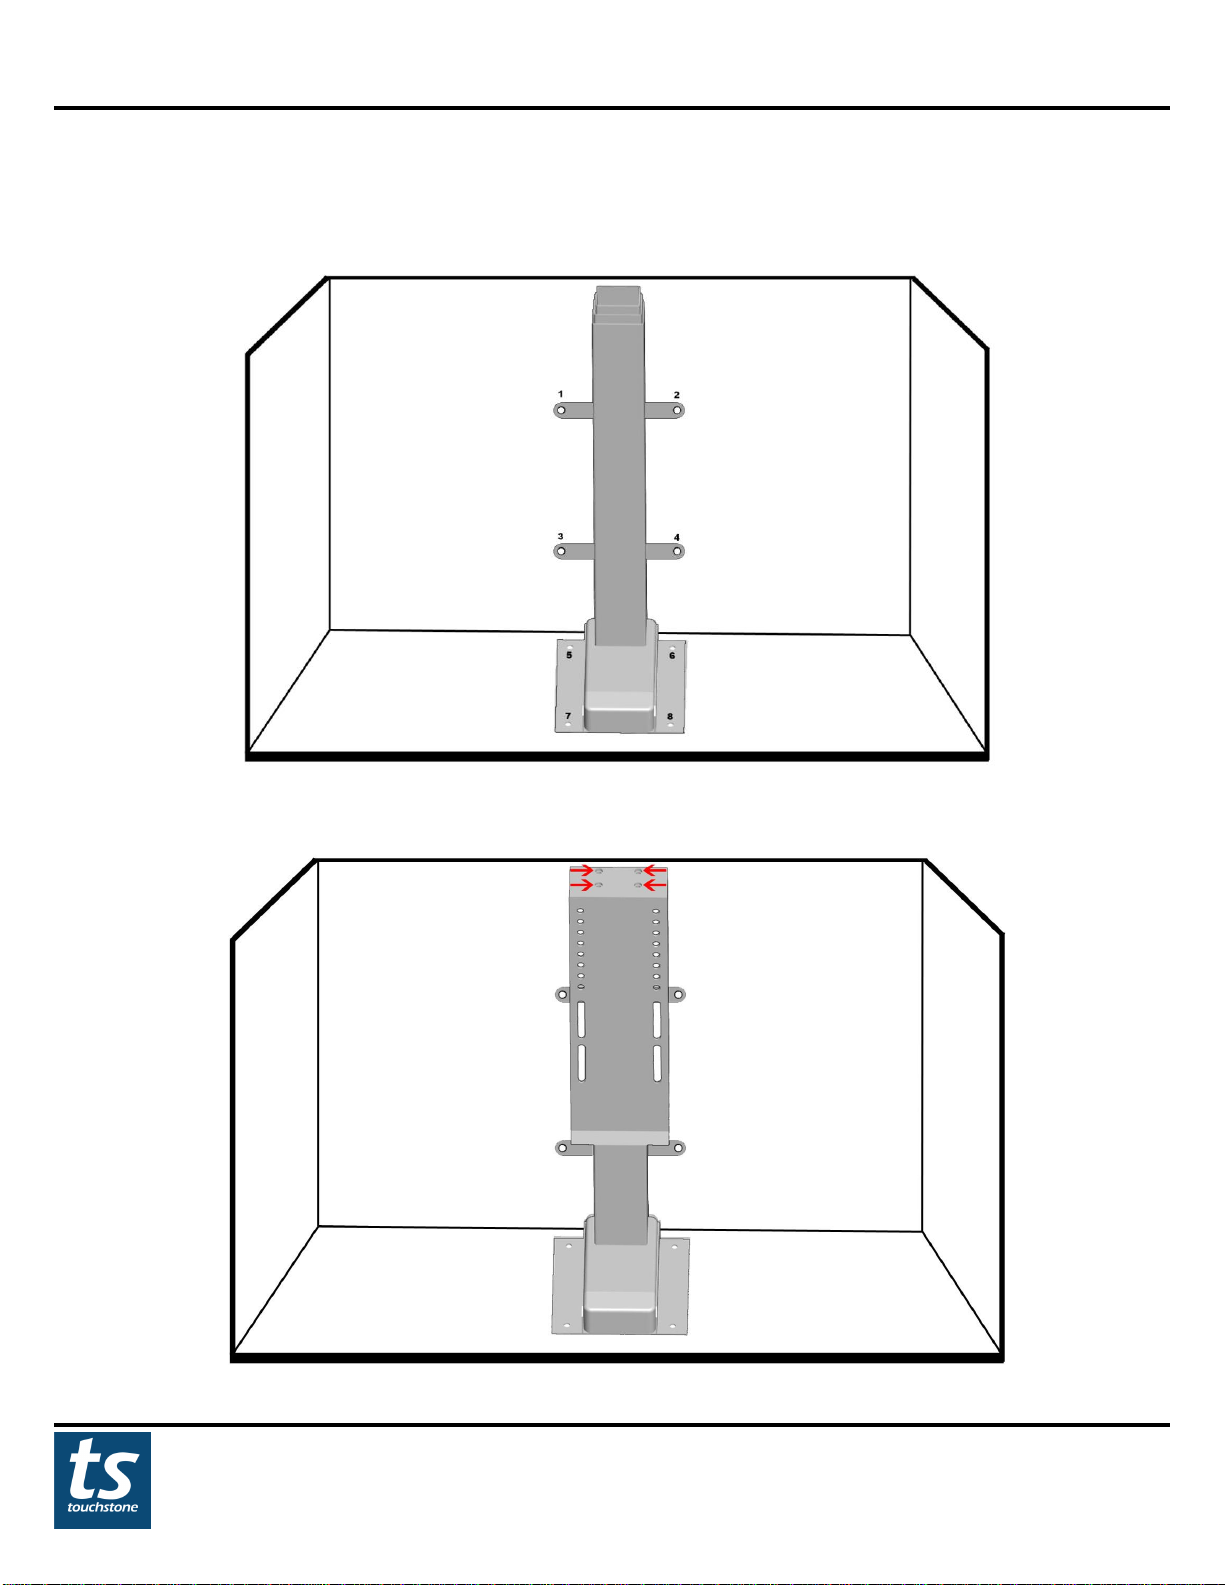
The Valueline TV Lift has 8 mounting points (4 on the back of the lift and 6 on the floor). Use the 4 rear mounting
points and the 6 floor mounting points to mount the lift in your cabinet.
Parts Required:
- Screwdriver or cordless-drill
- Hex wrench
Instructions:
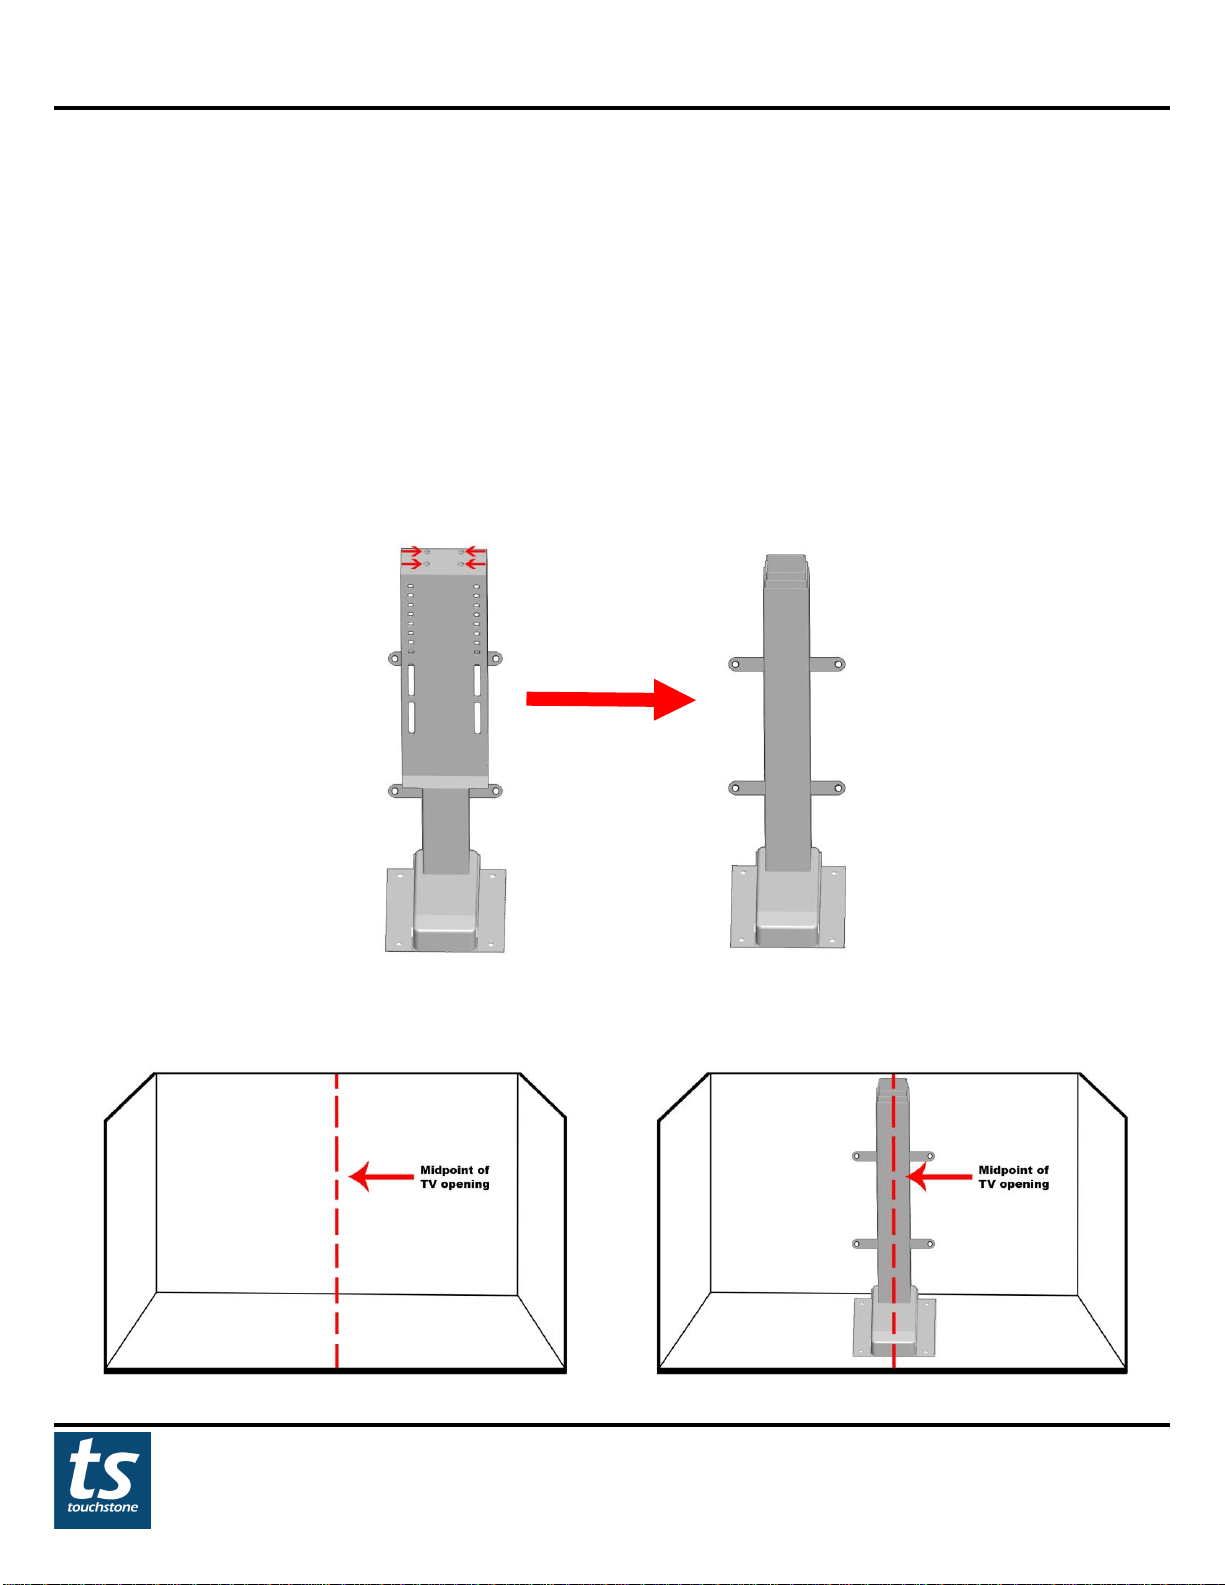
1. The Valueline TV Lift ships with the TV Lift plate already installed. For easier installation, remove the 4 bolts
securing the TV Lift plate to the top of the lift and remove the TV Lift plate from the lift.
2. Place lift in cabinet and align in center of cabinet so that the center of the lift is lined up with the midpoint of the
TV opening in the cabinet.
Valueline TV Lift
www.touchstonehomeproducts.com 800.215.1990
rev. 20200618
10
Fasten Lift To Cabinet –cont.
3. Once the lift is placed in the cabinet and aligned with the center of the cabinet, fasten the lift to the back wall of
the cabinet and the floor of the cabinet.
4. Once the lift is installed, reinstall the TV Lift plate that was removed in step 1.

Valueline TV Lift
www.touchstonehomeproducts.com 800.215.1990
rev. 20200618
11
Hooking Up Lift Components and Operating Lift
Once the TV Lift is installed in the cabinet, the individual lift components can be attached to the lift. The following
components will be needed:
- Lift Control Box
- Power Supply
- Wired Hand Set Control
Parts Required:
Control Box
Control Box-Lift Transit Cable
Wired Handset Control
Power Supply
Power Supply Transit Cable
Power Supply Power Cable

Valueline TV Lift
www.touchstonehomeproducts.com 800.215.1990
rev. 20200618
12
Hooking Up Control Box
Instructions:
1. Attach one end of the Control Box-Lift Transit Cable to the lift cable that is connected to the lift.
2. Attach the other end of the Control Box-Lift Transit Cable to the control box in the port shown below.
Lift Connection Port

Valueline TV Lift
www.touchstonehomeproducts.com 800.215.1990
rev. 20200618
13
Hooking Up Wired Handset Control
Instructions:
1. Plug the wired handset control into appropriate port on the control box shown below.
Hooking Up Power Supply
Instructions:
1. Attach the power supply transit cable (A) to the power supply and plug the power supply cable (B) into the
control box.
2. When complete, plug the lift power cable into a wall outlet to power the lift.

Valueline TV Lift
www.touchstonehomeproducts.com 800.215.1990
rev. 20200618
14
Operating the Lift
The ValueLine TV Lift can be controlled through the provided wired handset controller or the wireless remote
control.
Wired Handset Control
Wired Handset
Control
Lift Height: Shows the height of the lift in inches.
UP Button: PRESS and HOLD this button to raise the lift.
Releasing this button will stop the lift.
**Note: If a memory height is set, holding the UP button will
ignore the memory height and the lift will continue to run past
the set memory height.
DOWN: PRESS and HOLD this button to lower the lift. Releasing
this button will stop the lift.
MEMORY: The lift can be set to 1 memory position during the
UP travel. To set the memory position, raise the lift to the desired
position. At the desired position, PRESS the M button to set the
memory height. The LED screen will blink to confirm the height
setting. Repeat the operation to change the memory setting.
When the memory position is set, the UP button on the RF
Wireless Remote and IR Wireless Remote will go to the memory
height that was set.
NOTE: For applications where fixtures are mounted above the lift and in the path of the lift travel, please use
the WIRED HANDSET ONLY to avoid damages to the lift and other items!
Valueline TV Lift
www.touchstonehomeproducts.com 800.215.1990
rev. 20200618
15
Operating the Lift –cont.
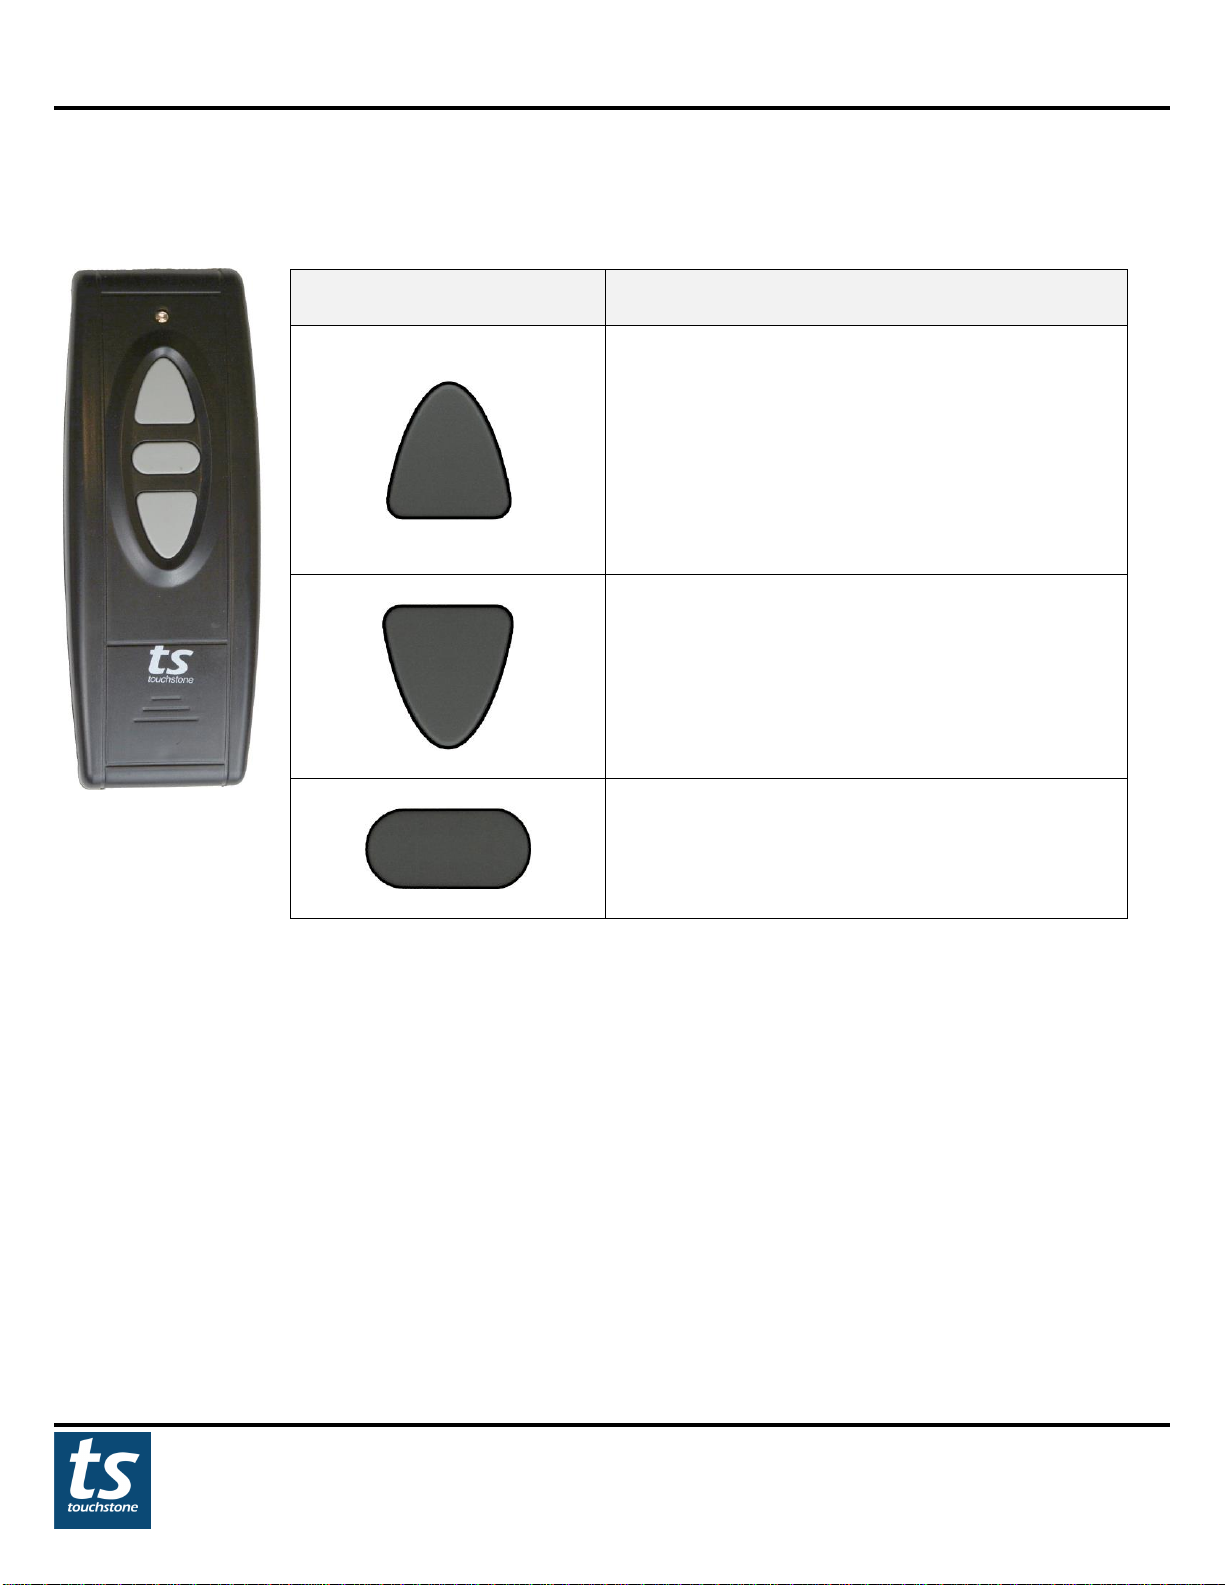
Wireless RF Control
Wireless RF Remote
Wireless RF
Remote Button
Function
UP Button: PRESS the button once to raise the lift.
The lift will raise all the way up unless the stop
button is pressed, if no memory position is set.
Note: When a memory position is set, the lift will
travel to the memory position when the UP button
is pressed.
DOWN: PRESS the button once to lower the lift.
The lift will lower all the way down unless the stop
button is pressed.
STOP: Press the button once to stop the lift.
NOTE: For applications where fixtures are mounted above the lift and in the path of the lift travel, please use
the WIRED HANDSET ONLY to avoid damages to the lift and other items, if a memory height is not set!
Pairing RF Remote Control to Control Box
The wireless RF remote will be paired to the Valueline TV Lift out of the box. Should the wireless RF remote stop
functioning, please follow the instructions below for pairing the RF remote control to the lift:
1. Unplug the power cable from the lift control box.
2. Wait 5 seconds and plug the lift power cable back into the control box.
3. Within 5 seconds of plugging the power cable into the control box, press UP button on the wireless RF remote
after plugging the power cable to control box.
4. The wireless RF remote is now ready for use.

Valueline TV Lift
www.touchstonehomeproducts.com 800.215.1990
rev. 20200618
16
Mounting and Installing the TV
IMPORTANT: Prior to installing the TV onto the lift, please ensure the following:
- If you have not done so already, remove the stand from your flat screen TV.
- Maximum lifting capacity:
30003 –Valueline 28” TV Lift: 175 lbs
30004 –Valueline 39” TV Lift: 175 lbs
- TV has VESA compliant mounting pattern.
Attaching TV Mounting Brackets To Flat Panel TV
Tools Required:
- Phillips head screwdriver
Parts Required:
- TV mounting brackets
- TV mounting screws
***Note: Touchstone Home Products includes a screw pack containing some of the most popular sizes of
mounting screws, used by most TV manufacturers. Due to the amount of TVs in the marketplace and no standard
for mounting screw size, Touchstone Home Products cannot guarantee that the screws required for your TV are
included in the screw pack. Please consult your TV manufacturer for the size of the mounting holes in the back of
your TV and use the appropriate size screws. Touchstone Home Products assumes no liability for damage to a TV.
Instructions:
1. Remove stand from TV. Consult TV manual for instructions on removing the stand from the TV.
2. Locate the TV mounting brackets. They are pictured below.
TV Mounting
Brackets
Valueline TV Lift
www.touchstonehomeproducts.com 800.215.1990
rev. 20200618
17
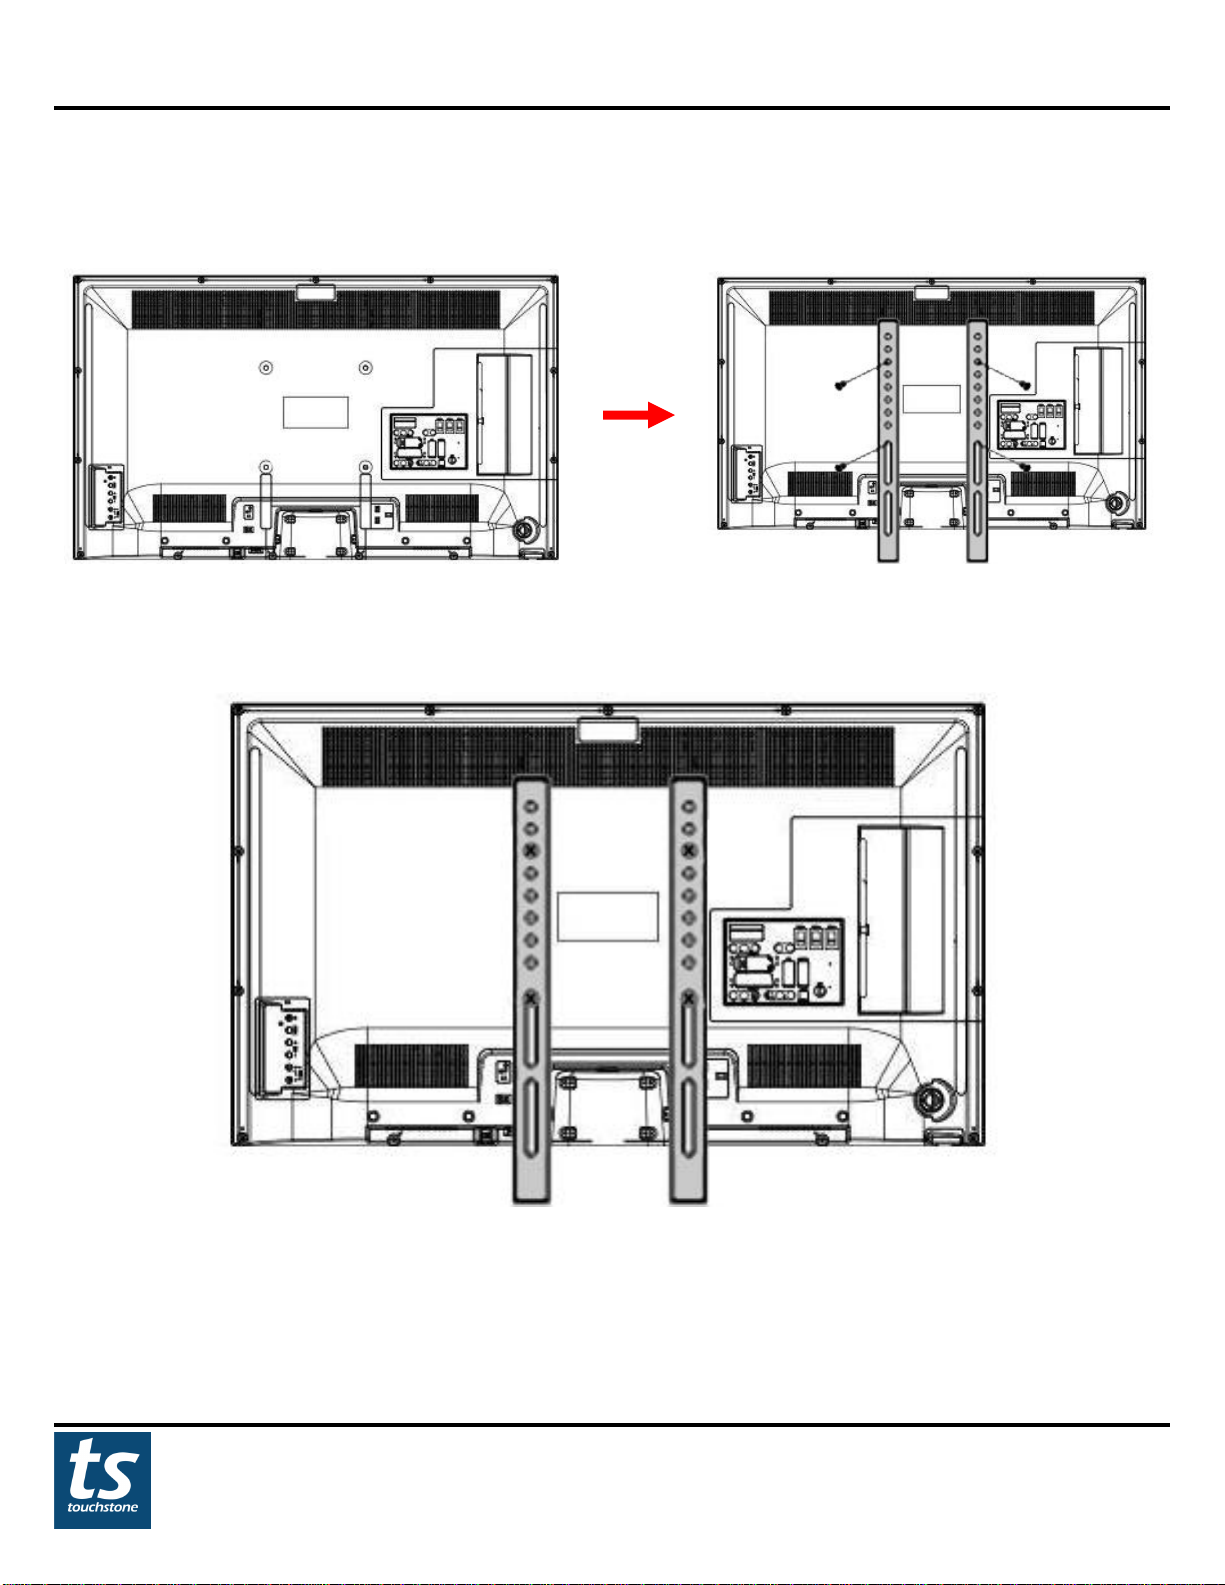
Attaching TV Mounting Brackets To Flat Panel TV- cont
3. Align TV mounting brackets so that brackets are centered on the back of the TV. Place the TV mounting bracket
so that the round holes are toward the top of the TV, while the elongated holes are toward the bottom of the TV.
4. Attach TV mounting brackets to back of TV. Consult your TV owner’s manual for the proper size mounting
screw.
Valueline TV Lift
www.touchstonehomeproducts.com 800.215.1990
rev. 20200618
18
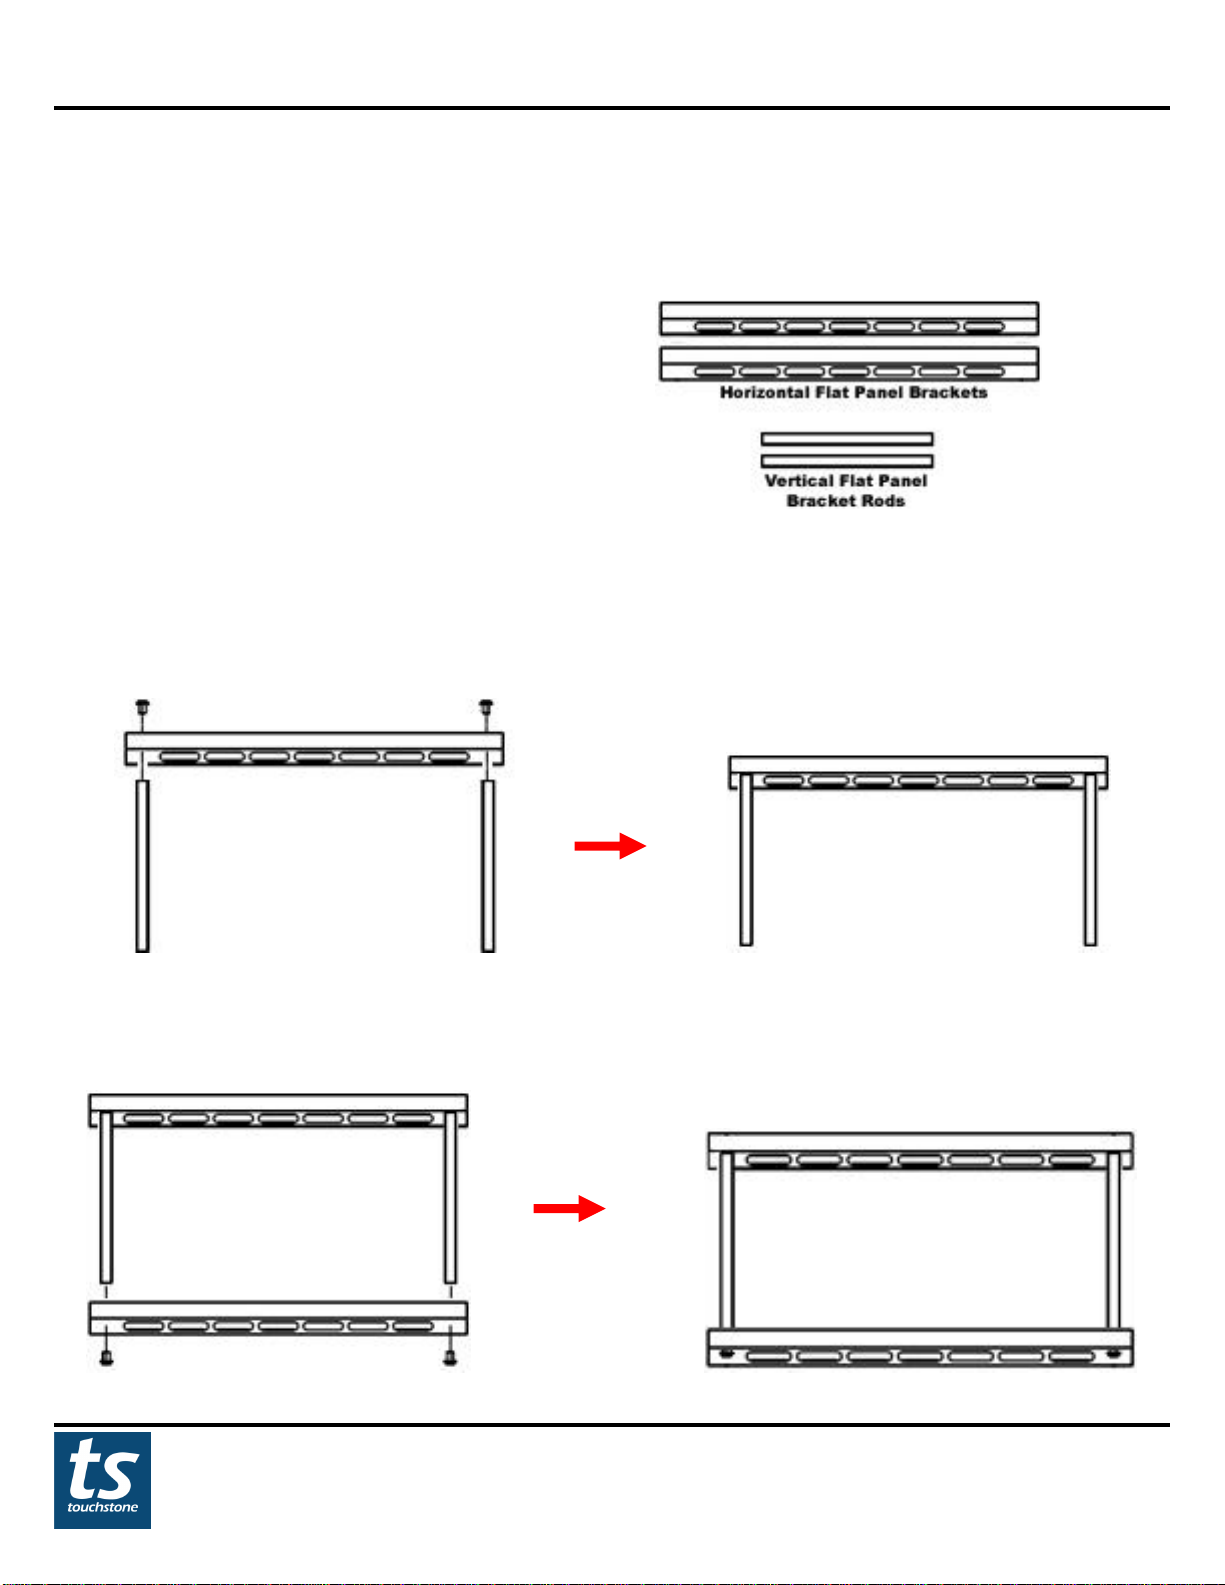
Assembling The Flat Panel TV Mount
Tools Required:
- Phillips head screwdriver
Parts Required:
- 2 horizontal flat panel TV mounting brackets
- 2 vertical rods
- 4 mounting screws and washers
Instructions:
1. Attach the 2 vertical flat panel bracket rods to the top horizontal flat panel bracket. The elongated holes in the
horizontal bracket should be facing down.
2. Once the vertical flat panel bracket rods are attached to the top horizontal flat panel bracket, attach the lower
horizontal flat panel bracket to the vertical flat panel bracket rods. The elongated holes in the horizontal bracket
will face down.
Valueline TV Lift
www.touchstonehomeproducts.com 800.215.1990
rev. 20200618
19
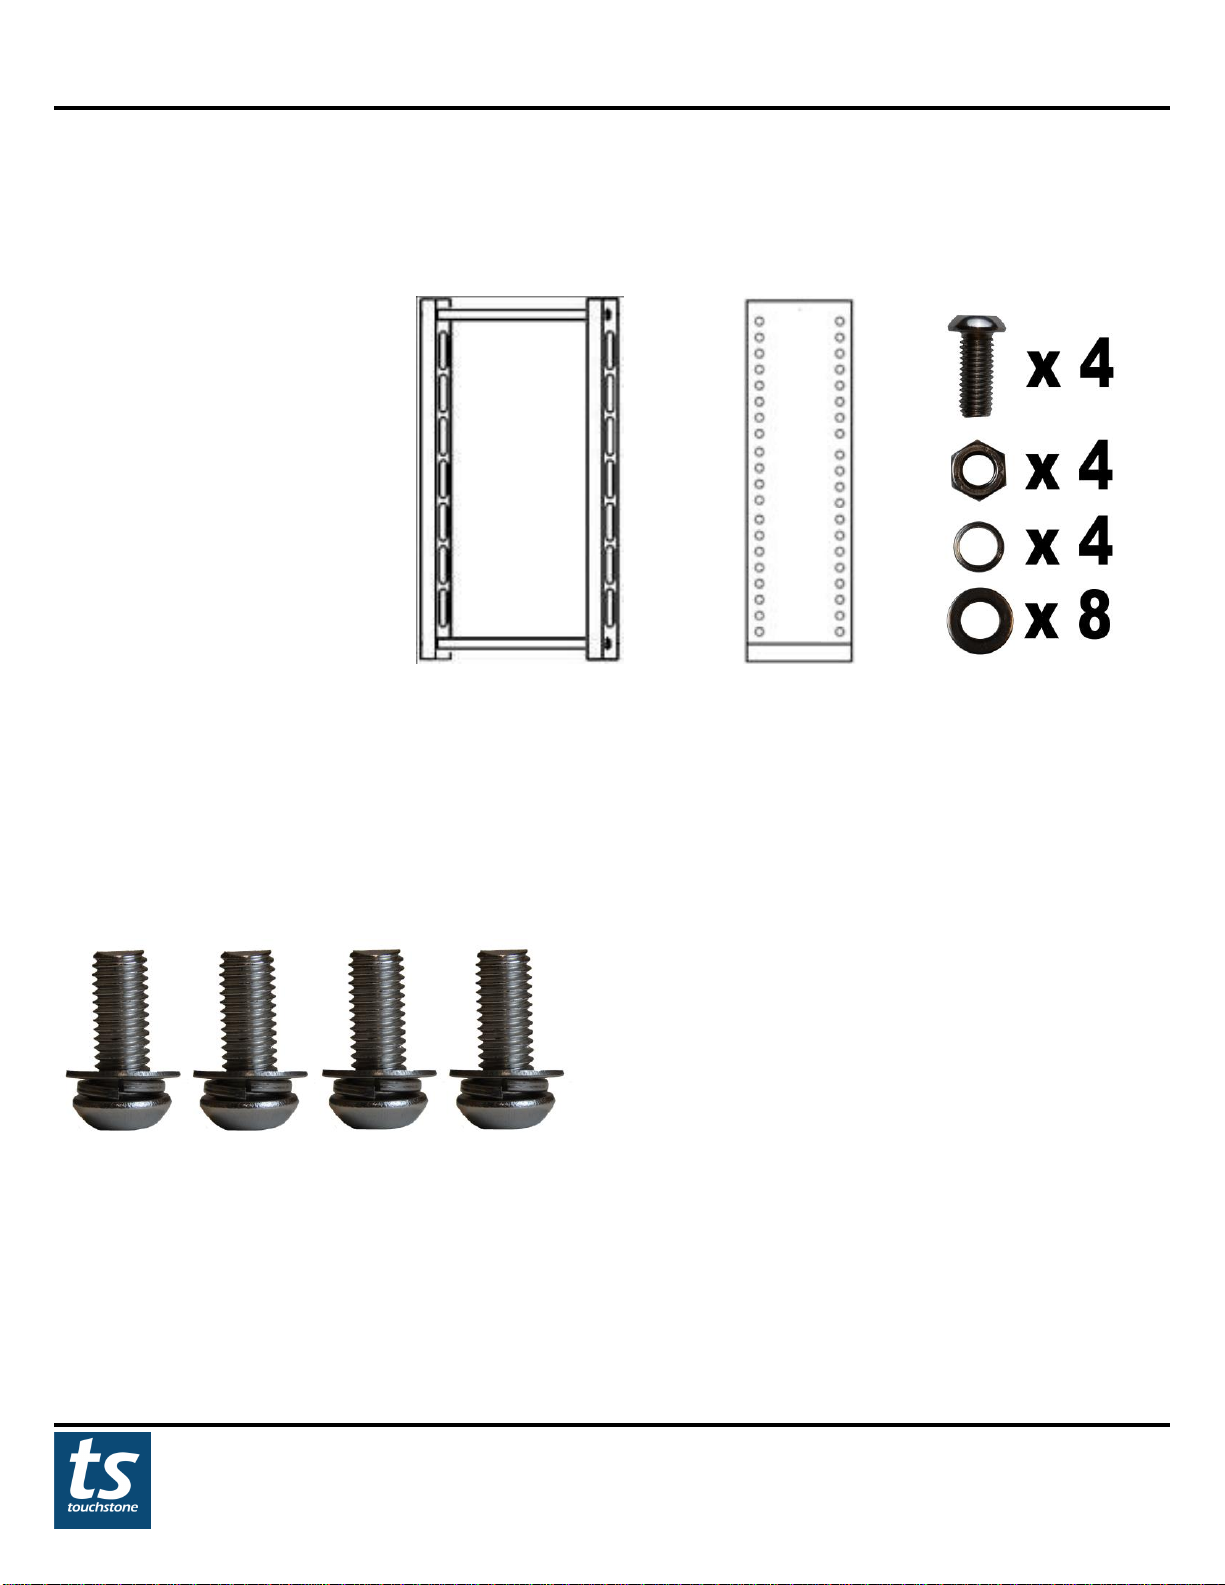
Mounting Flat Panel TV Mount To The Lift
Tools Required:
- Hex Wrench
Parts Required:
- Horizontal flat panel TV mount
- TV Lift
- 4 M8x20 bolts and nuts
- 8 washers
- 4 lock washers
Instructions:
1. Determine the placement for the horizontal flat panel TV bracket on the lift. The bottom of the TV should be just
above the base of the TV lift.
2. Place 1 lock washer and 1 regular washer on each M8 bolt as shown below:
Valueline TV Lift
www.touchstonehomeproducts.com 800.215.1990
rev. 20200618
20
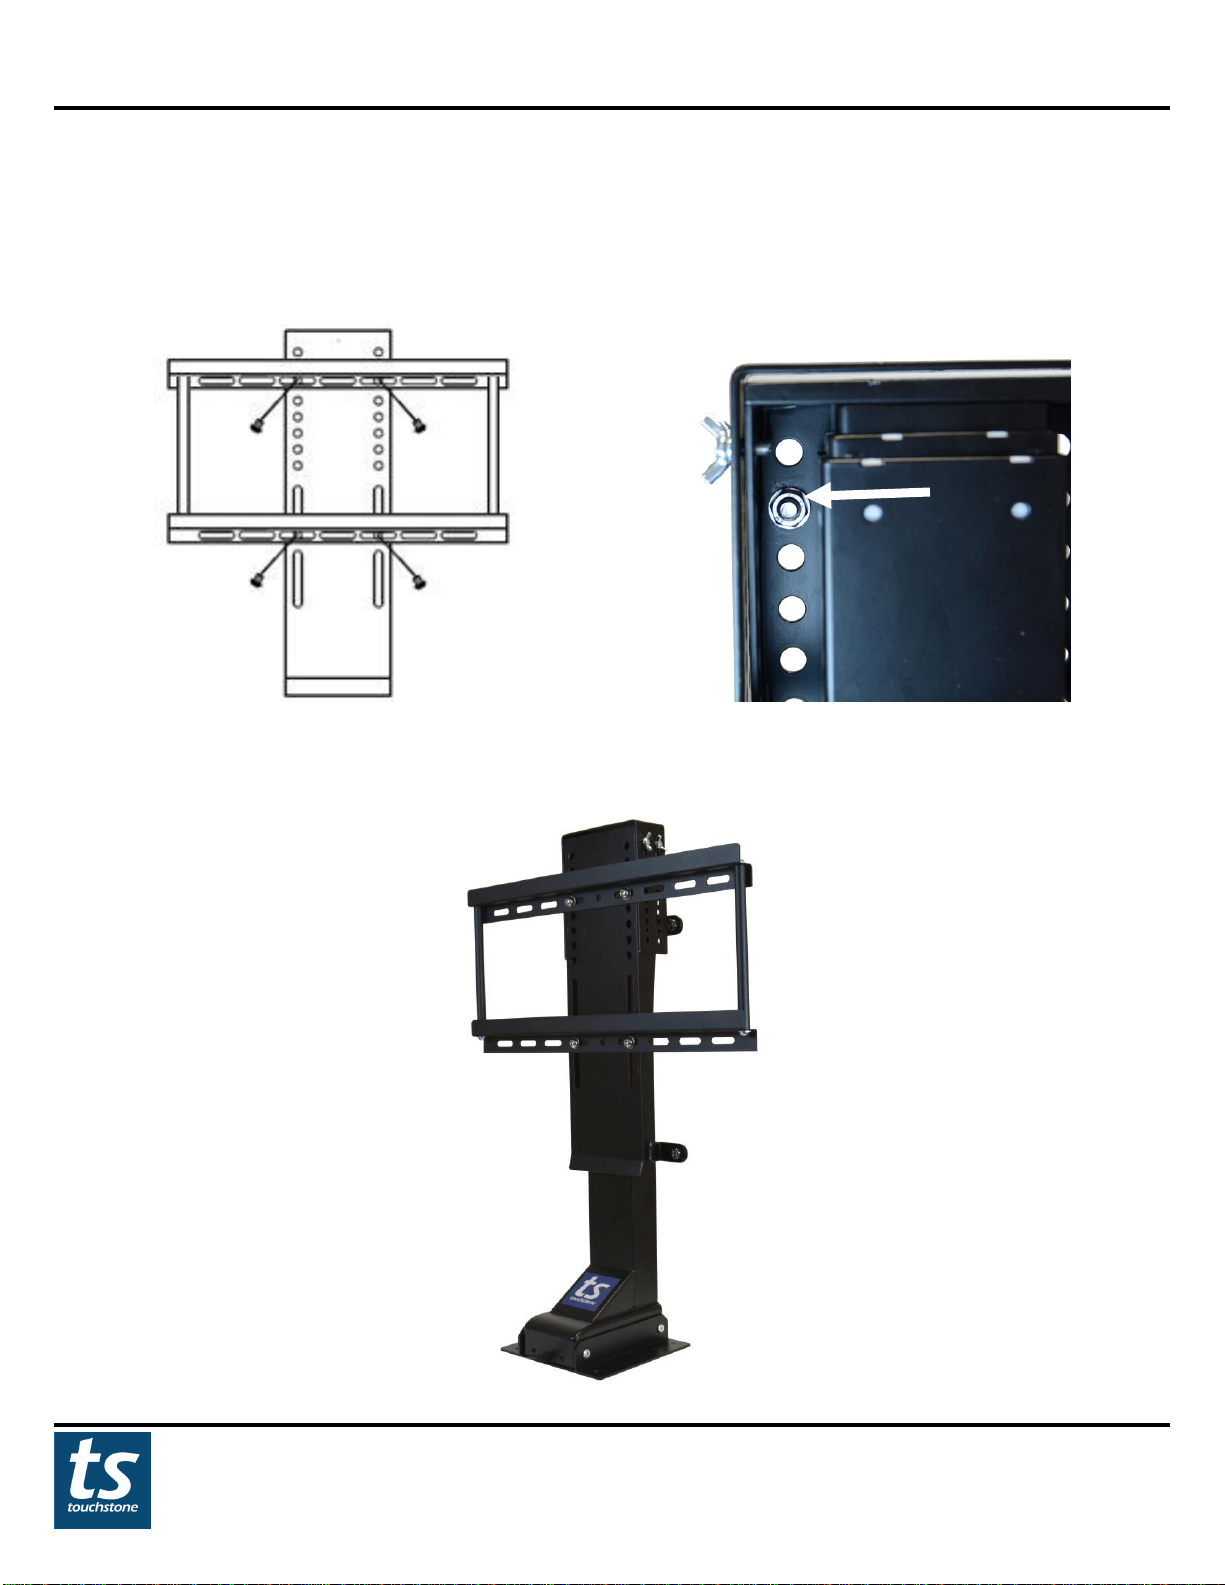
Mounting Flat Panel TV Lift Mount –cont.
3. Using the 4 M8x20 bolts and nuts, mount the horizontal flat panel TV bracket to the lift (Note: The position of
the horizontal bracket will depend on the height of your TV. The top of the TV should not be higher than the top of
the lift when mounted on the lift). Use 1 washer between the nut and back of the lift mounting plate. Tighten bolts
so bracket is secure to lift.
Mounting Screw Installation Back of Lift
4. Once the TV mounting bracket is installed on the lift, the TV is ready to be installed.
This manual suits for next models
1
Table of contents
Other Touchstone TV Mount manuals

Touchstone
Touchstone 32800 User manual

Touchstone
Touchstone 25021 User manual

Touchstone
Touchstone Whisper Lift II User manual

Touchstone
Touchstone Whisper Lift II User manual

Touchstone
Touchstone Whisper Lift II User manual

Touchstone
Touchstone Whisper Lift II PLUS Upgrade Kit User manual

Touchstone
Touchstone Whisper Lift II PRO Advanced User manual

Touchstone
Touchstone SRV 2800 Pro User manual


