manuals.online logo
Brands
  1. Home
  2. •
  3. Brands
  4. •
  5. TP-Link
  6. •
  7. Security Camera
  8. •
  9. TP-Link VIGI C540-4G V1 User manual

TP-Link VIGI C540-4G V1 User manual

Quick Start Guide
*Images may dier from actual products.
Appearance
Power Supply Interface
5
Status LED
6
7
White LED
2
RJ45 Network Interface
Infrared LED
3
Built-in Microphone
4
1
1
2
3
4
5
Package Contents
Network Camera
Waterproof Cable
Attachments
Quick Start Guide
Quick
Start
Guide
Option 1: Wall/Ceiling Mounting
1. Stick the mounting template to the desired mounting place. Drill 4 screw holes
according to the template.
2. Insert the anchors into the holes, use the provided screws to x the camera’s
bracket to the wall or ceiling.
Installing Waterproof Cable Attachments
Wall Mounting
Install the waterproof cable attachments for the network interface when the
camera is installed outdoors.
Note: Make sure each part is securely attached and the waterproof rings are ush to keep out water.
1. Route the network cable through the following components in order: x nut,
waterproof ring, and then the waterproof jacket.
2. Fix the O-ring to the network interface of the camera and connect the network
cables.
3. Attach the network interface with the waterproof jacket, then twist to lock.
4. Insert the waterproof ring into the waterproof jacket. Rotate the x nut to
secure it to the waterproof jacket.
1
Mount Camera
Fix Nut Waterproof
Ring
O-ring Network
Interface
Waterproof
Jacket
OR
Mounting Template
Anchor
Self-tapping Screw
Anchor
Self-tapping Screw
Mounting Template
Option 2: Pole Mounting
1. Thread each of the two cable ties through the slits on the back of the camera’s
bracket indicated below.
2. Slip the two cable ties through the pole. Tighten them to rmly attach the pole.
Cable Tie
Cable Tie
6
Status LED Indication
Note: Make sure that the wall is strong enough to withstand 3 times the
weight of the camera and mounting bracket .
8 Nano SIM Card Slot
7 Speaker
9microSD Card Slot
Insert a microSD card for local storage. Initialize the SD card via VIGI app or other
management tools before recording videos.
10 Reset Button
Long press the button to reset the camera to factory settings.
8
9
10
Note: Before inserting the micro SD card or resetting
the camera, rotate the sphere and unfasten the two
xed screws to remove the cover.
Mounting Template
Anchors x 4 Screws x 4
©2023 TP-Link 7106510348 REV1.0.0
VIGI 4G Network Camera
Status Description
Solid red Starting up
Blink red and green Connecting to network, mobile data used up or 4G network signal unstable
Blink green SIM card not detected
Solid green Connected to network, or Ethernet cable plugged in (for wired connection)
Blink red Mobile data disabled, or Ethernet cable unplugged (for wired connection)
Blink red quickly Camera resetting
Blink green quickly Camera updating
Install the waterproof seal for the power connectors when the camera is installed
outdoors.
Install Waterproof Seal for Power Connectors
Male Power Connector Waterproof Seal Female Power Connector
Waterproof Seal
Power Adapter
When installing with anchors
Φ = 6 mm (15/64 in.)
When installing with screws only
Φ = 3 mm (1/8 in.)
Appropriate drilling size (Φ)
Φ6 mm Φ3.5 mm
Stick this side upward when mounting on the wall
Stick this side forward when mounting on the ceiling
Φ
ΦΦ
Φ
When installing with anchors
Φ = 6 mm (15/64 in.)
When installing with screws only
Φ = 3 mm (1/8 in.)
Appropriate drilling size (Φ)
1. Download the VIGI Security Manager on your
computer at
https://www.tp-link.com/support/download/vigi-se
curity-manager/.
2. Install the VIGI Security Manager and open it.
3. Cameras on the same network as your computer
can be automatically discovered. Go to Settings >
Discovered Devices, click + Add to activate your
discovered cameras by setting passwords, and
follow the instructions to add your cameras.
Method 2: Via the VIGI Security Manager
(Windows only)
View live video and modify camera settings on
your computer.
Method 1: Use the camera with your
VIGI NVR
Before you start, make sure the NVR is working
properly.
1. Right click on the Live View screen and click Add
Camera.
2. Select your camera and click + to add your camera
directly. If you have disabled Plug and Play on your
NVR, create a password or use a preset password
for your camera.
If you are using your cameras with other NVR brands,
refer to the NVR’s User Manual to add cameras.
Method 3: Via a Web Browser
View live video and modify camera settings via a
web browser.
1. Find the camera's IP address on your router’s client
page.
2. On your local computer, open a web browser and enter
https://camera's IP address (https://192.168.0.60 by
default).
3. Select your Country/Region and Time Zone.
4. Set a password to activate the camera.
Done. You can view the live video on the Preview page, and
go to the Settings page to change camera settings.
More Management Methods (for Wired Connection)
2
Set Up Camera
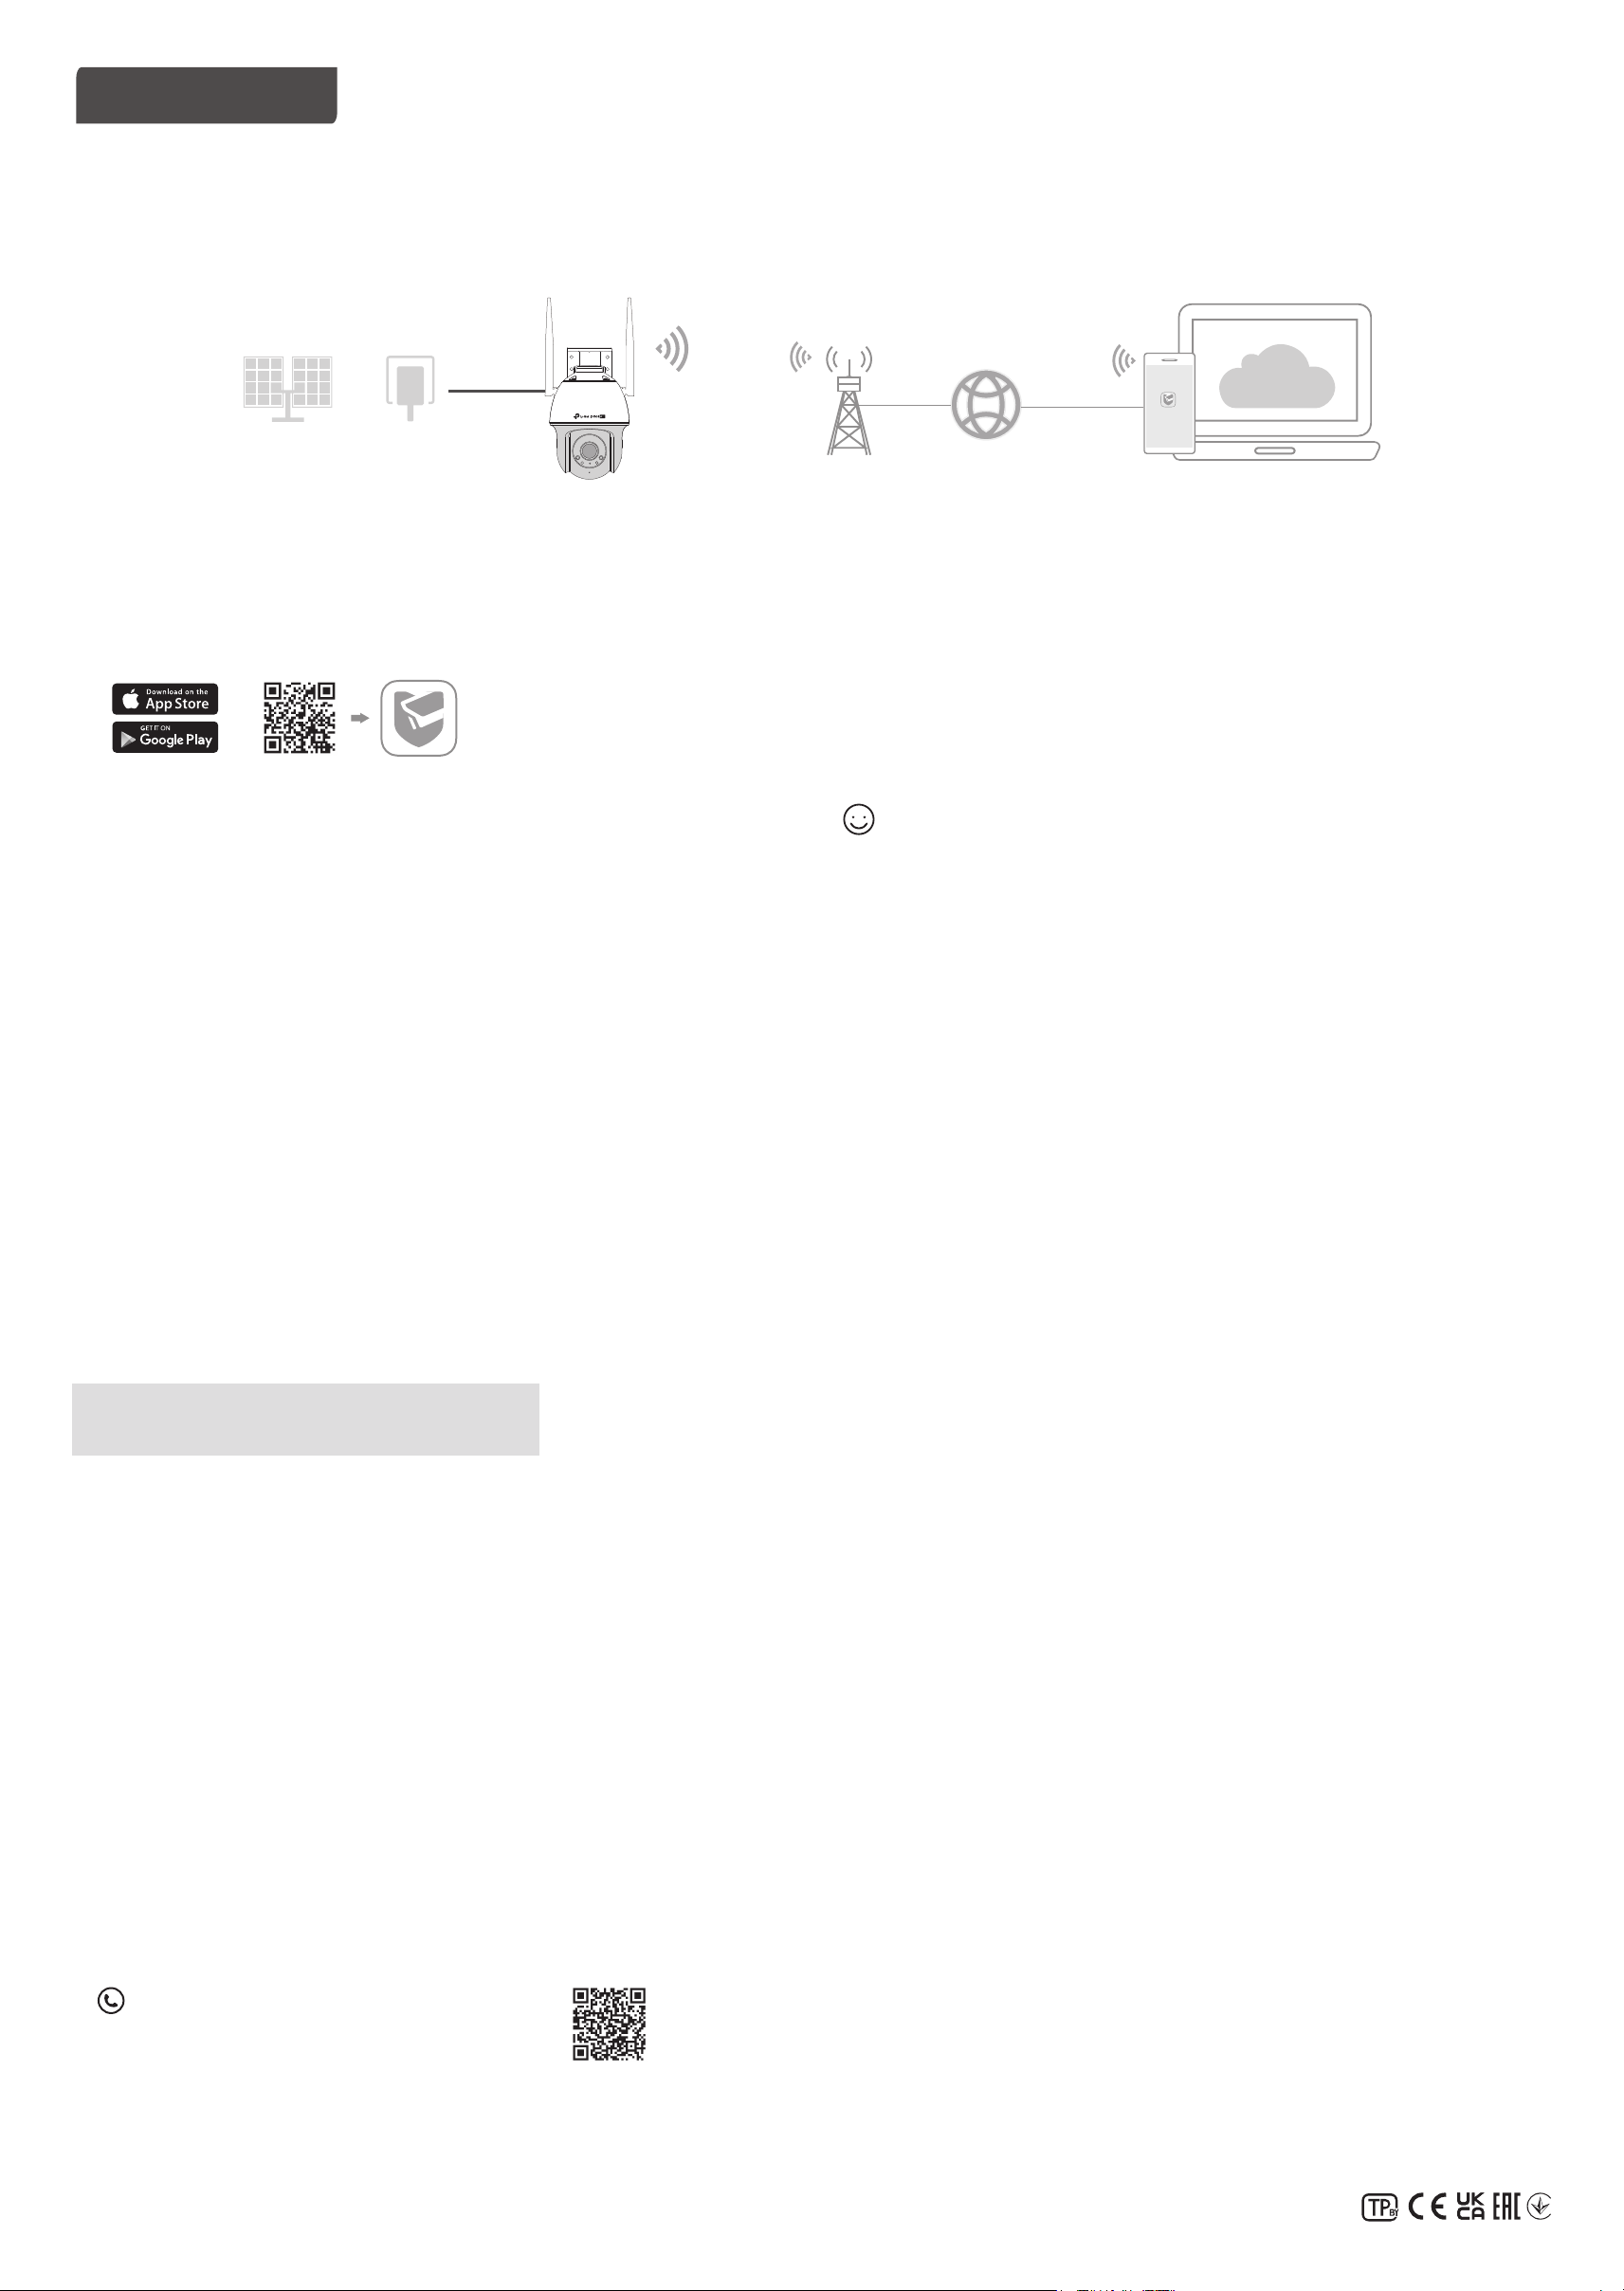
Here is a typical network topology for 4G network camera. If you want to manage the camera locally, you can connect the camera to your
network via an Ethernet cable.
Frequently Asked Questions (FAQ)
Q1: What can I do if I fail to congure my camera?
• Check if the camera is powered on properly.
• Make sure you have a 4G network for camera connection.
• For local management, make sure your camera and NVR/computer/Phone are in the
same subnet. If not, use TP-Link VIGI app to connect your camera to the same
network via an Ethernet cable.
• For other NVR brands, make sure you have activated the camera by setting a
password via the VIGI Security Manager, TP-Link VIGI app or web management
page.
Q2: How do I reset the camera?
• Rotate the sphere and unfasten the two xed screws to remove the cover. Long
press the reset button until the Status LED starts blinking red quickly.
Q3: What should I do if I forgot the password of the camera?
• You can check the password of the camera via VIGI NVR, VIGI Security Manager or its
web management page. For more details, refer to the corresponding user guides.
• You can reset the camera and activate it again. During the activation process, you can
set a new password.
Q4: What should I do if the SD card is not working properly?
• Make sure you are using a microSD card.
• Unplug the SD card and insert it again. Make sure you have inserted the SD card
correctly.
• It’s recommended to use a Class 10 microSD card or higher, with storage from 8 GB to
256 GB.
• Make sure you have initialized the microSD card via the VIGI Security Manager, TP-Link
VIGI app or web management page.
• If the problem still persists, contact our technical support.
• Do not use any other chargers than those recommended.
• Do not use the device where wireless devices are not allowed.
• Do not use damaged charger or USB cable to charge the device.
• Do not attempt to disassemble, repair, or modify the device. If you need service, please contact us.
• Adapter shall be installed near the equipment and shall be easily accessible.
• Keep the device away from fire or hot environments. DO NOT immerse in water or any other liquid.
• The power adapter must be used indoors. Make sure that the temperature of the power adapter is
within 0-40°C.
TP-Link hereby declares that the device is in compliance with the essential requirements and other
relevant provisions of directives 2014/53/EU, 2009/125/EC, 2011/65/EU and (EU)2015/863.
The original EU Declaration of Conformity may be found at https://www.tp-link.com/en/support/ce/
TP-Link hereby declares that the device is in compliance with the essential requirements and other
relevant provisions of the Radio Equipment Regulations 2017.
The original UK Declaration of Conformity may be found at https://www.tp-link.com/support/ukca/
Step 3. Power On the Camera
Connect the camera to the power socket via the provided power adapter or the
solar panel, and wait until the LED is solid green.
Step 2. Insert the SIM card
Insert a Nano SIM card into the SIM card slot.
Step 1. Download the TP-Link VIGI App
Get the TP-Link VIGI App from the Apple App Store or Google Play. Step 4. Set Up
1. Open the TP-Link VIGI app and log in with your TP-Link ID. If you don’t have an
account, sign up rst.
2. Tap the + button on the top right and follow the app instructions to activate and
add your cameras.
Done! You can now remotely view live video, manage camera, and
get instant alerts.
For more questions, please refer to https://www.tp-link.com/support/faq/2850/
For technical support, the user guide and other information, please visit
https://www.tp-link.com/support, or simply scan the QR code.
or
4G Network Camera
Internet
VIGI
Base Station
Power
Adapter
Solar
Panel
or
Note:
1. You can also use your TP-Link ID to remotely view and manage the camera via VIGI Security Manager
(Windows only).
2. It is recommended that you insert a micro SD card for local storage. And initialize SD card via VIGI
app or other management tools before recording videos.
3. For more detailed instructions, refer to the user guides at https://www.tp-link.com/support/
If you connect your camera to the network via an Ethernet cable, you can also access and manage your cameras via any of the methods below.

Other TP-Link Security Camera manuals

TP-Link VIGI C330 User manual

TP-Link

TP-Link VIGI C330 User manual

TP-Link C400 User manual

TP-Link

TP-Link C400 User manual

TP-Link TL-SC3130 Quick start guide

TP-Link

TP-Link TL-SC3130 Quick start guide

TP-Link Kasa Cam Outdoor User manual

TP-Link

TP-Link Kasa Cam Outdoor User manual

TP-Link kasa smart EC71 User manual

TP-Link

TP-Link kasa smart EC71 User manual

TP-Link NC450 User manual

TP-Link

TP-Link NC450 User manual

TP-Link NC260 User manual

TP-Link

TP-Link NC260 User manual

TP-Link VIGI User manual

TP-Link

TP-Link VIGI User manual

TP-Link TL-SC3171G User manual

TP-Link

TP-Link TL-SC3171G User manual

TP-Link Kasa Spot Pan Tilt User manual

TP-Link

TP-Link Kasa Spot Pan Tilt User manual

TP-Link Tapo C200 User manual

TP-Link

TP-Link Tapo C200 User manual

TP-Link tapo TC60 User manual

TP-Link

TP-Link tapo TC60 User manual

TP-Link TL-SC3230 User manual

TP-Link

TP-Link TL-SC3230 User manual

TP-Link VIGI User manual

TP-Link

TP-Link VIGI User manual

TP-Link Tapo C100 User manual

TP-Link

TP-Link Tapo C100 User manual

TP-Link Tapo C210 User manual

TP-Link

TP-Link Tapo C210 User manual

TP-Link NC210 User manual

TP-Link

TP-Link NC210 User manual

TP-Link kasa smart EC71 User manual

TP-Link

TP-Link kasa smart EC71 User manual

TP-Link VIGI User manual

TP-Link

TP-Link VIGI User manual

TP-Link Tapo TC65 User manual

TP-Link

TP-Link Tapo TC65 User manual

TP-Link Tapo Camera User manual

TP-Link

TP-Link Tapo Camera User manual

TP-Link NC200 User manual

TP-Link

TP-Link NC200 User manual

TP-Link TL-SC3000 User manual

TP-Link

TP-Link TL-SC3000 User manual

TP-Link tapo C425 User manual

TP-Link

TP-Link tapo C425 User manual

Popular Security Camera manuals by other brands

Idis DC-B1103 quick guide

Idis

Idis DC-B1103 quick guide

LevelOne FCS-3403 user manual

LevelOne

LevelOne FCS-3403 user manual

ADEMCO OptiCAM quick start guide

ADEMCO

ADEMCO OptiCAM quick start guide

Sony SNC-RS44N Technical specifications

Sony

Sony SNC-RS44N Technical specifications

Videology Seawolf DX56WXX instruction manual

Videology

Videology Seawolf DX56WXX instruction manual

FLIR FB-Series Quick connect guide

FLIR

FLIR FB-Series Quick connect guide

Axis Q1615-E Mk II installation guide

Axis

Axis Q1615-E Mk II installation guide

Swann ADS-450 user manual

Swann

Swann ADS-450 user manual

Brickcom Fixed Box FB-100A user manual

Brickcom

Brickcom Fixed Box FB-100A user manual

Aveo Systems VISCA Pan manual

Aveo Systems

Aveo Systems VISCA Pan manual

Mace MaceView MVC-IRVB-49 user guide

Mace

Mace MaceView MVC-IRVB-49 user guide

Zhejiang Dahua Vision Technology IPC-PFW8840-A180 quick start guide

Zhejiang Dahua Vision Technology

Zhejiang Dahua Vision Technology IPC-PFW8840-A180 quick start guide

Flexwatch FW1175 user manual

Flexwatch

Flexwatch FW1175 user manual

Digitus DN-18604 Quick installation guide

Digitus

Digitus DN-18604 Quick installation guide

Speco CVC-648IRHQ Quick installation

Speco

Speco CVC-648IRHQ Quick installation

SOMFY Visidom OC100 manual

SOMFY

SOMFY Visidom OC100 manual

EverFocus ED910 user manual

EverFocus

EverFocus ED910 user manual

Axis Q60 Series Repainting instructions

Axis

Axis Q60 Series Repainting instructions

manuals.online logo
manuals.online logoBrands
  • About & Mission
  • Contact us
  • Privacy Policy
  • Terms and Conditions

Copyright 2025 Manuals.Online. All Rights Reserved.