TPS smartCHEM-Titro User manual

Congratulations !
The smartCHEM-Titro is an advanced, high quality pH, mV & Temperature instrument. It
features the ability to directly connect to a Schott Universal burette for Automatic Titration
applications.
Despite its impressive list of features, the smartCHEM-Titro is a breeze to operate. This manual
has been designed to help you get started, and also contains some handy application tips. If at any
stage you require assistance, please contact either your local TPS representative or the TPS factory
in Brisbane.
The manual is divided into the following sections:
1. Table of Contents
Each major section of the handbook is clearly listed. Sub-sections have also been included to
enable you to find the information you need at a glance.
2. Introduction
The introduction has a diagram and explanation of the display and controls of the
smartCHEM-Titro. It also contains a full listing of all of the items that you should have
received with the unit. Please take the time to read this section, as it explains some of items that
are mentioned in subsequent sections.
3. Main Section
The main section of the handbook provides complete details of the smartCHEM-Titro,
including operating modes, calibration, troubleshooting, specifications, and warranty terms.
4. Appendices
Appendices containing background information and application notes are provided at the back
of this manual.
smartCHEM-Titro
pH, mV, Temperature Meter
with Automatic Titrator
function
Date : 29-Jun-2007
Author : AB
Version : 1.2

2
TPS Pty Ltd
ABN 30 009 773 371
Unit 6 / 253 Leitchs Road
Brendale, QLD,
Australia, 4500
Phone : (07) 3205.8027
International : 61 7 3205 8027
Fax : (07) 3808.4871
International : 61 7 3808 4871
Web : www.tps.com.au

3
Contents
1.
Introduction ..............................................................................................................................................5
1.1
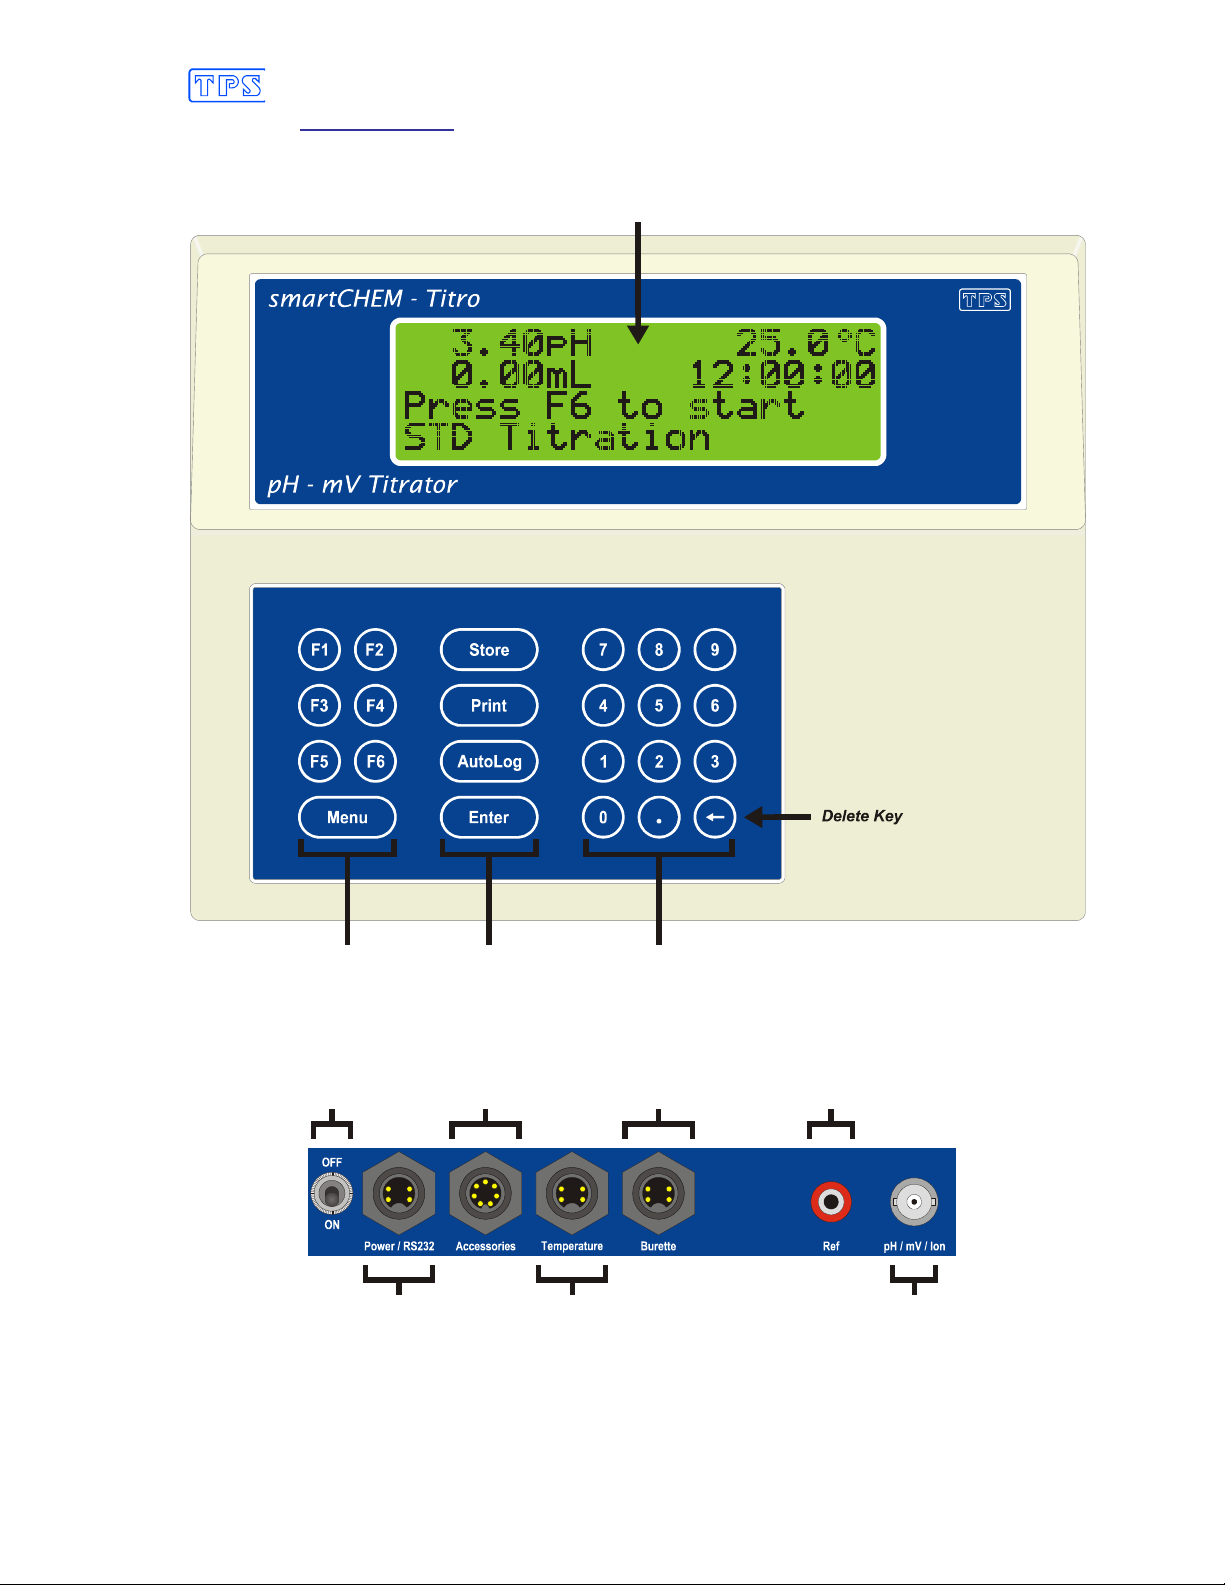
smartCHEM-Titro Display and Controls ..........................................................................................5
1.2
smartCHEM-Titro Rear Panel Connectors .......................................................................................5
1.3
Function and Menu Keys ..................................................................................................................6
1.4
One-Touch Keys ...............................................................................................................................6
1.5
Numeric Keypad ...............................................................................................................................6
1.6
Delete Key ........................................................................................................................................6
1.7
240 x 64 Dot Graphic Display ..........................................................................................................6
1.8
Unpacking Information.....................................................................................................................7
1.9
Specifications....................................................................................................................................8
2.
smartCHEM-Titro Menu Structure........................................................................................................10
3.
Automatic Titrator Mode .......................................................................................................................11
3.1
Selecting Automatic Titrator Mode ................................................................................................11
3.2
Setting up the apparatus for Automatic Titrations ..........................................................................12
3.3
Titration Parameters........................................................................................................................14
3.4
Performing a Standard Titration .....................................................................................................17
3.5
12V DC Switched Output ...............................................................................................................18
4.
Standard pH Mode .................................................................................................................................19
4.1
Selecting pH Mode .........................................................................................................................19
4.2
Selecting the pH Buffer Set ............................................................................................................20
4.3
Calibration Buffer Sequence...........................................................................................................21
4.4
pH Calibration.................................................................................................................................22
4.5
pH Calibration Notes ....................................................................................................................225
4.6
pH Calibration Messages ................................................................................................................25
5.
Absolute Millivolt Mode.........................................................................................................................27
5.1
Selecting Absolute Millivolt Mode.................................................................................................27
5.2
Absolute Millivolt Calibration........................................................................................................27
5.3
mV Calibration Notes .....................................................................................................................28
5.4
mV Calibration Messages ...............................................................................................................29
6.
Relative Millivolt Mode ..........................................................................................................................30
6.1
Selecting Relative Millivolt Mode..................................................................................................30
6.2
Relative Millivolt Calibration .........................................................................................................30
6.3
Relative Millivolt Calibration Notes...............................................................................................31
7.
Temperature Mode.................................................................................................................................32
7.1
Temperature Calibration .................................................................................................................32
7.2
Temperature Calibration Notes.......................................................................................................33
7.3
Calibration Messages ......................................................................................................................33
7.4
Manual Temperature Setting...........................................................................................................34
8.
Auto Stability Function (ASF)...............................................................................................................35
8.1
ASF During Normal Measurement .................................................................................................35
8.2
ASF During Calibration..................................................................................................................35
8.3
ASF with Manual Datalogging .......................................................................................................36
8.4
ASF with Automatic Datalogging...................................................................................................37
9.
Display Backlight ...................................................................................................................................38
10.
Good Laboratory Practices (GLP) ...................................................................................................39
10.1
To recall GLP information on the display ......................................................................................39
10.2
Failed Calibration............................................................................................................................39
10.3
Printing GLP Information to the RS232 Port..................................................................................39
10.4
GLP Calibration Alarm...................................................................................................................40
10.5
Instrument Serial Number...............................................................................................................41
10.6
Additional GLP Features ................................................................................................................41

4
11.
Access Code ......................................................................................................................................... 43
11.1
Enabling the Access Code System ................................................................................................. 43
11.2
Using the Access Code System...................................................................................................... 43
11.3
Changing the Access Code............................................................................................................. 44
11.4
Disabling the Access Code System................................................................................................ 44
12.
Datalogging ....................................................................................................................................... 45
12.1
Manual Datalogging....................................................................................................................... 45
12.2
Automatic Datalogging .................................................................................................................. 45
12.3
Recalling Readings from the Logger ............................................................................................. 46
12.4
Erasing Records from the Logger .................................................................................................. 47
12.5
Printing Records from the Logger to the RS232 Port .................................................................... 48
13.
RS232 Port......................................................................................................................................... 49
13.1
Setting the Baud Rate..................................................................................................................... 49
13.2
Sending Readings to the RS232 Port ............................................................................................. 49
13.3
RS232 Configuration ..................................................................................................................... 49
13.4
Communication and Statistical Software ....................................................................................... 49
13.5
Commands...................................................................................................................................... 50
13.6
Data Format.................................................................................................................................... 50
13.7
GLP Data Format ........................................................................................................................... 51
13.8
Importing Data into Microsoft Excel ............................................................................................. 52
14.
Setting the Clock ............................................................................................................................ 555
15.
Initialising the smartCHEM-Titro..................................................................................................... 55
16.
Instrument firmware version number ............................................................................................. 55
17.
Troubleshooting ............................................................................................................................... 56
17.1
General Errors ................................................................................................................................ 56
17.2
pH and mV Troubleshooting.......................................................................................................... 57
17.3
Temperature Troubleshooting........................................................................................................ 58
18.
Appendices........................................................................................................................................ 59
18.1
pH Electrode Fundamentals ........................................................................................................... 59
19.
Warranty ............................................................................................................................................ 63

5
1. Introduction
1.1 smartCHEM-Titro Display and Controls
1.2 smartCHEM-Titro Rear Panel Connectors
Turn the retaining nut clockwise until it clicks into place when plugging in plastic
connectors. This is essential to produce a waterproof seal.
Always replace the waterproof cap when a connector is not in use to maintain
waterproof integrity.
Function
and Menu
Keys
One-Touch
and Enter
Keys
Numeric
Keypad
240 x 64 dot Graphic LCD with Backlight
On / Off
Switch
12V DC Power
Input and
RS232 Port
Temperature
Sensor
Karl Fischer Polarisation
Titration
Burette
Reference Sensor
pH/mV/Ion Sensor

6
1.3 Function and Menu Keys
Press to enter the user-friendly menu system. is also used to step backwards through the
menu one level at a time, and as an “escape” key to quit functions such as calibration, data entry etc.
Press the to function keys to select desired options within the menu system.
Additionally, these keys perform the following function directly in normal measurement mode…
: Press to start the Automatic Titration (section 3.4).
: Press to start and stop the Automatic Stability Function. See section 8.
1.4 One-Touch Keys
: Press to manually record readings into the Logger. See section 12.1.
: Press to transmit current reading plus date and time to the RS232 port. See section 13.2.
: Press to start and stop Automatic Datalogging. See section 12.2.
: Press to accept default values or those entered on the Numeric Keypad.
1.5 Numeric Keypad
Used to enter values during set-up and calibration. A decimal point is provided.
1.6 Delete Key
Press to make corrections to values entered on the Numeric Keypad.
1.7 240 x 64 Dot Graphic Display
Graphic display with large, clear digits and letters. Features a user-friendly menu and context-
sensitive help system. pH/mV/Relative mV, Temperature, Dosed mL and Time simultaneously.
Backlight can be set to On, Off or Energy Saver modes. See section 9.

7
1.8 Unpacking Information
Before using your new smartCHEM-Titro, please check that the following accessories have been
included:
Part No
Standard Kit…
1. smartCHEM-Titro pH / mV Automatic Titrator............................................................ 121106
2. Cable to connect Schott Burette to smartCHEM-Titro ................................................. 130122
3. pH Sensor, Double Junction Porous Teflon design, 1m................................................... 121207
4. Temperature/ATC Sensor ............................................................................................... 121248
5. pH6.88 Buffer, 200mL.................................................................................................... 121306
6. pH4.00 Buffer, 200mL.................................................................................................... 121381
7. Plug-Pack Power Supply................................................................................................. 130048
8. smartCHEM-Titro Handbook ....................................................................................... 130050
Options that may have been ordered with your smartCHEM-Titro…
1. Schott Universal Digital Piston Burette........................................................................... 130350
2. Flexible arm type electrode holder .................................................................................. 130088
3. Double Platinum Karl Fischer Sensor ............................................................................. 122209
4. Silver Billet Sensor with IJ Reference for Silver Nitrate titration method for Chloride .... 121298
5. RS232 Serial Interface Cable .......................................................................................... 130041
6. Serial to USB adaptor (must also have 130041 Serial Cable) .......................................... 130087
7. WinTPS RS232 Communication software for Windows 95 and later .............................. 130086

8
1.9 Specifications
1.9.1 pH
Ranges Resolution Accuracy
0 to 14.000 pH
0 to 14.00 pH
0.001 pH
0.01 pH
±0.002 pH
±0.01 pH
Sensor Type ..........................................Glass bulb pH sensor, combination or half cell.
Input Impedance...................................>3 x 10
12
Ohms
Temperature Compensation ................Automatic, 0 to 100
O
C
Calibration............................................Automatic asymmetry and slope calibration.
Automatic Buffer Recognition .............pH4.00, pH6.88, pH7.00, pH9.23 & pH10.06.
Any other can be entered during calibration.
Sensor Asymmetry Range ....................-1.00 to 1.00 pH
Sensor Slope Range ..............................85.0 to 105.0 %
1.9.2 Absolute and Relative mV
Ranges Resolution Accuracy
0 to ± 400.0 mV
0 to ±1500 mV
(auto-ranging)
0.1 mV
1 mV
±0.15 mV
±1 mV
Sensor Type ..........................................Platinum or Gold tip ORP sensor, combination or half cell.
Ion Selective Electrodes can also be used in this mode.
Input Impedance...................................>3 x 10
12
Ohms
1.9.3 Temperature
Range Resolution Accuracy
-10.0 to 120.0
O
C 0.1
O
C ±0.2
O
C
Sensor Type ..........................................Silicon transistor
Calibration............................................Automatic offset calibration
Sensor Offset Range .............................-10.0 to 10.0
O
C

9
1.9.4 General Specifications
Memory................................................. 2340 readings including date and time
Automatic Logging ...............................User-set for one reading every 1 to 60 seconds, minutes or
hours.
RS232 Port............................................1200, 9600, 19200 & 38400 baud.
8 bits, no parity, 1 stop bit, XON/XOFF Protocol.
Clock .....................................................Calendar clock displays date, month, year, hours, minutes
& seconds.
Good Laboratory Practices .................. Date, time and results of last calibration for all parameters
are stored. This information can be recalled or sent to the
RS232 port at any time.
Power ....................................................12V DC, 90 mA (backlight off) / 130 mA (backlight on).
AC/DC adaptor to suit country of destination is included
in standard kit.
Dimensions............................................240 x 180 x 105 mm
Mass ......................................................Instrument only : Approx. 1.0 kg
Full Kit : Approx. 4.0 kg
Environment .........................................Temperature : 0 to 45
O
C
Humidity : 0 to 90 % R.H.

10
2. smartCHEM-Titro Menu Structure
A detailed breakdown of the menu system of the smartCHEM-Titro is shown below. This diagram
provides a quick reference for the menu functions available for the smartCHEM-Titro.
→F1:Calibrate →F1:pH or mV
F1 does not appear in the menu
when Relative mV mode is selected.
F3:Temperature
→F2:Logger →F1:Recall
F2:Erase →F1:Erase All
F2:Erase Last
F3:Print
F4:Program →F1:Secs
F2:Mins
F3:Hours
→F3:Mode →F1:0.01pH
F2:0.001pH
F3:mV
F4:Rel mV
F5:Titrator →F1:Titrator ON
F3:Titrator OFF
→F4:Setup →F1:pH Buffer
F2:Clock
F3:Backlight →F1:On
F2:Off
F3:Energy Saver
F4: Ports →F1:Baud Rate
F5:Initialise →F1:All
F3:pH SlopeB
F6:Titr. →F1:Max Rate
F2:Prop.
F3:Min rate
F4:Delay
F5:STD Parameters
→F5:GLP →F1:Recall
F2:Alarm →F1:Daily
F2:1 Week
F3:2 Weeks
F4:4 Weeks
F5:Off
F3:Print
F6:Access →F1:Change code
F3:Enable & Enter code or F3:Disable Security

11
3. Automatic Titrator Mode
3.1 Selecting Automatic Titrator Mode
1. Select the Mode menu ( →
→→
→F3:Mode)…
Mode
>F1:0.01pH F2:0.001pH
F3:mV F4:Rel mV
>F5:Titrator
The arrow indicates the current selection.
2. Select F5:Titrator from the menu. The Titrator mode section menu is now displayed…
TITRATOR
>F1:Titrator ON
F5:Titrator OFF
The arrow indicates the current selection.
Press to turn the Automatic Titrator function ON.
Press to turn the Automatic Titrator function OFF.
Press to quit without changing the current selection.
3. In normal display mode, the smartCHEM-Titro will now prompt you to press to start the
Standard Titration. For example…
7.00pH 25.0
o
C
0.00mL 12:00:00
Press F6 to start
STD Titration
If the Automatic Datalogging function is programmed (as per section 12.2), an additional
prompt informs the user that the titration curve will be logged into memory. For example…
7.00pH 25.0
o
C
0.00mL 12:00:00
Press F6 to start
STD Titration & Log
See section 3.3 for details on setting up the Standard Titration parameters to your specific
requirements.

12
3.2 Setting up the apparatus for Automatic Titrations
Illustration of connections for smartCHEM-Titro Standard Titration setup…
1. Select a flat Benchtop with enough free space to fit the entire Titration apparatus.
2. If computer interfacing is desired, connect the Serial cable (130041) to the
Power / RS232
socket of the smartCHEM-Titro.
3. Connect the AC/DC Adaptor (130048) to the
Power / RS232
socket of the smartCHEM-
Titro. If the Serial cable is connected, connect the AC/DC Adaptor in the spare in-line socket
of the Serial cable.
Continued over the page…

13
4. Connect the Burette Cable (130122) to the
RS-232
socket on the Schott Burette and
the
Burette
socket on the smartCHEM-Titro. See the Schott Burette handbook for full details
on setting up this device. The default factory settings should not need to be changed for use
with the TPS smartCHEM-Titro.
5. Connect the pH sensor to the pH/mV/Ion socket and the Temperature sensor to the
Temperature
socket of the smartCHEM-Titro.
6. Other apparatus that will be required includes…
•
Magnetic stirrer
•
Wash bottle with distilled water

14
3.3 Titration Parameters
3.3.1 General Titration Parameters
This section is only applicable if the titration parameters need to be changed in case of overshooting
the end point, speeding up the procedure etc. The maximum dose rate (mL/min), minimum dose
rate (mL/min), proportional band and delay times can all be set by the user.
•
The maximum dose rate is the mL/min of titrant addition when the pH or Millivolt reading is
outside the proportional band.
•
The minimum dose rate is the mL/min of titrant addition when pH is within 0.01 pH of the end
point or Millivolts is within 10 mV of the end point.
•
The proportional band is the number of pH units or the number of Millivolts away from the end
point at which titrant addition is slowed down to avoid overshooting. The addition rate is
slowed down from the maximum dose rate to the minimum dose rate gradually over this band.
•
The delay time is the number of seconds the smartCHEM-Titro will wait for when the end
point is reached before pronouncing the titration complete.
In the diagram below, the maximum dose rate is 10.0mL/min, the minimum dose rate is 0.2mL/min,
the proportional band is 1.00 pH and the end point is pH8.20.
To set the maximum dose rate…
1. Select the Titration menu (
→
→→
→
F4:Setup
→
→→
→
F6:Titr.).
2. Select F1:Max Rate from the menu. The following screen is now displayed…
Enter Maximum mL/min
Addition Rate:10.0
Enter the maximum dose rate, from 5.0 to 20.0 mL / minute, and press .

15
To set the minimum dose rate…
1. Select the Titration menu (
→
→→
→
F4:Setup
→
→→
→
F6:Titr.).
2. Select F3:Min Rate from the menu. The following screen is now displayed…
Enter Minimum mL/min
Addition Rate:0.2
Enter the minimum dose rate, from 0.1 to 3.0 mL / minute, and press .
To set the proportional band...
1. Select the Titration menu (
→
→→
→
F4:Setup
→
→→
→
F6:Titr.).
2. Select F2:Prop. from the menu. The following screen is now displayed…
Enter Proportional
Band:1.00pH
Enter the proportional band, from 0.1 to 1.00 pH. and press .
To set the delay time...
1. Select the Titration menu (
→
→→
→
F4:Setup
→
→→
→
F6:Titr.).
2. Select F4:Delay from the menu. The following screen is now displayed…
Enter End Time
Delay:10 sec
Enter the end point time delay, from 3 to 300 seconds, and press .

16
3.3.2 Standard Titration Parameters
This section is applicable directly to a Standard Titration procedure. The user is able to set the
Titration variables to their requirements…
1. Select the Titration menu (
→
→→
→
F4:Setup
→
→→
→
F6:Titr.).
2. Select F5:STD Parameters from the menu. The following screen is displayed…
For pH Titrations… For mV and Relative mV Titrations…
STD Parameters
Endpoint : 7.00 pH
STD Parameters
Endpoint : 0 mV
F2:Negative
Enter the desired Endpoint, from 0 to 14 pH,
and press .
Enter the desired Endpoint, from 0 to 1500
mV, and press .
Press to alternately select a Negative or
Positive value for the Endpoint
3. The direction of the titration process can now be selected…
For pH Titrations…
For mV and Relative mV Titrations…
STD Parameters
Titration Direction
>F1:Increasing pH
F3:Decreasing pH
STD Parameters
Titration Direction
>F1:Increasing mV
F3:Decreasing mV
Press when using an alkaline titrant that
increases the pH of the sample.
Press when using an acidic titrant that
decreases the pH of the sample.
Press to quit and retain the current
setting.
Press when using a titrant that increases
the Millivolts of the sample.
Press when using a titrant that decreases
the Millivolts of the sample.
Press to quit and retain the current
setting.
4. The Titration Parameters are now set. A Standard Titration can now be performed.

17
3.4 Performing a Standard Titration
For most users, the default settings programmed into the smartCHEM-Titro will result in fast,
reproducible titrations. However, some variables may be altered by the user to speed up the process,
avoid overshooting etc. See section 3.3.1 for details on changing the Titration Parameters.
Press at any time during the titration procedure to abort the titration.
1. When the smartCHEM-Titro is in Standard Titrator mode, the following display is shown in
normal display mode…
4.00pH 25.0
o
C
0.00mL 12:00:00
Press F6 to start
STD Titration
If the Automatic Datalogging function is programmed (as per section 12.2), an additional
prompt informs you that the titration curve will be logged into memory. For example…
3.40pH 25.0
o
C
0.00mL 12:00:00
Press F6 to start
STD Titration & Log
2. Place the pH and Temperature sensors into the sample. The reference
junction of the pH sensor must be immersed, as per the diagram.
The burette dosing tip should be immersed to the same level as the green
bulb of the pH sensor. It is best to mount this upstream from the pH
sensor when the stirrer is running.
Continued over the page…

18
3. Press to begin the Standard Titration. The smartCHEM-Titro will refill the burette
and start the titration. For example…
4.00pH 25.0
o
C
0.00mL 12:01:00
Titrating to
7.00pH
4. The smartCHEM-Titro will display a prompt when the titration is complete. For example…
7.00pH 25.0
o
C
10.00mL 12:05:00
Titration complete.
Press Print or Enter
5. Press to send the result to the serial port, which can be connected to a PC or an RS232
compatible printer. Press to exit and return to the opening screen.
3.5 12V DC Switched Output (Optional)
When the smartCHEM-Titro is in Standard Titrator mode, the 12V DC output can be activated
manually to switch on devices such as a solenoid valve for degassing. This function is available at
any time. A 1 Amp AC/DC adaptor is required when using the optional solenoid valve.
Press when the unit is in its main display to switch the 12V output ON. A “ *” is shown in the
display to provide visual indication, for example…
11.00pH 25.0
o
C
0.00mL* 12:00:00
Press F6 to start
STD Titration
Press again to switch the 12V output OFF.

19
4. Standard pH Mode
4.1 Selecting pH Mode
To select or change the pH Mode…
1. Select the Mode menu (
→
→→
→F3:Mode
)…
Mode
>F1:0.01pH F2:0.001pH
F3:mV F4:Rel mV
F5:Titrator
The arrow indicates the current selection.
Press to select pH mode with 0.01 pH resolution.
Press to select pH mode 0.001 pH resolution.
Press to quit without changing the current selection.

20
4.2 Selecting the pH Buffer Set
The smartCHEM-Titro can be programmed to automatically recognise any of the following buffer
sets during pH calibration. All pH values listed below are at 25 OC.
1. pH4.00, pH6.88, pH9.23
2. pH4.00, pH6.88, pH10.06
3. pH4.00, pH7.00, pH9.23
4. pH4.00, pH7.00, pH10.06.
To select the pH buffer set for automatic recognition…
1. Select the pH Buffer set-up menu.
(
→
→→
→F4:Setup →
→→
→F1:pH Buffer
).
2. The primary buffer selection menu is now displayed…
Select Primary
Buffer
>F1:6.88pH
F3:7.00pH
The arrow indicates the current selection.
Press to select pH6.88 as the Primary Buffer.
Press to select pH7.00 as the Primary Buffer.
Press to quit without changing the current setting.
3. The secondary buffers selection menu is now displayed…
Select Secondary
Buffers
>F1:4.00/9.23pH
F3:4.00/10.06pH
The arrow indicates the current selection.
Press to select pH4.00 and pH9.23 as the Secondary Buffers.
Press to select pH4.00 and pH10.06 as the Secondary Buffers.
Press to quit without changing the current setting.
Notes
1. The selected buffer set is kept in memory when the meter is switched off.
2. The buffers are re-set to pH4.00, pH6.88 and pH9.23 during initialisation.
3. pH6.88 buffer is a DIN 19266 and NBS Primary-standard pH solution. Its use as the primary
buffer is highly recommended for the most accurate possible results. If pH7.00 buffer is used,
ensure that it is manufactured to at least 0.01pH accuracy. pH7.00 buffer has a buffer capacity
less than half that of pH6.88 buffer and is therefore much less stable.
4. pH9.23 and pH10.01 buffers are highly unstable. Avoid using these buffers if possible. Discard
immediately after use.
This manual suits for next models
1
Table of contents
Other TPS Laboratory Equipment manuals
Popular Laboratory Equipment manuals by other brands

Varian
Varian 1200 LC/MS Operator's manual

Thermo Scientific
Thermo Scientific Dionex Integrion HPIC Maintenance Procedure

Sigma
Sigma 1-14K operating manual

Thermo Scientific
Thermo Scientific Sorvall T3 Service manual

Endress+Hauser
Endress+Hauser Liquistation CSF48 operating instructions

Thermo Scientific
Thermo Scientific 88882005 operating manual