Nordic Lab Termaks TS 9026 User manual

1
User’s Manual
Drying Ovens / Sterilizers
Models
TS 9026 - TS 9053 - TS 9135 - TS 9430

2
Basic Functions
This page gives you all information needed to operate the chamber. Details are given on the
following pages.
The display backlight turns into power saving mode 30 sec. after last key hit.
How to Change a Setting
•Go to Display Settings Mode by pressing the Set Key. Set LED turns on and
explaining text appears in left display
•Find desired parameter in the Settings Menu with Down keys
•Go to Change Mode by pressing Set Key for 3 sec. LED turns flashing and
explaining text appears in left display, Right display will flash
•Adjust the setting with Up/Down Keys
•Save the new setting by pressing the Enter Key
•
How to Operate the Standard Timer
•Enter CycleTime (hours and minutes) as described above
•Start timer by pressing Timer Key until the LED turns on
•Heating Up is displayed until the Set temperature has been reached
•Time Left (Hours Minutes) will be displayed when the set temperature has been
reached.
When Cycle is Complete:
•Cycle Complete appears in the display
•The LED starts flashing
•Heating turns off
•Air valve closes
•Fan stops (8 minutes delayed)
•The cycle can be repeated by pressing Timer Key until LED turns on
Right Display
•Actual Temperature
•Settings
•Text
Up / Down Keys
•Select Parameter
•Adjust Data
•Step by step or fast
running
Set Key
•Toggle Settings / Actual values
•Change data (3sec)
Set LED
•Lit = Actual Set Value
•Flashing = Change Mode
•Off = Actual Value Display
Left Display
•Target Temperature
•Text
Lower Line
•System Status
•Alarms
Standby Key
•Toggle Standby / Run (3 sec)
•Alarm Acknowledge
Standby LED
•flashing = Standby Mode
•Lit = Normal Run
Timer Key
•Toggle Timer On/Off (3sec)
Timer LED
•Lit = Timer On
•Flashing = Cycle Complete
•Off = Continuous Mode
Enter Key
Ends the Change Sessions and
store new data into memory

3
Installation
•Unpack and place shelves in desired position
•Place the chamber with at least 10 cm free air on all sides
•Do not connect the air outlet to a ventilation system
•Connect the chamber to a grounded power source
•Turn it on with the Main Switch on the right side.
•The display turns on and shows Wait… for a few seconds
•Set the desired Temperature, Fan Speed, Air Valve and eventually, the Time
•If Real Time Program is preferred, choose it in the System Setup menu
Main Switch and External Connections

4
Main Frame
Returns automatically to this
display 30 sec after last key
operation
Actual Set 180°C
Continuous Mode
180 °C
Fan Speed
08
Air Valve
080%
Min Aver Max
179 180 181
Logg °C
Model TS9053
Rel: 001 003 008
180 °C
Real Time
Day Hrs:Mins
Mo 20:15
Status Messages:
*TimeLeft 1h 25min
*Cycle Complete
*Heating Up
*Cooling Down
*Sleep Mode Alarm Messages:
*High Temp Alarm
*Low Temp Alarm
*High Temp Safety
*Sensor Failure
*Adjust Real Time!
*Data Error
Temperature Target Actual Temperature
Actual Fan Speed
Not allways equal to Set Value
May have been automatically
adjusted for optimal control
Display Only Frames,overview
Selected with Up/Down Keys when no light at the Set Key
Actual Air Valve Opening
Not allways equal to Set Value
Closed during Heating Up and
when Cyce Completed
Logged Temperature
Start logging when Set
Temperature is reached (30
minutes delayed)
Cleared at temperature change
and when the timer is turned on
Show Minimum, Average and
Maximum temperature since
last temperature change or
timer start
Zeros only if logging not yet
started
Actual Day and Time
This frame comes up only when
the Real Time Program is chosen
in the System Setup
Model and Firmware
Show actual Chamber Model
and Firmware Release
numbers for the different
microcontrollers in the system
Temperature Logging
•Starts when the temperature has been reached, about 30 minutes delayed
•Used to evaluate the temperature control
•Updates every minute
•Door openings and Air Valve adjustment will affect the Max and Min values
•All zeros means that the logging has not yet started
•Cleared when Power Up, wakeup from Standby, entering new Temperature Set and
when turning on the Timer

5
Pin Code
Available 30 seconds from startup
000 means deactivated Pin Code System
Settings Menu
Temperature Target
000 to 250°C
Cycle Time
Displayed when Stanard Timer is chosen only
Fan Speed
Display: 0 to 10 Setting: 1 to 10
Air Valve
0 to 100% in steps of 10
Actual Setting
TempAlarmLim +/-
03.0°C
Actual Setting
Air Valve
100%
Change Setting
Air Valve
050%
Actual Setting
Fan Speed
010
Actual Setting
Cycle Time
02h 30m
Actual Setting
Temperature
180°C
Actual Setting
Pin Code
000
Change Setting
Pin Code
123
Change Setting
Temperature
150°C
Change Setting
Cycle Time
01h 00m
Change Setting
Fan Speed
001
Change Setting
TempAlarmLim +/-
03.5°C
Actual Setting
Safety Lim +/-
05.0°C
Actual Setting
Temp B EndTime
Mo 06:00
Actual Setting
Real Time
Fr 07:58
Actual Setting
Temperature B
040°C
Temperature Alarm Limit
1 to 20°C
Safety Thermostat Limit
2,5 to 20°C
Change Setting
Safety Lim +/-
06.0°C
Change Setting
Real Time
Sa 10:17
Real Time
Day Hour : Minute
Change Setting
Temperature B
060°C
Temperature B Target
000 to 250°C
Change Setting
Temp B StartTime
Fr 16:30
Actual Setting
Temp B StartTime
Fr 16:00
Change Setting
Temp B EndTime
Mo 06:30
Temperature B Start Time Day Hour : Minute
Day = xx means every day
Temperature B End Time Day Hour : Minute
Day = xx means every day
Displayed only if the Real Time Program Option is chosen in System Setup
Calibration
Temp Offset
08.0°C
Change Calib
Temp Offset
08.5°C
Zero Point Constant (Z)
This example: Displayed temperature 0,5°C down
Calibration
TmpRangeFactor
755
Change Calib
TmpRangeFactor
757
Amplifying Factor (A)
Read Calibration Chapter
System Setup
Timer Option
Standard
Change Setup
Timer Option
RealTime
Timer Options
Choose Standard Timer or Real Time Program
System Setup
Language
English
Change Setup
Language
Norsk
Language
Choose English or Norwegian
Set Key
LED turns On
Display Mode Set Key
3 Sec LED Flashing
Change Mode
Up/Down Keys
Up / Down Keys

6
Timers
In the System Setup, one of two timer systems can be chosen:
Standard Timer (default):
•Can be set to maximum 99 hours and 59 minutes
•Starts counting down when the Set Temperature is reached
•In the case of power failure, lasting more than 5 minutes, the counting will restart from
the beginning
•Operation of this timer is described in the chapter How to Operate the Standard
Timer
•The Fan and Air valve are controlled as illustrated below
•If the chamber shall run without any timing, the time setting should be set to 00h
00m.This will avoid accidental start of the timer
Actual Setting
Cycle Time
01h 30m
Actual Setting
Temperature
180 °C
180°C
Time
Standard Timer, example
Fan Off Fan On Fan Off
Valve Closed Valve ClosedValve in Set Position
LED flashing LED Lit LED flashing
Cycle Time
Start
Real Time Program:
•Optional, can be chosen in the System Setup Menu
•Makes it possible to operate the chamber at two different temperatures
•The extra temperature is named Temperature B in the menus
•Setting Temperature B to 000°C means that heater and fan are turned off in that
period. (Sleep Mode)
•Start- and end Time for Temperature B can be set to any time during the week or
on daily basis
•When choosing xx instead of a specified day, the change will occur daily at the given
time
•The Real Time Clock is backed up for about 10 minutes if power fails. A warning is
given if adjustment is needed.

7
Mon Tue Wed Thu Fri Sat Sun Mon
180°C 180°C
100°C
Week Cycle, example
°C
Time
Actual Setting
Temperature B
100 °C
Actual Setting
Temp B StartTime
Mo 19:45
Actual Setting
Temp B EndTime
Fr 05:00
Actual Setting
Temperature
180 °C
Mon Tue Wed Thu Fri Sat Sun Mon
Actual Setting
Temperature B
100 °C
100°C
Actual Setting
Temperature
180 °C
180°C
Actual Setting
Temp B StartTime
xx 16:00
Actual Setting
Temp B EndTime
xx 06:00
Time
°C
Day Cycle, example
The Fan
•Adjustable speed, 10% to 100%
•When heating up, settings lower than 60% will be ignored
•Stops for about 30 seconds when the door is opened while running at set
temperature. This function is disabled for 4 minutes after last door opening or after
last Air Valve adjustment
•May reduce speed, or even stop, if operating at a temperature close to the ambient
temperature
The Air Valve
•Adjustable opening in steps of 10% (00 = closed, 100 = open)
•Movement may be 10 sec delayed
•Should be open when used for drying purposes
•Closes automatically when heating up, when a timer cycle is completed or in Sleep
mode (Real Time Program)
Standby
•Preferred way to shut down the chamber. Keeps the real time clock running
•Turns off Heaters, Fan and Display
•Press the Standby Key for about 3 seconds until the backlight in the display turns off
•The Standby LED will start flashing when the key is released.
•The chamber can be restarted by pressing the Standby Key for 3 seconds
•The right display will show Wait… for a moment during initialization

8
Pin Code
•Optional system to stop unwanted settings from unauthorized persons
•A personal pin code can be entered during the first 30 seconds after turning the
chamber on with the main switch or waking up from Standby Mode. Actual code is
displayed after pressing the Set key in that period. A unique code can be chosen in
the range from 001 to 999.
•000 means deactivated Pin Code System.
•When activated, Pin Code? will be displayed in the left display.
•Actual code must be set by Up/Down Keys, followed by pressing the Enter Key
•The system will remain opened for 30 seconds after the last key operation.
•Alarms can be acknowledged by the Standby Key even if the keys are locked
Alarms
•A number of alarm situations may occur, listed below
•Actual warning is given in the lower line of the left display
•The backlight starts flashing and the buzzer starts sounding whenever an alarm occur
•The flashing and the sound can be stopped by pressing the Standby Key
Alarm Output
•A potential free contact is available for external use (see drawing Main Switch and
External Connections)
•The output switches when an alarm situation occurs, one minute delayed
•Switches immediately at power failure
•Immediate return to normal when the alarm situation is over
Displayed Warning
Left Display
Explanation
High Temp Alarm
The temperature has drifted above the
entered High Temperature Alarm Limit
Turns off 0,5°C below the Alarm Limit
Low Temp Alarm
The temperature has dropped below
the entered High Temperature Alarm
Limit
Turns off 0,5°C above the Alarm Limit
Disabled during:
Change Up/ Down, Cycle
Complete and Sleep Mode
Disabled for 4 minutes after:
•Door Opening
•Valve Adjustment
•Heating Up
•Cooling Down
High Temp Safety
The Temperature Safety Limit has been exceeded and the power to the
heater is shut off
Sensor Failure
One of the two sensors, for display or safety, is probably broken. The
chamber operates with limited safety
Adjust Real Time!
The Real Time Clock needs adjustment. Probably due to a significant
power failure
Data Error
Communication error between the panel and the controller.
The chamber operates with the last valid settings, but the displayed data
may be wrong

9
Schedul/Ramping
There can be up to 5 schedules. A new schedul consists of following
-A start block
-Start day (All, Mon-Sun, None)
-Start hour ( 0-23)
-Start minute ( 0-59)
-End mode ( Stop, Continue, Cycle, Standby)
You can have up to 10 temp blocks in every scheduler.
-In every block you choose 3 different parameters
-Run time before shift (hours) ( 0-100, 0=block disabled)
-Temprature ( 0,0 to 250)
-Ramp °c/hour ( 1,0 –60)
Ex. Of scheduler 1.

10
Start
hour
Start
hour
Start
hour
Start
hour
-Here you have all 5 different schedules.
-You can set up all 5 differently and then chose which one you
want to use.
Sc
Start
day
Block 2
Run time
Temp
Ramp
Start
minute
Block 1
Run time
Temp
Ramp
Block 5
Run time
Temp
Ramp
Block 4
Run time
Temp
Ramp
Block 3
Run time
Temp
Ramp
Start
day
Start
hour
Block 1
Run time
Temp
Ramp
Block 2
Run time
Temp
Ramp
Block 3
Run time
Temp
Ramp
Block 4
Run time
Temp
Ramp
Start
minute
Schedule 1
It goes up to 10
Run time
Temp
Ramp
Block 5
Run time
Temp
Ramp
Block 6
Run time
Temp
Ramp
Schedule 2
Schedule 3
Schedule 4
Schedule 5
Start
day
Start
day
Start
day
Start
minute
Start
minute
Start
minute
Block 1
Run time
Temp
Ramp
Block 1
Run time
Temp
Ramp
Block 1
Run time
Temp
Ramp
Block 2
Run time
Temp
Ramp
Block 2
Run time
Temp
Ramp
Block 2
Run time
Temp
Ramp
Block 3
Run time
Temp
Ramp
Block 3
Run time
Temp
Ramp
Block 3
Run time
Temp
Ramp
Block 4
Run time
Temp
Ramp
Block 4
Run time
Temp
Ramp
Block 4
Run time
Temp
Ramp
Block 5
Run time
Temp
Ramp
Block 5
Run time
Temp
Ramp
Block 5
Run time
Temp
Ramp
Block 6
Run time
Temp
Ramp
Block 6
Run time
Temp
Ramp
Block 6
Run time
Temp
Ramp
Block 6
Run time
Temp
Ramp
It goes up to 10
Run time
Temp
Ramp
It goes up to 10
Run time
Temp
Ramp
It goes up to 10
Run time
Temp
Ramp
It goes up to 10
Run time
Temp
Ramp

11
hedual/Ramping explanied in pictures.
Here you have what the
display show when the
Schedule/ramping is
activated.
On this page you choose
which Schedule you want
You can have 5 different
Scheduals.
On this page you choose
which day you want to
start on you can chose
between mon-sun, all days
or none.
On this page you choose
which hour of the day you
want it to start on.
On this page you choose
which minute of the hour
you want it to start on,
Choose 0 if you want just
the hour.
Here you can choose what
the cabinet should do after
the schedule/ramping is
done.
This setting has
nothing to do with the
block parameters, this
setting only decide
what the cabinet does
after the scheduler is
done.
Remember that you
have 5 different
Schedules, every
schedule can be set
differently, here you
choose which one
you want.

12
This page shows you how to set the block parameters
-When all these steps are done do not forgett to press and hold button
Cycle for 3 sec otherwise the Schedule will not start.
-You will also need to set the clock to the right time in the real time
program menu otherwise it will not start on the right time.
-The Schedule will now start at the choosen time.
Here you choose which
block you want to set, you
can choose between 10
blocks, when you change
block, you will need to
change all the parameters
shown below.
On this page you choose
how many hours you want
the block to run. If you do
not want the block to run,
you choose 0 as run time.
On this page you choose
the temperature you want
the block to be set on.
On this page you choose
the ramping of the
temperature. Ramping
means how many degrees
the cabinet will go up or
down in an hour.
Remember that you
will need to set all
blocks up like you
want them. Every
block you want to use
need to be set up like
shown below.

13
Sterilization Cycle:
•A fixed sterilization cycle for the chamber is available, 180°C in 40 minutes.
•Enter the “Timer Option” menu under Setup and select Sterilization Cycle “Steriliz”
•Sterilization Cycle behaves as Standard Timer, but temperature and time can’t be
adjusted.
•The Sterilization Cycle can be started pressing the “Cycle” - key for 3 seconds.
•The message “Sterilization” appears in the left display and the Cycle LED turns on.
•“Heating Up” is displayed until the temperature 180°C has been reached.
•“Time left” will be displayed when the temperature 180°C has been reached.
•When finished, “Sterilize Complete” will be displayed, the cycle LED will flash and
the buzzer will buzz shortly.
•To return to normal operation
oPress the “Cycle” key shortly to enter continuous mode.
oPress the “Power” key for 3 second to turn off.
oPress the “Cycle” key for 3 seconds to start a “Standard timer” cycle.
Note when the Sterilization cycle is done the “Timer Option” is automatically set to
“Standard timer”,
so to start a new Sterilization cycle the user must set the “Timer Option” to sterilization cycle
again.
This is done to prevent an accidently start of the “Sterilization cycle”
Safety Thermostat
•Automatic system, preventing risky temperatures in the case of a controller failure
•Completely independent from the ordinary temperature control system
•Automatically adjusted whenever a new Temperature Set is entered
•Adjustable limit (offset from target)
•Cuts power to the heaters when the limit is exceeded
•Generates an alarm warning
•Turns to normal when the temperature has dropped 0,5°C below the limit

14
Calibration
Two calibration constants can be adjusted in order to bring the temperature measurement
equal to the true value according to a control device:
Amplifying Factor (A)
Should be calculated if the chamber is used in a wide temperature range
Zero Point Constant (Z)
Should be calculated if display and a control device is not equal at normal working
temperature
The calibration should be performed as follows:
Place the control device (external temp device) into the middle
of the cabinet and let the cabinet stabilize at a low temperature
Note the displayed temperature, Tdl and the true temperature
measured in the control device Tcl.
Let the cabinet stabilize at a high temperature
Note the displayed temperature, Tdh and the true temperature
measured in the control device Tch
Find current amplifying factor in the Settings Menu
Calculate the new factor:
Anew = {(Tch - Tcl) / (Tdh –Tdl)} * A
Enter Anew
Let the cabinet stabilize at a temperature in the middle of the
normal working range
Note the displayed temperature Td and the true temperature
measured in the control device Tc
Find current zero point constant in the Settings Menu
Calculate the new constant:
Znew = Z+ Td- Tc
Enter Znew
Example:
Tdl = 50°C - Tcl = 50,8°C
Tdh = 180°C - Tch = 181,5°C
A= 1,000
Anew ={(181,5-50,8) / (180- 50)} *1,000 =
1,005
Td= 120°C Tc= 122,0°C
Z= 0,00
Znew = 0,00 + 120 –122,0 = -2
The chamber is 2 degrees hotter then then it should be, so then you have to go to temp offset
and raise the chamber with 2 degrees. If the new Z is –you raise the temp if it is + you lower
the temp

15
Grunnfunksjoner
Denne siden viser det som trenges for å betjene skapet. Funksjonene er beskrevet mer i
detalj på de følgende sidene.
Bakgrunnslyset i displayet går i sparemodus 30 sekunder etter siste knappetrykk
Hvordan endre en innstilling
•Vis aktuelle innstillinger med et let trykk på Set-knappen. Set LED lyser opp og
forklarende tekst kommer i venstre display
•Velg ønsket parameter i innstillingsmenyen med Ned -knappene
•Gå til endringsmodus ved å holde Set-knappen inn i 3 sekunder. LED begynner å
blinke og forklarende tekst kommer i venstre display, høyre display vil blinke
•Juster med Opp / Ned -knappene
•Lagre endringen med et lett trykk på Enter-knappen
Hvordan bruke standard timer
•Mat inn ønsket tid som beskrevet over
•Aktiver timeren ved å holde Timer-knappen inn i 3 sekunder til LED lyser
•Varmer opp vises inntil innstilt temperatur er oppnådd
•Når ønsket temperatur er oppnådd, vises gjenværende tid i timer og minutter
Ved fullført tid:
•Syklus ferdig vises I displayet
•LED blinker
•Varmeelementene slås av
•Spjeldet lukker
•Viften stopper (8 minutter forsinket)
•Syklusen repeteres ved å holde Timer-knappen inn i 3 sekunder til LED lyser
Høyre display
•Aktuell temperatur
•Innstillinger
•Tekst
Opp / Ned knapper
•Velge parameter
•Justere data
•Trinnvis eller hurtig
Set knapp
•Veksler innstilling / virkelig
•Endre data (3sek)
Set LED
•Lyser = Aktuell innstilling
•Blinker = Klar for endring
•Av = Aktuell verdi
Venstre display
•Ønsket temperatur
•Tekst
Nedre linje
•System Status
•Alarmer
Standby knapp
•Veksler Standby / På (3 sek)
•Alarm kvittering
Standby LED
•blinker = Standby
•Lyser = Systemet er på
Timer Key
•Veksler Timer Av/På (3sek)
Timer LED
•Lyser = Timer på
•Blinker = Syklus ferdig
•Av = Kontinuerlig drift
Enter knapp
Avslutter endringesoperasjoner
og lagrer de nye verdiene

16
Innstallasjon
•Pakk ut og plasser hyllene i ønsket posisjon
•Plasser skapet med minst 10 cm luft på alle sider
•Spjeldåpningen skal ikke knyttes direkte til eksternt ventillasjonsanlegg
•Sett støpselet i en jordet stikkontakt
•Slå på skapet med hovedbryteren på høyre side, bak
•Displayet vil vise Wait.. i noen sekunder, deretter målt temperatur
•Innstill ønsket temperatur, viftehastighet, spjeldåpning og eventuelt tid
•Hvis norsk tekst ønskes i displayet, gå til System Setup og endre språk
•Programverk kan velges i stedet for standard timer i Systeminnstilling
Hovedbryter og tilkoblinger

17
Hovedbilde
Går automatisk til dette bildet
30 sekunder etter siste
knappetrykk
Actual Set 180°C
Continuous Mode
180 °C
Viftehastighet
08
Spjeld
080%
Min Snitt Max
179 180 181
Logg °C
Model TS9053
Rel: 001 003 008
180 °C
Aktuell tid
Dag Tim:Min
Ma 20:15
Statusmeldinger
*Tid igjen 1h 25min
*Syklus ferdig
*Varmer opp
*Kjøler ned
*Hvilemodus Alarmer:
*Høy temp alarm
*Lav temp alarm
*Høy temp Sikkerh
*Følerfeil
*Juster klokken!
*Datafeil
Ønsket temperatur Actual Temperature
Aktuell viftehastighet
Kan avvike fra innstilt verdi for å
oppnå optimal regulering
Displayoversikt,viser aktuelle verdier
Velges med Opp / Ned knappene når set LED ikke lyser
Aktuell spjeldåpning
Kan avvike fra innstilt. Stenger
under oppvarming og når en
syklus er ferdigkjørt
Temperaturlogging
Starter loggingen 30 minutter etter
at riktig temperatur er oppnådd.
Nullstilles ved temperaturendring
eller når timeren slås på
Viser minimum, snitt og
maksimum temperatur siden
siste temperaturendring eller
start
Aktuell dag og tid
Dette bildet kommer fram bare
hvis Programverk er valgt under
Systeminnstilling
Modell og programvare
Viser aktuell modell og
programversjon i systemets
ulike mkrokontrollere
Temperaturlogging
•Starter når innstilt temperatur er oppnådd, ca 30 minutter forsinket
•Brukes til å evaluere temperaturreguleringen
•Oppdateres hvert minutt
•Døråpninger og spjeldendringer påvirker resultatet
•000 betyr at logging ikke har startet
•Nullstilles når skapet slås på med hovedbryter eller etter Standby, når ny temperatur
innstilles eller når timeren slås på

18
Adgangskode
Tilgjengelig i 30 sek etter oppstart.
000 betyr deaktivert adgangskode
Innstillingsmeny
Børverdi temperatur
000 til 250°C
Tid syklus
Vises bare når standard timer er valgt
Viftehastighet
Visning: 0 to 10 Innstilling: 1 to 10
Spjeld
0 to 100% i trinn på 10
Aktuell børverdi
Alarmgrense +/-
03.0°C
Aktuell børvedi
Spjeld
100%
Endre innst.
Spjeld
050%
Aktuell børvedi
Viftehastighet
010
Aktuell børverdi
Syklus tid
02h 30m
Aktuell børverdi
Temperatur
180°C
Aktuell børverdi
Kode
000
Endre innst.
Kode
123
Endre Innst.
Temperatur
150°C
Endre innst.
Syklus tid
01h 00m
Endre innst.
Viftehastighet
001
Endre innst.
TempAlarmLim +/-
03.5°C
Aktuell børverdi
Sikkerhet +/-
05.0°C
Aktuell børverdi
Temp B Sluttid
Mo 06:00
Aktuell børvedi
Aktuell tid
Fr 07:58
Aktuell børverdi
Temperatur B
040°C
Alarmgrense
1 til 20°C
Grense, sikkerhetstermostat
2,5 til 20°C
Endre innst.
Sikkerhet +/-
06.0°C
Endre innst.
Aktuell tid
Lø 10:17
Sann tid
Dag time:minutt
Endre innst.
Temperatur B
060°C
Børverdi temperatur B
000 til 250°C
Endre innst.
Temp B Starttid
Fr 16:30
Aktuell børverdi
Temp B Starttid
Fr 16:00
Endre innst.
Temp B Sluttid
Ma 06:30
Temperature B Starttid Dag time:minutt
Dag= xx betyr daglig
Temperature B Sluttid Dag time:minutt
Day = xx means every day
Vises bare når sanntidsprogram er valgt under systeminnstillinger
Kalibereing
Nullpunkt
08.0°C
Endre kalib.
Nullpunkt
08.5°C
Nullpunktskonstant (Z)
Dette eksempel: Vist temperatur går 0,5°C ned
Kalibereing
Forsterkning
755
Endre kalib.
Forsterkning
757
Forsterkningsfaktor (A)
Se kapittel om kalibrering
Systeminstilling
Tidsfunksj.valg
Standard
Endre innst.
Tidsfunksj.valg
Program
Timeropsjoner
Velg standard eller sanntidsprogram
Systeminnstilling
Språk
Norsk
Endre innst.
Språk
English
Språk
Velg engelsk eller norsk
Set Knapp
LED lyser
Viser innstillinger Set Knapp
3 Sek LED blinker
Kan endre
Opp / Ned -knapper
Opp / Ned -knapper

19
Timere
En av to tidsfunksjoner kan velges under Systeminnstillinger
Standard (fra fabrikk):
•Kan innstilles til maksimun 99 timer og 59 minutter
•Begynner å telle ned tiden når ønsket temperatur er oppnådd
•Ved et eventuelt strømbrudd som varer mer enn 5 minutter, vil nedtellingen starte fra
full tid når strømmen er kommet tilbake
•Se kapittelet Hvordan bruke standard timer
•Vifte og spjeld blir styrt som illustrert nedenfor
•Hvis timeren ikke skal benyttes, anbefales det å sette tiden til 00h:00m. Dette hindrer
at timeren blir satt på utilsiktet
Aktuell børverdi
Syklus tid
01h 30m
Aktuell børverdi
Temperatur
180 °C
180°C
Tid
Standard timer, eksempel
Vifte av Vifte på Vifte av
Spjeld lukket Spjeld lukketInnstilt spjeldåpning
LED blinker LED lyser LED blinker
Syklus tid
Start
Sanntidsprogram:
•Alternativ som kan velges under Systeminnstilling
•Gjør det mulig å veksle mellom to temperaturer på angitte tidspunkt
•Den ekstra børverdien kalles Temperatur B i menyene
•Når temperature B settes til 000°C, betyr det at vifte og varmeelementer stopper i den
perioden (Hvilemodus)
•Start- og sluttid for temperatur B kan settes til ethvert tidspunkt i løpet av uken eller
på daglig basis
•Velges xx i stedet for ukedag, kommer endringene daglig til angitt tidspunkt
•Klokken holdes i gang i 10 minutter ved et eventuelt strømbrudd. Varsling kommer i
displayet hvis klokken må stilles

20
Man Tir Ons Tor Fre Lør Søn Man
180°C 180°C
100°C
Ukesyklus, eksempel
°C
Tid
Aktuell børverdi
Temperatur B
100 °C
Aktuell børverdi
Temp B Starttid
Ma 19:45
Aktuell børverdi
Temp B Sluttid
Fr 05:00
Aktuell børverdi
Temperatur
180 °C
Dagsyklus, eksempel
Man Tir Ons Tor Fre Lør Søn Man
Aktuell børverdi
Temperatur B
100 °C
100°C
Aktuell børverdi
Temperatur
180 °C
180°C
Aktuell børverdi
Temp B Starttid
xx 16:00
Aktuell børverdi
Temp B Sluttid
xx 06:00
Tid
°C
Viften
•Justerbar hastighet, 10% til 100%
•Under uppvarming vil hastigheter lavere enn 60% bli ignorert
•Stopper i ca 30 sekunder når døren åpnes etter at riktig temperatur er oppnådd.
Denne funksjonen sperres i 4 minutter etter forrige døråpning og etter at
spjeldåpningen er justert
•Viftehastigheten kan automatisk bli redusert eller stoppe hvis arbeidstemperaturen
ligger nær værelsestemperaturen
Spjeldet
•Justerbar åpning i trinn på 10% (000 = Lukket, 100 = åpen)
•Endring kan være opptil 10 sekunder forsinket
•Skal være åpen når noe skal tørkes, men lukket ved sterilisering av tørre ting
•Lukker automatisk under oppvarming, når en syklus er fullført eller i hvilemodus
(Sanntidsprogram)
Standby
•Anbefalt måte å slå av skapet. Holder klokken i gang.
•Slår av varmeelementer, vifte og display
•Hold Standby-knappen inne i 3 sekunder til display slukker
•Standby LED tenner når knappen slippes
•Skapet startes igjen ved å holde knappen inne i nye 3 sekunder.
•Høyre display vil vise Wait.. under oppstartsprosedyren
This manual suits for next models
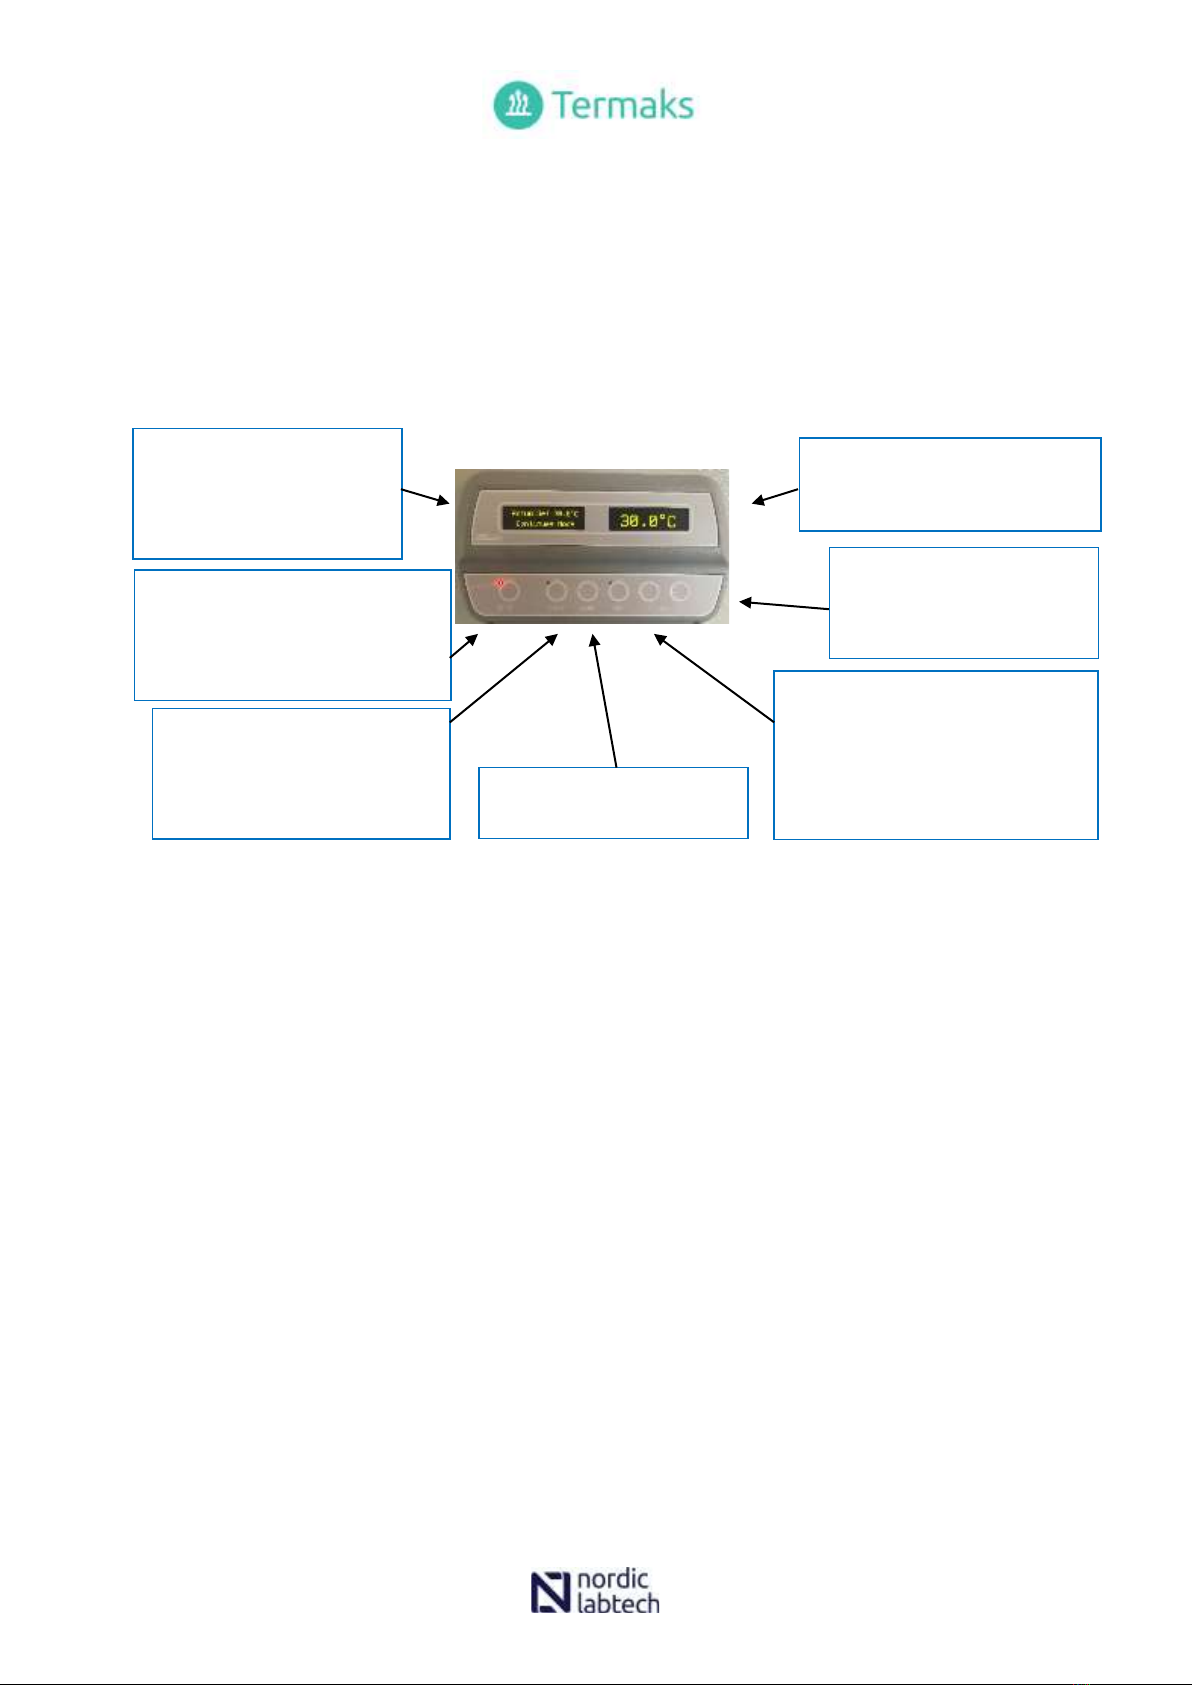
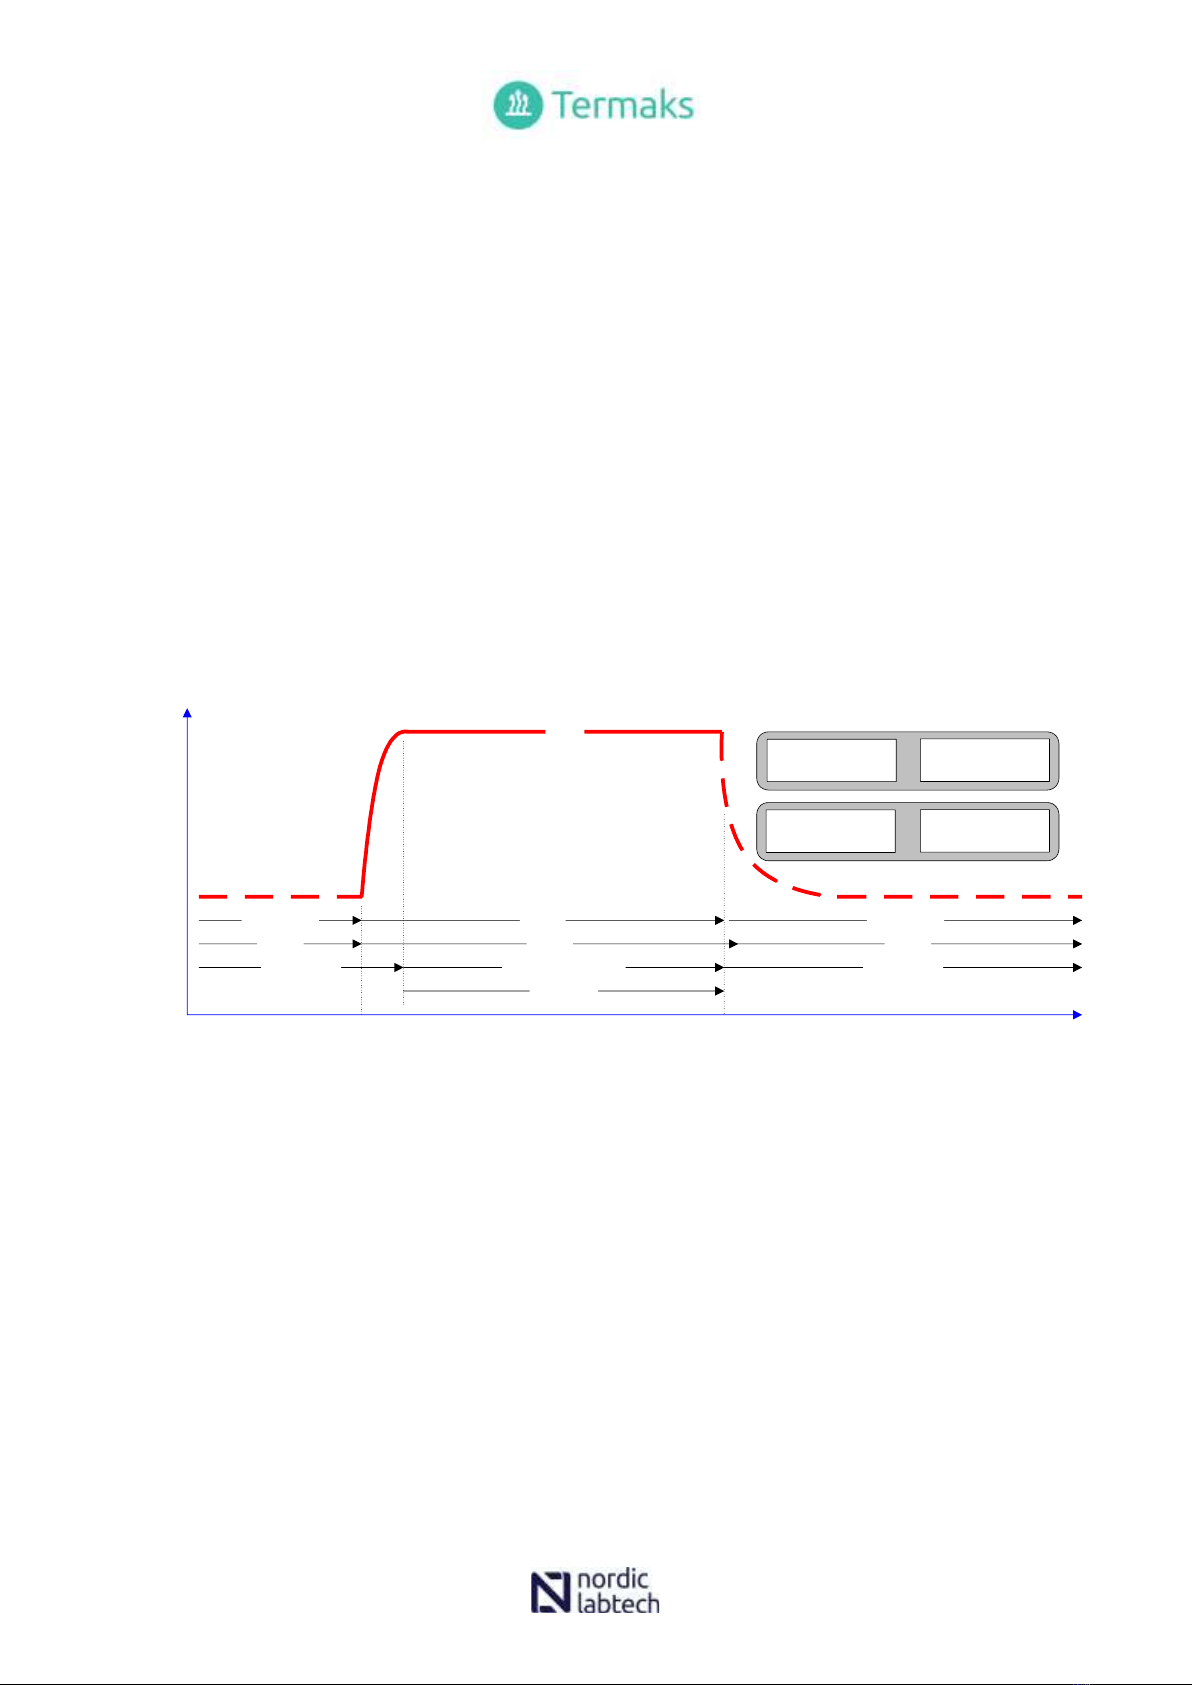
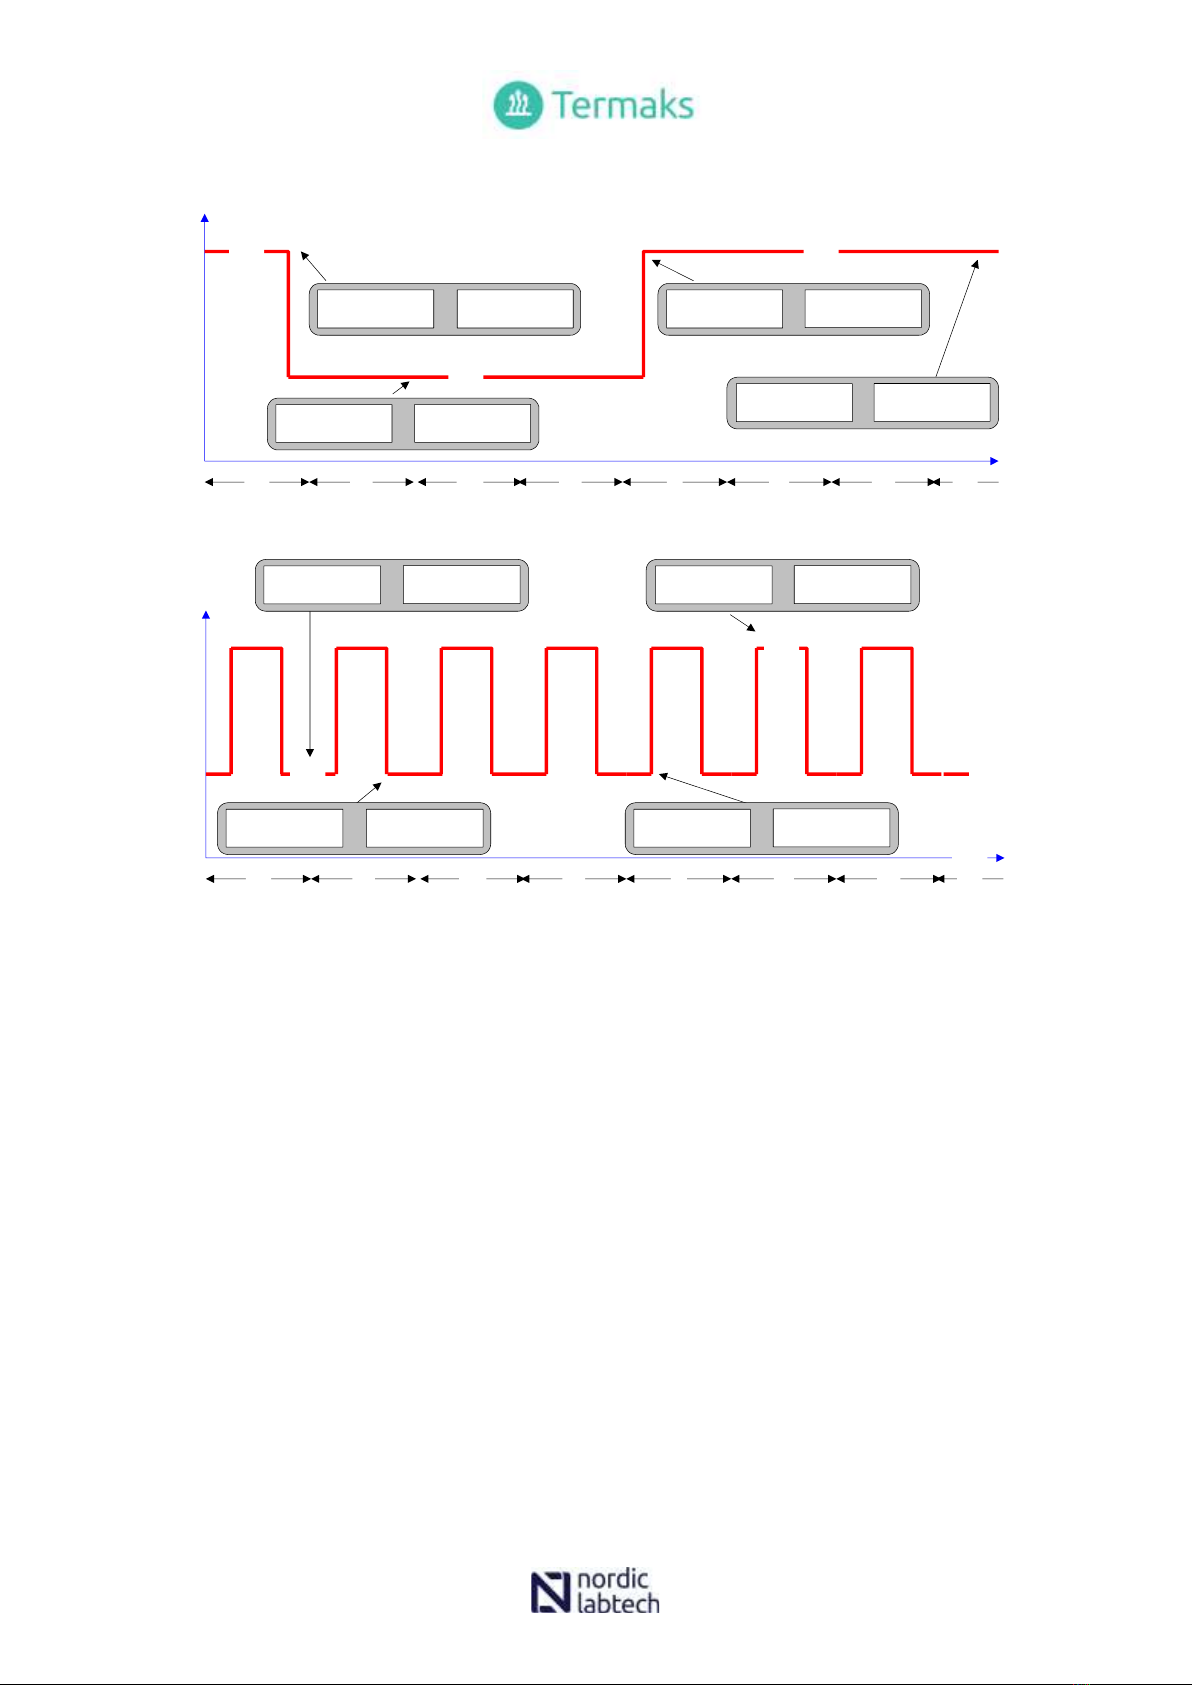
3
Table of contents
Languages:
Other Nordic Lab Laboratory Equipment manuals
Popular Laboratory Equipment manuals by other brands

Respironics
Respironics bilichek Service manual

ROBOfiber
ROBOfiber INJ-GE-30R user manual

VWR International
VWR International 1915A Installation and operation manual

Agilent Technologies
Agilent Technologies SIPS 10 user guide

Beckman Coulter
Beckman Coulter CytoFLEX LX manual

D-Link
D-Link DKT-200 Quick installation guide