manuals.online logo
Brands
  1. Home
  2. •
  3. Brands
  4. •
  5. TracVision
  6. •
  7. Antenna
  8. •
  9. TracVision Track Vision M9 User manual

TracVision Track Vision M9 User manual

KVH, TracVision, and the unique light-colored dome with contrasting baseplate are registered trademarks of KVH Industries, Inc.
All other trademarks are property of their respective companies. The information in this document is subject to change without notice.
No company shall be liable for errors contained herein. © 2008 KVH Industries, Inc., All rights reserved. 54-0532 Rev. A
1
These instructions explain how to replace an elevation motor and/or elevation motor belt in a
TracVision M9 antenna.
Installation Steps
Tools Required
This procedure requires the following tools:
Technical Support
If you need technical assistance, please contact KVH Technical Support:
1. Remove the Radome, 2
2. Mark the Current Belt Tension, 2
3. Remove the Belt, 3
4. Remove and Replace the Elevation
Motor (if required), 3
5. Replace the Belt, 3
6. Set the Belt Tension, 4
• Phillips screwdrivers
• Tension meter (30 lb/13.06 Kg or
greater)
• Needle-nose pliers
•Scribeorpencil
N. America, S. America, Australia:
Phone: +1 401 847-3327
E-mail: [email protected]
Europe, Middle East, Asia:
Phone: +45 45 160 180
E-mail: [email protected]
Elevation Motor/Belt Replacement
Instructions for TracVision®M9
2
Elevation Motor/Belt Replacement
Instructions
Follow the instructions below to replace the
elevation motor and/or motor belt.
Step 1 - Remove the Radome
Follow the steps below to remove the radome.
a. Disconnect power from the TracVision
system and any connected receivers and/or
multiswitch.
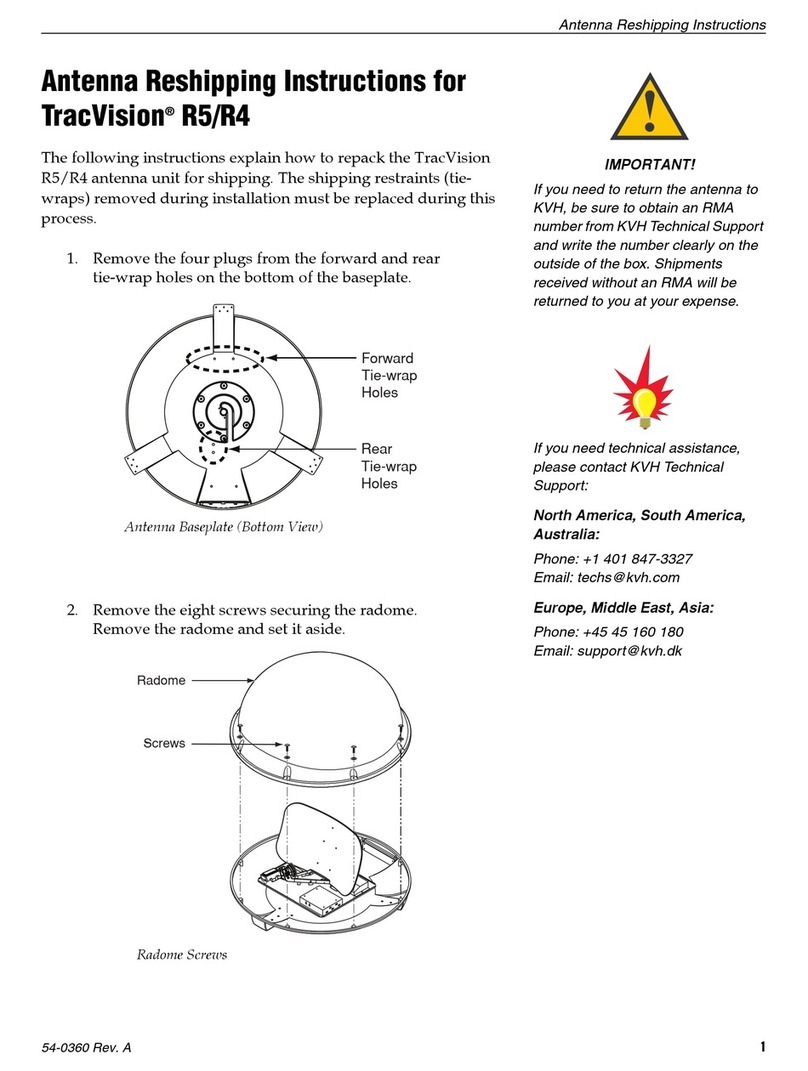
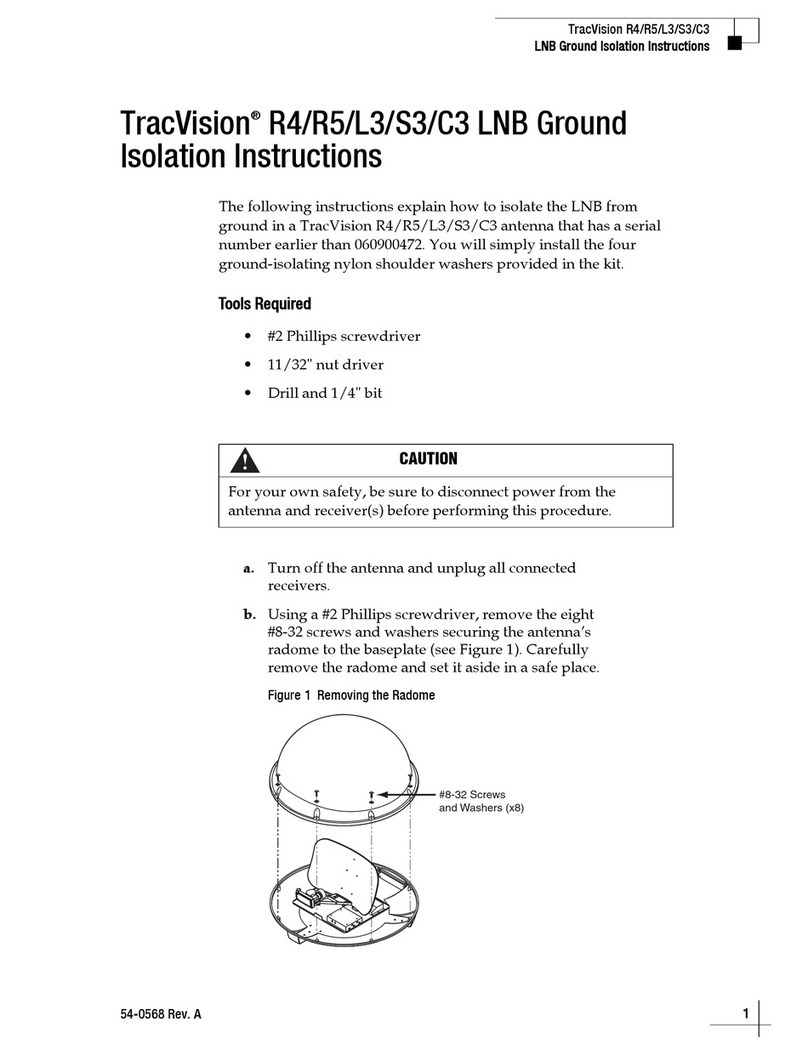
b. Remove the eight Phillips screws securing the
radome (see Figure 1). Then remove the
radome and set it aside in a safe place.
Step 2 - Mark the Current Belt Tension
You need to record the current belt tension to
ensure the belt is replaced correctly. This
procedure requires a scribe (or pencil) and a
tension meter.
NOTE: Improper belt tension might impair antenna
performance.
a. Locate the elevation motor assembly (see
Figure 2).
b. Using a tension meter, apply 30 lbs of force
on the belt at the location shown in Figure 3.
c. Use a scribe to mark the belt’s deflection on
the frame while applying 30 lbs (13.06 Kg) of
force. You will use this scribe mark later
when you replace the belt (see Figure 3).
CAUTION
For your own safety, be sure to disconnect
power from all wired components before
performing this procedure.
Figure 1 Radome Screws
Figure 2 Elevation Motor Assembly Location
Figure 3 Measuring Belt Tension
#10-32 Screw (x8)
Baseplate
Radome
Elevation
Motor
Assembly
Tension
Meter
Tension
Scribe Mark
3
Step 3 - Remove the Belt
Follow the steps below to remove the belt.
a. Loosen the four Phillips screws and washers
securing the motor to the frame until the
motor is free to move upward (see Figure 4).
b. Move the motor upward as necessary to
relieve tension, then roll the belt over the
motor hub while slowly moving the antenna
reflector through its vertical range.
c. Remove the belt.
Step 4 - Remove and Replace the Elevation Motor
(if required)
Follow the steps below to replace the elevation
motor. If you do not need to replace the motor,
skip to “Step 5 - Replace the Belt.”
a. Using needle-nose pliers, gently disconnect
the motor’s cable connector.
b. Remove the four screws and washers
securing the motor to the frame.
c. Install the new motor. Loosely secure the
motor onto the frame using the four screws
and washers you removed in the previous
step. You will tighten these screws later.
d. Reconnect the motor’s cable connector.
Step 5 - Replace the Belt
Follow the steps below to install/re-install the
elevation motor belt.
a. Carefully work the belt in between the
antenna pulley and reflector (see Figure 4).
Ensure that the belt teeth are positioned
inside the belt loop.
b. Route the belt between the rollers and onto
the motor hub.
c. Once the belt is in place, slowly move the
reflector through its vertical range to ensure
the belt is aligned and the teeth engage the
pulley and motor hub.
Figure 4 Elevation Motor Assembly
Elevation
Motor
Pulley
Connector
Belt
Rollers
Motor Hub
Motor Screws
and Washers (x4)
4
Step 6 - Set the Belt Tension
Follow the steps below to set the belt to the
correct belt tension you measured in “Step 2 -
Mark the Current Belt Tension” on page 2.
NOTE: Improper belt tension might impair antenna
performance.
a. Reposition the motor as necessary to achieve
the approximate belt deflection you marked
with a scribe in Step 2c. on page 2. Then
tighten the motor screws to secure the motor
in place.
b. Use the tension meter to verify that the belt
tension is set properly.
c. Repeat Steps a. and b. as required.
d. Reinstall the radome. Then reconnect power
to the Tracvision system and any connected
receivers and/or multiswitch.
The procedure is complete!
Figure 5 Measuring Belt Tension
Tension
Meter
Tension
Scribe Mark

Other manuals for Track Vision M9

4

Other TracVision Antenna manuals

TracVision R5SL User manual

TracVision

TracVision R5SL User manual

TracVision Track Vision M9 User manual

TracVision

TracVision Track Vision M9 User manual

TracVision A5 User manual

TracVision

TracVision A5 User manual

TracVision HD7 User manual

TracVision

TracVision HD7 User manual

TracVision TracVision M3 User manual

TracVision

TracVision TracVision M3 User manual

TracVision M3-DX User manual

TracVision

TracVision M3-DX User manual

TracVision M7 User manual

TracVision

TracVision M7 User manual

TracVision TRACVISION A7 User manual

TracVision

TracVision TRACVISION A7 User manual

TracVision Track Vision M9 User manual

TracVision

TracVision Track Vision M9 User manual

TracVision G8 User manual

TracVision

TracVision G8 User manual
TracVision Track Vision M9 User manual

TracVision

TracVision Track Vision M9 User manual

TracVision C3 User manual

TracVision

TracVision C3 User manual

TracVision R5 User manual

TracVision

TracVision R5 User manual

TracVision HD7 User manual

TracVision

TracVision HD7 User manual

TracVision C3 User manual

TracVision

TracVision C3 User manual

TracVision Track Vision M9 User manual

TracVision

TracVision Track Vision M9 User manual

TracVision TracVision M3 User manual

TracVision

TracVision TracVision M3 User manual

Popular Antenna manuals by other brands

D-Link DWL-R60AT datasheet

D-Link

D-Link DWL-R60AT datasheet

ETS-Lindgren 3160 Series user manual

ETS-Lindgren

ETS-Lindgren 3160 Series user manual

King Quest PRO VQ4800 owner's manual

King Quest

King Quest PRO VQ4800 owner's manual

MotoSAT D-DP3 Specification sheet

MotoSAT

MotoSAT D-DP3 Specification sheet

Bonito NTi MegActiv MA305FT operating manual

Bonito

Bonito NTi MegActiv MA305FT operating manual

REMO Electronics BAS-2301 WiFi Quick user guide

REMO Electronics

REMO Electronics BAS-2301 WiFi Quick user guide

Shure PA805Z2-RSMA quick start guide

Shure

Shure PA805Z2-RSMA quick start guide

M2 Antenna Systems FGSD-2.4DH manual

M2 Antenna Systems

M2 Antenna Systems FGSD-2.4DH manual

RR Electronic Alpha 2T Mounting instructions

RR Electronic

RR Electronic Alpha 2T Mounting instructions

RCA ANT1400E quick start guide

RCA

RCA ANT1400E quick start guide

Sirio Antenne GP 3-E installation manual

Sirio Antenne

Sirio Antenne GP 3-E installation manual

Ubiquiti RD-3G26 quick start guide

Ubiquiti

Ubiquiti RD-3G26 quick start guide

Radio Shack VU-120XR owner's manual

Radio Shack

Radio Shack VU-120XR owner's manual

RFS DBUX6-W6074ADB installation instructions

RFS

RFS DBUX6-W6074ADB installation instructions

RR Electronic AllinOne HAWAII 3G AIS Mounting instructions

RR Electronic

RR Electronic AllinOne HAWAII 3G AIS Mounting instructions

Glomex DANUBE NEO R500N User and installation manual

Glomex

Glomex DANUBE NEO R500N User and installation manual

TERK Technologies AM/FM Q owner's manual

TERK Technologies

TERK Technologies AM/FM Q owner's manual

MAS Elektronik XORO HAN 700 quick guide

MAS Elektronik

MAS Elektronik XORO HAN 700 quick guide

manuals.online logo
manuals.online logoBrands
  • About & Mission
  • Contact us
  • Privacy Policy
  • Terms and Conditions

Copyright 2025 Manuals.Online. All Rights Reserved.