TRADINGZONE Stehlampe Free MPP-SEN User manual

SMARTLINE
Tradingzone Stehlampe Free MPP-SEN
Montageanleitung
Installation Manual
Instructions de montage
2
Tradingzone AG I Allmendstrasse 2 I 8105 Regensdorf I 044 833 33 55 I [email protected] I 30.10.2019
WICHTIGEN INFORMATIONEN AUF FREE LED
IMPORTANT INFORMATION AT FREE LED
INFORMATIONS IMPORTANTES SUR FREE LED
LEDs reagieren auf elektrostatische Entladung. Die Leuchtelemente enthalten LED-Module. Berühren Sie die Oberä-
chen der Module möglichst wenig und wenn nötig mit Handschuhen. Lassen Sie die Abdeckungen auf den Modulen und
schützen Sie diese vor Staub, Feuchtigkeit, allgemeinen Verschmutzungen und mechanische Beanspruchung.
LED are sensitive to electrostatic discharge. The luminaries contains LED module that are sensitive to electrostatic
discharge. Do not touch the printboard and do protect the printboard against mechanical stress, dust, dew and other
pollutions.
Les LEDs réagissent aux perturbations électrostatiques. Les lampes contiennent des éléments LED. Touchez le moins
possible la surface des éléments LED. Si cela est nécessaire, utilisez des gants. Gardez les protections sur les éléments
LED et conservez-les loin de la poussière, de l’humidité, de tout type de pollution et de toutes contraintes mécaniques.
FREE F(BODEN / FLOOR / SOL)
DIE MONTAGE DER STANGE
MOUNTING OF LUMINAIRE POLE
LE MONTAGE DE LA BARRE
- Befestigen Sie die Stange mit den mitgelieferten Schrauben auf der Bodenplatte. Den benötigten Imbus
schlüssel ist im Lieferumfang enthalten.
- Montieren Sie die mitgelieferten Textil-Pads auf der Unterseite des Fußes. Ein Pad in jeder Ecke.
- Mount the pole to the oor plate with the screws provided. Use the provided hex key for mounting.
- Fit the supplied textile pads on the underside of the foot. A paw in each corner.
- Fixez la barre au socle avec la vis incluse dans le kit. La clé de xation se trouve dans le kit de montage.
- Montez les coussinets en textile sur la partie inférieure du pied. Un coussinet pour chaque angle.
INSTALLATION DES LEUCHTENKOPFES
MOUNTING OF LUMINAIRE
INSTALLATION DE LA TÊTE D’ÉCLAIRAGE
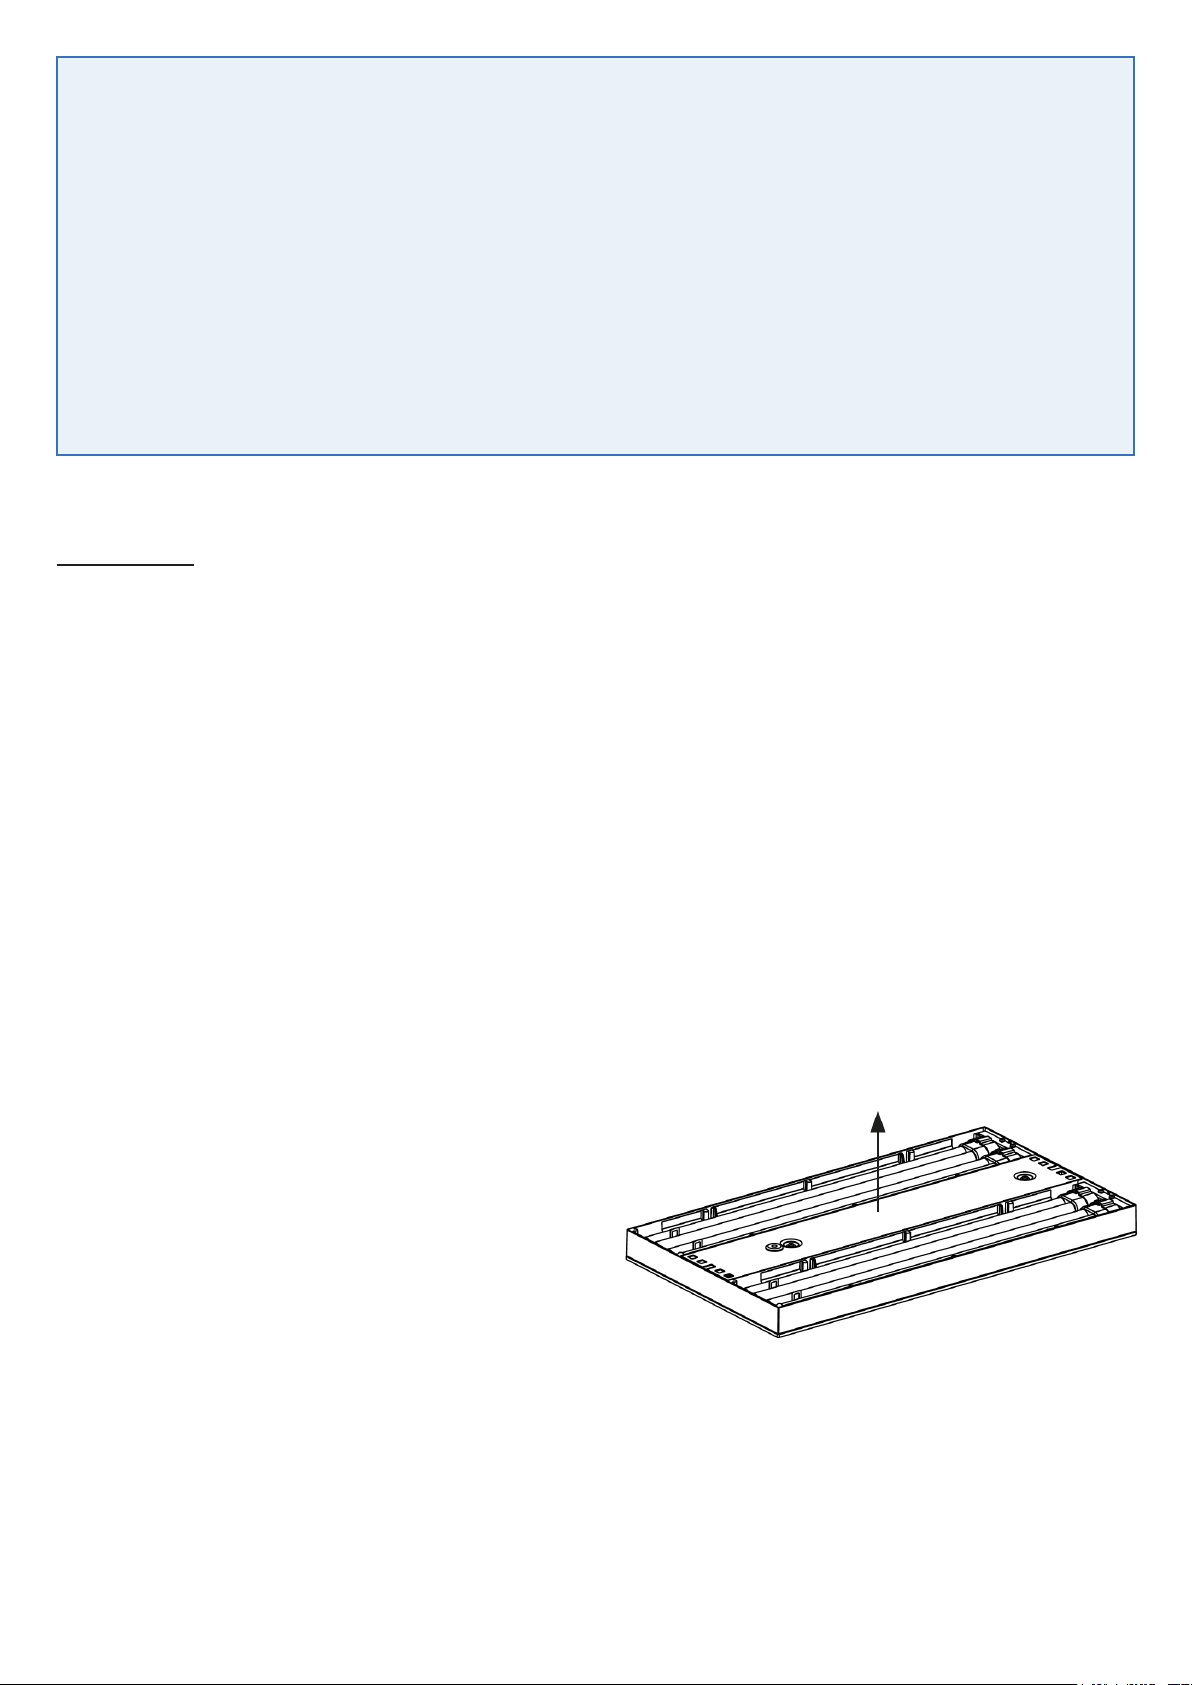
- Entfernen Sie bitte die Schutzabdeckung.
- Ziehen Sie die beiden Leitungen aus dem Lampen
ständer durch die Öffnungen des Lampen-
kopfs.
- Montieren Sie den Lampenkopf auf dem Lampenstän-
der. Die benötigten Schrauben, Scheiben und der
Imbusschlüssen nden Sie in der Verpackung.
- Remove the lid from the luminaire.
- Thread the cables from the pole through the hole in
the luminaire.
- Put the luminaire on top of the pole and attach it with
the screws and washers provided. Use the same hex
key as before.
-
Enlevez la protection du luminaire.
- Retirez les deux câbles du lampadaire par
l’ouverture de la tête d’éclairage.
- Montez la tête d’éclairage sur le lampadaire. Vous
trouverez les outils nécessaires dans le kit de montage.
3
Tradingzone AG I Allmendstrasse 2 I 8105 Regensdorf I 044 833 33 55 I [email protected] I 30.10.2019
ELEKTROINSTALLATION
ELECTRIC INSTALLATION
INSTALLATION ÉLECTRIQUE
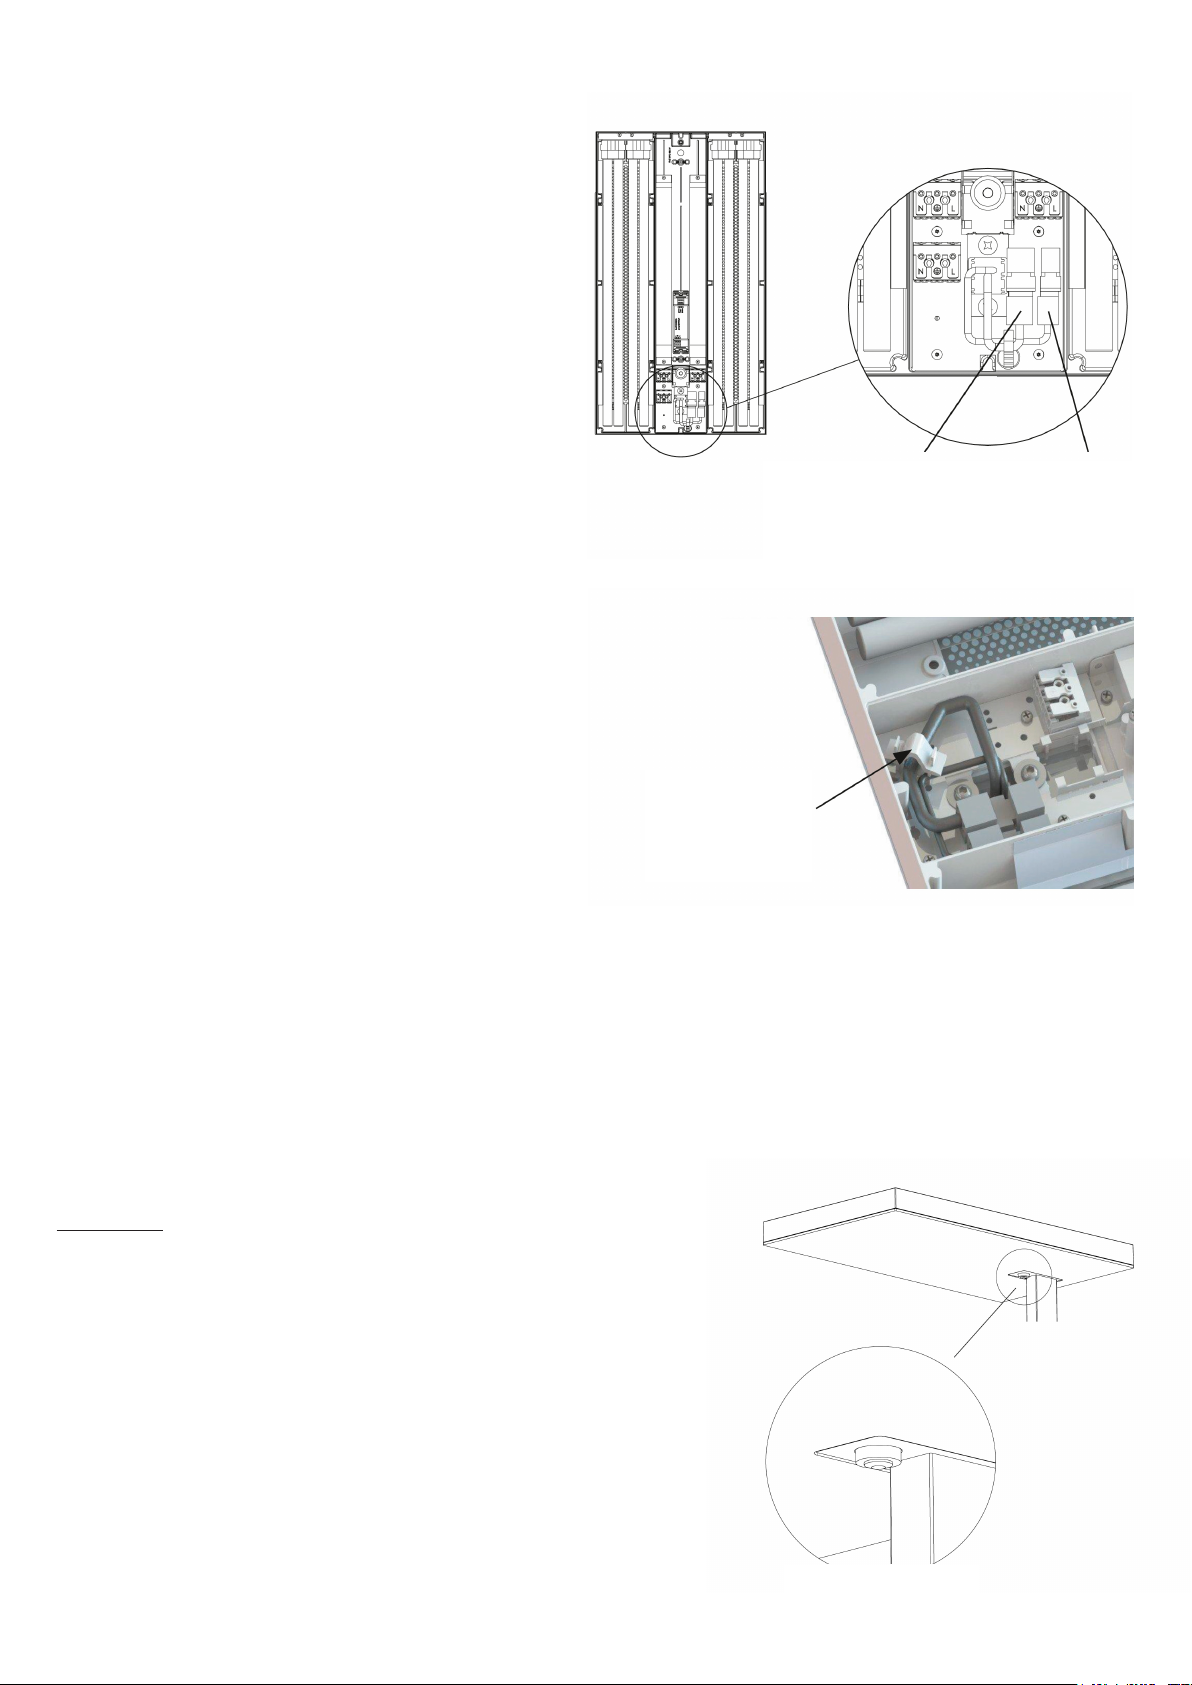
- Stecken Sie die Kabel in die Halterungen.
- Zuerst den 3-poligen Stecker und danach den 2-poli-
gen Stecker verbinden.
- WICHTIG: Montieren Sie die Zugentlastung (Abbil-
dung) am 3-Leiter-Kabel (führt zum 3 poligen Ste-
cker).
- Montieren Sie die Schutzabdeckung.
- ACHTUNG!
Sie sollten keine Stromversorgung herstellen, bevor
die Installation abgeschlossen ist. Sollte das externe
Stromkabel beschädigt sein, tauschen Sie es nicht
aus. Ein Ersatzlampenständer kann beim Hersteller
bestellt werden.
- Attach the cables to the luminaire.
- First connect the 3-pin connector and then the 2-pin
connector.
- IMPORTANT: Use the strain relief to the 3-conductor
cable
- Mount the lid back in place.
- The power should never be turned on before
the luminaire is completely assembled.
- ATTENTION!
The power should never be connected before the ins-
tallation is complete. The external cable must not be
changed. In case of cable damage, a new pole can be
ordered from the manufacturer.
- Insérez les câbles dans le lampadaire.
- Commencez par brancher le connecteur à 3 broches,
puis le connecteur à 2 broches.
- IMPORTANT: reliez le soulagement de traction
(image) au triple câble (qui est relié aux trois broches
du connecteur)
- Montez le capot de protection
- ATTENTION!
Ne rallumez pas l’alimentation en électricité tant que
l’installation n’est pas terminée. Si le cordon d‘ali-
mentation externe est endommagé, ne le remplacez
pas. Un support de lampe de rechange peut être com-
mandé auprès du fabricant.
Zugentlastung
Strain relief
Soulagement de
traction
3-poligen Stecker 2-poligen Stecker
3 parted contact 2 parted contact
Connecteur à 3 Connecteur à 2
broches broches
MPP-SEN
SmartDIM verfügt über einen Präsenz- und Tageslicht-Sensor. Die
Helligkeit wird durch das einfallende Tageslicht und die Anwesenheit
im Raum automatisch geregelt.
SmartDim is a presence/daylight detector for building into lumi-
naires. The luminaire has the same function as SMS, it also has a
daylight compensation, which regulates the lightlevel.
SmartDIM dispose d’un senseur de présence et de luminosité natu-
relle. L’éclairage se règle automatiquement en fonction de la lumière
du jour et de la présence de personnes dans la pièce.
MPP-SEN

4
Tradingzone AG I Allmendstrasse 2 I 8105 Regensdorf I 044 833 33 55 I [email protected] I 30.10.2019
TAGESLICHT- EINSTELLUNG
DAYLIGHT CONTROL
REGLAGE DE LA LUMIERE DU JOUR
Es sind 2 verschiedene Einstellungen
möglich. Zum Wechsel benützen Sie
den Service-Knopf auf der Lampen-
kopf-Unterseite neben dem Lichtsen-
sor.
Modus 1 (1x Blinken):
Einzelbüromodus.
Modus 2 (2x Blinken):
Grossraumbüromodus – PIR ist 15 Min
zeitverzögert.
Two different settins can be made
by pushing the service button. The
service button is located next to the
light-sensor on the bottom side of the
lamp-head.
mode 1 (1x ash):
cellular ofce.
mode 2 (2x ash:
ofce landscape mode – Timedelay on
PIR is 15 min.
Pour changer le type de réglage,
utilisez le bouton de service, qui se
trouve sur la face inférieure de la tête
lumineuse.
Mode 1 (cliquez 1x):
Mode bureau individuel.
Mode 2 (cliquez 2x):
mode open space - L’éclairage PIR est
retardé de 15 min.
Modus 1 / Mode 1 / Mode 1
Bewegungsmelder: Einzelbüro
Movement control: cellular ofce.
Senseur de mouvements: bureau individuel.
Modus 2 / Mode 2 / Mode 2
Bewegungsmelder, Modus 2: Grossraumbüro
Movement control Mode 2 ofce lands
Senseur de mouvements, mode 2: open space.
15 min
15 min 120 min
100 70 50 10
100 100 80 40


