Tramontina senseday User manual

1. Presentation 3. Important for your safety
Read before Installing
4. Hydraulic Installation
• This appliance must be installed by qualified persons.
• It is compulsory to turn off the circuit breaker
whenever this appliance is installed, serviced, or
cleaned.
• Never connect accessories or devices to this
appliance that are not recommended by this manual
or by the manufacturer.
• To avoid hazards, the supply cord of the appliance
and other electrical components should only be
replaced by the manufacturer or its Authorized
Technical Support. The user is only allowed to
replace the electric coil.
• This appliance can heat up water to a temperature
higher than that is adequate safe for use, which can
cause burns. Children, elderly people, sick people,
or people with a physical/mental disability must be
supervised when using the appliance. To do that,
special precautions should be taken to appropriately
regulate water temperature before and during use.
PREPARING
• For correct operation of the Senseday Shower, it is
recommended that the installation point be at least 1m
below the water tank and 2.1 meters above the floor
[pic.01].
• When the gap between the installed water tank and
the Senseday Shower is too large [in tower blocks, for
example], or when the supply comes directly from the
a public drinking water supply, please use the pressure
reducer included with the appliance [pic.02]. For pressure
above 80 kPa [8 m.c.a], please use reducer included with
appliance.
• Before attaching the Senseday Shower, let water run
through pipes for a few seconds to remove dirt or any
other residue.
• Attach the extension included with the product to the
wall-mounted connection.Attach the Senseday Shower
to the end of the extension.
• Apply thread seal tape to the Senseday Shower thread,
wrapping around the thread 3 to 4 times [pic.03].
• The connection thread embedded in the wall, should be
diameter of ½”. If you have not, use a reduction bush,
by also applying the tape to seal the thread.
•Attach the appliance manually. Do not use tools in order
to avoid damaging the item.
• Engage the extension cover in the shower body housing.
[pic. 02].
Tramontina’s Senseday Electric Shower
was developed under strict technical regulations for
increased safety, comfort, and ease of use.
Please read all assembly instructions and the
warranty before installing the product.
Keep this manual safe for future reference.
If you have any questions, please contact
2. Technical Specifications
MODEL 3 TEMPERATURES
4 400 W
Voltage Rating 110V ˜
127V ˜
220V ˜
230V ˜
Nominal
Wattage [W]
0 Off 0 0
1 Warm 2 850 2 850
2 Hot 4 400 4 400
Circuit Breaker or Fuse [A] 40 25
Minimum Wiring [mm²] 10 4
Maximum Distance [m]* 20 40
MODEL 3 TEMPERATURES
5 500 W
Voltage Rating 110V ˜
127V ˜
220V ˜
230V ˜
Nominal
Wattage [W]
0 Off 0 0
1 Warm 3 200 3 200
2 Hot 5 500 5 500
Circuit Breaker or Fuse [A] 50 32
Minimum Wiring [mm²] 10 4
Maximum Distance [m]* 27 32
Degree of Protection IP24
Operational
Pressure
Minimum 10 kPa [1 m.c.a.]
Maximum 400 kPa [40 m.c.a.]
Hydraulic Connection [Input] Thread - ½ BSP
THE RESISTIVITY OF WATER SUPPLIED TO THIS PRODUCT MUST NOT BE
LOWER THAN 1,300 OHMS . CM AT 22°C.
* FOR DISTANCES ABOVE THOSE INDICATED IN THIS TABLE USE LARGER
SECTION CONDUCTORS.
THIS PRODUCT IS COMPLIANT WITH THE
ELECTRIC SHOWERS STANDARD NBR 12483.
senseday
ILLUSTRATED INSTRUCTIONS MANUAL
MANUAL DE INSTRUCCIONES ILUSTRADO
ELECTRIC SHOWER 3 TEMPERATURES
DUCHA ELÉCTRICA 3 TEMPERATURAS
MI 055 e Rev. 02

2
5. Electrical Installation
• Before starting the electrical installation make sure the
power network tension [110V ˜/ 127V ˜ or
220V ˜ / 230V ˜] marked on the device is the same of the
power network.
•Make sure that the power line is exclusive and
connected to the switch board and the wire(s) and the
circuit breaker(s) are recommended for the device. [look
on the table of technical specifications].
• Make sure that the ground wire [green or green/yellow]
is connected directly to the wire or grounding bus of the
switch board.
• If the circut that feeds the device is Phase/Neutral
[110V ˜/ 127V ˜or 220V ˜ / 230V ˜ ] use only one circuit
breaker connected to the phase wire, if the circuit is
220V ˜/ 230V ˜Phase/Phase is one bipolar switch.
• Turn the selector of temperatures for the position “off”
[pic. 04].
• For your safety, electrical installation and earthing
grounding must be executed by qualified persons.
• The junction box or derivation must be located 15 cm
above the wall-mounted water outlet connection outlet.
• The earthing grounding system ensures your safety when
using domestic appliances.
Extension
Pressure
Reducer
Senseday
Shower
Extension
Pressure
Reducer
Senseday
Shower
03
02
01
Extension
Pressure
Reducer
Senseday
Shower
Extension
Pressure
Reducer
Senseday
Shower
IMPORTANT FOR YOUR SAFETY
To reduce risk of electric shocks, this ground
wire [green wire] in this appliance must be
connected to a groundingn earthing system,
in accordance with the instalattion norm.
WARNING
Before starting electrical installation,
turn off the mains switch or circuit
breaker where the Senseday Shower
is installed.
WARNING
05
04
Encaixar a capa
do Prolongador
no Alojamento
do Corpo da Ducha
Attach the Extension
cover to the Housing in
the Shower Body
6. Replacing the Electrical Coil
• Turn off the mains switch or circuit breaker and cut the
water supply.
• Loosen the top nut rotating it counterclockwise
[pic.08].
• Hold the electric coil box assemble tight with one hand
and support rubber diaphragm with fingers [pic.09].
• Pull up the entire electrical box assembly. Pull the
resistance assembly until you undock it [pic.10].
Before replacing the electrical coil,
always cut water supply and turn off
the mains switch or circuit breaker
where the appliance is installed to
reduce the risk of electric shock.
WARNING
10
Prolongador
Capa do
Prolongador
Redutor
de Pressão
Ducha
Sense Day
Prolongador
Capa do
Prolongador
Redutor
de Pressão
Ducha
Sense Day
Prolongador
Capa do
Prolongador
Redutor
de Pressão
Ducha
Sense Day
08 09
English
Prolongador
Capa do
Prolongador
Redutor
de Pressão
Ducha
Sense Day
• Use appropriate conector [in porcelain] to connect the
connecting cables of the Senseday Shower to the
feed wires of the power network.This conector is not
supplied with the device. [pic. 07].
• The junction box should be at a height of 2,25m from
the floor.
06
07
Prolongador
Capa do
Prolongador
Redutor
de Pressão
Ducha
Sense Day
Prolongador
Capa do
Prolongador
Redutor
de Pressão
Ducha
Sense Day
Never use plug and socket
in the installation [pic 06]
FOR YOUR SAFETY
WARNING

3
7. Operation
• After installing and before connecting the shower
to on the power grid, let water run until obtaining
reaching a normal flow. This procedure is extremely
important to prevent damage to the electrical coil
due to the lack of water in the heating chamber.
• Turn the mains switch or circuit breaker on again.
Adjust the temperature selector to the “hot” or
“warm” position. The appliance switches itself on
automatically when the faucet is on. Temperature
can be controlled through the tap, increasing or
reducing the water flow.
IMPORTANT
• For user’s safety and to extend the life of the
Senseday Shower, turn off the water before
changing temperature.
• Make sure that the new electric coil voltage
corresponds to the electrical installation voltage.
• Position the new Tramontina electrical coil on the
pins. Make sure they only fit in one position.
• Push the electrical coil down on the electrical box
pins, until the limiting pins touch the diaphragm disc.
• Position the diaphragm on the shower body
observing the position of the ground wire and
fittings.
• Make sure the electrical coil box is in place and the
“off” position is aligned with the central line on
the shower.
• Manually screw the top nut on, holding the shower
body. Make sure the top nut is firmly tightened.
• Turn on the water supply, Llet the water run for a
few minutes.
• Turn on the circuit breaker or mains switch.
• Select temperature and turn on the tap. Shower
should turn on automatically.
8. Troubleshooting
PROBLEM LIKELY CAUSE SOLUTION
Shower won’t
turn on
Temperature selector
is switched to “off”
position.
Set the selector to any
heating up position.
Low water pressure.
Check the minimum
height between the water
tank and the appliance.
Increase water flow.
There's no
water coming
out of the
Shower
The water supply is
off or there is air in
the pipes.
Turn on the water supply
and faucets related to the
system and let water run
until the air is removed,
with the appliance in the
“off” position.
The Shower
does not
heat up
Inadequate wiring.
Please contact a qualified
Professional to verify
whether the conductors
are in compliance with
the ones specified in this
manual.
Low electrical
tension.
Please contact a qualified
Professional to verify whether
the electrical tension is in
accordance with nominal
values 110V ˜/ 127V ˜or
220V
˜
/ 230V ˜ .
If it is, please contact your local
sales representative.
High water pressure/
flow.
Reduce water pressure/
flow by turning tap off or
adding a reducer.
The circuit
breaker is
unarmed
More than one appli-
ance switched on to
the shower circuit.
Provide an exclusive
electric circuit for the
shower.
The current of the
device is higher than
the rated current of
the circuit breaker.
Check that the wiring is
adequate, and if it is not
replace it with the circuit
breaker.
The circuit breaker
terminals are
warning up.
Retighten the terminals,
if the problem persists
change the circuit breaker
for another with the same
nominal value.
The Shower
heats up too
much
Low water pressure/
flow.
Increase water pressure/
flow by turning tap on or
removing the reducer.
Temperature selector
is switched to “hot”
position.
Adjust the Selector to a
pleasant temperature.
• Assemble the hand-held shower by attaching it to
the hose. To use it, pull to turn it on and push to
shut it off.
• To clean the appliance, use only a damp cloth.
Never use abrasive products.
• Before proceeding to cleaning or maintenance
work, shut the power off through the circuit
breaker.
• For your safety, electrical installation and earthing
grouding for this product must be executed by
qualified persons.
• Do not connect any accessories not produced or
authorized by Tramontina to this appliance.
• Any maintenance work needed must be executed
by authorized representatives.
• If the electrical coil is burnt, it must be replaced by
a new one of the same make and model. Only use
Tramontina original parts.
• Do not forget to shut the power off before
replacing the electrical coil.
• To avoid electrical hazards, the electric power cord,
as well as the other components of the appliance,
should only be replaced by the technical assistance
service.
English

4
9. Warranty
• It is essential to present the Receipt of Purchase of
the product to access the warranty.
• Please refer to our website for Tramontina
Authorized Technical Support:
www.tramontina.com
• Tramontina warrants this product against
manufacturing faults for 12 months, including legal
warranty, from the date on the Receipt, except the
electrical coil, which has a legal warranty of 3 months.
• This warranty encompasses exclusively
encompasses the replacement and/or service only
of the parts that are proven to have manufacturing
or material defects.
• Faults resulting from incorrect and/or inadequate
installation are not covered by the warranty.
• The warranty will be automatically void if the
appliance is damaged as a result of accidents,
inadequate electric tension subject to excessive
fluctuations, or if there is evidence of tampering,
adjustment or service by non-authorized persons.
• To prevent electric shocks, the supply cord, as well
as the other parts of the appliance, must only be
replaced by Authorized Technical Support staff.
• Tramontina will not be liable for damages caused
to the appliance and/or user as a result of non-
compliance with the Safety Standards contained in
this manual.
• Tramontina is committed to offering the warranty
services mentioned above, being exempt, however,
of extra liability such as: risks and expenses with
transportation, insurance and/or packaging.
• The warranty does not cover expenses incurreding
from installation and disassembling.
• If the user requires a visit by a Tramontina
Technical Support Technician to their residence,
a fee will incur atto the user’s expense.
1. Presentación
La Ducha Eléctrica Senseday Tramontina se
desarrolló de acuerdo a rigurosos estándares técnicos
para mayor seguridad, comodidad y facilidad de
utilización. Lea atentamente todas las instrucciones
de instalación y garantía antes de instalar el producto.
Guarde este manual para futuras referencias. En caso
2. Características Técnicas
MODELO 3 TEMPERATURAS
4 400 W
Tensión Nominal
110V ˜
127V ˜
220V ˜
230V ˜
Potência
Nominal [W]
0 Apagado 0 0
1 Tibio 2 850 2 850
2 Caliente 4 400 4 400
Disyuntor o fusible [A] 40 25
Cable mínimo [mm²] 10 4
Distancia Máxima [m]* 20 40
MODELO 3 TEMPERATURAS
5 500 W
Tensión Nominal
110V ˜
127V ˜
220V ˜
230V ˜
Potencia
Nominal [W]
0 Apagado 0 0
1 Tibio 3 200 3 200
2 Caliente 5 500 5 500
Disyuntor o fusible [A] 50 32
Cable mínimo [mm²] 10 4
Distancia Máxima [m]* 27 32
Grado de protección IP24
Presión de
funcionamiento
Mínima 10 kPa [1 m.c.a.]
Máxima 400 kPa [40 m.c.a.]
Conexión hidráulica [Entrada] Rosca - ½ BSP
LA RESISTIVIDAD DEL ÁGUA SUMINISTRADA A ESTE PRODUTO NO
DEBE SER INFERIOR A 1.300 OHMS . CM A 22°C.
* PARA DISTANCIAS SUPERIORES A LAS INDICADAS EN ESTA TABLA,
UTILIZAR CONDUCTOR DE SECCIÓN MAYOR.
3. Importante para su seguridad.
Leer antes de instalar
• La instalación de este aparato la debe efectuar una
persona calificada para ello.
• Es obligatorio apagar el disyuntor siempre que
efectúe la instalación, manutención y limpieza de
este aparato.
• Nunca conectar a este aparato accesorios o
dispositivos no indicados en este manual o por el
fabricante.
• Para evitar riesgos, el cable de alimentación del
aparato y los demás componentes los debe cambiar
el fabricante o la Asistencia Técnica Autorizada.
El usuario solamente podrá cambiar la resistencia
eléctrica.
EspañolEnglish
ESTE PRODUCTO ESTÁ FABRICADO DEACUERDO A LA NORMA DE
ESTANDARIZACIÓN DE DUCHAS ELÉCTRICAS NBR 12483.
ESTE PRODUCTO CUMPLE CON LA NORMA NMX-J-521/1-ANCE-2012.

5
• Este aparato puede calentar agua a una
temperatura superior a la adecuada para uso
y, por lo tanto, puede provocar quemaduras.
Los niños, personas mayores de edad o
físicamente/intelectualmente debilitadas deben
ser supervisadas cuando usen el aparato
Para eso, antes y durante el uso, se deben
tomar precauciones especiales para regular
adecuadamente la temperatura del agua.
4. Instalación Hidráulica
Extension
Pressure
Reducer
Senseday
Shower
Extension
Pressure
Reducer
Senseday
Shower
0504
Extension
Pressure
Reducer
Senseday
Shower
03
Encajar la cubierta de
la extensión en el
alojamiento del
cuerpo de la ducha.
5. Instalación Eléctrica
• Antes de iniciar la instalación eléctrica asegurese
de que el valor de tensión [110V ˜/ 127V ˜ó
220V ˜ / 230V ˜] marcada en el aparato es la
misma de la red eléctrica.
•Asegurese de que la línea de alimentación es
exclusiva y ligada al cuadro de distribuición y los
hilos y el termomagnético son los recomendados
para el aparato. [ver en la tabla de características
técnicas].
• Asegurese de que el cable a tierra [verde o
verde/amarillo] está ligado diretamente al hilo
o barramiento de aterramiento del cuadro de
distribuición.
• Si el circuito que alimenta el aparato es Fase/
Neutro [110V ˜/ 127V ˜ ó 220V ˜ / 230V ˜ ] utilize
solamente un termomagnético ligado al hilo
Fase, si el conductor es 220V ˜/ 230V ˜en un
termomagnético bipolar.
• Girar el selector de temperaturas para la posición
“apagado” [fig. 04].
• Para su seguridad, la instalación eléctrica y del
sistema de aterramiento debe ser ejecutada por
personas calificadas.
• La caja de ligación o de derivación debe situarse a
15 centímetros arriba de la conexión de salida de
água en la pared.
• El sistema de aterramiento garantiza la
seguridad durante la utilización de aparatos
electrodomésticos.
Antes de iniciar la instalación eléctrica,
apagar la llave general o disyuntor del
circuito eléctrico donde esté instalada
la Ducha Senseday.
ATENCIÓN
Español
Extensión
Reductor
de Presión
Ducha
Senseday
02
01
Encaixar a capa
do Prolongador
no Alojamento
do Corpo da Ducha
Prolongador
Capa do
Prolongador
Redutor
de Pressão
Ducha
Sense Day
PREPARACIÓN
• Para el buen funcionamiento de la Ducha
Senseday, se recomienda que el punto de
instalación esté, como mínimo, 1 metro abajo del
reservorio de agua y a 2,1 metros del piso [fig.01].
• Utilizar el reductor de pressión que acompaña el
aparato [fig.02], cuando la presion és superior a
80 Kpa (8 m.c.a.) o cuando el desnível entre el
depósito de agua instalada y la Ducha Senseday
sea muy grande [edifícios, por ejemplo] o cuando
la alimentación sea directamente de la red de
abastecimiento público.
• Antes de enroscar la Ducha Senseday, dejar correr
agua por la cañería durante algunos segundos para
retirar residuos.
• Enroscar la extensión que viene con el producto
en la conexión embutida en la pared. Enroscar la
Ducha Senseday a la salida de la extensión.
• Aplicar 3 ó 4 vueltas de cinta sella-roscas en la rosca
de la Ducha Senseday, en el sentido de la rosca
[fig. 03].
• La rosca de conexión empotrada en la pared debe
tener diâmetro de ½ plugadas. Caso no tenga, usar
una bucha de reducción, aplicando también la cinta
de vedar rosca.
• Rosquear el aparato con las próprias manos. No
utilizar herramientas para no dañalas.
• Encajar la tapa del prolongador en el alojamento del
cuerpo de la ducha. [fig. 02]
IMPORTANTE PARA SU SEGURIDAD
Para evitar el riesgo de descarga eléctrica,
el cable de tierra [cable verde] de este
aparato se debe conectar a un sistema de
conexión a tierra de acuerdo con la norma
de instalación.
ATENCIÓN

6
7. Funcionamiento
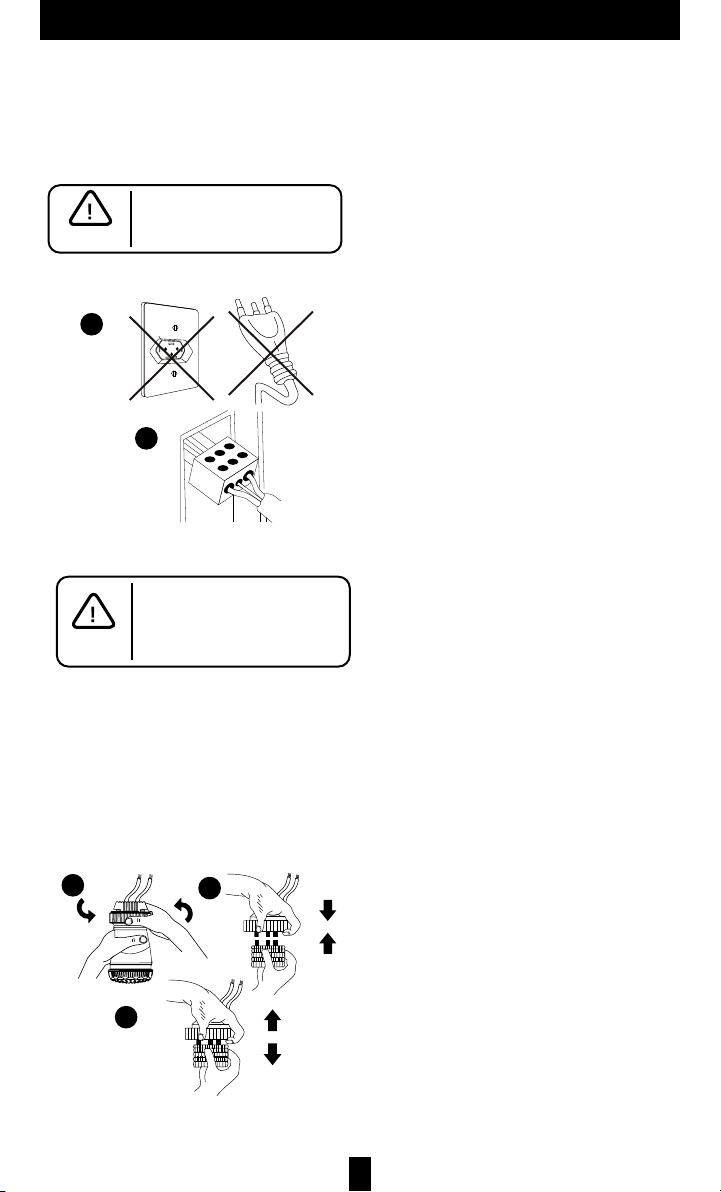
• Después de la instalación y antes de conectar
la ducha a la red eléctrica, abrir el grifo hasta
que salga un chorro de agua normal. Ese
procedimiento es importantísimo para evitar que
se queme la resistencia por falta de agua en la
cámara de calentamiento.
• Volver a prender la llave general o disyuntor.
Poner la palanca de temperatura en la posición
“caliente” o “tibia”. El aparato se prende
automáticamente al abrirse el grifo. La
temperatura se puede controlar con el grifo,
aumentando o reduciendo el chorro de agua.
IMPORTANTE
• Los niños deben supervisarse para asegurar que
ellos no empleen los aparatos como Juguete.
• Para más seguridad del usuario y más durabilidad
de la Ducha Senseday, cierre el grifo antes de
cambiar de temperatura.
• Montar la ducha manual introduciéndola en la
manguera. Para utilizarla, tirar para abrir y empujar
para cerrar.
• Para limpiar el aparato, utilizar solamente un
paño ligeramente húmedo. Nunca use productos
abrasivos.
06
07
Prolongador
Capa do
Prolongador
Redutor
de Pressão
Ducha
Sense Day
Prolongador
Capa do
Prolongador
Redutor
de Pressão
Ducha
Sense Day
6. Cambio de la Resistencia
• Apagar la llave o disyuntor que alimenta el circuito y
cerrar el grifo de agua.
• Aflojar la sobretuerca girándola hacia la izquierda
[fig.08].
• Sujetar el conjunto de la caja eléctrica firmemente con
una de las manos y apoyarse con los dedos sobre el
diafragma de goma [fig. 09].
• Tirar hacia arriba todo el conjunto de la caja eléctrica.
Con la otra mano, tirar el conjunto de la resistencia
hasta desencajarlo [fig. 10].
Antes de cambiar la resistencia, siempre
cierre el grifo de agua y desconecte la
llave general o disyuntor del circuito
eléctrico en el que esté instalado el
aparato, para evitar riesgos de descargas.
ATENCIÓN
10
Prolongador
Capa do
Prolongador
Redutor
de Pressão
Ducha
Sense Day
Prolongador
Capa do
Prolongador
Redutor
de Pressão
Ducha
Sense Day
Prolongador
Capa do
Prolongador
Redutor
de Pressão
Ducha
Sense Day
08 09
• Pujar para arriba todo el conjunto de la caja eléctrica.
Con la otra mano, pujar el conjunto resistencia hasta
desacoplarlo.
• Asegurese de que la nueva resistencia es de la misma
potencia y voltaje de la instalación eléctrica.
• Ubicar la nueva resistencia Tramontina sobre los
apoyos.Verificar que solamente se encajan en una
sola posición.
• Apretar la resistencia sobre los apoyos de la caja
eléctrica hasta que los limitadores se recuesten al
disco del diafragma.
• Ubicar el diafragma sobre el cuerro de la ducha,
observando el posicionamento del hilo a terra y de los
encajes.
• Enroscarla con las manos sobre la sobretuerca,
segurando el cuerpo del produto.Asegurarse de que la
tuerca esté totalmente enroscada.
• Abrir el grifo, dejar correr agua durante alguns
minutos.
• Prender el disyuntor o la llave general.
• Elegir la temperatura y abrir el grifo. La ducha se dede
prender automaticamente.
• Antes de proceder a la limpieza o manutención,
apagar la corriente eléctrica con el disyuntor.
• Para su seguridad, la instalación eléctrica y del
sistema de conexión a tierra la deben ejecutar
personas calificadas.
• No conectar a este aparato ningún accesorio que
no sea fabricado o autorizado por Tramontina.
• Los servicios de manutención que puedan
ser necesarios, deben ser ejecutados por
representantes autorizados.
• Si se quema la resistencia eléctrica, se debe
cambiar por otra nueva de la misma marca y
modelo. Utilizar solamente repuestos originales
Tramontina. No olvidarse que el cambio de la
resistencia sólo se puede hacer con la corriente
eléctrica desconectada.
Español
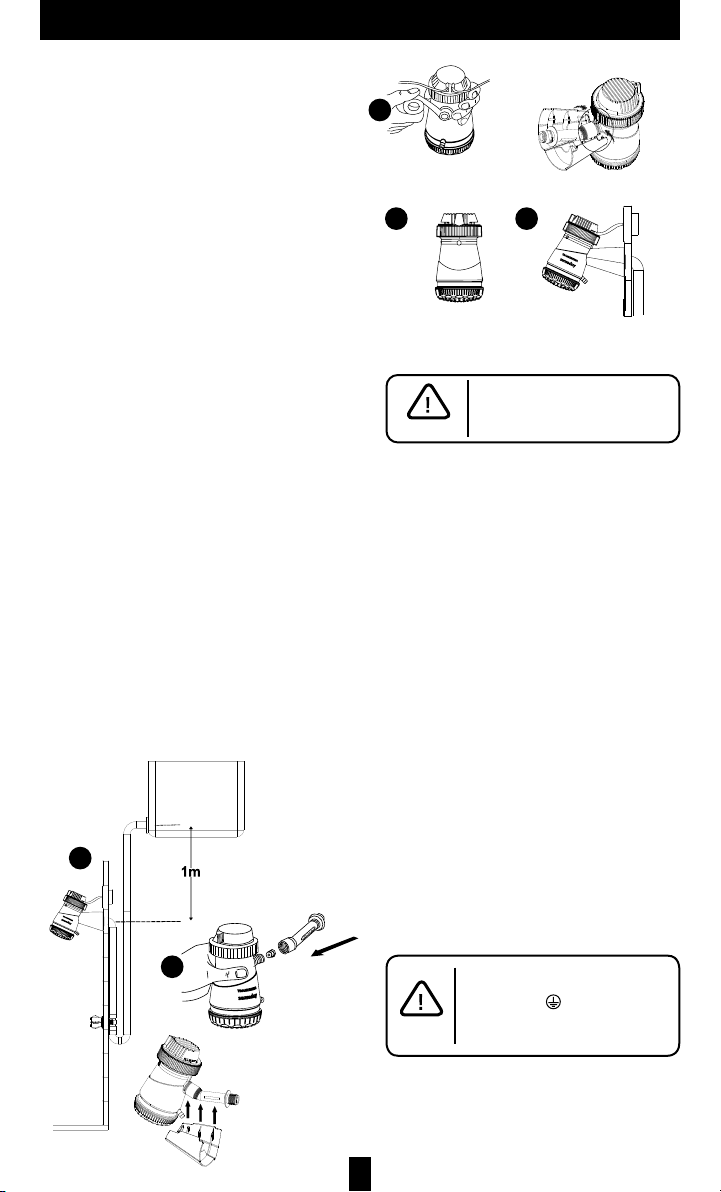
• Utilizar conector apropriado [en porcelana] para
conectar los cables de la ligación de la Ducha
Senseday a los hilos de alimentación de la red
eléctrica. Este conector no acompaña el aparato
[fig.07].
• La caja de ligación deberá estar a una altura de
2,25m del piso.
Nunca utilize plug y tomacorri-
ente en la instalación. [fig. 06]
PARA SU SEGURIDAD
ATENCIÓN

7
PROBLEMA CAUSA
PROBABLE SOLUCIÓN
La ducha no
prende
El selector de tem-
peratura está en la
posición “apagado”.
Poner el botón selector
en cualquier posición de
calentamiento.
Poca presión de
agua.
Verificar la altura mínima
entre el reservorio de agua
y el aparato.
Abrir más el grifo para
que salga más agua.
No sale agua
de la ducha
El grifo está cerrado
o hay aire en la
cañería.
Abrir los registros y grifos
relativos al sistema hasta
sacar el aire, con el
aparato “apagado” .
La Ducha
calienta
poco
Cable inadecuado.
Consultar un profesional
calificado para verificar si
los conductores están de
acuerdo a lo especificado
en este manual.
Baja tensión
eléctrica.
Consultar un profesional
calificado para verificar si
la tensión eléctrica está
de acuerdo a los valores
nominales de 110V~ /
127V ~ ó 220V~ / 230V ~.
En caso positivo, comu-
nicárselo a la concesionar-
ia de la región.
Presión / flujo de
agua elevada.
Reducir la presión/caudal
de agua con el registro o
instalar el reductor.
El disyuntor
está
desarmado
Más de un aparato
ligado al circuito de
la ducha.
Providenciar un circuito
eléctrico exclusivo para
la ducha.
La corriente del
aparato es mayor
que la nominal del
disyuntor.
Verificar si la fiacción está
adecuada y caso no estea,
cambiarla juntamente con
el disyuntor.
Los terminales del
disyuntor están
calientando.
Reapretar los terminales,
caso el problema continue,
cambiar el disyuntor por
otro con el mismo valor
nominal.
La Ducha
calienta
mucho
Poca presión / flujo
de agua.
Aumentar la presión/cau-
dal de agua con el registro
o sacar el reductor.
El selector de tem-
peratura está en la
posición “caliente”.
Regular el botón selector
de manera que quede
en una temperatura
agradable.
9. Certificado de Garantía
• Presentar la Boleta de Compra del producto es
fundamental para tener derecho a la garantía.
• Asistencia Técnica Autorizada Tramontina,
consulte el sitio www.tramontina.com
• Tramontina garantiza este producto contra
eventuales defectos de fábrica por un plazo de
12 meses, incluyendo la garantía legal, a partir
de la fecha de la Boleta de Compra, excepto la
resistencia, que tiene garantía legal de 3 meses.
• Esta garantía abarca, exclusivamente, el cambio
y/o reparación, solamente de las piezas que
comprobadamente presenten defectos de fábrica o
de material.
• Defectos causados por instalación incorrecta y/o
inadecuada no están cubiertos por la garantía.
• La garantía se cancelará automáticamente si el
aparato sufre daños provocados por accidentes,
uso de tensión eléctrica inadecuada y sujeta
a fluctuaciones excesivas o si tiene marcas de
violación y fue ajustado reparado por persona no
autorizada.
• Tramontina no se puede responsabilizar por daños
causados al aparato y/o al usuario en consecuencia
de falta de cumplimiento de las Normas de
Seguridad que están en este manual.
• Tramontina se obliga a prestar los servicios de
garantía anteriormente mencionados, pero estando
exenta de responsabilidades extras, tales como:
riesgos y gastos de transporte, de seguro y/o de
embalaje.
• La garantía no cubre gastos de instalación y
desinstalación.
• Si el usuario solicita la visita de un Técnico de
Servicio de Asistencia Técnica de Tramontina
en su domicilio, se cobrará la tasa de visita que el
propio usuario debe abonar.
8.Eventuales Problemas
y Soluciones
Español
• Para evitar riesgos eléctricos, el cordón de
alimentación eléctrica, bién como los demás
componentes del aparato, deben ser substituidos
solamente por el servicio de asistencia técnica.

senseday
Table of contents
Languages:
Popular Bathroom Fixture manuals by other brands

HappyOrNot
HappyOrNot Smiley Wall Assembly guide

Acorn
Acorn Terrazzo-Ware installation instructions

Kohler
Kohler RAIN DUET 15344T installation instructions

Bharat Photon
Bharat Photon BP-U612 Installation & operation manual

Helvex
Helvex PREMIER UH-3005-WOA installation guide

noken
noken SQUARE 100259027 manual

Roca
Roca SENTRONIC A890092200 installation instructions

Fleurco
Fleurco SH001 instruction manual

Stella
Stella ISOMIX IS3293 manual

Ponte Giulio
Ponte Giulio G41JCS09 Instructions for installation

Spectrum Brands
Spectrum Brands Pfister Kenzo 016-DF0 Quick installation guide

Hans Grohe
Hans Grohe Raindance Select E 120 26620000 Assembly instructions