3 4
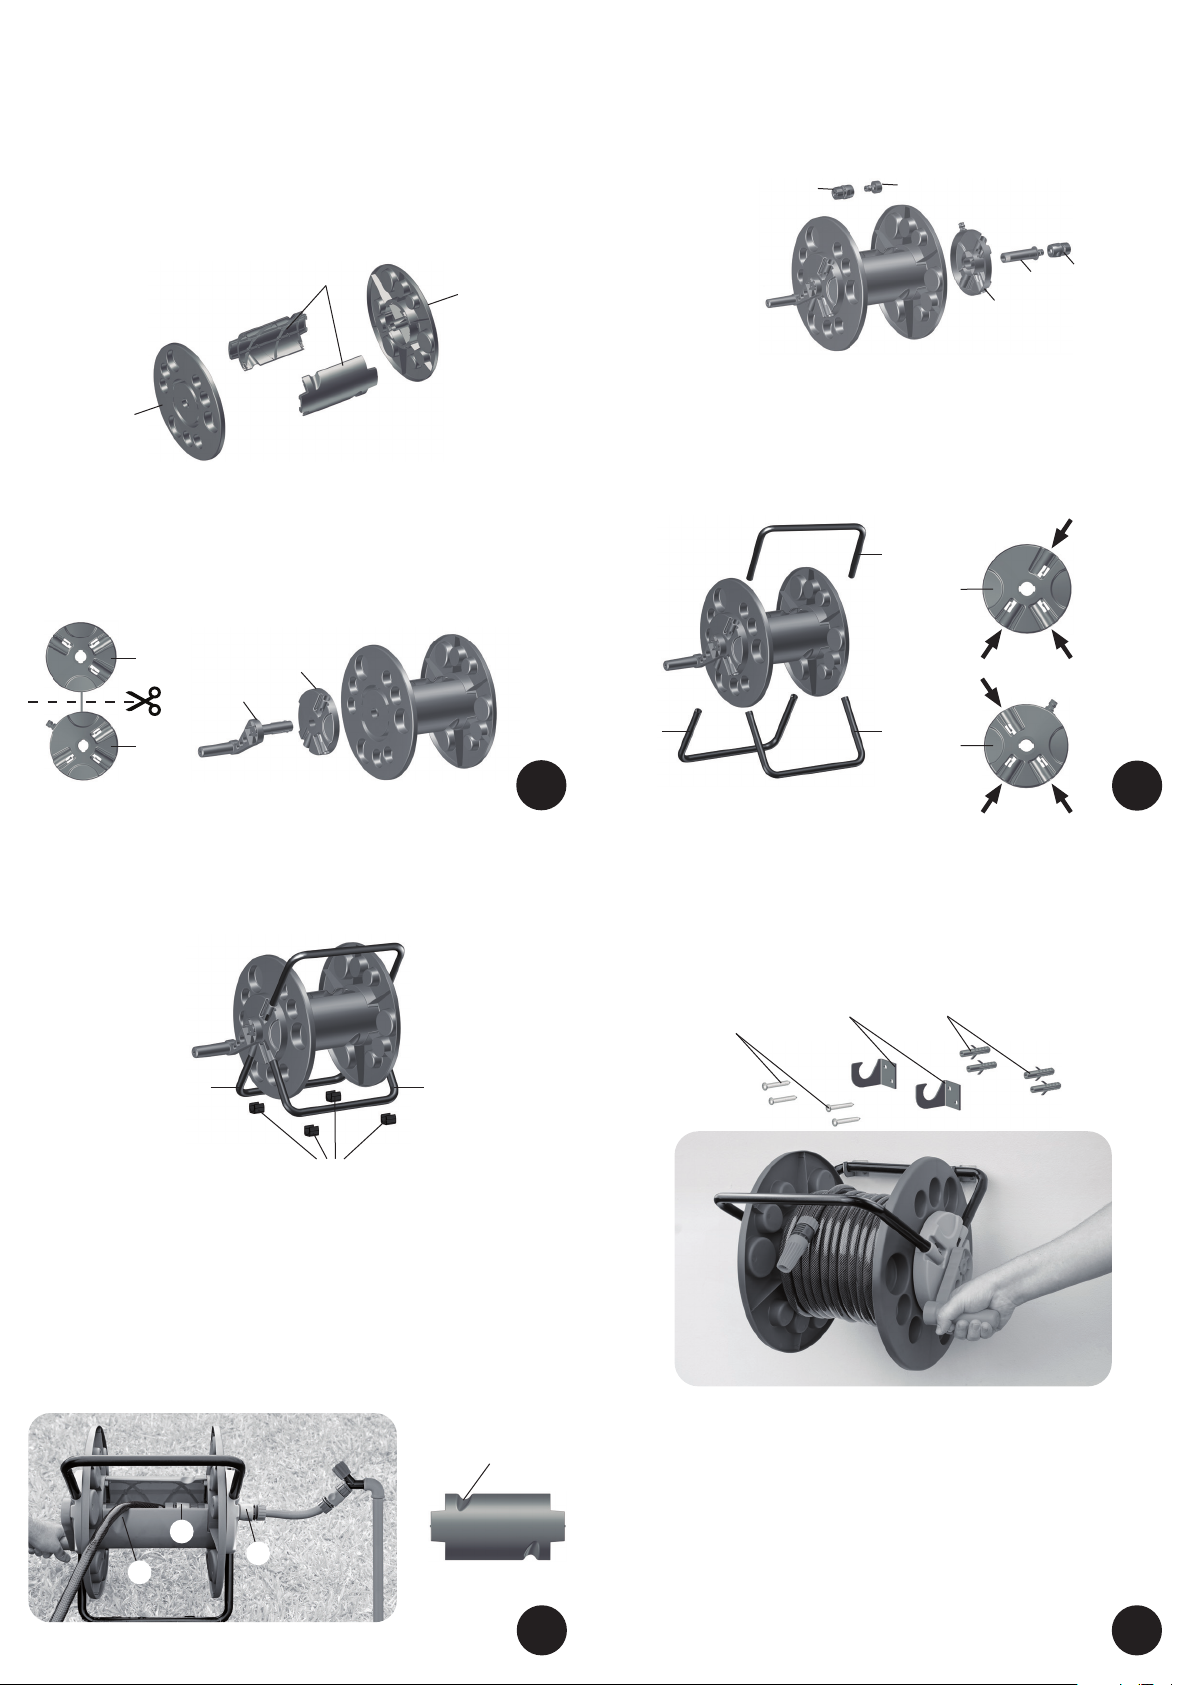
1. Inicie a montagem da estrutura do enrolador, encaixando os espaçadores (2) em um dos
discos (3), e em seguida encaixe o outro disco (3), resultando em um carretel (encaixar até
ouvir o click).
1. Start assembling the hose reel frame by fitting the spacer pieces (2) into one of the discs (3) followed by the other
disc (3), resulting in a reel unit (be sure you hear them clicking into place).
1. Comienza el montaje de la estructura del enrollador, encajando los espaciadores (2) en uno de los discos (3) y,
enseguida, encaja el otro disco (3), formando el carretel (encajarlo hasta que se escuche un clic).
2. Separe o mancal direito (4) e o mancal esquerdo (5), cortando a fita que os une [Fig. 02].
Encaixe a manivela (6) no mancal esquerdo (5), e monte este conjunto no carretel [Fig. 03]
(encaixar até ouvir o click).
2. Separate the right bearing (4) and left bearing (5) by cutting the tape, as shown on [Fig 02]. Attach the crank (6) to
the left bearing (5), and then connect this assembly to the reel [Fig. 03]. (Be sure you hear them clicking into place).
2. Separa el mancal derecho (4) y el mancal izquierdo (5), cortando la cinta que los une [Fig. 02]. Encaja la manivela (6)
en el mancal izquierdo (5), y monta el conjunto en el carretel [Fig. 03] (encajarlo hasta que se escuche un clic).
3. No outro lado encaixe o eixo (7) no mancal direito (4) e o mesmo conjunto encaixe no
carretel [Fig. 04]. Para realizar a fixação do conjunto, rosqueie o adaptador (9) no eixo (7). Em
seguida acople os engates rápidos (8) nas extremidades do adaptador (9) e do eixo (7).
3. On the other side, place the axle (7) into the right bearing (4) and then attach this assembly to the reel [Fig. 04]. To
secure the assembly, screw the adapter (9) onto the axle (7). Then attach the quick connectors (8) to the ends of the
adapter (9) and the axle (7).
3. En el otro lado, encaja el eje (7) en el mancal derecho (4) y el conjunto en el carretel [Fig. 04]. Para fijar el conjunto, enrosca
el adaptador (9) en el eje (7). Enseguida, conecta los acoples rápidos (8) en las extremidades del adaptador (9) y del eje (7).
6. A mangueira que tem origem em uma fonte de água (torneira, por exemplo) deve ser
conectada no engate rápido externo (8) [Fig. 07]. A outra mangueira deve ser conectada no
engate rápido interno (8) [Fig. 07]. A mesma deve ser enrolada sobre o carretel, iniciando o
encaixe no relevo (A) do espaçador, que fica no lado oposto do início.
6. The hose that starts at a water supply (tap, for example) should be connected to the external quick connector (8) [Fig. 07].
The other hose should be connected to the internal quick connector (8) [Fig. 07]. It should be wound around the spool, starting
by fitting it into the notch (A) in the spacer, which is on the opposite side from the start.
6. La manguera que se origina en una fuente de agua (grifo, por ejemplo) debe conectarse al acople rápido externo (8) [Fig. 07].
La otra manguera debe conectarse al acople rápido interno (8) [Fig.07]. Se la debe enrollar sobre el carrete, iniciando el encaje en
el relieve (A) del espaciador que se encuentra en el lado opuesto del inicio.
7. Se optar por fazer a fixação do enrolador na parede,
utilize as buchas plásticas (12), os
suportes (10) e os parafusos (11)
. Após isso é só pendurar o enrolador, como mostra a Fig. 08.
7. If choosing to wall mount the hose reel, use the plastic bushings (12), the hooks (10) and the screws (11). After that,
just hang the hose reel as shown in Fig. 08.
7. Si elige fijar el enrollador a la pared, use tacos plásticos (12), los soportes (10) y los tornillos (11); después, basta
colgar el enrollador, como muestra la Fig. 08.
11 10 12
Não acompanha mangueira e esguicho.
Hose and sprayer are not included.
No se incluye la manguera y la boquilla.
PROCEDIMENTO PARA MONTAGEM DO
ENROLADOR DE MANGUEIRA
ASSEMBLING PROCEDURE OF THE HOSE REEL
PROCEDIMIENTO PARA EL MONTAJE DEL ENROLLADOR DE MANGUERA
6
5
4
5
Fig. 02 Fig. 03
98
Fig. 04
4
7
8
3
23
Fig. 01
4. Encaixe os braços (1) nas posições indicadas no mancal direito (4) e no mancal esquerdo
(5). Os braços (1) devem ser posicionados de forma que os furos das extremidades do tubo
encaixem nas travas dos mancais.
4. Fit the arms (1) into positions as shown on right bearing (4) and left bearing (5).Arms (1) must be placed so that the
holes on the tube ends fit into the bearings stops.
4. Encajar los brazos (1) en las posiciones indicadas en el mancal derecho (4) y el mancal izquierdo (5). Los brazos
(1) debem ubicarse de forma que los agujeros de las extremidades del tubo se encajen en las trabas del los cojinetes.
1 1
1
5
4
2
5. Para finalizar, encaixe os protetores plásticos (13) nos braços inferiores (1).
5. Finish by fitting the plastic protectors (13) on the lower arms (1).
5. Para finalizar, encaje los protectores de plástico (13) en los brazos inferiores (1).
Fig. 05
A
Fig. 08
9
Fig. 07
A
88
1
Fig. 06
13
11


