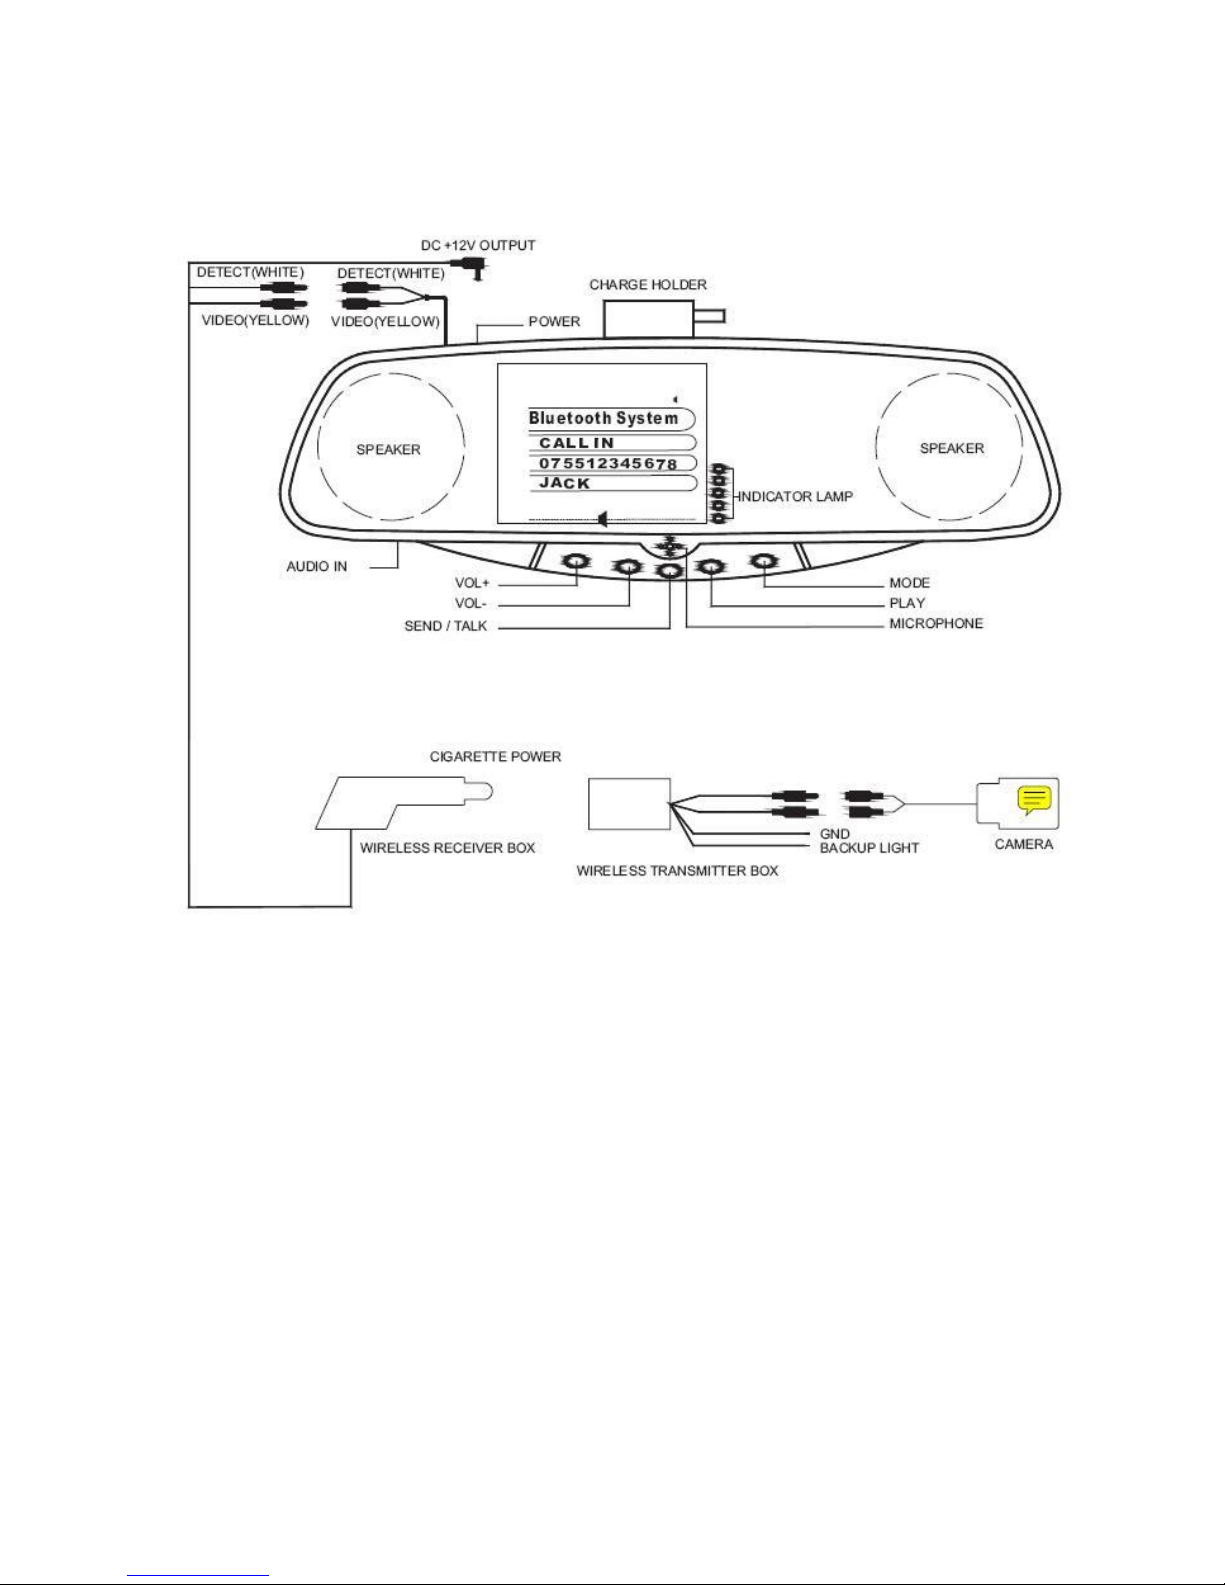
Trebs CC-120 User manual

BLUETOOTH User manual 3.0
for model CC-120

CONTENTS
WELCOME & DRIVE SAFELY --------------------------------------------------------2
ILLUSTRATION: Figure 1 -------------------------------------------------------------3
INTRODUCTION ---------------------------------------------------------------------4\5
INSTALLATION -------------------------------------------------------------------------6
POWER ON / OFF & PAIRING -----------------------------------------------------7\8
VOICE DIAL ------------------------------------------------------------------------------9
REDIALLING THE LAST DIALED NUMBER --------------------------------------10
CALL ANSWER AND CALL HANG UP ---------------------------------------------11
CALL REJECT -------------------------------------------------------------------------12
AUDIO TRANSFER--------------------------------------------------------------------13
VOLUME CONTROL ------------------------------------------------------------------13
MUTE CONTROL ----------------------------------------------------------------------13
ANSWER MODE SET -----------------------------------------------------------------13
SELECT RING TONE------------------------------------------------------------------13
BLUETOOTH AV DEVICE OPERATION -------------------------------------------14
SWITCH AUDIO OUTPUT MODE AND PICTURE ADJUSTMENT----------16
FM HEADSET USE ------------------------------------------------------17
To Set Audio On and Off---------------------------------------------------------------18
To Resume Factory Default Mode---------------------------------------------------18
WIRELESS CAMERA SYSTEM-------------------18
PHONE BOOK--------------------------------------------------------------------------19
SELECT LAST 10 CALLS DIAL-BACK FROM BLUETOOTH MIRROR-------19
Frequently asked questions----------------------------------------------------------21
SPECIFICATION-----------------------------------------------------------------------21
1

Welcome
Thank you for the purchase of this Bluetooth Handsfree
Car Kit. For the sake of making full use of the functions of
Bluetooth Car Kit, please read the user manual carefully in
advance.
Drive safely
It
is
dangerous
to
use
cellphone
when
driving
a
car.
It
will
increase
the
possibility
of
accident.
Please
reduce
conversation
time
by
mobile
as
possible
as
you
can
while
driving.
It
is
good
for
you
not
to
do
any
record
or
read.
You'
d
better
observe
the
surroundings
before
using
the
mobile
first.
When
it's
necessary
(if
the
weather
is
bad;
there
is
traffic
jam;
there
are
children
in
the
car
or
some-
thing
wrong
with
the
car),
you
should
leave
the
road
and
stop
the
car
before
dialing
or
receiving
a
call.

ILLUSTRATION: Figure 1
3

1. INTRODUCTION
The
Bluetooth
handsfree
car
kit
mirror
compose
of
the
parts
shown
as
Figure
1
1.1
1.1 MODE selector –Press this button to cycle through audio
output –transmission frequency –monitor setup. Press and hold
this button for 1.5 seconds to access the FM CHANNEL menu. You
can set the frequency. Press and hold to cycle through the
transmission frequencies. 7 settings are available.
1.2
Function
button
(PLAY)--
1.2 During active call the sound
mutes if pause or stop mode is selected on a Bluetooth AV device.
Press
and
hold
the
button
for
3
seconds
to
switch
to
video
mode.
1.3 Multi-function button(TALK)-- 1.3 Turn mirror on/off,
answering a call, hanging up a call, voice dialing, last number
redialing, rejecting a call
1.4 Volume (VOL+/VOL-) –Set volume, select ring tone, track
skip +/- if Bluetooth-compatible audio device plays.
1.5 Power connector (PWR) –DC +12V input.
1.6 Audio connector (AUDIO)--Connect to audio source,
such as MP3, MP4, or CD player. While handsfree system is
vacant (No call or Bluetooth AV activities),press “PLAY” key
twice to open audio input, “MEDIA PLAY” will be displayed
on mirror and the mirror can work as an stereo
sound box or FM audio adapter(in FM mode).
1.7 3.5 inch TFT display--Call ID display, Camera display,
Video in display
1.8 Speaker--Built-in dual channel stereo loud-speaker.
1.9 Microphone--Built-in microphone.
1.10 Indicator lamp--State indicator lamp.

2.
INSTALLATION
Easy
installation,
step
as
following:
2.1
Hook
bottom-stator
of
the
mirror
on
original
rearview mirror
bottom
edge.
Ensure
perpendicular
bisector
of
the
mirror
is
congruent
with
perpendicular
bisector
of
original
rearview
mirror.
Pull
up-stator
of
the
mirror
until
it
is
fix
on
original
rearview
mirror
(up
and
bottom
stator
will
adjust
by
spring).
Then
release
hand.
2.2
Check
if
the
mirror
has
been
firmly
clipped
to
the
original
review
mirror,
the
congruence
of
the
mirror
compare
to
original
rearview
mirror,
and
adjust
accordingly.
2.3
If
there
is
any
loose,
repeat
above
steps.
2.4
Plug
the
power
adapter
into
the
cigarette
socket

3. Turn mirror ON / OFF
Press multi-function button(TALK) and hold for 1.5 seconds,
until “POWER ON”. T h e m i r r o r s o u n d s a b r i e f b e e p t o n e ,
then release it. The device is turned on. Once power on
the device will auto connect the latest used cellphone, if never
paired with any cellphone yet, the device will enter pairing state.
Press multi-function (TALK) key and hold for more than
5seconds. Until “POWER OFF” is displayed on mirror.
The mirror sounds a brief beep tone. The device is turned off.
4. PAIRING
“Pair” means the handsfree system and mobile phone
authenticate each other and store the authentication
information. Only paired devices can establish link and
audio connection.

STEP
STATE/RESULT
1.
In
power
off
state,
press
and hold
TALK
button
for
more
than
5 seconds
until
Blue
LED
and
red LED
flash
alternately
to
enter pairing
state.
Blue LED and red LED will flash
alternately, ”PAIRON” will be
displayed on mirror.
2.
Select ‘Search for Bluetooth devices’
on your mobile phone.
Please
refer
to
mobile
user
manual.
After
searching
finished,
the
mobile
will display all found
Bluetooth
devices.
3.
According
to
the
mobile prompt
Information, select
“
WINS
”
in
device
list.
4. Enter Pin code “0000” to confirm the pairing.
Pairing
information
will
be stored.
“PAIR
SUCCESS
” will
be
displayed
on
mirror once
paired
successfully.
a) Some mobile can connect
to the device automatically after pairing
successfully
(such as nokia).
“MB CONNECTED” will be displayed on
mirror and blue LED is on.
b)
If
the
mobile
was
not
connected after
paired,
just
short
press
the
TALK
button,
the
Bluetooth
mirror
will
try
to
connect
mobile
phone.
As above.
8

5. VOICE DIAL
STEP
STATE / RESULT
1. Ensure mobile has
Connected to device.
Blue LED is flash.
2. Short press function button
(TALK).
“
VOICE
DIAL
”
will
be displayed
on
mirror.
The
device
will
send
voice
dial
prompt.
3 Bring out a pre-recorded
voice tag.
The mobile will dial number,”
CALL OUT” will be displayed
on mirror.
Note: This function used only the user mobile phone
Supports the voice dial function. Please refer to mobile
user manual for details.

6. REDIALLING THE LAST DIALED NUMBER
STEP
STATE / RESULT
1. Ensure mobile has
connected to device.
Blue LED is flash.
2. Press and hold function button
(TALK)for 1.5
seconds.
”REDIAL” will be displayed on
mirror.
Dial the last number.” CALL OUT”
will be displayed on mirror.
3 Press function button (TALK)
once again will hang up the out
going call just now.
”HANG UP” will be displayed on
mirror.
Note: This function depends on the feature of mobile.
Please refer to mobile user manual. When you find the
outgoing call number is not the desired, use Step 3 to
Cancel it.
10

Bluetooth Handsfree System
7. CALL ANSWER AND CALL HANG UP
STEP
STATE / RESULT
1. Ensure mobile has
connected to device.
Blue LED is flash.
2. Incoming call.
The mirror displays, which
ring tone is set.
If the ring tone is
unknown it is only
displayed.
3. Short press function button
(TALK)once.
”ANSWER” ”CALLACTIVE”
will be displayed on mirror.
4. Short press function button
(TALK)once again to hang
up a call during call active
”HANG UP” will be displayed
on mirror.
Note: Some mobile is in disconnected state after pair. it
will automatically connect to the device when has an
incoming call. Some mobile phone may not support the
caller ID indication function and the caller ID will not be
displayed.
11

Bluetooth Handsfree System
8. CALL REJECT
STEP
STATE / RESULT
1. Ensure mobile has
connected to device.
Blue LED is flash.
2. Incoming call.
The mirror displays, which
ring tone is set.
If the ring tone is
unknown it is only
displayed.
3
Press
and
hold
function
button
(
TALK
)
for
1.5
seconds
reject
the
incoming
call.
“REJECT” will be
displayed on mirror.
12

Bluetooth Handsfree System
9.
AUDIO
TRANSFER
During
call
active
or
call
out
going
state,
Press
and
hold
function(
TALK
)
button
and
hold
for
1.5
seconds
to
switch
the
call
between
Bluetooth
handsfree
and
mobile,
“
MIRROR
PHONE
”
“
MOBILE
PHONE
”
will
be
displayed
on
mirror.
10.
VOLUME
CONTROL
Press
“
VOL+
”
to
increase
volume,
press
“
VOL-
“
to
decrease
volume.
11.
ANSWER
MODE
SET
In
idle
state
hold
both
“
VOL+
”
and
“
VOL-
“
for
1.5
seconds
to
set
the
answer
mode
as
auto
answer
or
manual
answer.
12.
MUTE
CONTROL
During
active
call,press
“
PLAY
”
button
and
hold
for
1.5
seconds
to
mute
microphone, ”MUTE
ON”
will
be
displayed
on
mirror,
long
press
“
PLAY
”
button
1.5 Sec.
again
to
release mute,”
MUTE
OFF
“will
be
displayed
on
mirror.
13.
SELECT
RING
TONE
Press
the
“
VOL+
”
or
”
VOL-
“
key
and
hold
for
3
seconds
to
select
the
ring
tone,
total
16
sorts
of
ring
tones
are
available.
13

14. BLUETOOTH AV DEVICE OPERATION
STEP
STATE / RESULT
1.
If
AV
not
connected,
shortly
press
“
PLAY
”
key
to
connect
last
Bluetooth
AV
device
.
“BT
STEREO”
will
be
displayed
on
mirror
2. Shortly press “PLAY” key
to play or pause playback.
“AV PLAY” or “AV PAUSE” will
be displayed on mirror
3 Press and hold “PLAY” key
for 1.5S to stop playback.
“AV STOP” will be displayed
on mirror
4. Long press “VOL+”or “VOL-“
button for1.5seconds,
and release once heard an
prompt tone to skip
forward or skip backward.
“AV FORWARD” or
“AV BACKWARD”
will be displayed
on mirror
14

15. SWITCH AUDIO OUTPUT MODE
AND PICTURE ADJUSTMENT
STEP
STATE / RESULT
1. The default mode of audio
output is speaker mode.
“SPEAKER” will be displayed
on mirror and green LED will
be on.
2. Shortly press
“
MODE
”
key to switch to FM
transmitter mode.
“FM” will be displayed on
mirror and right red LED
will be on.
3 At FM transmitter mode, press
and hold “MODE”key to select
to thedesired
transmitting frequency, then
tune your car radio to
receive the frequency
accordingly.
Selected
transmitting
frequency
will
be
displayed
on
mirror
:87.7,
87.9,
88.1,
88.3,
88.5,
88.7,
88.9.
4. Shortly press
“
MODE
”
key to switch to picture
adjustment mode.
Picture menu will be displayed
on mirror, press and hold ”MODE”
key to select item “BRIGHTNESS”
or “CONTRAST” or “COLOR”, use
“VOL+” and “VOL-”to change the
value
16

16. FM HEADSET USE
CHARGE PORT
POWER SWITCH
NO FUNCTION
INDICATOR LED
(RED FOR POWE ON,
GREEN FOR CHANGING)
To make use of the FM headphones from the charging point on the
mirror take them from the mirror. In this case the audio output mode
automatically changes to FM 107.9 (the receiver frequency of the FM
headphones).Then press the headset button to turn on
the headset(red led on) to start talk. The operation range is
about 1m. Once headset put back to the charging socket, the
audio output mode will be auto restored to the mode before
headset unplug.
Attention:Keep volume below 11 to avoid noise when using
FM headset.
If there is a radio station 107.9MHZ,it may interfere
with FM headset.
17

17.To Set Audio On and Off
When
the
handsfree
system
is
vacant(no
call
in
or
call
out),
you
can
open
the
audio
input
by
shortly
pressing
“PLAY”
key
twice,
“MEDIA
PLAY”
will
be
displayed
on
mirror,
shortly
press
“PLAY”
key
twice
again
to
shut
the
audio
input
,
“MEDIA
OFF”
will
be
displayed
on
mirror.
18.To Resume Factor y Default Mode
Press
and
hold
“VOL+”and
“VOL-”
key
together
for
10
seconds
to
resume
factory
defaule
mode,
“DEL
ALL
BT”
will
be
displayed
on
mirror, all
bluetooth
device
will
be
cancelled.
19.REARVIEW SYSTEM
While car backward, the rearview system auto start working, the image of back around from
camera will be displayed on mirror. There will be several different transmitting and receiving
frequency, 2414MHz,2432MHz,2450MHz,2468MHz.The same tag can be used in
conjunction with transmitting and receiving.
18

20.
PHONE
BOOK
1.First store phone number into your mobile with English name.
2.Press “MODE” button twice to enter address list transfer, “B CARD
READY” will be displayed on mirror. To choose address list transfer
by bluetooth from mobile phone.
3.The English name will be displayed on mirror if transfer success.
4.Max.200 address can be stored .If over 200 address, the new
address will cover the earlier.
5.To delete address list: Press and hold “PLAY” button for 6 seconds,
“DELETE PB” will be displayed on mirror, press “PLAY” button twice
within period of 15 seconds to delete phone book.
21. SELECT LAST 10 CALLS DIAL-BACK FROM
BLUETOOTH MIRROR
Press “TALK” button twice to resume the last answered call, then
press “VOL+” or “VOL-” button to scroll the last 10 calls, press
“TALK” button to dial the number.
19

22. SWITCH TO VIDEO INPUT MODE
Press and hold “PLAY” key for 3 seconds to switch to video input
mode, you can connect the white video in socket to a video source.
Press and hold “PLAY” key for 3 seconds again to exit video input
mode.
23. Frequently asked questions
23.1
Can
Bluetooth
mirror
connect
to
any
bluetooth
devices?
Re:
Bluetooth
mirror
can
connect
with
any
bluetooth
devices
which
support
headset
profile
or
handsfree
profile.
But
different
bluetooth
devices
may
have
different
operation.
For
the
mobile
supporting
headset
profile,
it
disconnects
normally,
but
it
can
connect
to
handsfree
automatically
and
cannot
display
caller
ID.
23.2
What
is
useful
distance
between
Bluetooth
mirror
and
phone?
Re:
Usually
distance
between
device
and
phone
is
10M.
23.3
Does
any
interference
when
use
B
luetooth
m
irror?
Re:
Wireless
and
wireless
network
devices
may
have
interference
during
communication.
Use
bluetooth
devices
and
keep
away
from
RF
generator
will
reduce
interference.
21

SPECIFICATION
SECTION
UNI
T
DATA
1.Bluetooth Standard: Bluetooth 2.0+EDR
2.Bluetooth Frequency:2.4GHz ISM band
3.Bluetooth Transmit Power:
≤
4dBm,class 2 (communication distance:10
meters)
4.3.5 inch TFT LCD with vesolution:960X240
5.Power Supply: 9V~15V
6.Operating Temperature:-10
°
C~60
°
C
7.Audio Distortion(1KHZ/1000mv input)
%
0.3
8.Speaker Output Power(1KHZ/1000mv
input,max,volume)
W
0.5
9.Transmission Frequency(F1\F2\F3\F4)
MH
Z
ISM
2414\2432\2450\2468
10.FM Transmitter Output Level
NW
40
11.Wireless earphone receiving frequency
MH
Z
107.9
12.Wireless earphone receiving distance
M
1.0
13.Wireless earphone output power
M
W
60
14.Wireless earphone charging time
H
2
15.Wireless earphone working time
H
4~6
16.Received Sensitivity
DB
m
≤-
85
17.Mirror Consumption Current(MAX.)
MA
6
00
18.Unobstructed Effective Range(Min)
M
4
0
19.Mirror Dimensions(W X D X H)
M
M
285X90X24
20.Mirror Weight(about)
G
370
21.Camera Imaging Sensor
CMOS
22.Camera Total Pixels
720x4
80(NT
SC) 720x576(PAL)
23.Camera Horizontal View Angle
Deg
ree
80
24.Camera Transmission Power
M
W
2/FCC,10/CE
25.Camera Minimum illumination
0
Lux(I
R ON)
26.Camera IR Night Range
M
4
27.Camera Power Supply
Supplied By
Transmission
Box
28.Camera Consumption
Current(Max.)
M
A
120
29.Camera Dimensions(WxDxH)
m
m
525x148x4
5
45
30. Camera Weight (about)
G
264
Other manuals for CC-120
1
Table of contents
Other Trebs Automobile Accessories manuals
Popular Automobile Accessories manuals by other brands

Car Solutions
Car Solutions QPI-G7-MAIN-V2.0 user guide

AL-KO
AL-KO Mammut Tandem Translation of the original operating instructions

Rati
Rati Armster OE1 user manual

Tessera4x4
Tessera4x4 SOT-ROLL Series installation manual

Rhino-Rack
Rhino-Rack Jerry Can Holder manual

Blackweb
Blackweb BWA18AV003 instruction manual

EUFAB
EUFAB 16548 operating instructions

Dakota Digital
Dakota Digital LED Tail Lights LAT-NR161 installation instructions

WIX
WIX WP6830 Installation instruction

network
network SP25B manual

Havis-Shields
Havis-Shields Side Slide-Out Step 1997-2007 Chevrolet Full Size Van... installation instructions

BedFin
BedFin BFX Series User's installation guide