Triax ASTM F1292 User manual

TRIAX TOUCH WIRELESS SURFACE IMPACT
TESTER
USER’S MANUAL
REVISION 0.9 September 18, 2020
Sales and Technical Support
Alpha Automation, Inc.
127 Walters Avenue
Trenton, New Jersey 08638
United States of America
(V) 609.882.0366
Paul Bamburak
Jon Aubel (Technical Support)
Matt Appleby (Sales)
Training and Standards
Canadian Playground Advisory, Inc.
1097 West River Road
Cambridge, Ontario N1R 5S5
Canada
Rolf Huber

1
Table of Contents
1.0 Introduction 2
2.0 System Components 3
3.0 Hand Held Unit 5
4.0 “E” Missile 14
5.0 Tripod 15
6.0 “E” Missile System Use 20
7.0 Report Generation PC Application 22
Appendix A: Verification and Calibration 30
Appendix B: Memory Card 33
Appendix C: “A” Missile System 36
Appendix D: Troubleshooting 43
Appendix E: Missile Specifications 44
Appendix F: Critical Fall Height modes 45
Appendix G: Warranties and Representations 47
Appendix H: FCC Rules 48
Certificates of Compliance 49

2
1.0 INTRODUCTION
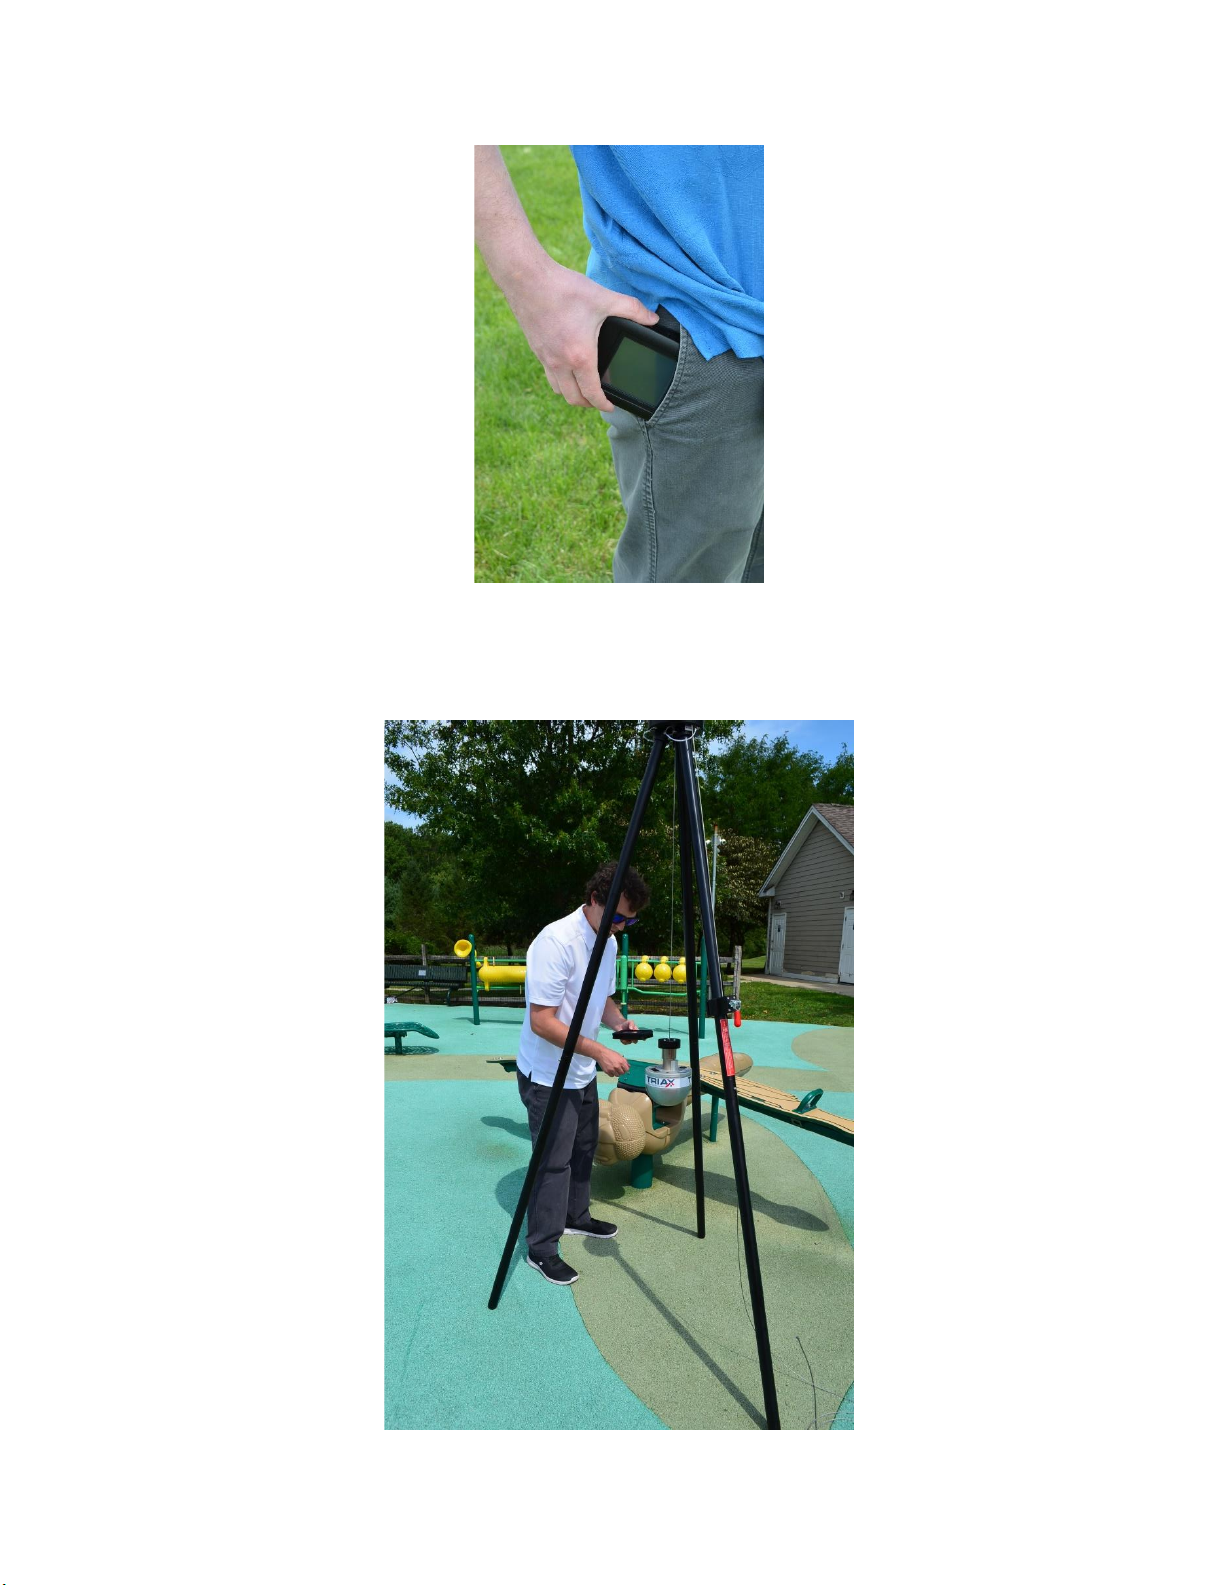
The Triax Touch “E” missile system is intended to be used to measure the impact attenuation of
surfaces under and around playground equipment in compliance with worldwide standards
including but not limited to:
ASTM F1292 ASTM F355 En1177 AS/NZS 4422 ASTM F3313
The use of Triax “E” missile system is applicable to a wide range of additional standards including:
Wall / Feature Padding ASTM F2440
Pole Vault Landing Systems ASTM F1162
Pole Vault Box Collars ASTM F2949
Engineered Wood Fiber ASTM F2075
Outdoor Fitness Equipment ASTM F3101
Soft Contained Play ASTM F1918
Aquatic Play Equipment ASTM F2461
Loose Fill Rubber ASTM F3012
Poured in Place Surfaces ASTM F2479
Home Play Equipment ASTM F1148
Climbing Crash Pads UIAA 161
Rugby Turf Fields ASTM F3146
World Rugby Regulation 22
The Triax Touch “A” missile system is intended to measure the impact attenuation of artificial and
natural turf playing surfaces in compliance with standards including but not limited to:
ASTM F1936 ASTM F355
The use of Triax “A” missile system is applicable to a wide range of additional standards including:
Wrestling Mats ASTM F1081
Trampoline Courts ASTM F2970
Consumer Trampolines ASTM F381
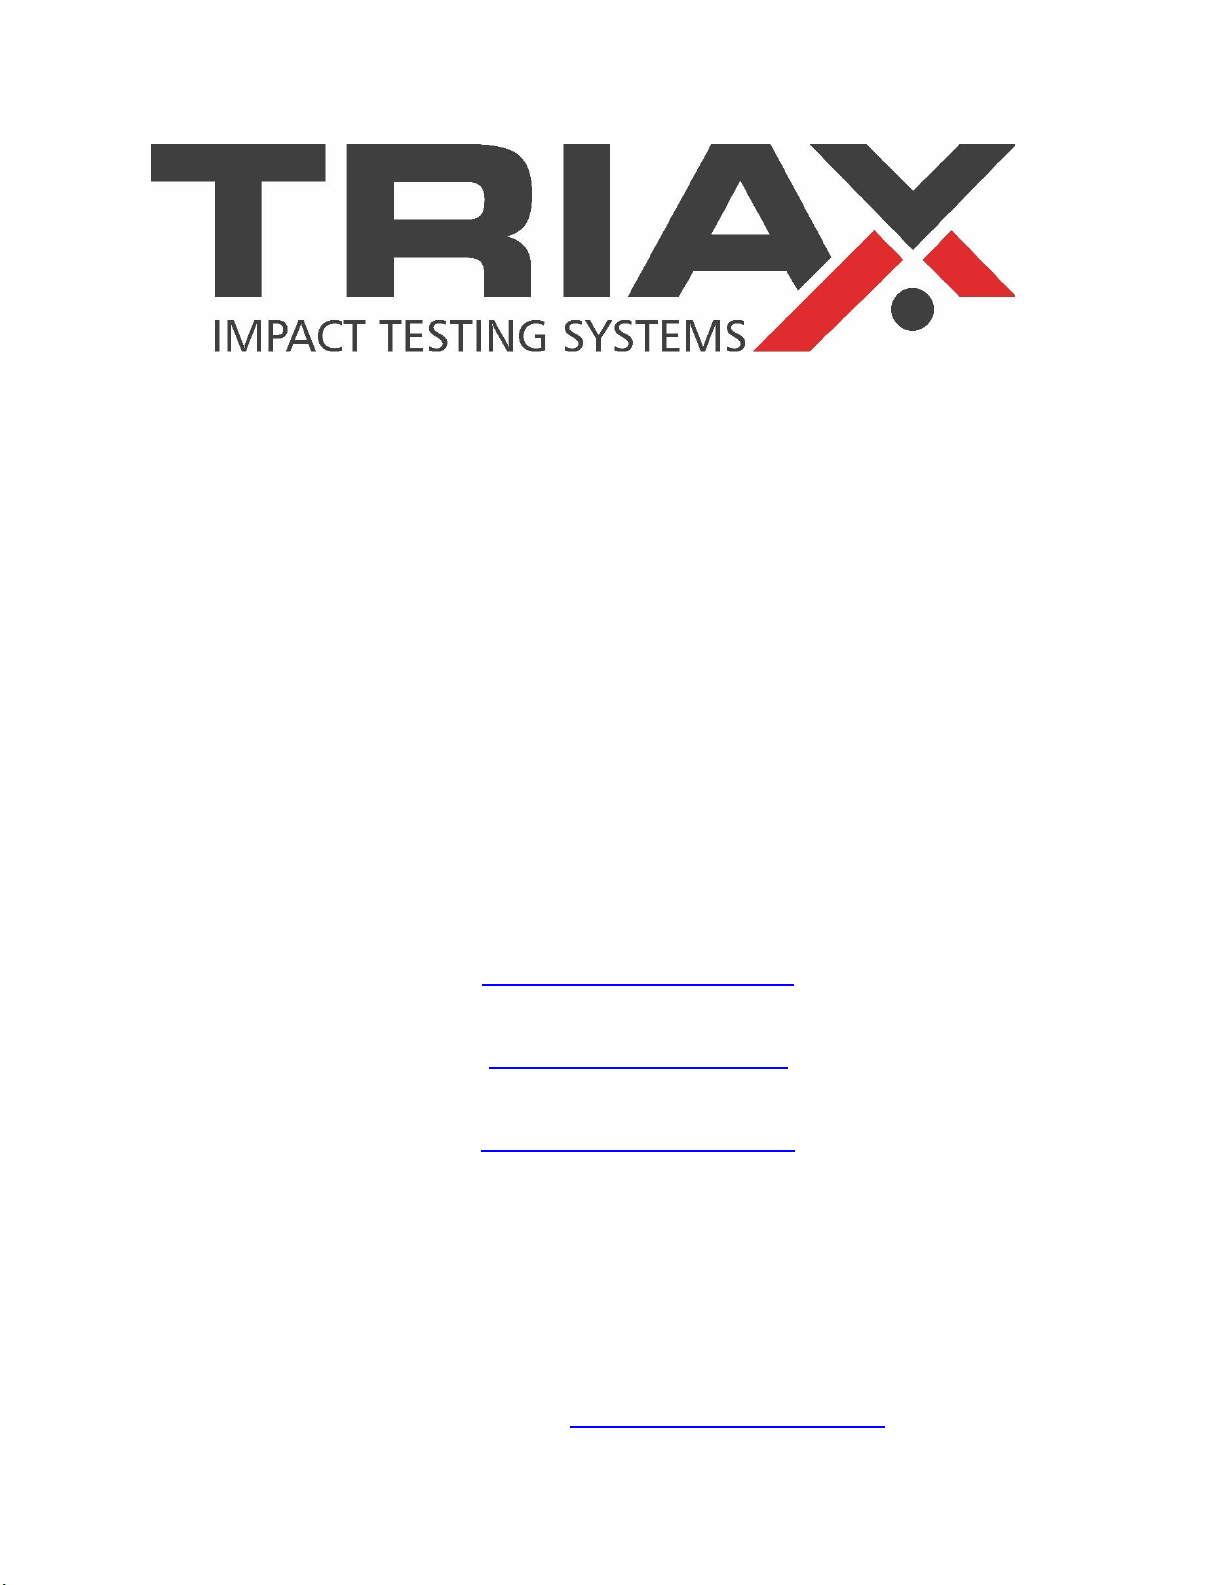
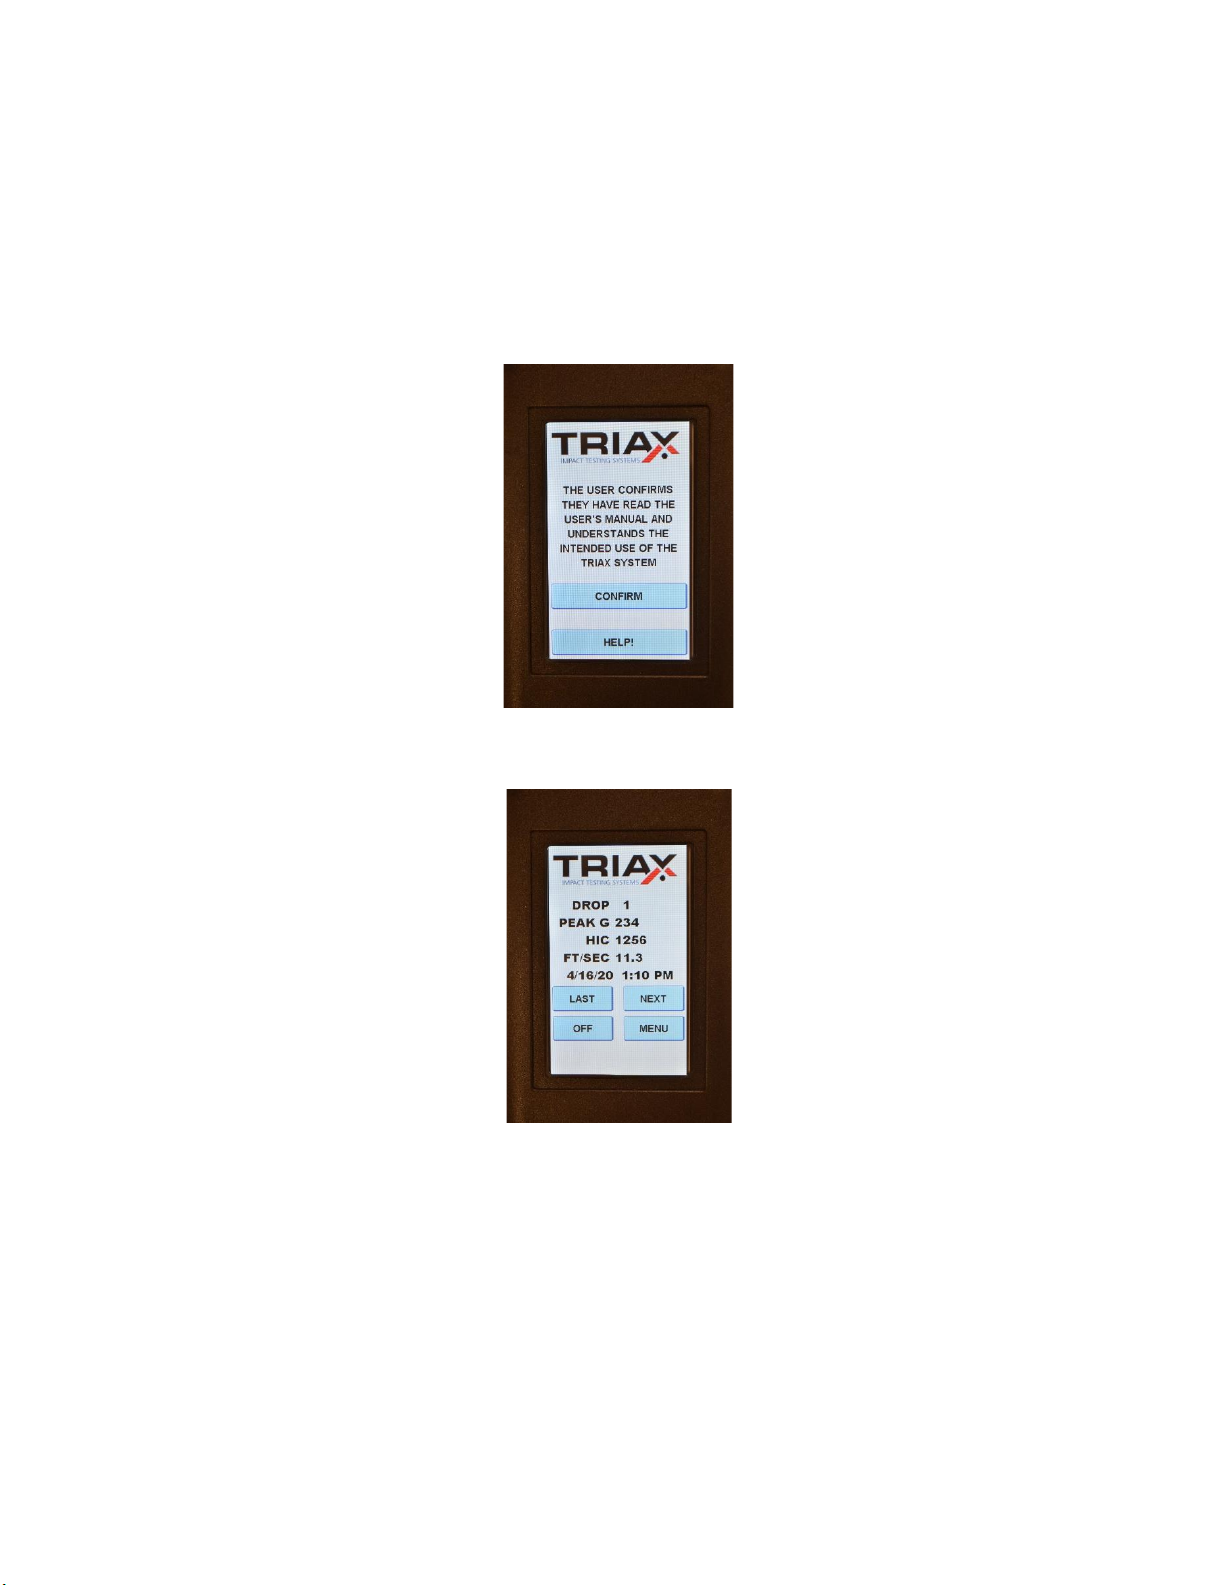
To promote effective use a Triax Touch system must be properly configured and used by a properly
trained operator.
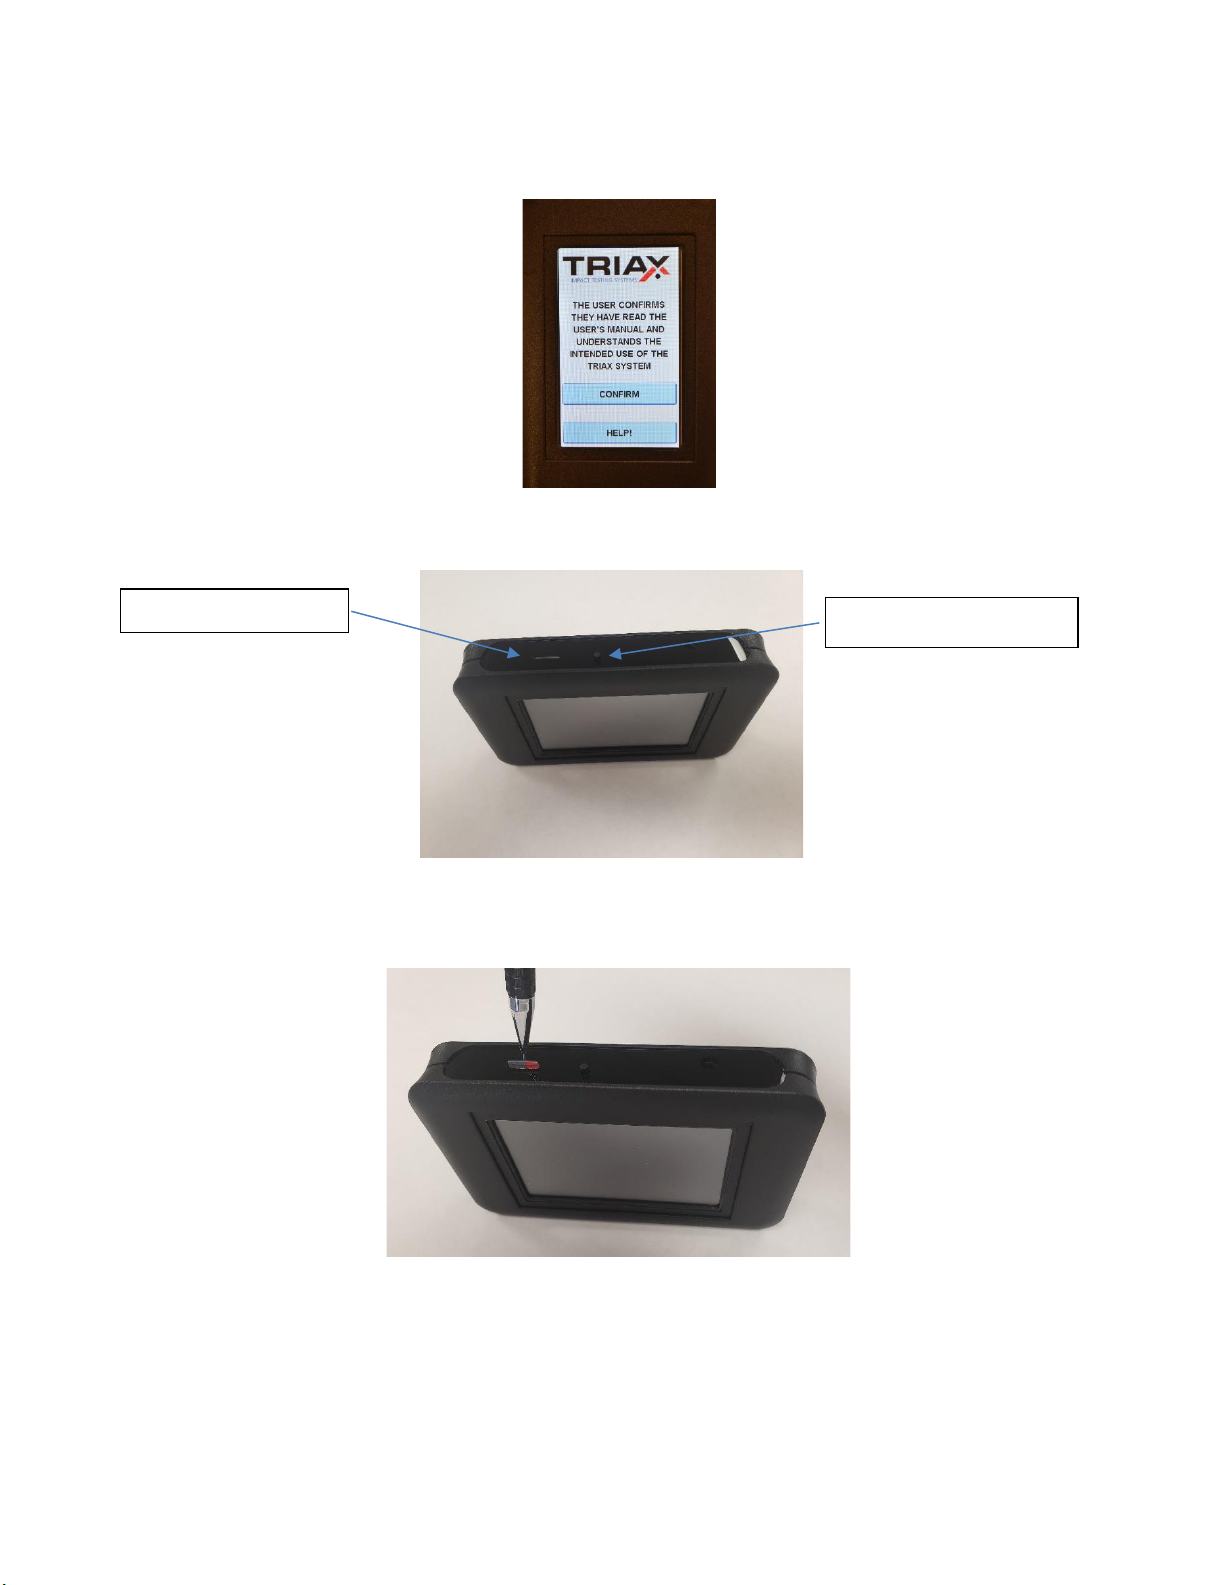
The designation “E” and “A” refer to the different missile shape and corresponding support
mechanism, and are described in ASTM F355. The “E” missile is hemispherical with a weight of
10.1 pounds and is supported by an adjustable height tripod. The “A” missile is cylindrical with a
weight of 20.0 pounds and is dropped in a guide tube from a fixed height of 24 inches. See
Appendix F for more details about missile dimensions. “A” missile drop heights of 36” and 1 meter
are also available. The missile is also commonly called the head form.
Throughout this document and the referenced standards the terms “head form” and “missile” will
be used interchangeably.
ASTM standards are available from ASTM, 100 Barr Harbor Drive, West Conshohocken, PA,
19428-2959, United States 610.832.9585

3
2.0 SYSTEM COMPONENTS FOR TRIPOD SYSTEM
The Triax Touch “E” system consists of the Triax Touch hand held controller, a hemispherical
missile and a support tripod. Also included with the Triax Touch “E” system are an 8” x 8” rubber
reference pad, battery charger, manual drop handle and fitted carrying cases.
The hand held controller is powered by an internal rechargeable NiMH battery, and records the
results of drop tests. The LCD display will show the Peak G, HIC, angle of impact and time and
date, while the impact velocity and HIC Interval (Delta T) are shown optionally. A memory card
is used to store the results of up to 1000 drop tests, and allows the user to copy the drop test results
to the included proprietary application program running on a Windows compatible platform for
report generation and archival purposes.
Internal to the head form is a tri-axial sensor (accelerometer) which produces electrical signals
proportional to the G value of the head form’s impact with the surface being tested. Circuitry
inside the head form measures these voltages, calculates Peak G, HIC, impact angle and impact
velocity and wirelessly transmits the results to the hand held for display. Affixed to the head form
is a normally on electromagnet.
This magnet allows the head form to be suspended from the lifting cable of the tripod, allowing
the user to set exact drop heights above the surface to be tested. The normally on nature of the

4
electromagnet requires no battery power to be used while the user prepares for the test preventing
the head form from falling unexpectedly should the batteries grow weak.
CAUTION: To prevent injury never allow any person to stand beneath the missile when it
is suspended from the tripod, nor anywhere in the possible drop path of the missile.
The head form is powered by an internal rechargeable NiMH battery. Nickel Metal Hydride
(NiMH) batteries are of a lower power density than Lithium Ion batteries thus allowing the Triax
system components to be transported by aircraft if required. Typical battery life on a full charge
exceeds two months of substantial daily use.
The Tripod is used to support the E missile and provide a repeatable drop height and drop location.
A steel cable is used to support a steel block to which the E missile’s electromagnet is attached.
The height of the missile above the surface can be adjusted by lowering or raising the steel block
by adjusting the position of the steel lifting cable.

5
3.0 HAND HELD UNIT
Photo 1 –Triax Touch Hand Held
Photo 2 –Triax Touch Hand Held
Side view
Photo 3 –Using a pen or pointed object, press the SD card in until it clicks. To remove,
press SD card in and it will protrude.
Power push button
Micro SD Card slot

6
PHOTO 4 –Triax Touch easily fits in the pocket

7
3.1 Power ON/OFF
Press the Power push button as seen in photo 2 to turn the hand held on. The following screen
will appear.
Press confirm to begin testing.
To power system (hand held and head form) OFF, press and hold the OFF button. The operator
will need to return to a drop screen to see the OFF button. Hand held will automatically turn off
after 5 minutes of no use.
3.2 Hand Held to Missile Communications and conducting drops
The Triax Touch uses wireless communication between the hand held and missile. As shipped
from the factory each hand held is paired with a unique missile. A Triax Touch hand held is factory
set to pair with both an “E”(hemispherical) and an “A”(cylindrical) missile. After pressing the

8
power button the head form and hand held will pair. The START key will show up when this is
complete and the system is ready for testing
The range of the Triax Touch wireless communications is about 20 feet. Should the user try
operation beyond this distance the communications between the missile and hand held will cease
and the system will appear to be non-operational. Moving back into range will allow
communications to resume after an approximately 30 second delay.
Some wireless devices such as laptops and tablets might show the Triax system in their respective
discovery modes. The Triax Touch system does not support apps or communications with devices
other than the missile and hand held, and any attempt to pair other devices could disrupt the factory
pairing resulting in an inoperable system.

9
After powering on the Triax Touch hand held and confirming the initial screen, the following
screen appears:
Press the power button on the head form and it will pair with the hand held.
Prepare the drop by pressing START
Press RELEASE to release head form from magnet. To save a drop, press SAVE AND NEXT.

10
3.3 Navigating Menus
From any drop, pressing LAST or NEXT will cycle through drops accordingly.
Pressing the MENU button will show the following options:
SETTINGS:
•UNITS: FT—FT/SEC—CM—CM/SEC
•RELEASE: TRIPOD (E MISSILE)—TUBE (A MISSILE)—SWING
•DELTA: HIDE—SHOW
•TIMER: ON—OFF
•PAIRING: YES—NO
•CFH: G+HIC 1 DROP—G+HIC 3 DROPS—HIC 1 DROP—HIC 3 DROPS
For more information, please see Appendix F

11
VIEW DROPS
Scroll up and down drops by pressing LAST or NEXT. To view the details of a drop, highlight
the drop line and press DETAIL.
Pressing GRAPH will bring up the graph for the drop

12
Pressing LAST or NEXT will allow you to view other drops. Press BACK to go back to previous
menu
3.4 Batteries and Charger
The Triax Touch hand held and missiles each make use of permanent internal rechargeable nickel
metal hydride (NiMH) batteries. Each Triax Touch system is supplied with a battery charger with
technology matched to the NiMH batteries used. The batteries in both the hand held and missile
requiring charging independently.
WARNING: DO NOT USE A BATTERY CHARGER OTHER THAN SUPPLIED WITH
THE TRIAX TOUCH SYSTEM. USING A BATTERY CHARGER OTHER THAN THE
ONE SUPPLIED WITH THE TRIAX SYSTEM COULD RESULT IN BATTERY
DAMAGE, POSSIBLY RESULTING IN FIRE AND PROPERTY DAMAGE.
DO NOT ATTEMPT TO USE THE TRIAX TOUCH WITH THE CHARGER
CONNECTED!
To charge either the head form or hand held plug the charger into the charger receptacle and plug
the charger in AC mains power. The charger runs on either 110VAC or 220VAC power without
adjustment or additional power converters. Initially a small LED on the charger will be green and
then switch to red when the charging begins. Depending on the level of charge left in the battery
up to six hours might be required for a full charge. When fully charged the LED will turn green.
Note that the charger is protected from overcharging the battery and may be left connected after
the LED turns green.
If the charger is unplugged and immediately plugged back in, the LED will once again go from
green to red. After a few minutes the LED will return to green.

13
4.0 Missile
The photo below shows the “E”missile. The missile is machined of solid aluminum and designed
and tested to be in conformance with applicable standards. The “E”missile is hemispherical with
a weight of 10.1 pounds and diameter of 6.30 inches. The normally on electromagnet is mounted
to the top of the head form connects to the steel lifting block of the tripod. The head form also has
a battery charger connection, and uses the same charger as the hand held. The charging port is
protected by a black cover. The gray push button turns the head form on, and a red LED blinks to
show the head form is operating.
The face of the magnet which contacts the steel lifting block should be kept free of rust, nicks and
scratches. Also be sure to remove any debris which might become stuck to the electromagnet
during storage or use. For the magnet to have full holding force and not inappropriately release
(allowing the head form to fall) the face of the magnet and the steel block must form a perfect
connection with no gaps. If the face of the magnet should become rusted use only Scotch-bright
type scouring pads to clean. Using sand paper or other course materials may cause deep scratches
which will affect the holding power of the magnet.
CAUTION: To prevent injury never allow any person to stand beneath the missile when it
is suspended from the tripod, nor anywhere in the possible drop path of the missile.
NOTICE: The electronics inside the Triax Touch missiles are sensitive to damage by water
intrusion into the missile. To prevent damage to the Triax missiles they should not be used
in rain or snow. The Triax missiles should also be stored in dry locations such as a heated
office. Storage of the Triax missiles in damp locations such as basements and cellars must be
avoided. Avoid any other storage location such as vehicles in cold climates which could
promote condensation on the metal surfaces of the Triax missiles.

14
E Missile (HIC tester)

15
5.0 Tripod
The Triax Tripod is shown in Photo 3. In addition to the three leg section attached to the top of the
tripod, nine snap together sections of legs are provided with the Tripod to allow a maximum drop
height of up to approximately 12 feet (drop height is measured from the bottom of the missile to
the top of the surface to be tested.)
Tripod with Head Form and Reference Pad

16
CAUTION! Erecting the tripod can be a hazard due to tipping.
To erect the tripod, two persons are recommended. Use of proper headprotection is also suggested,
as the operating height of the tripod will, in mostcases, be above the head of the operators exposing
them to the hazard of being struck by either the head form or the tripod. While erecting the tripod
hold or otherwise restrain the steel lifting block to prevent it from swinging into and hurting any
nearby persons.
5.1 Tripod Legs
The leg sections are connected by interlocking connectors as shown in the photo below. Before
connecting the tripod leg sections ensure that the connector mating surfaces are free from sand or
other debris. The connectors are precision fitted and any foreign object on the connectors could
prevent them from properly connecting. To start the coupling, align an “A” leg section (with spring
button) and a “B” leg section (without spring button.) Press the spring button down to allow the
“A” section to begin to slide into the “B” section. As the button enters the “B” section release
finger pressure on the button and slide the “B” section fully into the “A” section. After the sections
are fully connected rotate either section until the spring button pops into the hole in the “B” section,
locking the legs together.
Tripod Leg Connector
WARNING: Make sure that the spring button pin fully extends after the leg sections are
coupled as shown in photo 5A. Failure to do so could allow the leg section to unexpectedly
disengage, causing the tripod to fall and possible strike and injure anyone nearby.

17
Properly connected leg section with pin fully extended
INCORRECT connection –pin not fully extended
Three of the nine leg sections feature a rounded end. These must always be installed as the lowest
leg sections when the Tripod is erected.
Whenever connecting leg sections the Tripod must first be laid on a horizontal surface. After the
desired number of leg sections is connected carefully stand the Tripod up while simultaneously
spreading the legs out for stability.
WARNING: Always use the same number of legs sections on each of the three legs.
5.2 Lifting Cable and Locking Device
For fine adjustment of drop height, a flexible steel cable is used to raise and lower the steel lifting
block. To prevent the cable position from changing the supplied locking device is attached to the
leg section adjacent to the location where the cable exits the tripod head.

18
The factory installed steel cable is routed from the head of the tripod, along one of the legs and
into a hole in the top of the locking device. The cable then passes through the locking device and
out the bottom. To adjust the height of the head form, pull down on the part of the steel cable
below the locking device. Next, slowly lift the red handle on the locking device to free the cable.
When at the proper height, press down firmly on the red handle to lock the cable.
For additional drop height control, the position of the locking device on the leg section can be
adjusted by loosening the wing head screw on the back of the assembly and sliding the assembly
as required. Tighten the screw when complete.
In typical use, the missile will be removed from the lifting block and the lifting block lowered to
a convenient height. The missile will be attached to the lifting block and all persons moved to a
location safe from the fall path of the missile. While gripping the lift cable with a gloved hand, the
locking handle is raised allowing the lifting cable to be pulled, raising the missile to the desired
fall height. The locking handle is pressed down gripping the lifting cable and maintaining the
height of the missile. Standing to the side the surveyor’s rod (supplied with every Triax E missile
system) is used to verify the height of the missile. Fine height adjust can be made by holding the
locking device while loosening the lock screw. The locking device can then be slid up or down
along the leg to adjust the missile height and the locking screw tightened.
WARNING: When the red locking handle is raised or the screw holding the locking device
are loosened the weight of the steel lifting block will cause the lifting cable to slide through
the locking devices, or the locking device to slide upward on the leg. The user must firmly
hold onto the cable, preferably with a gloved hand, before lifting the red handle or loosening
the locking device screws. If the steel lifting block is allowed to fall uncontrolled the sliding
of the steel cable through the user’s unprotected hands could cause serious injury to the user.
Never allow anyone to stand under the tripod as the falling of the steel lifting block or the
head form could cause serious personal injury.
THE HEAD FORM CAN ALSO BE UNEXPECTEDLY RELEASED FROM THE
MAGNET DUE TO SHARP JOLTS DURING ADJUSTMENT.
5.3 Steel Lifting Block and Leg Clamp
At the end of the steel cable is the steel lifting block. This block gives the head form electromagnet
a surface to grip to before being released. As with the electromagnet the mating surface of the
lifting block must be kept free of rust and scratches.

19
5.4 Manual Drop Handle
Preliminary testing without setup of the tripod can be conducted using the optional hand held drop
handle. The use of the drop handle is shown in photo 6. When using the handle leave the release
mechanism set to magnet (see Appendix B.3)
Hand Held Drop Handle
This manual suits for next models
20
Table of contents
Other Triax Test Equipment manuals
Popular Test Equipment manuals by other brands

Extech Instruments
Extech Instruments MS420 user manual

HTA Instrumentation
HTA Instrumentation HD 2020 manual

Keysight Technologies
Keysight Technologies 16380C Operating note

Fluke
Fluke 712B Calibration manual

Martindale Electric
Martindale Electric PD440S instruction manual

Elenco Electronics
Elenco Electronics S-3000 user guide

AEMC instruments
AEMC instruments CA7028 user manual

Agilent Technologies
Agilent Technologies 100 Operator's manual

Aeroflex
Aeroflex 8800 Series Maintenance manual

Megger
Megger 128311841 operating manual

Apera Instruments
Apera Instruments EC20 instruction manual

Tektronix
Tektronix 454A Operator's handbook