Trikke POSITRON 60V AWD User manual
Owner’s Manual
TRIKKE POSITRON
Rev. Jan2024

TRIKKE Defender and TRIKKE Positron are professional grade Light Electric
Vehicles (LEV) for personal mobility.
Developed to offer quick and efficient transport of an individual
in a wide range of terrain: street, sidewalk, walk paths, on and off-road,
indoor and outdoors.
Rear wheels/motor
Decks Rear fenders
Rear lights
Trailing arms Swing arm / rear suspension
Cambering
mechanism
Front fork
Front wheel/motor
Brake caliper
Brake rotor
Front structure
Battery
Controller box
Battery tray
handlebar
Brake levers
display
Siren
Steering lock
Folding mechanism
MAIN PARTS
Pg.02
headlights
Marking lights
Gear bag
EMG lights
TRIKKE POSITRON Owner’s manual

FIRST ASSEMBLY (watch assembly video)
1) Remove the unit from the packing box
2) Unfold the frame, lock the folding levers.
3) Attach handlebar (cables route in front of the handlebar post), align with front wheel,
tight handlebar clamp bolts really well.
4) Attach the siren to the top of front structure (60V model,72V does not need it).
5) Secure the cables loom to the side of the front structure with the small clamps.
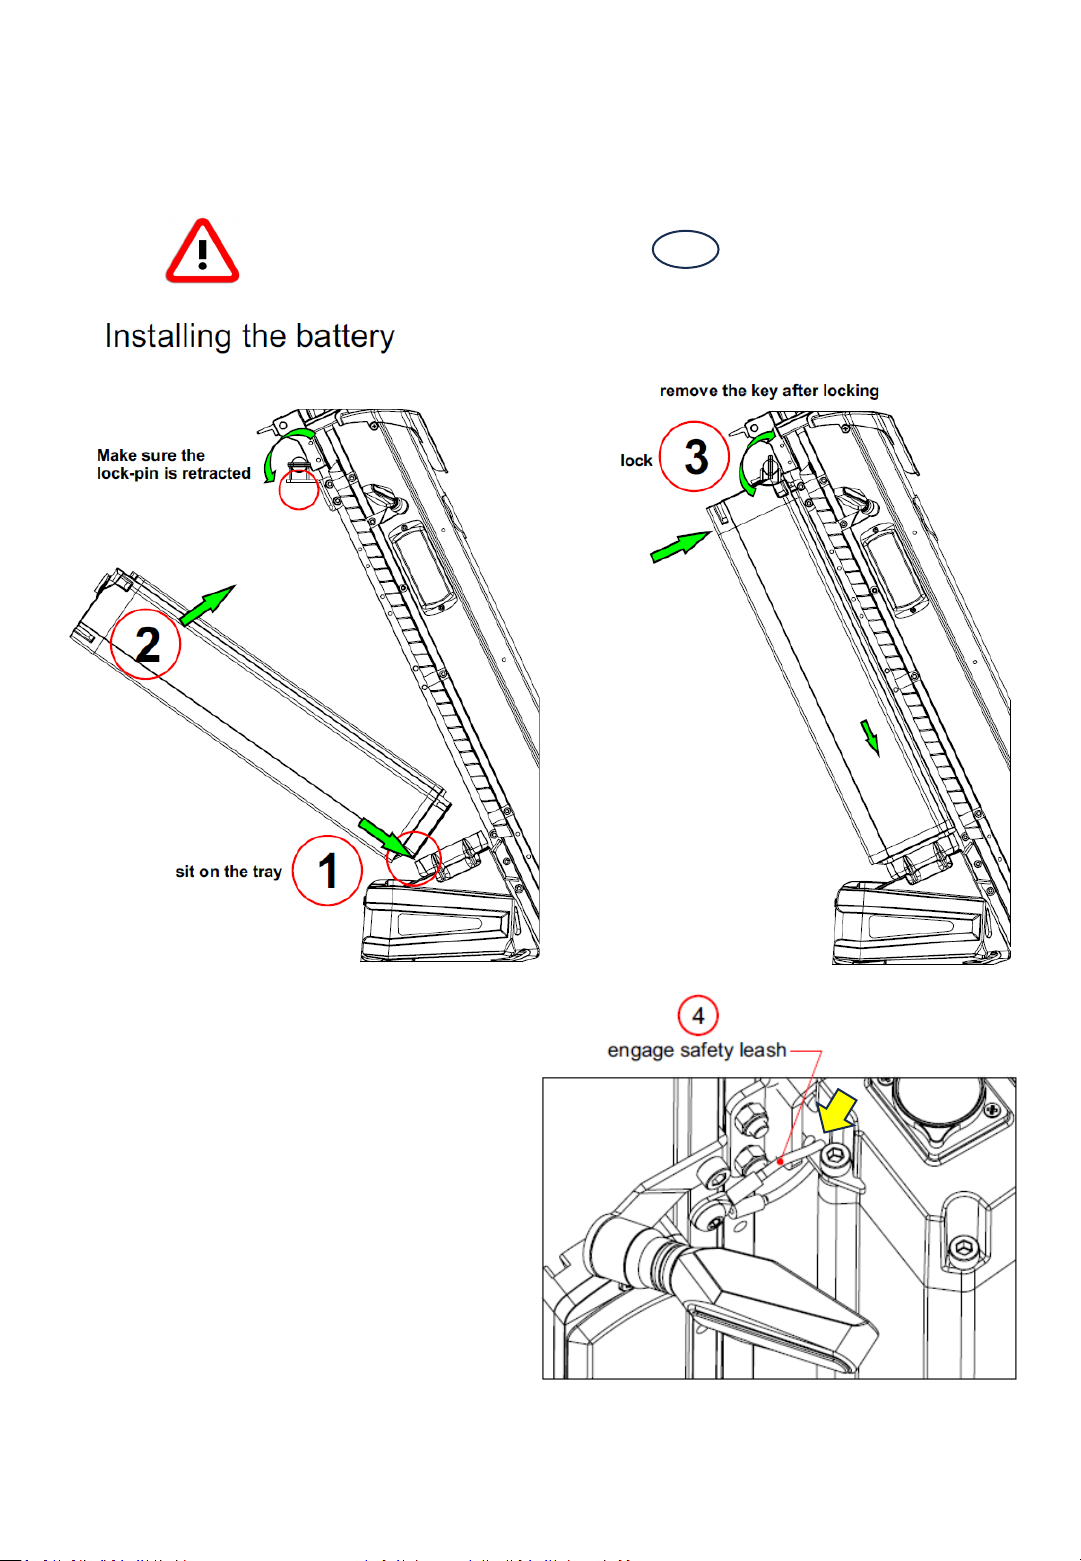
6) Install battery –a) battery must be switched OFF b) make sure the key-lock pin is
retracted (counterclockwise). c) identify front and back side of the battery d) place the
battery on the tray tilted to the back. e) push the battery forward against the lock all the
way and turn the key clockwise to lock. Remove the key from the lock and place in a safe
place.
7) Check/calibrate tires pressure. Use a floor pump or electric pump with a reliable gauge.
Front 50psi, Rear 65psi.
FOLDING
1) Retract the lock knob on each folding mechanism (LH and RH) until the tip clears
the levers.
2) Pull the center knob up to unlock the tensioners (while leaning the vehicle to the
opposite side)
3) Fold the frame
4) Screw the knobs into the hole through the lever in order to lock the frame folded.
This is imperative for handling and transport.
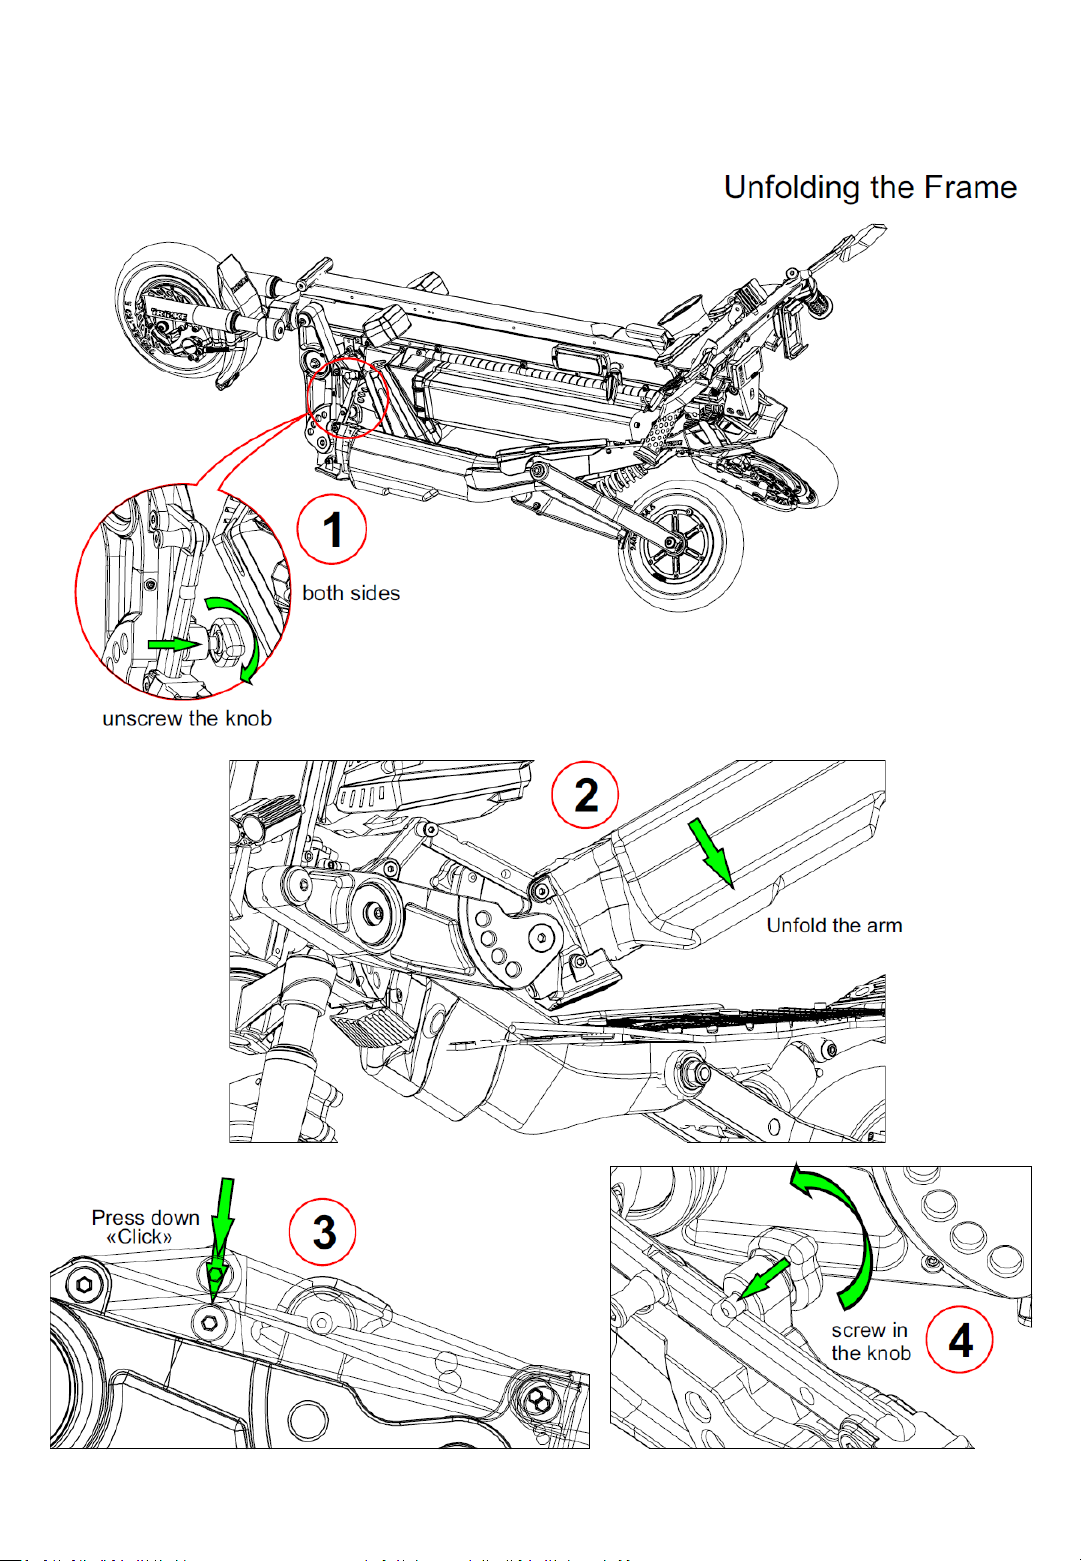
UNFOLDING
1) Retract the lock knob on each folding mechanism (LH and RH) about 3/8” (1cm)
2) Unfold the frame
3) Press down the tensioners (while leaning the vehicle to the opposite side) until it
snaps into locked position
4) Screw the knobs in until it locks. These will be on top of the tensioners as a safety
pin.
Pg.03
TRIKKE POSITRON Owner’s manual
Pg.04
TRIKKE POSITRON Owner’s manual

Pg.05
LOCK steering
to perform alignment
TRIKKE POSITRON Owner’s manual
Pg.06
Make sure the battery is switched OFF for installation
Installing the Battery
Left side of the vehicle
TRIKKE POSITRON Owner’s manual
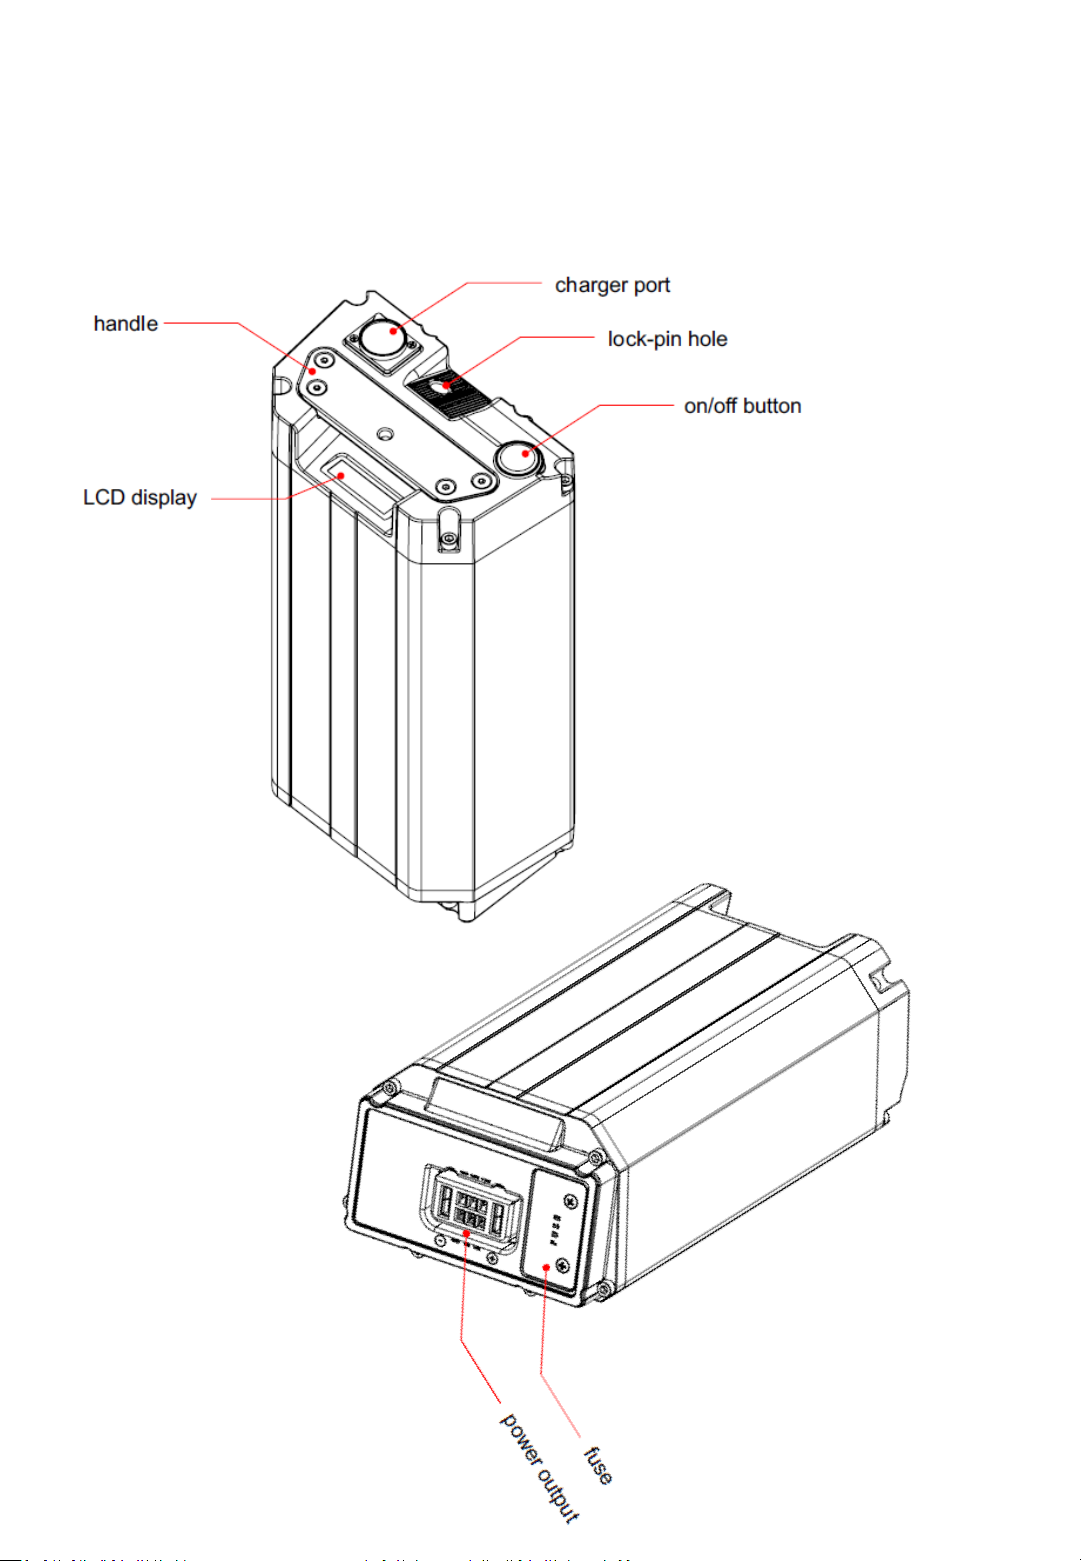
Battery
TRIKKE DEFENDER Owner’s manual
Pg.07
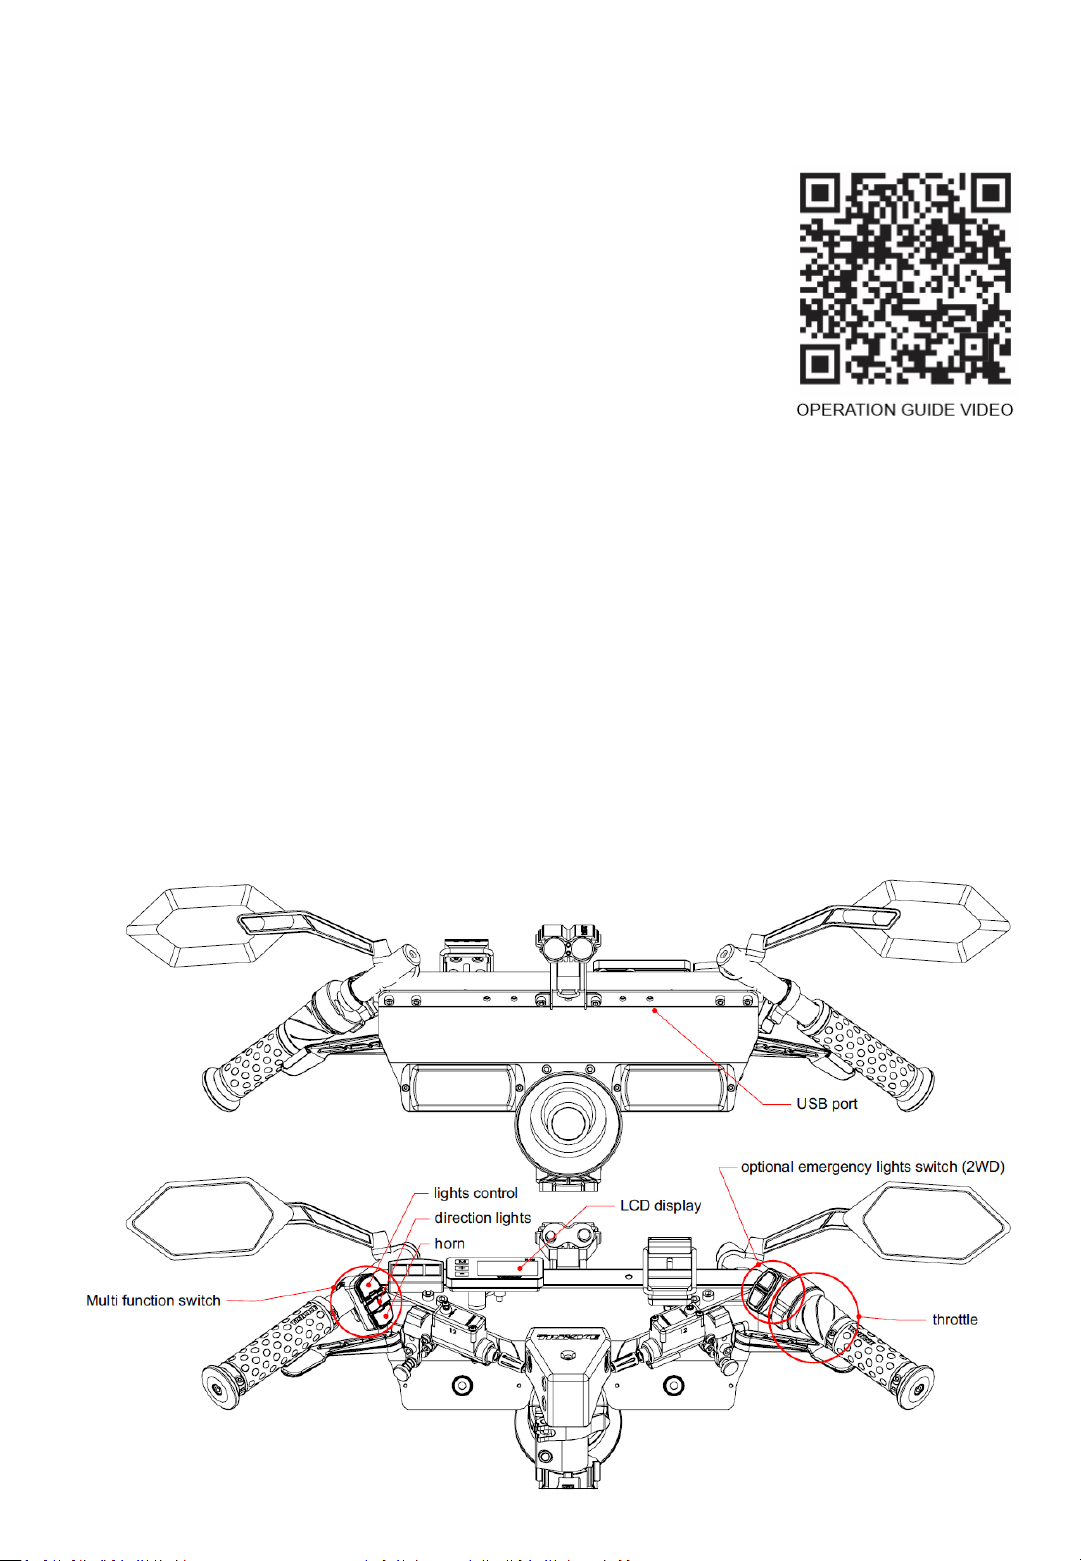
Handlebar mounted controls
OPERATION (watch operation tutorial video)
Turn On the battery power: press in the on-off switch.
The battery LCD will light up showing the % of remaining charge.
Push [M] button on Display to turn ON the drive system.
By default, the display is selected to PAS 2 (power level 2 of 5). You can increase or
decrease the power by using the [+] and [-] buttons
Gently twist the throttle towards you to make the vehicle move forward. The more
angle you turn the throttle, the speed will increase.
Use the brake levers situated on both sides of the handlebar to apply brake and reduce
speed or stop. Apply brakes evenly and gently. Avoid squeezing the brakes too hard as it
cause the wheels to lock and skid. Right hand brake for rear wheels. Left hand brake for
front wheel. Do not use front brake heavily while turning, the front wheel may skid or
lock, causing loss of control.
Pg.08
TRIKKE POSITRON Owner’s manual

Pg.09
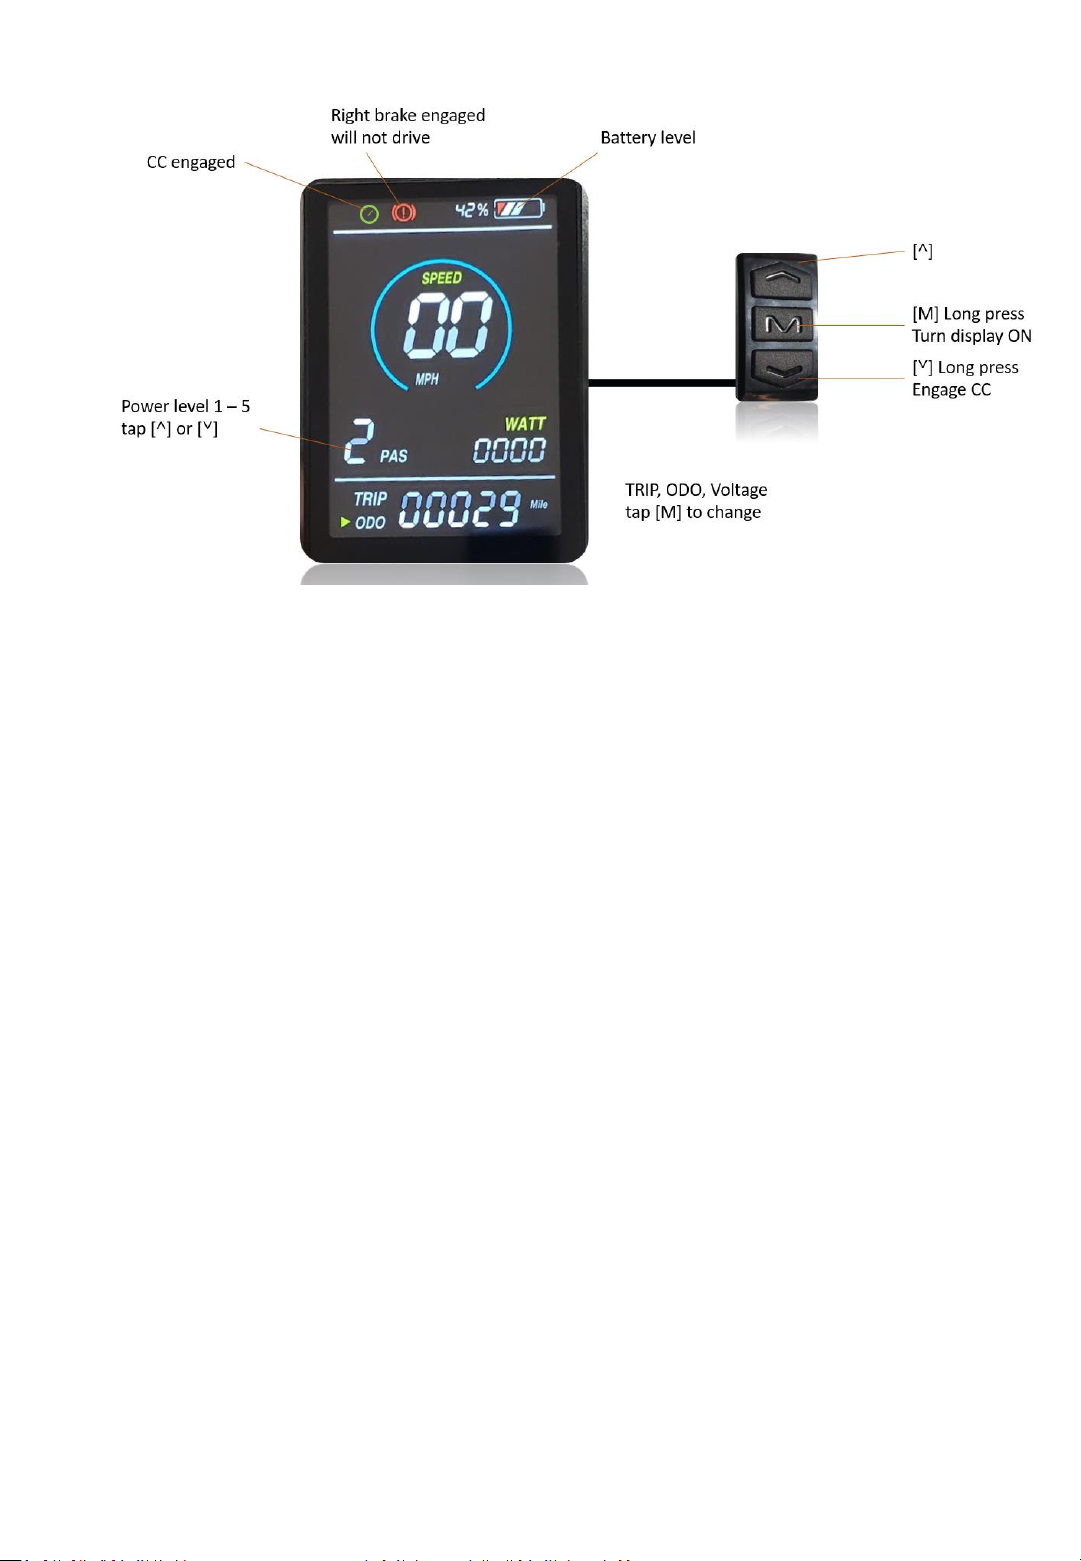
TRIKKE drive system - Display Settings
PARAMETER description range Factory value NOTE
P01 Speed limiter 0-100% of the top speed 100
100 = 28mph Defender
100 = 37mph Positron 60V
100 = 43mph Positron 72V
P02 Motor magnets count do not change 30
P03 Tire circumference 753mm (rear wheel) 753
P04 unit Miles ; Km Miles
P05 System voltage 48V ; 60V ; 72V 48 / 60 / 72
P06 System timeout 1-30 minutes 10
P07 Number of motors 1 (FWD); 2 (2WD); 3 (3WD) 3
P08 Speed sensor do not change 1
P09 Odometer reset 1 ; 0 will reset to zero 1
if you change this parameter to
"0" there is no way back.
P10 Starting power assist 1,2,3,4,5 choose default power at start up 2
P11 Blue Tooth key not used 0
P12 Immobilizer (motor jamming) 0 – off ; 1 - on 30 sec delay 1
engages 30s after turning display
off. Must keep battery switched
ON to work.
P13 Regenerative braking not used 0
P14 RFID card pairing
pair up to 3 cards. Show card near the [+]
button to pair. Hold [-] button for 10s to delete
all cards.
1, 2 , 3 … 0
P15 Pass Code "Cd" 4 digits used to access settings and to by-pass rfid key
factory default 3333
can be changed to any passcode
to by-pass RFID key > hold [-] for
20 sec and enter code
P16 Power level limiter 1, 2, 3, 4, 5 5
if select 3, rider can only use
1,2,3 (4 and 5 not available)
To enter SETTINGS press [+] and [-] buttons together for 2s. It will promp for passcode "Cd" (enter 3333)
Use [M] button to scroll through parameters P01-P16. Use [+] and [-] buttons to change value.
Press and hold [+] and [-] buttons to exit SETTINGS and go back to main screen (or wait for 30s and it will go back to main screen by itself) .
By-pass the rfid key ("Card" by holding [-] for 15s. Enter 4 digit code. Use [+] to switch position, use [-] to change numbers.
Display X3
TRIKKE POSITRON Owner’s manual
Display X6 (72V XL model)
The new X6 Display has a color screen and features a new button pad which is remote
from the main screen, placed on the right handle: [+] [M] [-]
With battery switched ON, press [M] to turn display (the drive system) ON.
To access settings press [+] and [-] together then enter PW 3333 (use + to change
position and –to set the number) than hold [+] and you are in.
Press [M] to move through parameters P01 ~P16
See below table of parameters and settings.
If you choose to use NFC access, go to P14, it prompts for a PW 0000 … enter code 3031
and hold [+] … P14 will show “0” meaning no phone or NFC card paired yet.
(you may pair up to 3 NFC devices)
Allow (turn on) NFC on your phone. Bring the phone close to the display screen. P14 will
turn to “1” then “2” and “3” as you add new phones. To delete the paired phones tap [-]
and it will go back to “0”.
Access without phone or NFC fob (back door) … (missing fob or phone)
Press [+] and [-] together until it prompts 0000 then enter PW 3031 … ***note that in
this situation [+] and [-] change the number up and down and [M] changes position.
Hold [+] after you enter the PW 3031… and you are in.
While you are in, you may want to delete all paired phones. Access settings press [+] and
[-] together then enter PW 3333 (use + to change position and –to set the number) than
hold [+]. Press [M] multiple times until P14. To delete the paired phones tap [-] and it
will go back to “0”. Press [+] and [-] together to exit settings.
TRIKKE POSITRON Owner’s manual
Pg.10

Display X6 (72V XL model)
Parameters settings:
P01 speed limit as a percentage of the top speed 44mph
P02 30 (nr of magnets in the motor)
P03 835 (tire circumference in mm)
P04 miles or km
P05 72V
P06 10 minutes sleep timer
P07 3 motors
P08 1
P09 1 (0 resets the odometer)
P10 2 (default power at start)
P11 0
P12 1 or 0 (turn on or off the wheel immobilizer –only works with battery switched on)
P13 keep it 0 (e-brake intensity 0-1-2-3)
P14 0000 enter code 3031 to pair NFC device (smart phone or NFC fob)
P15 set access password –factory set 3333
P16 max power level 1,2,3,4,5
P17 not used
TRIKKE POSITRON Owner’s manual
Pg.11

P A R K I N G
a) Lock parking brakes (both sides)
Pg.12
b) Set the kick-stand
Turn handlebar to the left and lean the
vehicle over the kick-stand.
TRIKKE POSITRON Owner’s manual
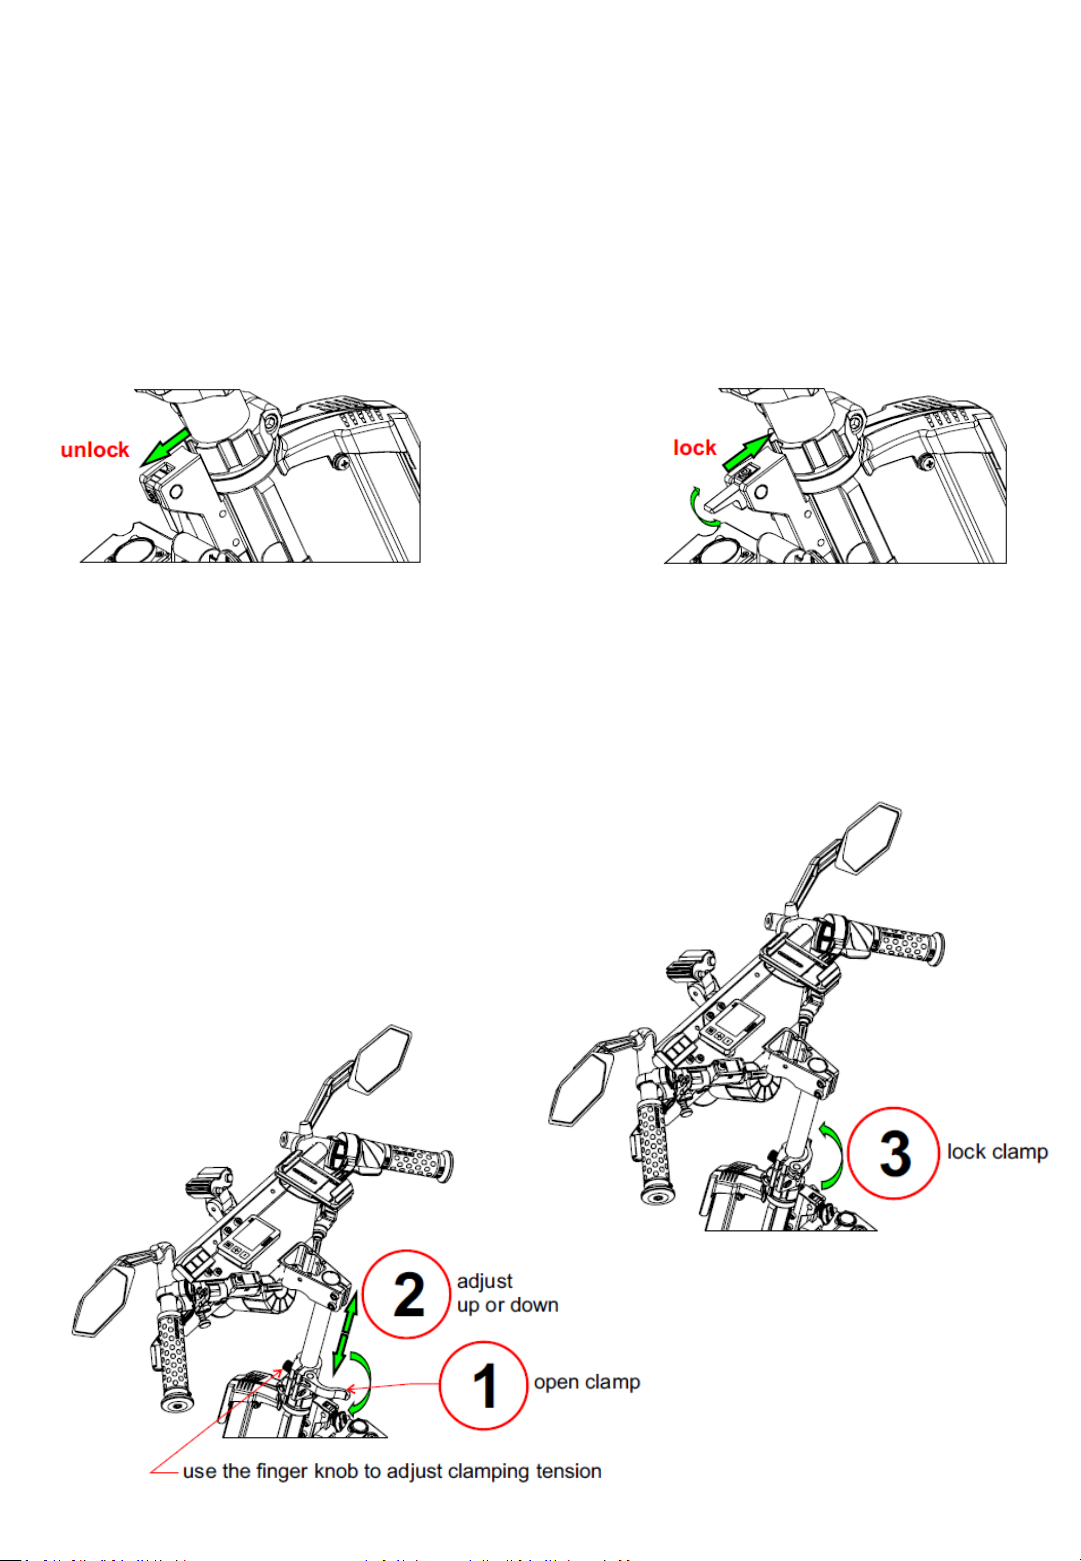
Steering lock
Useful for transport and maintenance, as well as theft deterrent.
Handlebar Height Adjustment
Useful for transport and maintenance, as well as theft deterrent.
Pg.13
TRIKKE POSITRON Owner’s manual

Folding Mechanism –adjusting lock tension
Keep a good tension to eliminate any play.
Reduce the tension for easy operation.
Pg.14
Headlight adjustment
Adjust the headlight projection angle by tilting the headlight on the bracket.
TRIKKE POSITRON Owner’s manual
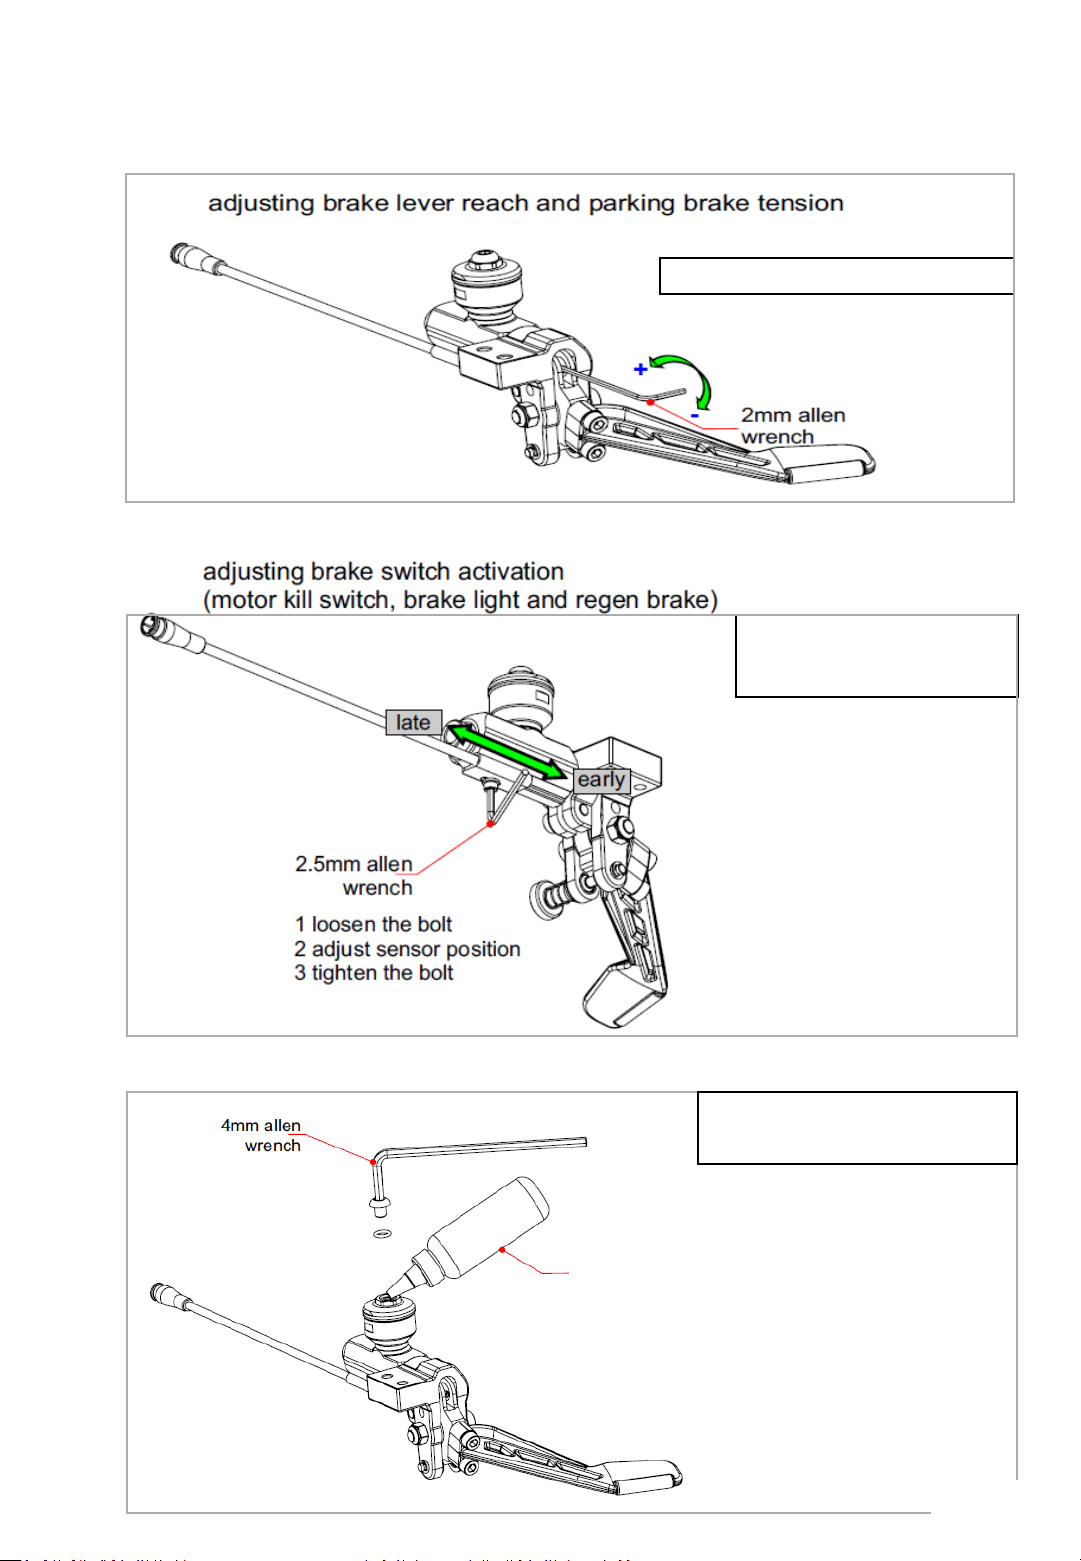
BRAKE LEVER ADJUSTMENT
BRAKE SWITCH
ADJUSTMENT
ADDING OIL
TO BRAKE RESERVOIR
mineral
oil
RIGHT lever = drive kill
switch
LEFT lever = brake light
switch
TRIKKE POSITRON Owner’s manual
Pg.15

Pg.16
TIRE PRESSURE
Check and inflate every 3 weeks!
MAINTENANCE
Standard tire width 65mm
FR 40-50 psi RR 50-65 psi
XL tire width 85mm
FR 25-30 psi RR 30-40 psi
CLEANING: wipe with a soft cloth and all-purpose cleaner
TRIKKE POSITRON Owner’s manual
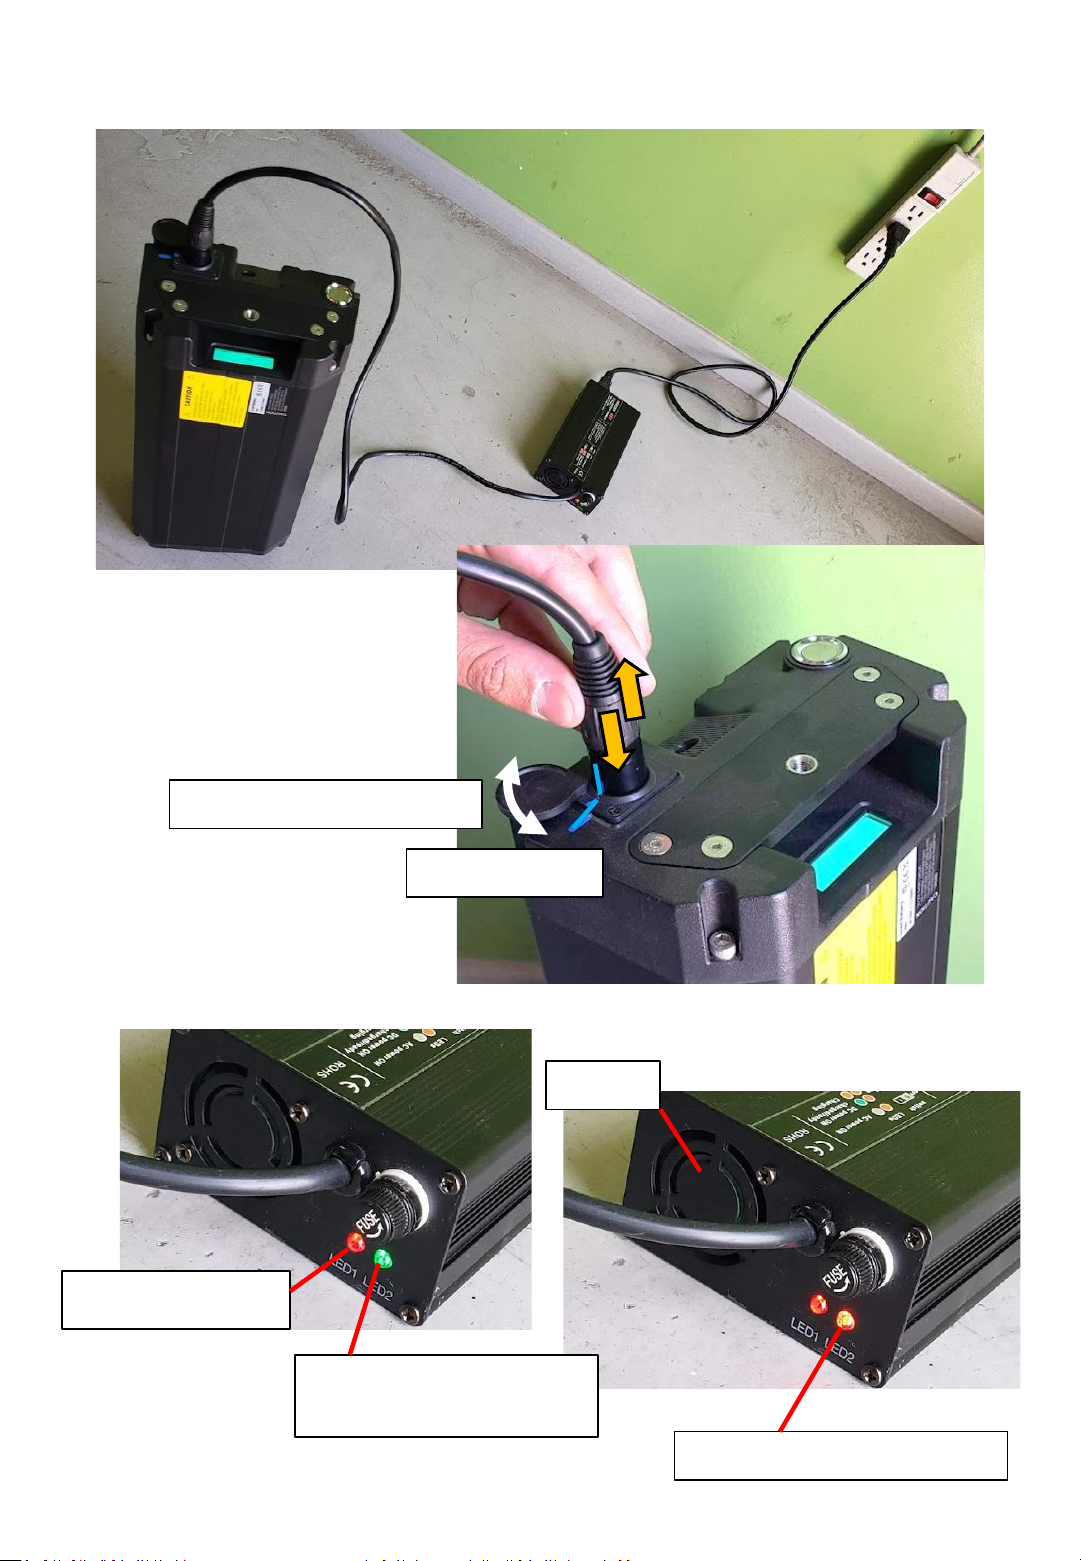
AC power ON
GREEN - not charging or
battery already charged
RED –charging in progress
CHARGING
Fan ON
AC power
DC charging
Align blue lines to insert
Charging Port
CHARGER
Pg.17
TRIKKE DEFENDER Owner’s manual

Removing/installing FRONT wheel
Removing/installing REAR wheel
Pg.18
(necessary to disconnect motor cable)
(necessary to disconnect motor cable)
TRIKKE POSITRON Owner’s manual
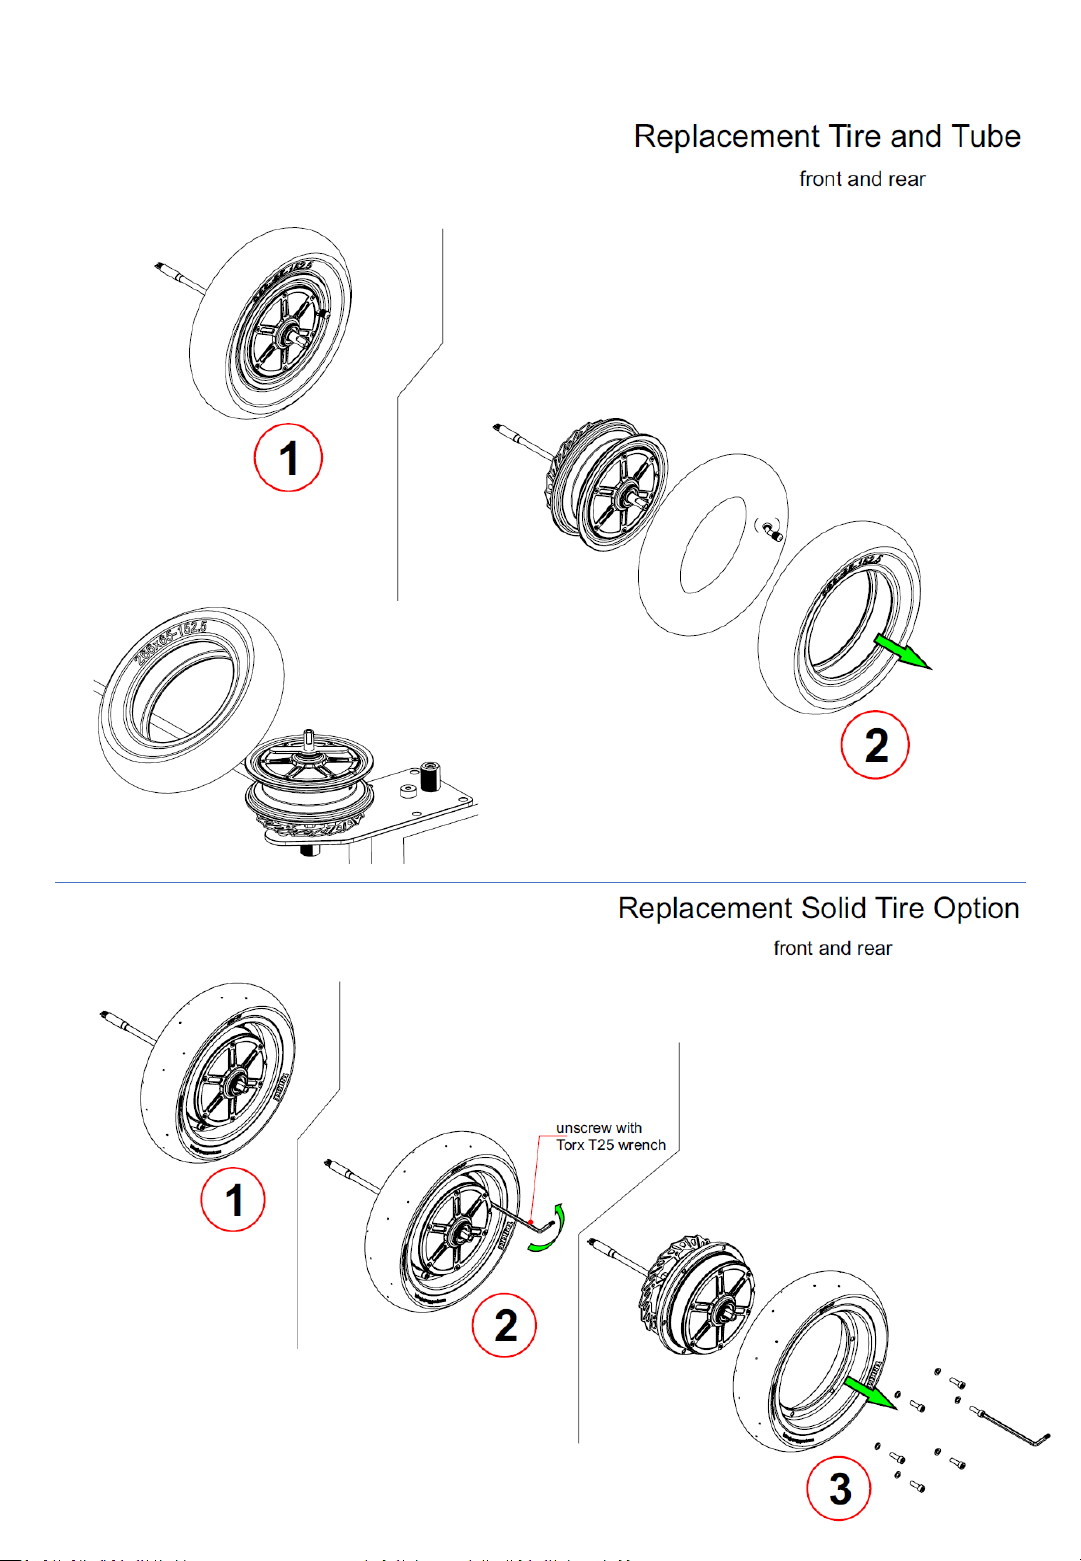
Using the TRIKKE tire changer
TRIKKE POSITRON Owner’s manual
Pg.19
Pg.20
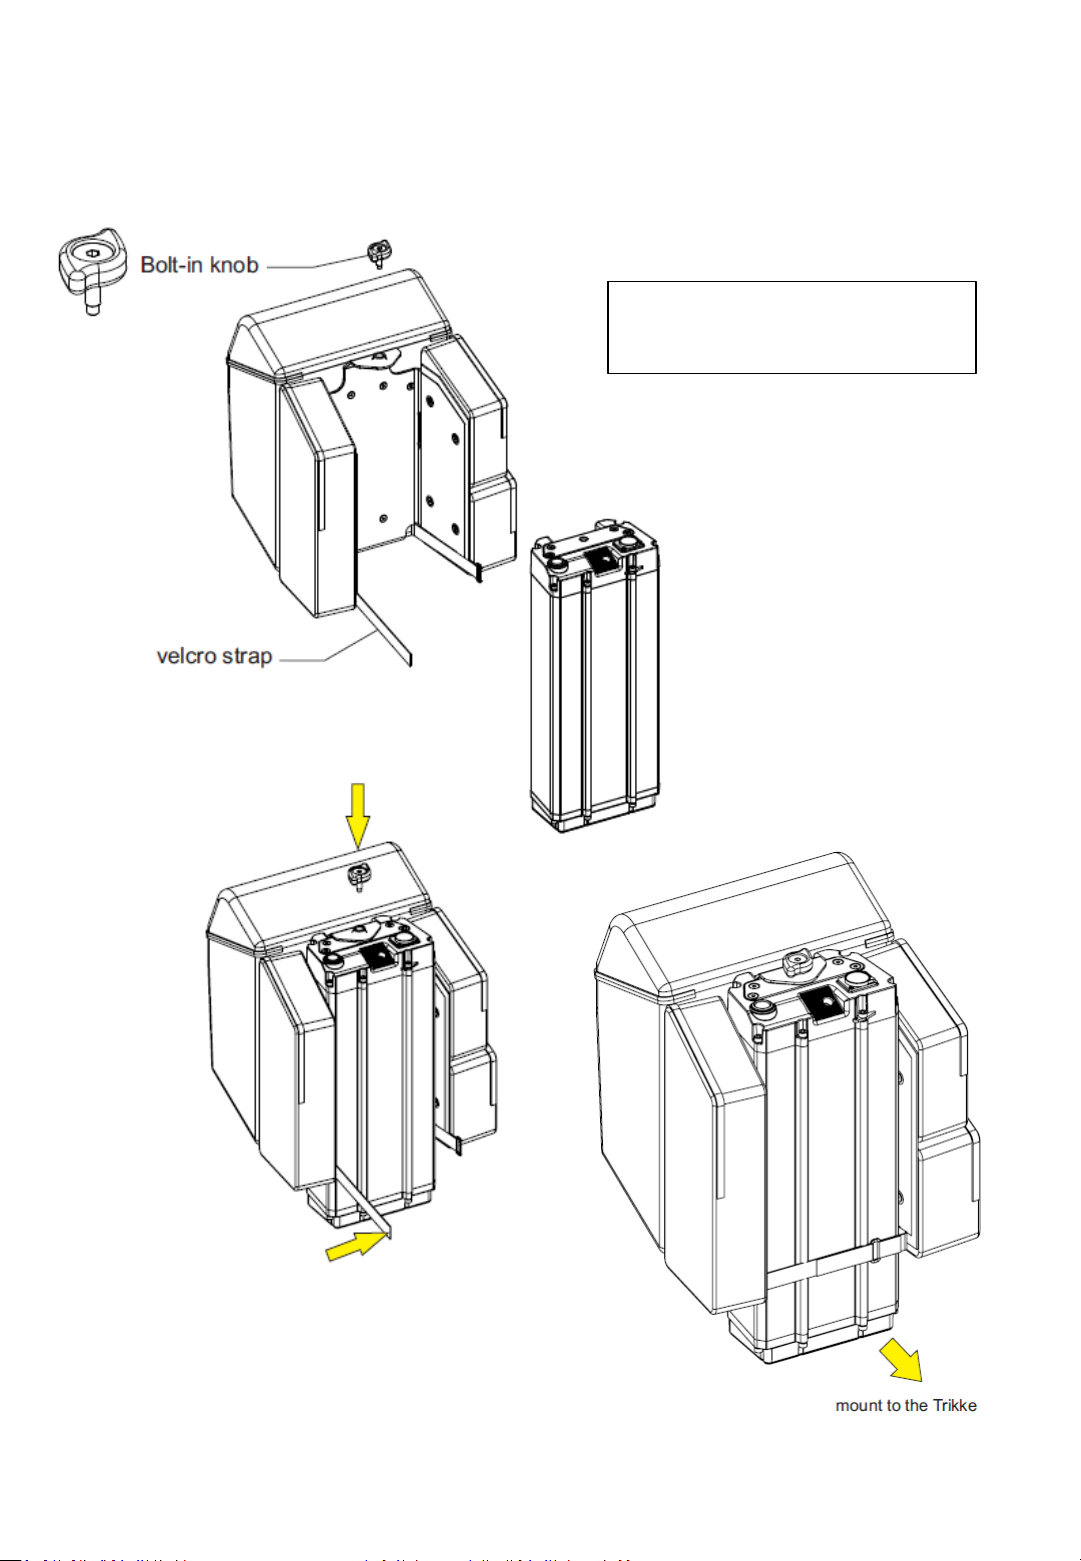
Mounting the GEAR BAG
to the battery
TRIKKE POSITRON Owner’s manual
This manual suits for next models
2
Table of contents
Other Trikke Scooter manuals

Trikke
Trikke T5 JOGO User manual

Trikke
Trikke T7 User manual

Trikke
Trikke uPT User manual

Trikke
Trikke DEFENDER 48V 2WD User manual

Trikke
Trikke Pon-e 48V User manual

Trikke
Trikke FREEDOM User manual

Trikke
Trikke T8 User manual

Trikke
Trikke Colt User manual

Trikke
Trikke eV5 User manual

Trikke
Trikke T8 User manual


