Trikke Tribred Pon-e User manual


ImportantMustReadWarnings,
SafetyInformationandRidingTips
Thank you for purchasing a Trikke™ product. This owner’s manual is designed to help you make the
most o
f
y
our Pon‐e vehicle. Instructions and warnin
g
s have been carefull
y
p
re
p
ared to make
y
our
y
g
y
pp
y
experience as safe and enjoyable as possible. Use common sense while riding and enjoy your new
Pon‐e. Read additional information on page 17.
READ AND UNDERSTAND THE ASSEMBLY, MAINTENANCE AND SAFETY SECTIONS OF THE OWNER’S
MANUAL BEFORE RIDING. ALWAYS FOLLOW THE INSTRUCTIONS AND PAY ATTENTION TO ALL
WARNINGS.
•ALWAYS WEAR PROPER SAFETY EQUIPMENT WHEN RIDING THE PON‐EINCLUDING AN ANSI,
SNELL, CPSC, ASTM OR DIN EN 1078 APPROVED HELMET. USE PROPER FOOTWEAR AND SECURE
LACES ON SHOES BEFORE RIDING.
•AVOID WATER, BUMPS, GRAVEL, SAND, CRACKS, UNEVEN SURFACES OR OBSTACLES THAT MAY
STOP YOU SUDDENLY OR CAUSE YOU TO LOSE CONTROL. THE PON‐EISNOTINTENDEDFOROFF‐
ROAD
USE
AVOID
RIDING
AT
NIGHT
ROAD
USE
.
AVOID
RIDING
AT
NIGHT
.
•HANDS FREE RIDING CAN BE DANGEROUS. USEBOTHHANDSTOHOLDTHEHANDLEBARS
FIRMLY AT ALL TIMES. DO NOT PUSH TOO HARD ON TOR APPLY UNEVEN PRESSURE TO EITHER SIDE
OF THE HANDLEBARS. DO NOT MAKE SUDDEN SHARP TURNS OR APPLY YOUR BODY WEIGHT TO
THE HANDLEBARS WHEN TURNING. SUCH ACTIONS MAY CAUSE THE VEHICLE TO “JACK‐KNIFE” OR
STOP SUDDENLY, WHICH CAN CAUSE SERIOUS INJURY TO THE RIDER.
•STUNT RIDING
,
RIDING BACKWARDS AND
/
OR EXTREME RIDING ARE NOT RECOMMENDED ON
,
/
THE PON‐E. RIDING IN THIS FASHION MAY DAMAGE THE PRODUCT AND VOIDS THE WARRANTY
AND MAY RESULT IN INJURY OR DEATH.
•DO NOT LEAN BACK OR PULL BACK ON THE HANDLEBARS. DOING SO CAN CAUSE THE RIDER
TO FALL OFF THE BACK OF THE VEHICLE POSSIBLE RESULTING IN SERIOUS INJURY OR DEATH.
•DOWNHILL RIDING IS NOT RECOMMENDED, ESPECIALLY FOR NOVICE RIDERS. THE PON‐EIS
DESIGNED PRIMARILY FOR USE ON DRY FLAT PAVEMENT. EXTREME CAUTION SHOULD BE USED
WHEN RIDING ON ANY HILL.
•WE RECOMMEND THAT YOU DO NOT EXCEED THE INDICATED MAXIMUM RIDER WEIGHT LIMIT
OF 250lbs. ON THE PON‐E.
•ALWAYS INSPECT THE VEHICLE BEFORE EACH RIDE ANDMAKESURETHATTHEHANDLEBAR
QUICK RELEASE AND THE FOLDING MECHANISMS ARE SECURELY LOCKED IN THE PROPER RIDING
POSITION. READ THE ASSEMBLY SECTION OF THE OWNER’S MANUAL FOR IMPORTANT ASSEMBLY
AND
MAINTENANCE
INFORMATION
AND
MAINTENANCE
INFORMATION
.
•TEST THE BRAKES FOR PROPER FUNCTION BEFORE EACH RIDE ALWAYS APPLY BOTH BRAKES
EVENLY WITH YOUR WEIGHT DISTRIBUTED EVENLY OVER EACH REAR WHEEL.
•CHILDREN SHOULD ALWAYS BE SUPERVISED BY AN ADULT WHEN RIDING. IT IS THE PARENT OR
GUARDIAN’S RESPONSIBILITY TO THE PROPERLY MAINTAIN AND INSPECT THE VEHICLE BEFORE
EACH RIDING SESSION. THE PON‐E IS NOT RECOMMENDED FOR CHILDREN UNDER 12 YEARS OF
AGE
OR
UNDER
5
’
‐
2
”
TALL
Trikke Tribred Pon‐eOwner's
ManualV110/1/08 2
AGE
OR
UNDER
5
‐
2
TALL
.

•ALWAYS EXERCISE EXTREME CAUTION WHEN YOU ARE RIDING IN PROXIMITY TO OTHER
VEHICLES, PEDESTRIANS, AND ESPESSIALLY IN PROXIMITY TO CARS IF YOU ARE RIDING ON A STREET.
BE SURE TO OBEY ALL RULES OF THE ROAD. PLEASE BE COURTEOUS TO RIDERS OF OTHER VEHICLES
AND ALL PEDESTRIANS. SHARE THE PATH!
•DO NOT MODIFY YOUR PON‐EVEHICLE. ONLY USE TRIKKE TECH, INC. APPROVED PARTS OR
ACCESSORIES. SEE THE LIMITED WARRANTY FOR OTHER USE RESTRICTIONS.
•THE PON‐EISALOWPOWER,ULTRA‐LIGHT SYSTEM AND ITS INTENDED USE IS TO ENHANCE THE
CARVING EXPERIENCE OF THE TRIKKE CARVING VEHICLE AND ADD A POWER ASSIST. IT IS THE
INTENTION THAT THE ELECTRIC MOTOR WILL BE USED IN COMBINATION WITH STANDARD CARVING
PROPULSION.
•THE USE OF THE ELECTRIC MOTOR WILL PROPELL YOU AT SPEEDS YOU MAY NOT BE
ACCUSTOMED
TO
WHICH
MAY
BE
BEYOND
YOUR
SKILL
LEVEL
PRACTICE
AT
LOWER
SPEEDS
IS
ACCUSTOMED
TO
WHICH
MAY
BE
BEYOND
YOUR
SKILL
LEVEL
.
PRACTICE
AT
LOWER
SPEEDS
IS
HIGHLY RECOMMENDED FOR YOUR OWN SAFETY.
•BE AWARE OF LOW OBJECTS. YOU ARE TALLER THAN YOU THINK WHILE RIDING. YOU MAY
NEED TO DUCK UNDER TREE BRANCHES, STREET SIGNS, ETC.
•LOOK FURTHER AHEAD AS OBSTACLES AND TURNS WILL BE COMING AT YOU FASTER.
•DUE TO INCREASED SPEEDS, RISK OF INJURY AND DEATH ARE VASTLY INCREASED WHILE
RIDING
WITH
THE
ELECTRIC
MOTOR
.
OERATOR
FOCUS
IS
A
CONSTANT
REQUIREMENT
RIDING
WITH
THE
ELECTRIC
MOTOR
.
OERATOR
FOCUS
IS
A
CONSTANT
REQUIREMENT
.
•THE BREAKING DISTANCE REQUIRED FOR A FULL STOP WILL INCREASE WITH THE USE OF THE
ELECTRIC MOTOR. PRACTICE BREAKING FROM FULL SPEED IN A SAFE ENVIRONMENT TO ASSESS
THEDISTANCEREQUIREDTOSTOP.
•WHENEVER YOU RIDE, FOLLOW ALL TRAFFIC REGULATIONS, INCLUDING STOP SIGNS, TRAFFIC
SIGNALS AND PEDESTRIAN CROSSWALKS. IF YOU WANT TO KNOW ANY SPECIAL LAWS THAT
GOVERN THE OPERATION OF THE TRIKKE TRIBRED VEHICLE, CONTACT YOUR LOCAL POLICE STATION
OR DEPARTMENT OF MOTOR VEHICLES FOR INFORMATION.
•ANY MODIFICATION OF THE ELECTRIC MOTOR SYSTEM WILL VOID THE WARRANTY INCLUDING
BUT NOT LIMITED TO, ATTEMPTING TO INCREASE THE SPEED OR PERFORMANCE OF THE MOTOR,
USING WHEELS OR TIRES NOT RECOMMENDED BY TRIKKE TECH INC., AND/OR EQUIPPING THE
MOTOR WITH NON TRIKKE COMPONENTS.
•TIRE WEAR, PUNCTURES OR RUPTURES CAN RESULT IN SUDDEN LOSS OF CONTROL AND MAY
RESULT IN SERIOUS INJUR
Y
. ALWAYS BE SURE TO MAINTAIN THE TIRES PROPERL
Y
.
•THE ELECTRIC MOTOR SYSTEM IS DESIGNED TO OPERATE WITH 36 VOLTS ONLY. USE OF ANY
BATTERIES OTHER THAN THE 36V‐9Ah LI‐ION BATTERIES SUPPLIED WITH THE PON‐EORTHEYIKLIK
CHARGER PROVIDED MAY RESULT IN SYSTEM FAILURE. ANY SUCH MODIFICATIONS WILL VOID THE
WARRANTY. TRIKKE WILL NOT BE RESPONSIBLE FOR ANY AND/OR ALL INJURIES OR DEATH OR ANY
OTHER DAMAGE(S) CAUSED BY SUCH MODIFICATION.
•
IF
YOU
DO
NOT
UNDERSTAND
HOW
TO
USE
THE
THROTTLE
PROPERLY
DO
NOT
RIDE
YOUR
PON
•
IF
YOU
DO
NOT
UNDERSTAND
HOW
TO
USE
THE
THROTTLE
PROPERLY
,
DO
NOT
RIDE
YOUR
PON
‐
E. CONTACT TRIKKE TECH SUPPORT AT 877‐4TRIKKE (877‐487‐4553).
•BREAKING AND LOCKING THE REAR WHEELS OR “SKIDDING” THE REAR WHEELS WILL DAMAGE
THE TIRES AND AIS NOT COVERED BY THE WARRANTY.
Trikke Tribred Pon‐eOwner's
ManualV110/1/08 3

GeneralWarnings:
•If you do not have the proper tools or find that you are unable to understand the assembly
instructions, have a qualified Trikke dealer assemble the Pon‐e for you. If a Trikke dealer assembles
the vehicle for you, be sure to read the Riding and Safety sections of the owner’s manual and watch
the
Riding
and
Safety
video
manual
before
riding
for
the
first
time
the
Riding
and
Safety
video
manual
before
riding
for
the
first
time
.
•Immediately stop riding if you suspect that any part of the vehicle is not functioning properly.
Inspect the vehicle closely to confirm what the problem is. Contact your dealer or Trikke Tech, Inc.
directly if you suspect that a malfunctioning or defective part is affecting its safe operation.
•
The
front
wheel
is
turned
exactly
180
degrees
to
that
of
a
bicycle
.
Unlike
a
bike,
a
carving
The
front
wheel
is
turned
exactly
180
degrees
to
that
of
a
bicycle
.
Unlike
a
bike,
a
carving
vehicle’s front wheel actually trails behind the fork. Altering this wheel position will change the
intended performance of the vehicle. See the photos on page 5 of this manual to see the proper
manufacturer suggested position of the front fork.
•Riders performing in Trikke Tech, Inc. produced videos and photos are highly skilled and specially
trained professionals. Do not try these tricks yoursel
f
or you may lose control and fall causing
serious injury and even death.
•If you did not receive an instructional video in the box, or if the written or video manual is
damaged, please contact Trikke Tech, Inc. before attempting to assemble or ride the carving vehicle.
•The Pon‐eisanelectrifiedvehicleandassuchthereispotentialforshockandorfireifthe
lil
i
d
ih
d
di i
e
l
ectr
i
ca
l
system
i
stampere
d
w
i
t
h
or expose
d
to wet con
di
t
i
ons.
•Use of a charger other than the Yiklik charger provided may cause the electrical system to
overheat and/or cause a fire.
Trikke Tribred Pon‐eOwner's
ManualV110/1/08 4
TRIKKETRIBREDPON‐EASSEMBLYMANUAL
Your pre‐assembled Pon‐e requires handlebar and front fork/motor assembly attachment , cable
connections and a quick maintenance checklist before riding. All of the following information and
more can be found on the www.trikke.com website. This owner’s manual is also supplemented by the
video Owner’s Manual with step‐by‐step instructions on the assembly process, how it works, and how
to ride.
frame
handlebar
motor
Brake Lever
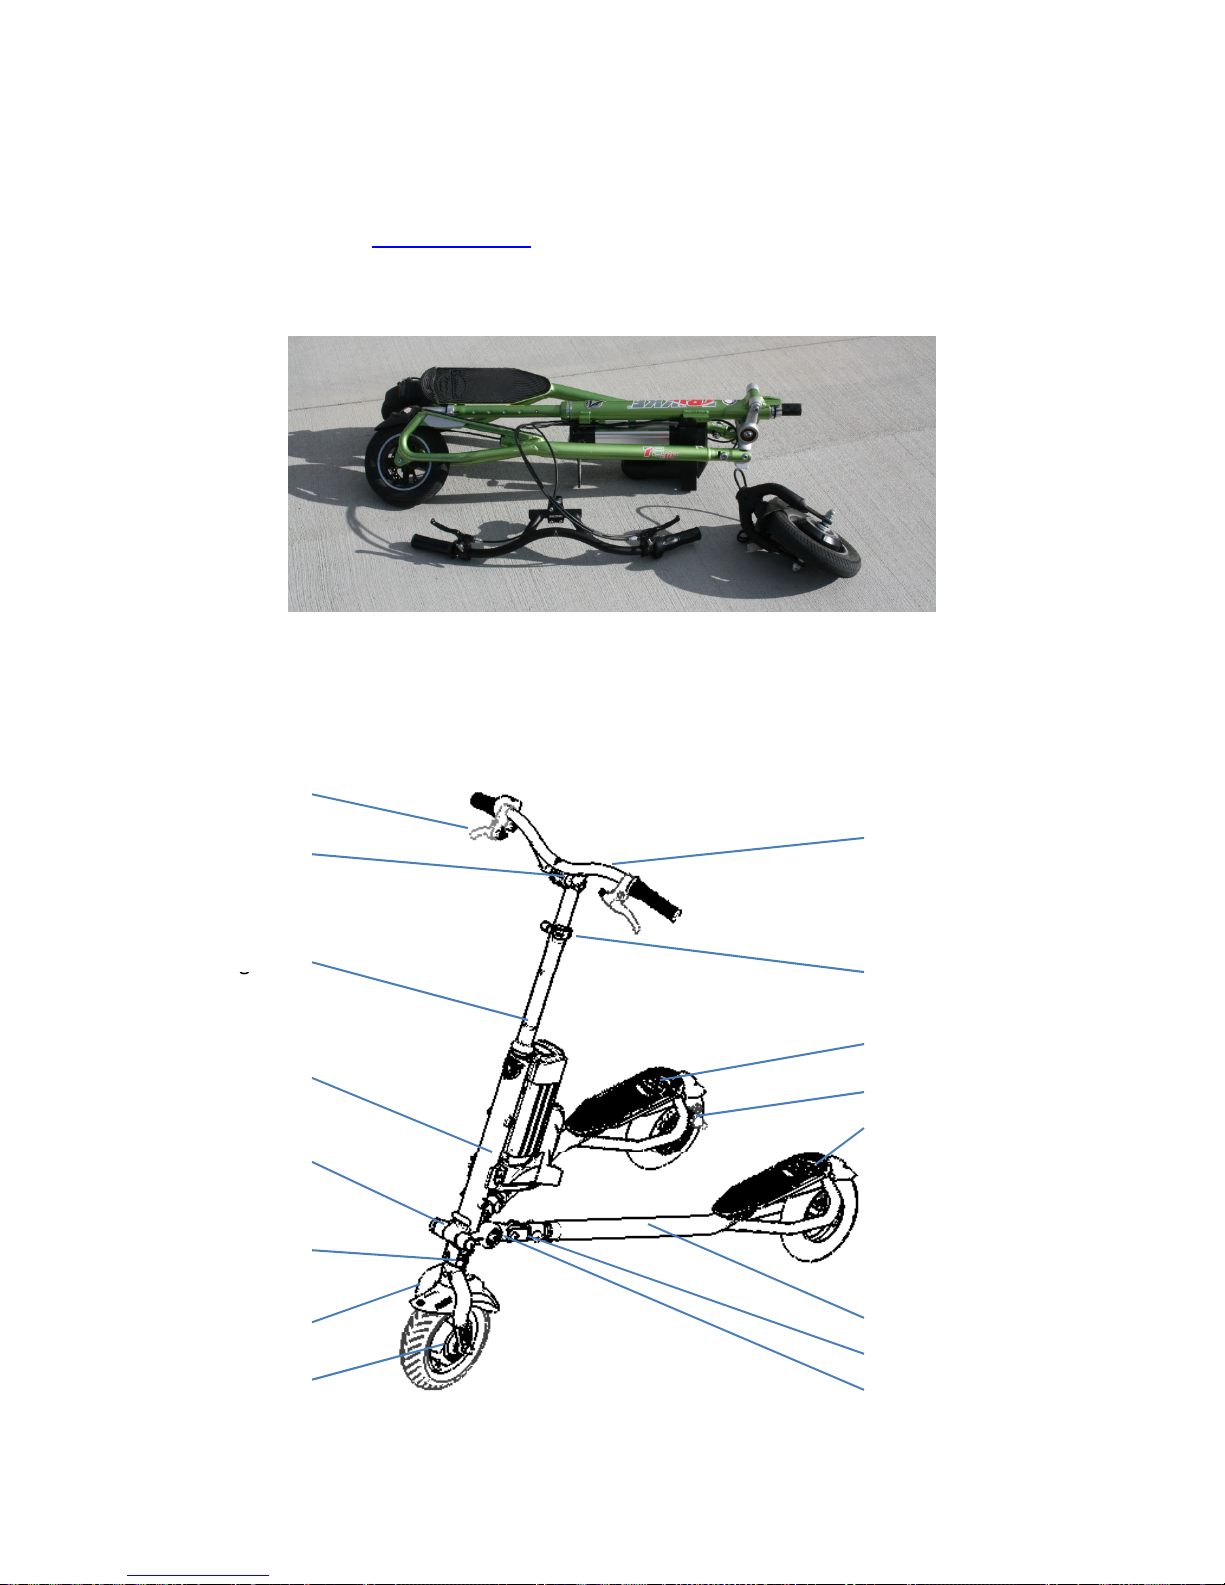
The various Pon‐e vehicle components are labeled for your reference below. You may need to refer to
these images to finish the assembly of your Pon‐e.
Handlebar
Brake
Lever
Stem
Steerin
g
Axle
Handlebar Level Quick
g
Deck
RearWheel
RightArm
Handlebar
Level
Quick
Release
FrontTube
LeftArm
CamberingAxle
FrontFork
SteeringStopper
Trikke Tribred Pon‐eOwner's
ManualV110/1/08
CamberingJoint
FoldingMechanism
FrontWheel/Motor
Assembly
5

TRIKKETRIBREDPON‐EPOWERPACK
36V‐9AhLi‐IonBattery
BatteryRail SpeedLimiterSwitch
ControllerBox
BatteryBasePlate
Controller
TRIKKETRIBREDPON‐EPOWERCOMPONENTS
Throttle Handgrips
ControllerBox
And Battery
Badge
And
Battery
Motor
Trikke Tribred Pon‐eOwner's
ManualV110/1/08 6

Step1:UnfoldingtheLegs
At the front of each leg there is a folding
joint near the cambering mechanism.
Each of the two joints has a spring‐
loaded
bolt
action
quick
release
loaded
bolt
action
quick
‐
release
mechanism with a notch to allow the
bolt to be held in the open position.
The same procedure also applies to
collapsing the vehicle. When the Pon‐e
is new, sometimes the joints are tight.
This is normal, and they will loosen up
after some use. If tightness continues,
us some spray oil like WD‐40 to lubricate
the joints.
The vehicle should be in its unfolded
standing position in order to attach the
handlebars.
Trikke Tribred Pon‐eOwner's
ManualV110/1/08 7
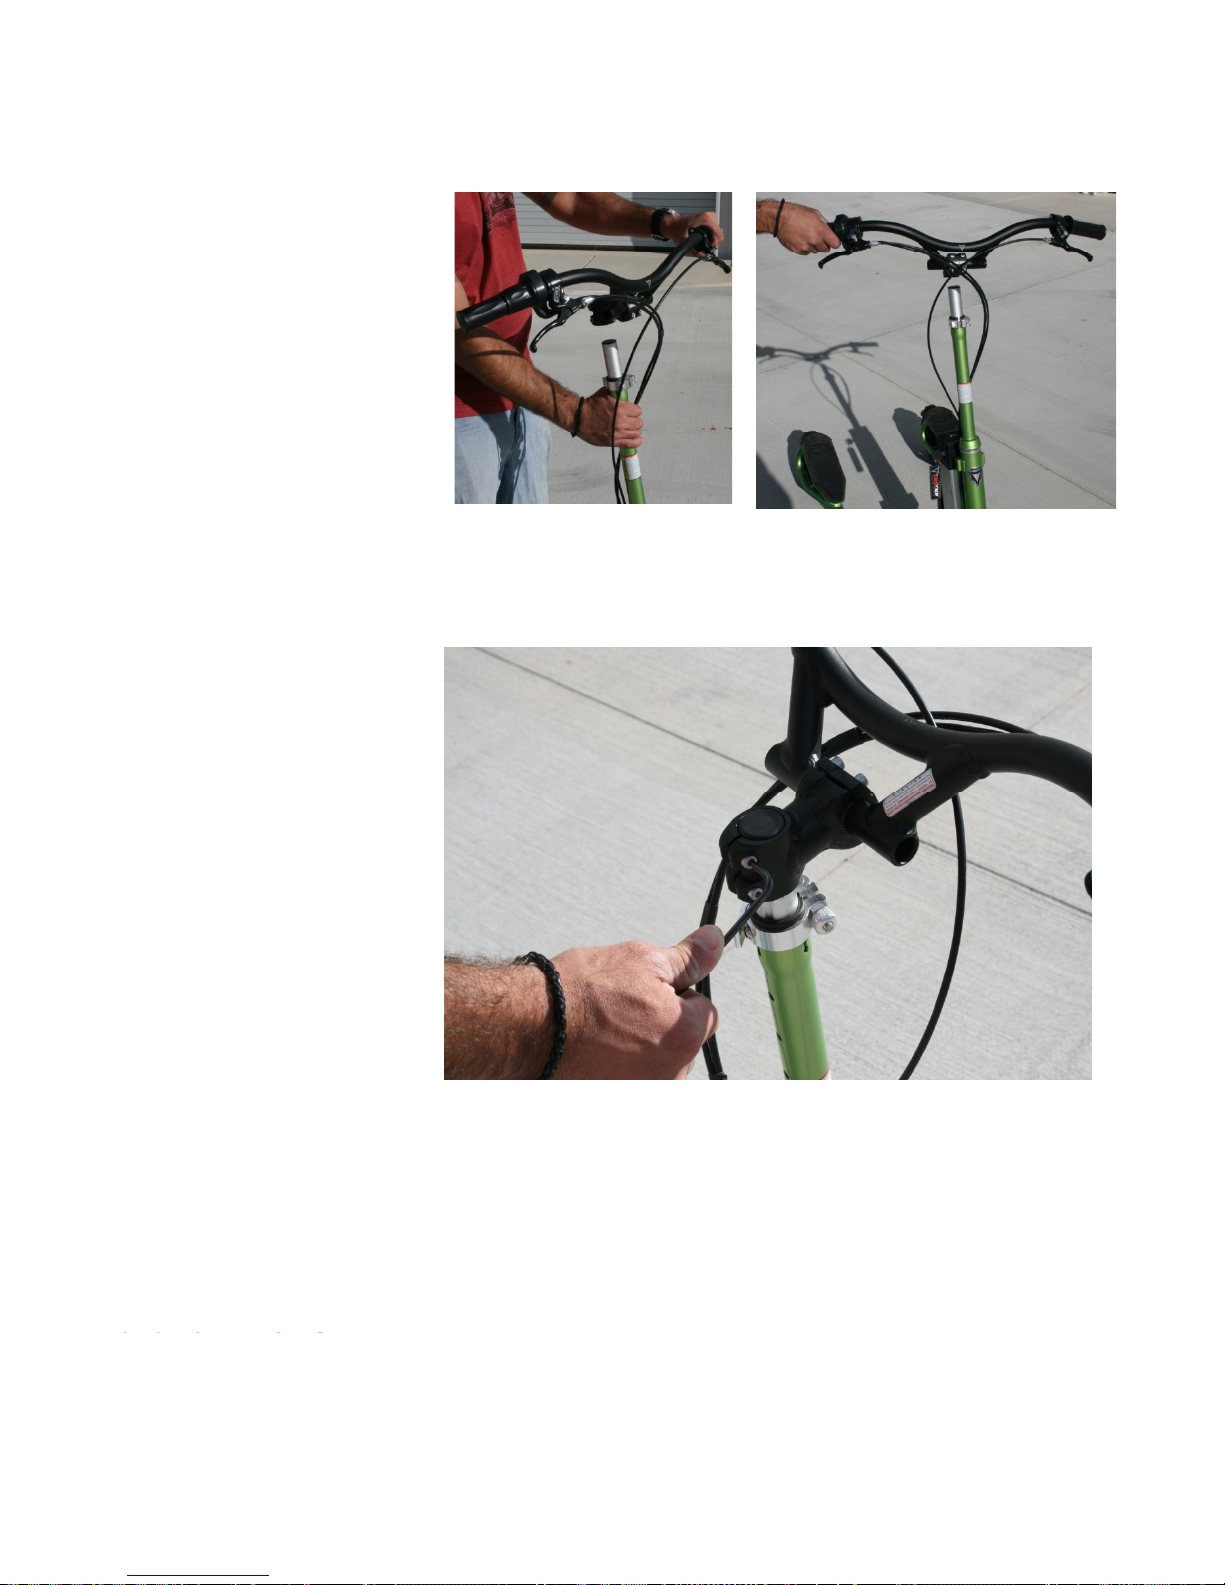
Step2:AttachingtheHandlebars
Position the handlebars with
the brake cables crossing
once behind the steering
column and again in front.
This simple method insures
that the left brake lever
actually operates the left
rear brake. If you find that
your brakes are crossing,
l
tt
i
d
p
l
ease s
t
ar
t
aga
i
nan
d
properly mount the
handlebars. Note: the
throttle cable should be
taped to the right brake
cable.
Once your brake cables are
properly routed you can
secure the handlebars.
Loosen the two bolts on the
stem that fasten the stem to
the stem post using the
supplied 5mm Hex wrench.
Slide the handlebar/stem
assembly onto the stem
post. You will need to insert
the plastic step post plug
(see
right
picture)
after
(see
right
picture)
after
sliding the handlebar stem
assembly onto the stem.
Align the handlebar
perpendicular to the front
fork pushpin which should
be
facing
in
the
direction
the
be
facing
in
the
direction
the
vehicle will be traveling.
Center the bars and tighten
(but do not torque) the two
hex bolts evenly. The final
torque will happen after
p
ro
p
erl
y
ali
g
nin
g
the
Trikke Tribred Pon‐eOwner's
ManualV110/1/08 8
pp y
gg
handlebars later in the
assembly procedure.

Step3:AttachingtheFrontFork
Putting the front fork/motor assembly on in the
proper riding position requires a 5mm Hex
wrench (supplied). First, turn the vehicle upside
down so the fork post (arrow right) is aiming
towards the sky. Note: place the plastic
packaging support underneath the handlebar to
avoid damaging the throttle. You should do this
procedure on carpet or soft surface to prevent
scratching the handlebars or foot platforms.
Loosen the two Hex bolts on the fork collar using the supplied 5mm wrench. Simply align the
Trikke Tribred Pon‐eOwner's
ManualV110/1/08 9
lockingpinwiththeholeandpushthefrontforkontotheforkpostuntilthetopo
f
the fork and the
locking pin meet. Tighten the Hex bolts on the fork collar.

Fromthefrontfork/motorassembly,besurethemotorcableisbehindthefrontforkandfastenedto
the upper arm of the fork with a zip‐tie. Allowing a little slack, use one of the zip‐ties provided to tie
the motor cable to the outside edge of the cambering mechanism. Cut the excess zip‐tie material.
Step4:Checkthefrontfork/motorassemblycablealignment
Turn the vehicle right side up and look down the front post. Adjust the stem post by aligning the
front wheel axle with the handlebar (You may need to loosen the stem bolts to adjust the handlebar
alignment)
Step5:Checkthehandlebaralignment
alignment)
.
Now all you need to do is use the 5mm Hex wrench to lock the handlebar in place.
Trikke Tribred Pon‐eOwner's
ManualV110/1/08 10

Step6:Connectingthecablesoftheelectricalsystem
Unscrew the bottom tray of the controller box to access the
cable connectors.
Connect the throttle cable. Connect the two–pin and the four‐pin wire connectors from the throttle
to the two–pin and four‐pin connectors from the controller labeled “Throttle.”
Connect the moto
r
. Connect the six‐pin connector from the motor to the six‐pin connector from the
controller labeled “Motor.” Connect the three wires from the motor to the same colored individual
wires from the controller labeled “Motor.” Slide the clear rubber sleeve (arrow) that covers the metal
connector portion of the wire down the wire to expose the metal. Connect the wires together and
slide the clear rubber sleeve back over the connection. This will insulate the connection as well as
keep the connection together.
TrikkeTribred Pon‐eOwner's
ManualV110/1/08 11
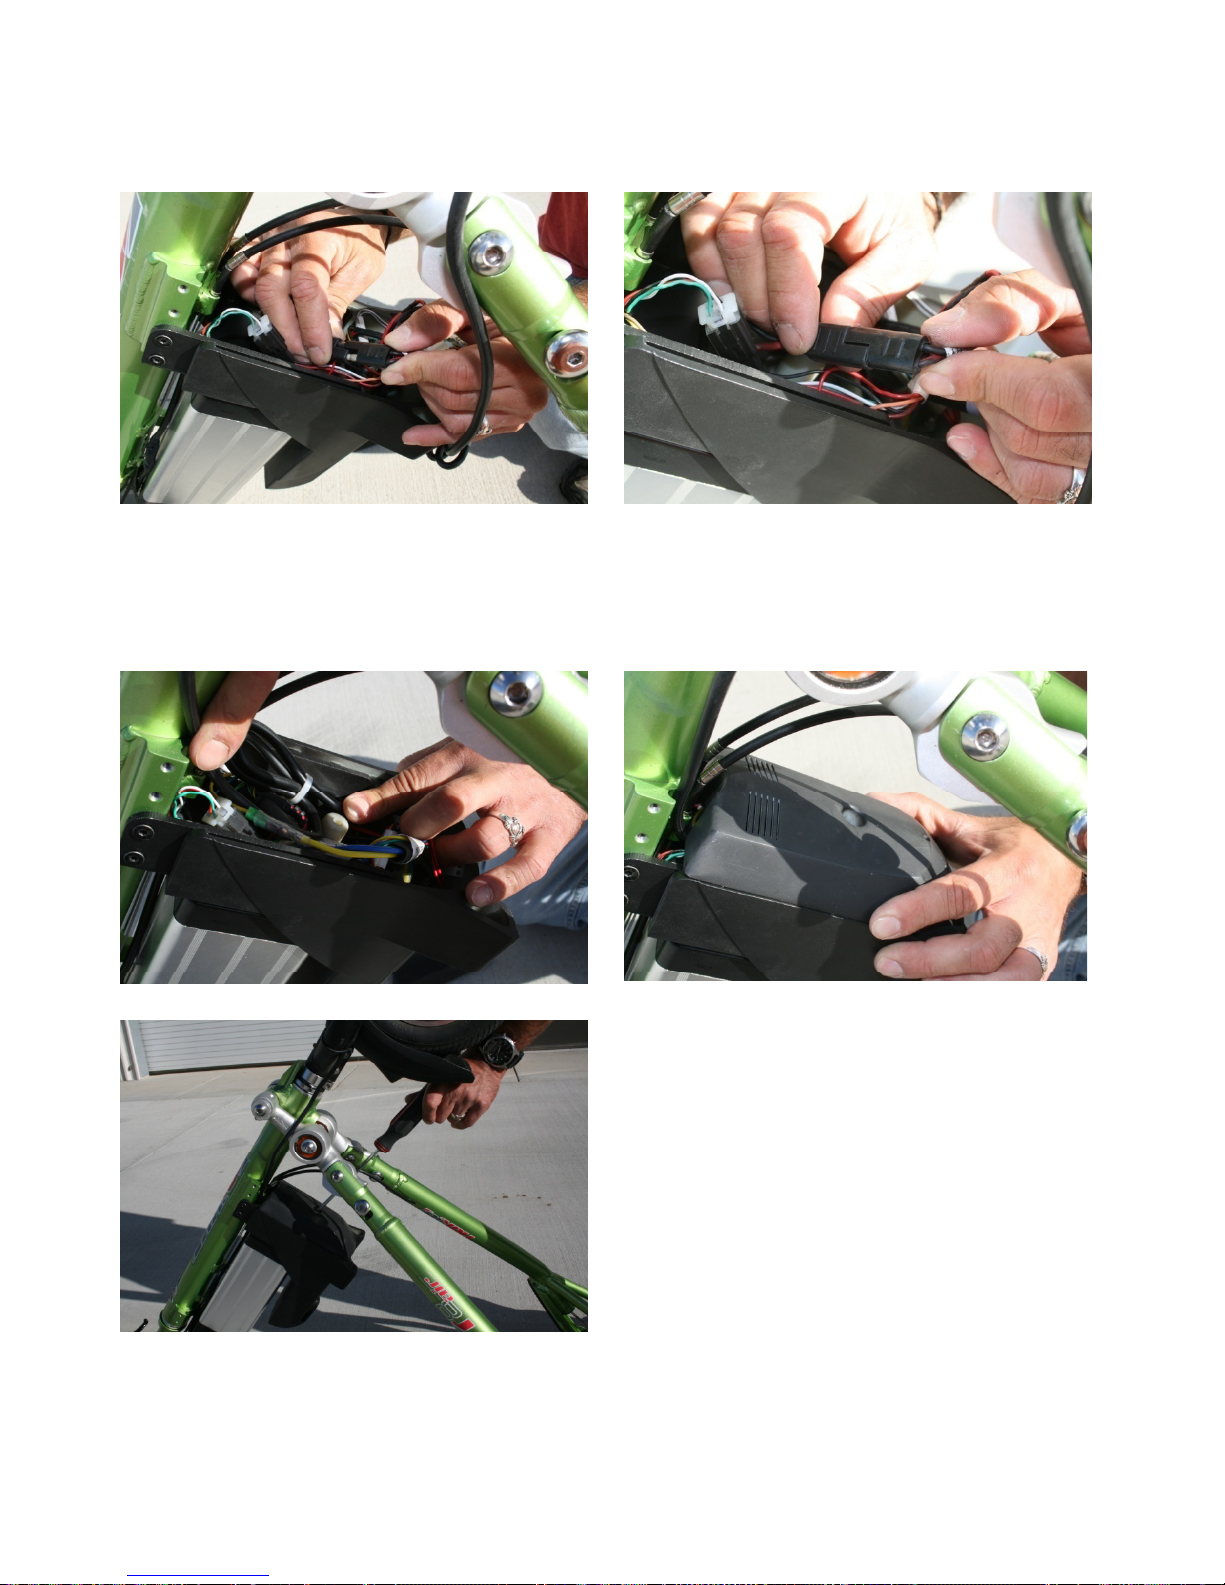
Connect the batteries. Connect the black connector from the controller to the black connector from
the battery. Note: You may hear a pop sound when the connection is initially made. This is normal.
Pack
the
wiring
into
the
controller
box
and
fasten
the
tray
back
into
place
Torque
the
bolt
Pack
the
wiring
into
the
controller
box
and
fasten
the
tray
back
into
place
.
Torque
the
bolt
.
TrikkeTribred Pon‐eOwner's
ManualV110/1/08 12
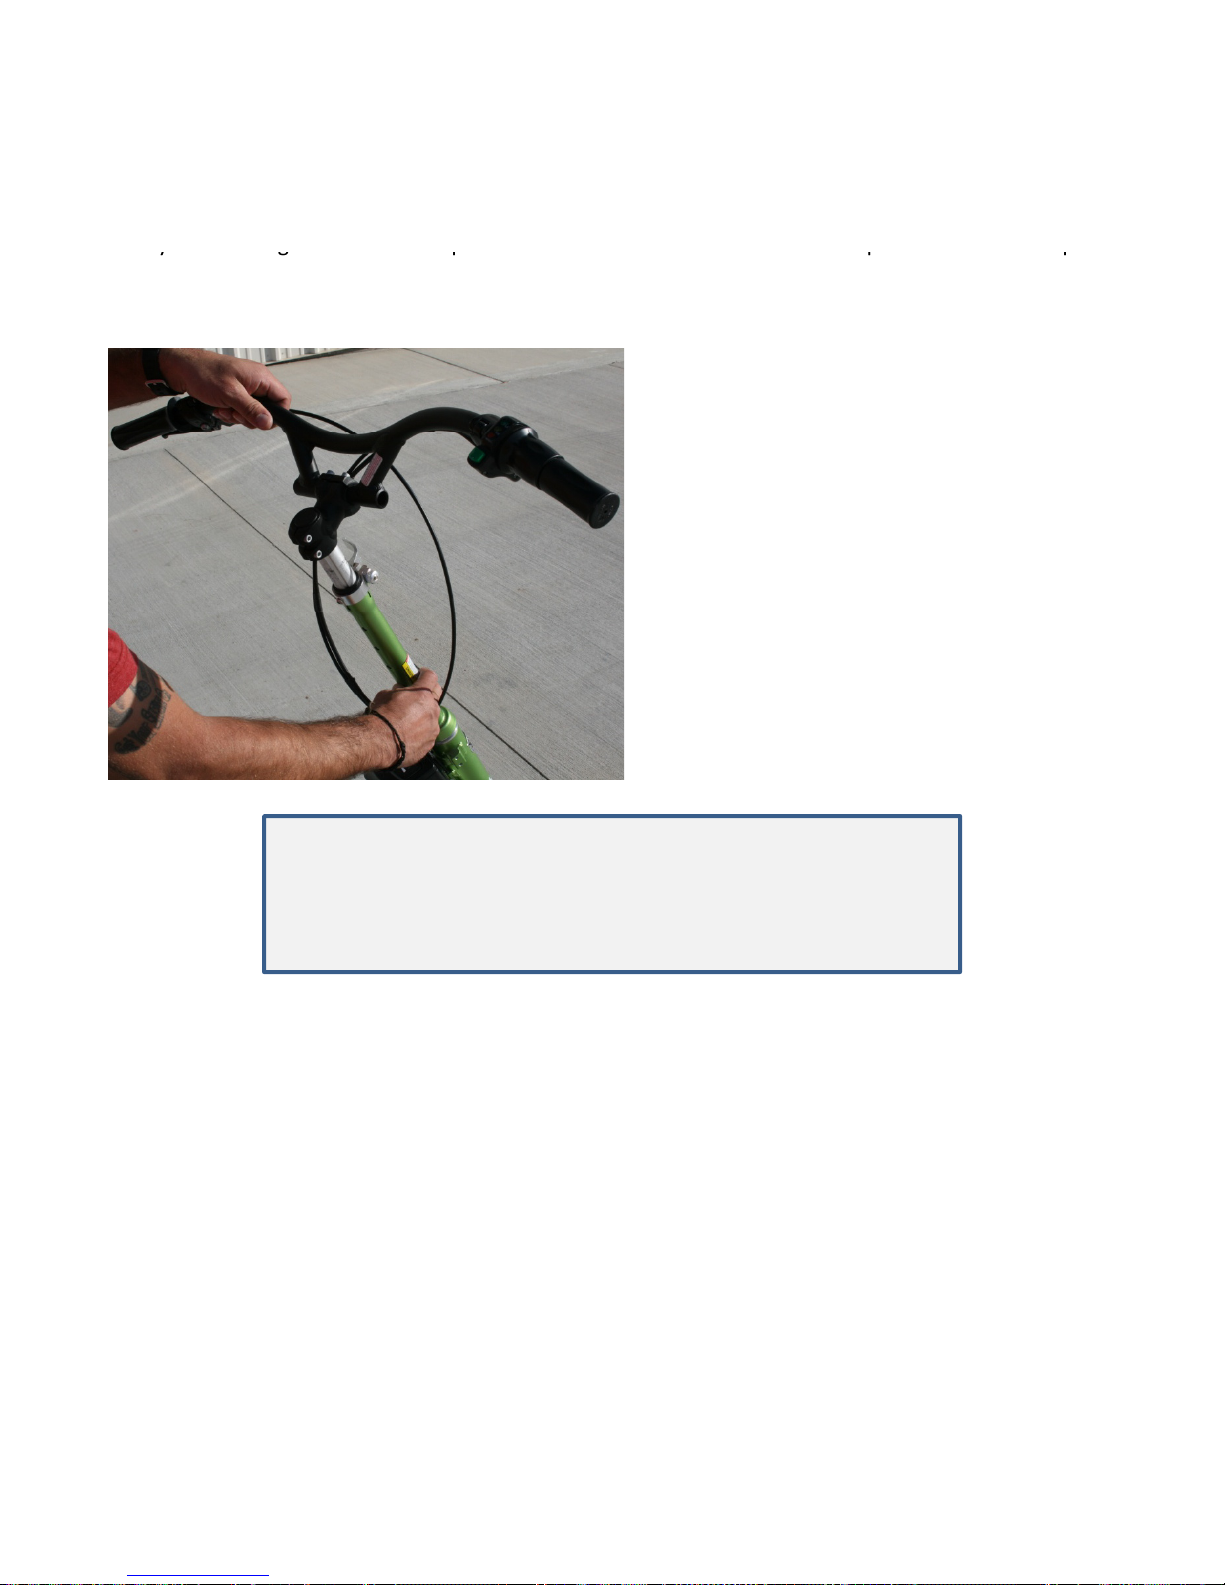
Step7:RaisingtheHandlebars
Raise the handlebar riser tube by first unlocking the quick release lever. Notice that there are round
holes down the back of the handlebar riser tube providing a number of height‐locking positions.
There is a spring loaded steel locking pin that snaps into these holes to provide a second level of
safet
y
while ridin
g
. Push the steel
p
in in to release the riser tube and telesco
p
e the handlebars u
p
to
y
g
p
p
p
your preferred riding height. Make sure the quick release firmly locks the telescoping steering
column in place.
If the quick release is loose, use the
adjustment finger nut to tighten the quick
release
Properly
adjusted
it
requires
a
firm
release
.
Properly
adjusted
,
it
requires
a
firm
hand to close.
After learning how to ride, you can adjust the handlebar position
to better suit your preferred riding posture, but don’t rock them
too far back as to inhibit proper folding. You can also adjust the
brake levers’ angle for riding comfort and ease of use.
Trikke Tribred Pon‐eOwner's
ManualV110/1/08 13

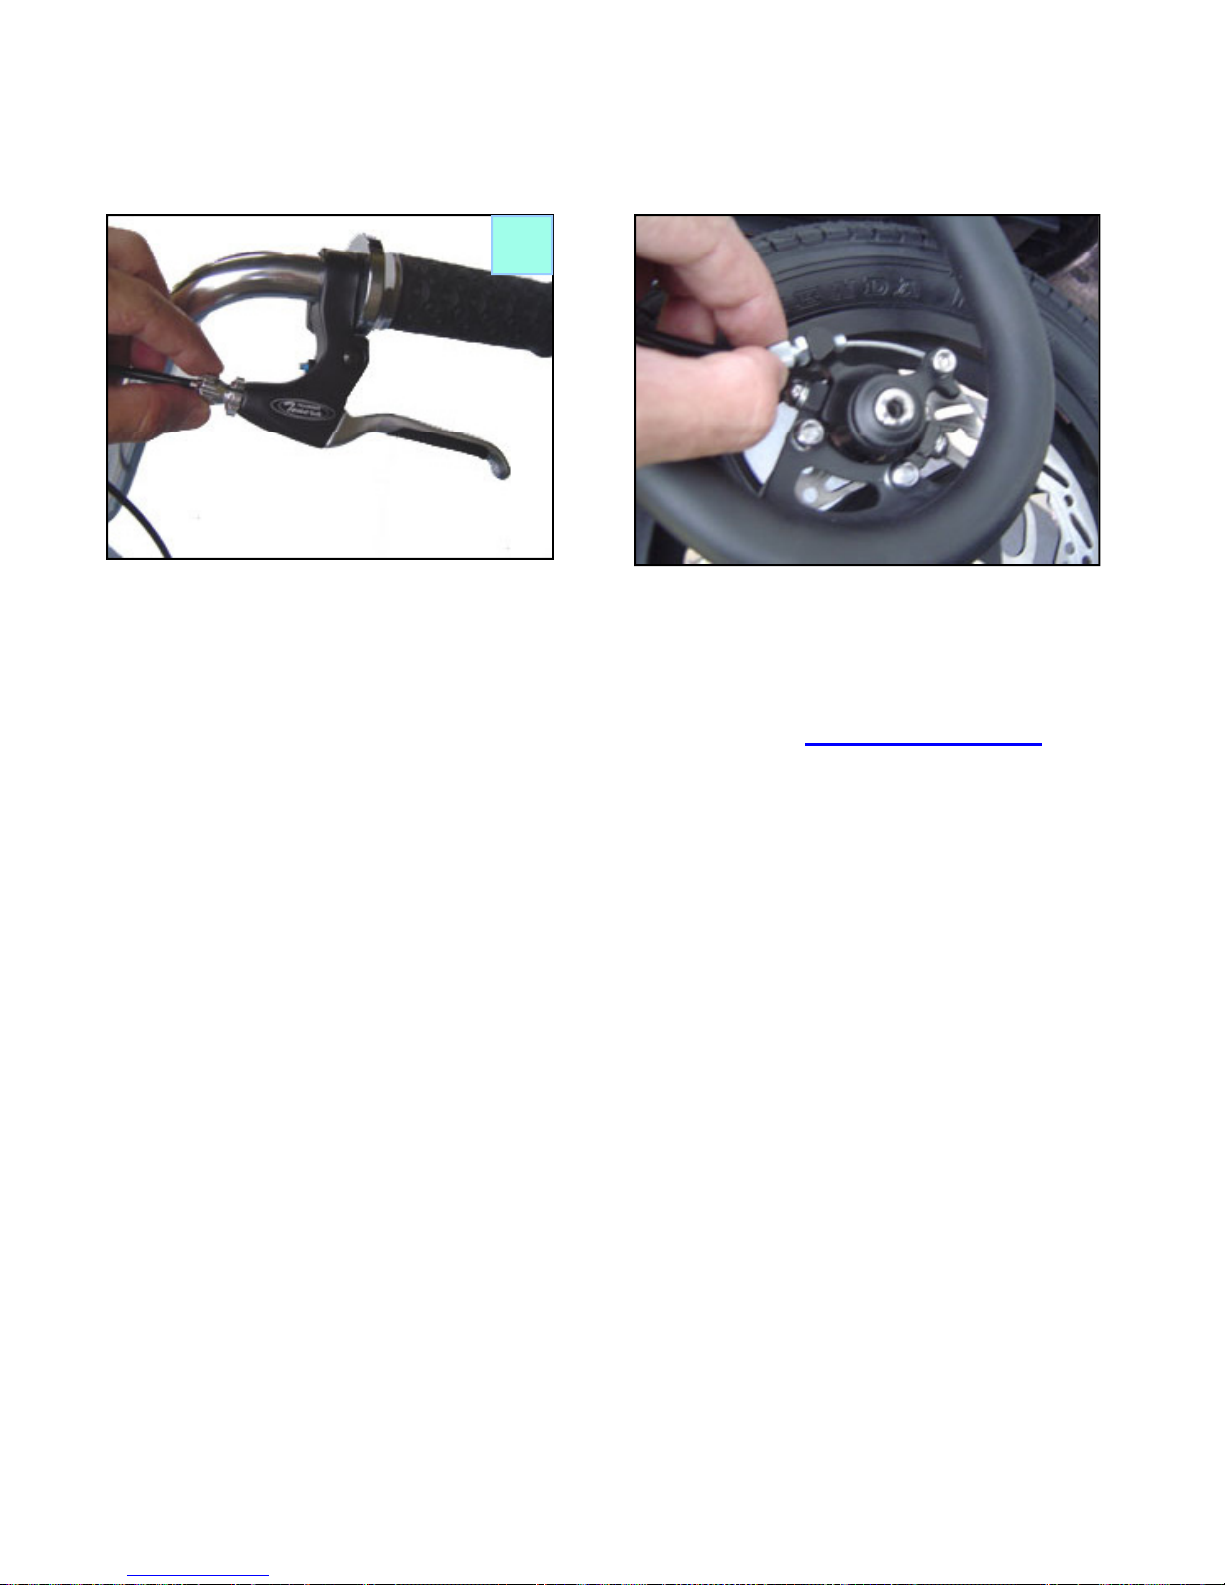
Step7:Adjustingthebrakes
The following are basic disk brake adjustment procedures. For a more in depth disk brake adjustment
procedure, please visit technical support at www.trikke.com .
1
1
Back off the inner pad until it doesn’t touch the disc. A light rub is ok.
2
Back off the outer pad until it doesn’t touch the disc. A light rub is ok.
inner
pad
outer
pad
3
Trikke Tribred Pon‐eOwner's
ManualV110/1/08 14

Spin each wheel. If the disc wobbles when rotated, mark the extreme point of the disc
that is off and correct it by using your fingers to bend the disc in or out. Repeat this
correction until the disc is “true” or no longer shows any wobble when you spin it. (this
is a common procedure because bicycle discs are very thin and may get deformed
easily)
easily)
.
4 5
After trueing the discs in step 4, you might need to make minor adjustments to the
inner and outer pads. When adjustments are final, use a 2.5mm allen wrench to lock
h
i
d
dj
b
ih i
i
lki
bl
(
ll
bl
h
id
t
h
e
i
nner pa
d
a
dj
ustment screw
b
yt
i
g
h
ten
i
ng
i
ts
l
oc
ki
ng
b
o
l
t
(
asma
ll
b
o
l
tatt
h
es
id
e
of the inner pad body)
6
Trikke Tribred Pon‐eOwner's
ManualV110/1/08 15
After some use, the brake pads will wear down a bit and seat properly with the disc.
Also, the brake cable will stretch. Re‐adjust your brakes using the fine adjustment
screws at the brake lever and at the caliper as seen in steps 1 & 2.
7
7
ForadditionalinformationabouttheTrikkeTribred Pon‐e,
totroubleshootbrakesetupissues,ortolearnaboutother
Trikkeproductsandaccessories,visitusatwww.trikke.com
Trikke Tribred Pon‐eOwner's
ManualV110/1/08 16

PNEUMATICTIRESONTHEPON‐E
The front and rear tires on the Pon‐e come with lower pressure from the factory for transportation
reasons. You will need to adjust the tire pressure according to the rider’s weight and riding
preferences. Please do not exceed 80 psi (5.6 bar) maximum inflation.
Example
of
recommended
pressure
:
Example
of
recommended
pressure
:
Rider’s weight/tires pressure:
170 lbs (77kg) tire pressure: front 60 – 70 psi (5.1 bar)/rear 80 psi (5.6 bar)
Tire pressure affects the riding performance: lower pressure makes for a smooth but slower
ride
higher
pressure
makes
for
a
faster
but
slightly
bumpier
ride
Check
tire
pressure
once
a
week
–
ride
,
higher
pressure
makes
for
a
faster
but
slightly
bumpier
ride
.
Check
tire
pressure
once
a
week
use a tire gauge. Do not ride with low pressure as this can damage the tires and pose more risk falling.
Final Assembly Check List for the Pon‐e
1. When you think that you have completed the assembly process, study the vehicle one
more
time
and
compare
it
to
the
photograph
on
page
5
more
time
and
compare
it
to
the
photograph
on
page
5
.
2. Check the bolts that secure the front fork and handlebars. A good push and pull on the
handlebars will immediately indicate whether or not the stem is properly secured. The
handlebars should not be able to rotate on the stem ‐‐‐ even with all of your weight
pushing on it.
3. Do a final brake check by spinning both rear wheels. They should spin freely until you
apply
the
brakes
You
should
be
able
to
vigorously
squeeze
the
brake
levers
without
apply
the
brakes
.
You
should
be
able
to
vigorously
squeeze
the
brake
levers
without
the levers depressing all the way to the handlebar.
4. Check the folding mechanism to insure that both of the rear legs are locked in the
riding position.
Assembly Questions or Replacement Parts
For any questions regarding assembling your Pon‐e, replacement parts or accessories, please go to
the www.trikke.com website for further details.
Caution!
Before riding for the first time, please take several minutes to go over the
Important Riding and Safety Tips on page 2 and 3 of this manual.
ForsafetyoffriendsandotherswhowilltryyournewPon‐e, it’s your
responsibility to coach them about safe riding. Make sure they read and
understand all warnin
g
s and safet
y
information in this owner’s manual
Trikke Tribred Pon‐eOwner's
ManualV110/1/08 17
g
y
before riding.
Trikke RidingManual
Now that you have successfully assembled your new Pon‐e vehicle, we will take you through some
simple riding tips to help you get started. These tips are focused on helping you with the manual
side of powering your ultra light hybrid vehicle. We always recommend that you ride with a
hl
d
f
l
h
d
h
h
e
l
met an
d
sa
f
ety gea
r
.Payspecia
l
attention to w
h
ere you are ri
d
ing, your proximity to ot
h
er
people, and especially your proximity to cars if you are learning to ride on a street or in a parking lot.
Please exercise respectful path etiquette where other riders and pedestrians are on the same path.
Athletes who are accustomed to skiing or inline
skating typically pick it up in a matter of minutes.
Don
’
t
be
discouraged
if
you
can
’
t
climb
on
and
Don t
be
discouraged
if
you
can t
climb
on
and
speed away at 15 miles per hour. Being and entirely
new vehicle, it requires some new skills. Regardless
of your athletic background, you can learn to ride a
Pon‐e vehicle in a relatively short period of time ‐‐‐
usually in less than an hour.
Thegreatestwordsofwisdomare:
“Keep going until you feel the sweet spot.” You’ll know it when you feel it. With the Pon‐e, the
electric power assist will help you to feel the sweet spot. Try to mimic the feeling manually. If
friendsorfamilyareridingforthefirsttime,fortheirsafetypleasetakethetimetoproperly
instruct them and have them wear safety equipment.
You are now embarking on a totally new experience for mankind. It is once in a century that a truly
new technology emerges to change our way of thinking about motion and its application.
Conservation of angular momentum is the physical principle that the Pon‐e vehicle harnesses in
order to transfer the rider’s energy into forward momentum. It is the painstaking research and
development by Trikke Tech over the period of 12 years that has optimized the melding of this
principle with a human powered vehicle. That propulsion technology is now combined with an
electric motor assist on your Pon‐e. The combination o
f
manual and electric power creates an
entirely new carving experience and makes the Pon‐e a practical commuter vehicle as well as an
exciting recreational vehicle.
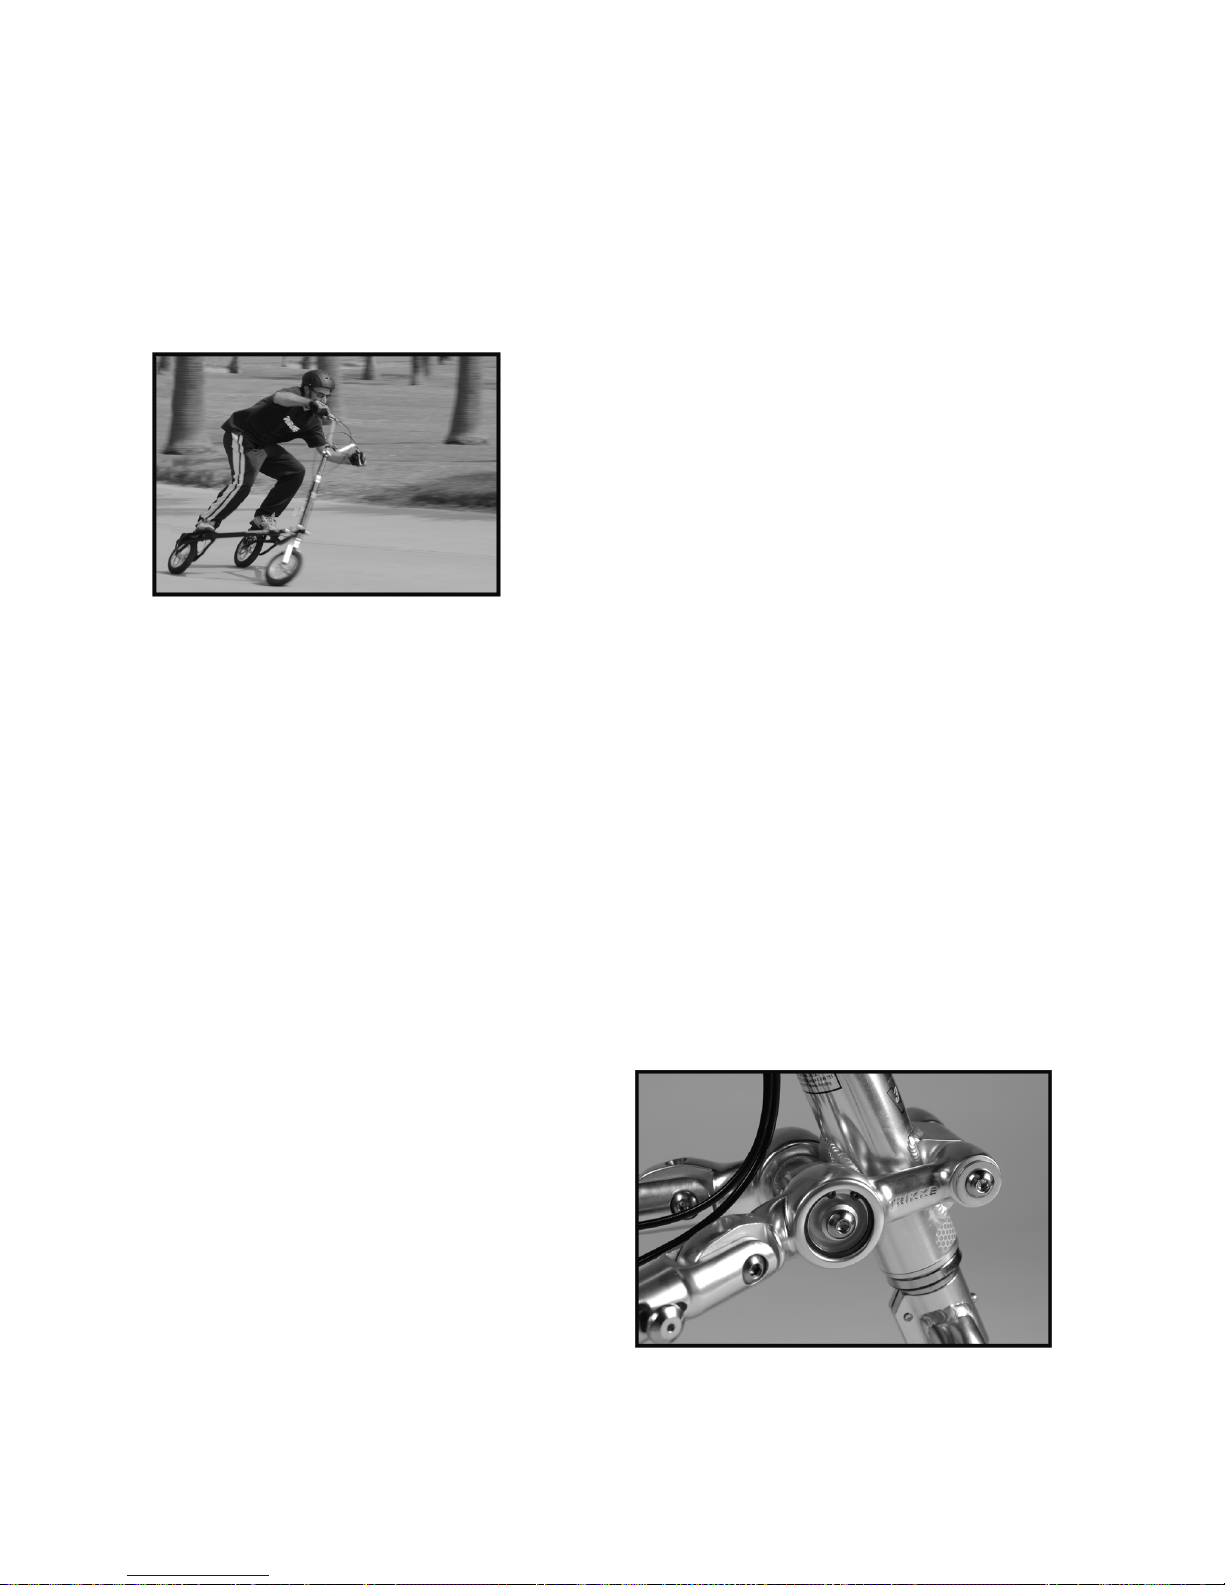
The exclusive 3CV™ technology developed by
Trikke Tech is the mechanism that makes this
forward
propulsion
possible
The
unique
forward
propulsion
possible
.
The
unique
cambering mechanism is elegantly simple yet
provides the necessary rigidity, geometry and
resistance to the rider’s motion to allow for
optimum control, speed, comfort, durability
and especially rider confidence. You are now
the
owner
of
the
original
Pon
‐
e
Trikke Tribred Pon‐eOwner's
ManualV110/1/08 18
the
owner
of
the
original
Pon
e
.

The following five warning have been selected from the list at the beginning of this manual for
more in depth description and instruction. Please read and understand these and all warnings
before riding.
Safety
Issue
#
1
:
Riding
in
Wet
Conditions
Safety
Issue
#
1
:
Riding
in
Wet
Conditions
Because Trikke™ Tribred vehicles use electricity to power the hub motor, riding in wet conditions is
not recommended. Always keep in mind that the Pon‐e is an electric vehicle and as such common
sense regarding safety around electricity should be practiced.
Additionally, the tires become slick when riding in wet conditions and extreme caution should be
used
as
rider
control
will
be
affected
Always
try
to
avoid
wet
riding
conditions
used
as
rider
control
will
be
affected
.
Always
try
to
avoid
wet
riding
conditions
.
Safety Issue #2: Weight Distribution
When using the motor from a dead stop, it is important to distribute your weight over the front wheel
as shown below. This will ensure proper traction of the front tire.
Once the Pon‐e is in motion, it is quite easy to go over backwards by leaning back. Be careful to not
lean back or distribute
y
our bod
y
wei
g
ht behind the rear wheels. This warnin
g
is es
p
eciall
y
im
p
ortant
y
y
g
g
py
p
for riders with restricted movement or reaction time. If you are standing still on the vehicle it is
always recommended that you keep the brakes on. If for some reason you feel yourself going off the
back, putting the brakes on will help stop the vehicle from scooting out from under you, but you
should always step off as a precaution.
In order to brake more effectively, distribute more of your weight over the back wheels as shown
below. Be careful not to fall over backwards.
Startin
g
Brakin
g
The best way to insure that you are always positioned properly on the vehicle and to minimize the
potential for going off the back is to distribute your weight evenly between the front and rear wheels.
Accordingly, you should not lean forward over or onto the handlebars either but rather move your
toes up to the front of the foot platforms and always let the balls of your feet and toes carry most of
your weight. Avoid rocking back on your heels, pulling back on the handlebars or sticking you butt
out behind them
(
in the case o
f
stickin
g
y
our butt out
)
y
ou will inevitabl
y
un‐wei
g
ht the front wheel.
g
g
Trikke Tribred Pon‐eOwner's
ManualV110/1/08 19
(
g
y
)
y
y
g
Besides the risk of going off the back, the other reason for evenly distributing your weight is to insure
that your front wheel has plenty of traction, which leads us to the next safety issue.
Table of contents
Other Trikke Scooter manuals

Trikke
Trikke uPT User manual

Trikke
Trikke T8 User manual

Trikke
Trikke Bikke User manual

Trikke
Trikke Pon-e 48V User manual

Trikke
Trikke T7 User manual

Trikke
Trikke T5 JOGO User manual

Trikke
Trikke Colt User manual

Trikke
Trikke T67s User manual

Trikke
Trikke T5 JOGO User manual

Trikke
Trikke DEFENDER User manual


