Trikke Bikke User manual
Congratulations!
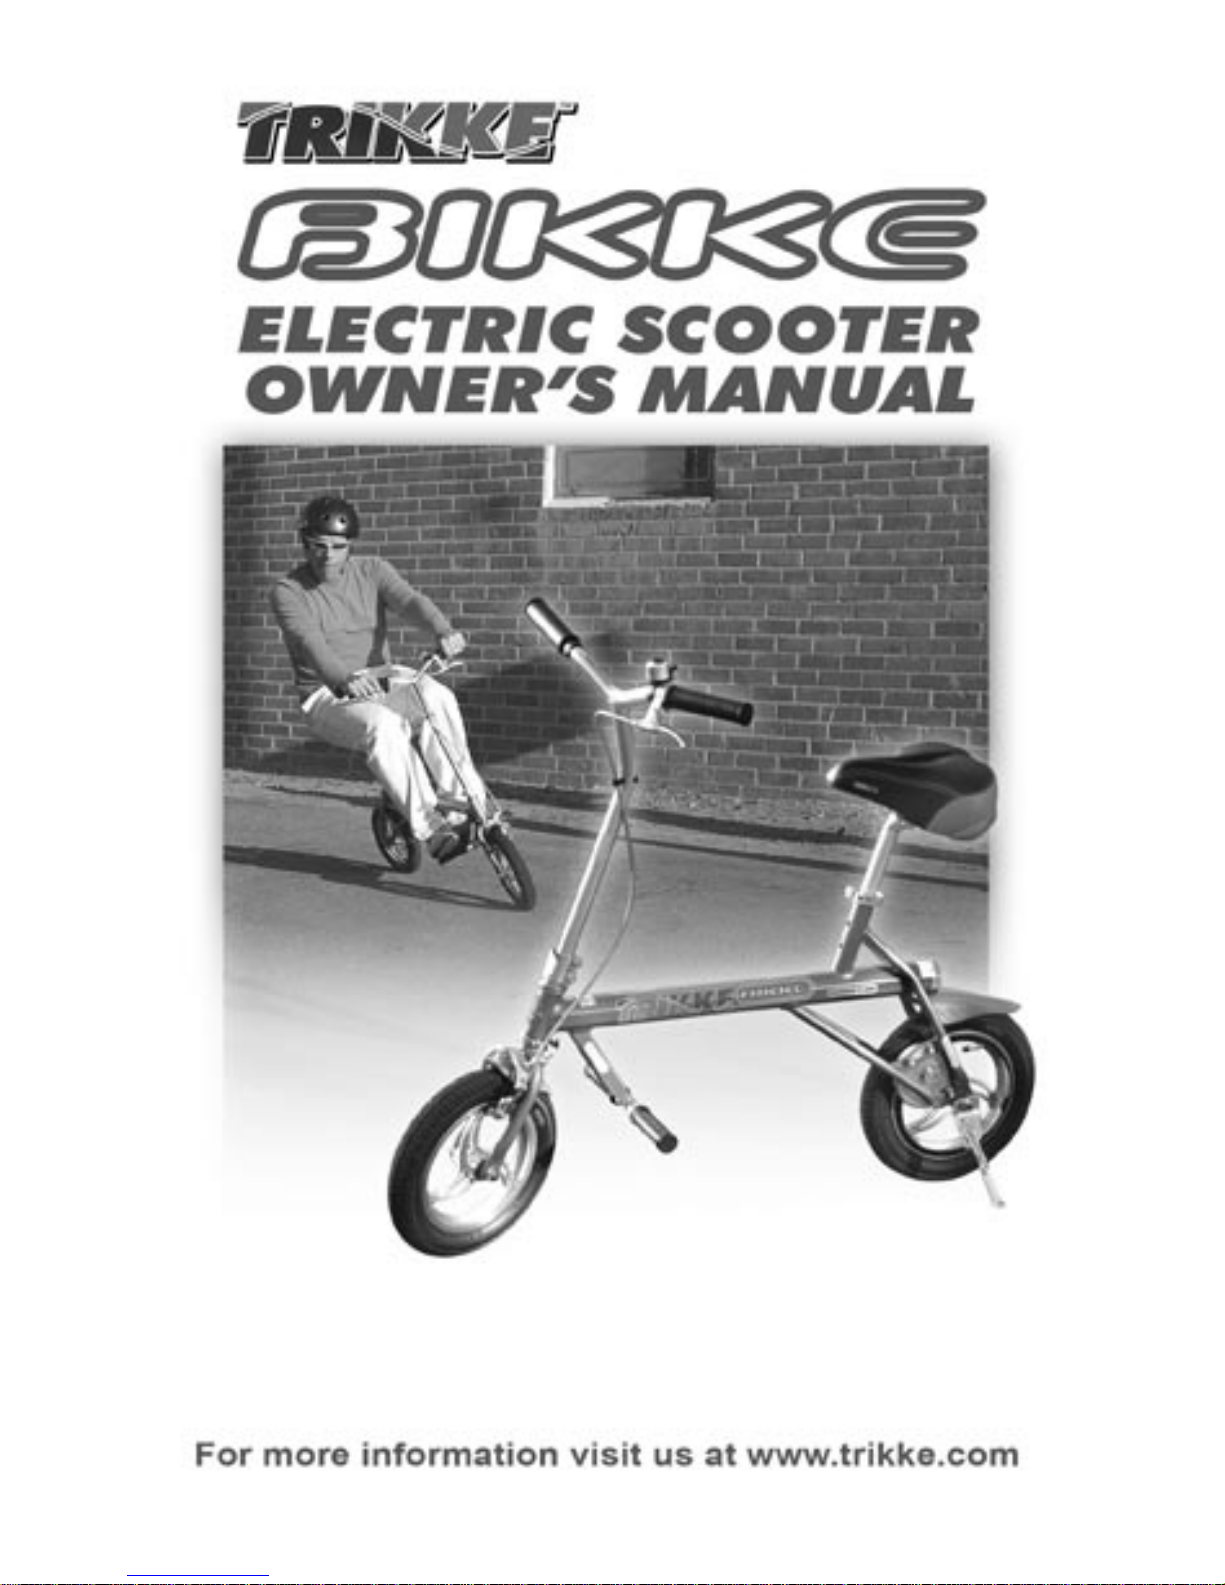
You have purchased the first of its kind Bikke Ultra Light Electric
Scooter by Trikke. This unique new vehicle combines a remarkably
compact all aluminum frame with a drive train that utilizes the
most recent advances in battery and electric motor technologies.
Feather-weight Lithium Ion batteries (developed for cell phones)
combined with a new flat motor technology create an all new
light-weight vehicle that is less than half the weight of the
lightest of the electric scooters or bicycles.
The Bikke is fascinating to watch because it appears to have
absolutely no driving mechanism. However, the Bikke can travel
at speeds of 10 to 12 mph for up to one hour giving a rider of
average weight (150 lbs.) a range of nearly 12 miles on flat
ground.
Enjoy one of the most remarkable little electric vehicles to hit the
streets!
2

TABLE of CONTENTS
4...............................................................................................WARNINGS
5.......................................................Vehicle Codes & Insurance Warnings
6.................................................................Warning and Instruction Labels
7...................................................................................Component Legend
8-9......................................................................................Bikke Assembly
10.....................................................................................Inflating the Tires
11...............................................................................Charging the Battery
13.......................................................................................How to Operate
14................................................................................Folding and Storage
15-16............................................................Battery and Charging System
17..........................................................Braking System Info & Adjustment
18..............................................................................BIKKE Specifications
19.....................................................................................Trouble Shooting
20-21............................................................................................Warranty
3

WARNING
PLEASE READ BEFORE OPERATING THE BIKKE. MAKE
SURE TO READ AND UNDERSTAND THE OWNER’S
MANUAL. PAY SPECIAL ATTENTION TO ALL SAFETY
SECTIONS AND WARNINGS IN MANUAL.
• The recommended minimum age for the use of the Bikke is 16 years of
age.
• ALWAYS wear an approved safety helmet and other appropriate safety
gear while riding.
• DO NOT ride the Bikke on wet surfaces or in the rain. Riding in wet
conditions may damage the electrical components.
• DO NOT ride at night, or in low visibility conditions.
• Take great care when riding in traffic or in the proximity of motor
vehicles.
• DO NOT stunt ride. Do not stand on the foot pegs. Do not lean back
or try to “pop wheelies.” Do not go off jumps (not even curbs). Ride
cautiously at all times.
• DO NOT carry passengers.
• ALWAYS wear proper footwear and keep hands, feet, hair and
shoelaces away from all moving parts.
• Rider weight should not exceed 200 lbs (91 kgs).
• Inspect your Bikke thoroughly for loose or missing parts before riding.
• DO NOT press the ACCELERATOR BUTTON when not riding.
• DO NOT place your BIKKE near fire or heat sources. Heat may cause
the batteries to explode.
• It is best to ride the Bikke in the low-speed gear in order to extend the
battery’s life. Try not to ride in the high gear for long periods of time.
4

Important Notes about Vehicle Codes and Insurance:
YOUR HOME OWNER’S OR AUTOMOBILE INSURANCE POLICIES
MAY NOT PROVIDE ACCIDENT COVERAGE INVOLVING THE USE OF
THIS VEHICLE. PLEASE CHECK WITH YOUR INSURANCE COMPANY
OR AGENT TO VERIFY YOUR COVERAGE.
Whether or not the Bikke is considered a “motor vehicle device” may vary
from state to state. Helmet laws, driver license requirements, rider age
restrictions, insurance coverage, and vehicle registration requirements
should be acquired by the Bikke owner prior to riding on public roads or
in public areas. Please check with the local authorities or Department
of Motor Vehicles to determine whether or not the Bikke needs to be
registered as a motor vehicle. Most states post Electric Scooter related
codes and legislation on the World Wide Web.
Repair and Service:
If you have any technical issues with your Bikke, please contact the dealer
you purchased it from or go to our website www.trikke.com to seek any
advice or information for trouble shooting. Please refer to your warranty for
important information about manufacturer defects and your responsibilities
regarding warranty repairs.
Do not attempt to service the battery, control system or motor yourself.
Doing so will void the warranty, can damage the components, and
can cause serious injury by electric shock.
5

WARNING and INSTRUCTION LABELS
Please heed the warnings and instructions labels posted on the Bikke.
Handlebar removal
Instructions
Operating
Warning Label
Driving Procedure
Battery Charging
Warning Label
6

COMPONENT DESCRIPTION
7
8
BIKKE ASSEMBLY
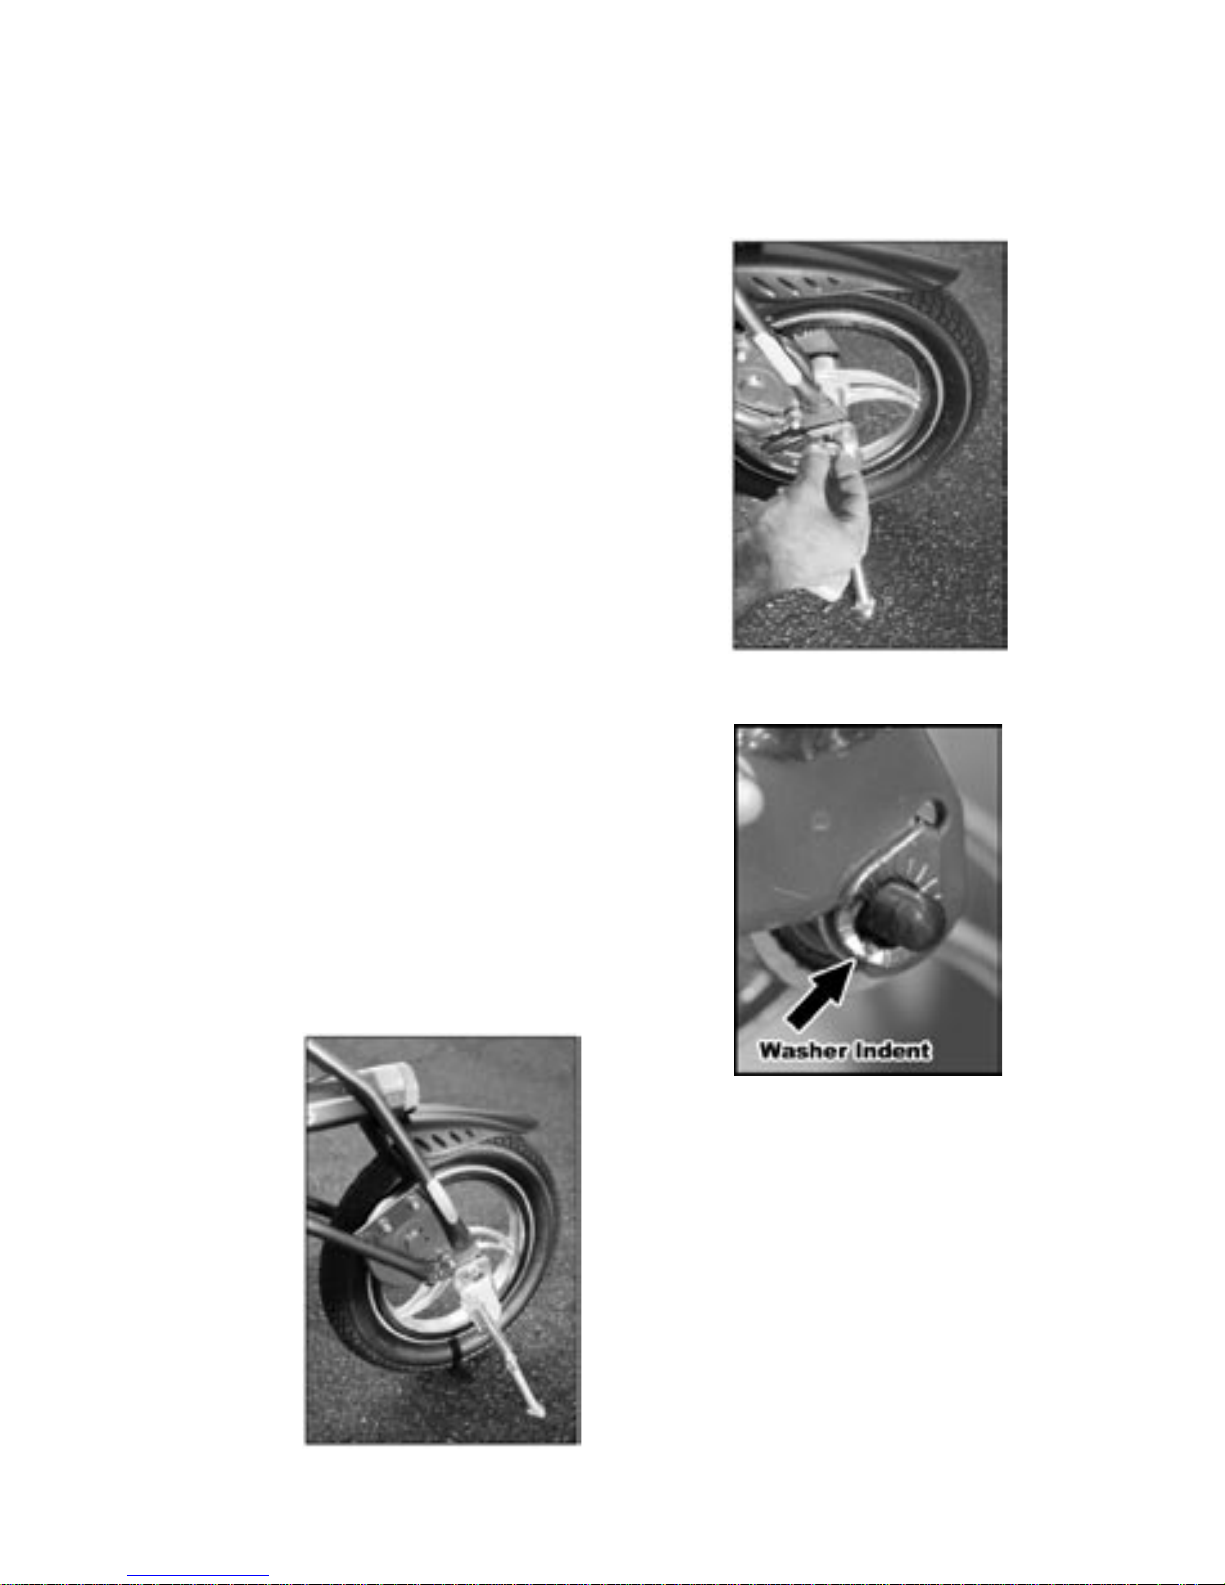
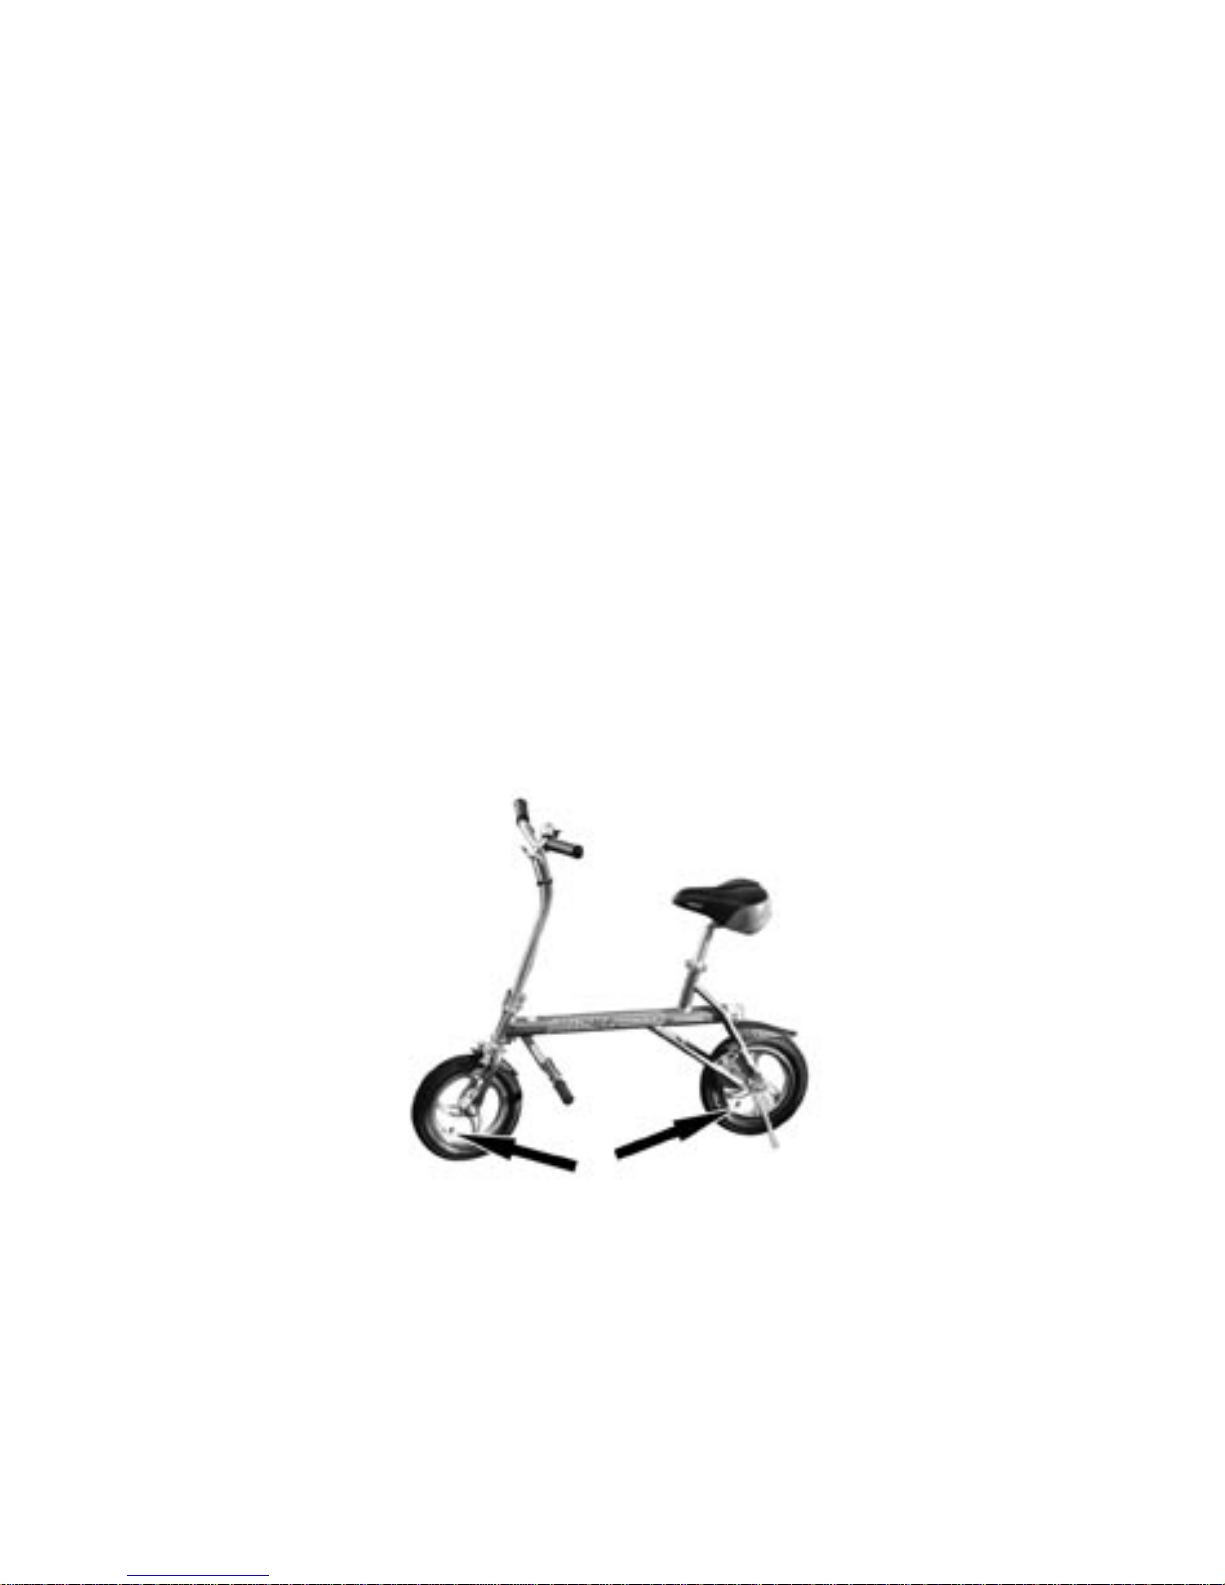
Kick Stand Attachment
Attaching the kick stand requires a crescent
wrench or 15mm combination wrench to
remove the nut from the left rear wheel
axle. Completely remove the nut. The
holding washer requires an indentation as
a guide pin for the kick stand mount. If your
holding washer has an indentation, leave it
on and proceed with the attachment. If not,
a separate washer has been inserted into
your box.
Slide the kick stand assembly onto the axle
so that the guide notch in the washer aligns
with the pin on the back side of the kick
stand. Replace the nut and firmly tighten.
Tighten firmly but do not tighten so much
that it causes the bearings to bind. Both
wheels should spin freely.
Move the kick stand leg into the open
position and check to make sure that the
BIKKE can stand freely. If it does not,
make sure that the kick stand assembly
was properly installed.
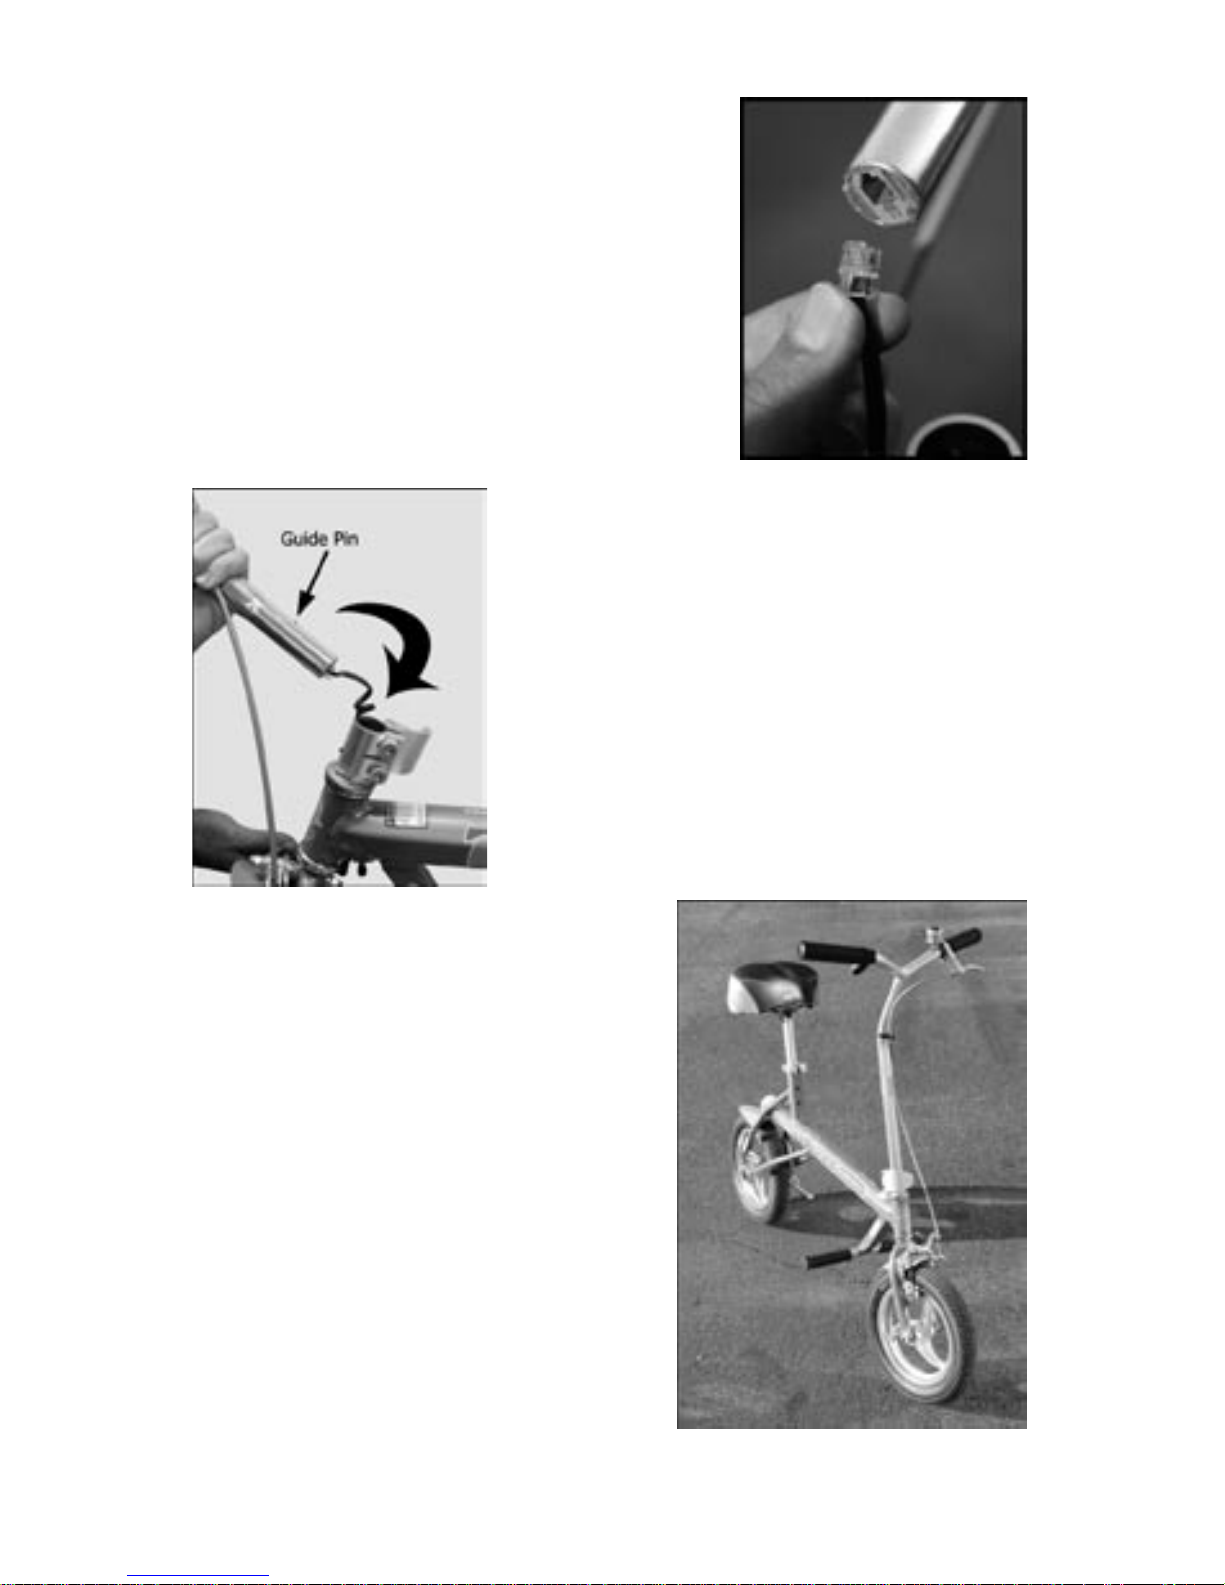
Handlebar Attachment
Before you can attach the handlebars it is
vitally important that you connect the throttle
control cable. On the bottom end of the
handlebar tube you will find what looks like
a telephone jack. Inside the steering tube on
the BIKKE where the handlebar inserts into
the quick release lever, you will find what
looks like a coiled phone cord. Pull the cord
out and attach it to the jack at the base of the
handlebar tube.
Next, make sure that the front wheel is turned
into its forward facing position with the brake
assembly facing forward. Check that the
coiled control cable under the frame is not
wrapped around the steering tube.
Fully insert the handle bar unit using the guide
pin on the back side of the handlebar tube to
insure that the bars are properly aligned with
the front wheel.
Once you have properly attached and
inserted the handlebars, use the quick
release lever (item 6 on page 7) to
secure the bars in their locked riding
position. If the quick release mechanism
feels too loose, use the two finger
nut adjustment screws to tighten the
release mechanism. It should require
a firm hand to completely close the
mechanism.
9
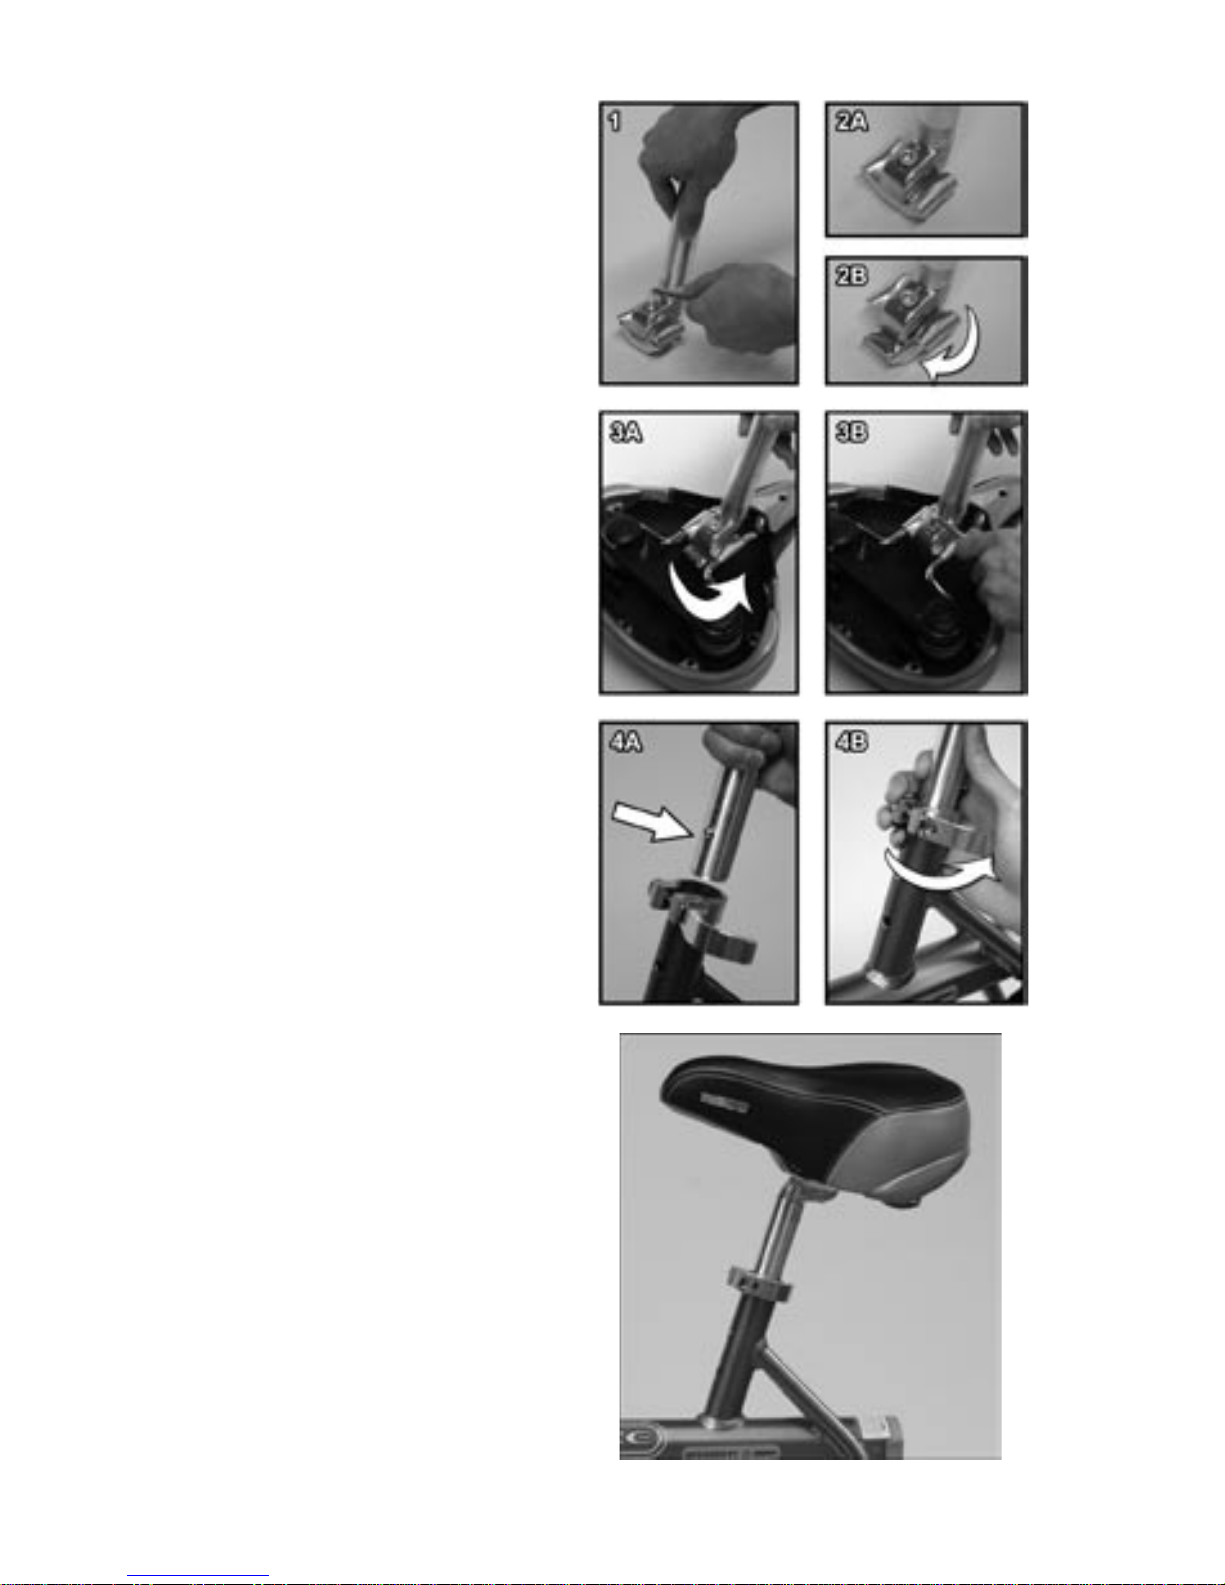
Seat & Post Assembly
1. The seat comes disattached to
the seat post. Use the 6mm hex
wrench supplied in the box to
loosen the single hex bolt on the
seat post.
2. You will loosen the bolt (1) far
enough so that the holding plate
(2A) can swivel 90 degrees (2B).
3. With the seat upside down, drop
the post onto the seat mounting
bars (3A). The bottom plate will go
down between the two mounting
bars. Rotate the plate back 90
degrees (3B) and use the hex
wrench to tighten the bolt. Before
firmly tightening the hex bolt,
leave enough slack to allow you
to adjust the seat position after
you mount it on the Bikke.
4. Insert the seat post into the
frame. There is a spring loaded
brass pin (4A) that secures the
seat in three preset riding heights.
The pin will face the front of the
BIKKE. Once you have inserted
the post to one of the preset
positions, secure it with the quick
release lever (4B). If the lever
seems too loose when closed,
use the adjustment finger nut on
the quick release lever to increase
the tension. When properly set
the lever requires a firm hand to
close.
5. The seat should look like the
photo to the right when properly
assembled and attached.
10
Inflating the Tires
The tires on the Bikke have a maximum inflation pressure of 80 PSI.
Please note that these tires have been especially modified from their
original maximum pressure of 40 PSI. The blue Trikke stamp on the
tire indicates that the tire is capable of pressures up to 80 PSI, though
the original manufacturers marking indicates 40 PSI. We recommend a
higher tire pressure for the rear tire as most of your body weight is over
the rear wheel. The front tire pressure can be reduced. Please note that
higher pressures will increase your speed, range, and acceleration. Adjust
pressures to suit your weight and ride preference.
Use a bicycle hand pump or foot pump with a gauge to inflate the tires.
1. Remove the caps from the tube stems
2. Please use a standard bicycle air pump to fill to these specific
pressures:
• Inflate the front tire to 50 PSI
• Inflate the rear tire to 75 PSI
• Put back the caps
Do not use the BIKKE when the tire pressure is low. It will
dramatically reduce the performance of the motor, riding speed,
battery life, and possibly harm damage the drive train.
Attention! Only use Trikke 80PSI tires when replacing
the tires on your Bikke. Replacement tires and tubes
can be purchased at www.trikke.com
11

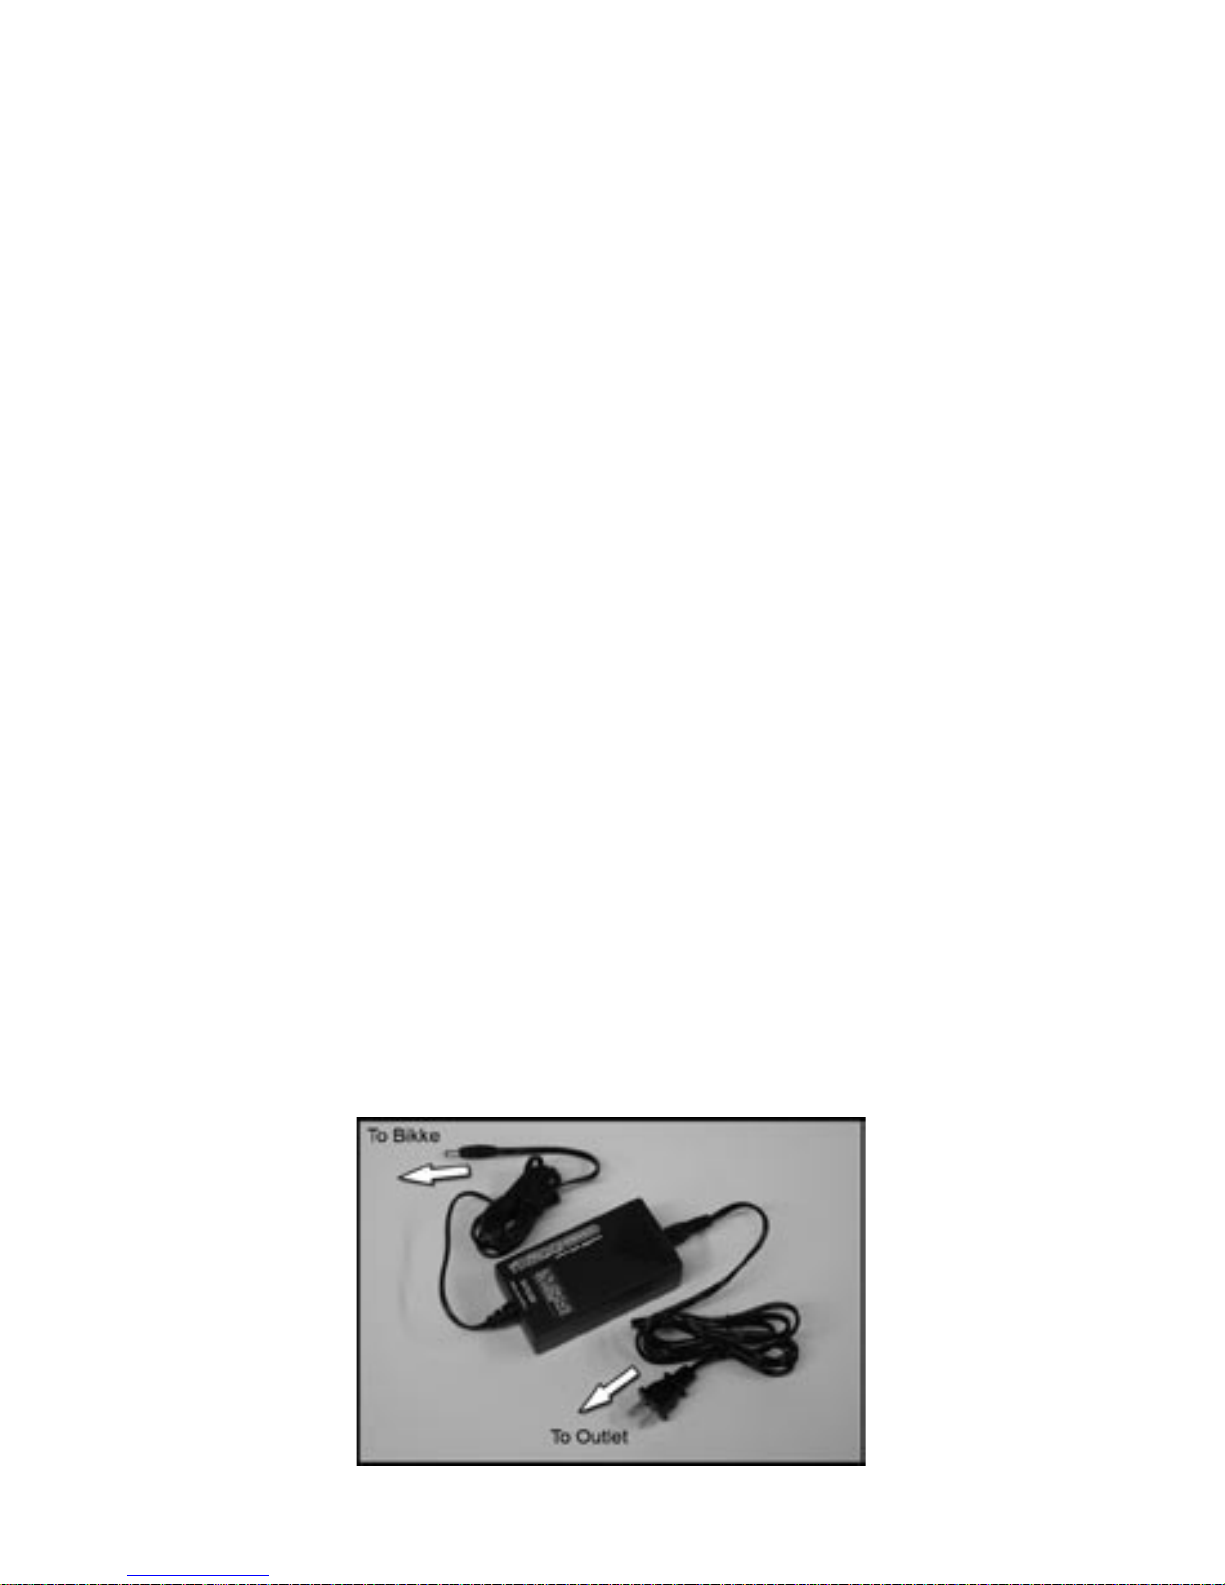
Charge the Battery
You must follow the battery charging instructions to avoid
damage to the electronic components.
1. Locate the AC Charger’s power plug and
plug it into a (120 or 220 volt) wall outlet.
2. Please locate the Charging Plug on
the left side of the BIKKE at the rear end
of the main tube. Insert the small round
connector from the charging unit into the
plug on the BIKKE frame (item 13 on page
7). When you see the red light illuminate
on the charger unit your BIKKE is now in
charging mode.
3. When the charger’s LED light turns from
red to Green, the unit is fully charged.
Please remove the charger.
Attention: Normal charging takes
approximately 3-6 hours. Do not leave the
BIKKE on a charge for more than 8 hours.
Read additional information about the battery
and charging system on page 16.
12

HOW TO RIDE
1. Make sure that all the clamps
and connective parts are secure.
2. Adjust the seat post to a suitable
height.
3. The BIKKE requires that you
ride with both hands holding the
handlebars at all times.
4. Underneath the right handgrip
on the handlebars there are two
buttons: a green Accelerator(1)
button and a red Stop(0) button.
To start the motor, you must press and hold the Accelerator(1) button while
giving the BIKKE a push with your foot. Please note that the BIKKE will
not engage the motor from a dead stop. As a safety measure to prevent
children from accidentally engaging the motor, the BIKKE has to be rolling
at 2 mph before the motor will start. When you want to shift to second gear,
release and then press the Accelerator(1) again. Because this throttle
design cycles back and forth between first and second gear, repeat these
steps until you are familiar with this operation.
Get used to your braking system by practicing in a smooth, dry open
area. Braking distance and function will be affected by wet conditions or
uneven riding surface.
7. If you sense that the BIKKE is sluggish, it may be running out of power.
It is best for the motor and the battery that you discontinue riding and set
the BIKKE on recharge.
13
5. Control your speed by pressing and
releasing the Accelerator(1) button.
6. The BIKKE uses an active electro-
magnetic braking system as well as a
traditional hand brake. To slow down or
to stop the bike, just press the stop(0)
button while simultaneously squeezing
the traditional bicycle hand brake.
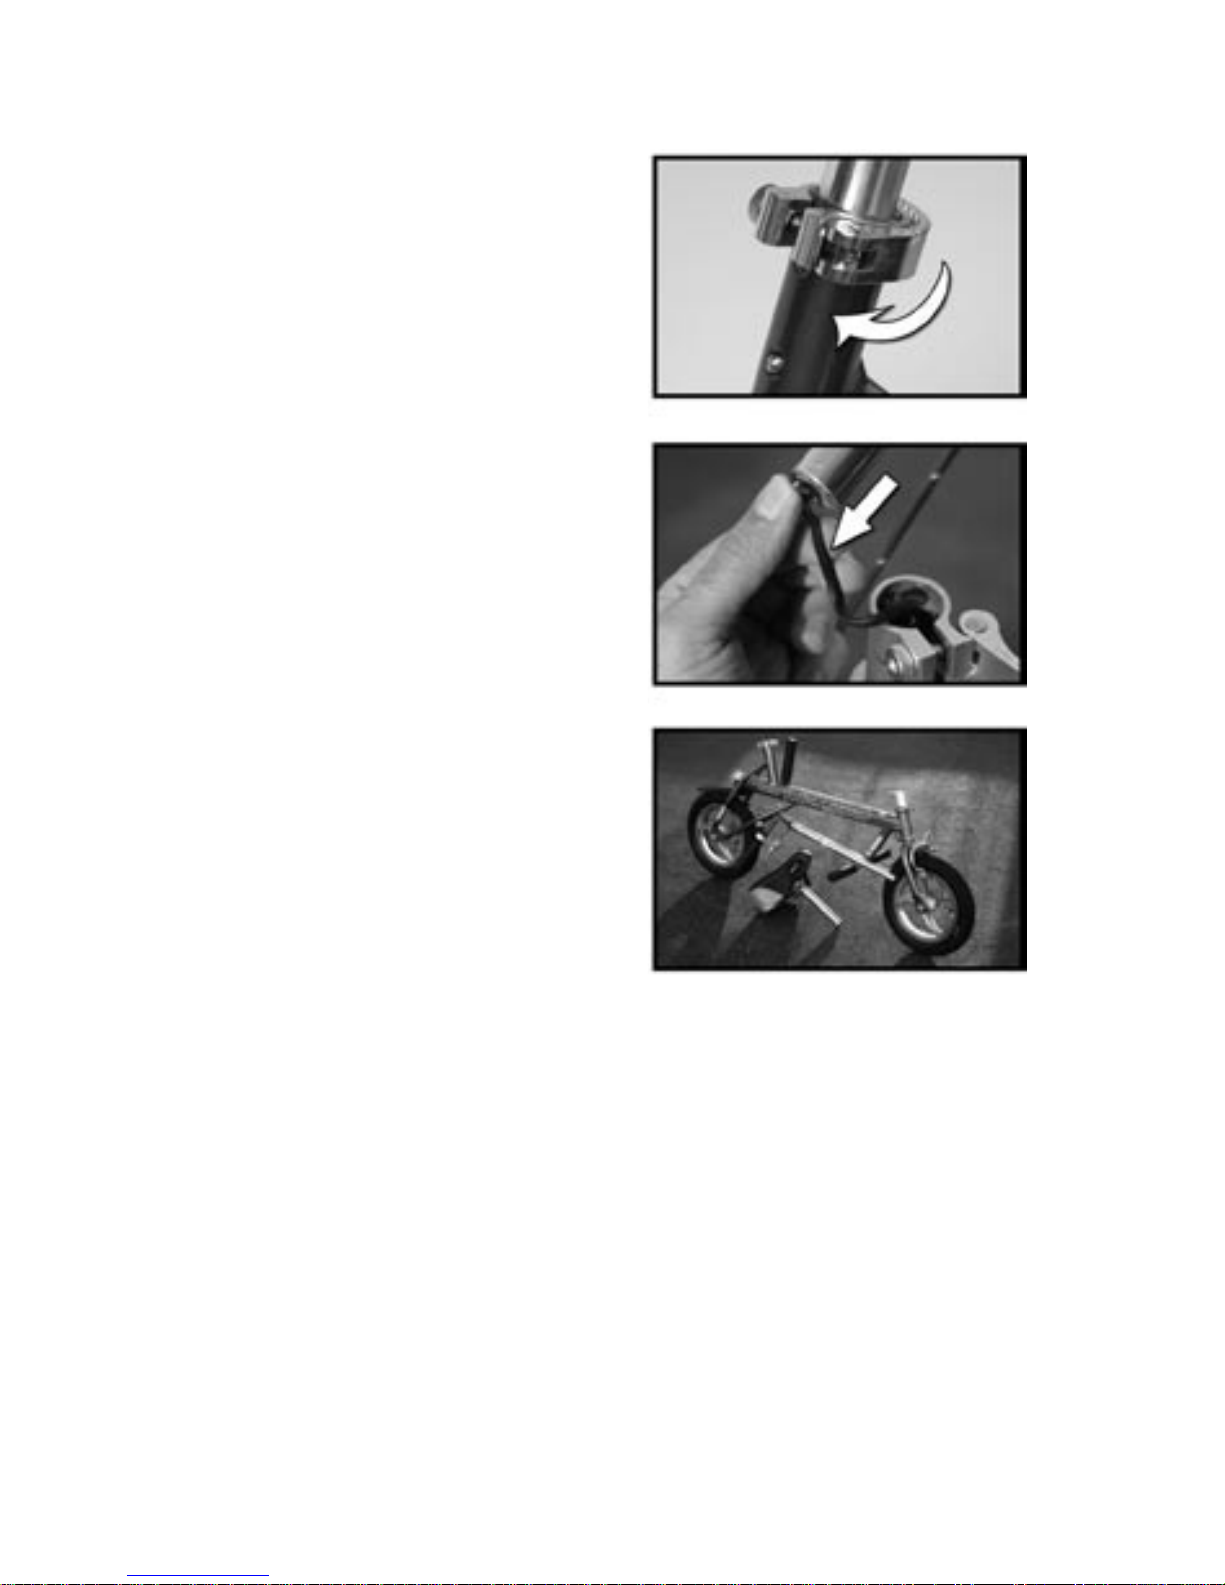
FOLDING and STORAGE
1. Open the handle bar Quick Release
lever and pull the handle bar post out
of the frame.
Attention: Please be careful when
you pull out the handle bar to insure
that you do not over extend the control
cable.
2. Carefully remove the control cable.
3. Release the seat post Quick
Release Lever, press the copper
button, then push the seat post down
to its lowest position. For even tighter
storage, pull the seat completely off
the BIKKE.
4. Set down the Handle bar unit, one
side against the rear of the Bikke as
shown in the photo to the right. You
can use velcro straps or bungy cords
to better secure the handlebars to the
frame of the Bikke.
Please store your BIKKE in a dry, cool location. For transportation or for
extended storage times, please keep the battery power at a 20% level.
(Approx. one hour charge time for a fully discharged battery)
14
BATTERY and CHARGING SYSTEM
Battery:
The BIKKE uses a specific Li-Ion battery. Do not attempt to replace with
other types of batteries. If you need to purchase or replace the battery,
please contact the local dealer or www.trikke.com for this service.
Do not leave the BIKKE in a location where the batteries can get hot
i.e. intense direct sun or a heat source like a water heater or floor
heater unit. Lithium Ion batteries can explode if they are artificially
overheated.
Recycling the Battery:
Under the U.S. Batteries Ordinance, the disposal of batteries is subject to
local regulations. The consumer is obligated to return all used batteries to
a public waste disposal service.
Charging System
BIKKE uses a specific Lithium-Ion battery charger. It will automatically
adjust the current (120v US or 220 Europe) to avoid any damage to
batteries. Do not use another battery charger or serious damage can occur
to the batteries and control system. Make sure your hands are dry before
plugging in the charger’s DC connector to the BIKKE as well as when
plugging the charger’s AC side to the wall outlet. To keep it safe, please
leave the charger in a dry, uncovered, well-ventilated area while charging.
Always remove the AC plug from the outlet first and then from the BIKKE.
15

Battery Danger
The battery inside BIKKE may accumulate heat, burn, explode, or cause
electric shock when improperly treated i.e. unauthorized dismantling, being
thrown into fire or water, short circuit due to metal or moisture. Please stop
using the battery pack right away if you sense a battery leak or odor.
Battery Warnings
1. To be safe, please do not use a charger other than the one that
comes with the BIKKE to avoid abnormal heat or risk of fire. An adult
should supervise battery charging.
2. Before Charging, read the instructions.
3. Concerning the charger: for indoor use. Do not expose to rain or
moisture.
4. Disconnect the supply before making or breaking the connections
to the battery.
5. Warning: Explosive gases – Prevent flames and sparks – Provide
adequate ventilation during charging.
To avoid any risk of danger, do not try to dismantle the charger,
battery, or control components inside the BIKKE.
16
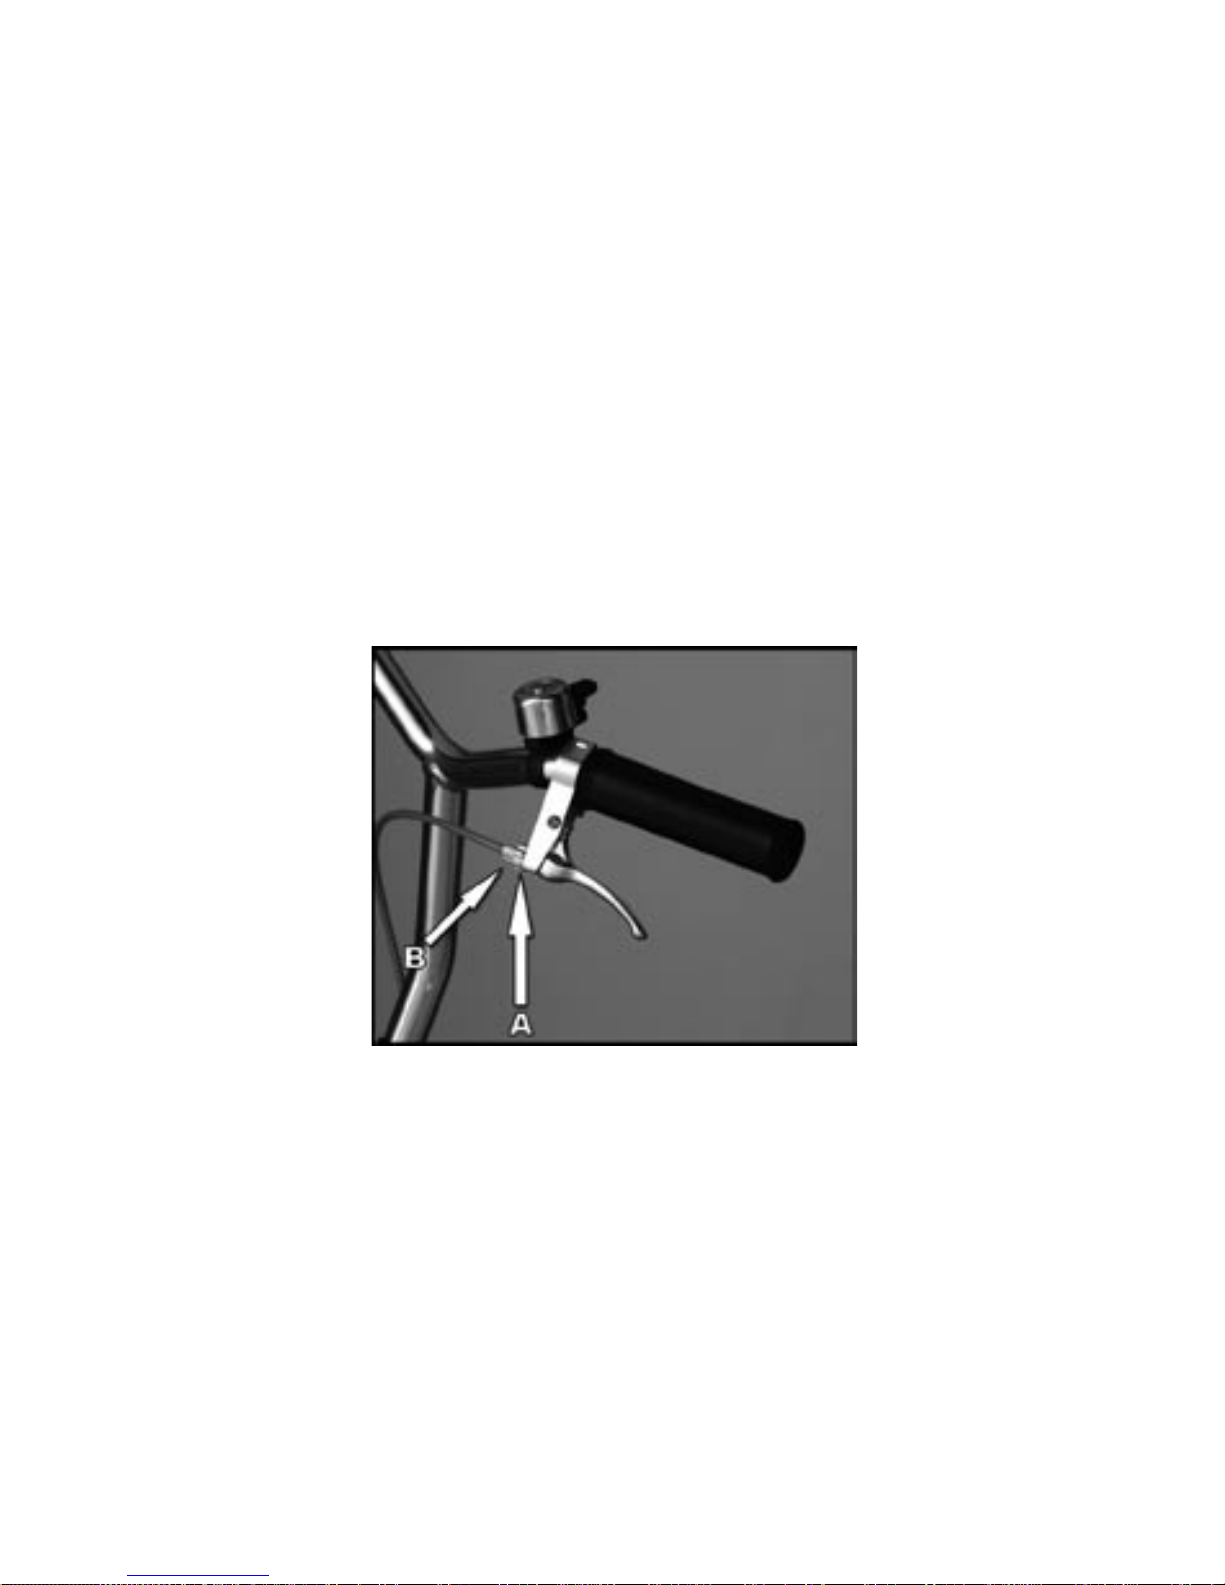
BRAKE SYSTEM ADJUSTMENT
Front Brake Tension Adjustment:
As soon as you feel that the front brake is losing its effectiveness, please
adjust the brake cable as follows:
1. Turn the adjustment finger screw B outward to extend the brake cable
housing. The result is that the brake pads are pulled closer to the wheel
which increases stopping power.
2. Turn the lock nut A in order to prevent B from backing out.
3. If you unscrew B to the end of its threading you will have to do the cable
tension adjustment at the wheel or replace the brake pads as soon as
possible. This operation is best done by a qualified bicycle technician.
17

TROUBLE SHOOTING
Types of
Trouble Possible Cause Solution
Unable
to Start
Dead battery Recharge battery
Motor will not start
running
Bikke will not engage
motor unless you first
push with your feet
to get up to 2mph
while pressing the (1)
accellerator button
Brakes fail
Front Wheel brake
cables are not tight
enough
Follow instructions
on P. 17 to adjust
the front brake. If
that fails, have an
authorized bicycle
repair shop adjust the
brake for you.
Unable
to Charge
Ambient Temp is over
113 degrees F (45
degree C).
Charge in a place
where the temp is well
below 113 degrees F.
Plug is not plugged in
Plug firmly into an
outlet that you know
is live
Charge Protecting
circuit activated
Unplug from the AC
outlet, see red light,
and plug in again.
Long storage time,
Battery runs out of
Power completely.
Recharge for 5 hours.
Unplug from AC outlet,
see red light, and plug
in again.
Flat Tire
Air Leakage
Inflate, have tube
repaired, or replace
with Trikke tube
Punctured Tire
Repair by authorized
dealer or replace
with authentic Trikke
80PSI tire and tube
18

BIKKE SPECIFICATION
1. Motor Power: 120 Watts
2. Dimension 43x16x35 inches (1100×405×900 mm)
3. Maximum speed 11mph (18 Km/h)
4. Frame material Aluminum
5. Battery Li-ion 18 Volt, 6 Ah
6. Weight 16 lbs. (7 kg)
7. Maximum loading 200 lbs. (91 kg)
8. Transmission 2 steps electrical transmission.
9. Trig: Electro-magnetism trig.
10. Wheel Size 12 inch (305mm)
11. Distance travel per charge 9 miles (15 km)
19

BIKKE 90 Day Limited Warranty
Name Purchase Date
Dealer Phone
Your
Address
BIKKE 90 Day Limited Warranty
Subject to the following limitations, terms and conditions, Trikke Tech, Inc. (“Company”)
warrants to the original owner of each new Bikke Electric Scooter (“Vehicle”) that the Vehicle
when new is free of defective materials and workmanship. This warranty shall expire ninety
(90) days from the date of the original purchase from Company or an authorized dealer or
representative and is conditioned upon the Vehicle being operated under normal conditions
and use, and properly maintained. This warranty is void if the Vehicle was not purchased
new or not properly assembled. Make sure to send in your Owner Registration Card to Trikke
Tech by mail or log on to www.trikke.com/registration and register online.
If the Vehicle frame should break or the drive train fail due to faulty materials or workmanship
during the warranty period, the Vehicle will be replaced subject to the Conditions of Warranty
below. If any part of the Vehicle fails to function properly due to faulty materials or workmanship
during the warranty period, such part will be repaired or replaced, at Company’s discretion,
subject to the Conditions of Warranty below.
Conditions of Warranty
This Limited Warranty is made only to the original owner of the new Vehicle purchased
from Company or an authorized dealer or representative, and it shall remain in force only
as long as the original owner retains ownership of the Vehicle. This Limited Warranty is not
transferable.
In order to exercise your rights under this limited warranty, the warranty claim must be
presented during the warranty period to Company or one of its authorized representatives,
together with a receipt, bill of sale or other appropriate written proof of purchase. The original
owner shall pay all delivery or shipping charges connected with delivery or shipment of
the defective frame or part to Company or its authorized dealer. Under no circumstances
does this limited warranty include the cost of travel, delivery or shipment to Company or
its authorized dealer. Such costs, if any, shall be borne by the original owner. Company
shall pay the shipping costs associated with shipment of a replacement Vehicle and/or the
shipment of a replacement or repaired part to the original owner. The original owner shall be
responsible for any re-assembly of the Vehicle required in connection with any replacement
or repair.
It is the responsibility of the original owner to ensure that all parts included in the factory-
sealed carton are properly installed and that all functional parts are adjusted properly. It
is also the responsibility of the original owner to perform or provide all reasonable and
necessary maintenance and adjustments to keep the Vehicle in good working condition.
This limited warranty does not apply to normal wear and tear, nor to claimed defects,
malfunctions or failures that result from abuse, neglect, shipping damage, damage
caused accidentally or deliberately, exceeding weight limits, improper assembly, improper
maintenance, alteration, collision, crash or misuse or improper use. The Vehicle has not
been designed, engineered, distributed, manufactured, or retailed for uses in trick riding,
ramp riding, jumping, aggressive riding, riding on severe terrain, riding in severe climates,
riding with heavy loads, commercial activities, use with motors, or any similar activities; such
uses may damage the Vehicle, can cause serious injury to the rider, and in all cases will void
this warranty.
20
Table of contents
Other Trikke Scooter manuals

Trikke
Trikke Pon-e 48V User manual

Trikke
Trikke T7 User manual

Trikke
Trikke POSITRON 60V AWD User manual

Trikke
Trikke uPT User manual

Trikke
Trikke eV5 User manual

Trikke
Trikke Colt User manual

Trikke
Trikke T5 JOGO User manual

Trikke
Trikke T5 JOGO User manual

Trikke
Trikke E-Kit User manual

Trikke
Trikke Tribred Pon-e User manual


